Improve
Updates for Rock 17.0
Below is a summary of the updates for this version.
- Admin Bar now supports keyboard shortcuts
- Updated settings layout in Admin Tools for better navigation
- Added IP Address Geocoding capabilities
- Google Map styling creates streamlined map styles
- Added support for multiple electronic signatures on documents
- The v2 API is live
- Entity Search simplifies querying for the v2 API and Entity Commands
Updates for Rock 1.0
No updates made.Updates for Rock 2.0
Below is a summary of the updates for this version.
- A DISC personality assessment chapter.
- Details on background checks.
- Noted that SmartyStreets is no longer free.
Updates for Rock 3.0
Below is a summary of the updates for this version.
- Added more tips when using international phone numbers.
- Noted that SmartyStreets is no longer free.
- Added information on Rock's new keyboard shortcuts.
- Documented new recommended naming conventions for security roles.
- Noted the change of the Background Check Administrator's application group move to a Security Role.
- Highlighted the move of the content channel pages from the
'Admin Tools > Communications' to 'Admin Tools > CMS Configuration'
- Documented the move of the Photo Request page to 'Admin Tools > Communications'.
- Noted Rock's new custom School Grade feature in the internationalization section.
- Documented the new Org Chart feature in under the Intranet menu.
- Filled in some of the missing jobs.
Updates for Rock 4.0
Below is a summary of the updates for this version.
- Added information on the new jobs Group Sync and Group Leader Pending Notifications
- Included the new PIN Authenication service.
- New Chapter on Merge Documents.
- Added documentation for several new service jobs.
- Documented the location editor under Data Integrity.
- Added information on the new merge request system.
- Added chapter on Note Types.
- Added details on the Google and Twitter authentication services.
- Change the email transport preference to Mailgun from Mandrill.
Updates for Rock 5.0
Below is a summary of the updates for this version.
- Added the documentation for the new Event Payment Reminders and Send Group Email jobs.
- Added the documentation for running multipleservers with Redis.
- Documented the Email Exceptions Filter global attribute.
- Described in detail the scoring system for finding duplicate records.
- Described the new Combine Family Members feature in the Merge Documents chapter.
Updates for Rock 6.0
Below is a summary of the updates for this version.
- Noted the move the 'Entity Attributes' page from 'Security' to 'System Settings'
- Discussed the new 'Category Manager' page (this replaced the 'History Categories'
page. It now allows you to manage categories for any entity type.
- Added the information pulled over from Facebook with authentication.
- Added Signature Documents section to General Settings chapter.
- Added Routes and Themes to the CMS Configuration chapter.
- Removed documentation related to Rock Jobs Scheduler and running Rock as a windows service.
Updates for Rock 7.0
Below is a summary of the updates for this version.
- Added Cloning Security Role Groups to the Security Settings chapter
- Updated SmartyStreets information to reflect free service, API Key housed on Rock servers.
- Added Database Maintenance/Care and Feeding of Rock section to Jobs chapter.
- Updated General Setting screenshot.
- Added Attribute Matrix Template documentation to General Settings chapter.
- Added Index Rock Site to jobs table in Jobs chapter.
- Added Communication Queue documentation and screenshot to Communications chapter.
- Added Person Tokens chapter.
- Updated Jobs List in Jobs chapter.
- Added Signature Documents section to General Settings chapter.
- Added Verify Security block documentation to the Securing Rock chapter.
- Updated CMS Configuration chapter to include Short Links and Lava Shortcodes information.
- Updated Communications chapter screenshot and page explanations.
- Updated Tags section of General Settings chapter to include tag security.
- Updated Security Settings screenshot.
- Updated System Setting descriptions to include Universal Search Index Components and Calendar Dimension Settings information.
- Updated Data Integrity considerations to include suffix matching.
- Updated BI Analytics job info and manual link in Jobs chapter.
- Added Interactions chapter and PBX CDR Records section.
- Added keyboard shortcut info for Mac users in the Getting Comfortable chapter.
- Added Data Integrity Settings section in Data Integrity chapter.
Updates for Rock 8.0
Below is a summary of the updates for this version.
- Added Interactions chapter and PBX CDR Records section.
- Added keyboard shortcut info for Mac users in the Getting Comfortable chapter.
- Added information on the new Auth0 external authentication service.
- Updated Merge Template Detail screenshot in Merge Documents chapter to include security button.
- Added security settings info for Merge Template Detail block in Merge Documents chapter.
- Added Process Adult Children job to list of jobs in Jobs chapter.
- Added Data Integrity Settings section in Data Integrity chapter.
- Added Person Signal Types section to Security Settings chapter.
- Updated Jobs list to include Process Group History.
- Updated the Rock Homepage chapter to include documentation of new homepage layout and sections.
- Added Checkr documentation to Background Checks chapter.
- Added CacheManager documentation to CMS Configuration chapter.
- Added information on how to set up the Google Maps API key.
- Added information about note approvals, replies and watches
Updates for Rock 9.0
Below is a summary of the updates for this version.
- Added Mailgun Configuration Details
- Added Group Member Schedule Templates to General settings
- Added Asset Manager to the CMS Configuration
- Added SMS Pipeline to Communications Page
- Added "time zone" information to the System Settings section.
- Added Asset Storage Provider to the System Setting
- Updated Campus Detail Screen Shot
- Added "time zone" information to campus detail section
- Updated "named location" note when adding a new campus
- Added a Note to the Digital Signatures Chapter
- Updated Checkr step 1 instructions
Updates for Rock 10.0
Below is a summary of the updates for this version.
- Added Status and Type information to the Campuses section
- Added details to describe single-campus behavior
- Added Connection Status Changes tool details
- New chapter with recommendations for 'Things You Should Not Do'
Updates for Rock 11.0
Below is a summary of the updates for this version.
- Added the ability to upload documents for any entity type
- Defined Value attributes can allow adding new values to the list from anywhere the attribute is used
- Added Campus Team feature, which ties people and their role directly to a campus
- Individual parts of a physical address can be made required, optional or hidden
- Added the Phone Number Lookup block, which provides a mobile-friendly alternative to traditional logins for
your external site
- Added more granular controls for File Type caching
- Added options for considering logins when automatically inactivating/activating person records
- Added cookie Persistence Length and Database Performance Counter system options
Updates for Rock 12.0
Below is a summary of the updates for this version.
- Cache Statistics in the Cache Manager are now turned off by default, and can be manually enabled
- Added OpenID Connect server feature, enabling Rock to act as an authorization server for OIDC clients
- Added a new 'Location List' field type for selecting or adding new locations from a configured parent location
- A new Account Registration block setting lets administrators force the use of an email address as a person's Rock username
- Added support for Attributes on Notes
- Businesses can be set to appear in Person Picker search results
- Campuses can now have Schedules associated with them
Updates for Rock 13.0
Below is a summary of the updates for this version.
- A new Group Attendance Reporting job will create and populate person attributes to track group attendance data
- The Send Communications job has a new setting for sending multiple communications in parallel
- Data Automation settings for Reactivate and Inactivate now include a check for event registrations
- New Security Settings restrict merges or other record matching operations in Rock in order to reduce the possibility of an account hijack attempt
- A new Security Change Audit page has been added to assist when troubleshooting security permission changes
Updates for Rock 14.0
Below is a summary of the updates for this version.
- If enabled on the Defined Type, Defined Values can now be assigned categories
- New IP address geocoding features let you see where people who visit your site are coming from
- Rock now ships with electronic signature features for use in workflows or event registrations
- The CSV Import feature lets you import data from an external system into Rock
Updates for Rock 15.0
Below is a summary of the updates for this version.
- The Account Registration block now supports asking for person attributes on the form
- You can securely log in to Rock without a password using Passwordless Authentication
- Rock Captcha distinguishes humans from bots for security purposes
Updates for Rock 16.0
Below is a summary of the updates for this version.
-
Observability gives you system performance insights
-
If a person has a valid signature document on file,
that document will not be shown again in Event
Registration
-
In the Electronic Signature Document workflow action,
the signature document can be set using a workflow
attribute
-
Rock now supports Two-Factor Authentication (2FA)
for enhanced account security
-
Interaction Intents enhance data insights within
Interaction records
-
A new NCOA process which does not use Spark Link
has been implemented
Welcome
We hope that by the time you finish this guide you will not only be able to survive, but
thrive in your role as a Rock administrator. Our goal is to make you the hero of your team,
the one person everyone goes to for answers. So, what are we waiting for? Let's get started.
Rock Homepage
The Rock homepage is the first screen most of your staff will see, so use that to your advantage.
This is a great place for you to add organizational announcements, tips for using Rock and links
to common resources. We've provided a great starting template for you to use and edit.
Let's walk through some things you can do to make this page a useful resource.
Rock Homepage
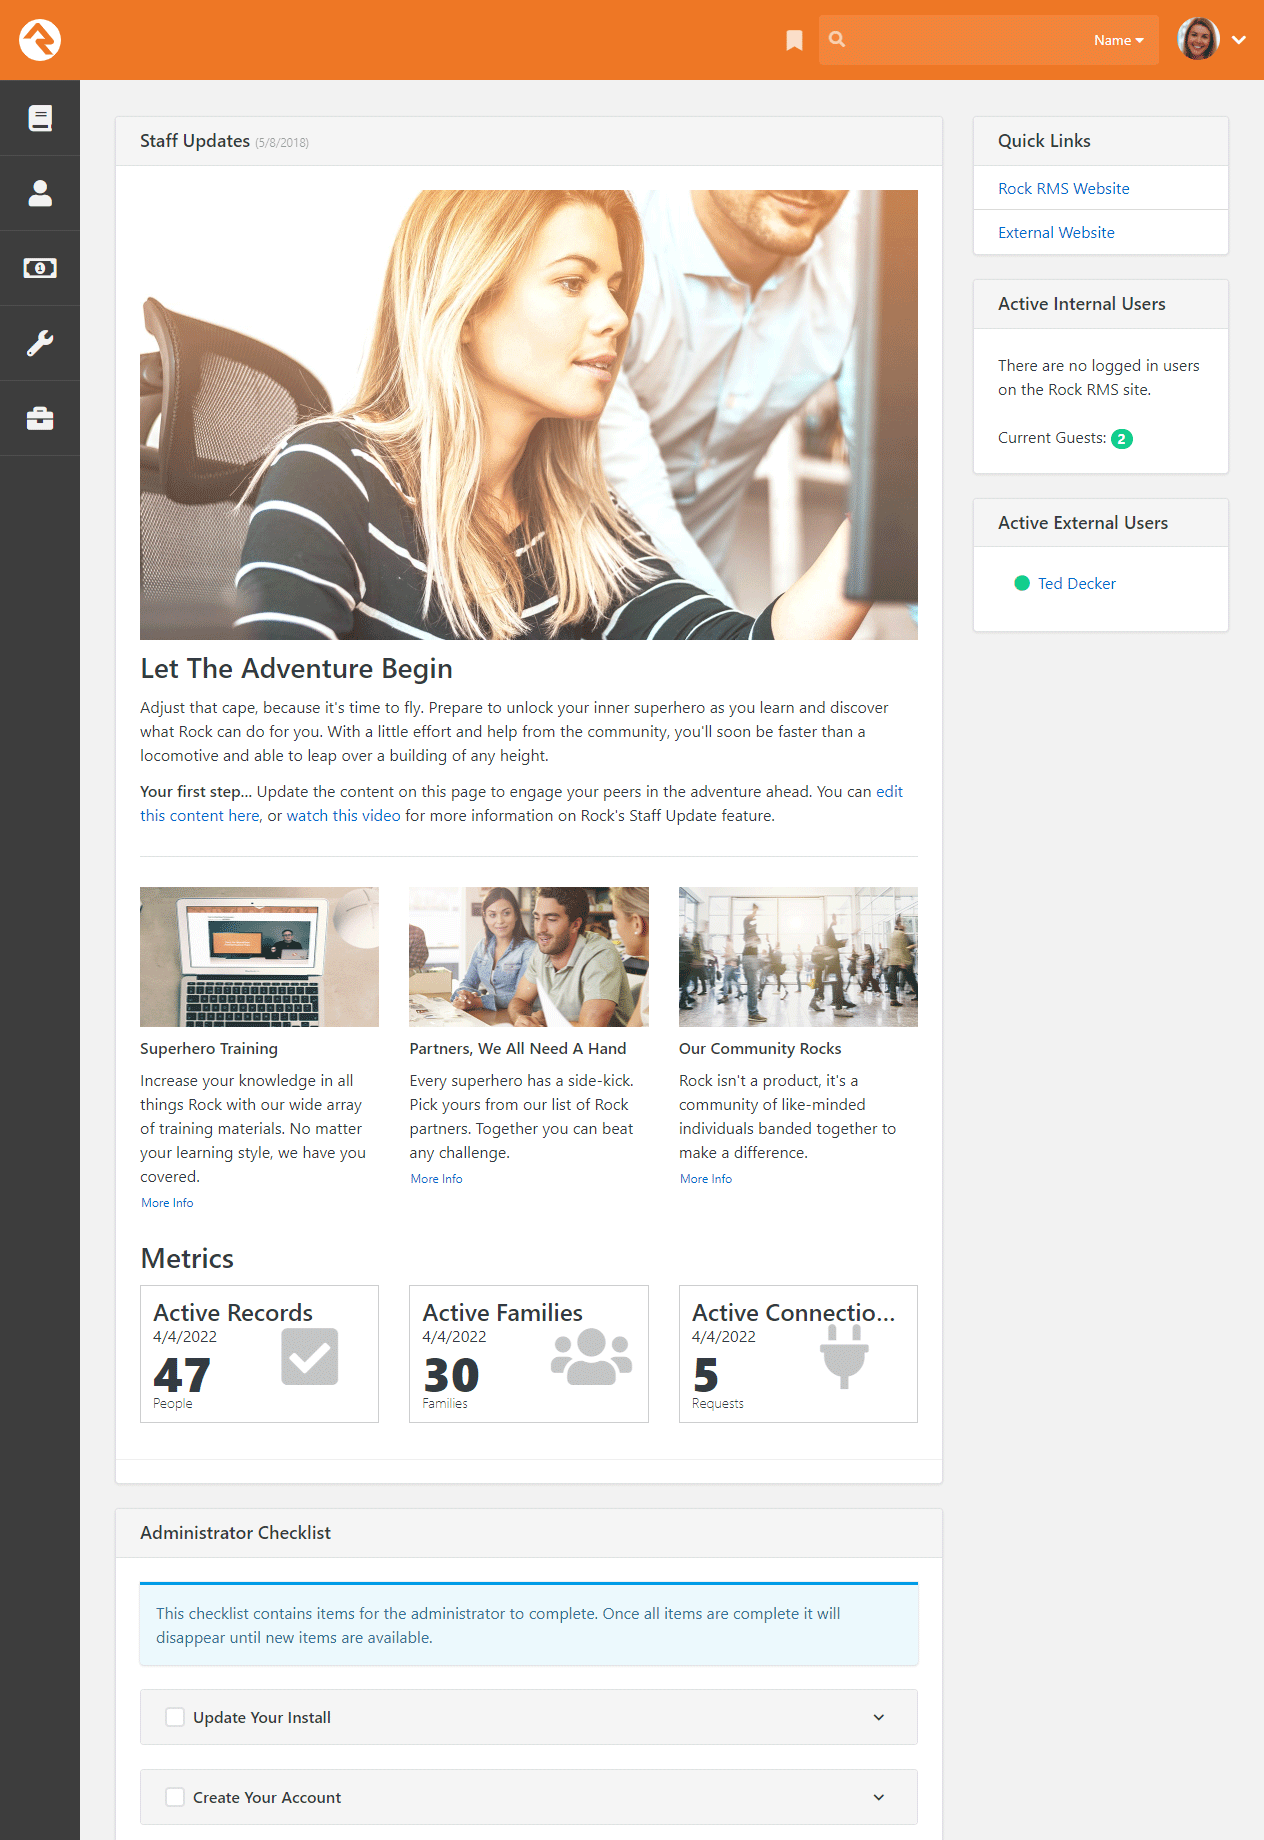
Staff Updates
The main area of the homepage is dedicated to staff updates. This is a great place to post news items and announcements for your staff. Learn how to customize this area for your organization in the Customizing Your Rock Homepage section below.
Metrics
Below the articles in the staff updates section, you'll see the metrics section. This section displays
Active Records,
Active Families and
Active Connection Requests.
Learn more about these metrics and how to customize this section in the Configuring Homepage Metrics section below.
Quick Links
The Quick Links section on the right side of the screen is a great place to provide staff with links
that your organization uses most often. For example, organizations have used this section to provide links to:
- The online catalog for ordering office supplies
- Referral lists for counseling or pastoral needs
- The organization's webmail site
- Project management tools like Basecamp or Asana
- Facility management tools like ServiceU
- Frequently used forms
You can update the Quick Links section by editing the HTML, which is accessed the same way block settings are accessed.
Tip... Be Careful
When adding links, be careful with the HTML since its format is fairly specific.
The best way to avoid mistakes is to simply copy an existing list item (<li>) and change the URL and name. Don't worry, HTML may look complex
but changing what's already been done is a great way to start learning. You can do it!
Active Users
Under the quick links section, you'll see blocks listing active individuals on the internal and external websites. This
allows you to see staff who are currently working and individuals browsing your website. You can click on a name to view the individual's
Person Profile page.
Administrator Checklist
After you first install Rock, you'll see an Administrator's Checklist on the homepage. Don't worry, only
Rock administrators can see this block.
This is a list of tasks you'll want to complete before you get too far along in your Rock deployment. Once you've checked all items off the list the block will disappear, but not forever. After an update you may need to add or change certain settings in order to use a new feature, and those steps will be listed in the block. Think of it as an old friend who shows up in your hour of need (not like your old college roommate who only shows up at the worst possible times).
Be Creative
Don't limit yourself to what's provided out of the box, or even the suggestions we give in this guide. We crafted these features just for you, because we want to enable you to take what Rock provides and make it your own. Manage the content on your homepage to reflect the unique needs, resources and vision of your organization.
Customizing Your Rock Homepage
To manage the content of your Rock homepage, go to:
Tools > Content > Internal Communications - Homepage.
Internal Communications - Homepage
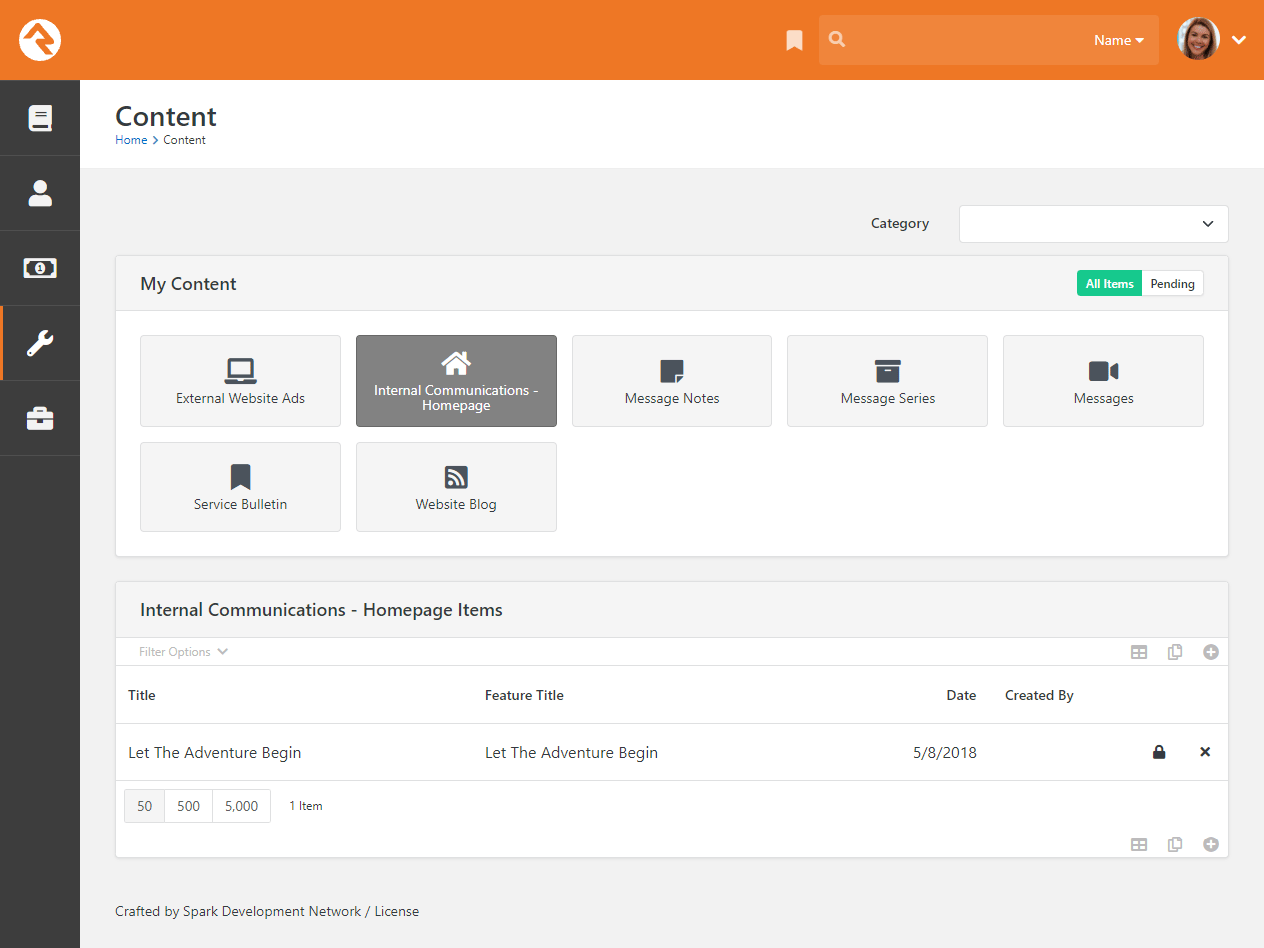
You can edit existing content items, or add new items, from the block at the bottom of the page. Doing either will bring you to the Edit Content Channel Item page.
Edit Content Channel Item

Viewing Updates
Content channel updates might not display on the homepage right away. If this happens, it’s because of the block’s Cache Duration setting. If you want to see updates immediately, change the duration to “0” seconds in the block properties.
See our Designing and Building Websites Using Rock
guide for more information on working with content channels and content channel items.
Configuring Homepage Metrics
Rock ships with three metrics ready to display on your Rock homepage:
- Active Records: The number of active person records in the database
- Active Families: The number of active families in the database
- Active Connections: The number of active connection requests in the database
We've supplied these metrics—which will automatically update weekly—as a way of getting you started. We encourage you to customize this section and select different metrics by editing the block settings.
Intranet
The Intranet tab is one area of Rock that will be unique to every organization.
Rock ships with a few intranet items already set up, but we encourage you to customize the list.
This is a great place to share information with your staff and key volunteers.
Your intranet might include items like:
- Office Information
- Holiday Schedule
- Common Links (ordering office supplies, etc.)
- Referral Lists
- Staff Phone Lists
- Human Resources Content
- Payroll Calendars
- Timesheet Templates
- Employee Forms
- Org Charts
- Benefits Information
- Employee Manual
- Finance Information
- Chart of Accounts
- Expense Report Templates
- Forms (W-9, etc.)
- IT Resources
- FAQs
- How to set up email on mobile devices
Keeping It Up-To-Date
It’s important to know who will be responsible for keeping each area of your intranet up-to-date.
It's easy enough to add the information, but there's no point in adding it if you don't have a
plan for keeping it updated.
Org Chart
Under the Intranet tab you’ll find an
Org Chart page. This is simply a group viewer
that's designed to help you develop your own organization chart. It's often helpful to have an org chart in
Rock that you can easily reference, like when you’re setting up security. If you don't think you'll need this,
you can simply hide it from the navigation by changing the Display When
setting to Never under Page Properties.
Or you can always just delete it.
Going Deeper
The group type for the Org Chart areas/departments is Organization Unit.
Feel free to add additional attributes to groups of this type if it makes sense for your organization.
Getting Comfortable
Hopefully by now you've had some time to poke around Rock - window shopping at all the features. Let's discuss a
couple of tips and tricks that will make you feel more at home.
Keyboard Shortcuts
In an effort to speed up your interaction with Rock, we've added several keyboard shortcuts. We made changes to our shortcut keys to be standardized for both Obsidian and Web Forms. Let's look
at what's available:
- Alt + Q Quick Search: Sets focus to the search box at the top of the page.
- Alt + S Save: Presses the save button on the given page.
- Alt + E Edit: Presses the edit button on the given page.
- Alt + C Cancel: Presses the cancel button on the given page.
- Alt + N New: Presses the add button on any grid on the page.
- Alt + E Edit Individual: On the Person Profile page this allows you to edit the individual's information.
- Alt + O Edit Family: On the Person Profile page this allows you to edit the family's information.
- Alt + R Refresh: Presses the refresh button on the given page.
- Alt + → Next: Presses the Next button on the given page.
- Alt + ← Previous: Presses the Previous button on the given page.
We also have keyboard shortcuts specifically for admin bar functions:
- Alt + B Block Configuration: Enables the Block Configuration fly-outs.
- Alt + Z Page Zones: Enables the Page Zones fly-outs.
- Alt + P Page Properties: Opens the Page Properties modal window.
- Alt + L Child Pages: Opens the Child Pages modal window.
If you're using a Mac, press Ctrl + Opt (instead of Alt) and the letter key of the shortcut you want to perform. We will continue using Alt + M as a legacy shortcut for "Edit".
Working with Rock's Settings
Throughout this manual you'll find frequent references to the administrative settings located at
Admin Tools > Settings. Let's
go over the features in this area to help you get comfortable finding the settings you need.
Settings
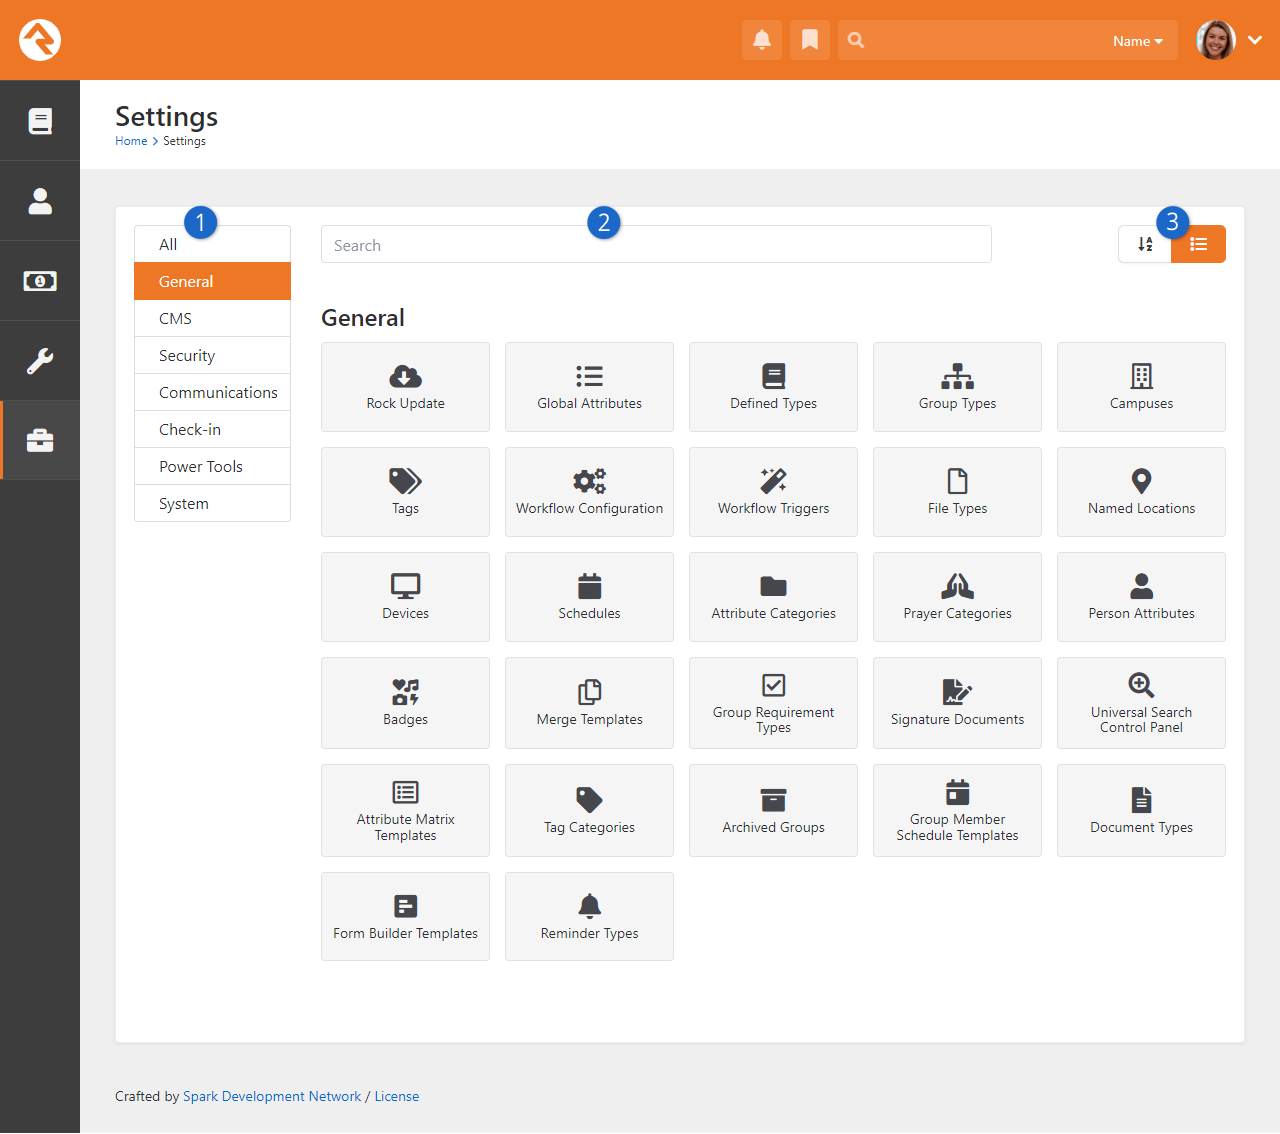
- 1 Categories Menu
- Rock's settings are organized into categories. Here you can select which category to view.
Choose "All" if you want to see every setting. The last category you
view is saved and will be selected the next time you access the page.
- 2 Search
- You can provide the setting's name to quickly find what you need.
The search only applies to the selected category, so choose "All" to
search across all categories.
- 3 Order
- You can choose to view the settings in their default order or alphabetically.
Rock will remember your selection and apply it whenever you visit the page.
Learn the Lingo
Why do techies always seem to speak another language? We’ve worked hard to limit the tech babble,
but there are a few words we’d like to define to help build a shared vocabulary.
Entities
The word "entity" is used to describe the classification unit of different
types of data in Rock. For instance,
People,
Groups,
Financial Transactions,
Locations and
Pages
are all entities in Rock. If you’re familiar with databases,
entities are very similar to tables. In fact, most entities in Rock have an
associated table in the database.
You might be asking, "Why do I need to know this?" For the most part, you
don’t have to know a thing about entities to successfully use Rock. You'll
see the term in many of the configuration screens so it’s good to know
what it is.
Defined Types / Defined Values
Many of the configuration items in Rock are made up of a list of valid values. Think about
the Marital Status of a person.
While we could have made this a textbox where anyone could type in the marital status of a couple,
in today’s world that could be a disaster. You’d probably get a million different answers to that
question. Instead, it's better to limit the options to a finite list that makes sense to your organization.
The "valid value" concept is prevalent in numerous areas
(Record Status,
Phone Types,
etc.) Instead of creating separate screens and logic for each of these, we
came up with the concept of Defined Types.
These are lists made up of values (Defined Values)
that you get to configure according to your organization’s needs.
Check out the Defined Types section of the
General Settings chapter below for more information.
My Settings
Rock offers several types of personal settings for each logged in individual. To help manage this, Rock has
a My Settings page which lives under the
Login Status
dropdown in the upper right of the internal pages. This page is a one stop shop for personalizing settings and
configurations.
My Settings Page
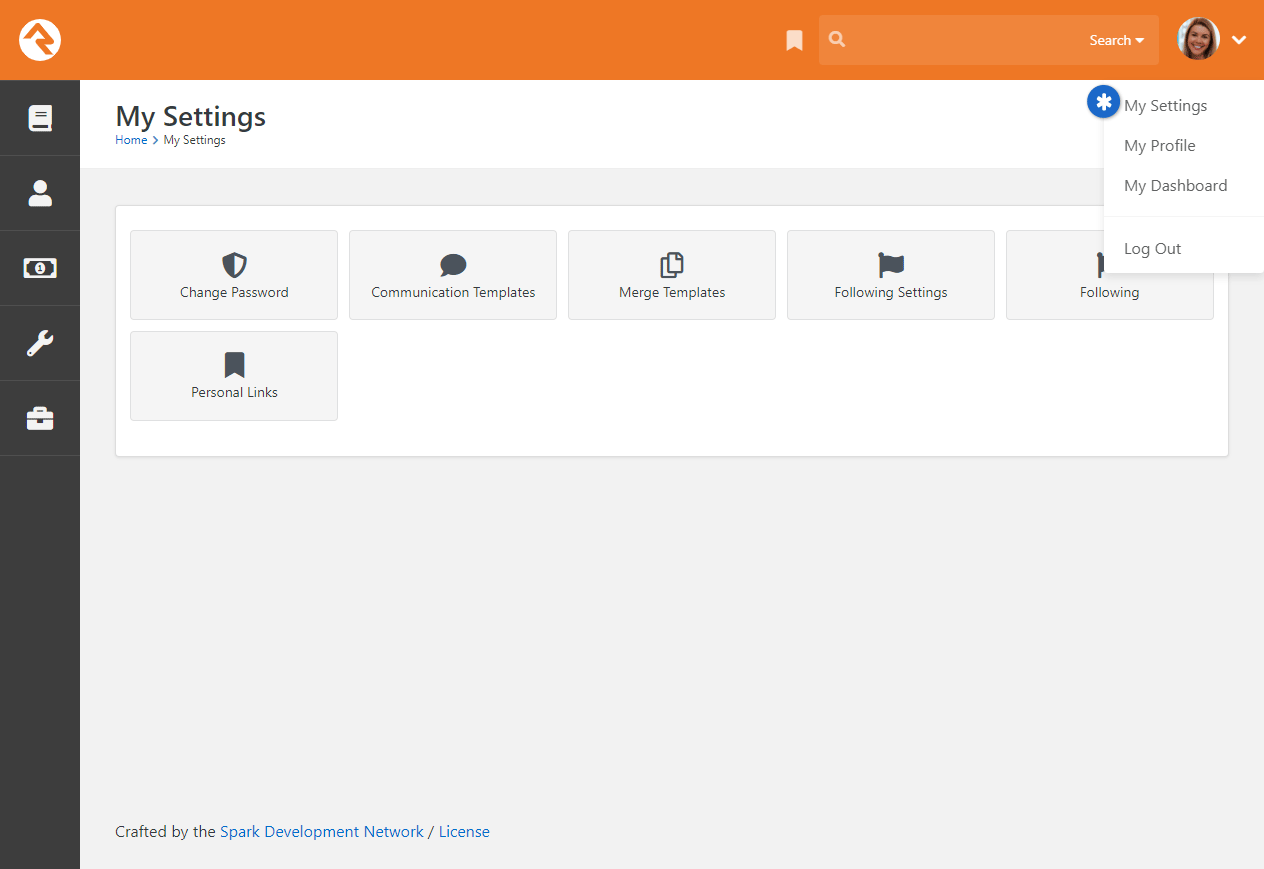
Change Password
This is where the individual can change their password. Simple enough.
Communication Templates
This page allows the individual to access communication templates they are permitted to edit.
You might find it convenient to secure certain templates so only a single person can edit them;
they can edit those templates here even if they don't have access to the
Settings page on the Admin Tools menu.
For more information on templates, check out the
Communicating With Rock
and
Email Template Survival Guide
manuals.
Merge Templates
The Merge Templates feature allows
you to take a table of data and convert it into a formatted report or set of labels.
This page allows the individual to view, add, edit and delete personal merge templates.
Merge Templates are covered in the
Merge Documents
chapter of this manual. In general, though, templates uploaded here won't be available for use by
other people.
Following Settings
Rock's following features allow an individual to be notified of activities in which they are interested.
From here, an individual can customize their Following Settings.
You can read more about these features in the
Person and Family Field Guide
Following
This page allows the person to view their current following list (the list of people and other items they
have chosen to follow). You can read more about these features in the
Person and Family Field Guide.
Personal Links
From here you can add, remove or organize your bookmarked pages and sections. We go into detail about Personal Links in the
Person and Family Field Guide.
Background Checks
Background checks are an important requirement for most organizations these days.
They involve the coordinated efforts of staff, security teams, service providers
and other resources. Because of all these points of contact, it can take quite a
while for background checks to process.
Using workflows to expedite the process helps prevent delays and maximizes the
efficiency of your organization.
Rock seamlessly integrates with two background check providers, Checkr and
Protect My Ministry. The procedure is similar for each, but we'll look at
them separately beginning with Checkr.
Configuring Checkr
The first option for running background checks on individuals is Checkr. Once configured,
Rock will default to using Checkr for background checks. You can easily change this default,
however, which we'll look at shortly. First, though, let's look at the steps to set up your
Checkr account.
Step 1: Sign-up
The first step in the process is to sign up for a Checkr account. You'll start from your rockrms.com account.
- Log in at www.community.rockrms.com, and then click on
the menu in the top right corner with your picture on it.
- Click on "Your Organizations". In the center you'll see the organization(s) with which your account is
associated.
- Click on the organization you wish to set up with Checkr. Then, beneath the organization logo in the
Integrations section, click the
"Checkr" option.
- Click the Create New Checkr Account
button.
- Once your account is set up, your organization page in the Rock RMS site will update with an Account
ID and Access Token.
Organization Page on rockrms.com
Step 2: Set Up Webhook Inside Checkr
The next step is to set up a webhook inside Checkr. This tells Checkr where to send updates when background checks are complete.
Begin by logging into your Checkr account at dashboard.checkr.com, then navigate to:
Account Settings > Developer Settings.
Checkr Account Settings
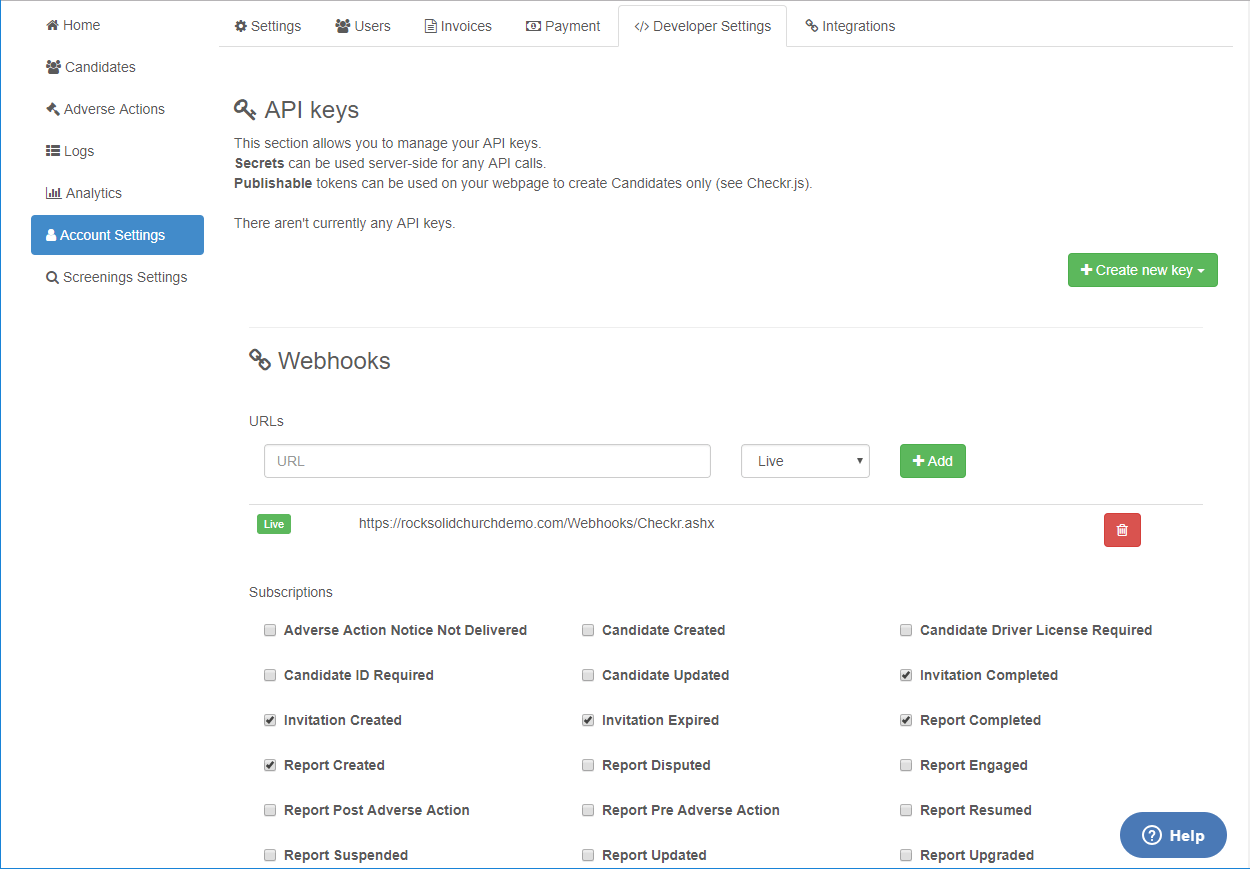
Type your Rock URL appended with /webhooks/checkr.ashx in the Webhooks URL
field, select Live, then click Add.
Finish by selecting the subscriptions shown in the above screenshot.
Note:
If background checks are successfully submitted to Checkr but results are not returned, Checkr may need to enable account-level webhooks
on your account in order for everything to work correctly. You'll want to make a request to Checkr support to enable them in this case.
Step 3: Configuration
Now that Checkr is active, it's time to link your account to Rock. From within Rock, access the Checkr screen located at:
Admin Tools > Settings > Checkr
Enter your Checkr Access Token (from the Rock RMS website)
into the field provided. Click Save. The Background Check Types
list is automatically downloaded when you enter the access token. If you want to download an updated Background Check Types list,
click the Update Packages button.
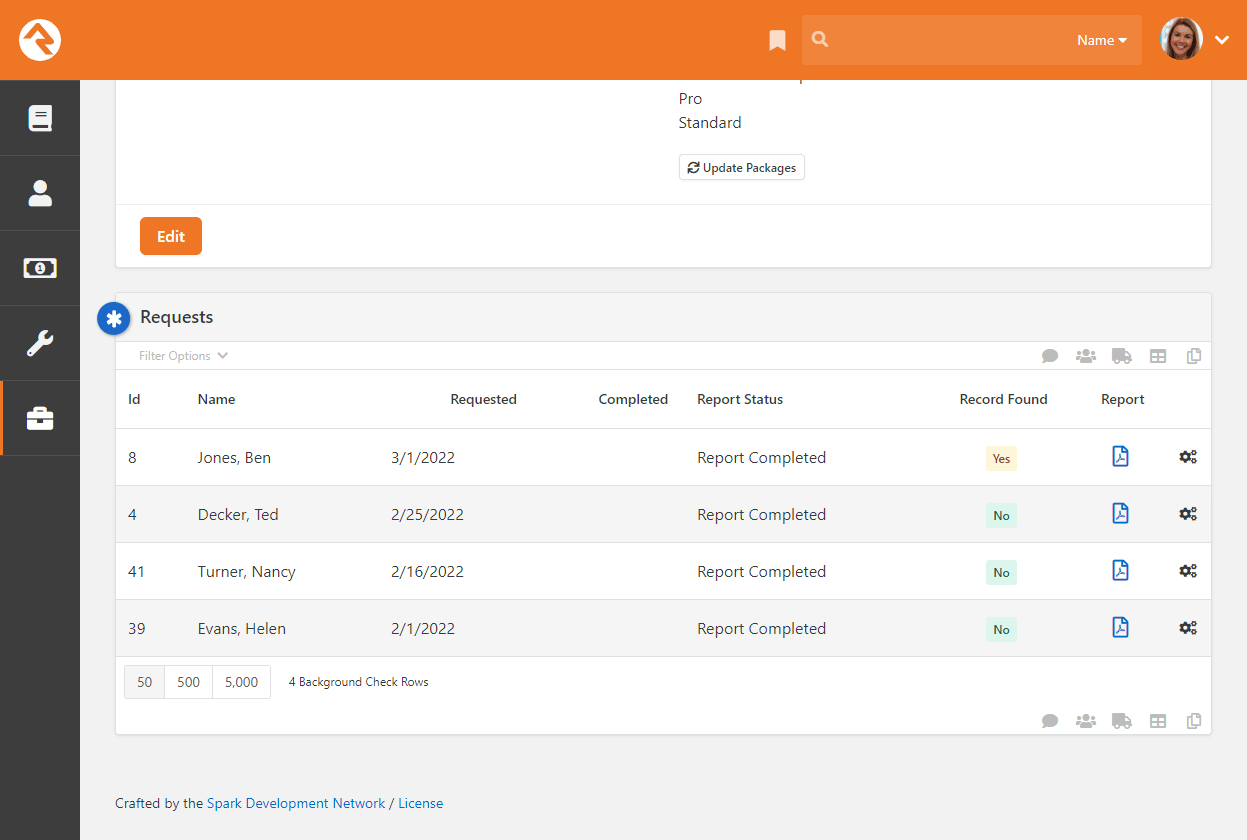
Checkr Background Checks
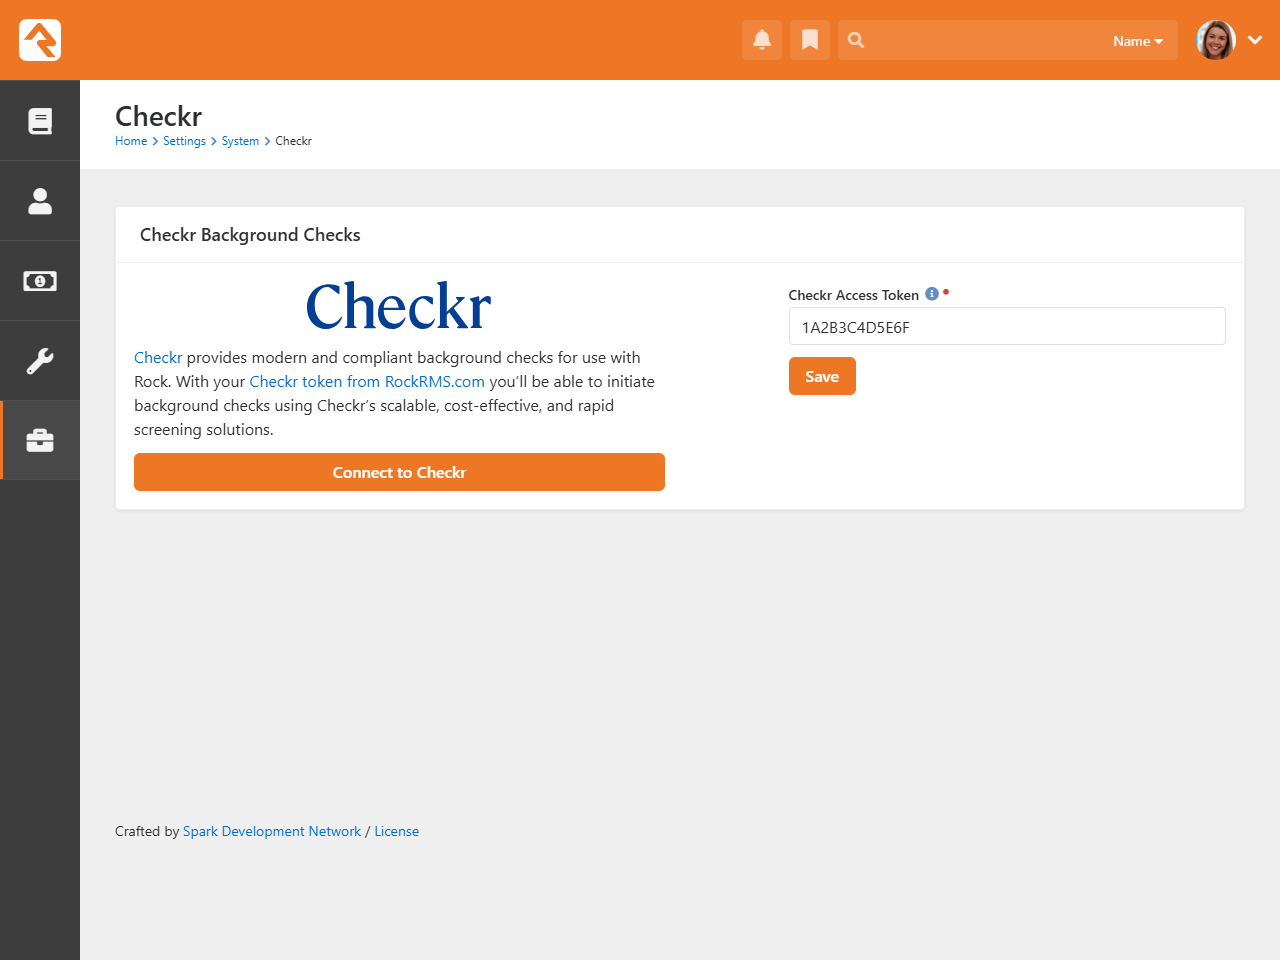
Checkr is now active by default in Rock. You can view Checkr's status in the Background Check Providers
page in Settings under Admin Tools.
Background Check Providers Screen
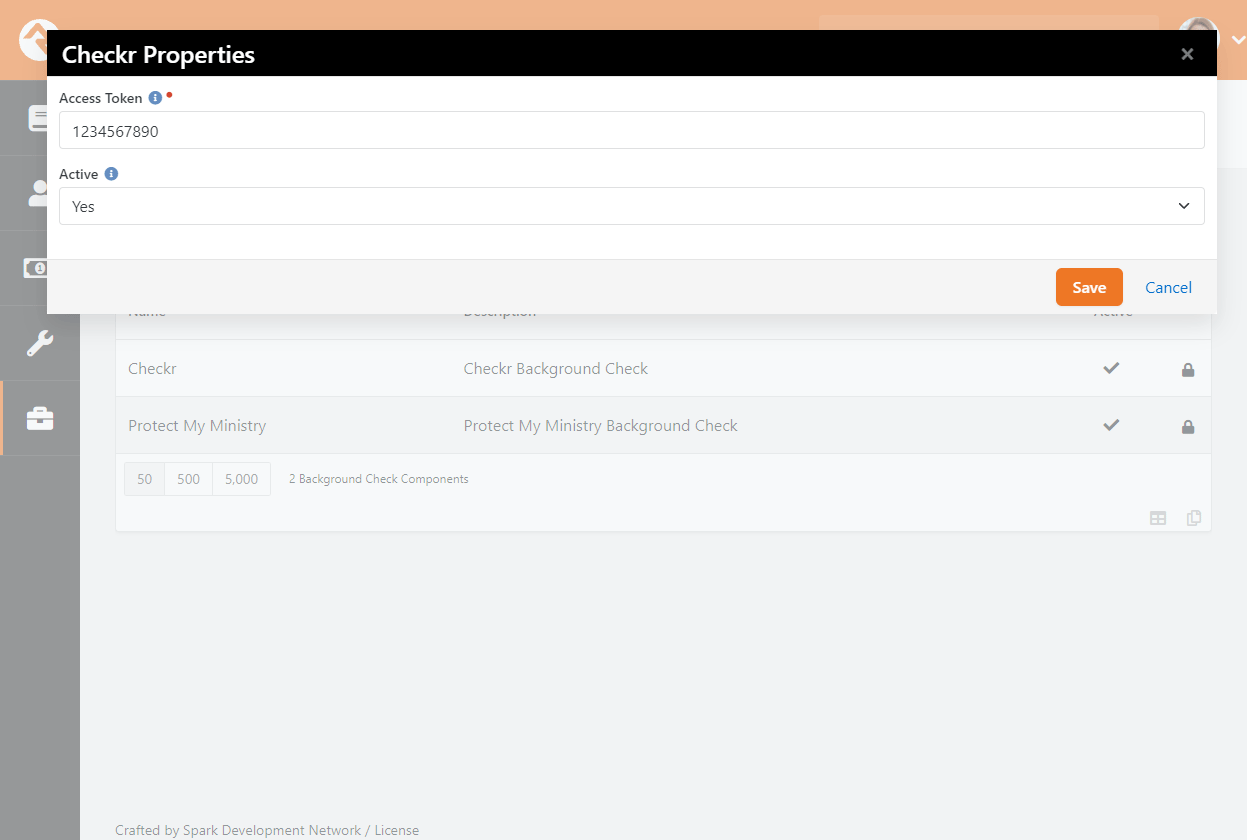
The Access Token should already be filled in for you at this point, since you provided it on the Checkr configuration page.
Pictured below, you can see the Background Check Types list and the
Update Packages button mentioned above.
Enabled Background Check Types
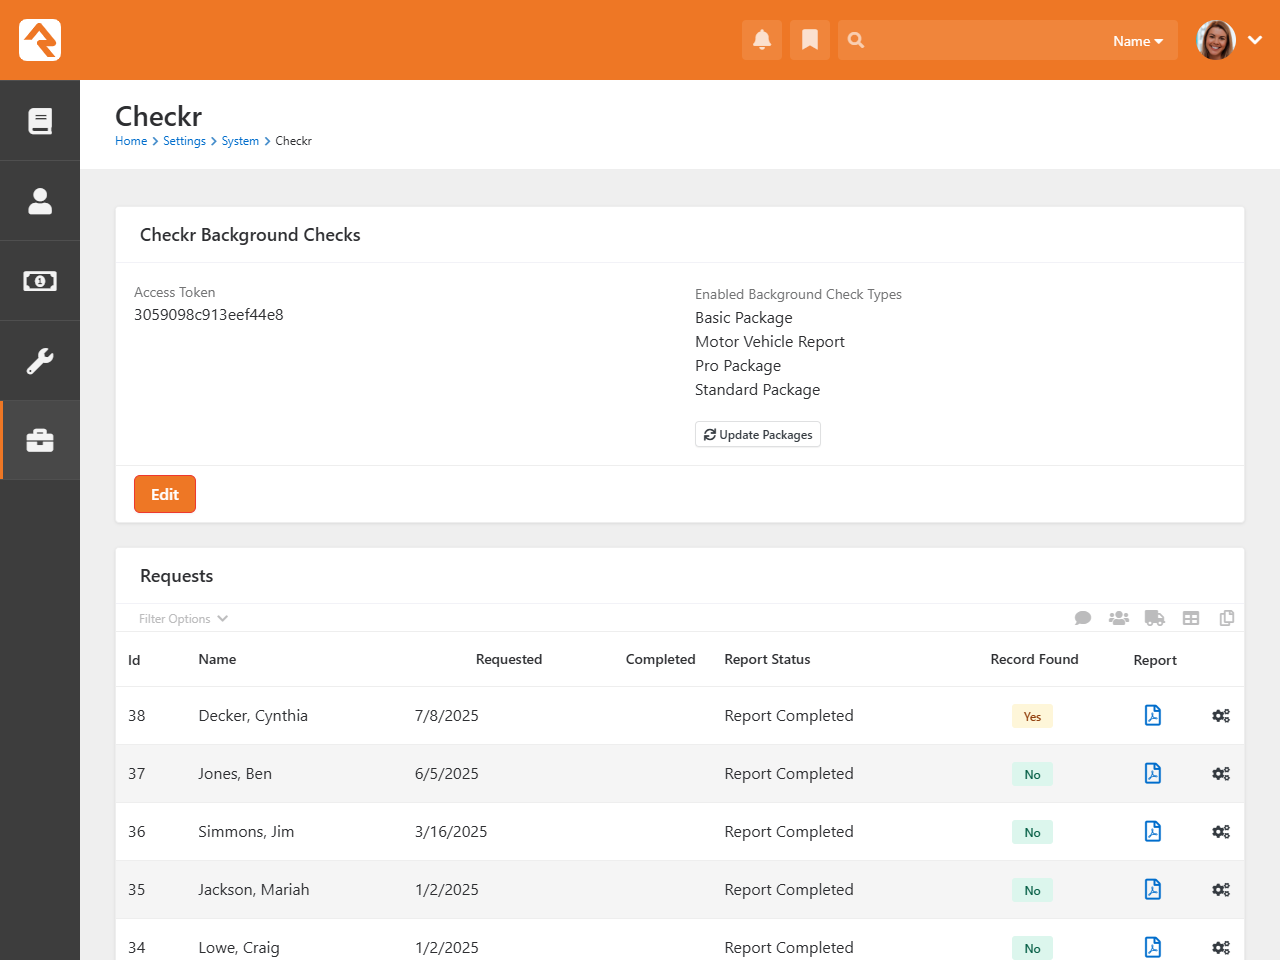
Viewing Checkr Requests
You can view all the requests that Checkr has processed in the Checkr page.
This list is provided to help you see what's being processed at a high level. As you'll see soon, you can also view the results of a specific
background check request from the Workflow and
Person Profile pages.
Checkr Requests
Configuring Protect My Ministry
The second option for background checks is Protect My Ministry. Below are the steps for setting up and configuring this provider in Rock.
Step 1: Sign-up
The first step in the process is to sign up for the Protect My Ministry service. To do this, start at the
Protect My Ministry page in Rock under:
Admin Tools > Settings > Protect My Ministry.
Protect My Ministry Start Page
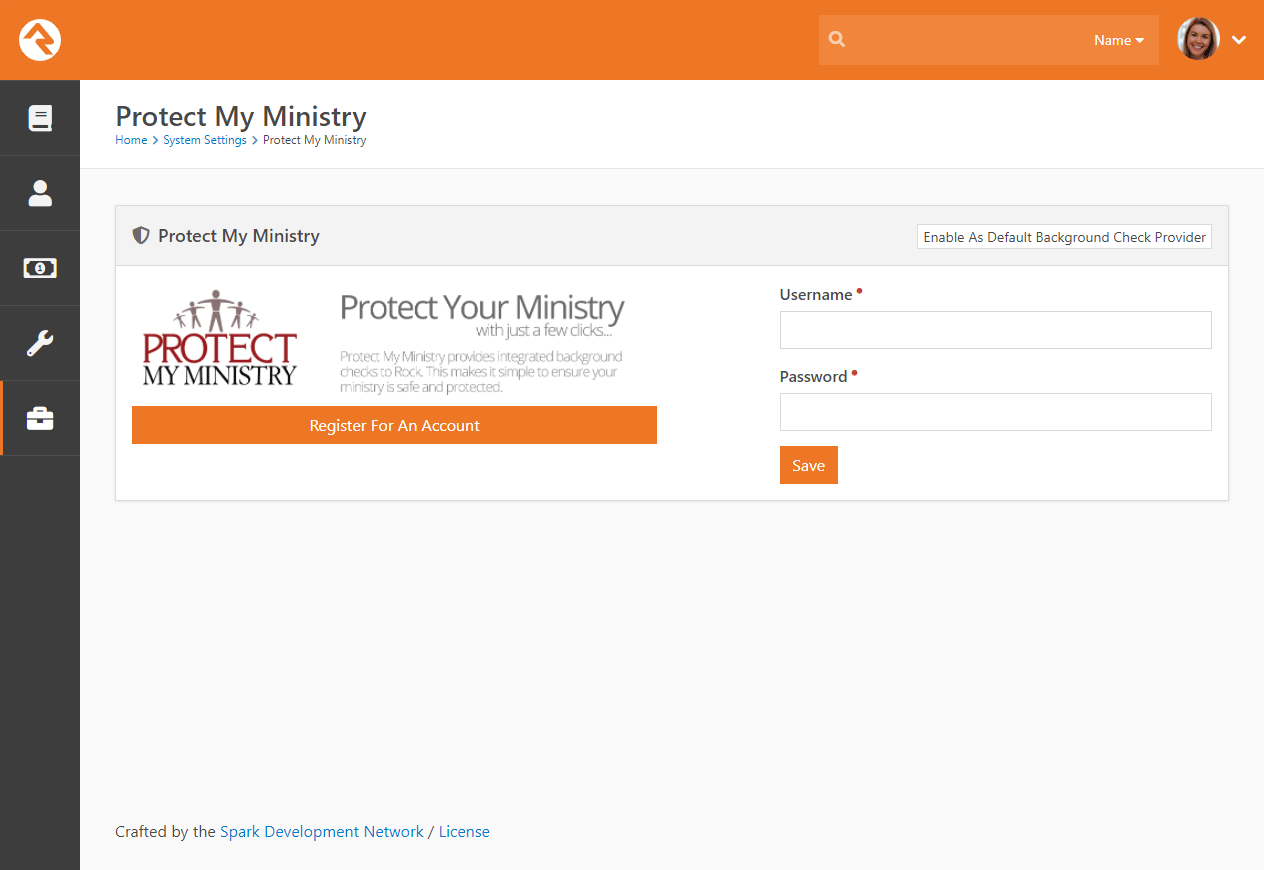
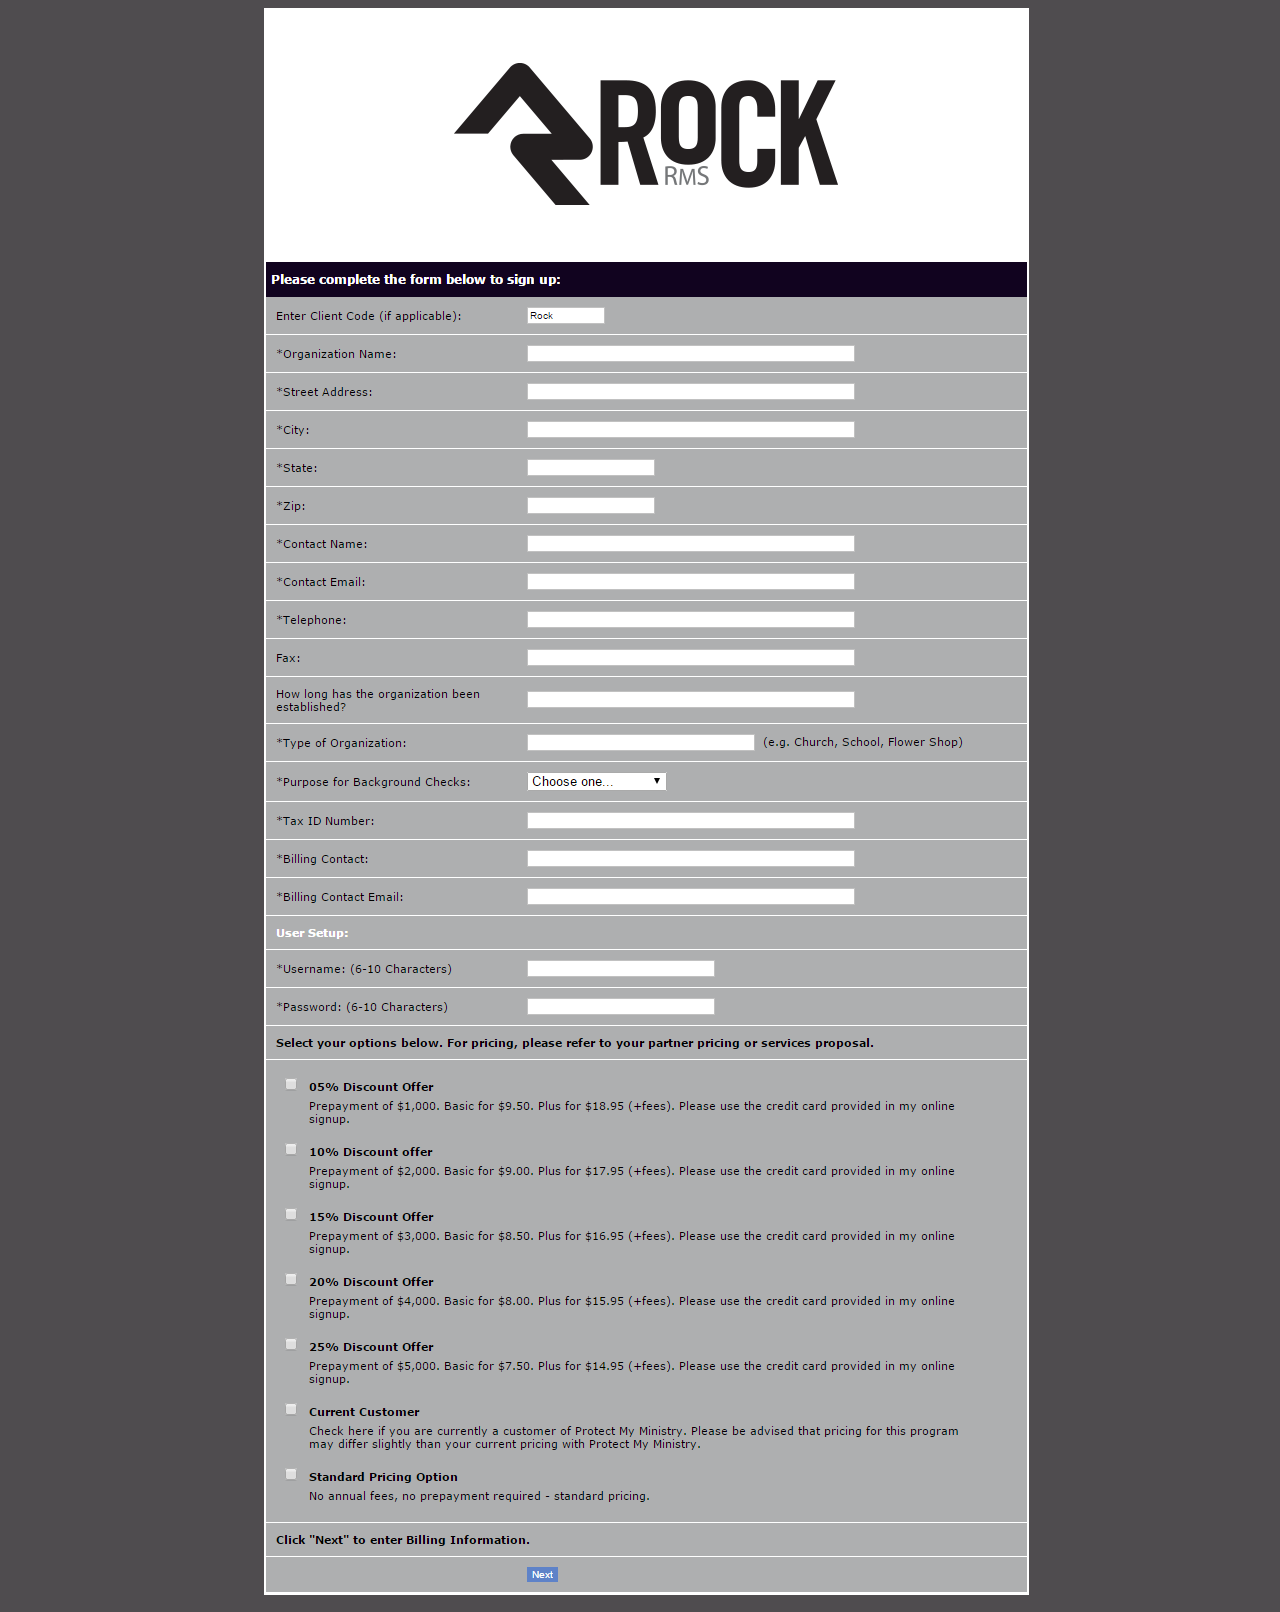
Should you choose to register for a new account, click the Register For An Account
button. You'll be taken to the Protect My Ministry website to complete the registration.
Protect My Ministry Registration Page
After completing the registration, come back to the Rock Protect My Ministry
page and enter in the username and password you created. You'll then
be taken to the Protect My Ministry Detail Page.
Step 2: Configuration
Once you've entered your account information in Rock, you’ll see the details of your account on
the Protect My Ministry page.
Protect My Ministry Registration Page
Important
The Result Webhook setting will be populated automatically using
your Rock Public Application Root Global Variable. However, this can
be changed here if needed by clicking the
Edit button.
This address must be secured using SSL/TLS (must start with https://).
Know that you
can't simply change the http:// to https:// here, though, without having a valid SSL/TLS certificate
installed and your web server configured properly. Google is your friend if you need help obtaining and
installing a certificate.
You'll now want to configure the packages that are tied to your account. The most popular packages
have already been made available to you through the integration. Each package has a brief description
that outlines its specific merits.
There are several configuration settings for each package. Let's look at each setting and what it means.
- Package Name This is the PMM name for the package. It must be an exact match to what's in their system, so please don't
change it unless instructed to.
- County Criminal Default County Depending on your state it may be recommended that you provide a county on your request.
If so, this will be the default county to use if one isn't present on the address of the person you're checking. You can check your
state’s requirements using this map from PMM.
- Use Home Address for County Criminal This too will depend on the state in which you live. If your state is recommended
for the county search, you'll want to enable this option.
- State Criminal Default State This is the default state to use when doing a state criminal request. This option is
defaulted to the state that's most common in your database, but feel free to change it.
- Use Home State for Statewide Criminal This setting determines if the state from the address should be sent.
- MVR Jurisdiction Code This setting determines jurisdiction to use for MVR (Motor Vehicle Records) searches. You can
select your area from the list provided. This is only needed for MVR type searches.
- Use Home State for MVR Search This determines if the state from the home address should be sent for the MVR search.
This is only needed for MVR type searches.
While you can add new packages using the settings above, the packages provided should meet all your needs. You may need to edit some of the
configurations to meet the recommendations for your state. This decision centers around whether you should be doing a state or county search.
Viewing Protect My Ministry Requests
From the Protect My Ministry page you can also view requests that have been processed.
This list allows you to see what's being processed from a high-level perspective. However, it's much easier to see the results of a specific background
check request from the Workflow and Person Profile
pages. We'll talk about that next.
Protect My Ministry Requests
Background Check Administrators
Background check admins have access to all background check details and the ability to approve or deny them at several points in the process.
Before you start processing, you'll want to configure the person or people who will be included in this security role under
Admin Tools > Settings > Security Roles > RSR - Background Check Administration.
Processing Requests
Several different organizational needs kick off a background check request workflow. For instance, you may be hiring a new staff member,
screening a potential volunteer, updating person profile records or transferring someone into a new position. Whatever the reason, it’s
usually a staff member who needs to start the request for a background check.
To see if an individual has completed a background check, go to the
Person Profile
page and look under the Extended Attributes tab.
Staff will be able to see either a
Yes or
No
in the Background Checked
field. Background check administrators can see additional fields and have editing privileges.
Background Check Person Attributes
- 1 Background Checked
- Simply a "Yes" or "No" to indicate if the person has a background check.
- 2 Background Check Date
- Will have the date the check was completed, if applicable.
- 3 Background Check Result
- Will show either Pass
or Fail.
- 4 Background Check Document
- Will have a complete PDF of the background check results, if a check has been completed.
- 5 Driver's License Number
- Will have the license number, if provided.
Make It Quick
If you want greater visibility for Background Checks on your
Person Profile
page, consider adding a badge to the
Badge Bar.
How It Works
Initiating A Request
Background checks can be initiated from an individual’s
Person Profile
page. Below the person's photo is an
Actions button,
which you can click to display available actions.
Click on the Background Check
option. The initial request will save both the person and the requestor,
while prompting the requestor to provide any key missing details
such as social security number, campus, type, etc.
Just A Double Check
Rock will automatically look for previous background checks for
that individual within the last year. If it finds another check
within that timeframe, it will notify the requester, who will have
to confirm that they want to request another background check
before proceeding.
Workflow
The background check workflow has eight possible activities. Like
many other aspects of Rock, it's customizable. You may find that you'd
like to configure your background checks a little differently for your
organization. For instance, you could add a step to the process after
a staff member requests a background check that notifies a volunteer to
provide their own social security number.
To review or modify the workflow configuration, go to:
Admin Tools > Settings > Workflow Configuration > Safety & Security > Background Check.
For more details on workflows in Rock, see
Blasting Off With Workflows.
A chart of the out of the box workflow is below.
The Lifecycle Of A Request
- 1 Initiate
- A staff member will initiate a request.
- 2 Notify
- Individuals in the 'Background Check Administration' security role
will be notified of the request and will either Approve or Deny it.
- 3 Denied
- If the request is denied, a notification will be sent to the requestor,
who can then update the request and resubmit it or cancel the request.
- 4 Approved
- If the request is approved, it will be submitted to your organization's
background check provider to be processed.
- 5 Results
- If the background check comes back as 'Pass', Rock will update the
Person Profile
page with pass/fail results and a PDF copy of the full report. The requester
will also be notified of the completion.
- 6 Review
- If the check comes back with a status other than 'Pass' the workflow will notify the
individuals in the 'Background Check Administration' security role to review the
results and determine if the background check should be passed or failed. The results
will then be emailed to the requester.
Locations
With the development of mapping technologies, location has taken on a new importance in our lives.
Concepts like proximity, distance and location are common in our everyday lives and our interactions
with others. Rock has a very robust location strategy. It’s important that you understand all the
possibilities as you set out to implement it in your organization.
Location Descriptors
When you create a location, you can define several location descriptors:
-
Street Address: This is pretty obvious, the street
address of the location.
-
Latitude / Longitude Point: The lat/long point is simply the latitude/longitude of
the address. You can set this by either providing an address and allowing Rock to convert it to a
lat/long using the built-in address standardization service or you can reference the point using
Rock’s location picker.
-
Geo-fence: A geo-fence is a virtual perimeter for a real-world
geographic area or boundary. Geo-fences are used by Rock to define
things like regions for groups and to power features like mobile check-in.
Rock allows you to draw these fences right in the address picker.
Types of Locations
There are two types of locations in Rock. Let’s take a look at each and see how they are used by Rock.
Positional Locations
Positional locations describe places you could point to on a map. By themselves they
don’t tell you anything about the point, just its location on the map.
They only find meaning when they are used by features like
Families
(to describe where they live) or
Groups
(where they meet).
Named Locations
Named locations have position and meaning. The meaning comes from
giving the position a name. For instance, after install there's a
Main Campus
location that describes your organization’s campus.
Named locations can also have hierarchy. Think again to your organization’s campus.
The campus itself is a location, but it’s also made up of sub-locations
like buildings. Buildings have locations too - rooms. Having a hierarchy
allows Rock to build rich location contexts into applications like
check-in.
Named locations must be setup under
Admin Tools > Settings > Named Locations
before they can be used in the application.
Address Standardization and Geocoding
Your attendees' addresses are very valuable, so it's important that they are formatted correctly and validated
through the USPS database. Also, in order for these addresses to be used with the latest mapping technologies
it's important to convert them into latitude and longitude points through a process called geocoding. Fortunately,
Rock makes both of these tasks simple.
As addresses are entered into the system, Rock will automatically send them to an online service to standardize and geocode
them. This service will ensure that:
- Addresses are formatted correctly (e.g., fix upper / lower case issues)
- Items like Streets, Avenues, West and East are abbreviated correctly
- Zip+4 is researched and added
- Latitude and longitude are added to your addresses
Out of the box Rock uses SmartyStreets to provide this service. SmartyStreets is a service for address standardizing and
geocoding capabilities. They have also generously granted the Rock community a license to use their service for free. We've
built this license directly into the product so there's nothing you need to do to enable this functionality. Just sit back
and enjoy quality addresses.
While you don't need to configure anything to enable SmartyStreets, there are settings of which you should be aware:
- Acceptable DPV Code - This setting determines the acceptable quality match for standardizing
an address. You can find all of the options on the
SmartyStreets documentation site. The default setting is 'Y,S,D' which is a full or partial match.
- Acceptable Precisions - This setting is similar to the DPV code but is related to
the required precision of the geocoding in order for it to be considered a successful match.
You can find more information on the
SmartyStreets documentation site. The default setting, 'Zip7,Zip8,Zip9' determines a successful match
if the address is matched at Zip+2 (e.g., 85383.23__) or better.
If you'd like to make changes to the services used by Rock, you can under:
Admin Tools > Settings > Location Services.
There you'll see a list of services that Rock supports. Not every service supports both standardization and geocoding.
| Service Name |
Description |
Service Type |
Cost |
| SmartyStreets |
SmartyStreets is the default solution because of their high-quality results for US addresses and free license for the Rock community.
Find out more on their website.
|
Address Standardization & Geocoding |
Free |
| Bing |
Microsoft's Bing mapping service provides a free geocoding service. The service does have
a few limitations. You can only make a maximum of 5,000 requests a day and 125,000 in a 12-month
period. For most organizations, this will be more than enough. We've even built in a daily transaction
limit, so you won't have to worry about going over on any given day. This service requires a key.
To get your free key, follow these simple steps:
- Go to the Bing Maps Portal.
- Sign in using a Microsoft Account or create a new account.
- With an account set up, you'll need to contact Bing Maps directly to get a Non-Profit key.
Reach out to mpnet@microsoft.com to get in touch
with the Bing Maps account team.
- After you've obtained your key, it can be added to Rock under Admin Tools >
Settings > Location Services > Bing.
While the Bing service provider isn't a true address standardization component it will do some format
cleaning of the addresses you provide. For instance, it will put your addresses in the proper case and fix
any minor missing elements. It won't, however, add zip+4 information. It also removes apartment numbers from addresses.
|
Geocoding |
Free |
| StrikeIron |
StrikeIron provides a paid option for geocoding data. You can find more
information on their website.
|
Geocoding |
Must request a quote |
Want Even More Options?
If you have a developer handy, you can even write your own location service provider to add to the list.
Maintaining Locations
Locations are used in different contexts so there are different ways you might change a location's details.
If it's a family's address on the
Person Profile page then hover your
mouse over the address and click on the
icon
that appears to the right. If it's a named location, you can adjust it by navigating to
Admin Tools > Settings > Named Locations
as described above.
Wherever you access a location, you'll generally be able to edit the same common fields
(e.g., Address Line 1, City, State). However, there are some configuration
options that are specific to the context of the location. For instance, below
is an example of a Named Location.
Here you can provide a Parent Location,
a Location Type or an
Image. But you won't
see those options when you're editing a family's address or a group's meeting location. Keep this in
mind as we cover the location configuration options pictured below.
Named Location Configuration
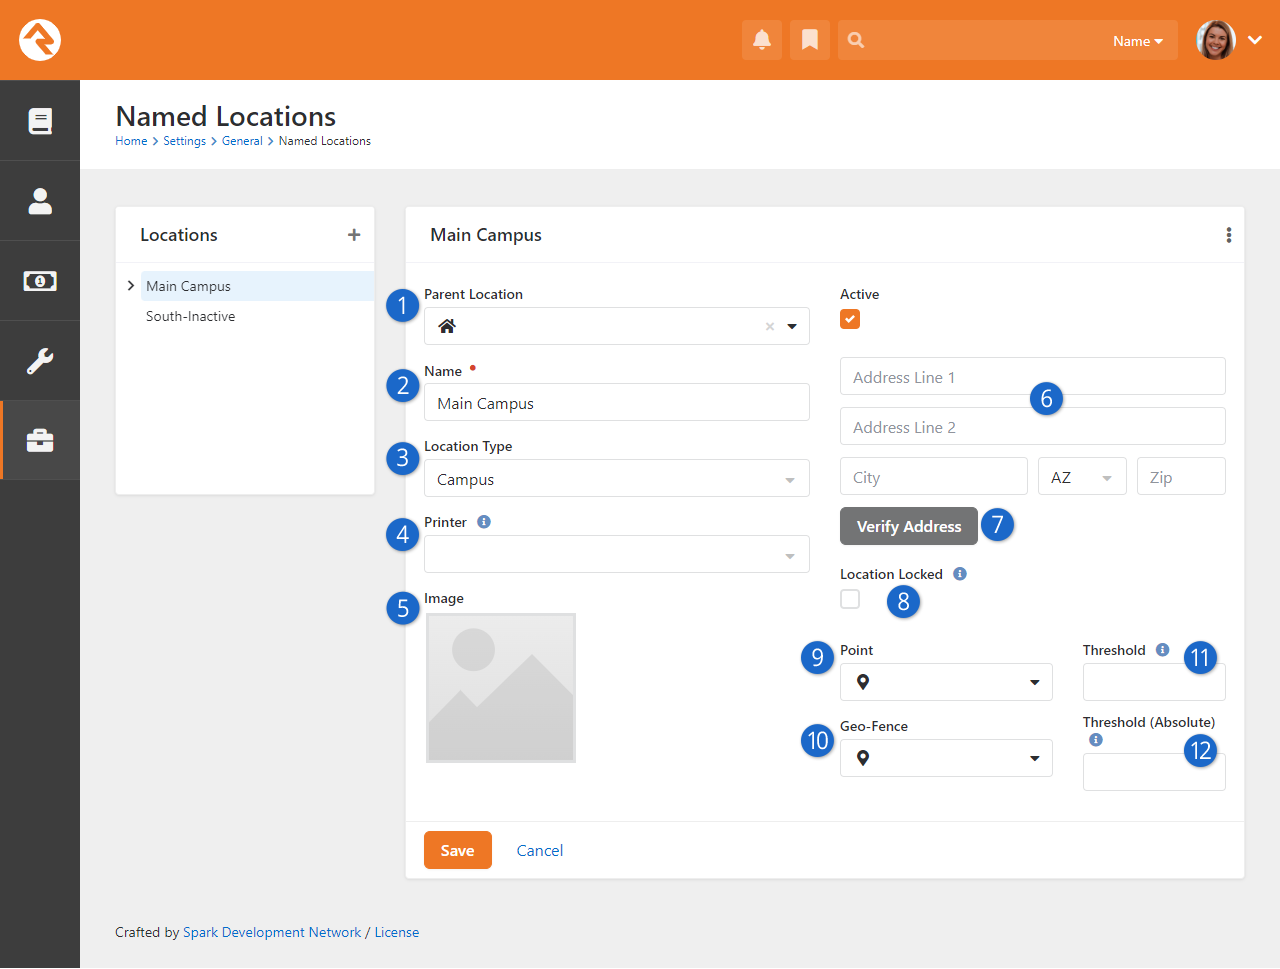
- 1 Parent Location
- Not all locations will have this option. For
Named Locations,
this indicates where the location should be in the location tree to the left.
- 2 Name
- A critical element of Named Locations
is the name assigned to the location. This identifies the location throughout Rock.
- 3 Location Type
- The Location Type
is not only descriptive, but also has some functionality associated with it. For instance,
only locations of type 'Campus' can be used when you're configuring a Campus.
- 4 Printer
- Named Locations
can have a printer assigned to them. New printers can be added under
Admin Tools > Settings > Devices.
- 5 Image
- You can optionally add an image for the location, such as a photo of the location
itself. This makes it easy to display the location along with its image.
- 6 Address
- Locations don't always need addresses. For locations like buildings or
rooms, an address won't always make sense. It's different if you're working with
a family's location, which should always use these address fields.
- 7 Verify Address
- With the click of a button you can verify (i.e., standardize and geocode)
the location's address.
- 8 Location Locked
- In the prior section above we discussed address standardization and geocoding.
If Location Locked
is enabled, the address will not automatically be updated by standardization services.
Enable this if the address would become incorrect when standardized. Note that enabling
this does not prevent someone from manually changing the address.
- 9 Point
- Clicking here will open the
Geography Picker
where you can pick a specific spot on a map to associate with the location.
- 10 Geo-Fence
- Similar to the above item, click here to reveal a map where you can
draw a shape that encompasses any area you wish to associate with the
location.
- 11 Threshold
- This is similar to a room capacity, and applies to check-in. If this threshold is
reached, a manager override is needed to check in additional people.
- 12 Absolute Threshold
- If this threshold is reached then no additional people can check in to the location.
Unlike the above item, there is no way to override this limit.
Email Configuration
Email is an important part of your communication strategy. Getting it configured in Rock should be one of your first priorities after install.
Like many aspects of Rock, you have choices when it comes to email. We highly recommend using an email service that will provide additional services
like bounced mail processing, the ability to track when emails have been opened and when links have been clicked. Rock ships with Mailgun and
SendGrid, but others are available in the Rock Shop.
Email Settings
The configuration items you provided during the install can be updated under
Admin Tools > Settings > Communication Transports.
Email is sent from Rock using a communication transport. Think of this as a delivery service.
Just as you might pick between sending your package via UPS or FedEx, Rock gives you options when sending
out your emails.
CSS Inlining
CSS Inlining of Email Templates is only available if the email Communication Transport supports it.
Currently only Mandrill supports CSS Inlining.
Mailgun Email Service
Mailgun is an email delivery service that provides several advanced features.
Mailgun is operated by the popular web hosting company Rackspace and is used by numerous online
businesses.
Mailgun HTTP
Mailgun HTTP is the quickest and easiest way to send emails. This transport sends the email to Mailgun with their newer HTTP API.
Below are the settings Rock needs from your Mailgun account.
| Setting |
Description |
| Base URL |
You can view or change the API URL from Mailgun.
|
| Active |
This setting turns the Mailgun service on or off.
|
| Resource |
This will be populated with a URL provided by Mailgun.
|
| Domain |
Enter your organization's domain for email.
|
| API Key |
The API key is provided to you by Mailgun.
|
| Track Opens |
If enabled, this setting allows Rock to report whether an email was opened.
|
Mailgun SMTP
This transport delivers the emails to Mailgun with their SMTP API. Below are the Mailgun SMTP settings in Rock.
| Setting |
Description |
| SMTP Hostname |
This is the SMTP host. The default setting will work here in most cases.
|
| API Key |
The API key is provided to you by Mailgun.
|
| Active |
This setting turns the Mailgun service on or off.
|
| Domain Login |
Enter your Mailgun provided username.
|
| Domain Password |
Enter your Mailgun provided password.
|
| Port |
Indicate the port on your server that should be used for communications.
Ports 587 or 2525 are often used, especially if you're encrypting the sending.
|
| Use SSL |
Set whether your mail server supports sending emails via an encrypted SSL session.
|
| Track Clicks |
If enabled, clicks on sent emails will be tracked.
|
SMTP
Below are the configuration items that are needed to enable SMTP emails to work. If you're unsure
what these values should be, consult with your ISP or your organization’s IT support.
| Setting |
Description |
| Active |
This setting turns the SMTP service on or off.
|
| Server |
Provide the SMTP email server that Rock should use to send the emails through.
|
| Port |
Indicate the port on your server that should be used for communications. This
will typically be port 25 but port 587 is often used if you're encrypting the
sending.
|
| Username |
If your email server requires you to authenticate to relay email, this is where you'll
provide the username.
|
| Password |
When enabling authentication, this will be where you set the password.
|
| Use SSL |
Set whether your mail server supports sending emails via an encrypted SSL session.
|
Most organizations will set these values to their established email server, but some very small
organizations might not have a central or common server. For example, some might run completely off of
a Gmail account. Below is what you would enter for each of these settings.
Warning
Using Gmail settings is not a recommended configuration for organizations sending out
large bulk emails. We're providing these settings only as a service for small organizations.
- Server: smtp.gmail.com
- Port: 587
- Username: (your Gmail username "xxxx@gmail.com")
- Password: (your Gmail password)
- Use SSL: True (checked)
Sending bulk email is difficult in today’s age of spam and spam filters. Simply configuring an ISP
or Internal Exchange Server isn't enough if you want to ensure all your messages will make it to
their intended recipients. To do that, you need to confirm your DNS has proper SPF and Domain Key
records and ensure that you're not on any blacklists. Even for the largest organizations, this
can be an overwhelming task.
Wherever a problem exists, a new service will be created to help solve it. That has certainly been
the case in the area of email deliverability. With the importance of email and the complexity of getting
your environment right, it makes sense for most organizations to outsource the sending of their emails.
These services specialize in getting it right and the pricing is fairly reasonable. Rock ships with
Mailgun and SendGrid transports, but you can check the Rock Shop for integrations with other transports.
Tip
Some of these vendors have free accounts that would suffice for many small organizations.
Mailgun, as of the time of this writing, has a free starter package that generously gives you 5,000 emails a month for your
first month. After that you can pay by the number of emails you send or purchase a different plan.
For full details and up-to-date pricing visit their website.
In our experience, Mailgun's pricing has been very competitive, and their features are among the best in their class.
Note
We realize that a list of recommended vendors is helpful, but sometimes it can also be overwhelming.
If you’re looking for a single recommendation, we’d say start with Mailgun. We use them ourselves
for the Rock site and have been very happy with the setup and deliverability to-date.
These services do require some minor changes to your organization’s DNS settings, but they walk you
through the process online to make it easier.
Configuring Deliverability Services
While each of the vendors listed above have their own custom API for sending emails, they also allow
you to send via SMTP using their servers. Once you get set up, they will provide you with the values
needed for the SMTP settings above.
Currently, the only email transport provided by Spark that supports these features is the Mailgun transport.
For more information on configuring this transport see the
Integrations chapter of
the Communicating With Rock guide.
Securing Rock
Many items in Rock can be secured to protect access to sensitive information. While we hope that you find the default security
configuration and roles to be a good start, it’s important that you understand how security works so that you’re able to configure
it in a way that makes sense for you and your organization.
Security Roles
While you can provide detailed security for every person individually, it's often tedious and problematic. Security roles,
on the other hand, are much more flexible and far less prone to error.
Tip
We highly recommend learning the Rock pattern for security before making changes or additions. It's always easier to swim
downstream than upstream, but you must first know which way the river is flowing before you dive in.
Having a well thought out strategy for security roles is critical. Too simple and individuals might have more rights than they need;
too complex and security will be difficult to maintain.
We've worked hard to lay a security foundation that makes sense for you to
build on. We strongly recommend you closely review the security roles that ship with Rock before you start setting up your organization’s
security. You can find those roles under Admin Tools > Settings > Security Roles.
Tip
Do you have an existing group whose members also need access to a particular page or item? You can
enable any group to also act as a security role. In the group viewer, simply check the group's
Security Role property and it
will show up in the security role lists.
Elevated Security Levels
Each security role has an
Elevated Security Level
setting. This setting is used by Rock to calculate a person's
Account Protection Profile.
There are three
Elevated Security Level
values to choose from.
- None: The role has no elevated security. This should be used sparingly,
and only for roles that don't grant access to any areas that could expose any part of
a person's information.
- High: The role has a low level of elevated security and doesn't grant
access to sensitive areas.
- Extreme: We recommend using this level for any new roles you create that
give access to anything inside Rock. This helps protect staff and volunteers from account
hijack attempts and makes it more difficult to perform merges on their
records.
Permissions
Wherever you see the
icon you can manage the security of the item being displayed. Clicking the icon will bring up the
Security Editor shown below.
Security Editor
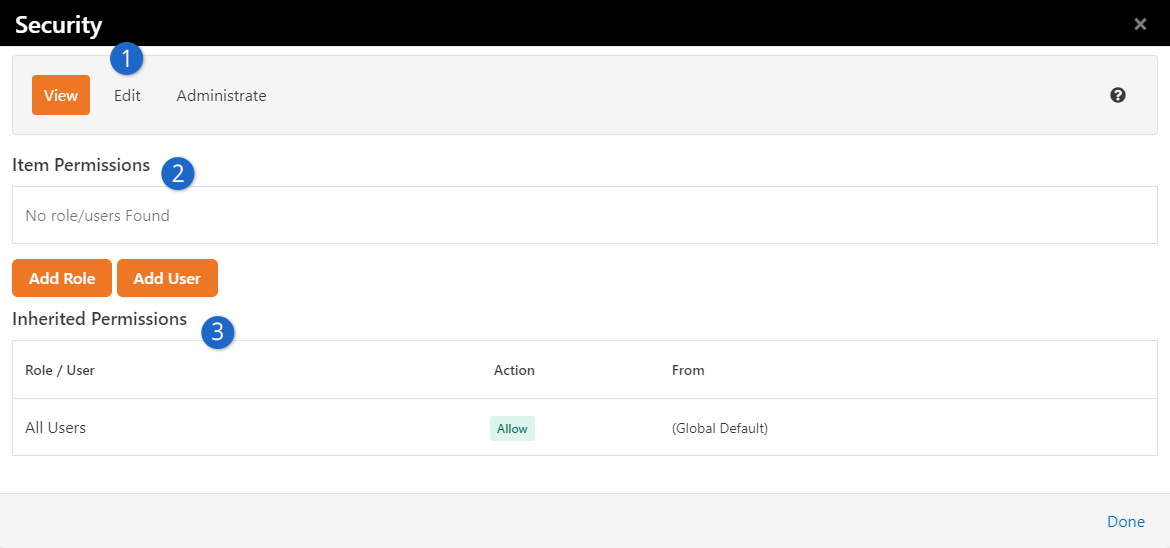
- 1Actions
- The first thing you’ll see is a tabbed list of the security actions available for the item. Typically,
these will be View,
Edit and
Administrate. You'll set
permissions for each of these actions.
- 2Item Permissions
- The Item Permissions area is a list
of the specific permissions defined for the item. If there are no specific permissions set for this particular
item, the list will be empty. In these cases, security is being inherited from its parent. But now we’re
jumping ahead...
- 3Inherited Permissions
- Most items don’t have permissions of their own. They inherit their permissions from their parents.
For the most part, you’ll only add Item Permissions
when you want to increase the security of the item. This is a very powerful concept. It keeps you
from having to constantly and consistently tweak the security of each item. It also allows you to
change the security of an item and let the change trickle down to all of its children.
Note
The Inherited Permissions list tells you which parent item has set the security.
This allows you to easily find the parent and fix any incorrect security.
Setting Permissions
When setting permissions, you'll add either an individual or, more commonly, a security role to the
permissions list with either Allow
or Deny access. The order of these
permissions is very important. The way the system works is that it starts at the top and works its way
down the list looking for a matching rule. The first rule that matches the logged in individual will
be implemented, either granting or denying access. Crafting the order of these permissions is important.
Let’s look at an example. First, we’ll look at a case where a page should only be viewed by staff members
(and not volunteers or other individuals accessing Rock).
Incorrect Permissions:
| Name |
Allow / Deny |
| All Users |
Deny |
| All Staff |
Allow |
The above setup might look correct at first because both roles exist with the proper access.
It’s true that staff should have access and other non-staff users should be denied. However,
remember that Rock works through security from the top down. Because Staff are also Users,
the system will stop at the “All Users | Deny” level and won’t allow access.
Correct Permissions:
| Name |
Allow / Deny |
| All Staff |
Allow |
| All Users |
Deny |
Now the logged in staff person will match on the first rule and be granted access. Processing
of the subsequent rule won't occur for this person, so even though the staff person is also
in All Users, they will still
be granted access. An individual without the All Staff
role will cause the system to keep checking down the list, where it will find a match at the
All Users level and deny access accordingly.
Verifying Permissions
There may be times when you want to view a quick snapshot of a person's security permissions. You can do this in the
Verify Security block, found in
Admin Tools > Settings > Inspect Security.
Verify Security Block
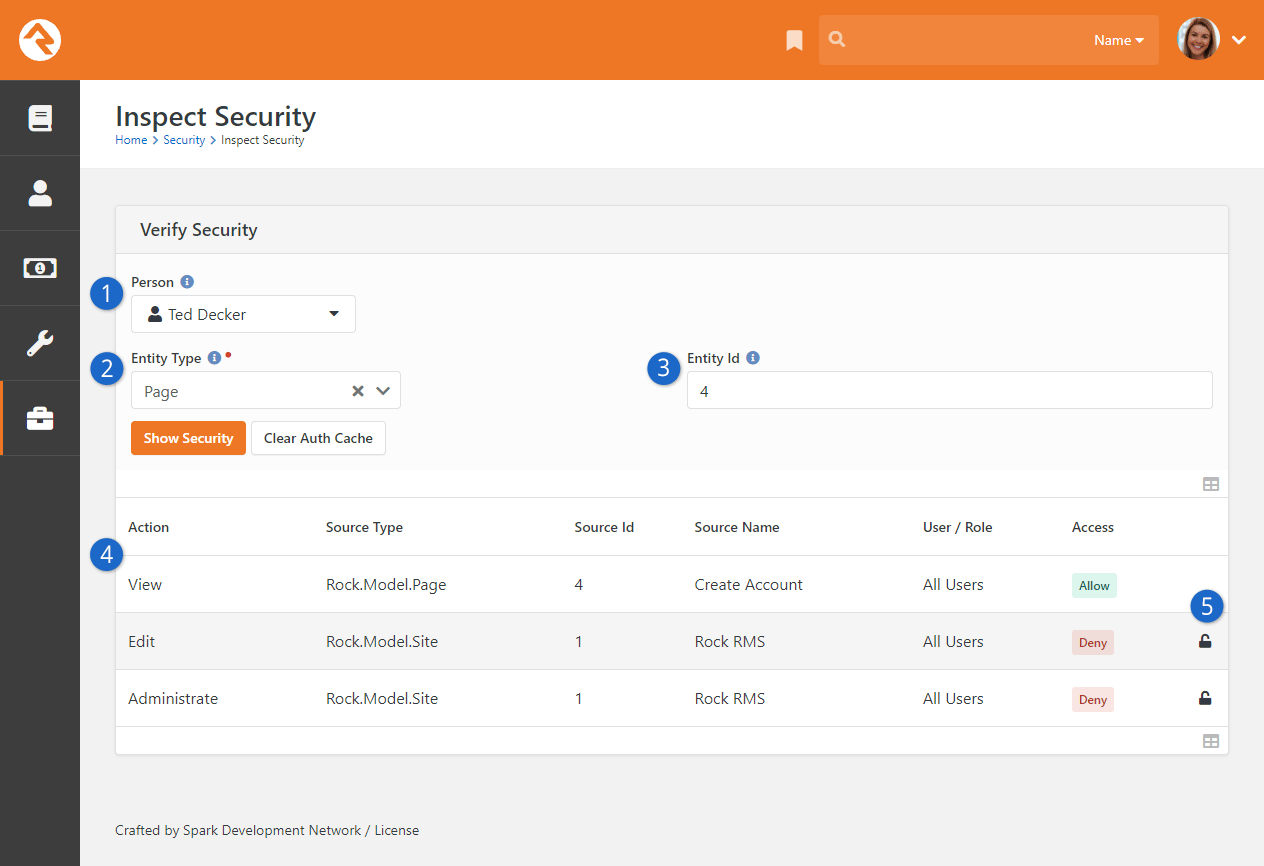
- 1 Person
- Search for the person whose security permissions you want to view.
- 2 Entity Type
- Select the entity type you want to verify. For example, if you want to view the security on a page, select 'Page'.
- 3 Entity ID
- This field is where you enter the Integer ID or Guid of the entity you want to view. For example, if you want to view
the security of the external homepage (which has an Id of '1'), type "1" in this field.
- 4 Security Permissions
- This is the list of security permissions for the person based on the search criteria.
- 5 Unlock Security
- This button allows you to quickly unlock security permissions.
This snapshot view allows you to do a couple of handy things.
First, it allows you to view the source of a person's effective security permissions.
If, for example, someone should have access to a particular page or function but doesn't,
the Verify Security
block allows you to quickly view where the Deny rule is coming from. Keep in mind that the
security permissions of particular entities (e.g., pages, groups, etc.) not listed here may
cause additional limits to the person's access.
Second, and perhaps more importantly, it allows you to restore your own permissions when
you accidentally lock yourself out. Don't be embarrassed; it happens to everyone. The
Verify Security block
allows you to quickly unlock your access without having to go into the database. Simply
click the
button.
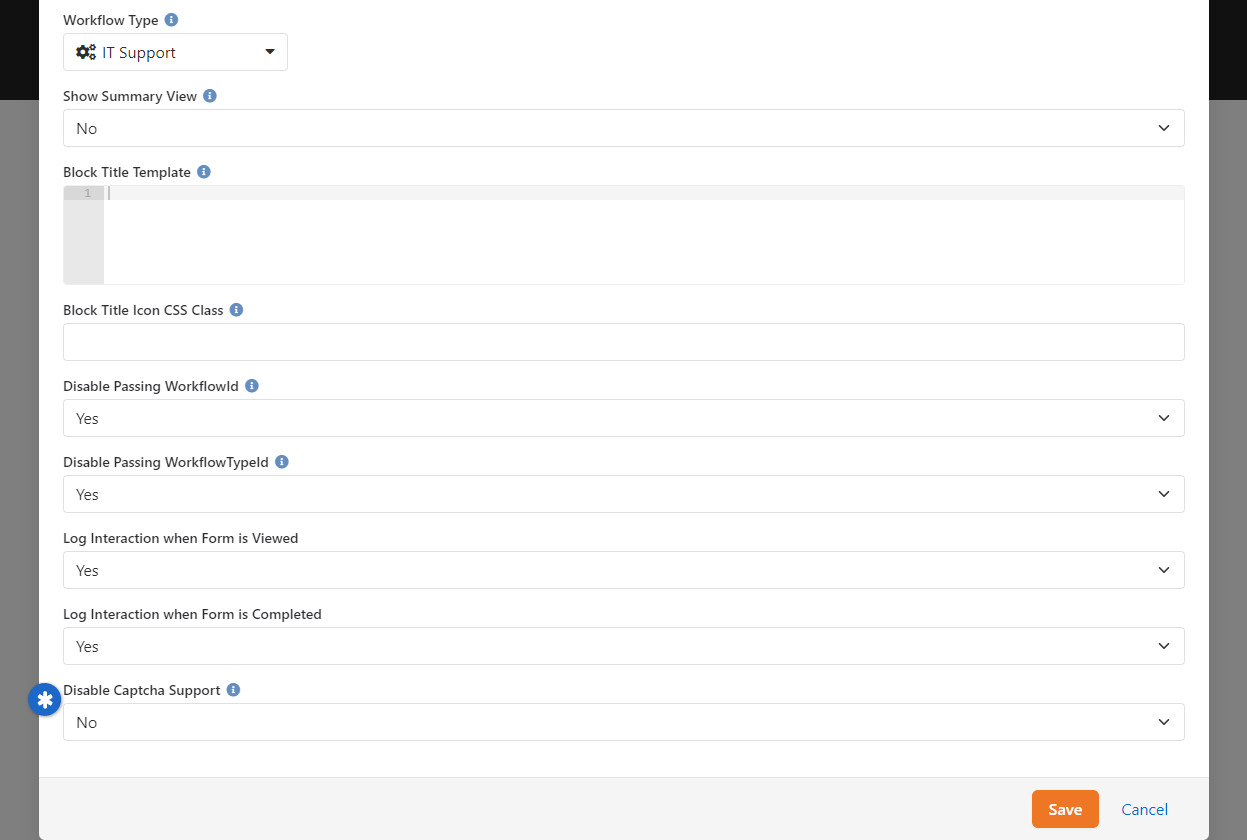
Rock Captcha
Captcha adds an extra layer of security to certain tasks, helping to ensure the actions are
performed by real people and not bots. This makes your online transactions more secure from
spam and fraudulent activities. In this chapter we’ll walk you through the simple steps to
use Captcha in Rock.
Rock Captcha
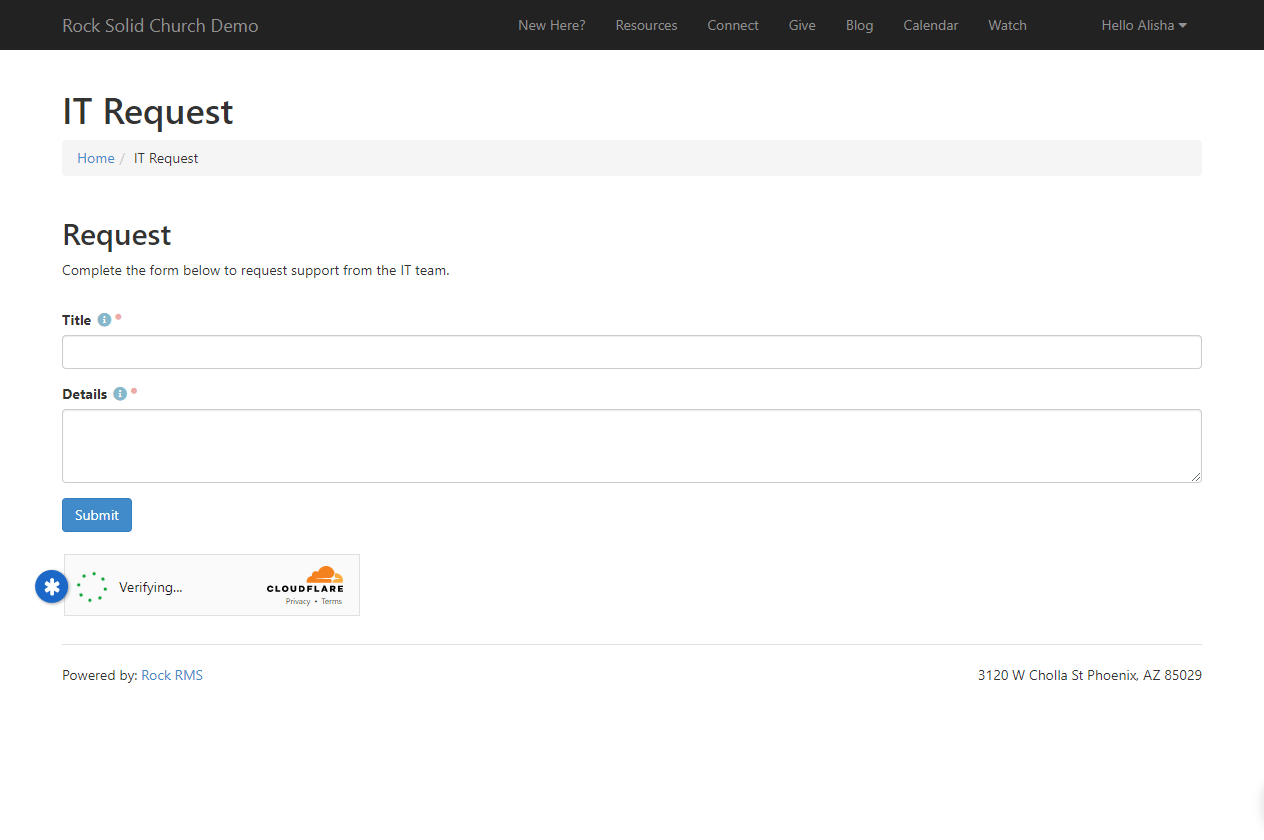
Using Captcha
There are several blocks that support Captcha, and more may be added in the future.
Pictured above is an example workflow entry block with Captcha enabled. Keep in mind
that the person will not always need to check that box. Often, the validation occurs
behind the scenes and the person won't have to do anything extra. We'll look at
different ways to configure this in the next section.
Use of Captcha is optional, though it is turned on by default. You can disable Captcha
by accessing the block settings for any block where Captcha is used.
Rock Captcha Block Setting
Below is a list of blocks that have Captcha support. Please note that this
list may expand to include other blocks. If you don't see Captcha on one of
these blocks, you may need to switch to the Obsidian version of the block
or to a more recent Rock version.
Blocks with Captcha Support:
- Workflow Entry
- Transaction Entry v2
- Utility Payment Entry
- Account Entry
- Forgot Username
- Change Password
- Family Pre-Registration
- Registration Entry
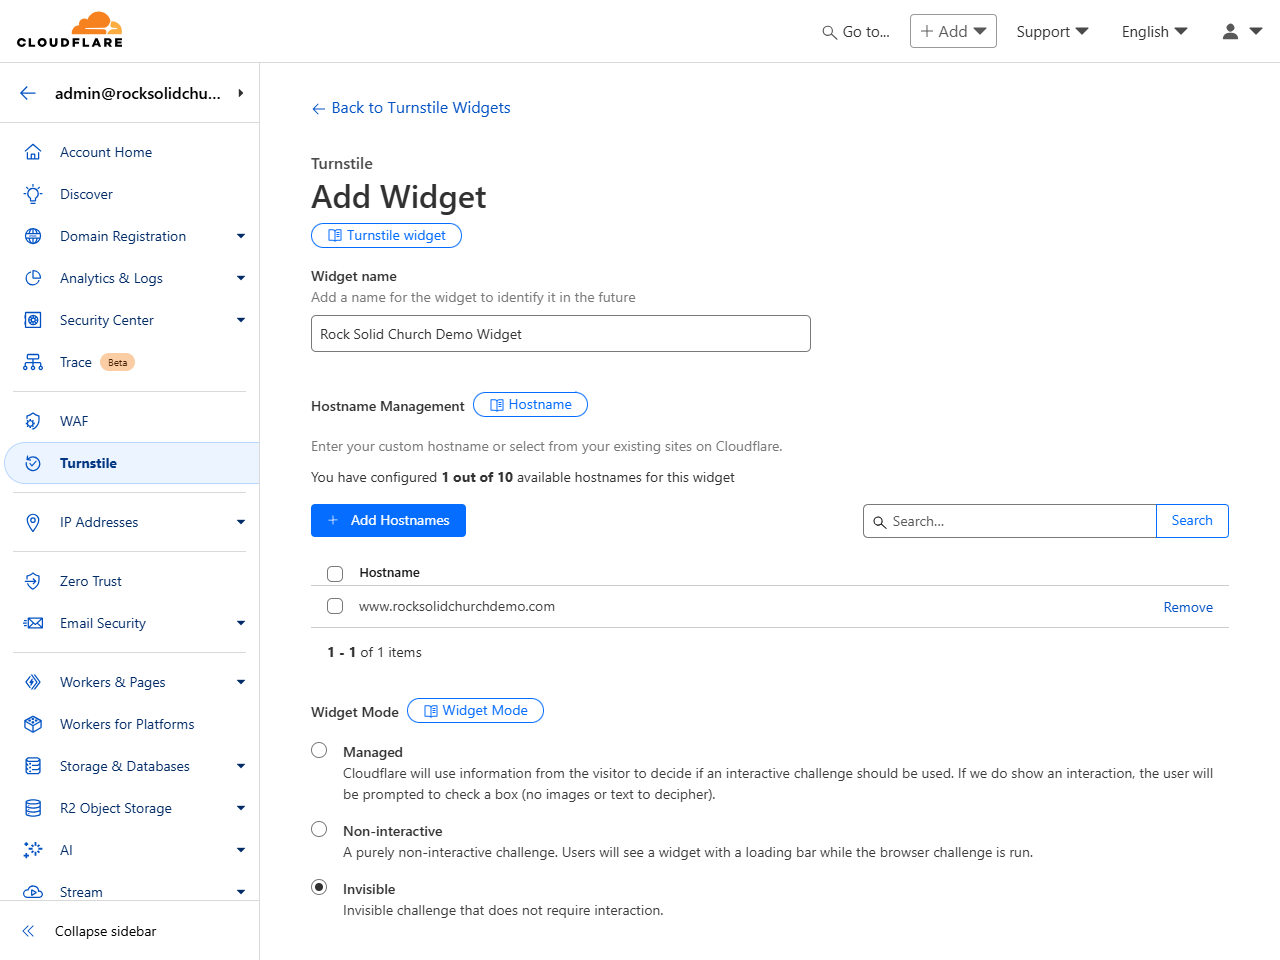
Configuring Captcha
You’re going to need a free
Cloudflare account to use
Captcha in Rock. Luckily the signup process only involves providing an email and creating a
password. Once you’re logged in and looking at your dashboard, select
Turnstile along the left.
You’ll need to click the “Add widget” button to get started, then fill out the short form
pictured below.
Add Widget
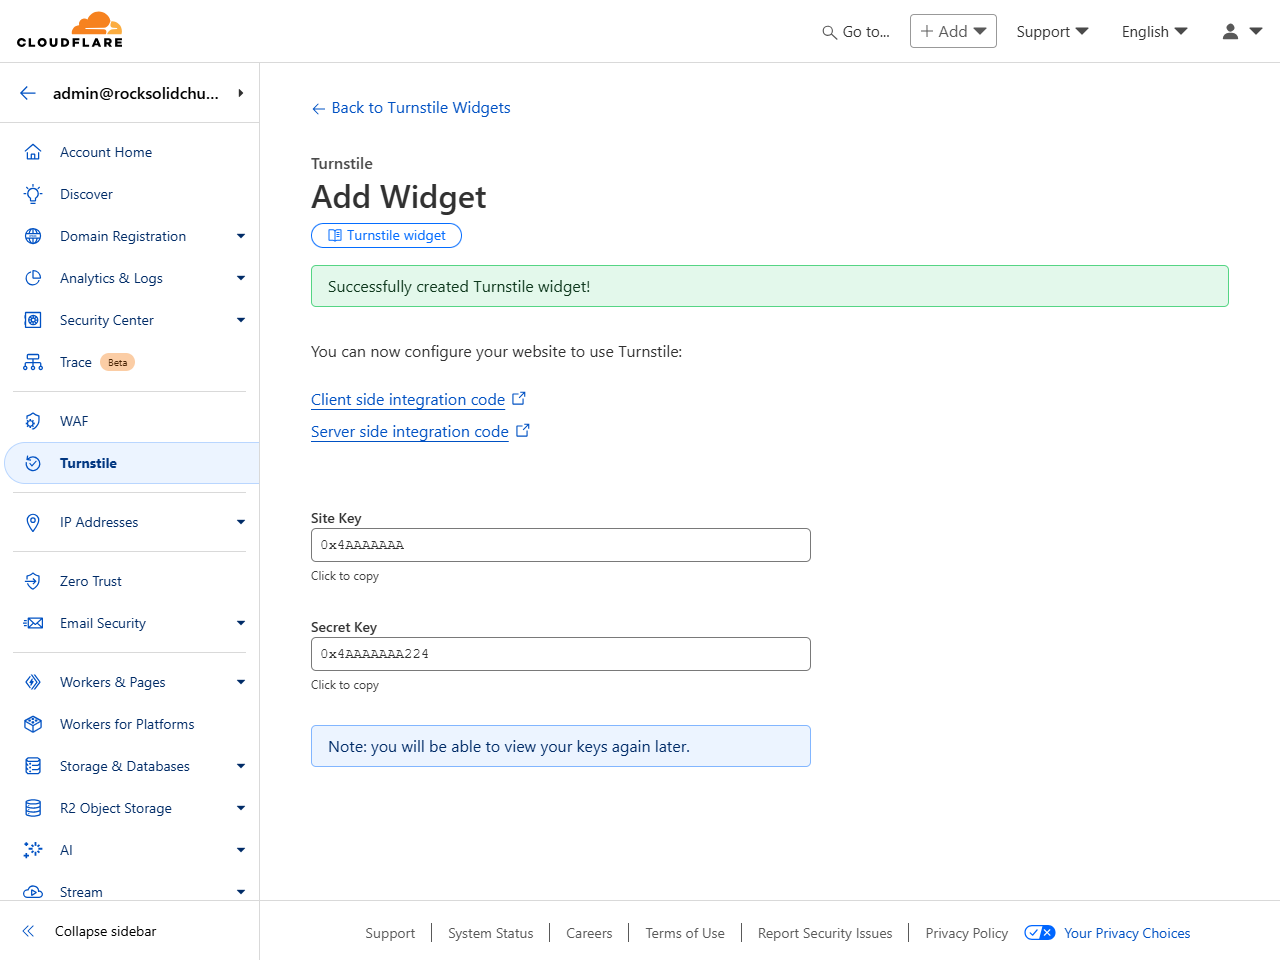
At the end of the process, you’ll see a
Site Key and a
Secret Key. Keep these handy because
they’ll both need to be copied into Rock.
Site Key and Secret Key
Back in Rock, navigate to
Admin Tools > Settings > System Configuration
Under the UI Settings panel, paste the two Keys.
Add Keys to Rock
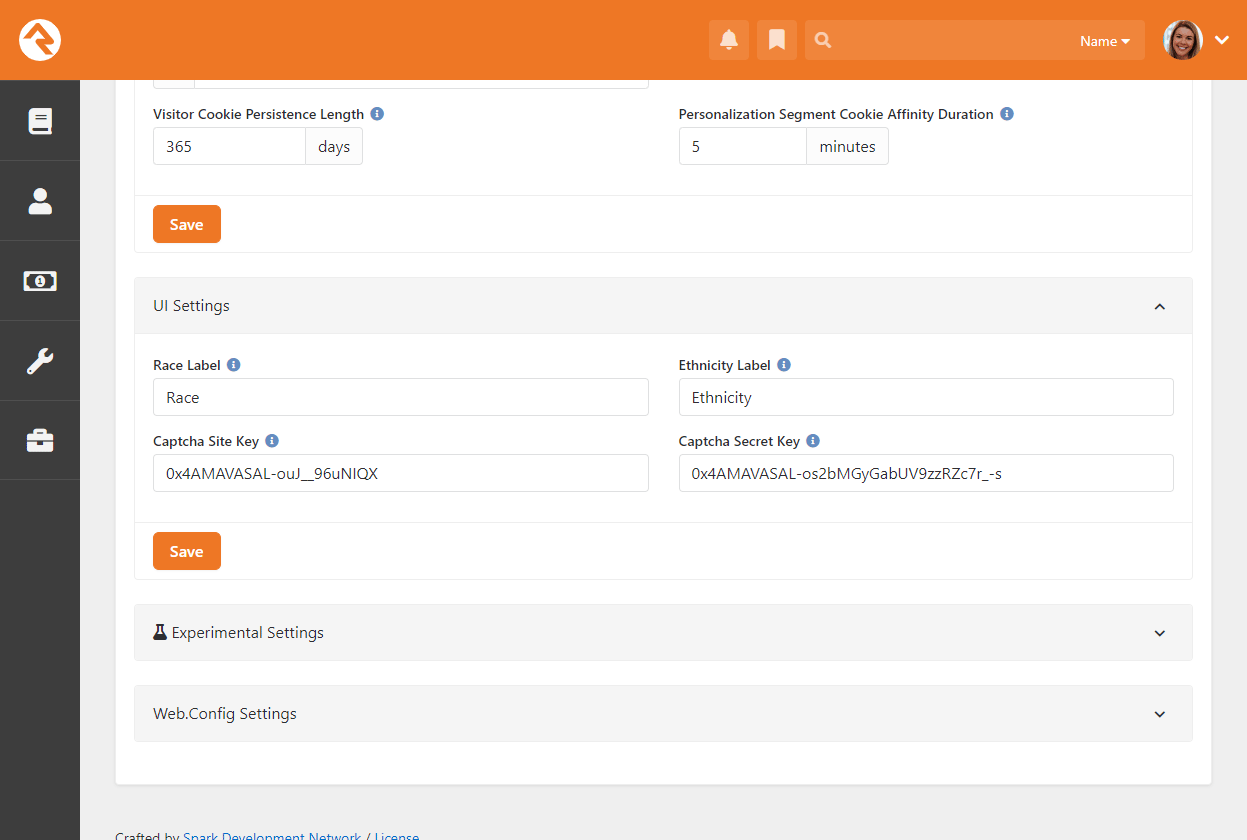
And that’s it! With your keys in place, the Workflow Entry and Transaction Entry v2 blocks
will automatically perform a Captcha validation when they’re visited.
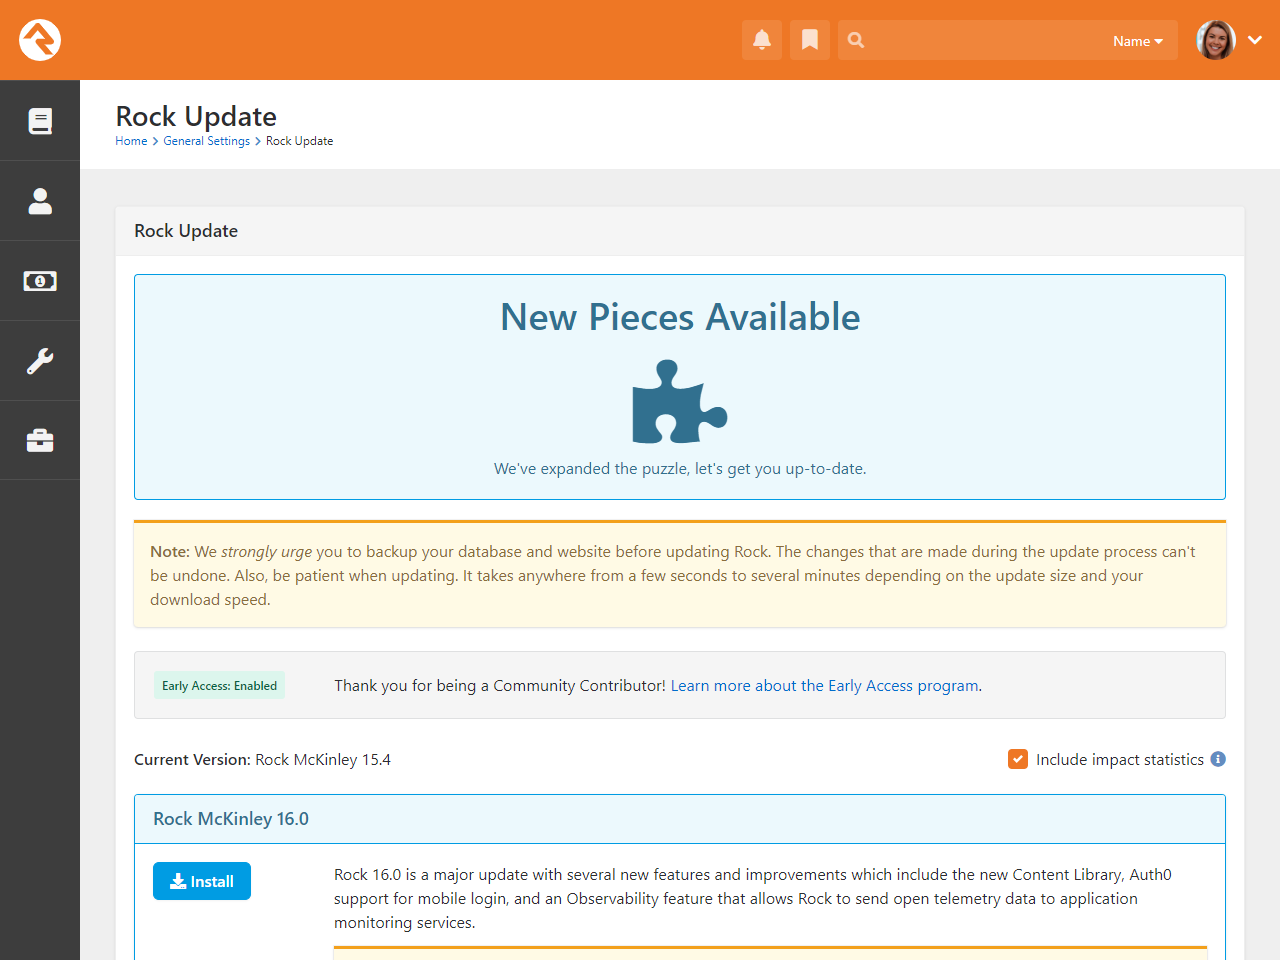
Updating Rock
We know how important Rock is to your organization. That’s why we dedicate so many resources to providing you with
timely bug fixes and a steady stream of new features. That’s also why we’ve built a sophisticated, yet simple,
update process.
The update screen can be found under:
Admin Tools > Settings > Rock Update.
From this screen your server will initiate a quick check to Rock’s server to see if there are any new updates available.
If there are, the updates and their descriptions will be displayed. Once you decide you’re ready, simply click the
Install button and Rock will do the rest.
Warning
Updates can't be undone, so be sure you have a backup of your system before installing the updates.
Rock Updates
Questions About Updating
- Do I have to update to the latest version?
-
Depending how often you update, you may see several updates available. You don’t necessarily need to
update to the latest and greatest version. You can update to any version you wish. Doing so will install
all of the previous updates up to that point.
- Can I skip a specific update?
-
No, updates are cumulative. You can't skip over a specific update or patch.
Data Integrity
With data coming into Rock from all directions, it can be a real challenge to keep it all clean, consistent and
accurate. To help you out with that, we've built tools that find and fix issues as they arise. You'll find these
tools under:
Tools > Data Integrity.
Data Integrity
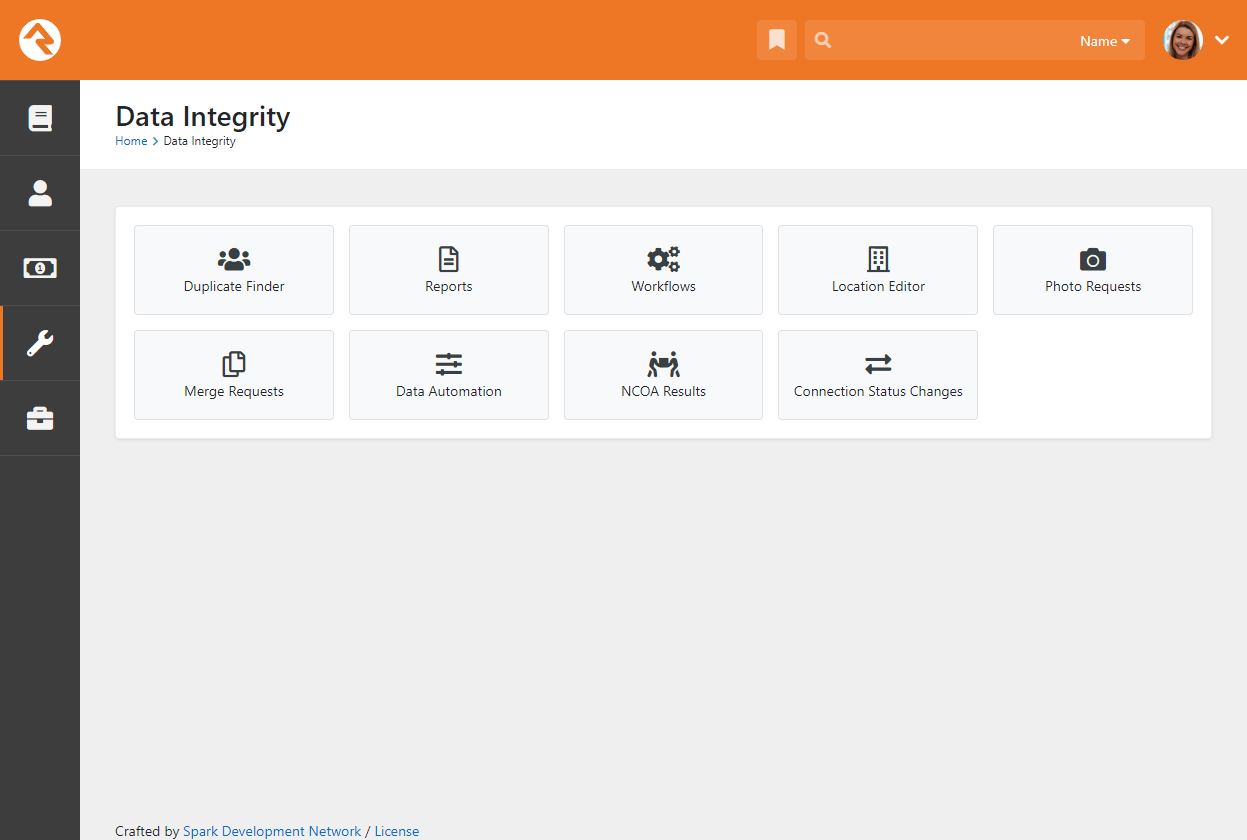
Only individuals in the Data Integrity Worker
security role will have access to these tools.
Let's look at each one in detail.
Duplicate Finder
The duplicate finder routinely goes through your database looking for
records that could be duplicates. When it finds possible matches, it
scores them and lists them for you under:
Tools > Data Integrity > Duplicate Finder.
Duplicate List
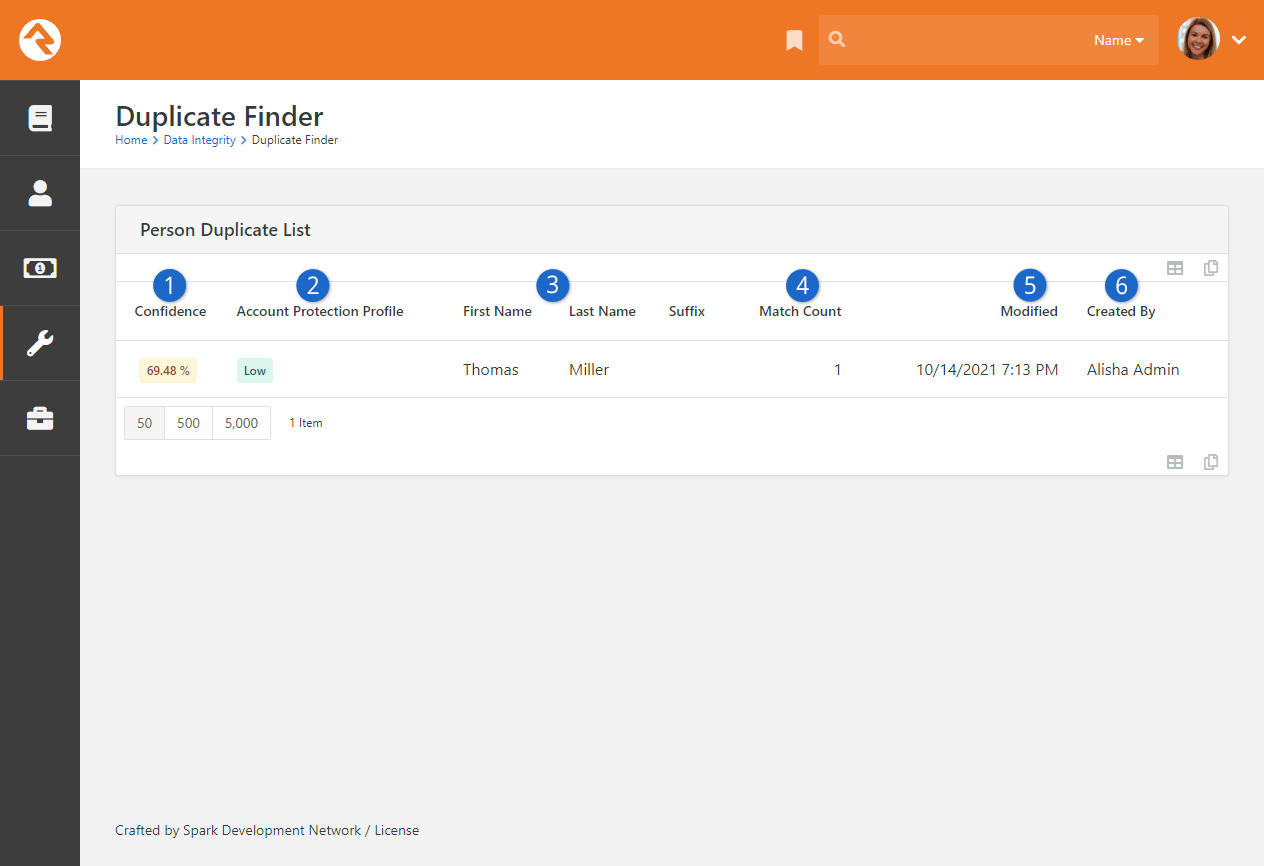
- 1 Confidence
- Indicates the likelihood that this is a duplicate record.
- 2 Account Protection Profile
- The
Account Protection Profile
level assigned to the record. Records with a High or Extreme level may require staff with additional security
to perform the merge.
- 3 Name
- The first and last name of the individual.
- 4 Match Count
- The number of possible duplicate records for this person.
- 5 Modified
- The date and time the duplication record was modified. This is
another data point to help you determine if a record is a duplicate.
- 6 Created By
- The person (or possibly application) who created the duplicate
record. This helps determine how the duplicate may have come into
existence and which data point might be more accurate.
Clicking on a row will take you to the duplicate detail screen.
Duplicate Detail

The top row represents the source record, and the rows below represent
possible duplicate records. If any of these rows are duplicates, you
can select them and select the icon
in the grid footer to merge them. Each record has a series of buttons
to the right. These buttons perform the actions defined below.
-
Opens the Person Profile page
for this individual in a new window.
-
Tells Rock that this record is definitely not a duplicate of the record above.
-
Tells Rock that there's currently no way to be sure if this record is a duplicate of the one above.
Selecting this will keep Rock from showing it as a possible duplicate until more information is available.
If you're uncertain whether two records are duplicates or not, you can simply decide not to do anything yet.
As more data is added to the records, Rock will update the match scores to reflect a more accurate prediction.
Detail-minded admins might be interested in how the percentages are calculated for
duplicate records. The out-of-the-box logic compares two records based on a points system.
Points are awarded based on the following factors:
- Email Match (4pts)
- Partial Name Match (First two characters of the first name plus full last name) (1pt)
- Full First Name Match (3pts)
- Full Last Name Match (3pts)
- Suffix Match (4pts)
- Cell Phone Match (4pts)
- Non-Cell Phone Match (2pts)
- Address Match (2pts)
- Birthday Match (3pts)
- Gender Match (1pt)
- Campus Match (1pt)
- Marital Status (1pt)
A percentage is then calculated by comparing the number of points scored to the total possible points.
Reports
There are several cleanup
reports that have been created to help you identify records that need
your attention. Feel free to add your own reports here. Each report
that ships with Rock is documented below.
| Report Name |
Description |
| Self-Inactivated Individuals |
This report lists individuals who have inactivated
themselves from the database. This usually comes from
using the unsubscribe link at the bottom of bulk emails.
You'll want to go through this list occasionally to
inactivate the other individuals in their families. You'll
also want to read through the inactive reasons to get a
pulse on why individuals are leaving the organization. |
| Pending Individuals |
When someone registers on the website, their individual
record status is set to Pending.
This allows you to view the record and determine if it's
a duplicate record. Once you go through them all, you'll
want to bulk update their statuses to Active. |
| Individuals with Duplicate Phone Numbers |
This report finds different individuals who share the same phone number.
You can also use this report to identify individuals who have the same phone
number listed more than once on their profile. |
| Individuals with Duplicate Emails |
Like the duplicate phone numbers report, this report finds different
individuals who have the same email address. This may be common, especially
for families. |
Workflows
Workflows can be set up to help automate the process of data integrity.
Feel free to add your own. We've outlined the ones that come with Rock
below.
| Workflow Name |
Description |
| DISC Request |
This drives the DISC assessment request workflow. |
| Person Data Error |
This is the workflow that's accessed from the
Actions
list of the Person Profile page. |
| Photo Request |
This drives the photo request workflow. |
| Request Assessment |
This is the workflow that's accessed from the
Actions
list of the Person Profile page. |
See our Blasting Off With Workflows
guide for more information.
Location Editor
The location editor allows you to edit and clean locations in your database. Because there are so many locations
in your database (think every address) the list will only show items that match the filters you provide. A common
use for this page is to edit the geocoding for a specific address. There's a helpful filter to show you addresses that
are not geocoded.
Location List
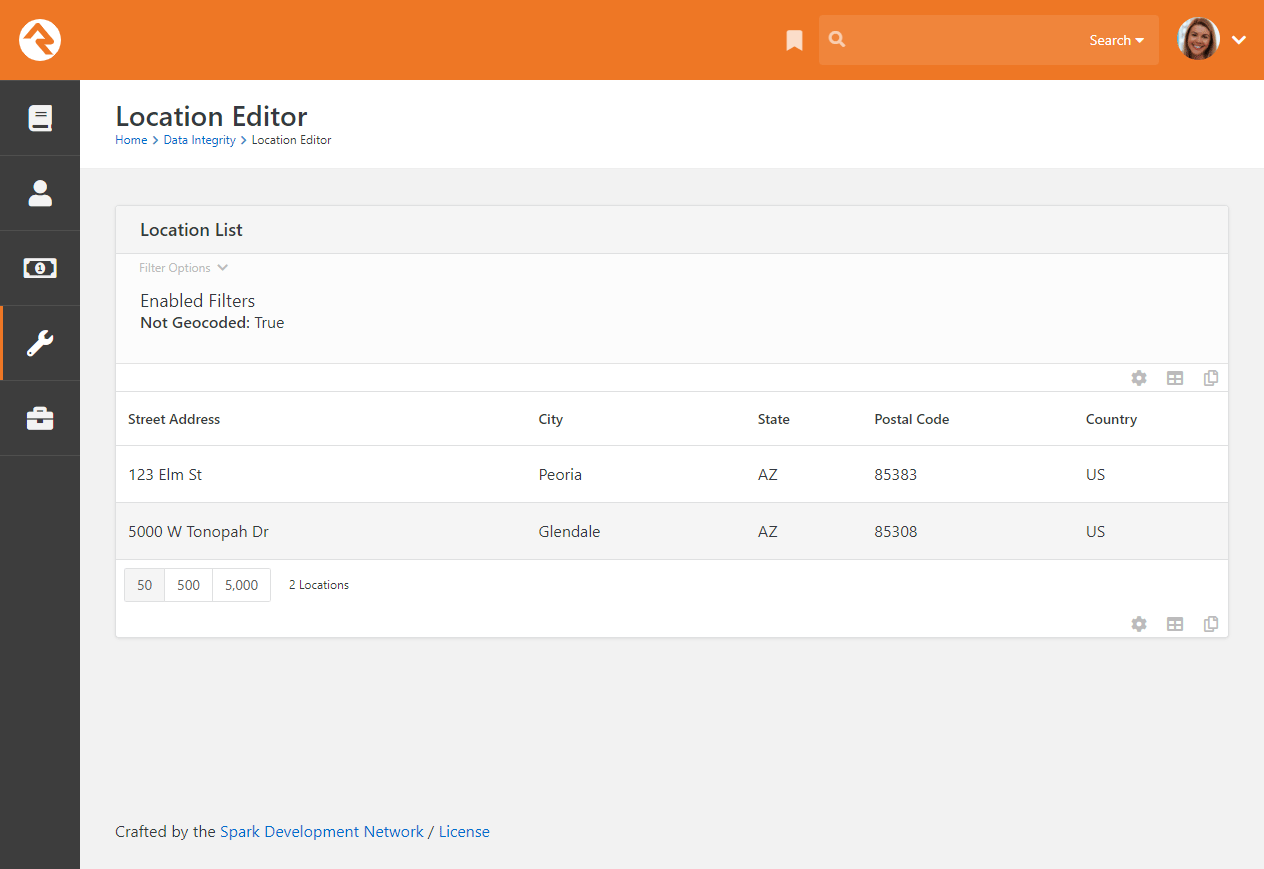
You can select an address to view or edit its details.
Location Editor
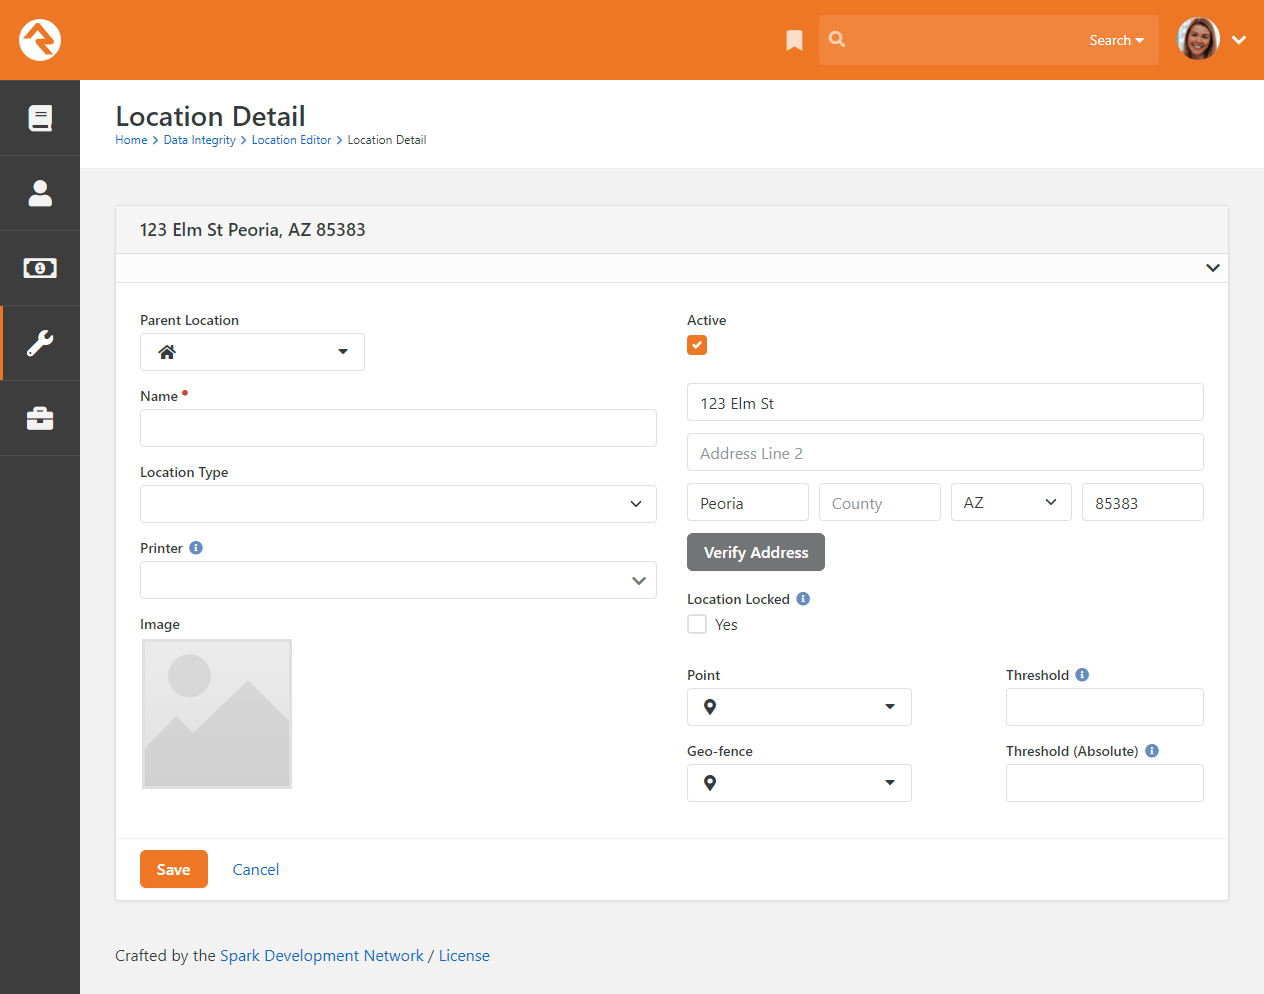
Photo Requests
When new photos are submitted by your organization's members they will be displayed here.
This allows you to review the photos and ensure that they are appropriate. You can read
more about this process in the
Person and Family Field Guide.
Merge Requests
If a staff member without the needed security tries to merge person records, then a merge request will be
created and listed here. By default, you won't have security access until you're listed on the
Merge People page with read rights.
Data Automation
Rock ships with a powerful Data Automation
job that automatically updates person and family records. This makes things a lot easier for you. The job
settings are configured here on the Data Automation
page, located at:
Tools > Data Integrity > Data Automation.
Data Automation Settings
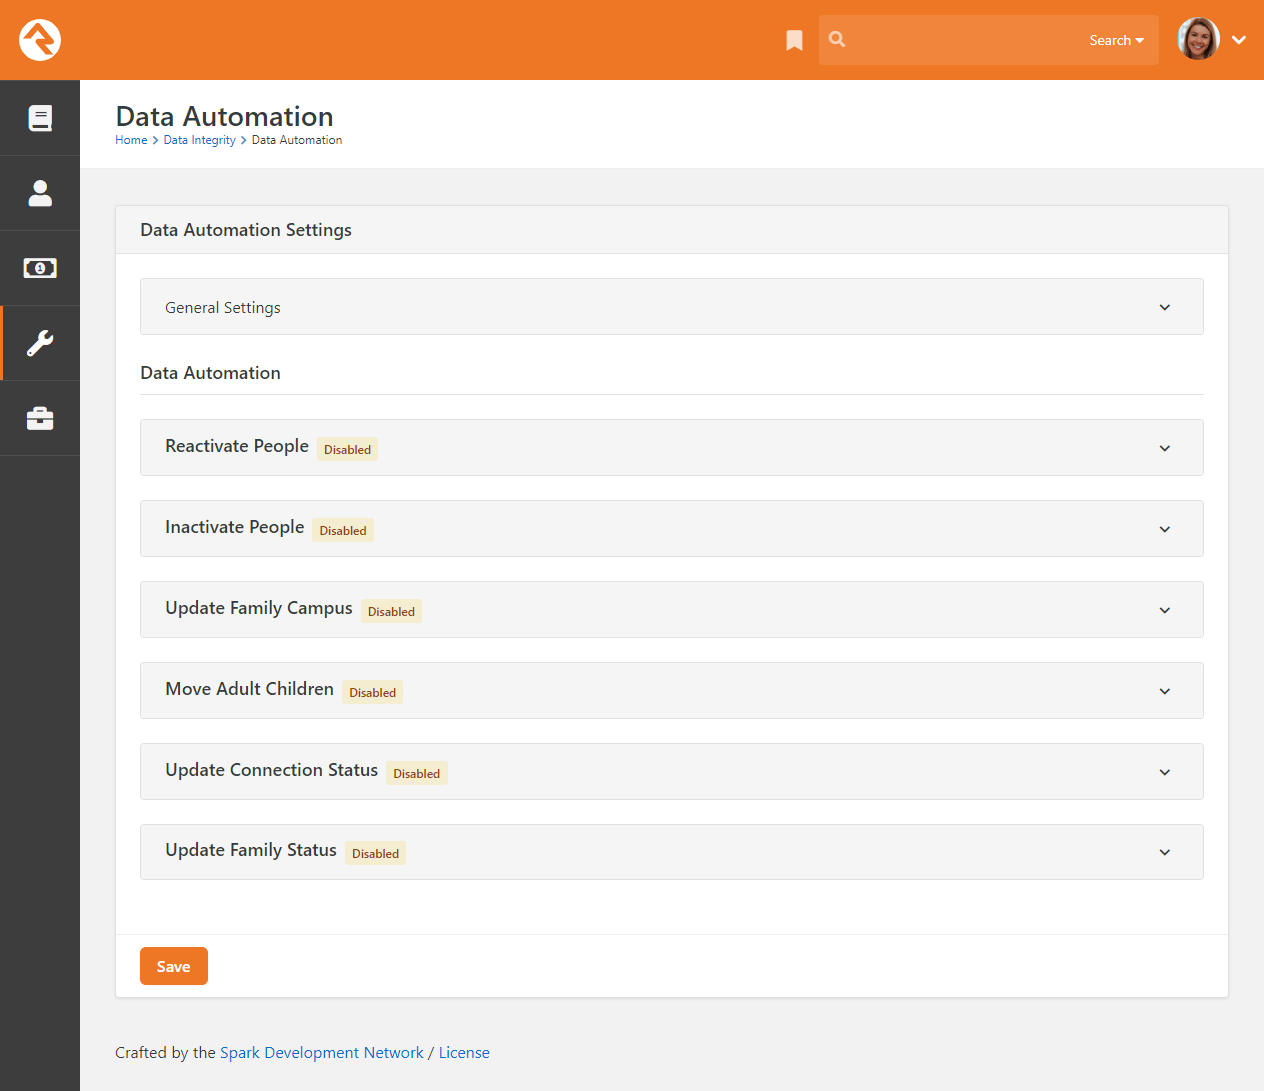 The Data Automation job uses these settings to update person and family records in the following ways:
- Reactivating individuals who are currently inactive
- Inactivating individuals who are currently active
- Updating which campuses families are associated with
- Moving adult children to their own families
- Updating Connection Status values
- Updating Family Status values
Updates are made to records when the Data Automation
job runs. By default, the job is configured to run every Tuesday morning, but you can change that time to what works best
for your organization. Also, note that the job is active by default, but the data automation types listed above are all
disabled. The updates will run automatically once the settings are enabled.
OK, now that you have an overview of the job, let's take a closer look at the different types of data automation included in the
Data Automation Settings screen.
Reactivate People
When the Reactivate People option is enabled, every
person in the database who matches any of the following criteria (according to your selections) will
have their record status updated from 'Inactive' to 'Active'.
- Any family member has made a contribution in the last: If any family member in
any of the person's families has made a contribution during the selected time period.
- Any family member has attended a group that is considered a service in the last: If there's an
attendance record associated with any family members in any of the person's families, and if the attendance is for a
group of a type with the Weekend Service option set to
'true'.
- Any family member has registered for any event in the last: If any family member in
any of the person's families has registered for an event during the selected time period.
- Any family member has attended a group of this type in the last: If there's an attendance record
associated with any family member in any of the person's families, and if the attendance is for a group that's of any
of the selected types.
- Any family member has logged into Rock in the last: If any family member
in any of the person's families has logged into Rock within the provided time period.
- Any family member has submitted a prayer request in the last: If a prayer
request has been submitted by any family member in any of the person's families during the selected time period.
- Any family member has a new value for any of the following person attributes in the last: If any of
the selected person attributes have an updated value for any family member in any of the person's families during the
selected time period. The person attributes are based on the
ModifiedDateTime of the attribute value.
You can choose to ignore specific attributes by adding the
Key of the attribute to the
Data Automation Ignored Person Attributes
Defined Type.
- Any family member has an interaction of the following type in the last: If there's an
interaction record for any of the selected types for any family member in any of the person's families during the selected
time period.
- The person is in a specified data view: If the person is included in the selected data view.
- Exclude any person in a specified data view: This option acts as an override. Even if a person
meets any of the previous criteria, if they are included in this data view, their record won't be updated.
When the Reactivate People automation runs, the Inactive Reason and
Inactive Note fields for each person are cleared.
Allow Automated Reactivation
There may be scenarios where you don't want certain people reactivated even if they meet the conditions
you've configured. For instance, someone might have given in the last 90 days but has recently told you
they've moved or will no longer be attending. For cases like these you can set
Allow Automated Reactivation
to "No" for certain inactive reasons (e.g., Moved, No Longer Attending) in the Inactive Record Reason
Defined Type under
Admin Tools > Settings > Defined Types > Inactive Record Reason.
This will prevent automatic reactivation for any people with the given inactive reason.
Inactivate People
When the Inactivate People option is enabled, every person
in the database who matches all of the following criteria (according to your selections) will have their record
status updated from 'Active' to 'Inactive'. Each person who's inactivated will also be inactivated in most of the groups to
which they belong, including security roles. Once these people have been inactivated in their groups, there's no process to revert
that change.
- The number of days that the records must be older to get considered for Inactivate process:
This setting helps ensure that brand new individuals aren’t made inactive only because they haven’t had a chance
to engage in any activities yet.
- No family member has made a contribution in the last: If no contributions have been made
by any family members in any of the person's families during the selected time period.
- No family member has attended any group type that takes attendance in the last: If there are no
attendance records associated with any family members in any of the person's families.
Any specific group types whose attendance should be ignored by the automated process can be specified in the
Ignore any attendance in the following group types
field.
- No family member has registered for any event in the last: If there are no
event registrations for any family member in any of the person's families within the provided time period.
- No family member has logged into Rock in the last: If there are no Rock
logins for any family member in any of the person's families within the provided time period.
- No family member has submitted a prayer request in the last: If no prayer requests have been
submitted by any family members in any of the person's families during the selected time period.
- No family member has a person attribute value updated in the last: If no person attribute values
have been updated for any family member in any of the person's families during the selected time period.
The person attributes are based on the ModifiedDateTime
of the attribute value. Specific attributes you want the automated process to ignore can be selected in the
Ignore any updates to the following attributes field.
- No family member has an interaction of the following type in the last: If there are no
interaction records for any of the selected types for any family member in any of the person's families during
the selected time period.
- The person is not in the following data view: If the person isn't included in the selected data view.
This option can be used to make sure that certain people, such as staff members, are never inactivated.
When the Inactivate People automation runs, the
Inactive Reason for each inactivated person is updated to 'No Activity' and the
Inactive Note field is updated to
'Inactivated by the Data Automation Job on mm/dd/yyyy'.
Any person who's inactivated will also be inactivated in all of the groups they belong to, except for those that have a
group type with the Don't Inactivate Members option selected.
A Note of Caution
Enabling the Inactivate People automation could have pretty
significant ramifications if the options aren't configured correctly. For example, if only one criterion is selected,
everyone who doesn't meet that one criterion will be inactivated. For this reason, it's best to select all
of the criteria so a person has to match all of the options in order to be inactivated.
Update Family Campus
The Update Family Campus option is available
only if you have more than one campus.
When the Update Family Campus option is enabled, the
attendance for every family will be evaluated. If the family is attending or giving to a campus other than the one that's
currently configured for the family, the campus for the family will be updated. Let's look at how this works.
First, the Data Automation job evaluates the attendance records at a specific location for all members of the family in
question to determine if that location has the greatest number of attendance records for the family. Next, the job looks
at all of the contributions to campus-specific accounts made by members of the family, to determine if that campus has
the greatest number of contributions. Finally, the job uses the following settings to help determine if the campus should
be updated:
- Calculate campus based on the most family attendance to a campus-specific location in the last: Determines
how far back attendance records should be evaluated. You can optionally exclude specific schedules from being used in this
determination. You can also specify how many times a person should attend a campus before having their family campus updated.
- Calculate campus based on the most family giving to a campus-specific account in the last: Determines
how far back transaction records should be evaluated.
- If the calculated campus for most attendance and most giving are different: Determines which campus to
use if the campus to which the family gives the most isn't the same campus the family attends the most.
- Ignore any family that has had a campus update in the last: If the campus for a family has been updated
within the selected number of days, the DataAutomation job will ignore the family.
- Ignore any update that would change campus: There may be scenarios where a family attends or gives to a
campus other than the one with which they are associated. Exclusions can be added in this field to make the DataAutomation
job ignore any specific campus changes based on attendance and/or giving.
Move Adult Children
When the Move Adult Children option is enabled, the
DataAutomation job processes people who have a child role in one or more families, but also are of an "adult" age. The
default adult age in Rock is 18. The job processes one person (not a group member) at a time. For each person, the job looks
at all of the families that person belongs to and their role in each family.
- If the person is already an adult in any family, then they won't be added to any additional families, but they will be
removed from all families where they are a child.
- If they are currently not an adult in any family, the job checks if they are the only person in any of their families.
- If they are in a family by themselves, the person will only be updated as an adult in that family and the job will
remove them from any other family where they are a child.
- If they are not an adult in any family and are not the sole member of any family, a new family will be added, and
the person will be added to that family as an adult. The person will also be removed from all other families where
they are a child.
The job considers the following options:
- Should children only be moved if they have graduated?: If this option is checked, the job will first look
at the graduation year for each person considered. If they don't have a graduation year, they won't be moved. If they
have a graduation year in the future (according to the Grade Transition Date and the person's graduation year), they won't
be moved.
- The age a child should be considered an adult: The age to consider a child an adult. The default setting
is '18'.
- An optional known relationship that should be added between the new adult and their parent(s): You can add an
optional relationship for the other adults in the original family to have with the updated person. The recommended setting, if
you use this, is "Parent".
- An optional known relationship that should be added between the new adult and their sibling(s): You can add an
optional relationship for the siblings in the original family to have with the updated person. The recommended setting, if you use
this, is "Sibling".
- Should the new adult's home address be the same as their current family?: Check this box if
the updated person's new family address should be the same as the Home address of the original family. The checkbox is selected
by default.
- If the new adult does not have a home phone, should they use same number as their parent?: Check this box
if the updated person's Home phone number should be the same as the Home phone number of the original family. The checkbox is
selected by default.
- The workflow type(s) to launch for each person that is processed: Indicate any optional workflows that should
be triggered for each person who's updated. The updated person will be set as the workflow's Entity. If the workflow has an
OldFamily and/or
NewFamily attribute, the job will set those attributes to
the old/new family for the person.
- The maximum number of records that should be processed at a time: Set the maximum number of people to process
on each run of the Data Automation job. The default setting is '200'.
The job also considers the "Lock as Child" option in the Edit Person Advanced Settings.
If this option is selected on the person, they won't be made an adult by this job.
Update Connection Status
When the Update Connection Status option is enabled, you can
update connection status values based on one or more Data Views. The status is set to one of the values listed below if the person
meets the conditions of the data view.
- Member
- Attendee
- Visitor
- Participant
- Prospect
Update Family Status
When the Update Family Status
option is enabled, you can update family status values based on one or more Data Views. The status
is set to either Participant
or Unknown if the family meets
the conditions of the data view.
General Settings - Gender AutoFill Confidence
Included in the General Settings section of the
Data Integrity Screen is an optional DataAutomation
task to autofill gender. This task looks for individuals with an unknown gender and attempts to set the correct gender
based on the person's first name. The process uses the minimum confidence level (think of this as an accuracy rate)
entered in the Gender AutoFill Confidence field to
automatically set blank genders while running the Data Automation service job. If the number is set to 0, genders won't
be automatically determined. If the number is set to 99.9% (the default setting), only names with genders matching
that 99.9% confidence level will be determined. If the individual is a child, the job checks the likely match for gender
against the minimum confidence level. If the likelihood of finding a match is greater than the confidence level, the
gender is updated. Otherwise, it's left unknown. Adults won't autofill with a gender that's already taken by another
adult in the same family.
National Change of Address
The National Change of Address (NCOA) list is a database that the United States Postal Service
maintains to reroute your mail to a new address when you move. In other words, it’s a big list
of official address changes.
What does that mean for your organization? As you’ve probably experienced, people aren’t always
very diligent about letting you know when they move. Even if you notice someone has been absent,
it could be that they’re on vacation or have had a change to their work schedule.
Whatever the circumstances may be, as a Rock admin you want to ensure your data is clean and up
to date. The NCOA service helps you do that by comparing addresses in your system with their list
of address changes.
NCOA Processing
To get your addresses updated and formatted you'll need to go to
Tools > Data Integrity > NCOA.
If this is your first time there won’t be any data there, but either way you’ll need to click
the Process NCOA button near
the top-right.
Access Processing
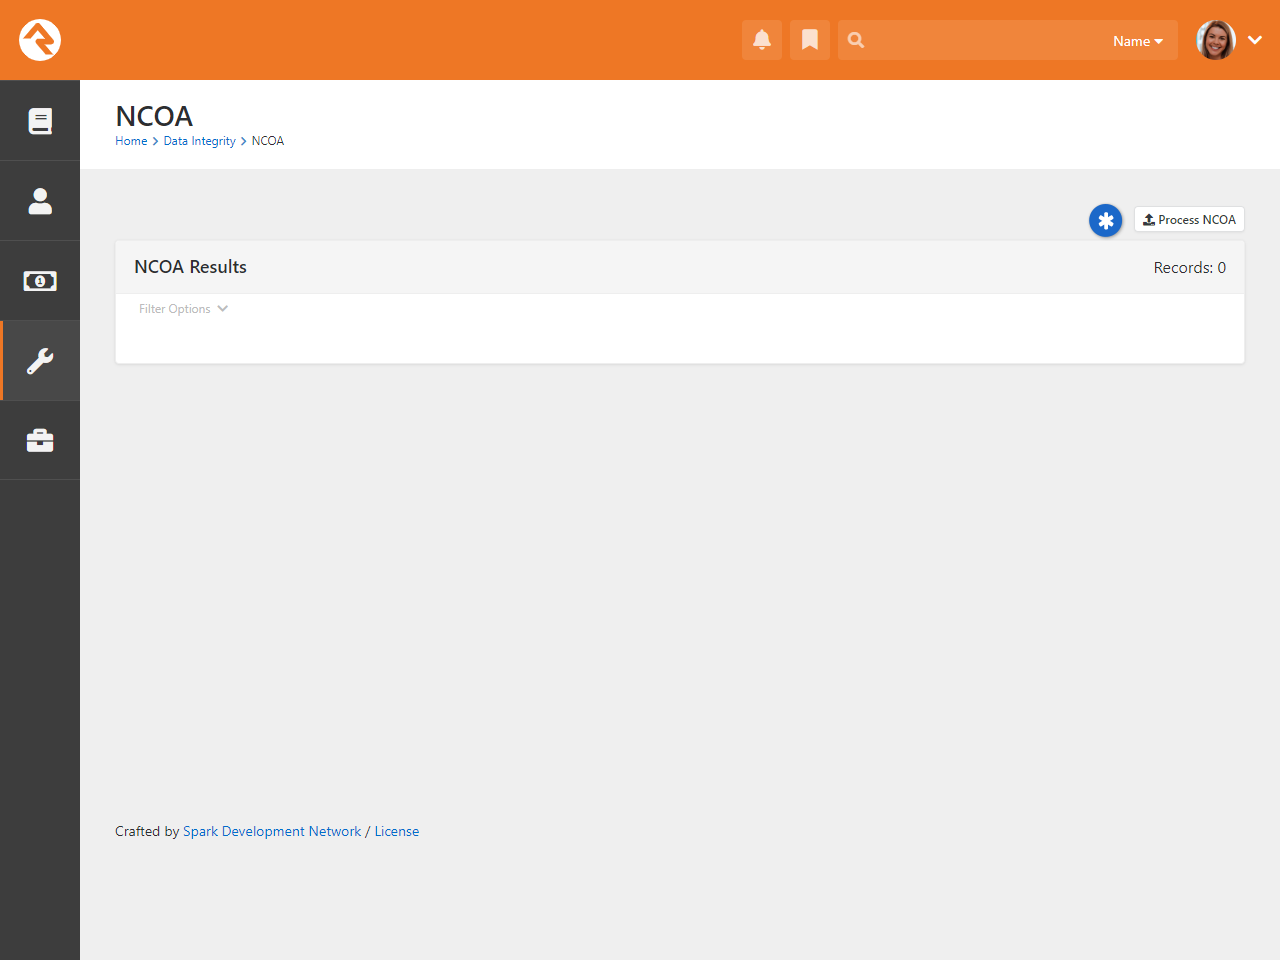
You’ll arrive at the page pictured below. This is where you create a file of people and addresses
to send to NCOA. This is also where you’ll upload the results of NCOA’s processing back into Rock,
which we'll see later.
Rock NCOA Processing
- 1 TrueNCOA Registration
- Click this link to sign up with
TrueNCOA
if you haven’t already. This step is required before you proceed.
- 2 Step 1: NCOA Export Tool
- You’ll need to have a Data View that returns people in-hand before you can
complete the first step. Once you’ve selected your data view, simply click
Export File at
the bottom of the panel. This will generate a file containing the people in your
Data View.
- 3 Step 2: NCOA Results Uploader
- This is where you’ll upload the processed file from TrueNCOA. We’ll circle back
to this at the end.
After you’ve selected a Data View and clicked
Export File,
you’ll see a message at the bottom of the screen with a link to
TrueNCOA,
where the process will continue.
Record Minimum
If fewer than 100 records are returned by your Data View, you won’t be able to proceed
with the export.
If you’re curious, the file Rock produces contains the columns listed below. You don’t
need to know this, but it is what you should expect to see if you open the file.
- PersonId
- PersonAliasId
- FamilyId
- LocationId
- FirstName
- LastName
- Address Line 1
- Address Line 2
- City
- State
- PostalCode
- Country
Once you’re in TrueNCOA, you’ll need to upload the file that you just downloaded from
Rock. TrueNCOA gives you options for how to upload the data and shows previous files
if any exist.
When the file upload completes, you’ll see a preview of the data that will be processed.
Click the Continue
button to proceed. Your next step will be to set the mapping. This takes the fields from
Rock and maps them to corresponding fields in TrueNCOA where applicable. If there isn’t a
direct equivalent, select
Pass-Through
as pictured below.
NCOA Field Mapping
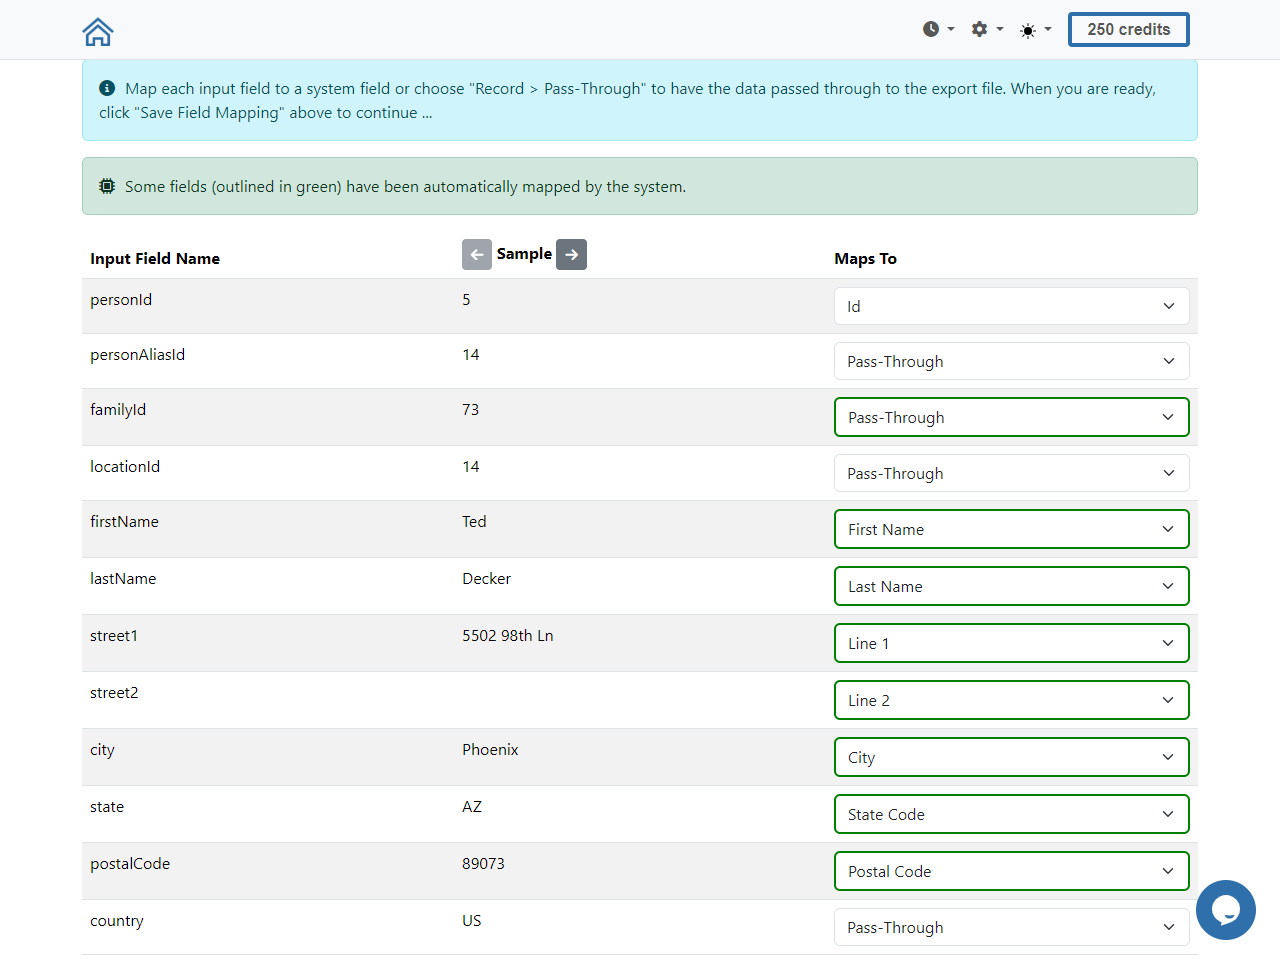
Updating the Field Mapping
Your mapping should pretty much look identical to what's pictured above.
The default mapping that TrueNCOA provides will need to be changed in most cases.
When the mapping is completed, you’ll proceed to the next page to confirm everything
looks good, or to go back and make corrections if needed. Once you’ve confirmed you’re
ready, click the Continue
button near the top of the page to proceed.
The processing of the file may take a little while, especially if the file contains many
thousands of records. You may need to wait several minutes for completion. Once it’s
done, you’ll see a page like the one pictured below. This is where you’ll click the
Export button to start the
process of getting your results out of NCOA to load back into Rock.
NCOA Export File
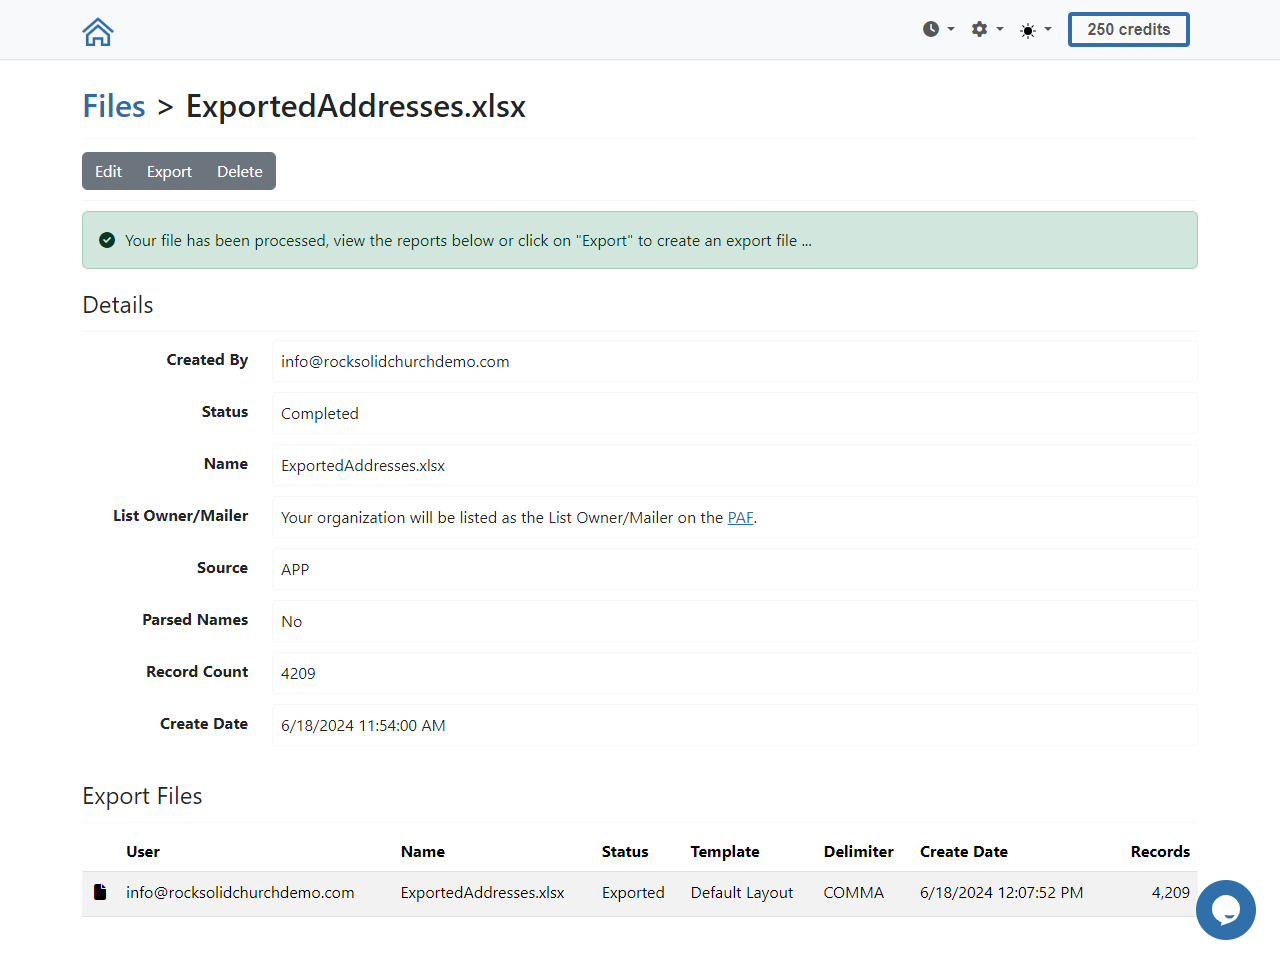
Click Export, then click
Purchase & Download when
that option appears. You may be asked to confirm that you’re certain you want to proceed.
The export process can take several minutes, especially with larger files, so don’t be
surprised if you have to wait.
When the export is finished, you’ll see a button to
Download the file. If the
download doesn’t start or you don’t see that button, click the
Home icon in the top-left
corner, where you can see your list of files, including the one that was just exported.
Click the file name under Export Files
then click the Download
button pictured below.
NCOA Download Export File
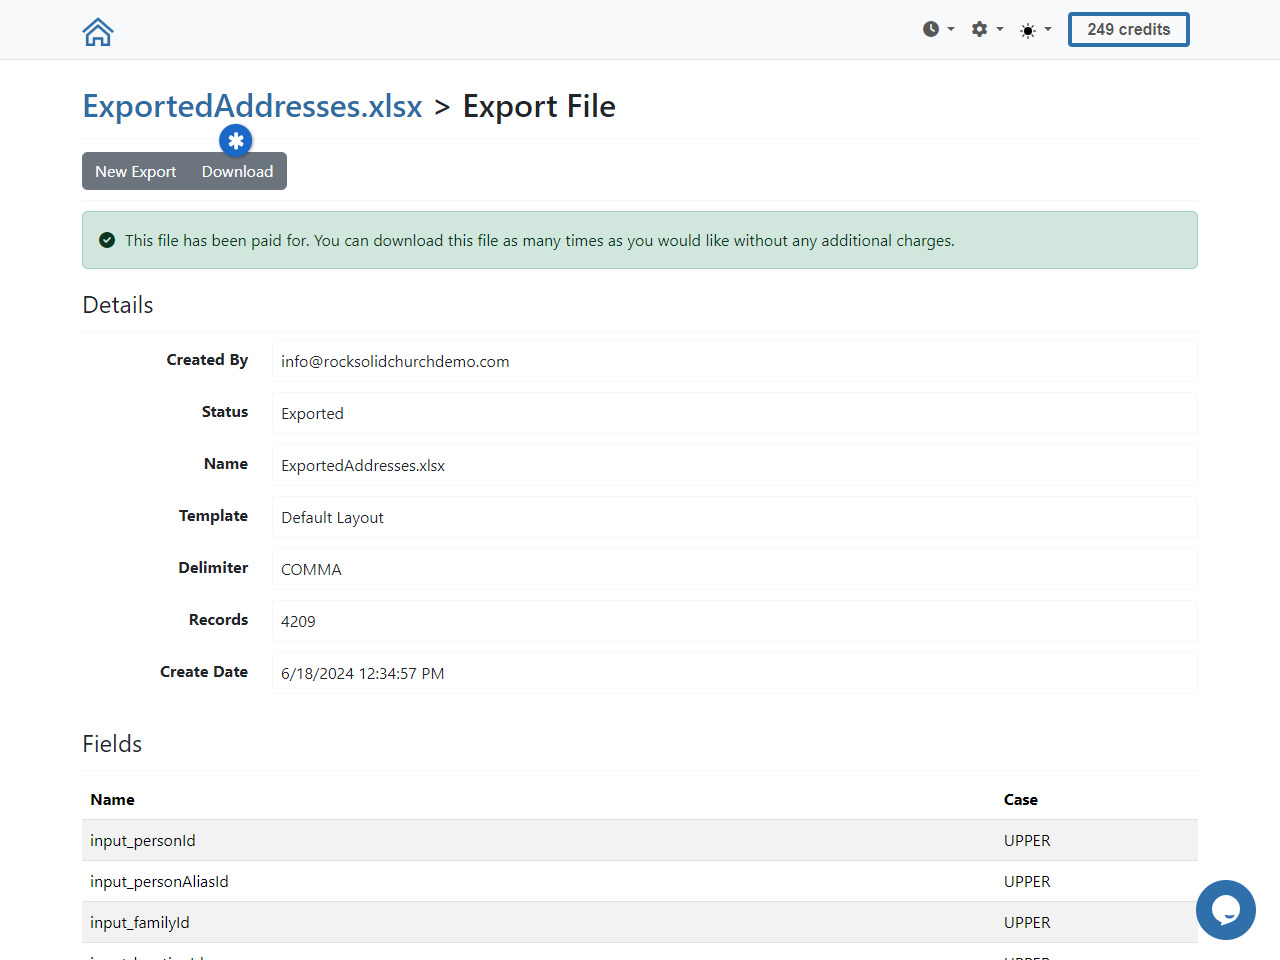
Next, you’ll take that file and import it into Rock, from the same
NCOA Processing page we saw
earlier. Upload the file from TrueNCOA as part of the “Step 2” process. You have some options
to work with, but they’re pretty intuitive and you can use the blue info icons to clarify their
purpose if needed.
Don't forget!
If someone is inactivated by this process because of a move, they can be automatically
re-activated by the
Reactivate People
portion of the Data Automation job we covered above.
NCOA Import Into Rock

After the file has been processed you can look at the results from the
Tools > Data Integrity > NCOA
page where we started. This page will list every family whose address was checked, so it can get
very long very quickly. Be sure to use the
Filter Options to narrow the
list to only the records you want to see.
NCOA Results Page
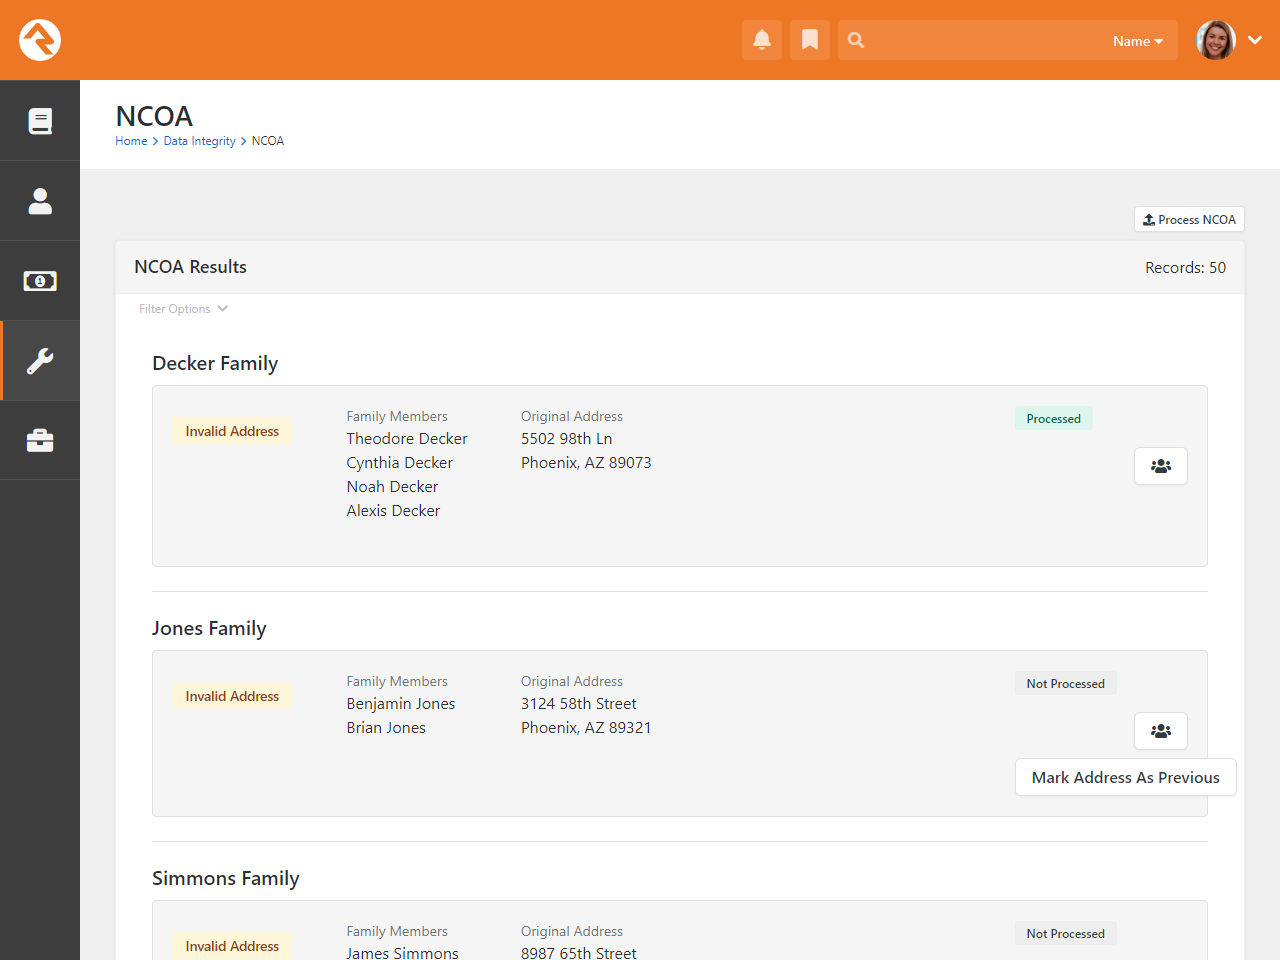
Connection Status Changes
As the name implies, the Connection Status Changes tool lets you
see (you guessed it!) changes in connection statuses. Since we’re
already clear on its purpose, let’s dive right in and take a look
at how to use it:
Connection Status Changes
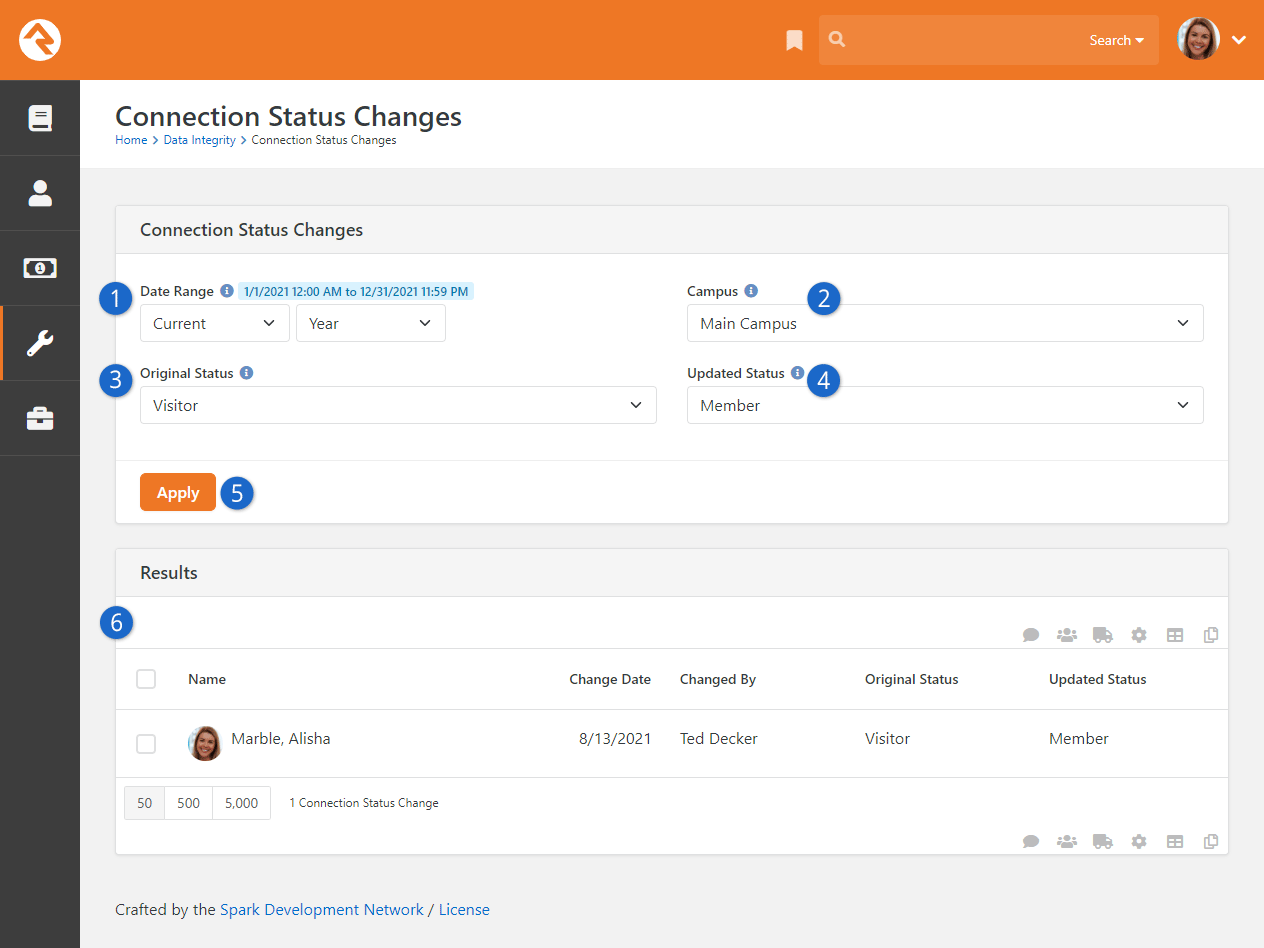
- 1 Date Range
- You can narrow the results to status changes that occurred within
a time period you choose. You can also leave the Date Range blank to
view changes on any date.
- 2 Campus
- Only people from the selected campus will be shown in the results.
You can leave it blank to show individuals from all campuses. This is
disabled if you have only one campus.
- 3 Original Status
- If selected, only changes from this status will be shown in the results.
This can be left blank to view changes from any status.
- 4 Updated Status
- If selected, only changes to this status will be shown in the results.
This can be left blank to view changes to any status.
- 5 Apply
- Use this button to apply the above selections to the results.
- 6 Results
- Individuals who match all criteria provided are listed here after clicking
the Apply
button.
Interactions
Picture this: your website is a mystery, and you're the detective. How do you know what people
are doing? Are they clicking, exploring, or just passing through?
Interactions in Rock let you track every move. Each page visit, email click, and session
detail gets recorded. It's your backstage pass to understand how people engage with your
content. But here’s the twist—it’s not just about tracking behavior. With Interaction Intents,
you also discover why people engage. What brought them to that page? What’s their motivation?
Under Tools > Interactions,
you’ll find the answers. Interactions help you uncover deeper insights to improve your website,
communications, outreach strategies and much more.
Overview
Think of the process like a flowing stream, with each part naturally leading into the next.
As we follow the flow, we’ll use the diagram below to guide us.
Interactions Diagram
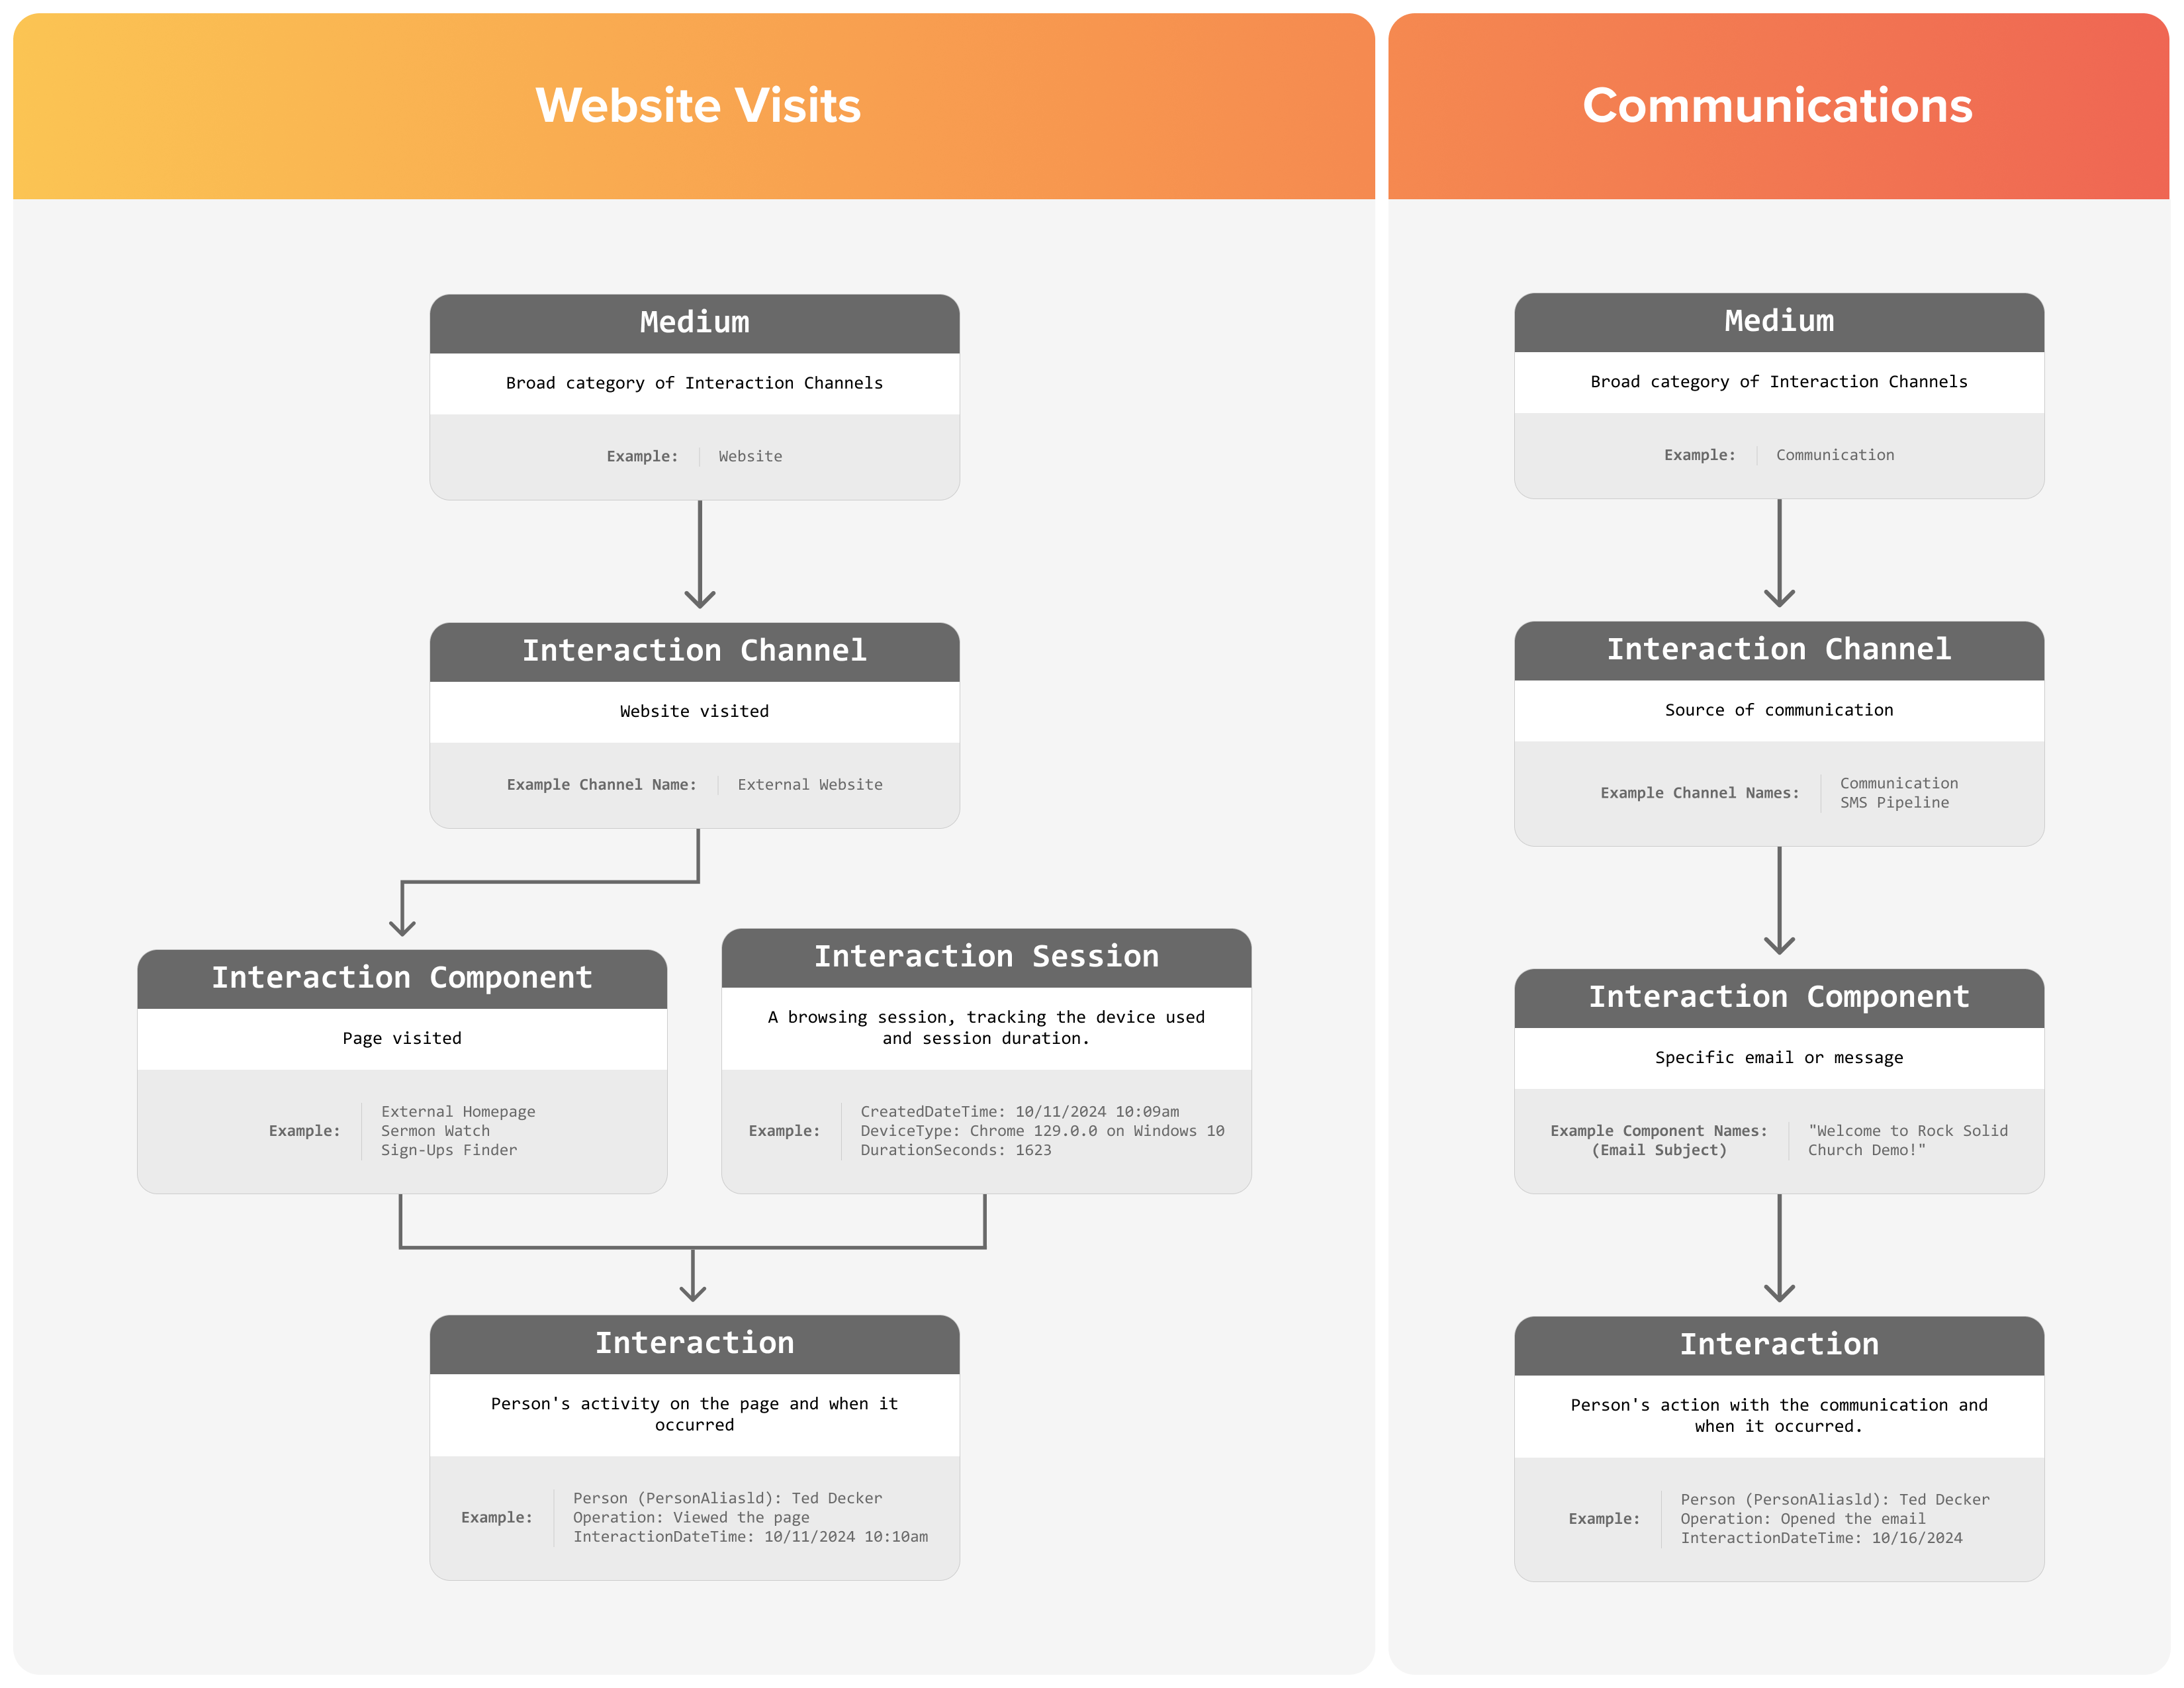
At the source, we have
Mediums. These are very broad
categories like "Website" or "Communication" that start the flow of information. From here,
the stream moves into
Interaction Channels, which
give us more specific details. For example, under the "Website" medium, you have channels like
"External Website" or "RockRMS" (your internal site), showing which website is involved.
As the stream continues, we hit
Interaction Components which
represent specific webpages or communications. At this point we should also mention
Sessions, which capture a
single visit to a site. Communication interactions, though, don’t have sessions because they’re
quick, one-time actions.
Finally, the stream reaches its endpoint: the Interaction. This is where the details flow together,
showing who did what, when, and how.
Remember, the goal is to understand the big picture. Don't be overwhelmed by the details.
Interaction Channels & Mediums
Let’s take a closer look at
Interaction Channels,
which are like the doorways to all the data we gather from interactions in Rock. Interaction
channels provide a broad container where we will store sets of related interactions. For
websites, an Interaction Channel represents the specific site someone visited, like your
external public site or your internal admin site.
Now, to make things easier to manage, Interaction Channels are grouped using a
Medium. A Medium is
a way of saying, "Where is this data coming from?" For example, "Website" is a Medium for
interactions that occur online, like page visits, while "Communication" covers things
like someone opening an email. By grouping channels this way, it becomes a breeze to figure
out where specific activities come from.
Interaction Channels
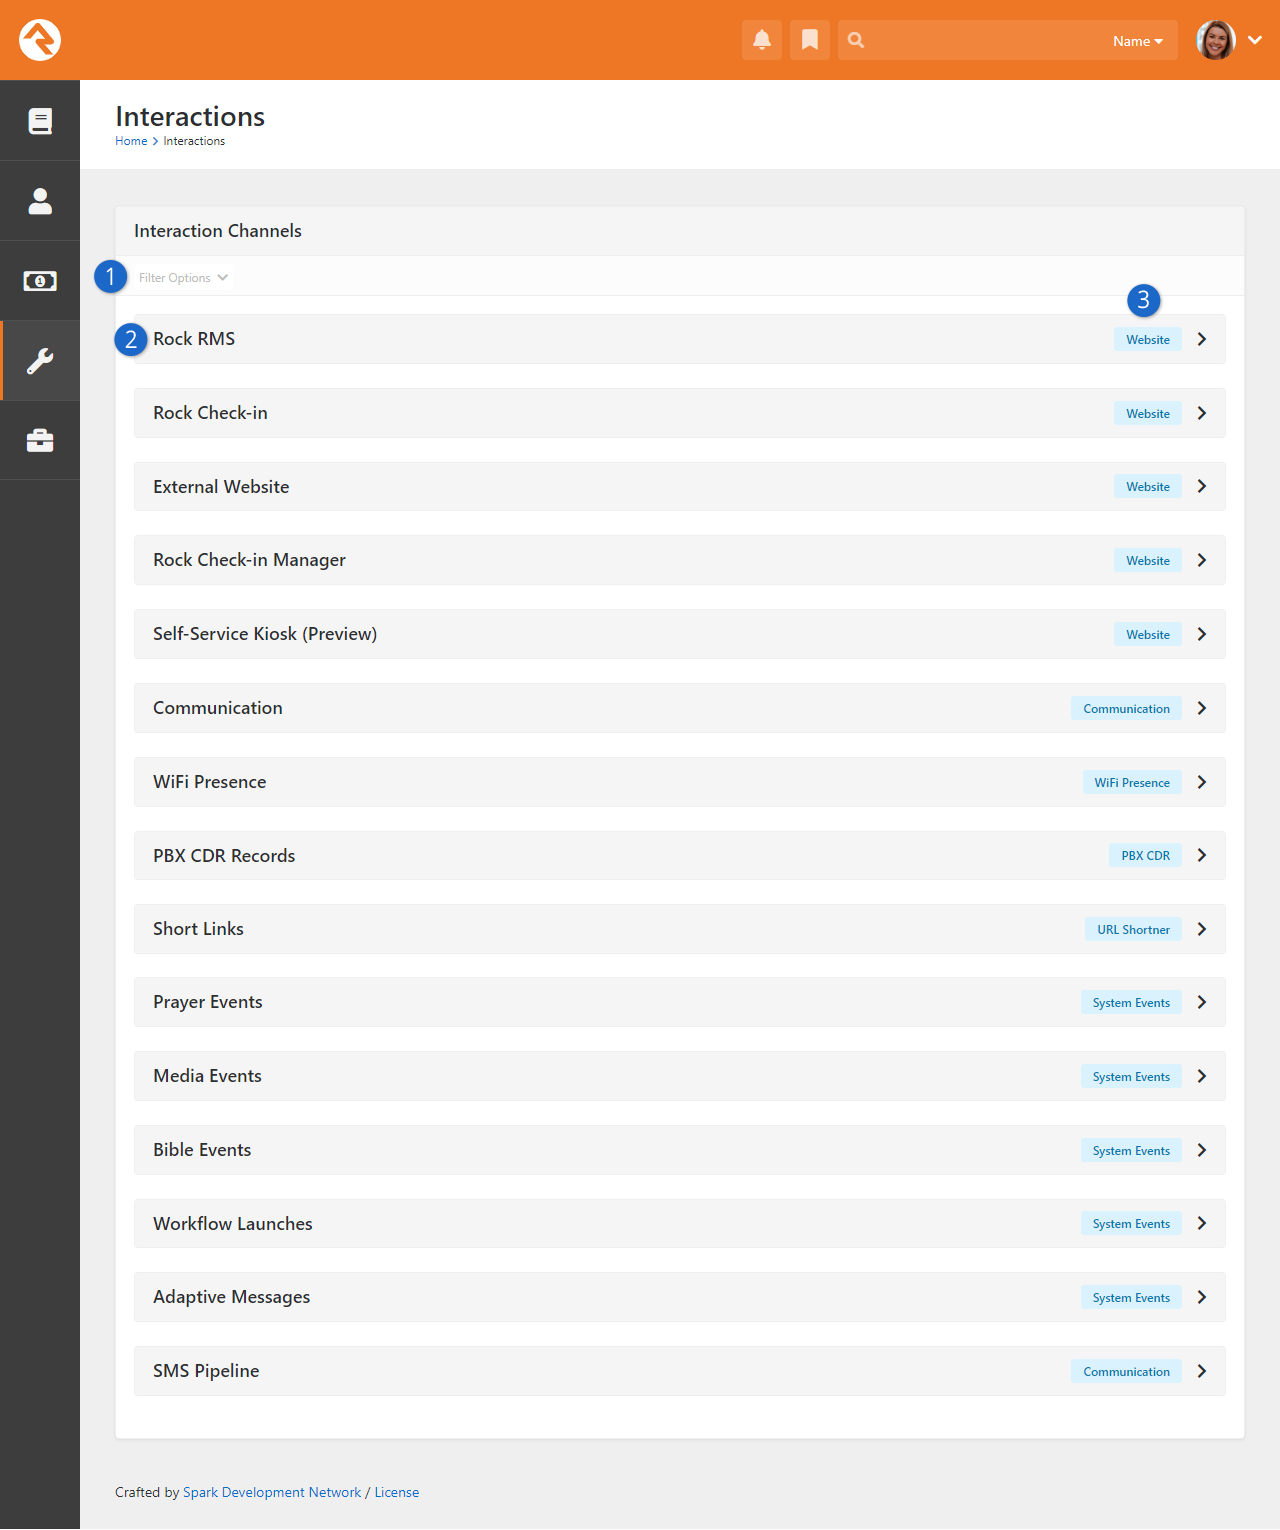
- 1 Filter Options
- This lets you narrow down the channels you’re looking at by Medium type or even
see inactive channels if needed.
- 2 Interaction Channels
- This is where you’ll find all the Interaction Channels Rock uses. Most of the
time, Rock comes pre-loaded with the channels you need, but if you ever need
something custom, a developer can help you add more.
- 3 Interaction Medium Type
- As we just talked about, this is the Medium associated with each channel. Most of
the time, it’s "Website" (for online interactions) or "System Events" (for things
happening inside Rock itself).
Interaction Components
Let’s break it down a little further with
Interaction Components.
Components represent the specific parts within a Channel that people engage with. Think
of them as sets of interactions.
For Channels under the Website medium, Components are the individual pages that someone views.
For communication channels, Components track individual emails and SMS messages.
Pictured below is an example of a Communication channel where each Component represents an email.
Interaction Components
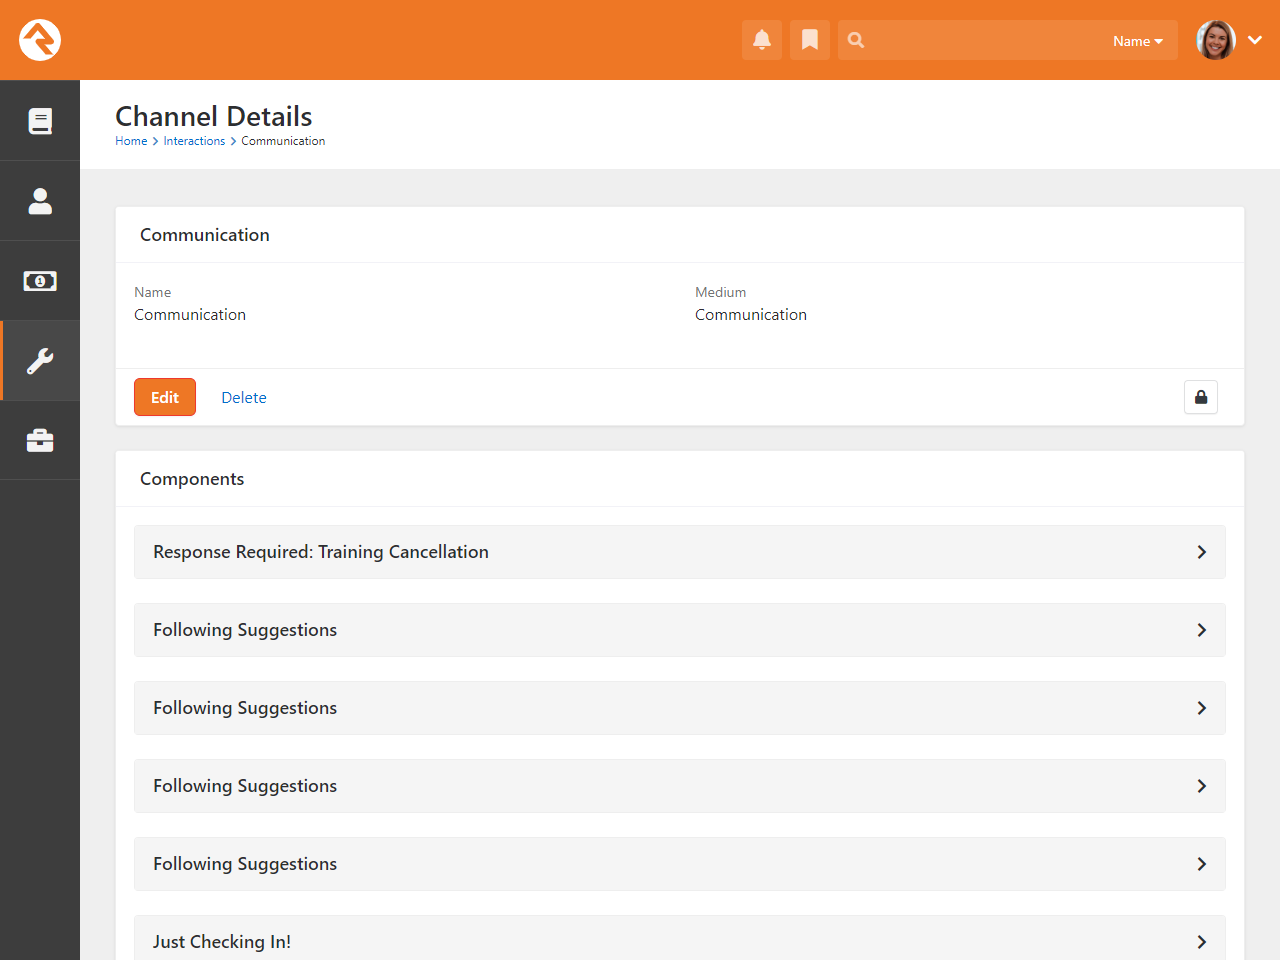
By understanding Interaction Components, you can dive deep into the details of what someone interacted
with. This helps you see which page was viewed or which email was opened.
Interactions
Now, the fun part—when you get to interactions, you can see even more details. For instance, you’ll
find out that on 10/18/2024 at 5:21 PM Ted Decker opened an email you sent. If you’re looking at a
channel with a Medium of Website, then the interactions it contains will tell you who visited a page,
which page was visited, and when it was visited. These details give you a deeper understanding of
how people are engaging with your content.
The image below shows a list of Interactions coming from an email. Here we can see that several
people opened the email at the date and time shown on the screen.
Component Detail
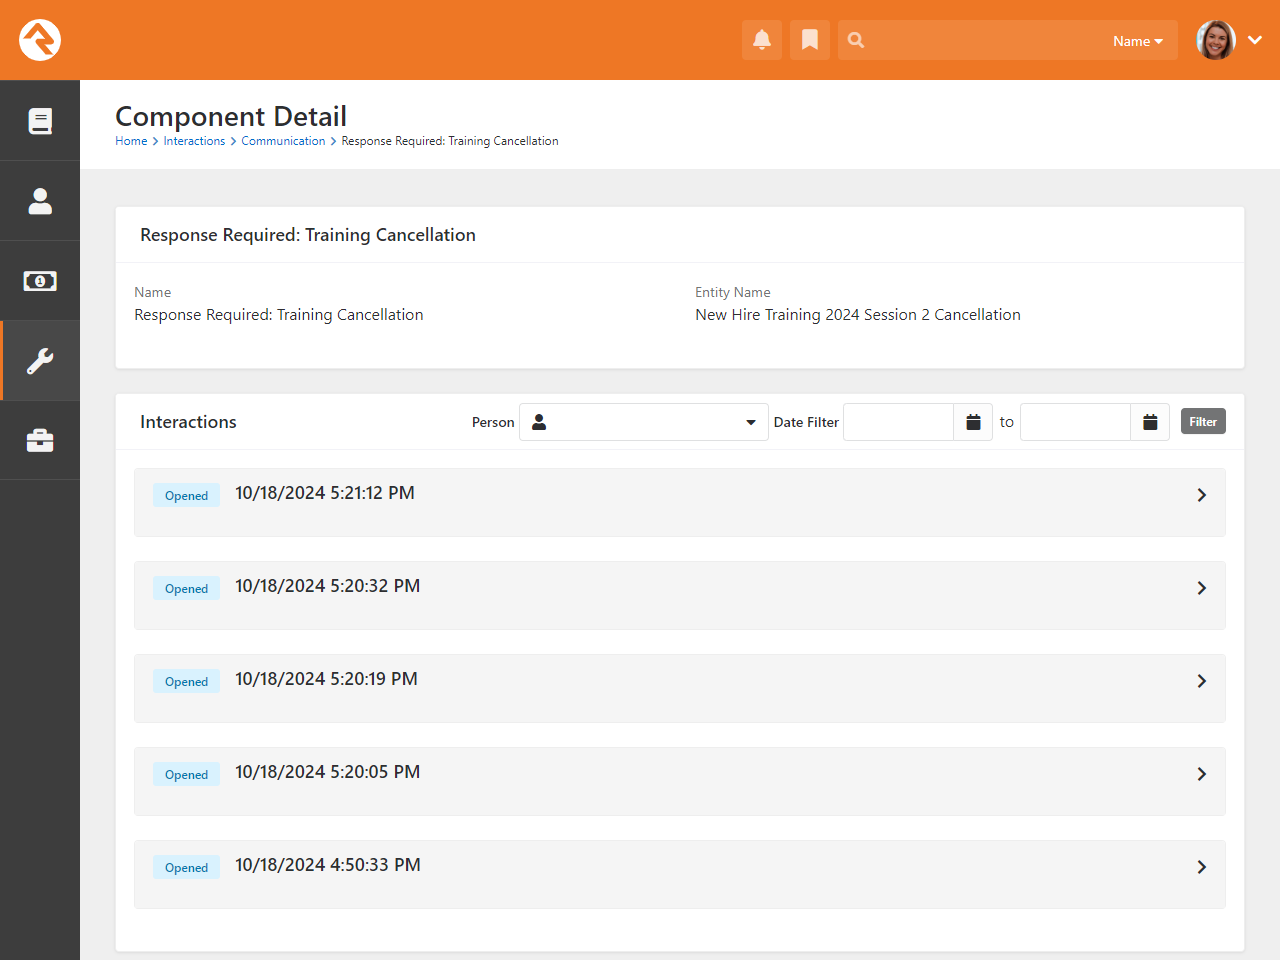
This same structure applies to all types of interaction channels. Whether it’s a website, a
communication, or something else entirely, each channel holds components which contain sets
of interactions.
Interaction Sessions
An Interaction Session is like
a snapshot of the person's entire visit to your site. It groups all the interactions that took place
during a single browsing session, capturing important details like which device the visitor used,
when the session began, and how long they stayed. Interaction. Sessions give you a full picture of
a person’s overall experience during their visit, even if they hop between multiple pages.
Interaction Sessions
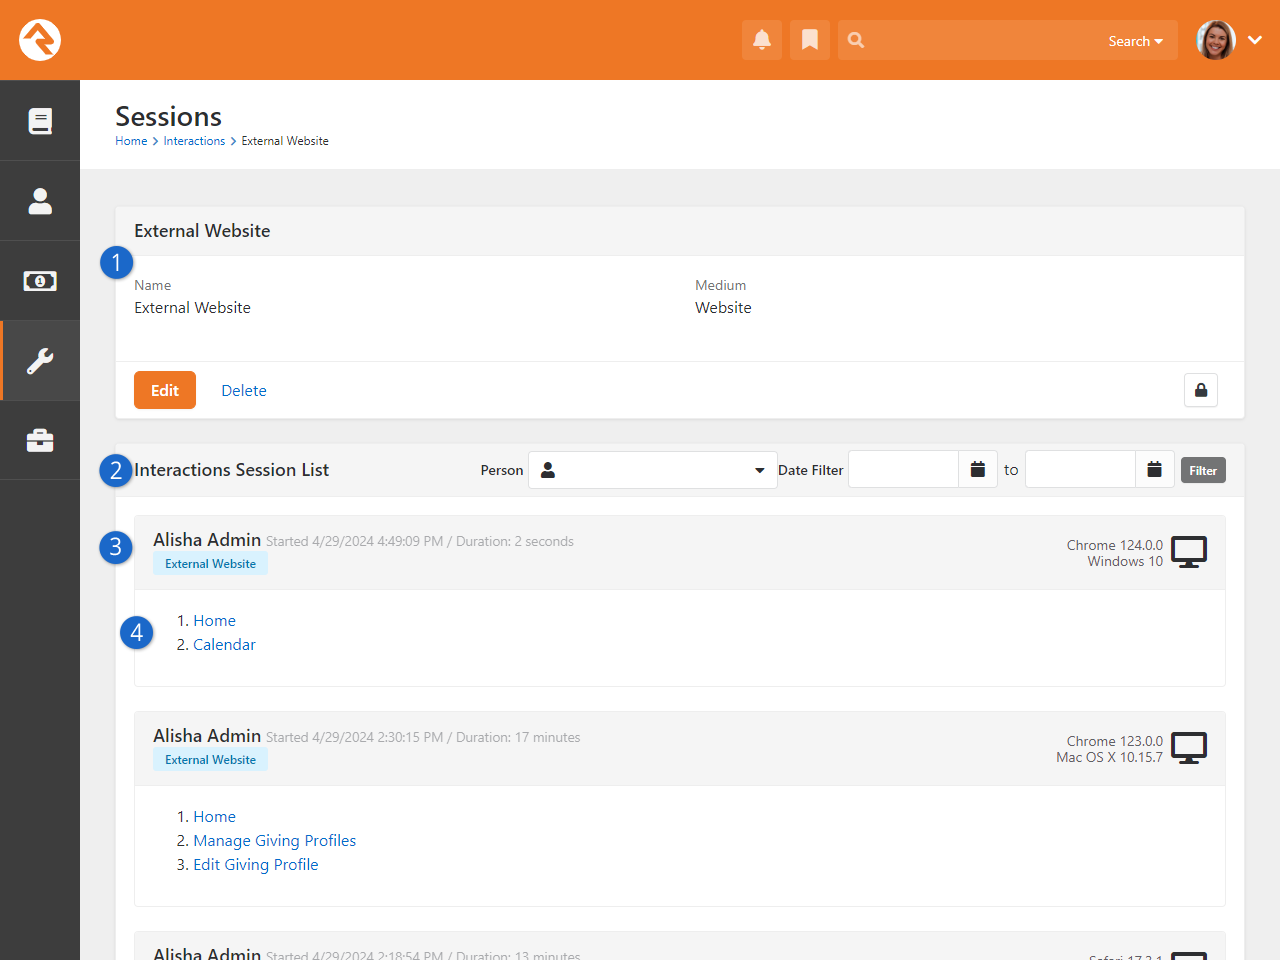
- 1 Interaction Channel
- This is where you would go to make changes to the Interaction Channel itself. Generally,
you won’t make any changes here.
- 2 Interactions Session List
- All of the sessions that Rock has captured are listed below this header. Here you can
also filter by Person (the person who visited your site) or by the date of the
interaction.
- 3 Session Data
- As you can see, a variety of data points are provided to you, including the length of
the session, the name of the person, and what sort of technology they were using to access
the site.
- 4 Visited Pages
- In this case, below each Session Data header, we see the list of pages that the person
visited, in the order in which they visited them. Clicking on any item in this list will
bring you to that page.
In some cases, when a someone accesses something specific (like a group in the Group Viewer)
clicking the “Group Viewer” link will not only take you to the Group Viewer, but it will also
take you directly to that group. Pretty nifty, right?
It’s important to note that not all interaction channels track session information. For instance,
in the case of the Communication channel, the concept of a session doesn’t really make sense
because the person is just opening an email, not browsing your site over a period of time.
Interaction Intents
What if you could not only track what pages people visit, but also why they’re visiting?
That’s exactly the magic of Interaction Intents. These powerful little tags let you attach
purpose to your pages and content, giving you a whole new layer of insight into your web
traffic. Whether someone’s checking out your youth ministry page or diving into discipleship
resources, you’ll know not just that they visited, but what drew them in or kept them there.
Rock comes with a couple of pre-loaded intents, and a Content Channel for tracking them.
The intents are "Discipleship" and "Youth Interest."
Interaction Intents
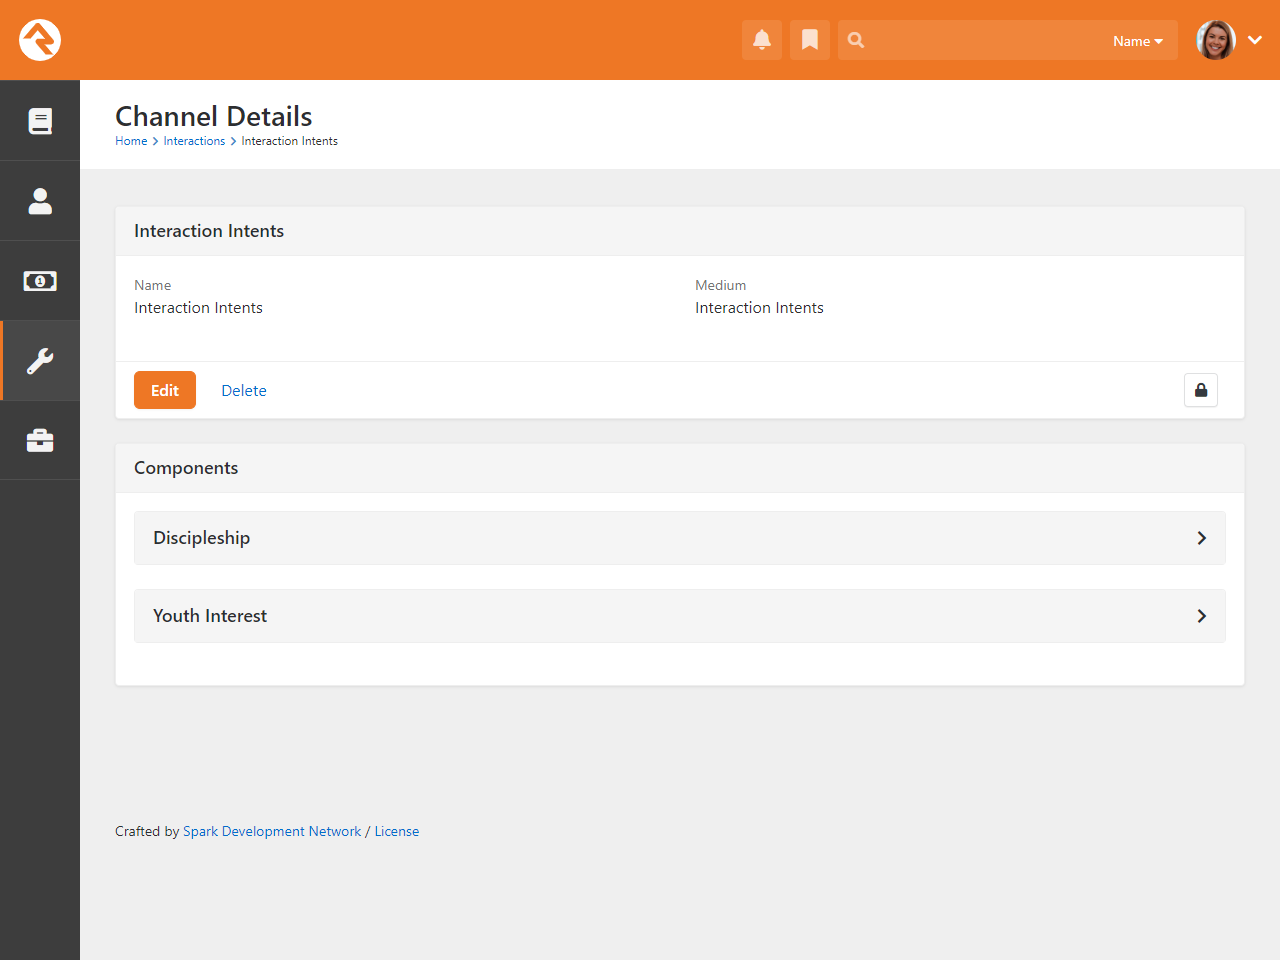
You can tag pages or content channel items with these intents. So, let’s say you have a page
packed with resources for young people or their parents—you’d tag it with “Youth Interest.”
Before Interaction Intents, all we could say was “Person A visited Page B.” Now, we can add:
“…because of the youth ministry content!”
So, are you ready to dive into crafting your own list of Interaction Intents? In Rock,
Interaction Intents are managed through a Defined Type
Admin Tools > Settings > Defined Types
called
Interaction Intent.
Initially, you’ll see some predefined intents, but don’t stop there—be sure to add
your own. Tailor your intents to match the specific goals and priorities of your ministry,
ensuring your interactions tell the full story of what matters most to you.
Interaction Intent List
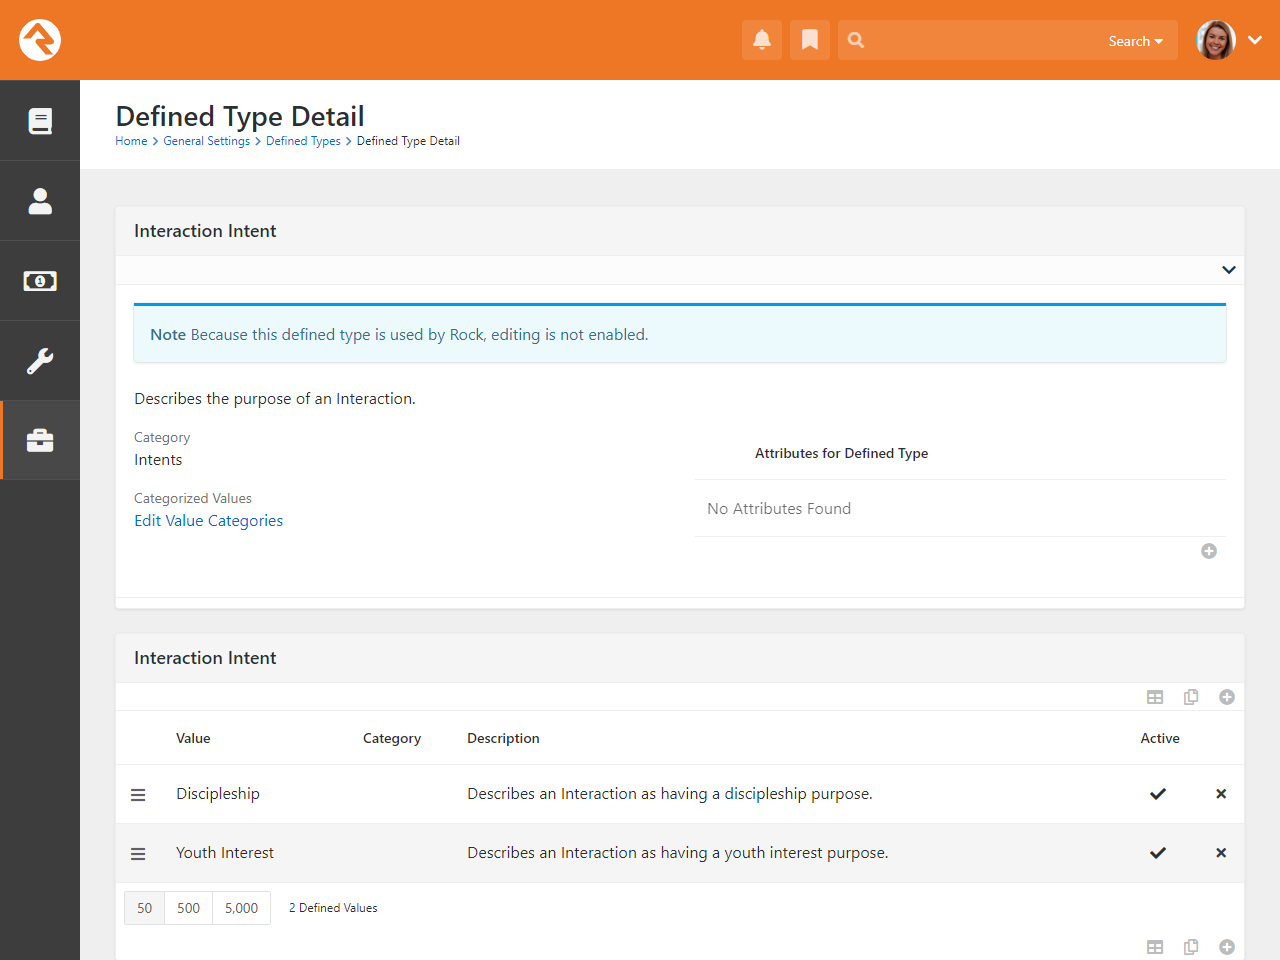
Once your list of intents is good to go, you can start assigning them to Content Channel
Items and Pages. And if you want to get even more creative, you can use Lava to capture
intent data beyond just pages and content items. We’ll get into that fun stuff a little
later.
Adding Intents to Content Channel Items
Now let’s talk about using Interaction Intents with Content Channel Items. It’s a breeze!
Once you’ve got your Intents all set up, putting them to work is very simple.
Head over to
Admin Tools > Settings > Content Channels
and select the channel that contains the items you want to tag with an Intent. As pictured in the image below,
you’ll see a list of your Intents. Just pick the ones that match the purpose of the content. Now you have a way to
gain insight into why someone engaged with that content channel item.
Content Channel Item Intent
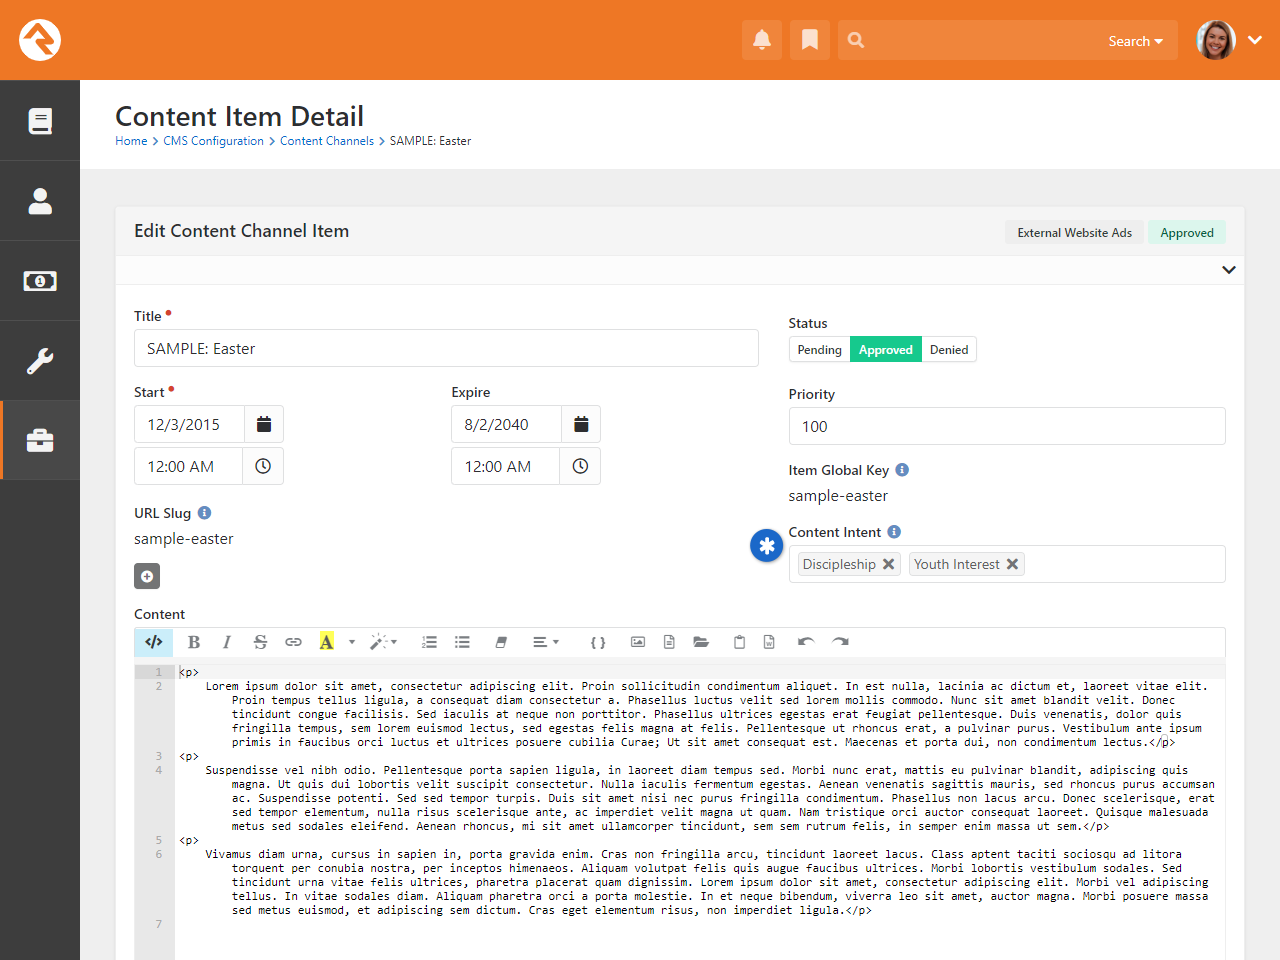
Don’t forget to ensure that the block displaying the item has interaction logging
enabled (see screenshot below). Otherwise, you’ll miss out on capturing all that
amazing data!
Enable Interaction Logging
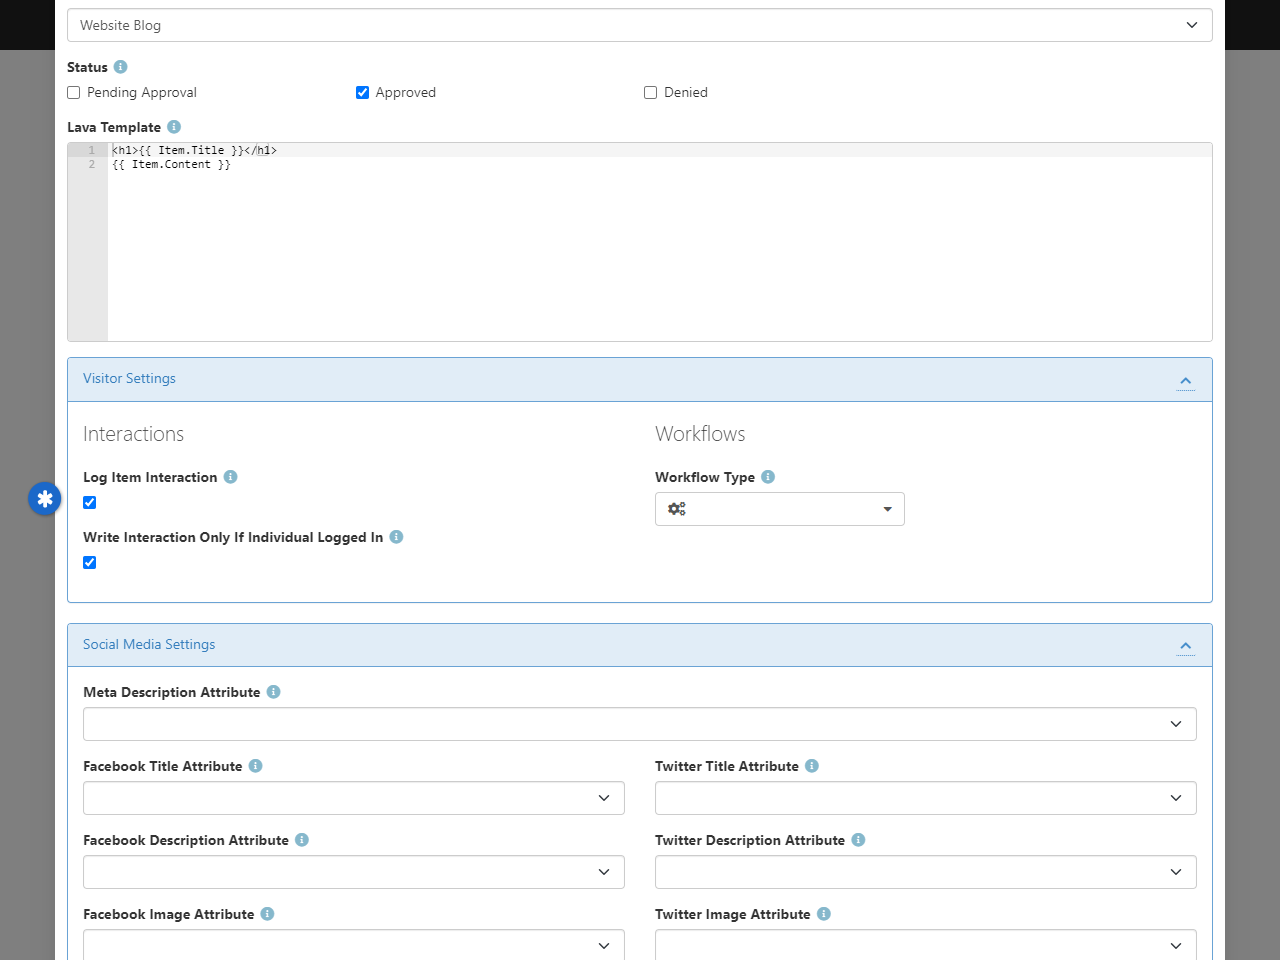
Adding Intents to Pages
Now, let’s move on to adding Intents to web pages—because why should Content Channel Items have all the fun?
This process is just as easy, but now we’re talking about tagging whole pages with your carefully crafted Intents.
To start, go to
Admin Tools > Settings > Pages
and edit the page you want to tag with an Intent. Under the Advanced Settings panel (pictured below),
you’ll find the place to add Intents. Just select the ones that best match the purpose of the page,
and boom—you’re giving your data an extra layer of meaning.
Add Intent to Page
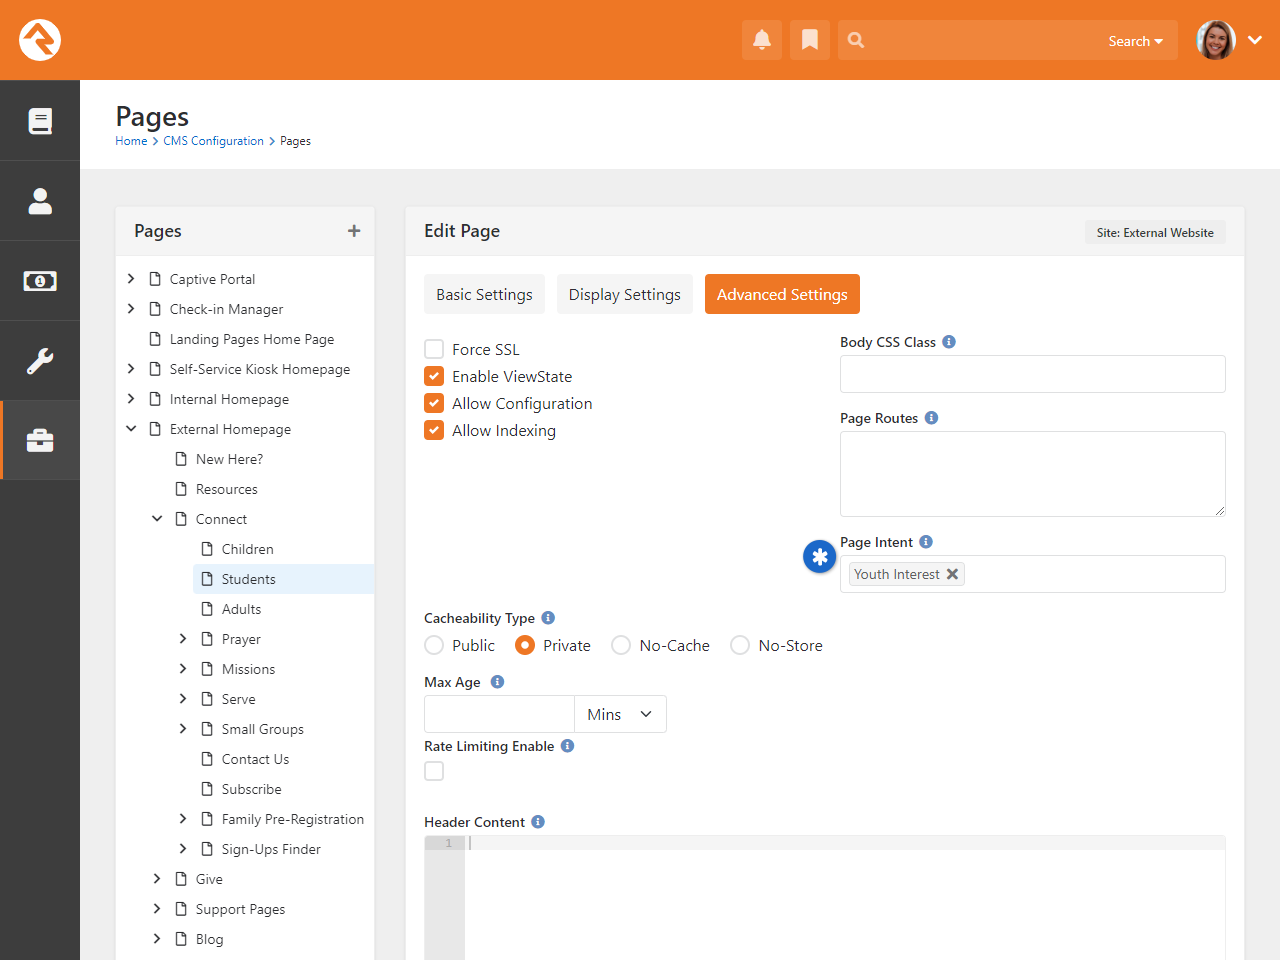
With just a few clicks, you’re not only tracking where people go, you understand why they go there!
Logging Interaction Intents with Lava
We know flexibility is key, and we didn’t want to box you in when it comes to logging Interaction Intents.
That’s why we’ve introduced a Lava command that lets you write an Interaction Intent wherever Lava is in play.
Yep, that means you can track intents beyond just pages and content channel items. Basically,
anywhere you can write Lava, you can record those valuable insights.
For all the details on how to harness this feature and start logging Intent interactions with Lava, head over to our
Lava documentation.
Interaction Intent Write
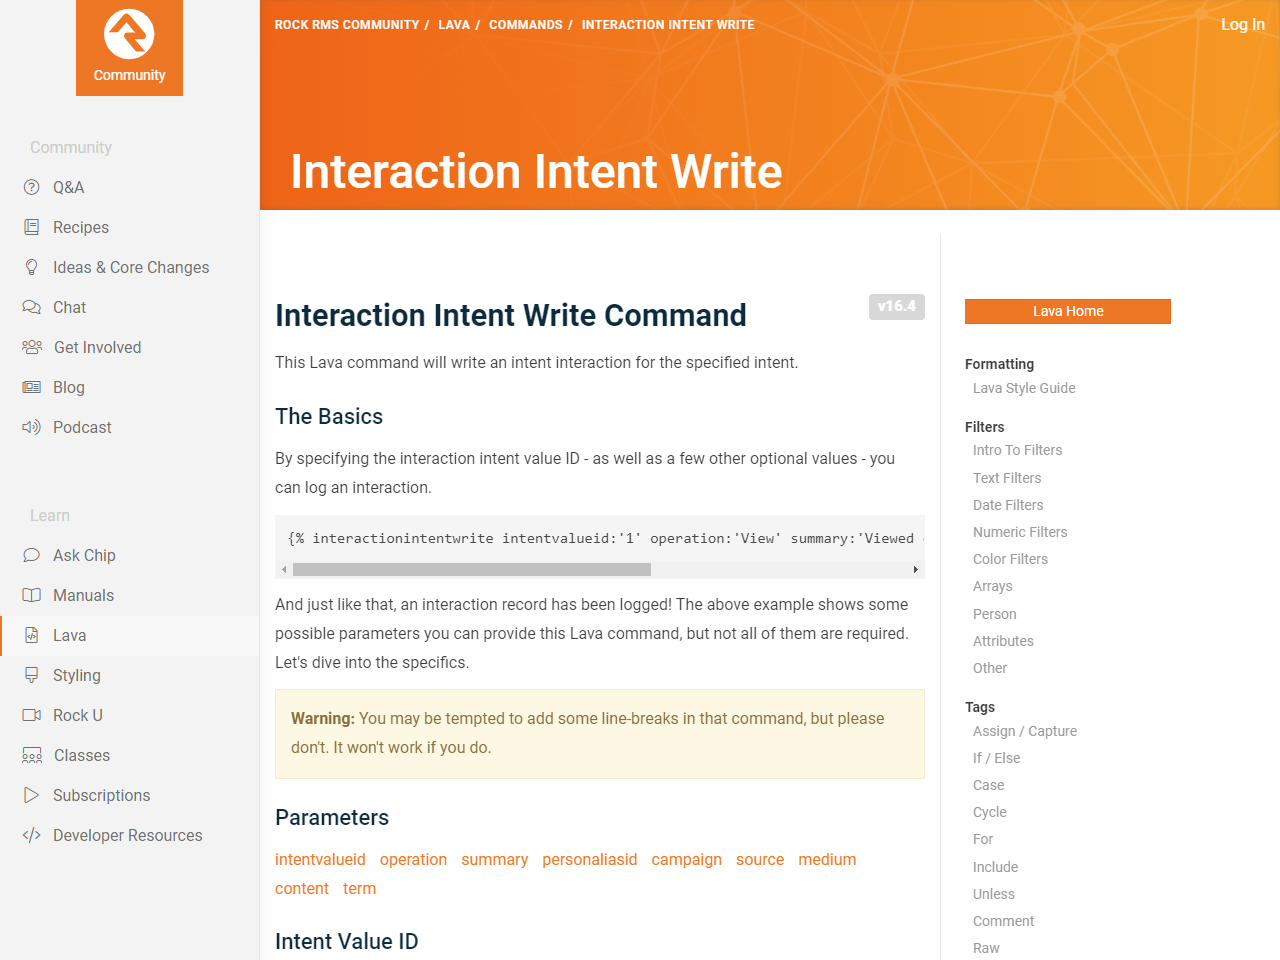
Reporting on Intents
Let’s look at how you can easily access and analyze your Interaction Intents data.
Rock comes equipped with a built-in Data View filter designed specifically for
Interaction Intents. All you need to do is select the intents you’re interested
in, set the frequency of interactions, and apply date criteria. In just a few
clicks, you’ll have valuable insights into member engagement data.
Interaction Intent Data View
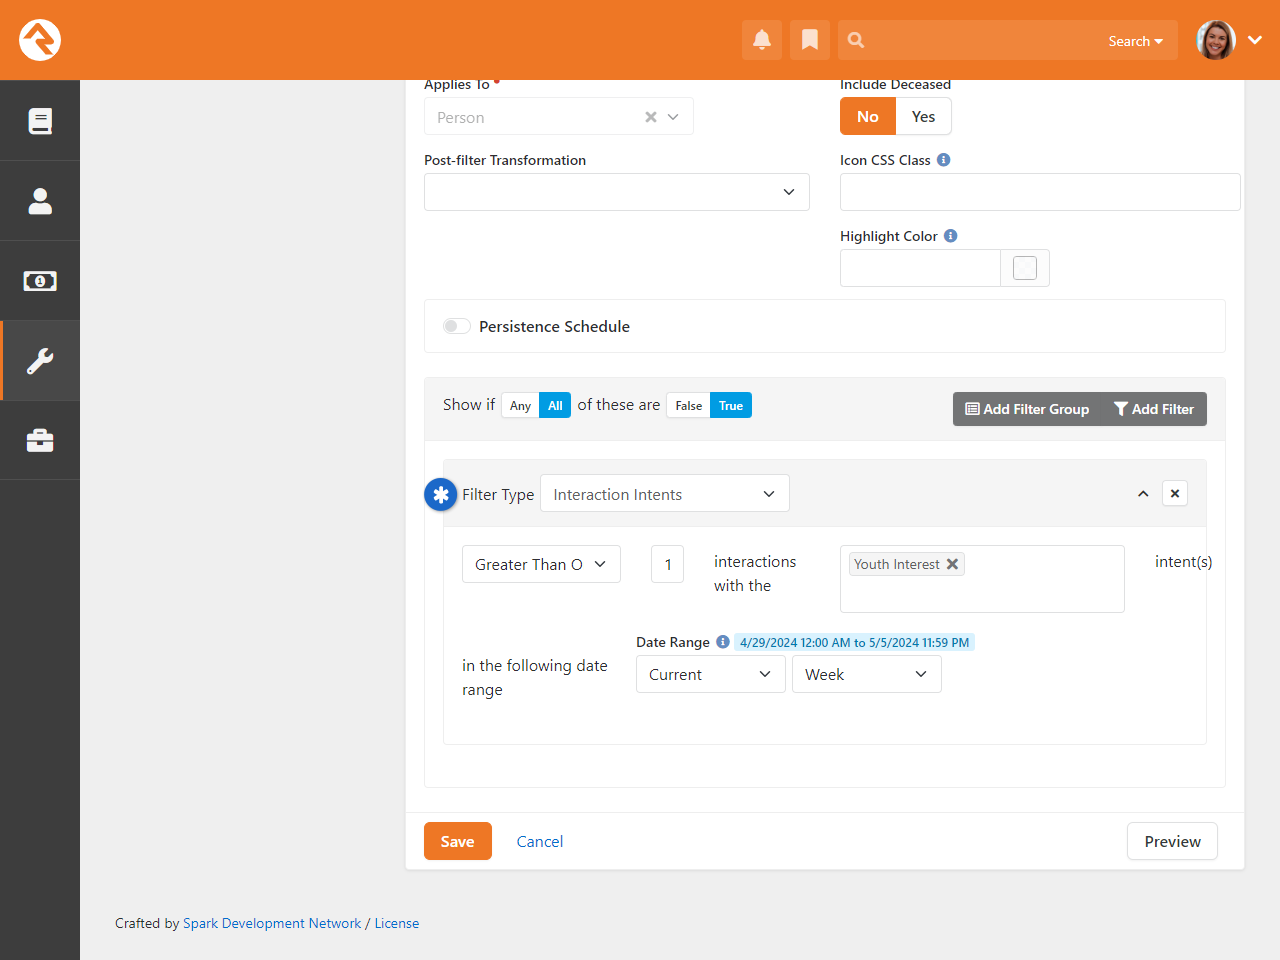
For more details on how to work with Data Views, be sure to check out our
Taking Off With Reporting
manual.
PBX CDR Records
A PBX, or Private Branch Exchange, is a telephone system in an organization that switches calls between people
in that organization on local lines while allowing them to share several external phone lines. In short, it allows Rock
to talk to the phones within your organization. PBX CDR Records downloads phone call detail records for the calls made
on those phones and stores them in interaction tables. This valuable data helps you map the real-life relationships that
exist within your organization. It also allows you to use click-to-call technology, where Rock places your calls for you
with the click of a button.
You'll need a plug-in to let Rock talk to your phone system. You can write your own, or you can use one of the plugins available
in the Rock Shop, such as Digium Switchvox. Additional PBX plugins will be added as this technology becomes more widely used.
IP Address Geocoding
Rock includes a built-in component called
GeoLite2 Data created by MaxMind
(https://www.maxmind.com).
This tool maps an IP address to a rough, physical location.
Why would you want that? Well, there are a wealth of IP address data in your Interaction's
InteractionSession table that you could use to "see" where your visitors are coming from. For instance,
you can get the person's IP address, the country, and more, as detailed in the chart
below.
Using what's called the Rock Gateway
HTTP Module, Rock efficiently updates geocoding details in the
InteractionSessionLocation table for all incoming web requests.
The table below outlines the specific properties available in this data.
| Property |
Description |
Example |
| CountryCode |
This is a two-letter code that represents a country. |
US = United States
CA = Canada
MX = Mexico |
| GeoPoint |
The geopoint is the geographical location (latitude/longitude) associated with the IP address, telling you where visitors to your site are coming from. |
-121.88996 37.33262
31.1326 -26.31511
9.49101 51.29926 |
| Location |
For the United States, the location will be the city and the state associated with the IP address. For other countries you may see a region, province or country. |
Sun City, Arizona
London, England
Sydney, New South Wales |
| PostalCode |
This will be the zip code for visitors from the United States. For other countries you may see different types of codes. Some locations will not have a PostalCode. |
85029
SL1
114 46 |
| RegionCode |
For the United States, this will be the abbreviation for the state the person is in. In other countries this code may represent a region, province or country. |
AZ = Arizona
EN = England
QC = Quebec |
As an added bonus, a Geolocation
merge field will be available for use in your Lava that runs on a Rock page:
Lava Example
Hi {{ CurrentPerson.NickName }}... looks like you're in {{ GeoLocation.RegionCode }}.
Hi Ted... looks like you're in AZ.
Currently, the only place you'll see this data will be in
Media Analytics.
Otherwise, to use this data you'll need to do a little coding and reference the
InteractionSessionLocation table.
Ipregistry Service No Longer Needed
If you previously set up IP Address Geocoding using Ipregistry in an earlier version of Rock,
you can now cancel that service. Starting with this version, Rock no longer relies on Ipregistry
for IP address geocoding. Geocoding is now handled internally, so no additional configuration is needed.
Insights
"You can't manage what you can't measure."
-Peter Drucker
Ask any ministry leader and they’ll tell you how crucial it is to understand the makeup of your
congregation. The Insights feature gives you a powerful tool to do just that. With easy-to-read graphs
and statistics, you can gain valuable insights (see why we called it that?) into the completeness of
your church’s data and the demographics of your congregation.
But it's not just about collecting data. Insights are used to make informed, data-driven decisions
about how to best serve your congregation. For instance, if you notice that there is a
disproportionate number of men versus women, you can develop specific outreach programs to attract
more women to your church. Or you might notice that you’re not collecting enough of the right types
of information. Either way, Insights help you target areas of potential growth.
To access Insights, navigate to Tools > Insights.
Insights
Many of these items has a corresponding metric under the Insights Metrics category. Having this
data in metrics means you can see changes over time.
General Settings
To make Rock a configurable and flexible tool, we’ve added a lot of settings you can tweak to make it work
for your organization. While these settings may seem intimidating at first, once you learn more about them,
you’ll become more and more comfortable. Let’s look at each of the major configuration sections and we’ll
briefly explain what each one does. All of these areas can be found under the
Admin Tools > Settings menu item.
General Settings
Rock Update
Updates are one of Rock’s best features. Many systems require tedious software updates only the vendor can
complete. Not so with Rock. When an update is made available, all you need to do is visit this screen to
check the details. When you’re ready, simply click the Install
button. Rock will then download and install the updates for you. How easy is that?!
Global Attributes
Global attributes (Admin Tools > Settings > Global Attributes)
are the basic configuration settings that are used to customize Rock. Each has a default value that you can override. Many of these
are set up during the installation process. Below is a list of some of the core settings and descriptions.
| Setting |
Description |
| Organization Name |
The name of the organization that's running Rock. This was set for you during
the install, but you can modify it at any time.
|
| Organization Abbreviation |
There will be times when you want to refer to your organization in a less formal manner.
Enter an Organization Abbreviation
to provide this value.
|
| Organization Address |
The primary address of the organization. If you're a multi-site organization, this
should be the address of your central team location. Each of your campuses will have
its own address elsewhere.
|
| Organization Email |
The default email bucket for the organization. This will be the default address used
in the From field
of bulk emails. This is commonly info@organizationdomain.com
|
| Organization Phone |
The primary phone number for the organization.
|
| Organization Website |
The primary website for the organization.
|
| Public Application Root |
Many times, this will be the address of your external website, if it's hosted on Rock.
It's the address that will be used in links that are sent out to the public, such as
www.organizationname.com. If your organization's primary website isn't hosted on Rock, it's
important that this setting remain the public address of the Rock server (not your organization's
primary website) as this setting is used for providing linkbacks for things like images and webhooks.
|
| Internal Application Root |
Similar to the Public Application Root setting above, this is the address of the internal
Rock website. It will be used to construct links on the internal site. Many organizations
configure their DNS to be rock.organizationdomain.com.
|
| Update Server URL |
This is the address that Rock uses to look for updates. It should not be changed.
|
| Google API Key |
Rock uses Google Maps for many of its features. This requires what's known as an API key
to use the maps. While there was a setup step in the post-install checklist, you can change
this key at any time. See below for details on
setting up this key.
|
| Google Maps Id |
This relates to how your maps in Rock are styled. We discuss this field in greater detail
in the Google Map Styles section below.
|
| Google ReCaptcha Site Key |
This is one of the two API keys needed to use ReCaptcha in Rock. To obtain this key, go to
https://www.google.com/recaptcha/about/
and click “v3 Admin Console” near the top of the page. You’ll need to log in with a Google account.
Select reCAPTCHA v2 as the reCAPTCHA Type and complete the rest of the form. Upon submission, you’ll
be provided with your Site Key and Secret Key.
|
| Google ReCaptcha Secret Key |
This is one of the two API keys needed to use ReCaptcha in Rock. See the above entry for
directions on obtaining this key.
|
| Email Exceptions List |
"Exceptions" is a technical term for errors. This setting is a list of email addresses that
should receive an email when these errors occur. Keep in mind that errors do happen, and
don’t worry if you get a notification email occasionally. Rock also keeps a list of every
exception in the database, so you don’t need to keep these emails. Just think of them as an FYI.
|
| Email Exceptions Filter |
Oftentimes exceptions will occur when search indexes (like Google or Bing) scan your site
and reference pages incorrectly. While these exceptions will always get logged, you can use
this setting to prevent a notification email from being sent for these (and any other) types of
exceptions. When any exception occurs, Rock will evaluate the client's HTTP Server variables for
any variable you specify in the Key. If that server variable exists, and its value contains what
you entered in the Value, the notification won't be sent. In addition to server variable names,
if you use a key of 'Type', 'Source', 'Message' or 'StackTrace', Rock will check to see if the
current exception's values for those keys contain what you entered for the value and if so, the
notification won't be sent.
|
| Grade Transition Date |
The date your organization uses to promote kids to the next grade level. Grades are calculated
in Rock based on the future graduation date from the 12th grade. This date is used to update
the grade each year. While the default date of 6/1 will probably work for most organizations,
you can modify it to match the needs of your community.
|
| Email Header / Email Footer |
The HTML that makes up the header and footer for emails that are sent from Rock. These settings
are only used for system communications. You can create multiple different email templates to use in Rock.
See the
Communicating With Rock
guide for more information on best practices in email templates.
|
| Email Header Logo |
This is the logo that should be used in the email header. If the logo displays as a broken link,
be sure to check that your Public Application Root setting is correct since this is used to help
generate the link to the logo.
|
| Password Regular Expression |
A secure password means different things to different people. By default, all passwords in
Rock need to be at least six characters long and can only contain letters and/or numbers. If
you like to require passwords to include special characters and/or mixed case letters, you
can provide a regular expression that all passwords are required to match.
|
| Password Rules Friendly Description |
When you change the regular expression required for passwords, you’ll want to change the
description of the password requirements that people see on the website. Use this setting
to describe what a valid password must contain.
|
| Job Pulse |
This isn't really a setting; it continuously displays the date and time that jobs last ran.
You can use this to confirm that jobs are running correctly.
|
| Log 404s As Exceptions |
This tells Rock whether File Not Found errors (404s) should be treated as exceptions. For the
most part, you'll want to leave this off. You can enable it if you’d like to find all of the
broken links on your website.
|
| Preferred Email Link Type |
This setting is used to configure the type of email links you'd like Rock to use. 'New Communication'
will cause Rock to link to the New Communication page, while 'Mailto' will configure Rock to use a
mailto tag which will take the individual to their configured mail client. |
| Lava Support Level |
This setting allows you to choose your support level for old Lava syntax. In short, you can
either allow legacy Lava or not. Generally, and especially for organizations new to Rock,
this should be set to "NoLegacy". |
Editing A Global Attribute
You can click the row to edit the attribute's value. This is the standard way to, for example, change your
organization’s phone number or enable auditing.
You’ll also notice a
icon for each row. While clicking the row will let you edit the attribute’s value, clicking
allows
you to update the attribute itself. Typically, there won’t be any reason to do this.
Creating a Google Maps API Key
Let’s take a moment to look more closely at the “Google API Key” global attribute. We’re giving this particular
attribute a lot of attention because there are several steps involved with setting it up correctly.
Rock's Group Viewer can display a static map
showing a group's location, but to do so it requires you to set up a Google Maps API Key and activate the
Google Maps JavaScript and Static APIs. Below are the steps you’ll need to get started.
Note
Google provides a large number of free credits each month, so you shouldn’t be charged for using maps in Rock.
- Go to the Google Maps Platform welcome page then click Get Started.
- You'll need to log in with a Google account.
- If prompted, provide the requested account information:
Account Information
- If prompted, provide the requested payment information.
Your card will not be charged unless you manually upgrade
to a paid account.
Payment Information Verification
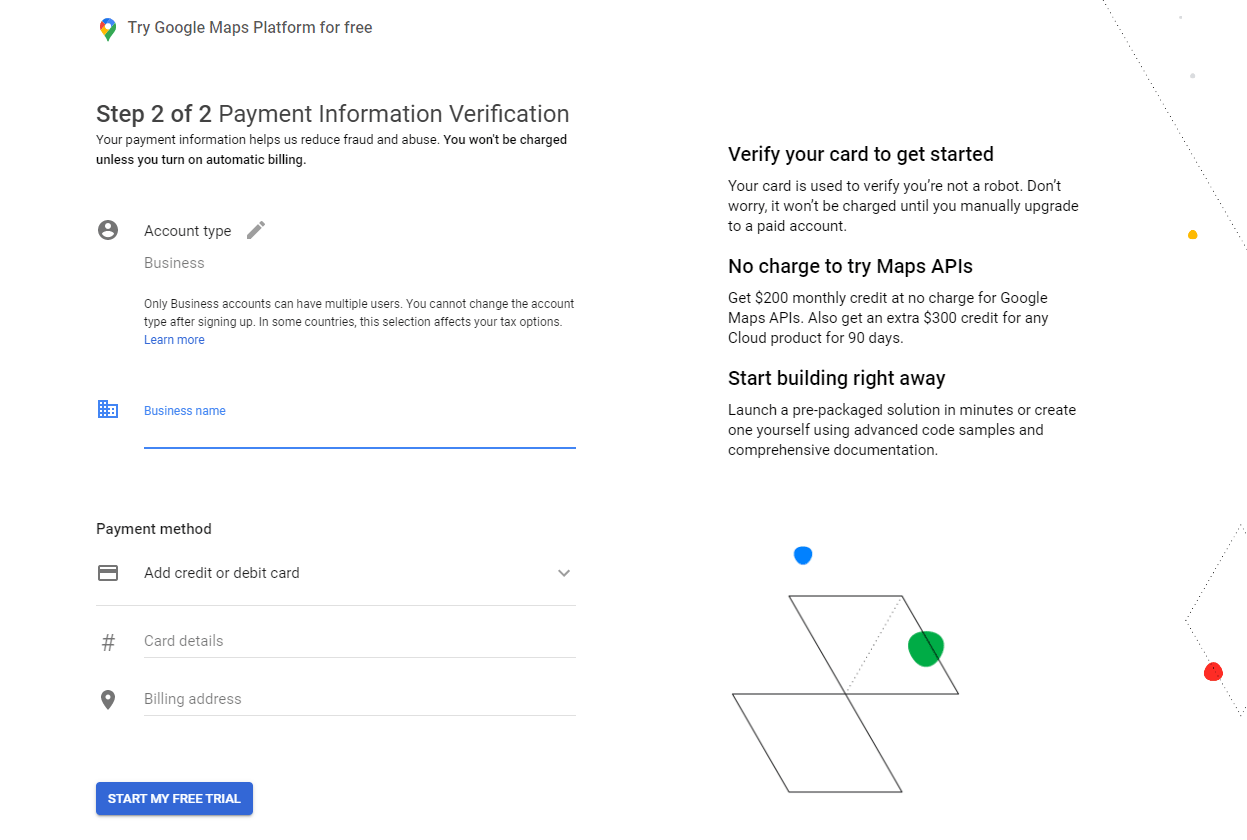
- Answer the provided questions according to your organization.
Google Maps Platform Questions
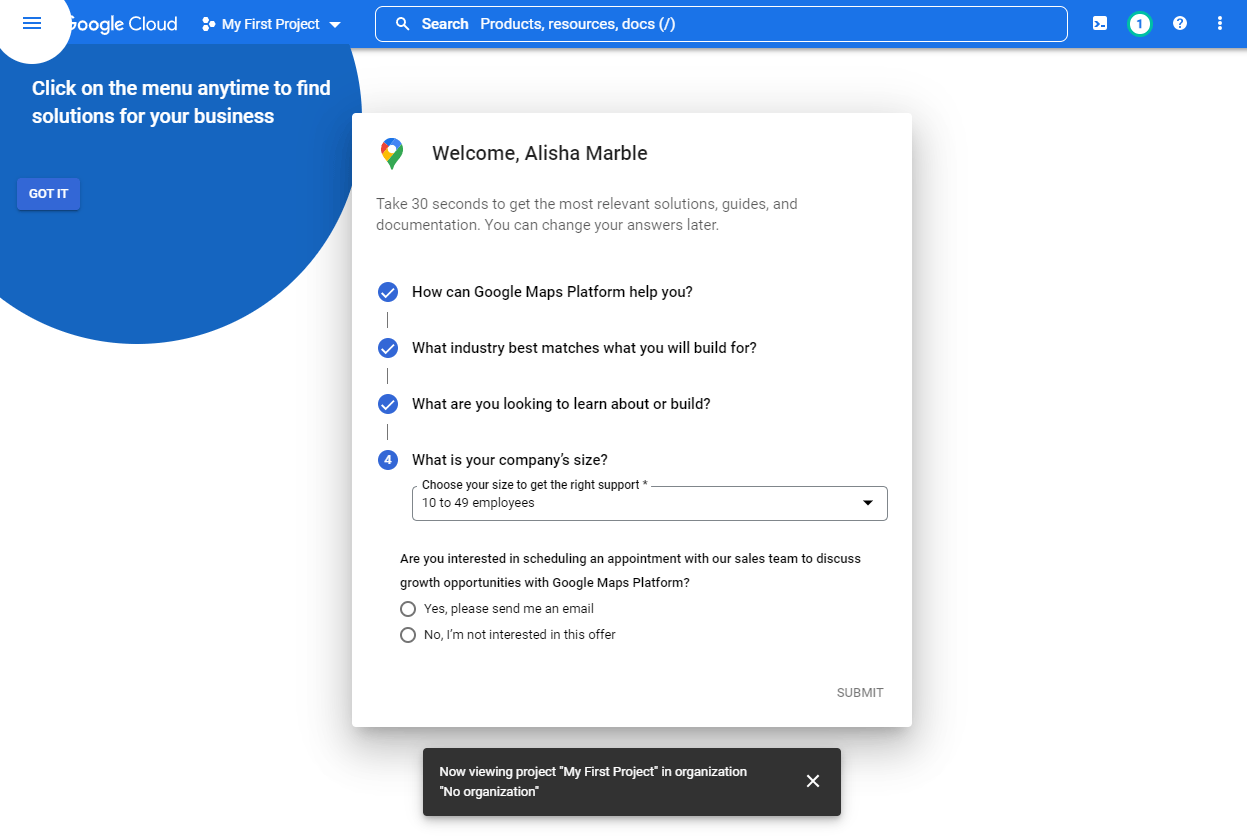
- Click the copy button next to the API key to copy it to your clipboard.
Copy API Key
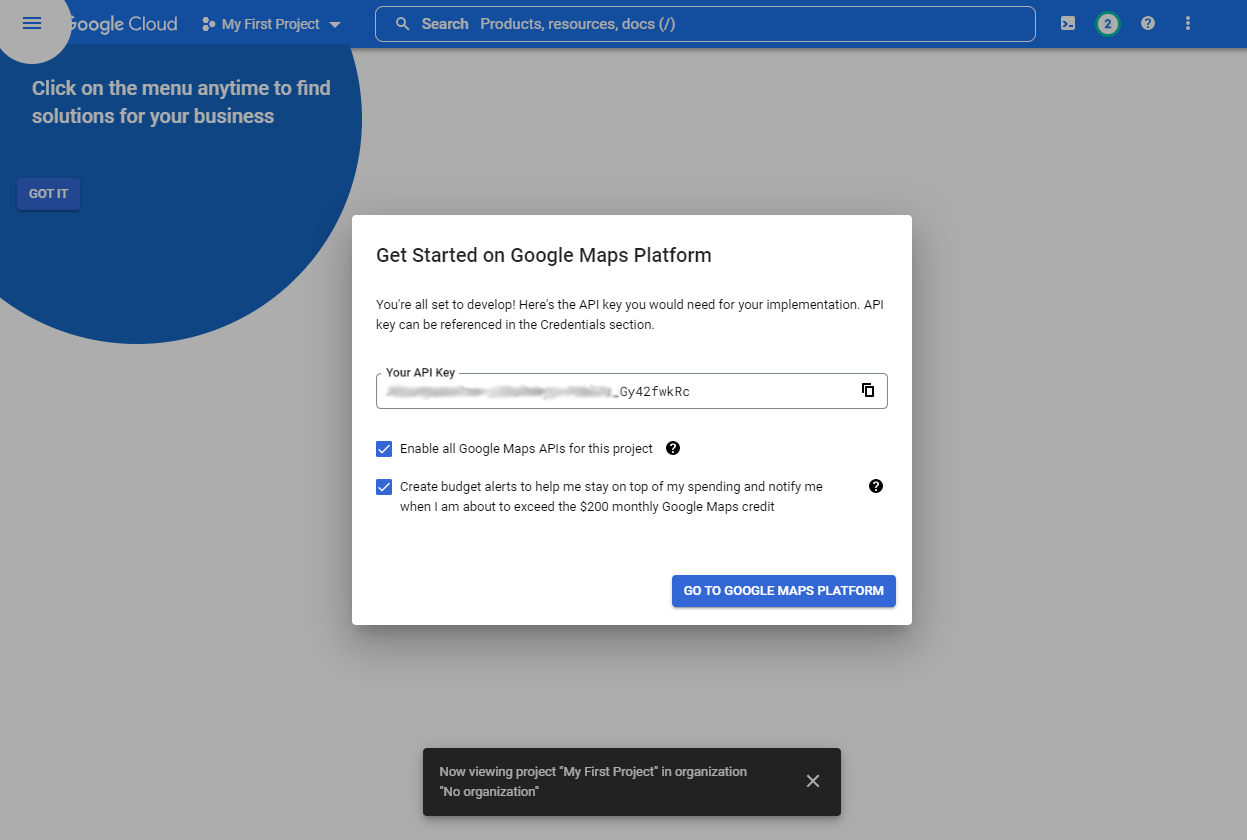
- In Rock, on the Global Attributes page
(Admin Tools > Settings > Global Attributes)
click the "Google API Key" row to edit and add the key value.
Protect Your API Key
After obtaining your key, you may optionally choose to implement a restriction type, to
limit where the API key works. For instance, you might choose
HTTP referrers and
provide your website as yourdomain.com/* to limit its use to only your
website. If you're not sure what to choose we recommend consulting with your IT
department.
Back in Google, navigate to the "dashboard" on the API manager and click on the button labeled "ENABLE API".
This brings you to a page listing all the available API's. Under the Google Maps API click on the JavaScript
API. Then you'll choose your project, and once that's loaded, you'll select the "ENABLE" button near the
top center of the page. You'll also need to enable the Static API for static maps used by blocks like
Group Finder.
Google Map Styles
Maps in Rock serve many purposes—from locating your church to guiding small groups and service projects. Rock’s built-in map themes offer customization, but what if you have a unique vision?
If the default templates don’t fit your style, or you want to showcase your design skills, try Google Map Styles to create a look that’s truly yours.
Google Map Styling
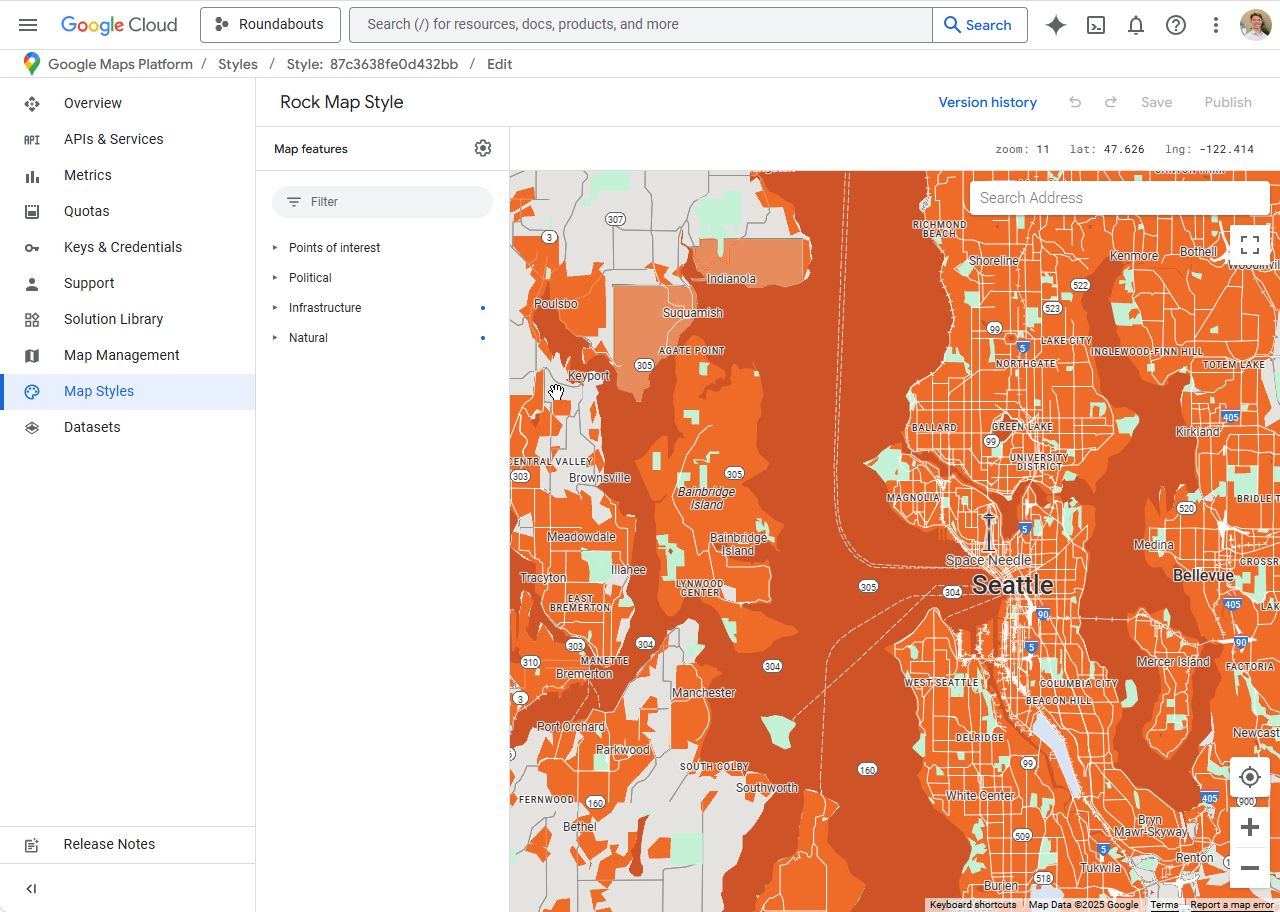
Check out this bright orange map above. Google's Map Styles
makes it easy to change how land, road, and water are themed, or whether they are even visible.
Customizing Your Map Style
When you're ready to create a custom map, access the Google Maps Platform
. Once there, you can start dreaming in the
Map Styles tab.
Google Maps Create New Style
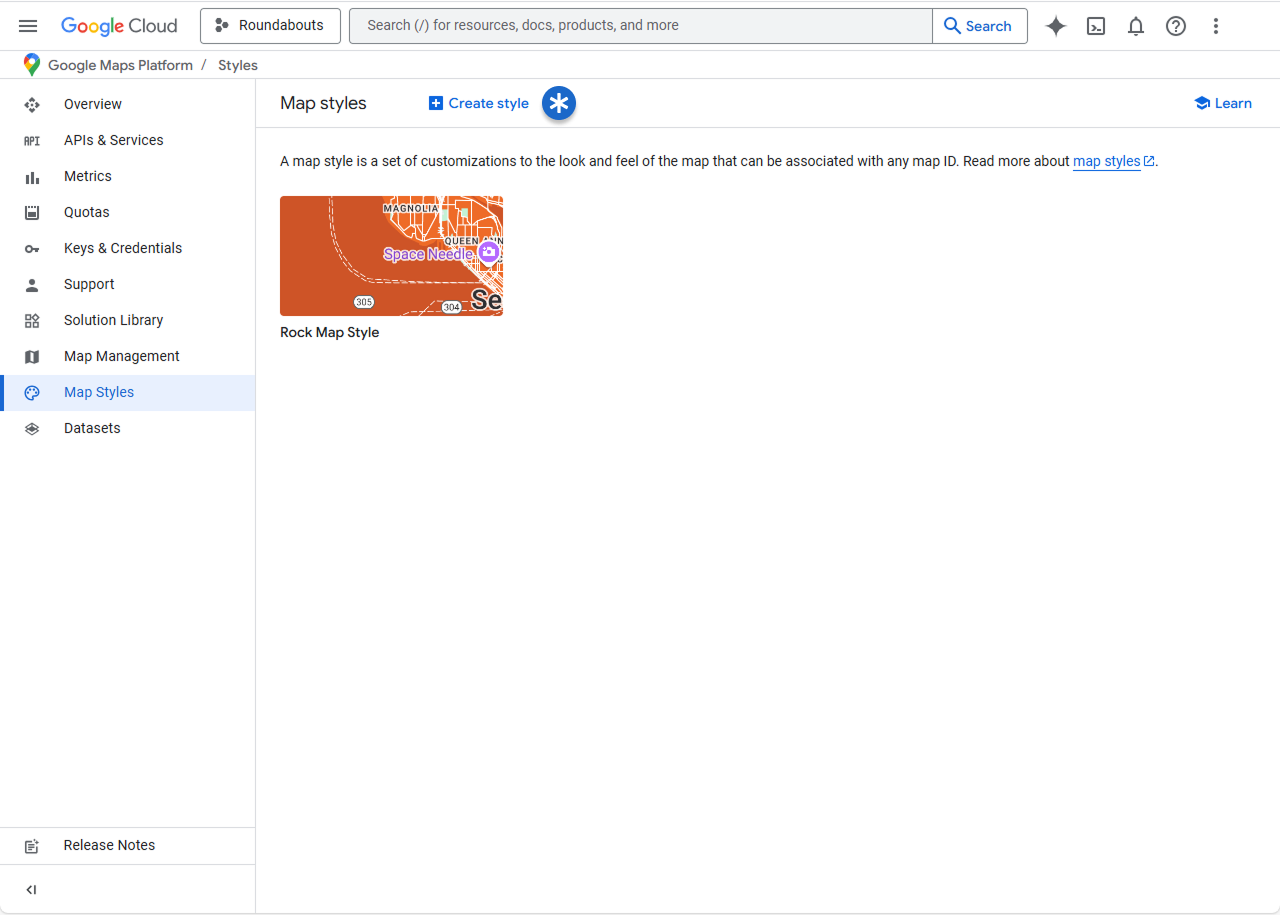
Now edit and edit to your heart's desire. When your map is ready, go to the
Map Management tab.
Here you'll find Google's tool to create your Map ID.
This string of characters tells other systems how you want your Google maps to look.
Create Map ID
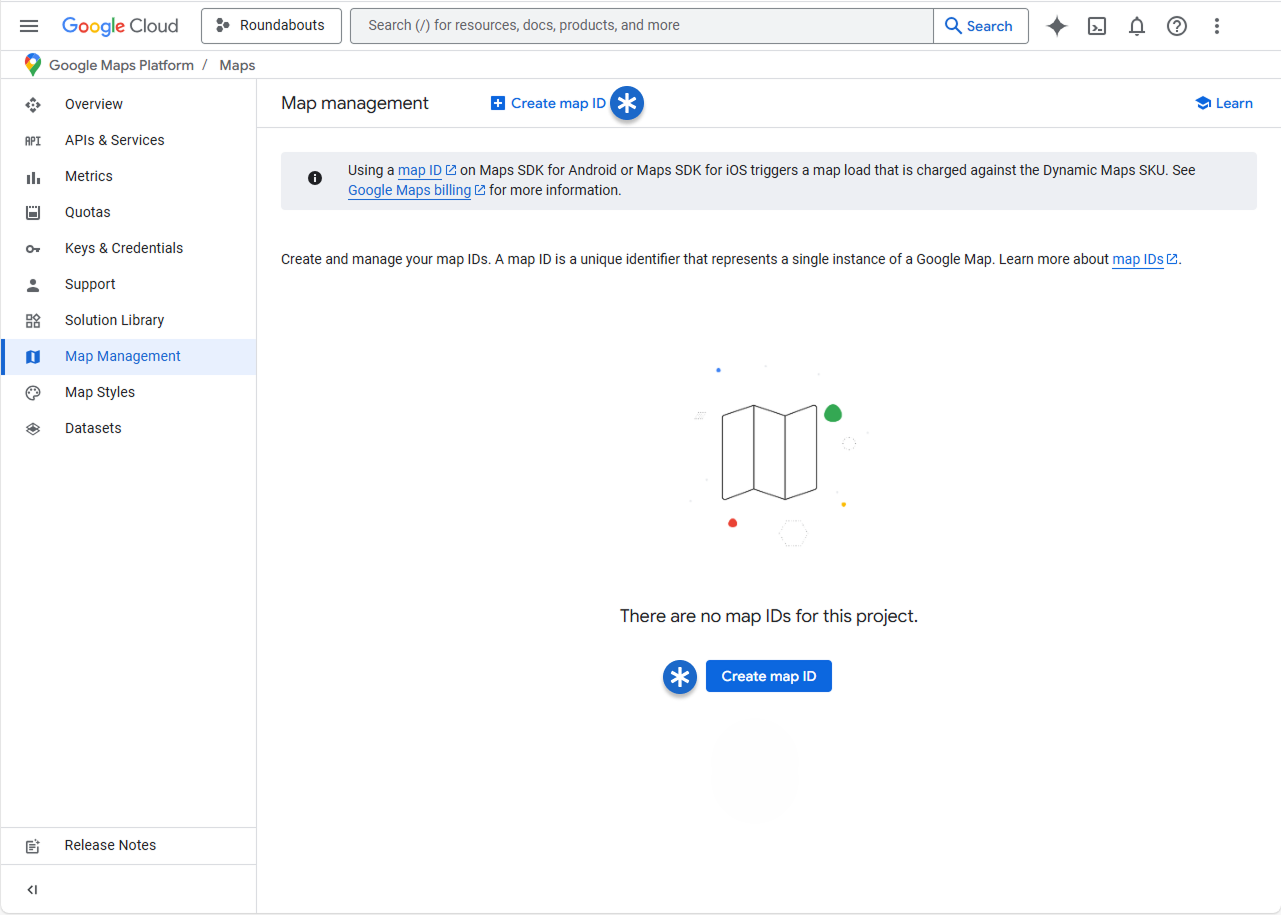
To get the key to your custom map, start by generating a Map ID
and selecting "JavaScript" as the Map Type. After saving, navigate to the Map Styles
section and click "Change Style." Choose your custom design, then save once more to apply your changes.
Now that you have your Map ID
handy, go back to Rock, (Admin Tools > Settings > Defined Types.
Map Lava Shortcode
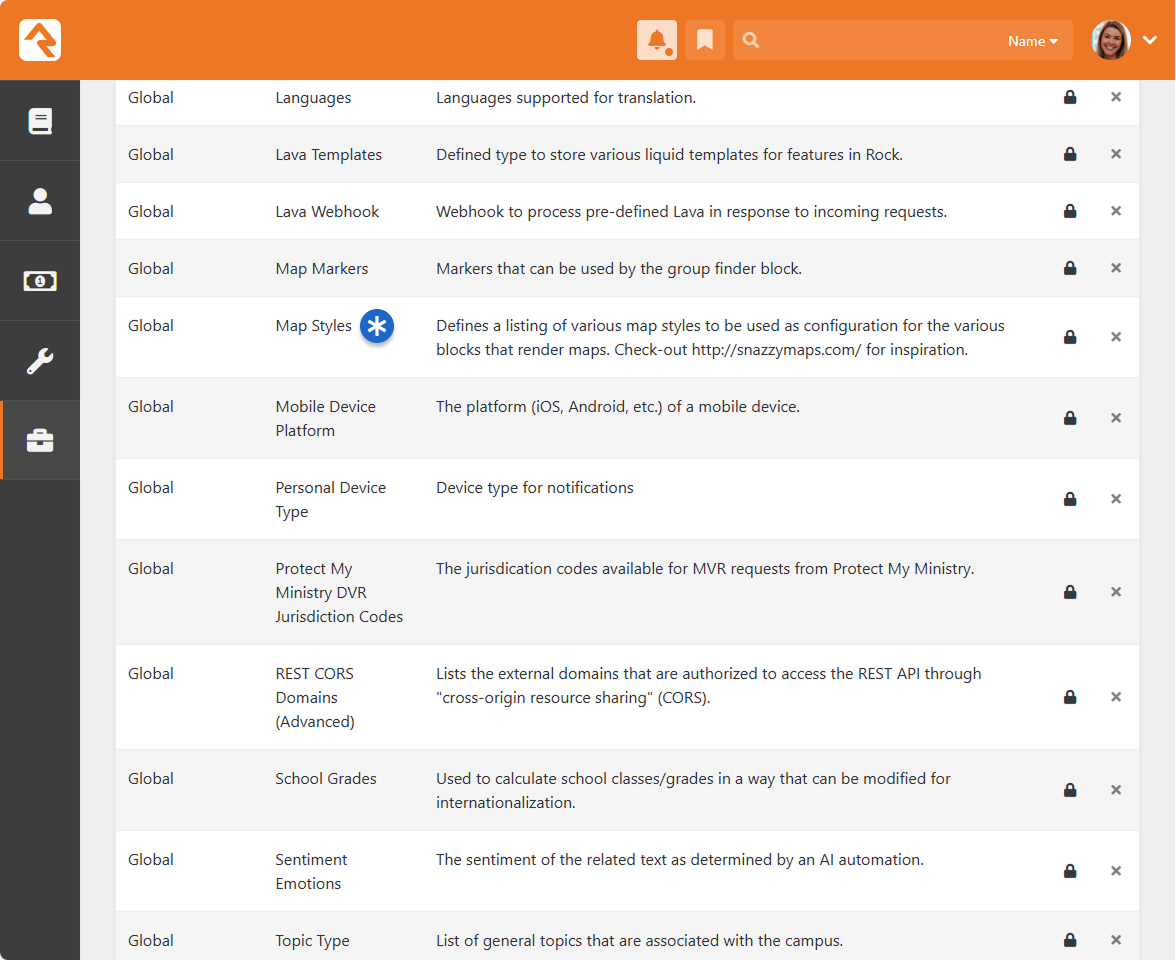
In Map Styles, many pre-configured options exist.
Now, it's time to add a new one. Update the Google Map ID
attribute, save, and you have a fresh look to use on any map you desire. Update the block settings for any map block, and you can select your new theme.
Map Lava Shortcode
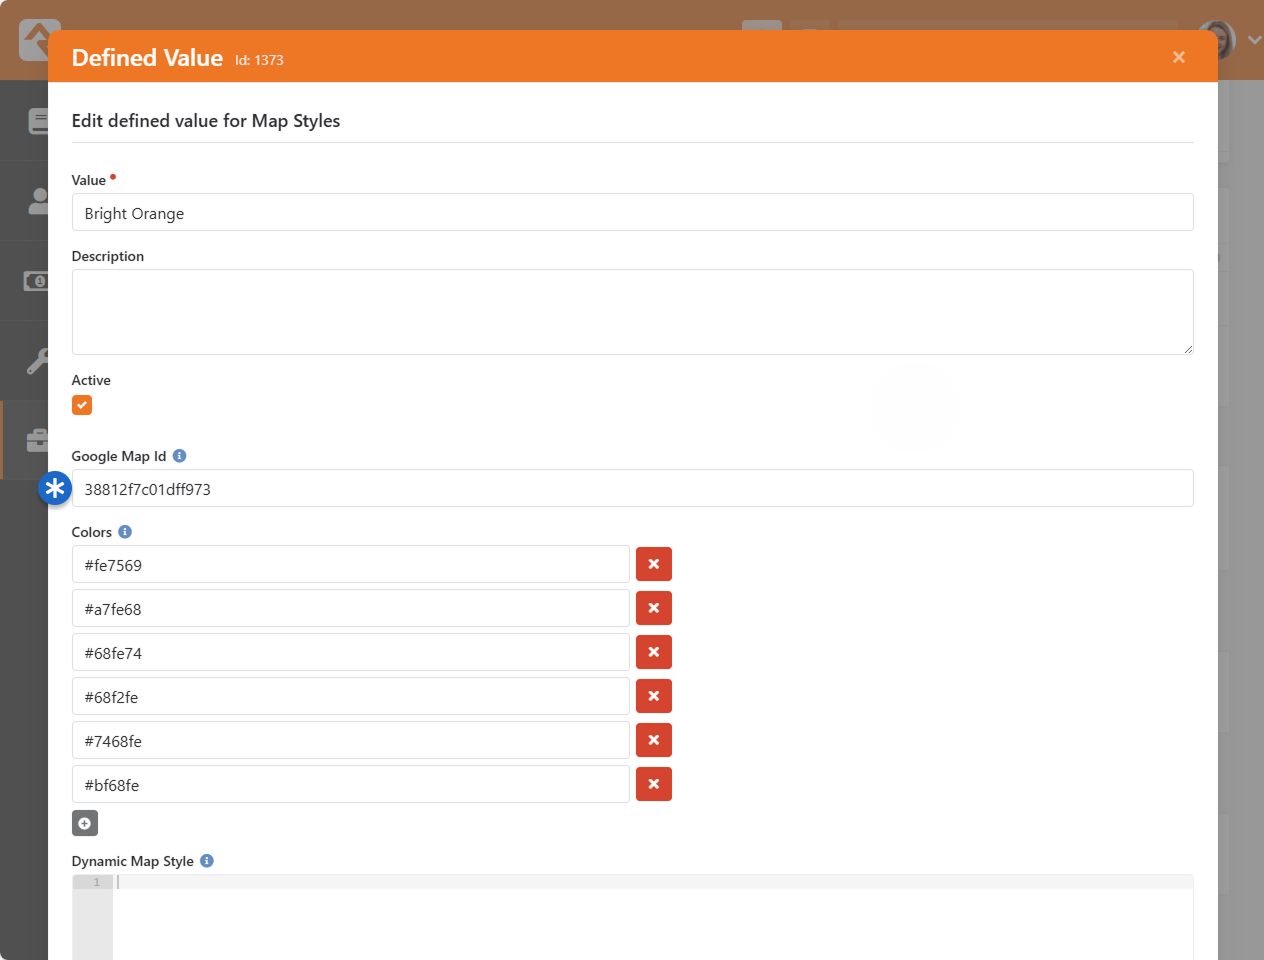
Map Style Lava Shortcode
Maps in Rock aren't confined to specific blocks. The Google Map shortcode lets you drop a map onto any page,
giving you complete creative freedom.
Here's how it works: If you've set a Google Maps ID
in the "Map Types" Defined Type, that styling automatically applies to any shortcode map you create. But let's say you
want a particular map to have its own unique look. You can use the 'mapid' parameter in your shortcode to override the global setting.
This allows you to fine-tune maps for special use cases without affecting the rest of your system.
Map Lava Shortcode
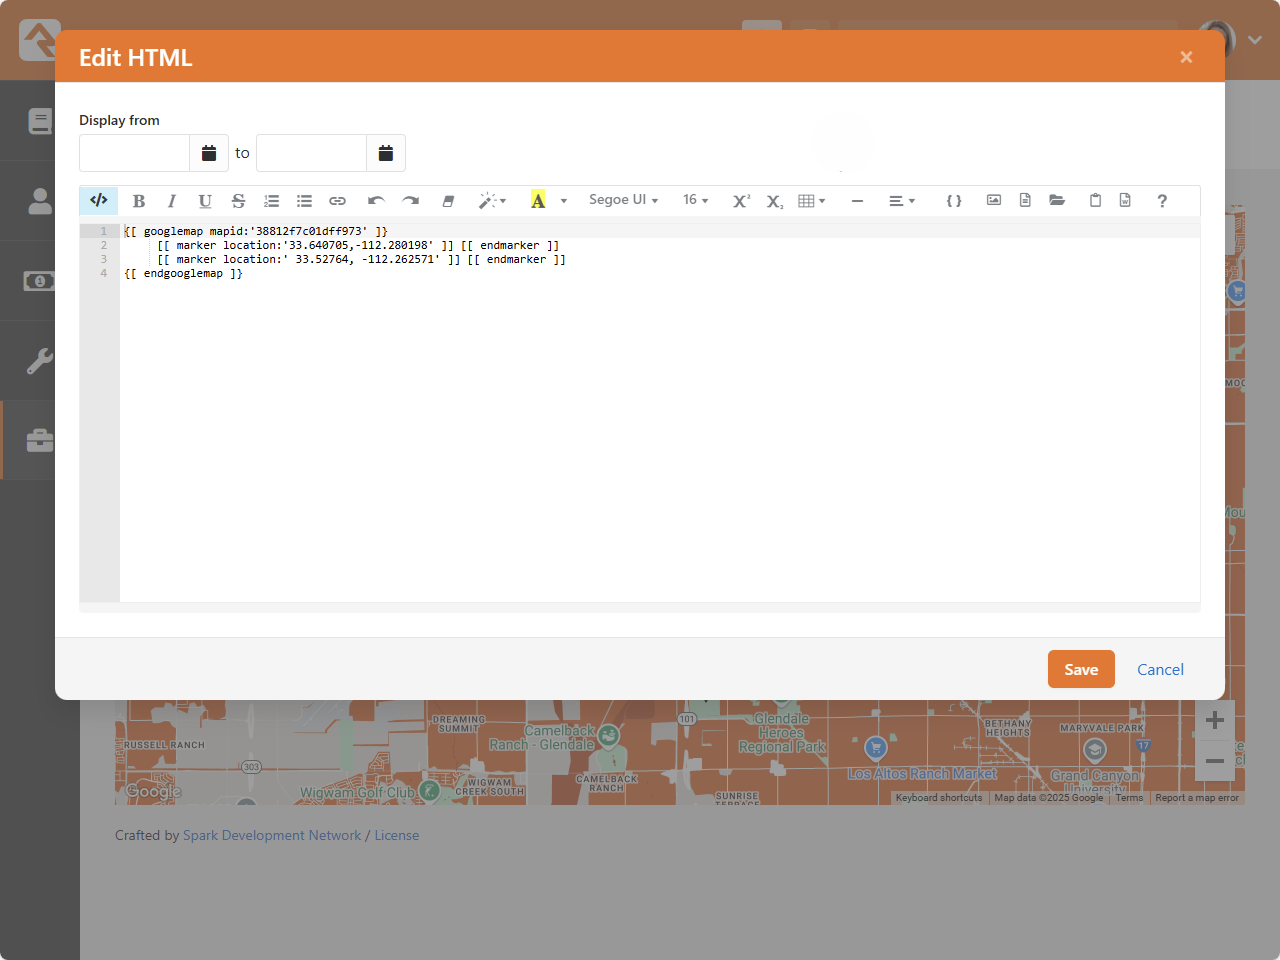
Rock's Lava shortcode is also pretty smart. It checks for a 'mapid' parameter in your shortcode first. If it finds one, that style is applied.
If not, it falls back to the Defined Type. And if you've skipped both, you can still provide local styling directly in Lava.
Defined Types
Defined Types are settings that are
specific to a certain feature. In the list, you’ll find settings for
Check-in,
Giving,
Marketing Campaigns,
Metrics and
People. Each of these will be
discussed more in sections relevant to each feature, but let’s look quickly at how you can edit these
settings.
Each Defined Type
can have multiple values (cleverly called Defined Values).
To edit the values for a Defined Type,
simply click on the item in the grid you want to edit. You'll then be taken to a new screen where you
can edit its values.
A basic example is the “Ability Level” Defined Type. There are three ability levels that can be used
in the system (Infant, Crawling or Walking, or Potty Trained) and each is set up as a Defined Value
within the Defined Type.
Inactive Values Staying Visible
Inactive values are preserved on existing records to prevent data loss. If a record includes an inactive value, it will still appear in the edit control for review or updates. However, inactive values won’t appear for records where they were never used.
Defined Value Categories
Each Defined Type has
an option that allows you to categorize its
Defined Values.
For instance, if you're using a person attribute of type
Categorized Defined Value
then this lets you find and select a
Defined Value
based on its category, without having to go through the full list of all available
Defined Values. The
categories are maintained within the
Defined Type itself if
Enable Categorized Values
is enabled, as pictured below. Each category can have child categories if needed.
Defined Value Categories
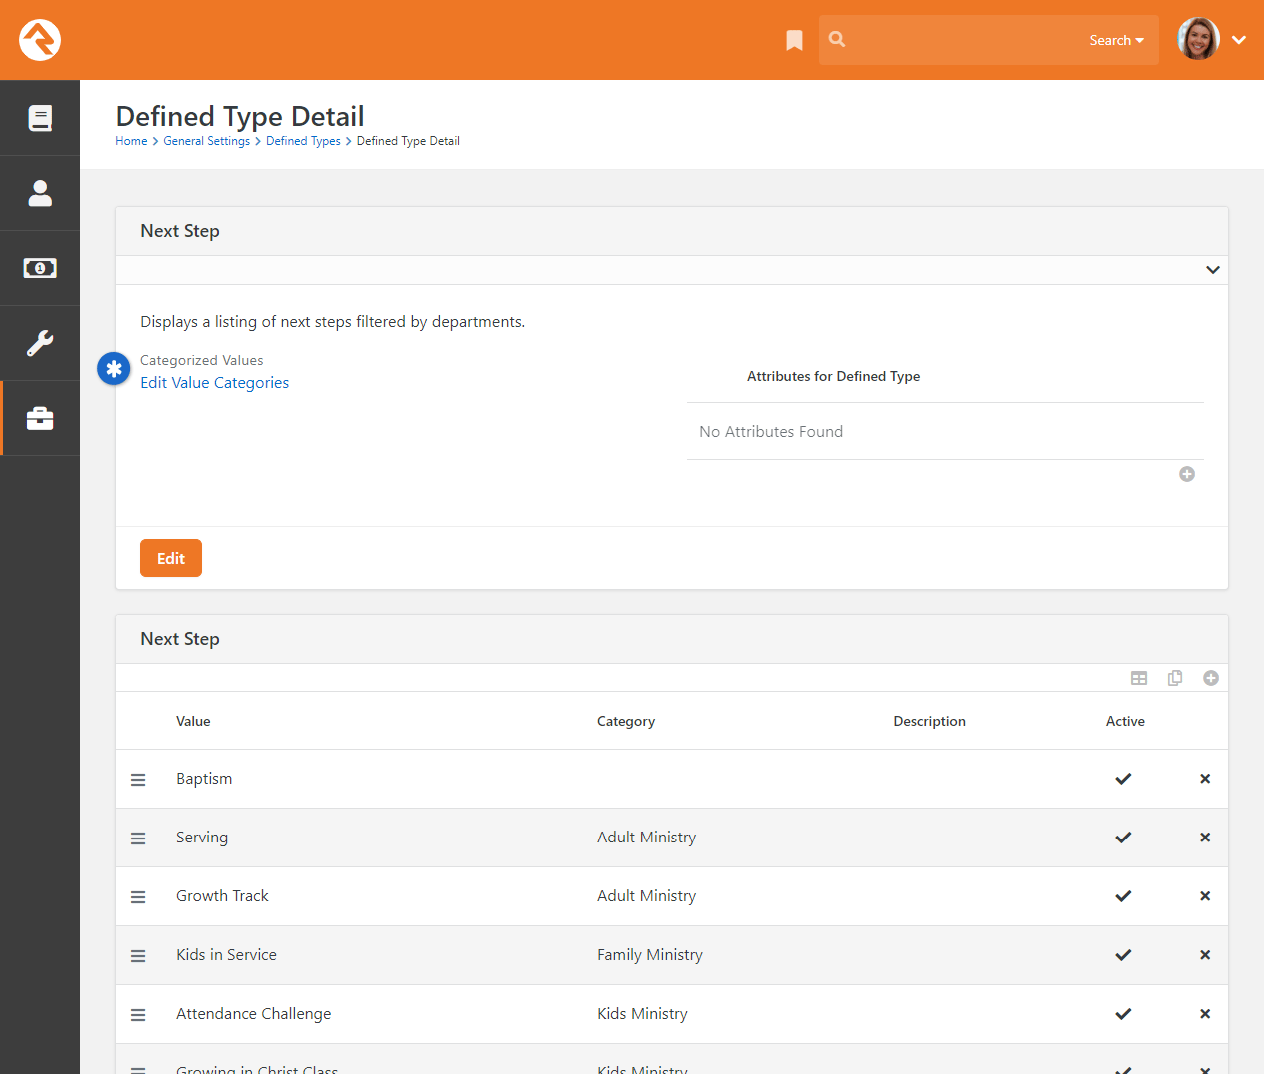
Keep in mind that when a
Defined Value doesn't
have a category, it will always be available. If a
Defined Value has a
category in cases where there are child categories beneath it, it will appear in the list
when looking at the child categories.
Group Types
The Group Types screen is used to
add new types of groups and to modify those that already exist. These settings are discussed in detail in
the
Rock Your Groups
guide.
Campuses
If your organization has several sites, you can manage them here. Check out the Campuses chapter to see
the various options available to you.
Tags
Tags allow you to categorize any entity (person, content channel, etc.) into groupings based on a descriptive label.
The default entity is Person, but you can change it to any entity you want. The possibilities here are endless, and the
results can be super beneficial to your organization.
Tags are discussed in detail in the
Person and Family Field Guide.
As an administrator, you'll be responsible for the classification of organizational and personal tags.
Only administrators can create an organizational tag and convert a personal tag to an organizational tag.
Only those with tagging rights can add security to tags.
Create A New Organizational Tag
To create a new organizational tag, first be sure that your filter settings are set to view only organizational tags. Once this is set, simply click the
button in the footer of the grid.
Converting A Personal Tag to An Organizational Tag
Before converting the tag, be sure that the filter for the tag list is set
to show only personal tags. Next, find the tag you want to convert and click
its row on the grid. You'll then be taken to the edit screen where you can
convert it to an organizational tag.
Securing Tags
Organizational tags can be secured, which limits who can see them. Tagging rights are based on security configuration,
and this advanced usage is typically done by administrators. You can add security to a tag by clicking on the
button in that tag's detail
screen, located at Admin Tools > Settings > Tags.
For more information about security configuration, see the Securing Rock chapter.
Workflow Configuration
Rock is built on top of a powerful workflow engine. These workflows can be
configured using the screens found in this section. Creating and configuring
workflows is covered in the
Blasting Off With Workflows
guide.
Workflow Triggers
You can configure a workflow to be launched whenever an entity record is changed
or deleted. See the
Blasting Off With Workflows
guide for more information on configuring workflow triggers.
File Types
Rock can be made to store and manage several different types of files. These include
things like images for marketing campaigns, label templates for check-in and the
pictures of individuals that display on the
Person Profile page.
These files can be saved in different storage types. The two main storage types are:
-
Database: The files are stored as BLOBs (Binary Large OBjects)
in the database. Database storage is a good solution for items that you’d
like backed up with your data. Database storage is also a bit more secure
since the files are stored in an additional layer of security in the database.
-
File System: Files using this storage type are stored
on the webserver’s file system. They are securely stored in a directory
that can't be directly linked to. This storage type is best for large
files that might eat up your valuable database storage space.
File Type Settings
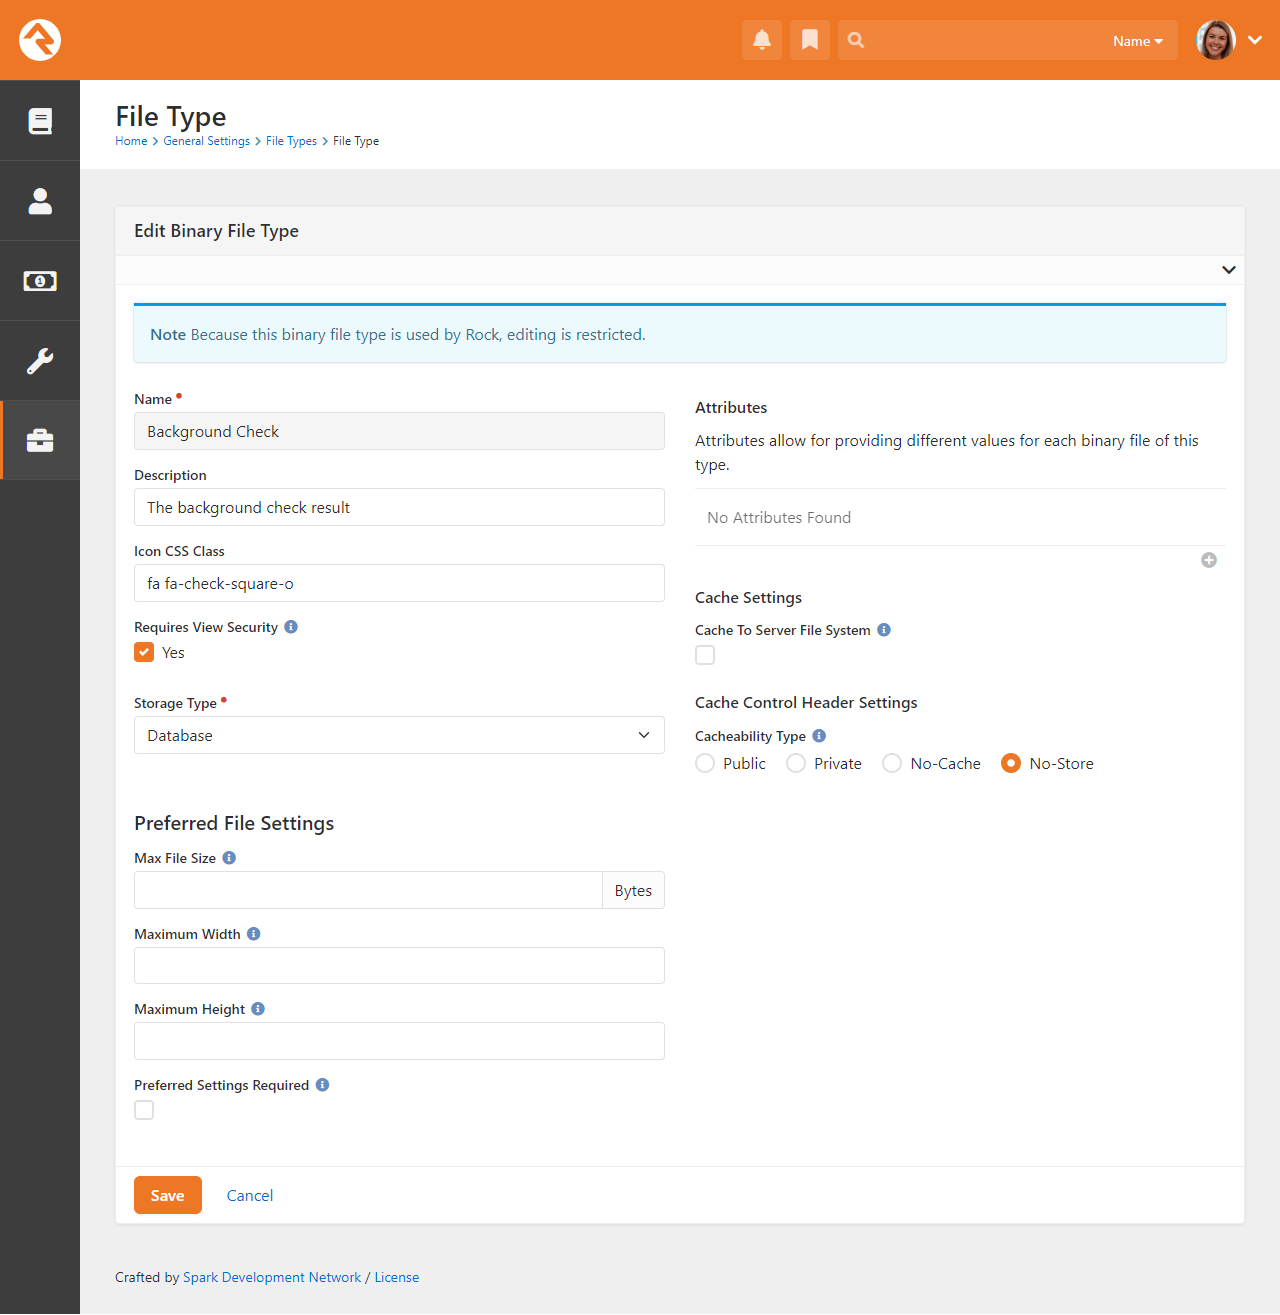
In the screenshot above you may have noticed settings related to Caching.
Caching files can improve the performance of your Rock application, especially
for file types that are frequently accessed. When you enable caching for a file type,
Rock stores a cached copy of the file on the server's file system. This cached version
can be accessed more quickly than the original file, reducing load times and improving
overall performance. Caching is particularly beneficial for images. Rock can resize
images on the fly, which can be resource-intensive. By caching resized images, you can
avoid unnecessary resizing operations and improve performance.
Below is some general information related to the
Cacheability Type
options:
- Public: The file can be cached on the browser or any other shared
network cache like a CDN. This is for files that can be shared and cached by multiple
people, such as static assets like images. This can reduce network traffic and improve
page load times.
- Private: This item can only be cached in the browser. Private is
best for files that should only be cached by the individual's browser, such as
user-specific data or personalized content. This helps ensure privacy and prevents
unauthorized access to sensitive information.
- No-Cache: Files of this type will be checked on every load, but
if it is deemed not to have changed since the last load, a local copy will be used.
No-Cache means that people will always see the most up-to-date version of the file.
- No-Store: The file will never be stored by the local browser.
This is used for sensitive files like check images or background check documents,
to ensure files of this type are protected from unauthorized access.
Lastly, when working with File Types, you have the option to make
Preferred Settings Required.
This simply means that the values you provide for
Max File Size,
Maximum Width, or
Maximum Height must
be respected or the file won't upload.
Named Locations
This configuration screen allows you to define specific locations with a name. You'll
want to use this to define your campuses, buildings and rooms. These
Named Locations
can then be used with configuring groups, check-in, etc.
Devices
The Devices page is
used to manage devices that interact with Rock in some way. Today this is primarily
used to help manage check-in kiosks and label printers, but in the future, we hope
to add support for all types of devices.
Schedules
Several features require the configuration of repeating schedules. For instance,
check-in needs to know your organization’s schedules to be able to configure
the time check-in should start. These screens allow you to create those schedules.
Attribute Categories
Everything stored in Rock can have attributes added to it. For example, we can add
numerous attributes to a person according to what's important to your organization.
In an effort to keep this from becoming unmanageable, you can group your attributes
into categories. These screens help define these categories and provide some basic
configuration for each.
The first step in adding a category is to filter by the data entity you wish to
work with. The default, and most often used, is Person. For each category you
can provide a description and give it an icon to use on the Rock screens.
Prayer Categories
The prayer features use categories to help organize and classify prayer requests.
See the
Raising Up With Prayer
guide for more information on configuring prayer features.
Person Attributes
This screen allows you to manage the person attributes you've configured in the system.
See our Person and Family Field Guide
for more information.
Badges
Badges are simple icons that express details about a person’s involvement or activity
with your organization. Examples of badges would be baptism or attendance rate. You can
view badges in places like the
Person Profile or in
Connection Requests.
See our
Person and Family Field Guide
for more information.
Merge Templates
This is where you'll manage the systemwide merge templates. You can find out more about
merge templates in the Merge Documents chapter of this guide.
Group Requirement Types
This page allows you to manage the group requirements for your organization. You can learn more about
group requirements in the
Rock Your Groups
guide.
Signature Documents
This page allows you to house templates for documents that require signatures, such as registration forms.
Click the button
to add a new document. You can learn more about
electronic signatures in the
Electronic Signatures chapter of this guide.
Universal Search Control Panel
This screen allows you to configure the Universal Search settings. To learn more about Universal Search, see the
Universal Search manual.
Attribute Matrix Templates
The Attribute Matrix Templates screen allows you to create a dynamic layout of multiple field types of your choosing.
Like a spreadsheet, the matrix is made up of rows and columns. You can use Lava to customize the fields, but
what's provided out of the box will likely fit most of your needs. Keep in mind that attribute matrix
templates aren't reportable (yet), but this powerful tool allows you to dynamically populate pages with just about any
information you want. For example, you can create a matrix of phone number attributes, then customize a page to display
those numbers on the fly.
Creating an attribute matrix is a two-step process. First, create your template in the
Attribute Matrix Templates screen, then configure the page to display the matrix. You can learn more about page customization
in the Designing and Building Websites Using Rock guide.
Tag Categories
This screen allows you to view and configure tag categories. To learn more about tags, see the Tags chapter of the
Person & Family Field Guide.
Archived Groups
This screen allows you to view groups that have been archived and allows you to unarchive them. To learn more, see the
Rock Your Groups manual.
Group Member Schedule Templates
This allows you to add or modify group member volunteer/serving schedule preferences. Examples include every week, every other week, etc. To learn more, see the
Rock Your Groups manual.
Document Types
Use the Document Types page to manage documents
for use by any entity. This block provides a summary of the document types, the file type and the associated
entity type.
See the Entity Documents
chapter for full details.
CMS Configuration
Rock is built on top of a very powerful Content Management System (CMS). A detailed review of Rock’s CMS tools is outside the scope of this guide, but we do want to
provide you with a high-level overview of these settings. For full details on any of these configuration settings, check out the
Designing and Building Websites Using Rock
guide.
CMS Configuration
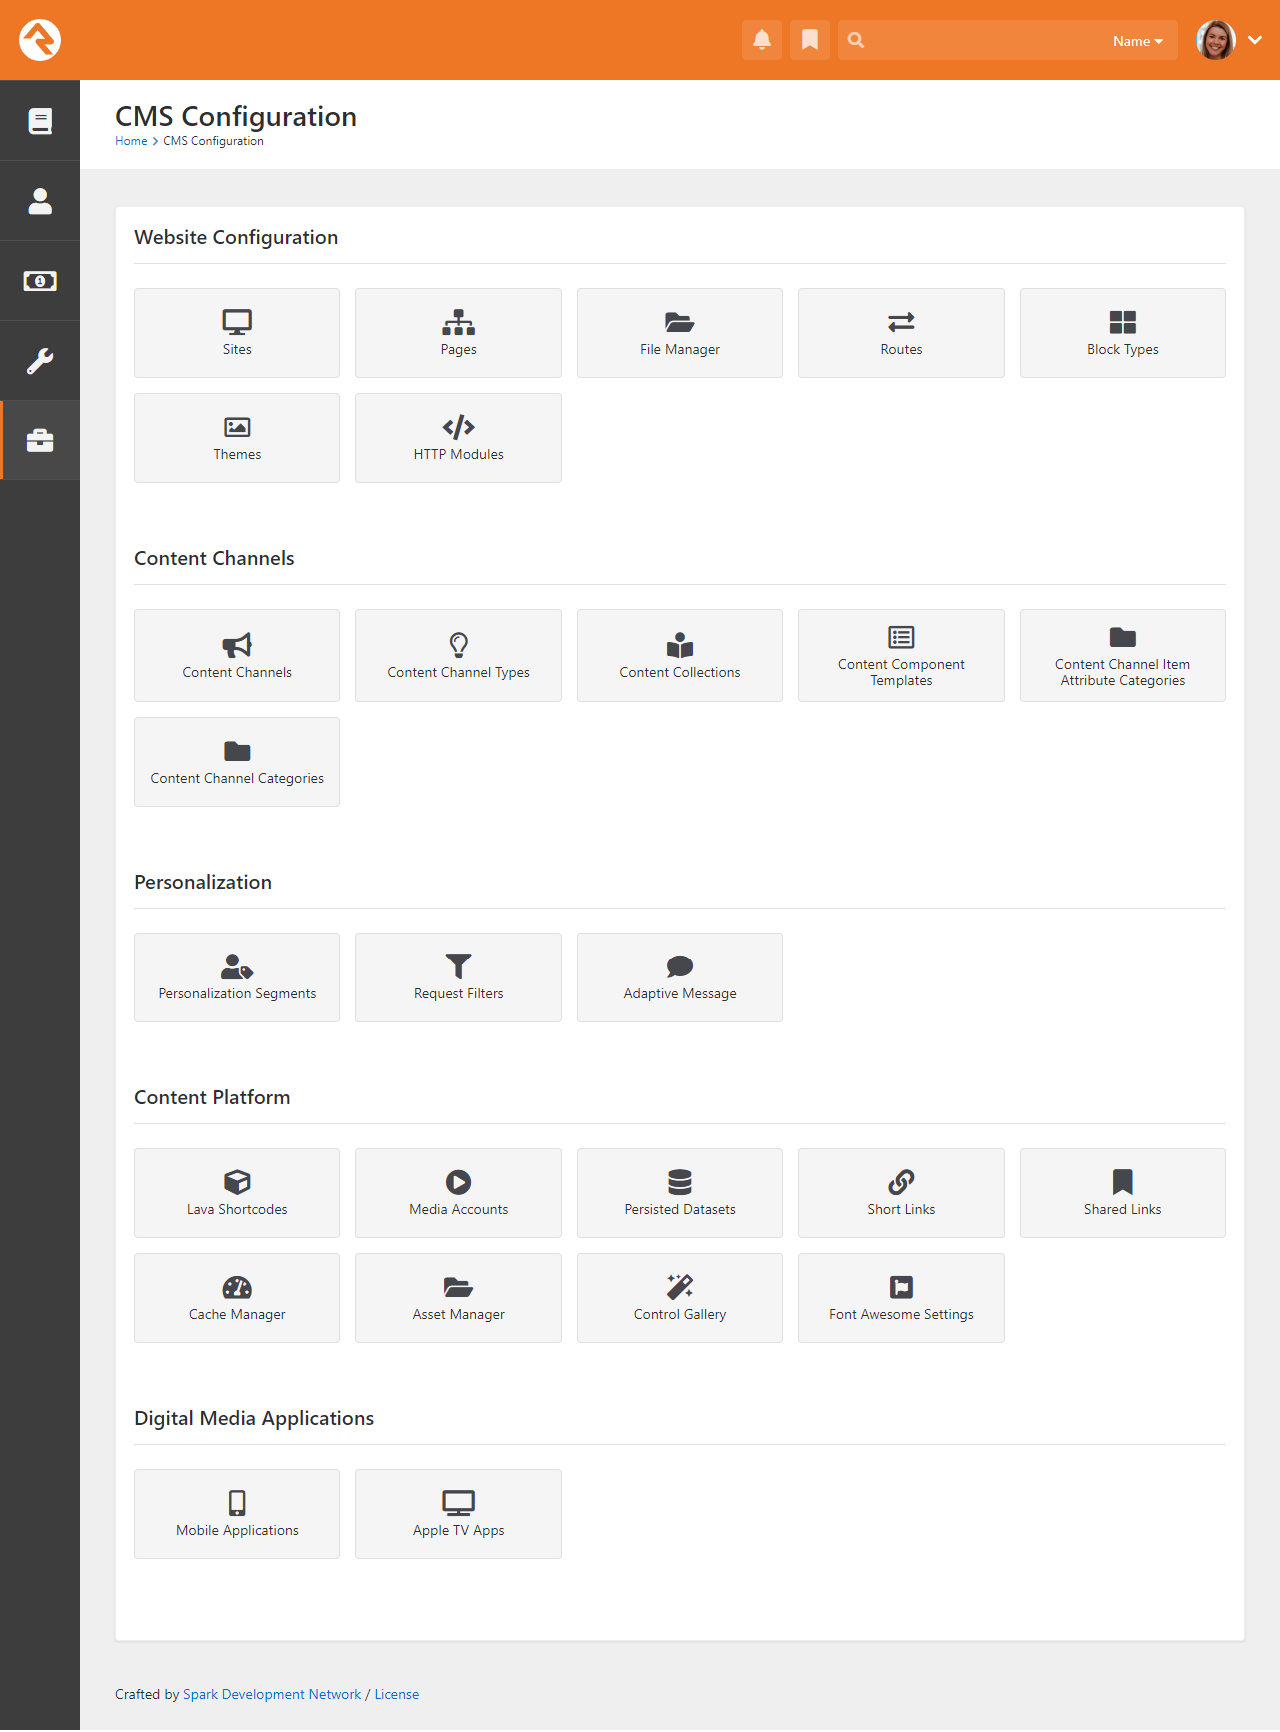
Sites
The sites section lists your Rock websites. Rock initially comes configured with several different sites
for different purposes. Below are a few:
-
Rock Internal: The internal site used by the organization’s staff to manage people, groups and the system in general.
-
External Website: The primary portal for those outside the organization.
-
Check-in: The site that's used for the check-in system.
You can add as many sites as you wish. For instance, the site that
Spark Development Network uses to manage Rock has all of the sites above
plus two additional ones. One hosts the Spark site (sparkdevnetwork.org)
and the other hosts the Rock site (rockrms.com). Notice that each site
looks different and unique from the outside but shares a common set of
data and configuration.
Pages
While most of the configuration for a page can be completed directly on the page itself, there are
times when it’s difficult to navigate to a supporting page if it isn’t shown in the main navigation.
This screen lists all the pages defined in Rock in a simple tree display to help you get where you’re
going. New pages can also be added here.
File Manager
The File Manager allows individuals to upload
files and manage directories on your Rock host server.
Routes
The routes section lists all the routes, or URL page names, in use for both the internal and
external pages of your site. Some routes come preconfigured in Rock. The ability to edit these
system routes is limited, but custom routes you create are fully editable.
Block Types
Every page in Rock is made up of several blocks. These blocks are the core unit of functionality.
For the most part, anything you see on a page is a part of one block or another. The
Block Types page lists all the
types of blocks available.
Themes
Rock comes preconfigured with several themes, all of which you can customize using the Theme Styler. You can also
get creative, though, and design your own. All themes, both system and custom, will be listed here, and you can
access the Theme Styler for each from this page.
HTTP Modules
HTTP Modules in Rock are technical components that handle specific tasks related to HTTP requests,
such as managing deep links for mobile apps, enhancing system observability, and adding custom
response headers. These modules are used by developers to extend and customize the behavior of the
web server. Administrators typically do not interact with these modules directly.
Content Channels
The Content Channels represent the actual
data that's defined for use by the CMS tools.
Content Channel Types
Rock's dynamic content capabilities are a cornerstone of its content management system (CMS) feature
set. The Content Channel Types
page is where you'll define the data structures for dynamic content.
Content Collections
Content Collections in Rock allow you to group multiple content channels (like blogs and sermons)
and calendars into a single searchable collection, making it easy to find related content across
different channels. For details, see the
Designing and Building Websites Using Rock
manual.
Content Component Templates
Out of the box, Rock comes with three preconfigured content component templates.
Use Lava to create your own.
Content Channel Item Attribute Categories
Use this page to add or modify categories for content channel item attributes.
You can edit the name, description, icon or highlight color.
Content Channel Categories
Content Channel Categories
let you group and organize your content channels according to how they're used. This page is
where those categories can be configured. A content channel can be in more than one category
if it's needed in different areas. See the
Designing and Building Websites Using Rock
guide for more information.
Personalization Segments
Content on your Rock website can be personalized to the person viewing it.
Personalization Segments let you filter
content based on something about the person or based on a person's actions.
See the
Designing and Building Websites Using Rock
guide for more information.
Request Filters
Content on your Rock website can be personalized to the person viewing it.
Request Filters relate to the technical characteristics of the visitor's
browsing session. You could use a request filter to show content only if
the person is on a mobile device, or if they're coming from a certain IP
address.
See the
Designing and Building Websites Using Rock
guide for more information.
Adaptive Message
Adaptive Messages in Rock deliver personalized content, enhancing
engagement by showing relevant, tailored content to individuals.
Lava Shortcodes
Shortcodes are a way to make Lava simpler and easier to read. They allow you to use a simple Lava tag in place
of a complex template written by a Lava specialist, which means you can do some really powerful things without
having to know exactly how everything works. Rock comes with some Lava shortcodes preconfigured, but you can
create your own. All of your shortcodes will be listed on this screen. To read more about shortcodes and how to
author them, see the
The Long & Short on Shortcodes
manual and the
Lava guide.
Media Accounts
From here you can manage your media accounts and view analytics for individual media elements.
For full details see the Digital Media chapter below.
Persisted Datasets
With Persisted Datasets
you can shape data for speed and reuse demanding queries without worrying about performance.
For all the details, see the
Designing and Building Websites Using Rock
guide.
Short Links
You can create short links for the internal and external pages of your site either from this screen, or by
clicking the button
in the admin tool bar. All of your short links will be listed here.
For more details on creating Short Links on Rock, check out our
Designing and Building Websites Using Rock Manual.
Shared Links
This is where you can create and maintain bookmark links that are accessible by others in your
organization. These shared links appear with a person's Personal Links. For full details check out the
Person and Family Field Guide.
Cache Manager
The Cache Manager lets you manage the information cached on your Rock server(s) through the use of cache tags. Cache
tags work a bit like personal and organizational tags, except in this case you're tagging types of information. Using
the Cache Manager, you can tell Rock to clear the cache of information based on those tags. There are two sides when
it comes to configuring and using the Cache Manager: the more user-friendly web person side, and the more technical,
IT person side. Let's look at the web person side first.
Clear Cache by Tag
From the Cache Manager screen, you can add and view cache tags, clear the cache by cache tag, view cache statistics,
and clear the cache by type.
Cache Manager Screen
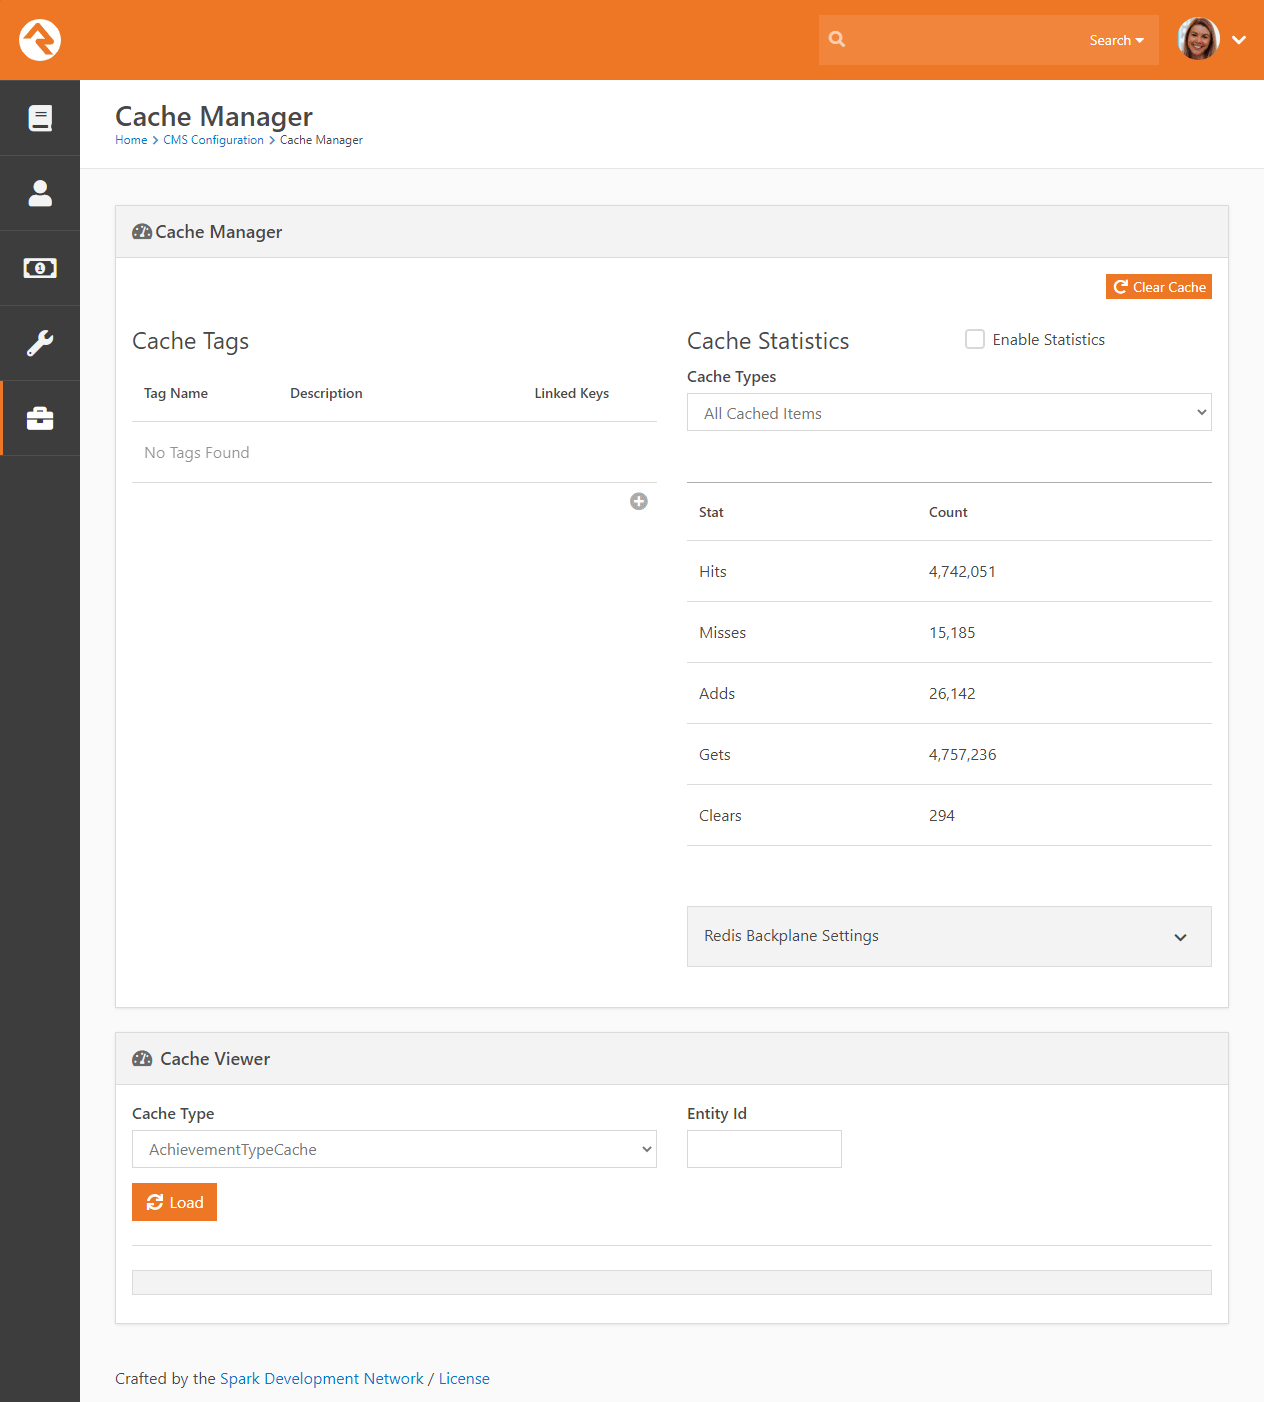
The complete list of cache tags, as well as their descriptions and number of items (called Linked Keys) currently
cached by each tag are listed in the Cache Tags section of the screen. To clear cached items by a particular tag,
click the button for
that tag. Clearing the tagged items from the cache won't change the associated linked key number.
Add Cache Tags
Click the button to add
a new cache tag. Tag names must be all lowercase with no spaces. Once created, they are stored as a defined value of
the Cache Tag Defined Type and can't be deleted.
Add Cache Tag
Current Cache Statistics
The Cache Statistics section of the screen displays
the statistics for the cache type selected in the Cache Types
field. Here's a breakdown of the stats provided:
- Hits – The number of times something was looked for and found in the cache.
- Misses – The number of times something was looked for but not found in the cache.
- Adds – The number of items added to the cache.
- Gets – The number of cache requests (i.e., the total number of hits and misses).
- Clears – The number of times a clear was performed on the cache.
Because these statistics aren't used very frequently, they're turned off by default. This helps improve overall system performance.
You can choose to Enable Statistics using the checkbox near the
top of the page. Keep in mind that enabling statistics causes Rock to restart, so it’s best to do this when there isn’t much
activity on your site.
Clearing Cache by Type
You can clear the cache of the item types specified in the Cache Types
field by clicking the Clear Cache button.
Asset Manager
The Asset Manager
allows you to browse and manage assets in the provider.
Control Gallery
The Control Gallery in Rock is a resource for developers
to access and use various input controls for customizing
the system.
Font Awesome Settings
Font Awesome is the easiest way to add icons throughout Rock. There's a free version already linked to Rock that's
ready and available for use. You can optionally upgrade to a Pro version for more icons.
Security
Due to the sensitive nature of the data in Rock, it's important that you secure it
wisely. This next section displays configurations specific to customizing the security
of Rock.
Security
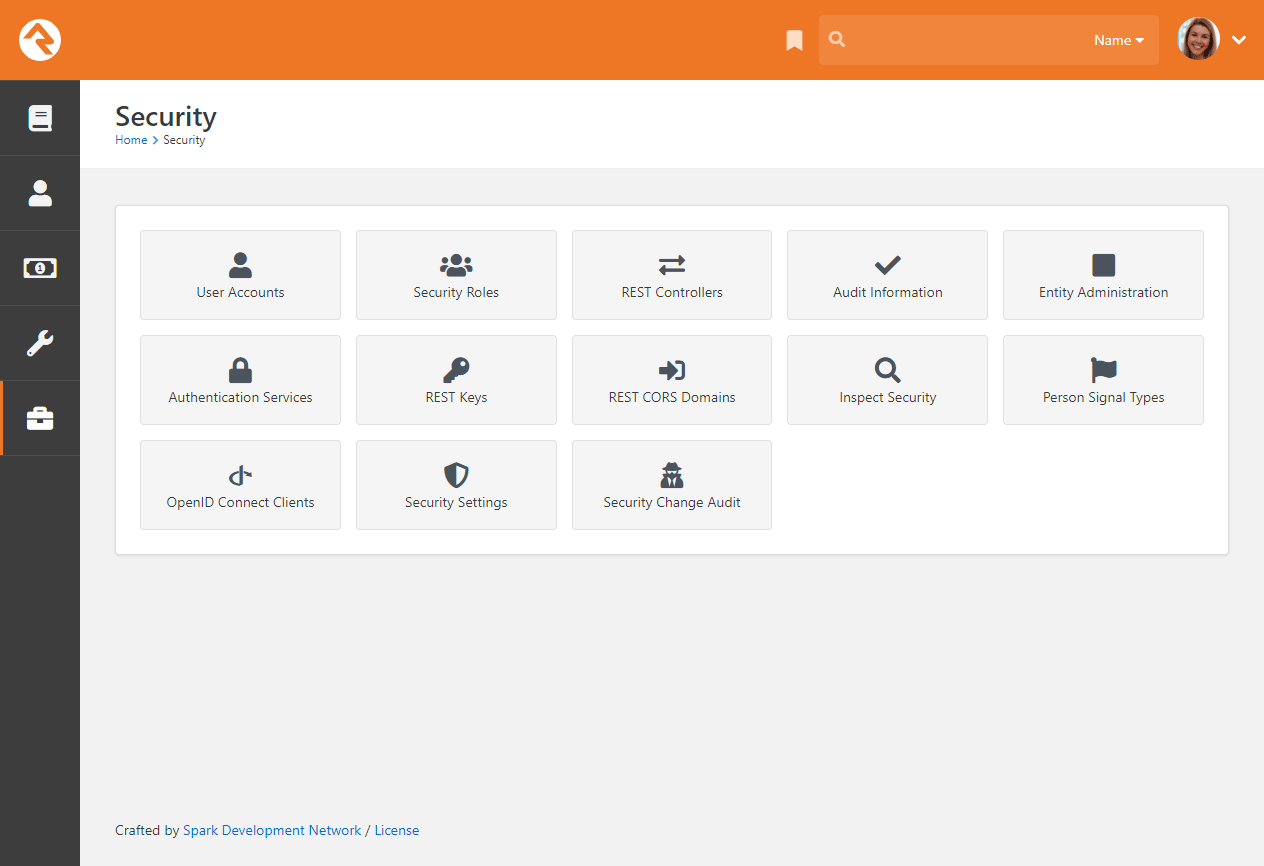
User Accounts
While you can find a specific user’s accounts on their
Person Profile page,
you can see a list of all user accounts on these screens. This helps determine which
person is tied to a specific account and allows you to monitor general login activity.
Security Roles
Security roles are used to lock down features and data in Rock. While you can configure
Rock at the user level (allow and deny specific users), it's much easier to assign people
to roles and then build security around those groups. This adds consistency to your
security model, which leads to fewer mistakes. The security role pages allow you to manage
your roles and to add individuals to them.
It's important that you think strategically as you create security roles for your
organization. A little planning in the beginning can prevent a jumbled mess of
roles in the end. You’ll also want to think about a naming scheme for your roles.
While it sounds trivial, a good naming convention can significantly reduce confusion.
We suggest using a naming convention of:
prefix – area action (RSR – Prayer Administration)
We've added helpful prefixes for you to use:
- RSR – This stands for 'Resource Role'. Roles with this prefix
are used to secure various 'Resources' in Rock.
- APP – These roles are used to secure various applications that
use Rock. For example, Rock ships with a role of
'APP – Check-in Devices' that's used to provide security
to the check-in site.
- WEB – You'll quickly find the need to add several new roles that
allow your staff and volunteers to edit parts of the website.
Adding the 'WEB' prefix to these roles allows you to group
these roles together.
- GROUP – While not technically a prefix, Rock will dynamically add this
prefix for you when it lists groups that, while not a 'Security Role'
group type, are marked to be considered a 'Security Role'.
Feel free to add new prefixes that make sense to your organization.
REST Controllers
One way you can build applications that extend Rock is through a technology called REST
(REpresentational State Transfer,
http://en.wikipedia.org/wiki/Representational_state_transfer).
If this seems Greek to you, don’t worry. Most developers are familiar with it. The screens in this
area help document all of the REST APIs that are available to you. From these screens you can also
manage REST API security to ensure only authorized applications can access the data.
Audit Information
Most changes to the Rock database are tracked in a special audit table. The information
in these tables is presented in the screens of this section. This is a helpful tool for
you to see what changes are being made and by whom. You can also use these logs to write
custom SQL reports or create custom jobs that take action after certain changes.
Auditing can be enabled under
Admin Tools > Settings > Global Attributes | Enable Auditing.
However, note that enabling auditing will cause a significant impact to Rock's performance.
You may want to enable this only for brief periods.
Entity Administration
Entities are specific types of data. A person is a type of entity. So is a group, an email
communication and a financial transaction. For those of you familiar with databases, an entity
is like a table in your database. In fact, many entities do have a corresponding table in the
database. These sets of screens allow you to view and configure the entities in Rock.
There are only two configuration items that you need to worry about. The first is whether the entity is "common."
Common entities are shown at the top of the list when you need to select from a list of entities. We've
preconfigured Groups and
People to be common, but you may wish to add
more (especially if you start adding custom entities of your own).
The second configuration item you’ll want to note is related to security. You can also add security to entities
to help protect the data they contain. For instance, we've configured the
Financial Transactions
entity to only be viewable by those in the finance security roles. This is especially useful when it comes to
using the reporting features of Rock. The security you define here will be used by the reporting engine to
ensure that only authorized individuals can access sensitive data.
Authentication Services
Rock can be configured to allow several types of authentication during the login process.
The available options out of the box are:
-
Auth0: Auth0 provides authentication and authorization as a service.
For full details, see the Auth0 Integration section.
-
Database: This is the most common authentication type for most organizations.
This stores the user's username and password in the database. The user's password is stored
in a one-way encrypted format so it can't be retrieved by any means.
-
Active Directory: If your organization uses a Microsoft Active Directory
for network logins, Rock can use it to authenticate your staff. To enable this service,
you'll first need to activate it and provide the address of a Domain Controller server
along with the Domain Name of your network. Then, you'll then be able to configure
Active Directory logins for your staff under the Security
tab on their Person Profile pages.
-
PIN Authentication: This authentication service is primarily used in the Check-in Manager to
provide a quick way to authenticate on touch devices. This authentication only requires a username made up of numbers.
-
Facebook: You can also enable the use of an individual's Facebook account as
authentication to Rock. This makes their life a little easier because they have one less
password to remember. In order to enable this, you'll need to configure a Facebook application.
-
Google: This authentication provider allows guests to use their Google account with Rock.
-
Twitter: As you can probably guess... yes, you can use Twitter as an authentication source.
-
OidcClient: OpenID Connect (OIDC) is an open standard for verifying the identity of an
individual in one system based on the authentication performed by another system. In this case, Rock would
be the Client, allowing people to log in to Rock using credentials from another system. For more information
on using Rock as an OIDC Server see the OpenID Connect chapter of this guide.
Implementing Authentication
Once you implement a new authentication service, you'll need to enable it on each login page where you want it used.
REST Keys
When writing applications that use Rock's REST API, you'll need to use keys for authentication. These keys
can be set up and configured here. See Rock's developer documentation for more information on using REST keys
in your applications.
REST keys function as a type of person record, allowing you to assign them to any roles as needed. When adding
a REST key to a role, use the key's name to search for it.
REST CORS Domains
Writing secure web applications requires that all domains that use your server's REST API be authorized
using Cross-Origin Resource Sharing (CORS). You can define these allowed domains here.
Inspect Security
The Inspect Security page does just what the name implies:
allows you to quickly verify a person's security settings.
It also allows admins to "pop the trunk" on their own security settings when they lock themselves out of Rock.
(It happens sometimes.) To read more about verifying permissions, see the Securing Rock chapter
of this manual.
Person Signal Types
Signals are discreet flags that can be assigned to a person to bring attention to a sensitive or private matter.
As with most aspects of Rock, signals are highly customizable. They can be used to flag anything from security
concerns to high-level lay leads and everything in between. Check out the
Person Signal Types chapter of the
Person & Family Field Guide to learn more about
this powerful feature.
OpenID Connect Clients
When you're using Rock's OpenID Connect server feature, this is where you'll go to add your clients. We cover
this area in detail in the OpenID Connect chapter below.
Security Settings
From the Security Settings
page you can manage how people with different
Account Protection Profiles
are handled by Rock.
These settings are in place to help avoid account hijack attempts, and to avoid someone
logging in as someone else by using things like a tokenized link in an email or Rock's
impersonation feature. For instance, people with higher Protection Profile levels will have
duplicate records created whenever a check for an existing record would otherwise be
performed, like when filling out an online form. This helps ensure the existing account is
secured and protected against malicious activities. We know duplicates stink, but you can't
come down to zero duplicates and have good security.
As described below, there are also protections around who can merge certain duplicate records
when they're created. If an account has a Protection Profile of High or Extreme, then the
person doing the merge will need the specified security role to combine the records. To
protect these accounts, the roles you assign should be ones that are limited to a small number
of trusted and trained people.
Security Settings
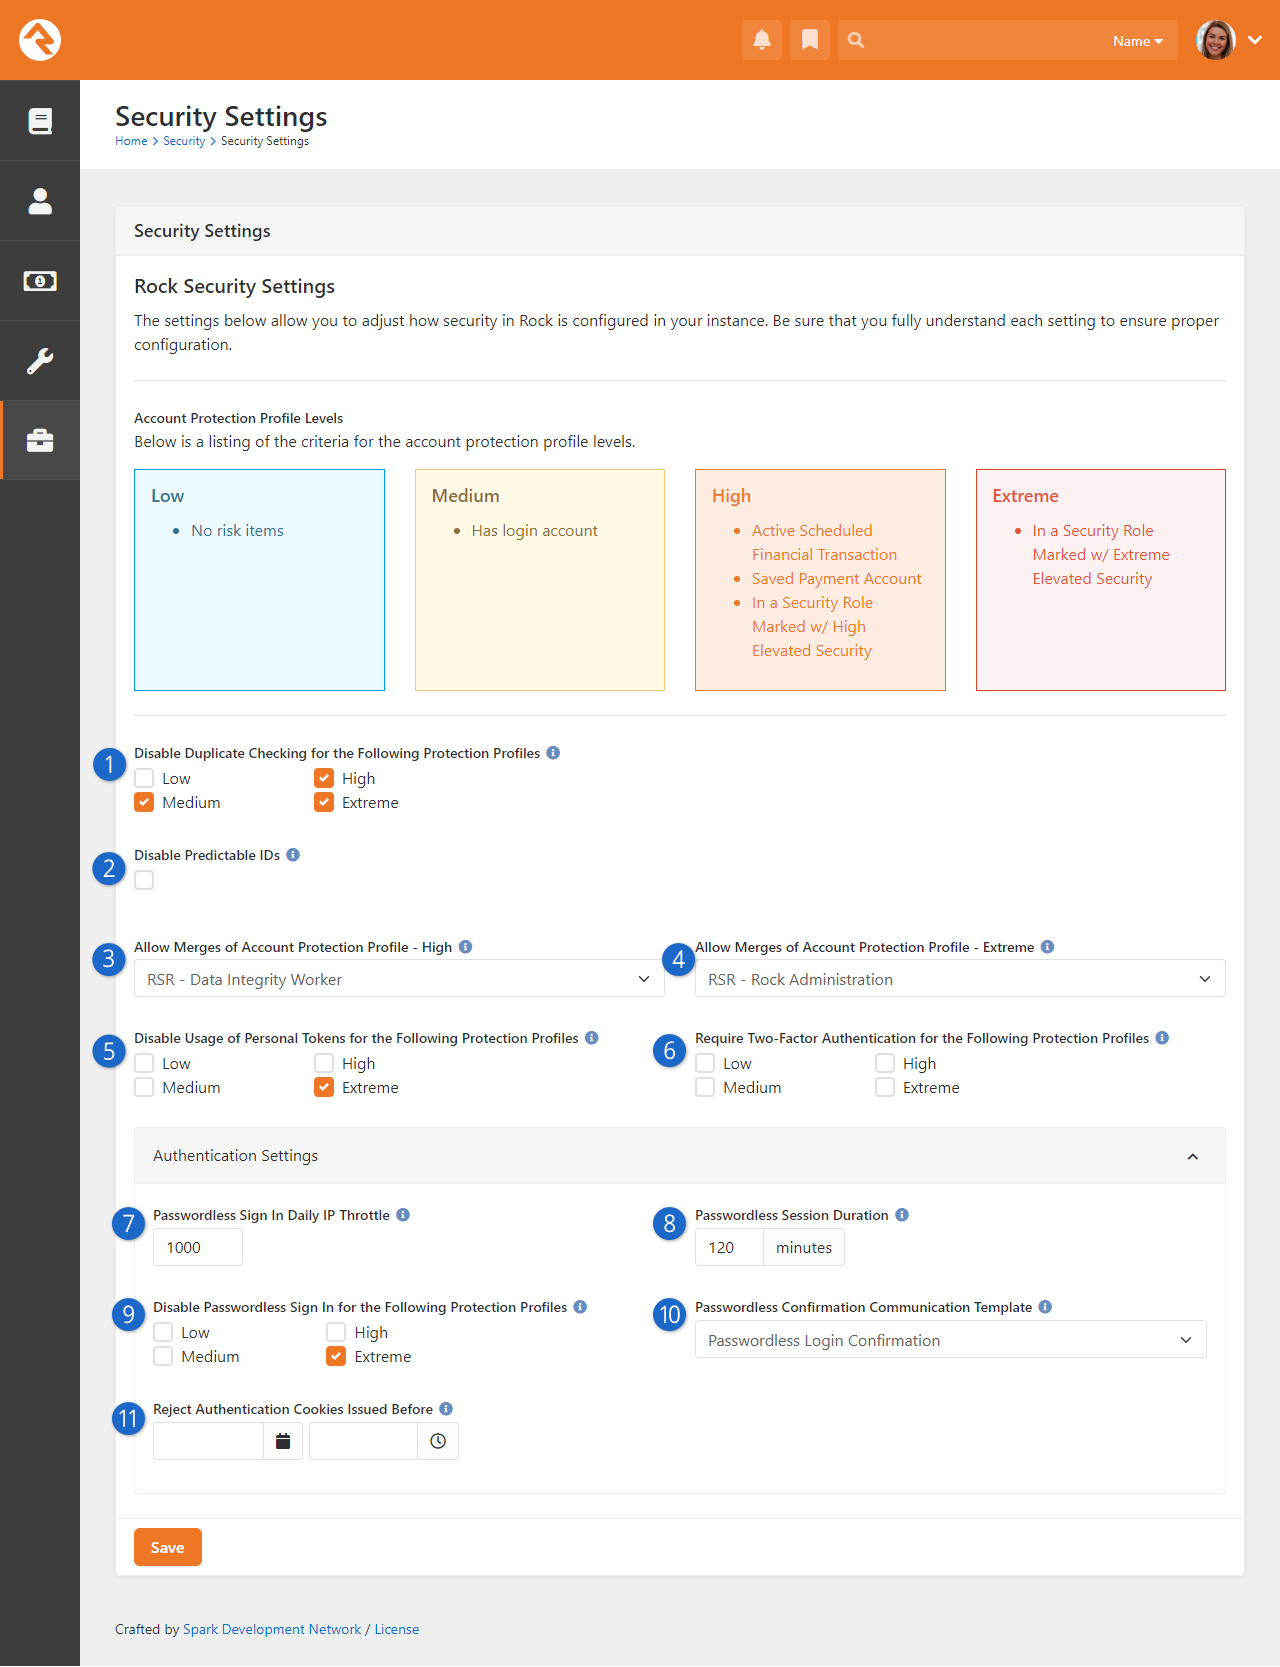
- 1 Disable Duplicate Checking
- Out of the box, duplicate checking is only enabled for Low Protection
Profiles. To ensure optimal security, we strongly recommend keeping the default
settings in place.
- 2 Disable Predictable IDs
- When checked, the GetFile, GetImage and GetAvatar endpoints will use ID Keys and
GUID values instead of predictable IDs.
- 3 Allow Merges - High
- Only people in the security role specified here will be able to merge records
where at least one of the records has an Account Protection Profile of High.
- 4 Allow Merges - Extreme
- This is similar to the above setting but applies when one or more of the records
being merged has an Account Protection Profile of Extreme.
- 5 Disable Personal Tokens
- People with the selected Account Protection Profiles can't be impersonated and
can't use tokens to authenticate into Rock. This will also affect mobile onboarding,
as people with Protection Profile levels selected here will not be able to be onboarded.
- 6 Require Two-Factor Authentication
- Selected Protection Profiles will require
Two-factor Authentication (2FA) when logging in.
- 7 Passwordless Sign In Daily IP Throttle
- This simply limits how many times the same IP address can use passwordless login in a
single day. We don’t think people will be logging in 1,000 times per day, but this is a
security measure to prevent against certain types of digital attacks.
- 8 Passwordless Session Duration
- Once the person logs in their session will only last this long. After that they’ll
need to authenticate again.
- 9 Disable Passwordless Sign In
- People with access to sensitive areas of Rock should probably be required to provide
a password. You don’t want to make it too easy to log in as an administrator.
- 10 Passwordless Confirmation Communication Template
- Rock ships with a Passwordless Login Confirmation communication template
specifically for this purpose.
- 11 Reject Authentication Cookies Issued Before
- This setting lets you reject all authentication cookies issued before the provided
date and time. This forces people who logged in before that point to log back in. This
is particularly helpful when sensitive login sessions, such as those generated by
impersonation tokens, need to be revoked to maintain system security. See below for
additional details.
Passwordless Login
More details on Passwordless Login can be found in the User Login & User Accounts chapter
here.
Enabling 2FA Without Passwordless Sign In
If Passwordless Sign In is disabled for a protection profile, enabling Two-Factor Authentication (2FA) for the same profile will lock them out from Rock during their next sign in attempt. Don't worry though, Rock won't let you enable both settings at the same time.
Reject Authentication Cookies
In the screenshot above we briefly looked at the
Reject Authentication Cookies Issued Before
setting. Here are some additional details on this setting and when
you'll need it.
Often, you'll want to send communications which include a link to a page
in Rock. That link sometimes includes a Person Token, using the
PersonTokenCreate Lava filter.
It's a low-friction way to get people quickly logged in and
directed to the relevant page. However, the link is unique to each communication recipient.
So, if the person forwards the communication to someone else,
or posts the communication publicly, others can potentially use it to log in as them.
This shouldn't scare you away from using these tokens. The
PersonTokenCreate
Lava filter lets you restrict usage of the token to a certain timeframe, a maximum number of
uses, or a specific page, so there are built-in safeguards. However, browser cookies
introduce a potential loophole in those safeguards. If a person logs in while the token
is still valid, they get an authentication cookie. This cookie can allow them to stay
continuously logged in, even after the token is no longer valid. When this happens, you
need a way to force the person to log out.
Forcing people who have used the token to log out is a two-step process. First, you'll
need to use some SQL to delete the token from Rock. Then, you can adjust the
Reject Authentication Cookies Issued Before
setting to be the date and time you deleted the token, or slightly after. To delete the token
you can use the following SQL:
Delete Person Token
DECLARE @PersonId AS INTEGER = 12345; --Replace "12345" with the Person Id

DELETE FROM
    [PersonToken]
WHERE
    [PersonAliasId] IN  (
                            SELECT
                                [Id]
                            FROM
                                [PersonAlias]
                            WHERE
                                [PersonId] = @PersonId
                        );
Deleting the token ensures it can no longer be used. With the
Reject Authentication Cookies Issued Before
date and time set, you ensure anyone who is already using the token will be forced
to log out. Both steps should be taken, because the
Reject Authentication Cookies Issued Before
feature alone does not disable impersonation tokens.
Disclosure of Incident
If an impersonation token or other sensitive information has been shared,
it’s important to inform those affected and other stakeholders as soon as
possible. Transparency allows people to take additional security steps,
such as changing their passwords or reviewing account activity.
Note that future dates cannot be used to reject authentication cookies, ensuring that
logouts occur based on authentication cookies that have already been issued. Also,
keep in mind that people are not logged out immediately when the
Reject Authentication Cookies Issued Before
date is set. Instead, they will be logged out when they next interact with the system,
such as navigating to a page, refreshing a page, or accessing any functionality in Rock.
Security Change Audit
This page was designed to assist when troubleshooting security permission changes. Keep in
mind that this tracks changes to item permissions, not changes to an individual's security.
For instance, granting the role "RSR - Staff Worker" permission to view a page would appear in
the audit log. Adding the role "RSR - Rock Administration" to Ted Decker's account would not
appear in the audit log. However, an addition to the log would be made if Ted Decker were
granted access as an individual (using
Add User instead of
Add Role) to the list of an
item's permissions.
Security Change Audit
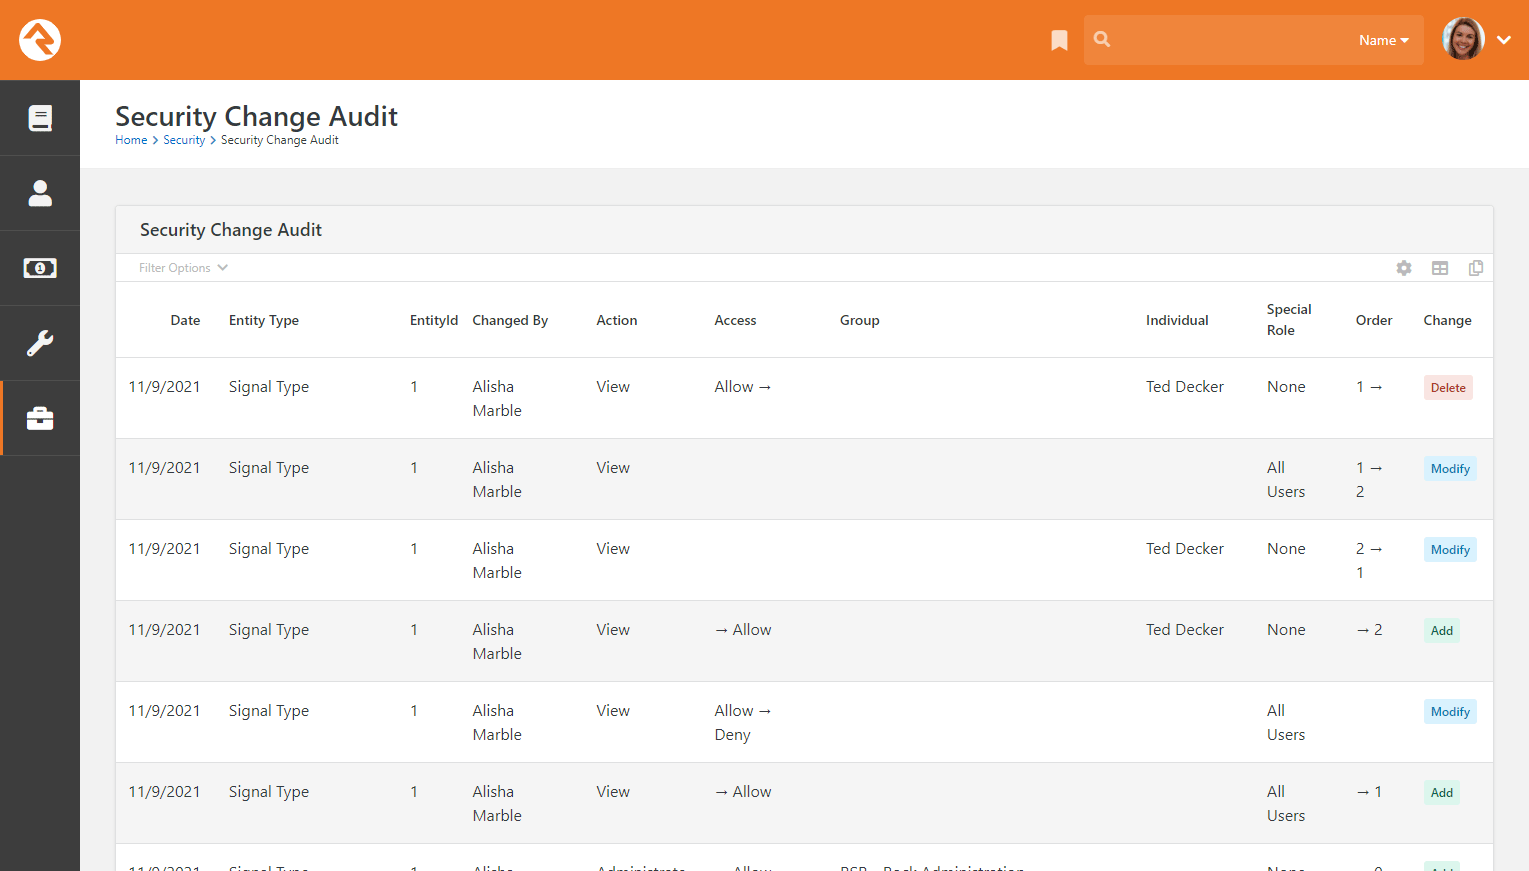
Cloning Security Role Groups
We’ll wrap up our Security chapter by circling back to the Security Roles
page we reviewed earlier. To save you time (and possibly a headache), you can access the Security Roles
page to clone security role groups. Cloning allows you to make a copy of an existing group along with all of its security configuration. Group members are not copied over
to the new group.
Clone Security Role Group
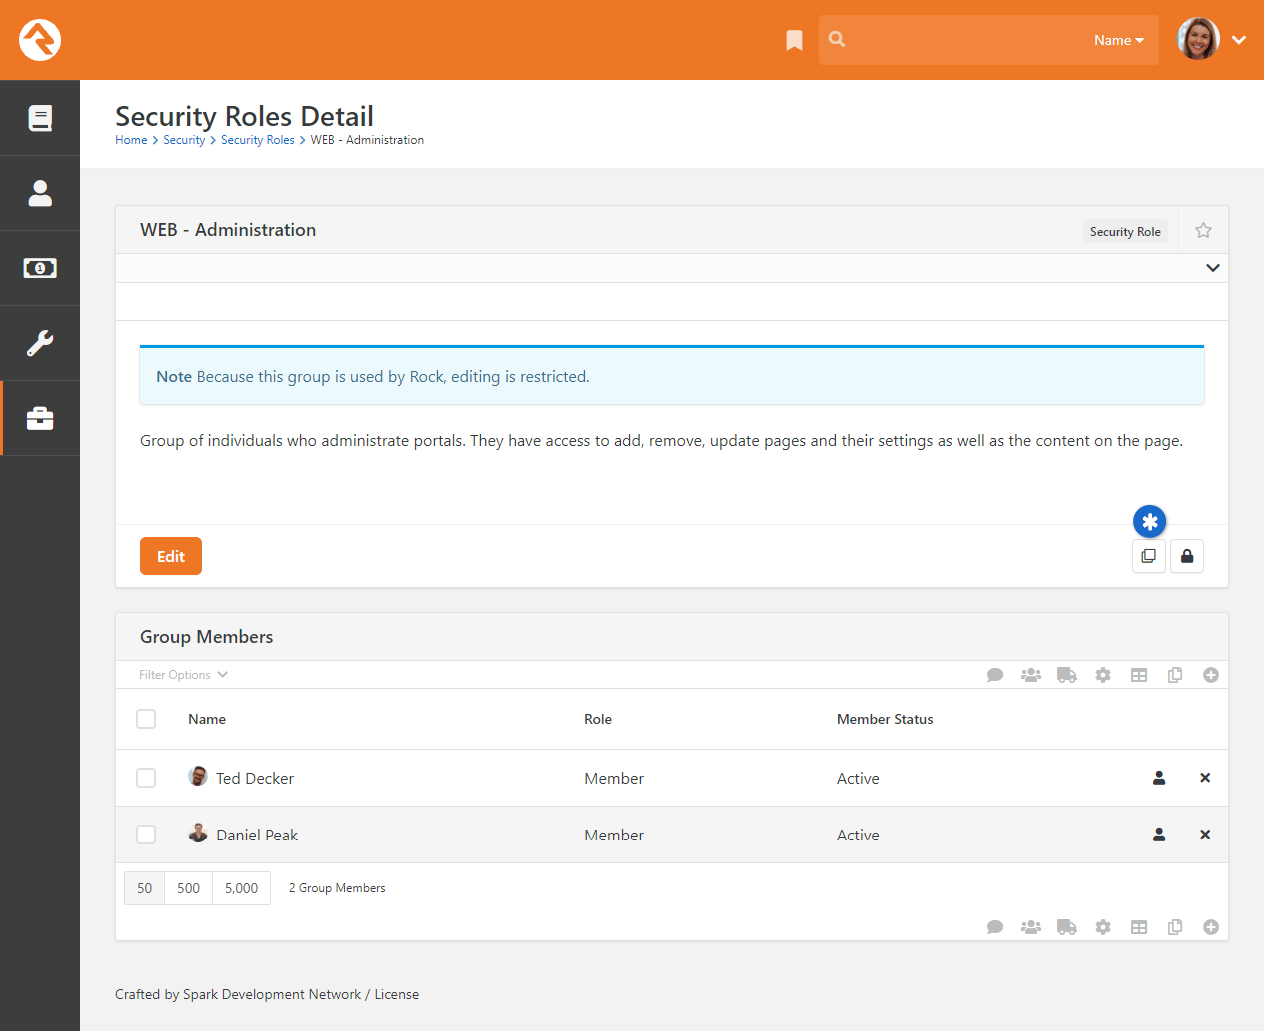
Cloning groups is a quick and easy process. Simply choose the group you want to clone in the Security Roles Group List and click the
button. The word “Copy” will be appended
to the name of the new group. Click the Edit button to change the name
and description of the group, and to make any further changes to the group’s settings. Then click
Save. When you return to the Group List, the newly-cloned group will
be listed among the other security roles.
Communications
These settings help Rock use powerful tools to communicate with your attendees. While each tool
is covered below, additional information can be found in the
Communicating With Rock
guide.
Communications
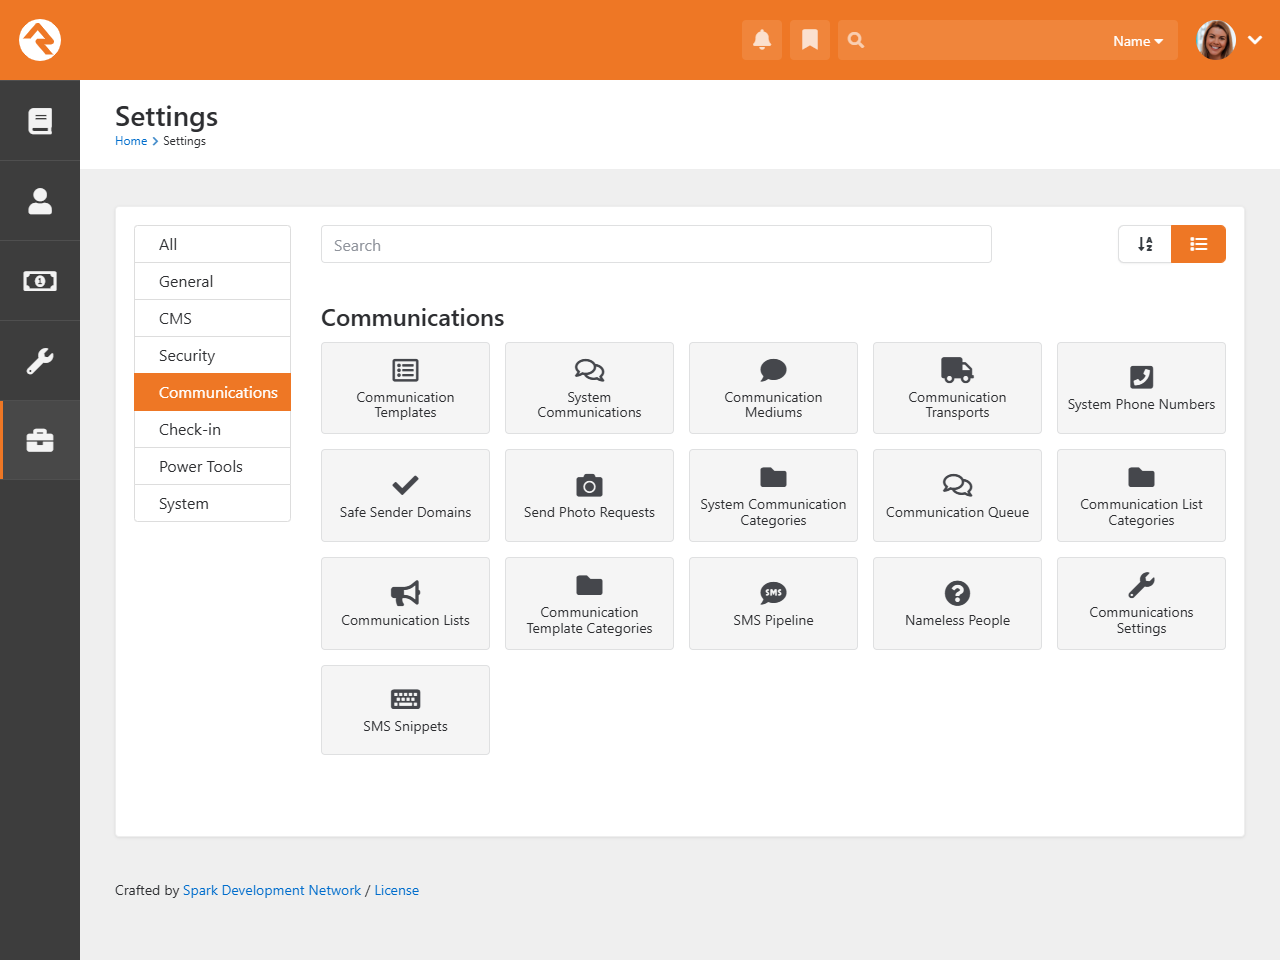
Communication Templates
You'll find over time that you often send the same types of emails and SMS messages over and over. When
you see this pattern consider making a communication template to help simplify these tasks and improve
consistency.
System Communications
System Communications
(formerly known as "System Emails") are communication templates that are used by Rock to send very specific
messages. Typically, these are automated communications, such as the message someone receives when they've
forgotten their password and requested to reset it.
System Communications
can be used with either emails or SMS messaging. While Rock sets these up to look professional from the start,
you may want to modify them to match your organization's branding. You can edit these communications under
Admin Tools > Settings > System Communications.
Communication Mediums
When you send a new communication from People > New Communication
or from the bottom of any grid that contains a list of people, you can select to send either an SMS message or an email. Both of
those are communication mediums. You can configure the settings for each medium from the
Communication Mediums page. This is where
you can set the Email transport to use normal SMTP or a bulk
delivery service like SendGrid. This is also where you can configure the SMS medium to use Twilio to send text messages.
Communication Transports
We mentioned services like SendGrid, Twilio and SMTP in the Communications Mediums section. These delivery options are called
transports. They take the message contents and make sure that they get to the recipients. Each transport has a set of configuration
options specific to its needs. For example, the Twilio transport requires an account SID and a token to tie into your account.
Don't Forget...
If you activate a new transport, you must then navigate to
Admin Tools > Settings > Communication Mediums
to set it as the Transport Container for a Communication Medium.
Like channels, new transports can easily be added over time, from either the core Rock team or third parties.
SMS Phone Numbers
This menu item is a hotlink to the SMS Phone Numbers
defined type. This defined type helps you configure the SMS environment. See the
Communicating With Rock
guide for more information on SMS.
Safe Sender Domains
This menu item is a hotlink to the Safe Sender Domains
defined type. This defines the domains that can be used to send emails. If an email communication is created with a
From address that isn't from one of these domains,
the Organization Email global attribute value will be
used instead and the original value will be used as the Reply To
address. This helps reduce the likelihood of communications being rejected by the receiving email servers.
Send Photo Requests
These pages allow you to send and administrate requests for photos from your community. You can find detailed
instructions for these tools in the
Person and Family Field Guide.
System Communication Categories
This page allows you to create and manage categories (e.g., Event Registration, Groups) for your system communications.
Communication Queue
Communications
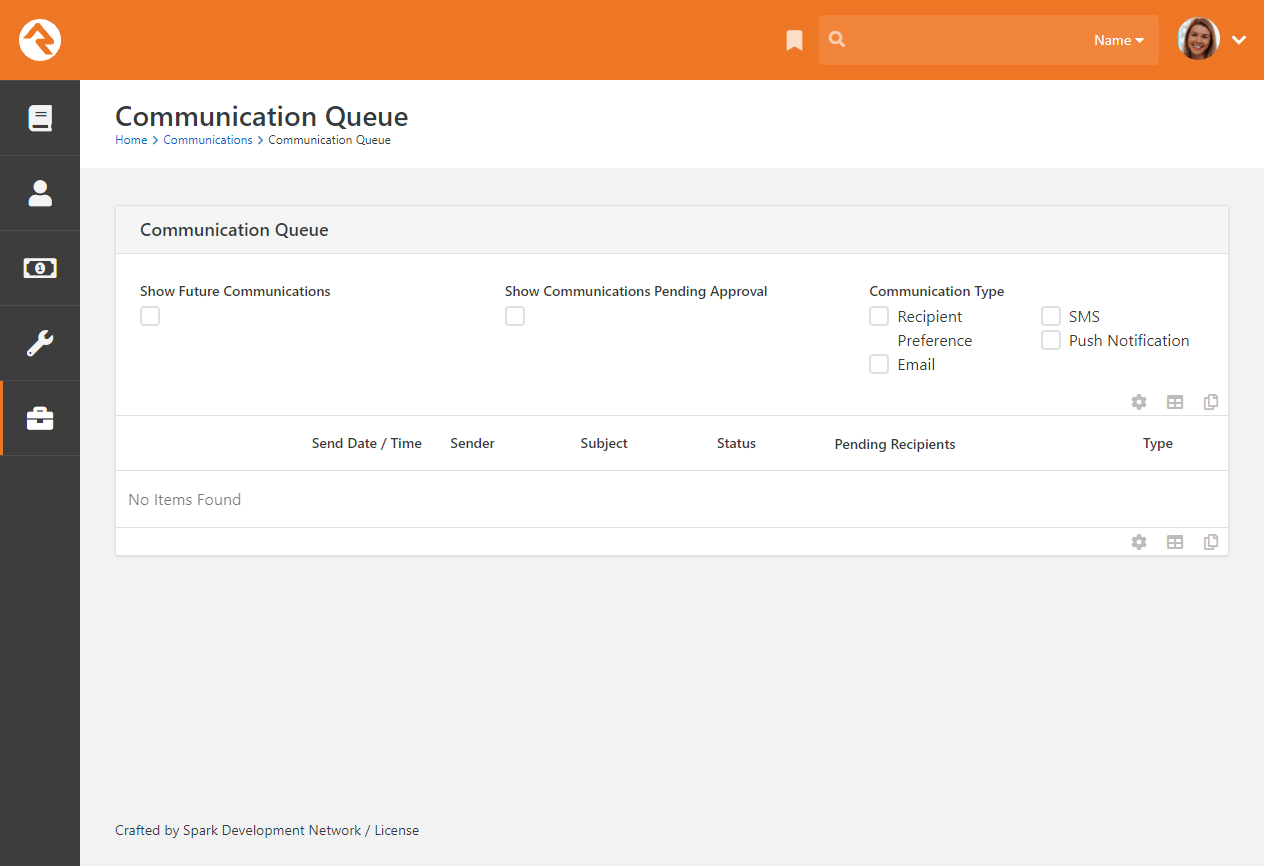
The Communication Queue is where communications
that are pending approval or have failed to be sent are stored. Ideally, you'll never see anything listed here but,
if you do, you’ll know something elsewhere in the system needs attention.
While the Communication Queue doesn't require
any configuration, the Send Communication job
settings will affect what may end up in the queue. By default, the
Send Communication job waits 30 minutes before
sending any new communication to prevent any sending overlap for communications requiring approval.
Also, you can use the Communication Queue Alert
job to send an email notice to specified recipients when a communication is sent to the
Communication Queue. This helps to ensure the
queue is being monitored regularly.
The Send Communication and
Communication Queue Alert jobs
can be configured by going to
Admin Tools > Settings > Jobs Administration.
Communication List Categories
The Communication List Categories page is where you
can view, edit and create new categories for use with communication lists. Communication list categories can be used for
a number of powerful functions, from segmenting communication lists to allowing communication recipients to subscribe and
unsubscribe from lists. To learn more about communication list categories, see the
Communicating With Rock
manual.
Communication Lists
This page allows you to view, modify and add communication lists to be used with the
Communication Wizard.
To learn more about communication lists and sending communications, check out the
Communicating With Rock
manual.
Communication Template Categories
This page allows you to view, modify and add communication template categories.
To learn more about communication templates, check out the
Communicating With Rock manual.
SMS Pipeline
This is where you'll configure your SMS phone numbers with the necessary actions used by your organization. Check out the
Communicating With Rock
manual for more details.
Nameless People
If you receive SMS messages from phone numbers Rock doesn't recognize, the number
becomes associated with a Nameless Person record. This page is where you can view
these phone numbers and link them to a person in your system. For more information
check out the
Communicating With Rock
guide.
Communications Settings
This page is used to specify the template you want to use for approver notification emails.
By default, the Communication Approval Email template that ships with Rock is selected. For
details see the
Communicating With Rock guide.
SMS Snippets
Come here to create and maintain your list of SMS Snippets.
With snippets you can create and save SMS message content that can be easily referenced and reused across multiple messages.
Stay tuned as we roll out additional places where snippets can be used, like Check-in Manager and SMS Conversations.
Check-in
Rock's check-in system is very powerful. With that power comes several configuration options. This section
of the administrative tools groups all of the check-in configuration into one place.
Check-in
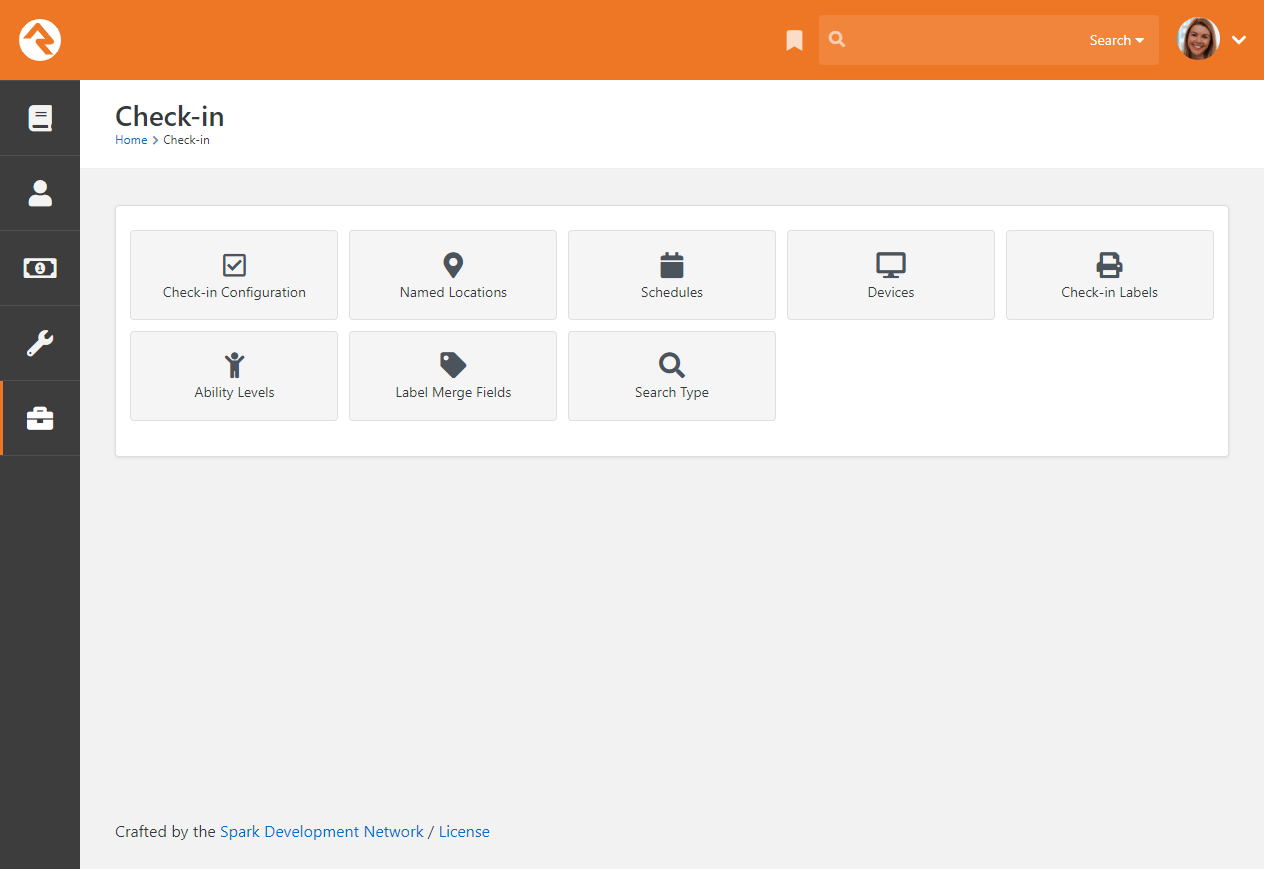
Check-in Configuration
These screens help manage the setup of your check-in configurations. These
settings are discussed in detail in the
Checking-out Check-in
guide.
Named Locations
This configuration screen allows you to define specific locations with a name. You'll
want to use this to define your campuses, buildings and rooms. These
Named Locations
can then be used with configuring groups, check-in, etc.
The Named Locations
page can alternatively be accessed from
Admin Tools > Settings > Named Locations.
Schedules
Several features require the configuration of repeating schedules. For instance,
check-in needs to know your organization’s schedules to be able to configure
the time check-in should start. These screens allow you to create those schedules.
The Schedules page is also available under
Admin Tools > Settings > Schedules.
Devices
The devices screens are used to manage devices that interact with Rock in some
way. Today this is primarily used to help manage check-in kiosks and printers but in the
future we hope to add support for all types of devices.
The list of devices is also available under
Admin Tools > Settings > Devices.
Check-in Labels
The check-in process can be configured to use several formats of printed labels.
These labels and their configuration are managed using these screens. The
Checking-out Check-in
guide also covers the creation and configuration of these labels.
Ability Levels
This is a short-cut link to the Ability Levels defined type.
Ability Levels are used to classify developmental stages.
Ability Levels can also be accessed under
Admin Tools > Settings > Defined Types > Ability Levels.
Label Merge Fields
This is a short-cut link to the Label Merge Fields defined type.
Label Merge Fields are used to find and print data for labels.
This defined type is also available under
Admin Tools > Settings > Defined Types > Label Merge Fields.
Search Type
This is a short-cut link to the Search Type defined type.
Search Type are the ways to search for a family
(e.g., phone, name, etc.) in check-in. You can also manage this defined type from
Admin Tools > Settings > Defined Types > Search Type.
System Settings
While system settings are rarely modified, understanding them will give you better
insight into how Rock works and what's possible.
System Settings
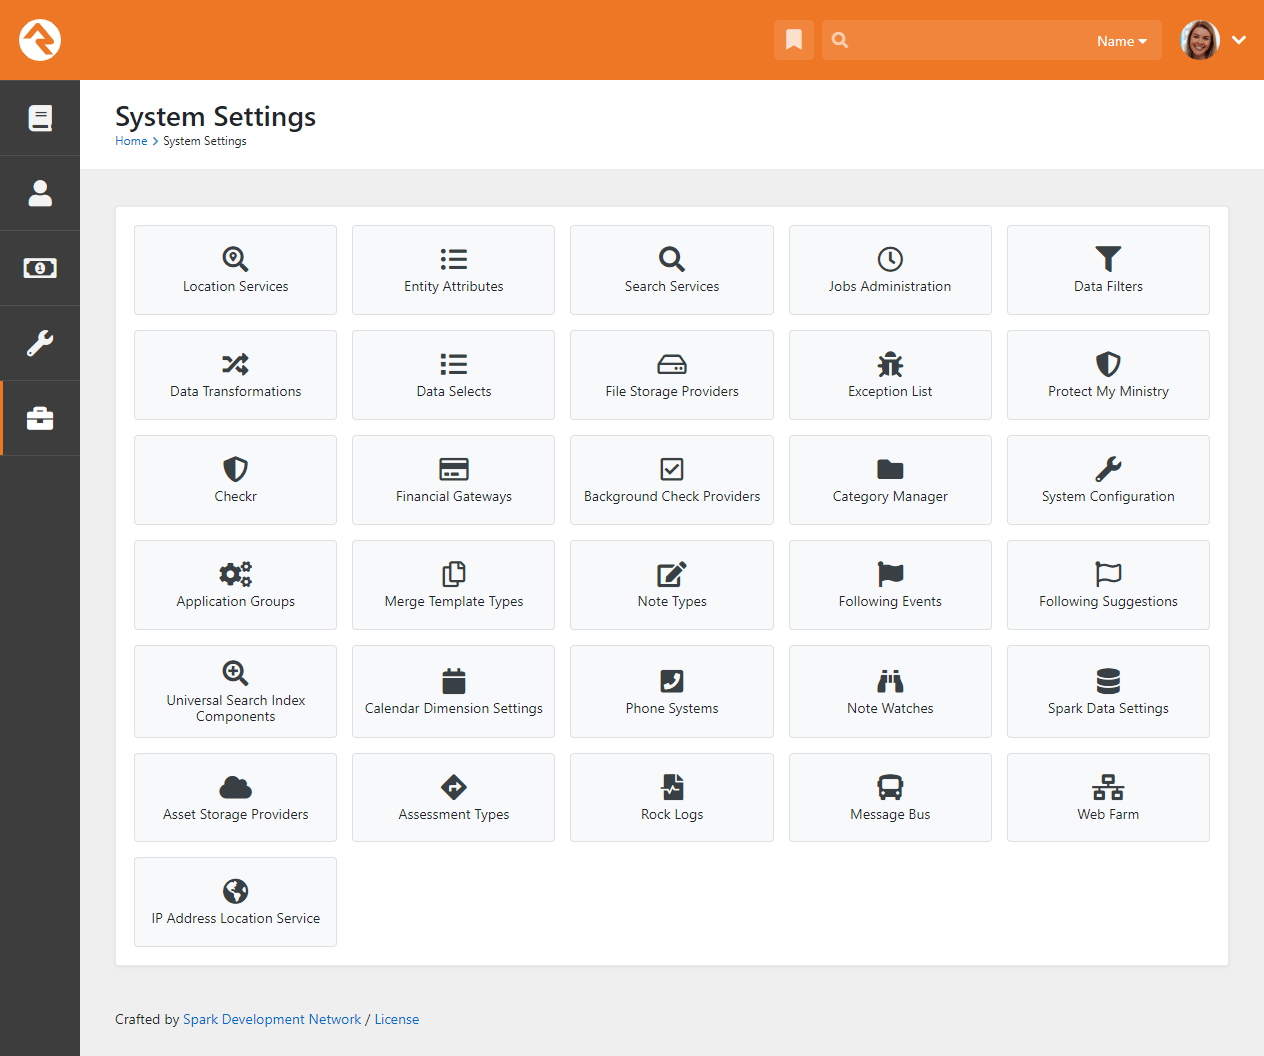
Location Services
Knowing the locations of those who engage with your organization can be very powerful.
In order to do this, you need to be able to convert a person's address
(3120 W Cholla St Phoenix, AZ 85029) to a latitude / longitude point
(33.590795 , -112.126459). To do that, you’ll need to run your addresses
through a geocoding process. Rock will handle all of the work; all you
need to do is provide a geocoding service to handle the requests. Rock has
a couple of services for you to pick from. More information on geocoding can
be found in the Locations chapter of this document.
Like the geocoding services, you can also send your addresses through a
standardization process. These processes can fix the following for your addresses:
-
Fill in any missing items (555 W Main to 555 W Main St)
-
Fix any case issues (555 w main st to 555 W Main St)
-
Standardize elements (555 West Main Street to 555 W Main St)
-
Append Zip+4 info (85383 to 85383-3622)
The standardization process helps increase the quality of the addresses in your database.
More information on address standardization can be found in the
Locations chapter.
Entity Attributes
We’ve already discussed how attributes can be attached to common entities like people or groups. By now you know
about those attributes and the power they bring to Rock. But that's only the tip of
the iceberg. From the Entity Attributes page,
you can add attributes to any entity that exists in Rock.
Sometimes you won't want the attribute applied everywhere the entity exists. For instance, you might want a
group attribute to apply only to groups of a certain type. You can narrow the scope of the attribute using the
Qualifier Field and
Qualifier Value fields. Using these fields,
the attribute pictured below will only be attached to Connection Request Activity entities within
the "Children's" connection opportunity. Rock's Model Map can help you identify what
properties you can use as qualifier fields.
Entity Attributes
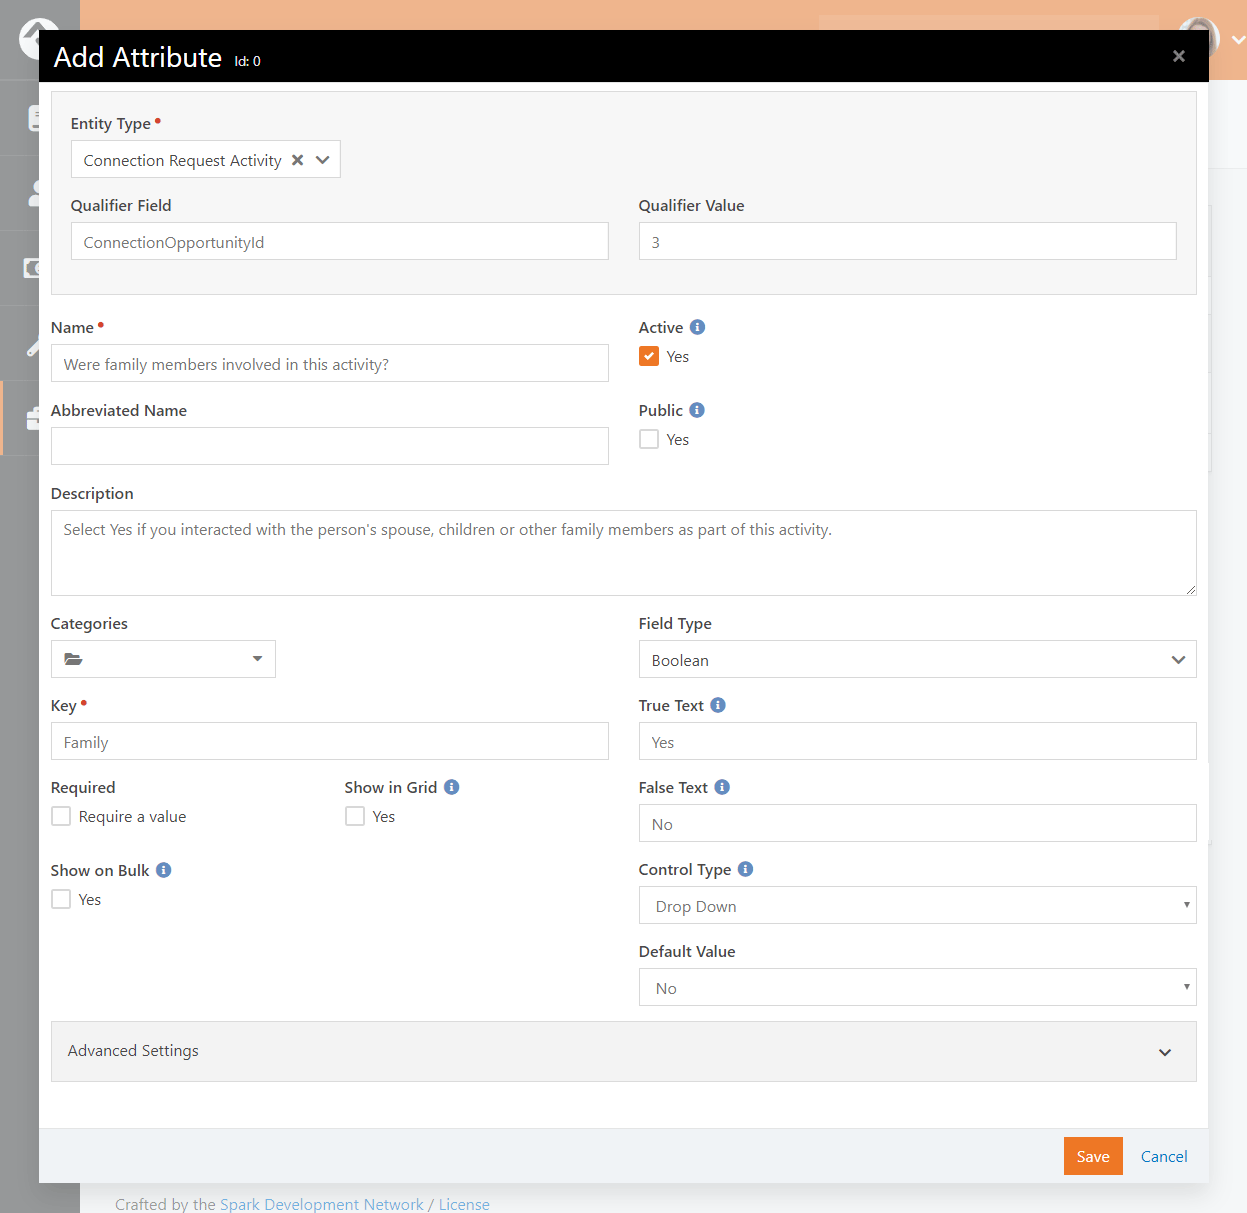
Although there's a dedicated page for this, you can also create
Global Attributes from the
Entity Attributes page.
For the most part, you shouldn't need to do this unless you're writing your own code to
run inside Rock. To add a Global Attribute,
simply create a new entity attribute that isn't tied to any entity.
Adding New Options from Attributes
When adding an attribute with a Field Type
of "Defined Value" you'll be given the option to
Allow Adding New Values. If enabled, this
lets you add to the Defined Type's list of values
from anywhere the attribute is accessed.
The same concept applies to attributes with a Field Type
of "Location List", which has the option to Allow Adding New Locations.
Search Services
Rock’s Smart Search
box at the top of every page allows you to search for people and groups using various
criteria like name, phone and email. These screens allow you to manage those search types.
For the most part you’ll want to leave them set as-is, but you can inactivate one if you
find it isn't helpful. A key concept is that you can write your own search services with
some custom coding. If you do, they will appear on this list for you to enable and configure.
Jobs Administration
While much of Rock works through the interaction of individuals within the system, there are
times when you’ll want to run functionality in the background. For example, you may want to
run a process to clean up or update data in the system in an automated fashion.
These background tasks are called Jobs
and can be managed and scheduled through the screens in this area. See the Jobs
chapter for additional details.
Data Filters
Data Filters
are an integral part of Rock’s reporting strategy. Hopefully you’ve already read about
them in the
Taking Off With Reporting
guide. At a high level, data filters allow you to narrow down your view of data by providing
specific criteria. These filters can be enabled, disabled and secured in this set of screens.
Like many things in Rock, you can develop your own
Data Filters
that can be managed here.
Data Transformations
Once you’ve filtered your data, you can add a transformation to it before it's displayed.
Say you've filtered to see only children who have attended twice in the last two months,
but you really want to display information about the parents of these children.
A transformation (in this case the Person Parent Transformation)
would convert the child data to parent data. You can manage these
transformations here. Just like with filters, you can also develop your own transformations.
Data Selects
Data selects are used in reporting. When you create a report, you provide it with a data
view to act as a filter. You also add columns to your report. Many of these columns will
be attributes of the person or group. You can also choose to add some powerful dynamic
columns. These dynamic columns are managed and secured from this screen.
File Storage Providers
In the File Types section we discussed file storage providers.
These providers help Rock manage the saving and retrieving of
files to different storage media. The two default storage types are
Database and
File System, but
others like Amazon, Cloudinary, Azure or Google can be used.
Under the File System
configuration, you can change the default location for file storage. For the most part,
you can leave these settings as you found them.
Exception List
Despite all of our work to eliminate bugs, some will sneak by us. Exceptions, also known as errors,
can occur as a result of software bugs or when blocks and pages are misconfigured. While you can set
these errors to be emailed to you (see
Admin Tools > Settings > Global Attributes > Email Exceptions List),
you can also view the history of these errors here.
Exceptions are sorted chronologically. Instead of showing you every error in a large list, we've grouped them by type.
This helps you determine how often an error is occurring.
Protect My Ministry
Rock provides a seamless integration with Protect My Ministry to provide reliable background checks for your organization.
See the Background Checks chapter for specifics on this integration.
Checkr
Checkr provides modern and compliant background checks for use with Rock. With your Checkr token from RockRMS.com
you’ll be able to initiate background checks using Checkr’s scalable, cost-effective and rapid screening solutions.
See the Background Checks chapter for specifics on this integration.
Financial Gateways
Financial gateways allow Rock to move money from individuals’ accounts to the organization.
Information on these gateways and their configuration is provided in detail in the
Rock Solid Finances
guide.
Background Check Providers
These screens allow you to configure different background check providers. You can read more about Rock's background
check features in the Background Checks chapter.
Category Manager
The Category Manager allows you to
add categories for any entity type in Rock. Think of it as your one stop shop for any category. To help
simplify the process be sure to use the entity type filter.
System Configuration
This screen allows you to change some technical configuration settings in Rock. For the most
part you should never need to worry about these settings, but we've provided this page to help
you change them if needed.
Warning
Changing these settings will cause Rock to restart. This means that all sites will be
unavailable for a few minutes during the restart. Use caution when changing these settings.
General Configuration
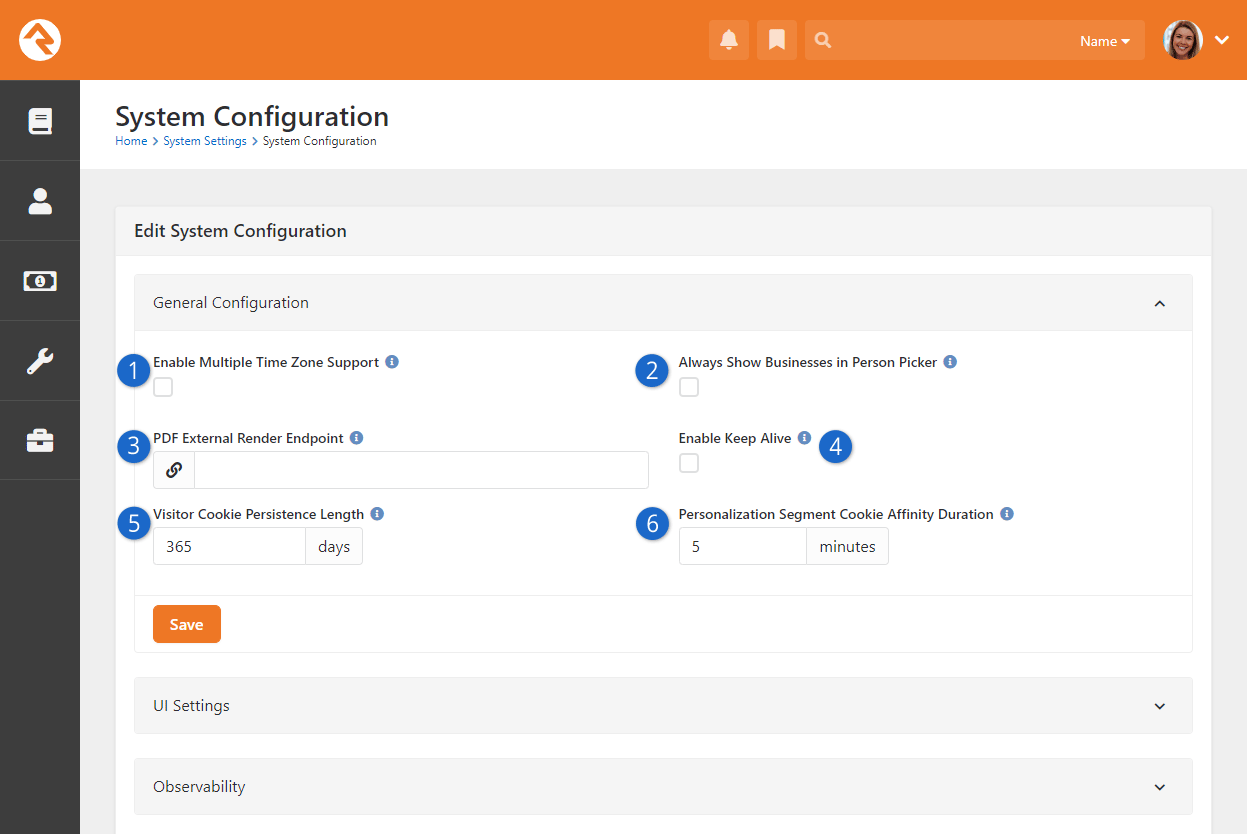
- 1 Enable Multiple Time Zone Support
- Out of the box Rock assumes that all campuses are in the
same time zone. There's typically not a big impact when they’re different, except for check-in. Enable
this option to ensure check-in works as expected across different time zones.
- 2 Always Show Businesses in Person Picker
- If this is enabled then businesses will appear in
the search results when you're using any Person Picker in Rock. That means if you search for 'Decker' you'll
see Ted and his family, but you'll also see the 'Decker & Sons Plumbing' business returned.
- 3 PDF External Render Endpoint
- If you're running Web Services on Azure, or if you're running
Rock in an environment that does not support running Puppeteer/Chrome on the server, you'll need a third-party
service to handle PDF generation. This is where you'll specify the endpoint for this service.
- 4 Enable Keep Alive
- Enable this setting to have Rock poll itself to keep it "alive" during
times of inactivity. This setting is not needed if your AppPool's Idle Time-out is set to 0 (Highly
Recommended).
- 5 Visitor Cookie Persistence Length
- This is simply the number of days a visitor cookie
persists. This is used by features like Personalization.
- 6 Personalization Segment Cookie Affinity Duration
- This controls how old
the
ROCK_SEGMENT_FILTERS cookie can be before it needs to get refreshed from
the database. This only impacts
Personalization
features.
UI Settings
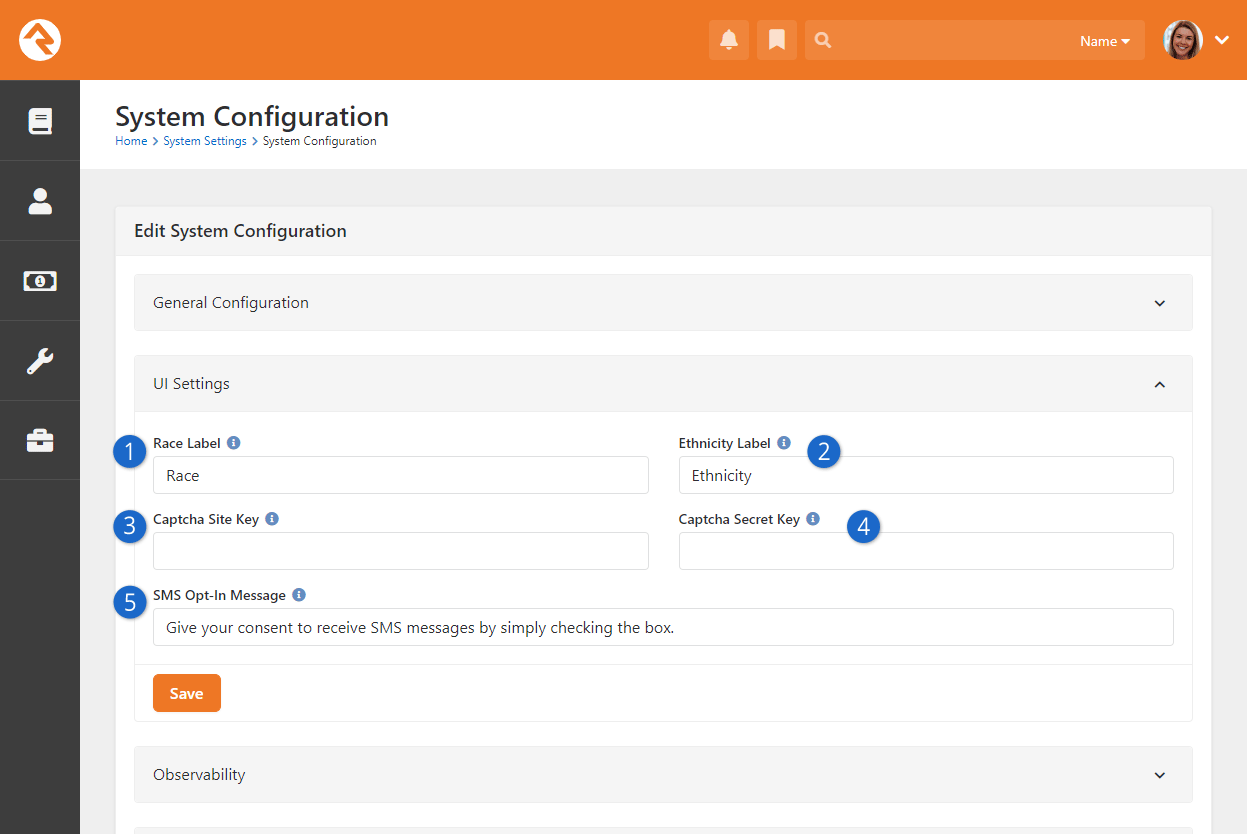
- 1 Race Label
- Some blocks, like Family Pre-Registration
give you the option of collecting race and ethnicity information for a person (off by default). Here you can
change the name of "race" to something else.
- 2 Ethnicity Label
- This is the same as the above setting but applies to ethnicity.
- 3 Captcha Site Key
- If you're using Captcha, this is where you'll put the
Site Key from
Cloudflare. See the Rock Captcha chapter for details.
- 4 Captcha Secret Key
- This is the same as the above setting, but applies to the
Secret Key.
- 5 SMS Opt-In Message
- The message you put here will be seen on certain blocks
(e.g., Family Pre-Registration)
when a person is prompted to provide a mobile phone number if the SMS Opt-in feature is
enabled for that block.
Experimental Settings
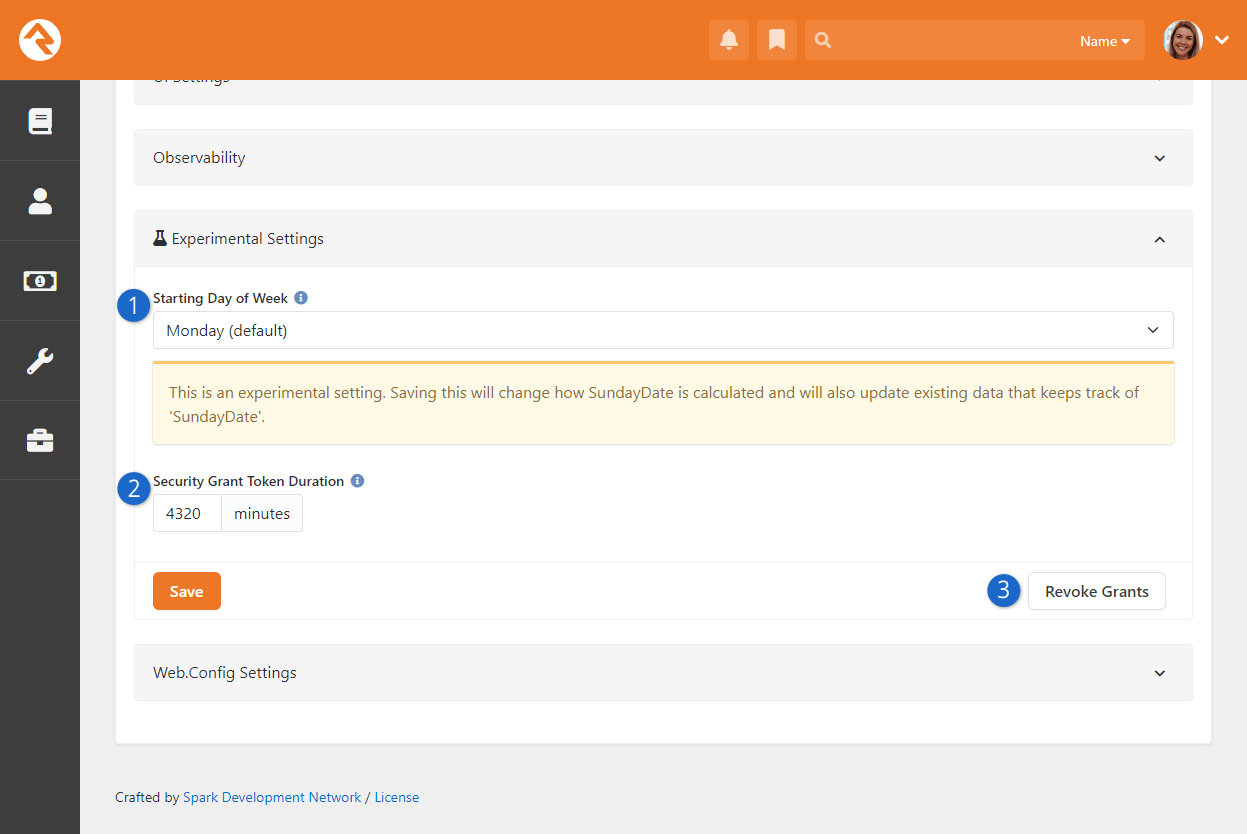
- 1 Starting Day of Week
- By default, a week in Rock starts on Monday and ends on Sunday. It is possible, but not
necessarily advised, to choose a day other than Monday to start the week. As noted on the
page, this will impact things like SundayDate calculations.
- 2 Security Grant Token Duration
- This is simply the default length of time for which a security grant token is valid.
Note that this is not the same as the
Person Token Expire Minutes
Global Attribute, which gets used with the
PersonTokenCreate Lava filter.
- 3 Revoke Grants
- With the click of a single button you can revoke all security grant
tokens that have been issued.
Web.Config Settings
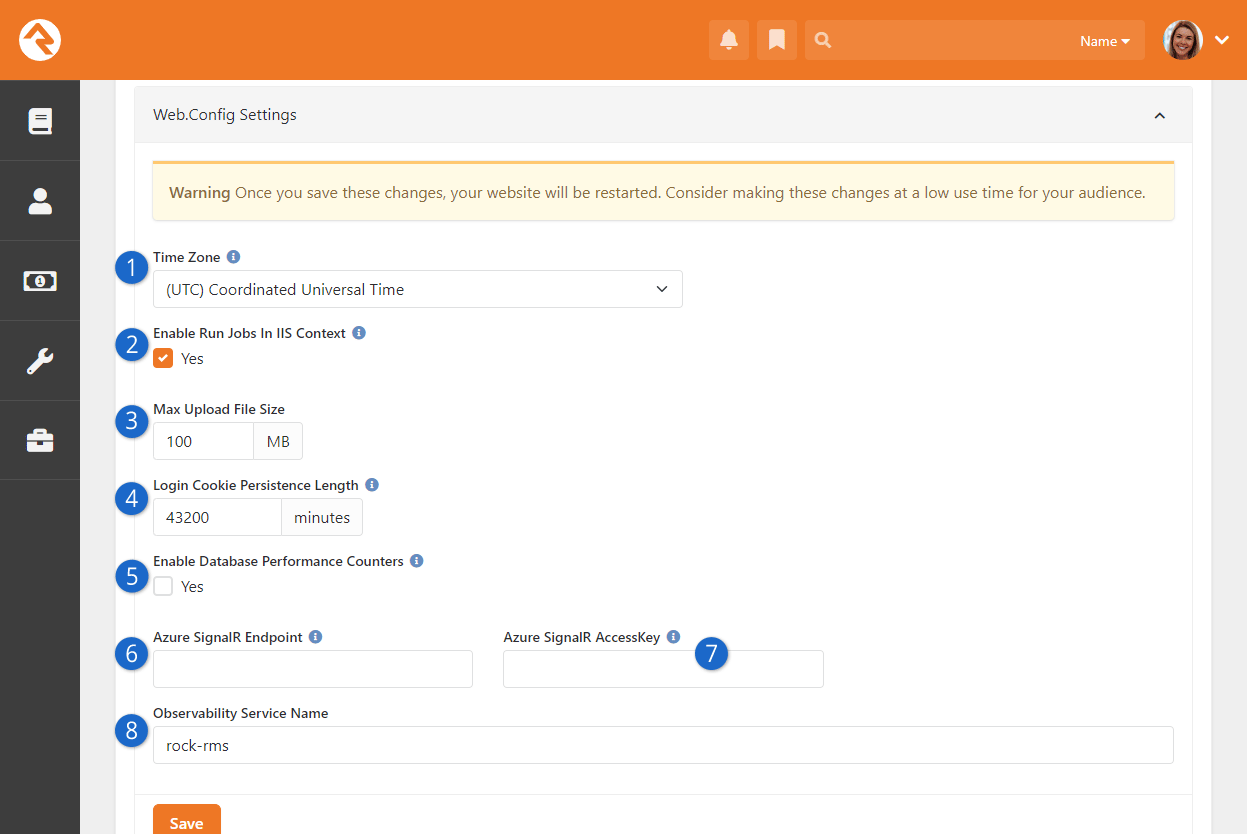
- 1 Time Zone
- When you were installing Rock you should have set your time zone. If you need to change it,
you can do that here.
- 2 Enable Run Jobs In IIS Context
- By default, Rock’s job engine runs on the webserver. This setting allows you to disable
this in order to run jobs as a Windows Agent. See the Jobs
chapter for more information on this topic.
- 3 Max Upload File Size
- For security reasons, webservers limit the maximum file size that can be uploaded.
This helps to limit the impact of denial of service attacks. Rock has set the default value to 100 MB. If you
need more, you can update the size here.
- 4 Login Cookie Persistence Length
- Use this setting to override the authentication cookie length.
The value you set will become the default for things like the REST API. This will impact how frequently a person
needs to authenticate, so try to strike a balance between convenience and security.
- 5 Enable Database Performance Counters
- This setting should remain disabled unless you're actively
troubleshooting a system performance issue. When enabled, and after the system restarts, Rock will start collecting
data about the usage of your database "connection pool". Rock ships with a set of
Metrics you can use to see the results
of this data collection. These metrics can be accessed in Rock under
Tools > Metrics | Hosting Metrics and will provide
the information described below:
- Number Of Active Connections - The number of active
connections that are currently in use. This number will naturally jump up and down
during the day.
- Number Of Free Connections - The number of open connections
available for use. This number will decrease as the number of active connections
increases.
- Hard Connects Per Second - This is a count of how many
connections are being opened explicitly each second. You might expect this number to
rise when first starting Rock or when there aren’t enough available connections in
the connection pool.
- Soft Connects Per Second - The number of connections being
obtained from the connection pool per second. Note, it's possible for this number to
be larger than the number of connections in your pool because most connections are
used for only fractions of a second.
- 6 Azure SignalR Endpoint
- Once you’re signed up with Azure you'll add your SignalR Endpoint here. This is
used by Rock's Real-Time Engine.
- 7 Azure SignalR AccessKey
- This is the same as the above setting, but for the AccessKey.
- 8 Observability Service Name
- If you have Observability enabled, this is where you'll put the service name.
Family Rules
- 1 Bible Strict Spouse
-
This feature enables churches to configure Rock by allowing or disallowing the
entry of spouses with the same gender.
Application Groups
Application groups are, as the name suggests, groups that are used by the Rock application. This way, Rock
can refer to the members of a group instead of running through complex logic to identify certain individuals.
These groups are listed here for administrator access.
Merge Template Types
Rock allows you to have several different merge template types (think 'HTML', 'Word', etc.) You can manage these provider types
with these screens.
Note Types Settings
Rock allows any entity type (People, Financial Batches, Prayer Requests, etc.) to have notes attached to it. In fact, you can even
have different types of notes on a single entity. These screens allow you to set up this powerful feature. You can read more about
these features in the Note Types chapter of this manual.
Following Events
This section allows you to define new Following Events.
You can read more about these features in the
Person and Family Field Guide
Following Suggestions
This section allows you to define new Following Suggestions.
You can read more about these features in the
Person and Family Field Guide
Universal Search Index Components
This page is used to view and maintain the available Universal Search Index Components. Universal Search allows you to search multiple
types of data at once in a full-text manner. In a sense, it's like Google for Rock. To learn the ins and outs of Universal Search, check
out the Universal Search guide.
Calendar Dimension Settings
These settings are used to support Rock’s Business Intelligence (BI) features. In short, these settings relate to date-based information
that may be impacted by your organization’s fiscal year. Check out the
Business Intelligence
guide for full details.
Phone Systems
This page is part of the framework for linking Rock to PBX phone systems. The features added here allow for plug-ins to be created for specific
phone systems to allow for features such as creating interactions from call detail records and click to call.
Note Watches
Here, administrators can see everyone who's watching a note, and can add new "watches".
See the Watching Notes section for full details.
Asset Storage Providers
An asset storage provider basically refers to storage space in the cloud for things like pictures
or videos that are used by your website. Check out the
Designing and Building Websites Using Rock
guide for more information on configuring the asset manager.
Assessment Types
Rock ships with Assessment Types already configured and ready to use for each available assessment. Generally, you won't need to
change these settings, but you may want to adjust the Minimum Days to Re-take
or Requires Request options.
- Minimum Days to Re-take: The minimum number of days after the test has been taken before it can be taken again by the
same person.
- Requires Request: If enabled, a person is required to receive a request before the assessment can be taken.
Our Assessments
guide has all the details you'll need on each of Rock's assessments.
Rock Logs
Rock provides a simple, easy to use logging tool. Most of the time you won't need this but
having logs can be helpful when troubleshooting or researching. The Rock Log is similar to the
Exception List, except you can track more than just errors.
Logs are turned off by default, and typically should only be turned on if there is a
specific need. To enable Rock logging, simply select the
Verbosity Level
and the domain or domains you want to output. You have the following choices for the
Verbosity Level:
- Off: No logging should be performed.
- Fatal: Very severe error events that will presumably lead Rock to abort.
- Error: Error events that might still allow Rock to continue running.
- Warning: Potentially harmful situations.
- Info: Defines the default set of levels recognized by the system.
- Debug: Fine-grained informational events that are most useful for debugging Rock.
- All: Log everything.
Message Bus
Larger organizations may have more than one Rock server. A Web Farm allows multiple servers
to talk to each other. They talk to each other over what's known as a Message Bus. The Message
Bus can talk to external systems in a two-way conversation. This gets complex and you'll need
a developer to set that up, but it unlocks a lot of capabilities within Rock.
Two bus services are currently supported by Rock. They are:
- Azure Message Bus
- Rabbit MQ
To set up the Message Bus, navigate to the Message Bus page under System Settings and
click the
Configure Transports
button. Then click on the transport you want to use, make it active and provide the
needed details from either the Azure Service Bus server or the Rabbit MQ server. Ensure
only one transport is active by inactivating any you're not using.
Web Farm
Large organizations soon reach the point where a single server will no longer be able to
support peak loads. When this happens, the need for a server cluster, or Web Farm, becomes
evident. From the Web Farm page, you can view or edit your Web Farm settings, nodes and a
log of certain activities. Benefits of using the Rock Web Farm include:
- It's a more reliable form of cache invalidation
- Takes less resources than the Redis backplane
- Allows the nodes of the cluster to better work together
- Shows basic alerts and server health metrics
- Will allow for more robust clustering features in the future
For full details on Rock's Web Farm feature see our
Hyper Scaling Rock guide.
AI Providers
An AI Provider is a service, such as OpenAI, that offers tools powered by artificial intelligence (AI) to help automate tasks.
For example, Rock's Prayer Request system can tap into this power to fix grammar, suggest
categories, and other things for prayer requests. Check out the
Raising Up With Prayer
guide for more information on configuring Prayer AI Automation.
Rock includes two AI providers: the official OpenAI provider and a generic OpenAI-compatible provider.
Setup steps may vary depending on which provider you choose. Here, we'll focus on configuring the basic OpenAI provider.
Configuring OpenAI
Although we can't describe how all AI providers work, this is how you would get the required keys
from OpenAI for use inside Rock.
Step 1: Sign-up
Visit OpenAI's Platform website.
Log in using your credentials.
If you don’t have an account, sign up for one.
Step 2: Copy your Organization ID
After logging in, navigate to the Organization > General page.
Copy your Organization ID for use later in Rock.
Step 3: Access the API Keys Page
Next, navigate to the API keys page.
Note this can be found under Organization or under Project.
Step 4: Create a New API Key
On the API Keys page, click the + Create new secret key. A popup will appear with your newly generated secret API key.
Important
This key will only be shown once. Be sure to copy and securely save it (e.g., in a password manager or a secure document).
Step 5: Use the API Key in Rock
Once you have your API key, navigate to
Admin Tools > Settings > AI Providers.
Select the "Open AI" provider from the list.
Enter the API key Secret Key field and
the Organization Id in the OpenAI Organization Id field.
Copy API Key into Rock
Select the Default Model you'd like to use. GPT-4o-Mini is the most affordable model; while GPT-4o is the most performant.
Pricing and Other Info
OpenAI charges usage based on the volume of tokens (words) processed. Check their
pricing page for details.
Keep your API key private. Never expose it in public repositories or unsecured environments.
For further details, consult the OpenAI API documentation.
Entity Documents
Want to track documents for a person or group? The
Entity Documents
feature lets you add documents just about anywhere in Rock. You can even add multiple documents
of the same type to the same entity, quickly and easily.
If you want to cut to the chase and see what adding a document for a person looks like, we have an
example in our
Person and Family Field Guide.
In this chapter we're going to dive straight into the configuration, and then see how that
configuration can be used to add documents to other types of entities in Rock.
Configuring Entity Documents
The first step is to define what types of documents you can add to entities.
Navigate to Admin Tools > Settings > Document Types
to manage the types of documents that can be stored for each entity. Pictured below, you can see
we've already configured three types of documents, all for people.
Document Type List Block
You might be wondering why we didn't mix it up a little and show you some example document types
for other entities besides people. We're starting with the Person entity on purpose, and you'll
see why in a bit.
Click on any row to manage details about a document type or click on the
button to add
a new document type.
Add New Document Type
- 1 Name
-
Provide a descriptive name for the document type.
- 2 File Type
-
Each document type must be associated with a file type. See the
File Types section above for more details.
- 3 Entity Type
-
Select the entity type for this document type. Document types can be associated
with people, groups or any other entity.
- 4 Is Image
-
Select this checkbox if the document is an image.
- 5 Manually Selectable
-
Check this box if the document type can be manually added to an entity (e.g., by
a staff person or volunteer).
- 6 Icon CSS Class
-
This setting allows you to enter the CSS class for the icon you wish to use.
When using Font Awesome, you should use the syntax
fa fa-[icon name].
- 7 Max Documents Per Entity
-
With this setting you can limit the number of documents of this type that can be
added to the entity.
- 8 Advanced Settings
-
Click this link to show or hide the
Advanced Settings
fields described below.
- 9 Entity Qualifier Column
-
If you want the document type to only apply to specific entities of the specified
Entity Type,
then you can provide a column to filter on for that entity. For example, if you
would like the documents to be specific to a group of a certain type then you
would enter 'GroupTypeId' here.
- 10 Entity Qualifier Value
-
After you provide an
Entity Qualifier Column,
you’ll need to also provide a value here. In the example of groups of a certain type, the
Entity Qualifier Value
would be the Group Type Id
value (e.g., 12) for the desired group type.
- 11 Default Document Name Template
-
Use this field to provide default text that will automatically be populated in the
Document Name field
when adding a document of this type to an entity.
Person documents are the easiest to configure because all you need to do is define your document
types as described above. Rock ships with everything else you'll need to start adding documents
to people right away. See the
Person and Family Field Guide
for an example.
Setting up documents for other types of entities is still pretty easy, but there's an extra step
or two you'll need to take. We'll show you what you need in the next section below.
Adding the Documents Block
In the above section we described how to configure types of documents. That's all you need for
Person documents because the
Person Profile page ships
with a dedicated tab for managing documents. However, for entity types other than Person,
there's a little more to it. In this section we'll show you what else needs to be done, using
the Group entity as an example.
First, you still need to set up a document type as described in the prior section above. In this
case, we'll add one with an
Entity Type of
Group.
Document Type Detail - Group
Now that we have a document type that we can use with groups, we need a way to actually manage those
documents. This is where the
Documents block comes in.
Because we're working with groups in this example, we’ll add the
Documents block to the
Group Viewer page in Rock. You
can do this from the Group Viewer
page by using the admin toolbar to edit the page’s zones.
Pictured below, we’ll add the
Documents block to the
Main page zone by clicking the
button to add a row.
Add Block to Main Zone
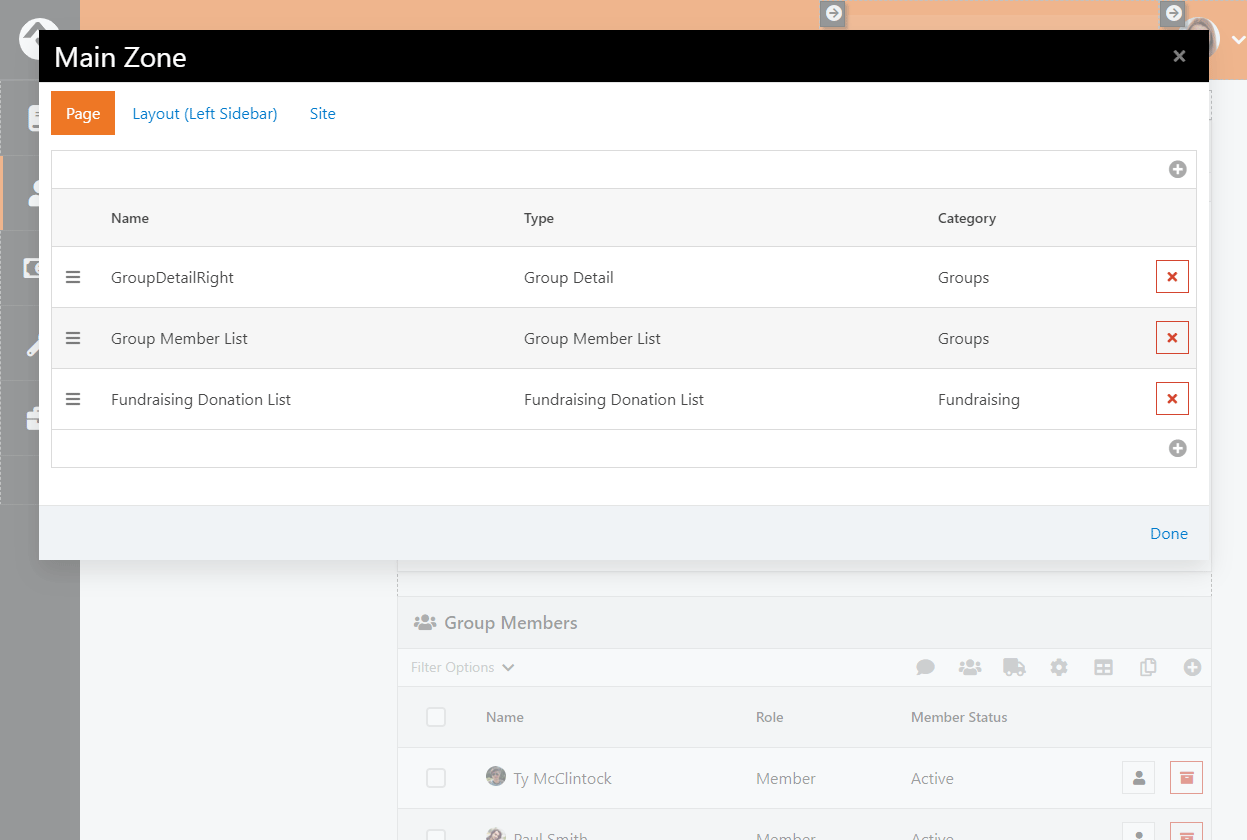
Adding the block is easy. As pictured below, simply provide a name and select
Documents as the
Type. Click
Save and then
Done to finish.
Add Group Documents Block
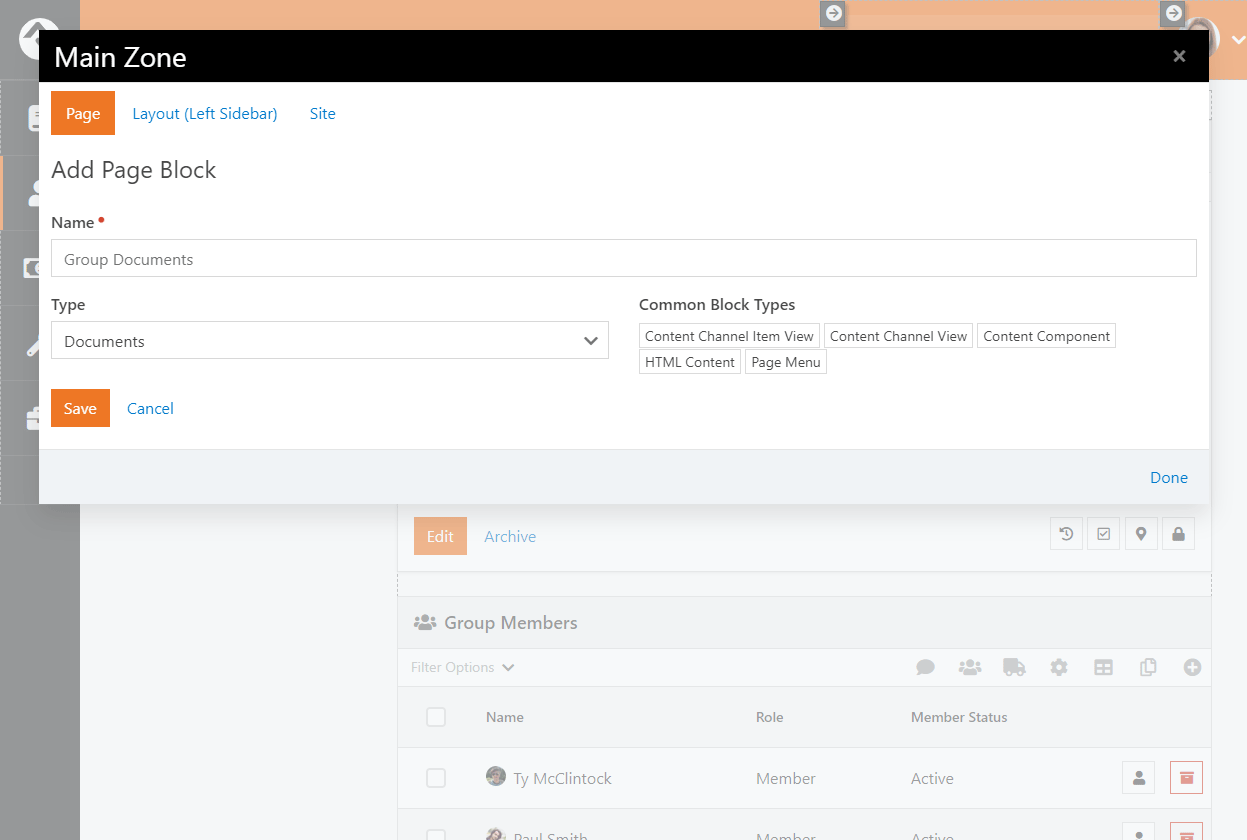
When you first add the
Documents block to a page,
there’s a good chance you’ll see a warning message telling you to “configure a valid context
entity” for the block. That just means you need to let the
Documents
block know what kind of entity it’s working with.
To do that, we’ll use the admin toolbar again to access the settings for the
Documents block. In this
example you’ll need to provide an
Entity Type of "Group" to
ensure the block works with groups. While we're here, there are some other block settings you
might want to be aware of, as described below.
Documents Block Settings
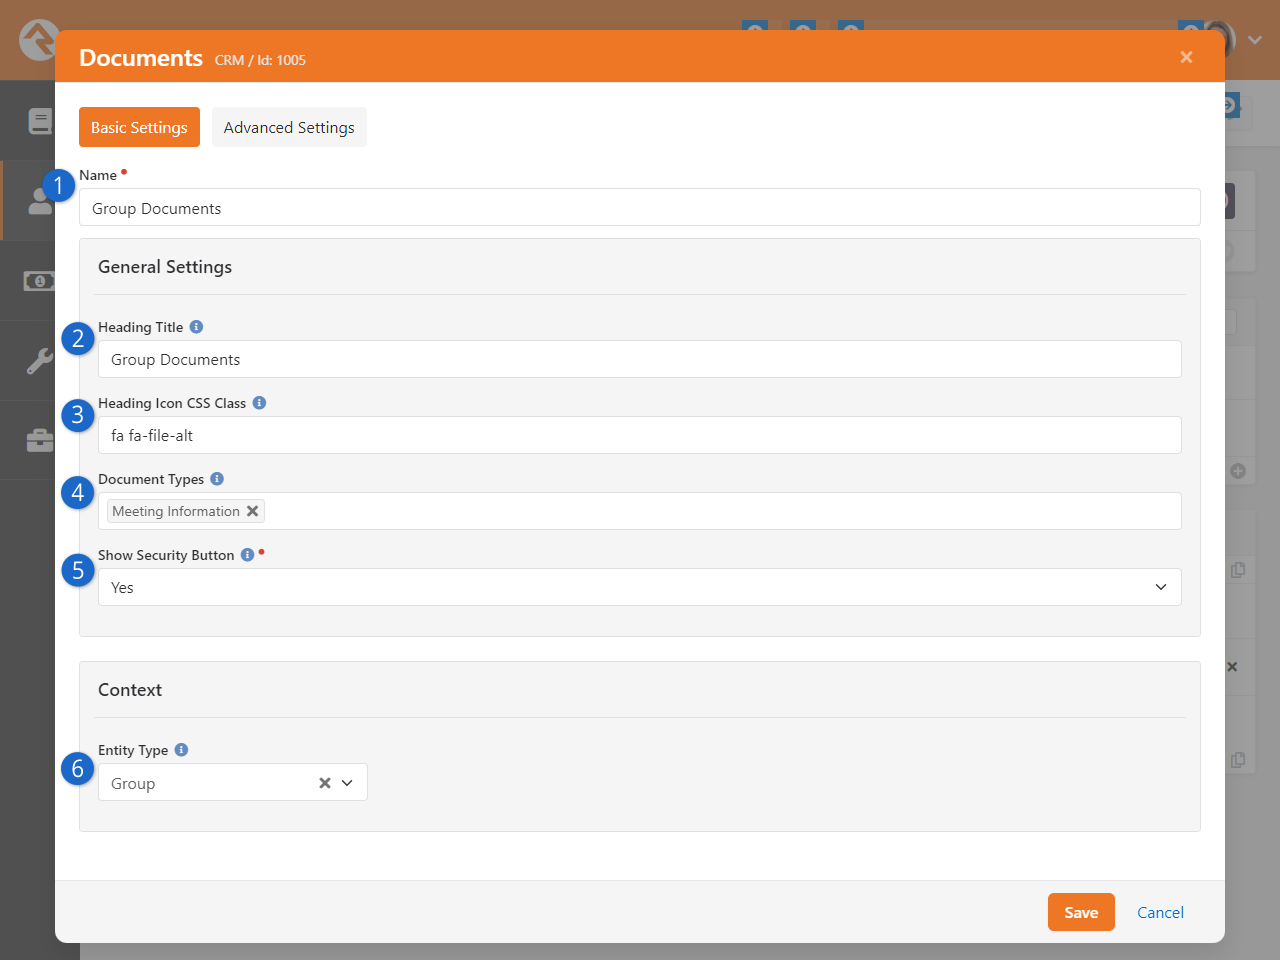
- 1 Name
-
Provide the block with a descriptive name.
- 2 Heading Title
-
A title will appear at the top of the block if one is provided, otherwise the block will have no
title in the heading.
- 3 Heading Icon CSS Class
-
You can optionally assign an icon that will display in the block’s heading.
- 4 Document Types
-
If you want the block to only work with documents of certain types, you can list those types here.
In the example pictured above, only “Meeting Information” documents will be accessible from the
block.
- 5 Show Security Button
-
Showing the security button allows you to manage security access for each document.
- 6 Entity Type
-
This is where you tell the block what type of entity it’s working with. In this example we’re only
interested in group documents, so “Group” has been selected.
The Documents block is now
ready to start handling documents for groups. We'll walk through what that looks like in the
next section below.
Managing Entity Documents
With the new block added, we can start adding documents to our groups. Start by clicking the
icon in the Documents block
to add your first document as shown below.
Add a New Document
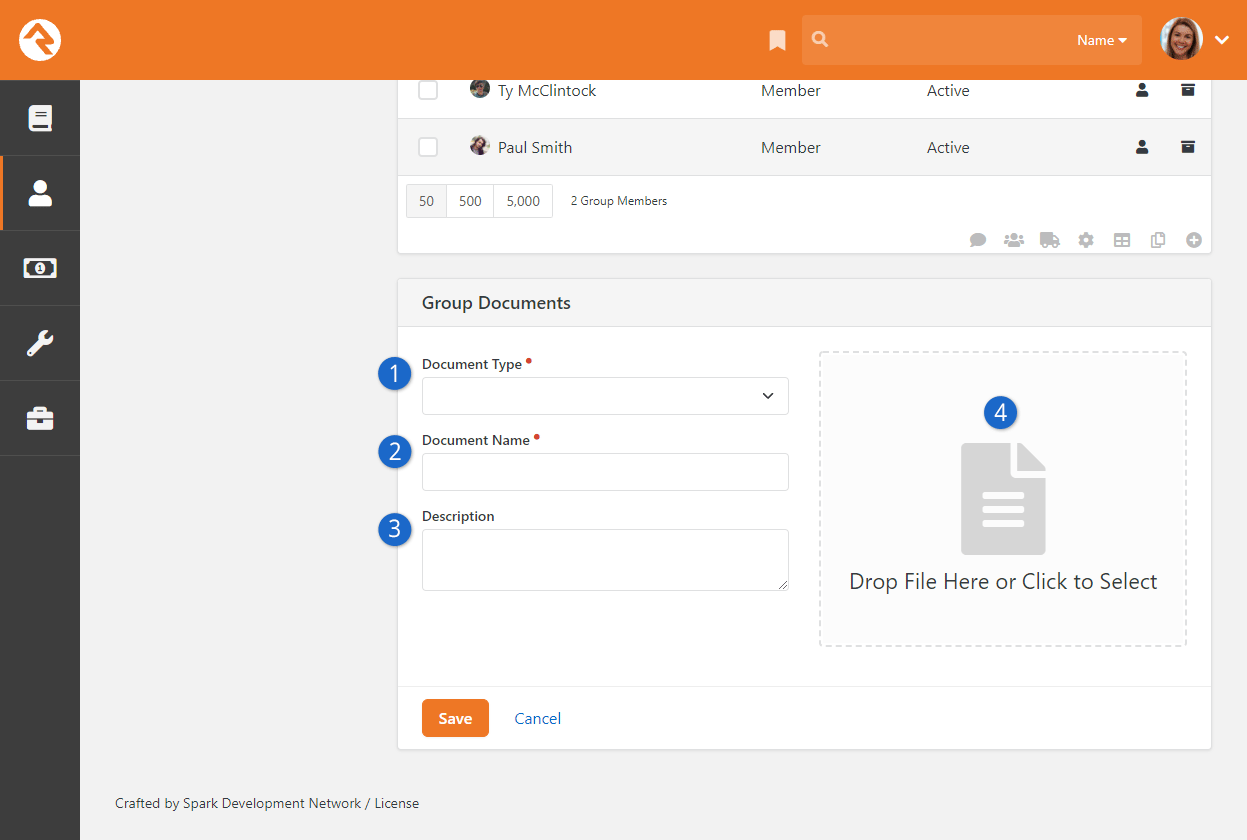
- 1 Document Type
-
Select the type of document that you want to add. The available items are controlled by the
document type’s configuration and by block settings.
- 2 Document Name
-
If configured for the document type, a default name may be pre-populated here. Otherwise, it will be
blank. You can provide your own name or edit the default name.
- 3 Description
-
You can optionally add a description to provide specific details related to this document.
- 4 Add Document
-
This is where you attach the actual document for this entry.
After you add one or more documents for the group (or the entity you're working with) there are
several ways to manage those documents from the block. In the example below, we've added two
documents that we can now manage.
Manage Documents
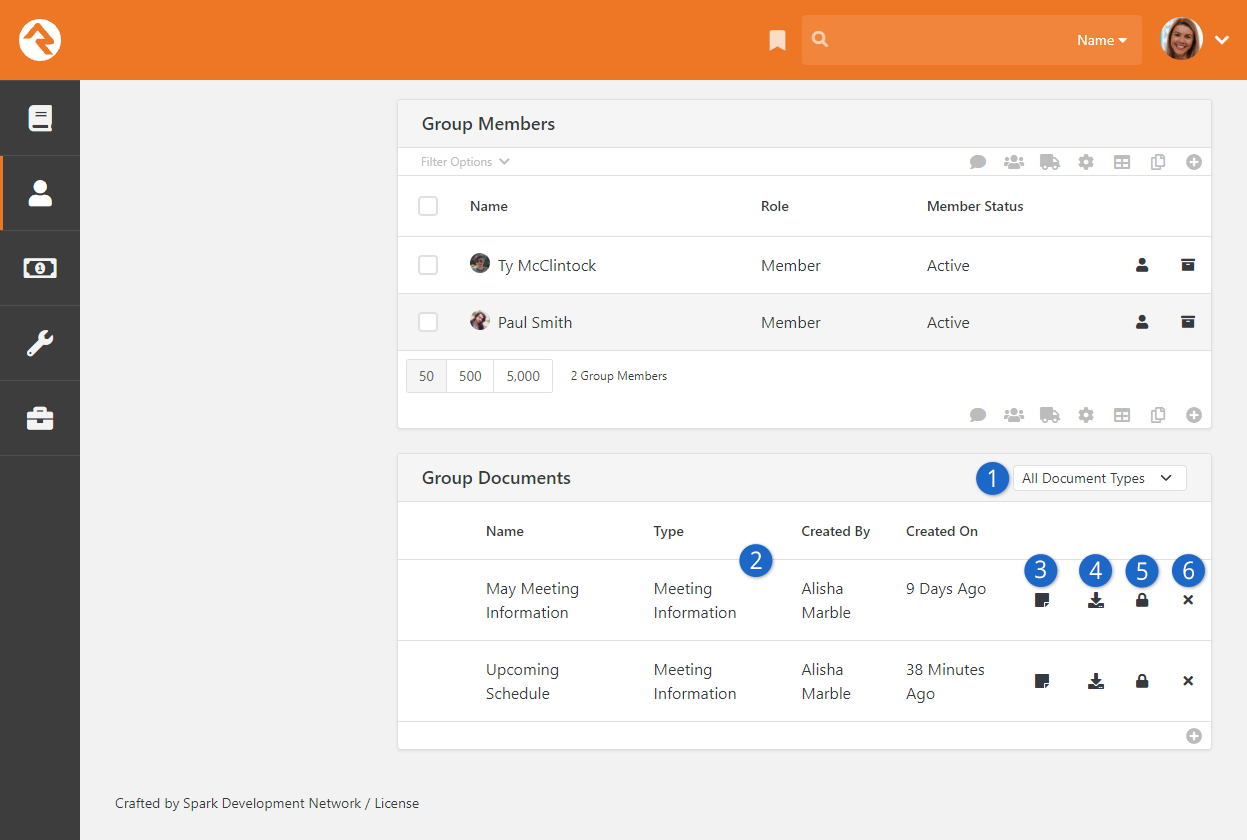
- 1 Document Type Filter
-
Use this drop-down menu to filter the document types that are shown below, or to show all document types.
- 2 Document Information
-
A summary of information for each document is shown for reference.
- 3 Document Icon
-
You can hover over this icon with your mouse to view the document’s
Description
if one was provided.
- 4 Download
-
Click this icon to download a copy of the document.
- 5 Security
-
Security settings can be applied to the document itself, allowing you to have
different restrictions for different documents. This icon will only appear if
it’s enabled in the block settings.
- 6 Delete
-
Click this icon to delete documents from the list. This action cannot be undone,
so use caution when deleting documents.
We've been using groups in the above examples, but don't forget that the
Documents
block works with any entity in Rock.
Adding Documents Using Workflows
The
Entity Document Add
workflow action lets you add documents to any entity using a workflow. There are a few things to
keep in mind when you’re doing this.
As described in the sections above, each
Document Type is associated
with both an entity and a File Type. This means your workflow might get tripped up if it’s
working with the wrong type of entity or with a file that doesn’t align with the File Type
configuration.
For instance, if the Document Type is configured for the Group entity, and if your workflow is
trying to add a document for a Person, it won’t work. The workflow entity and the Document Type
entity must match or else you’ll get an error.
Similarly, the document you’re trying to add needs to conform to the
File Type configuration for the File Type that’s associated with the
Document Type you’re using. This will probably only be a concern if the File Type configuration
has Preferred File Settings
that are required. For someone to upload a Person document they need Edit access to both a
Person Document Type and the File Type Person Document.
Lastly, don’t be surprised if you’re able to add a document in cases where you think you
shouldn’t be able to. For instance, the
Media File File Type that
ships with Rock is intended to be used for audio or video files but there’s nothing stopping you
from adding a Word document using that File Type.
Merge Documents
Hopefully by now you've had a chance to play with "Lava", Rock's templating engine. To know Lava is to love Lava. Much of the time Lava is
used to format many of the pages in Rock. But what if you wanted to use Lava to format documents? Well, that's exactly what merge documents do.
Rock ships with two different merge document formats: Word and HTML. The HTML format is pretty simple—just create a new HTML file
and embed Lava much like you do elsewhere in Rock. The Word format makes it super simple to achieve amazing
results. Let's take a look at the output from a few sample documents to see what's possible.
Merge Documents
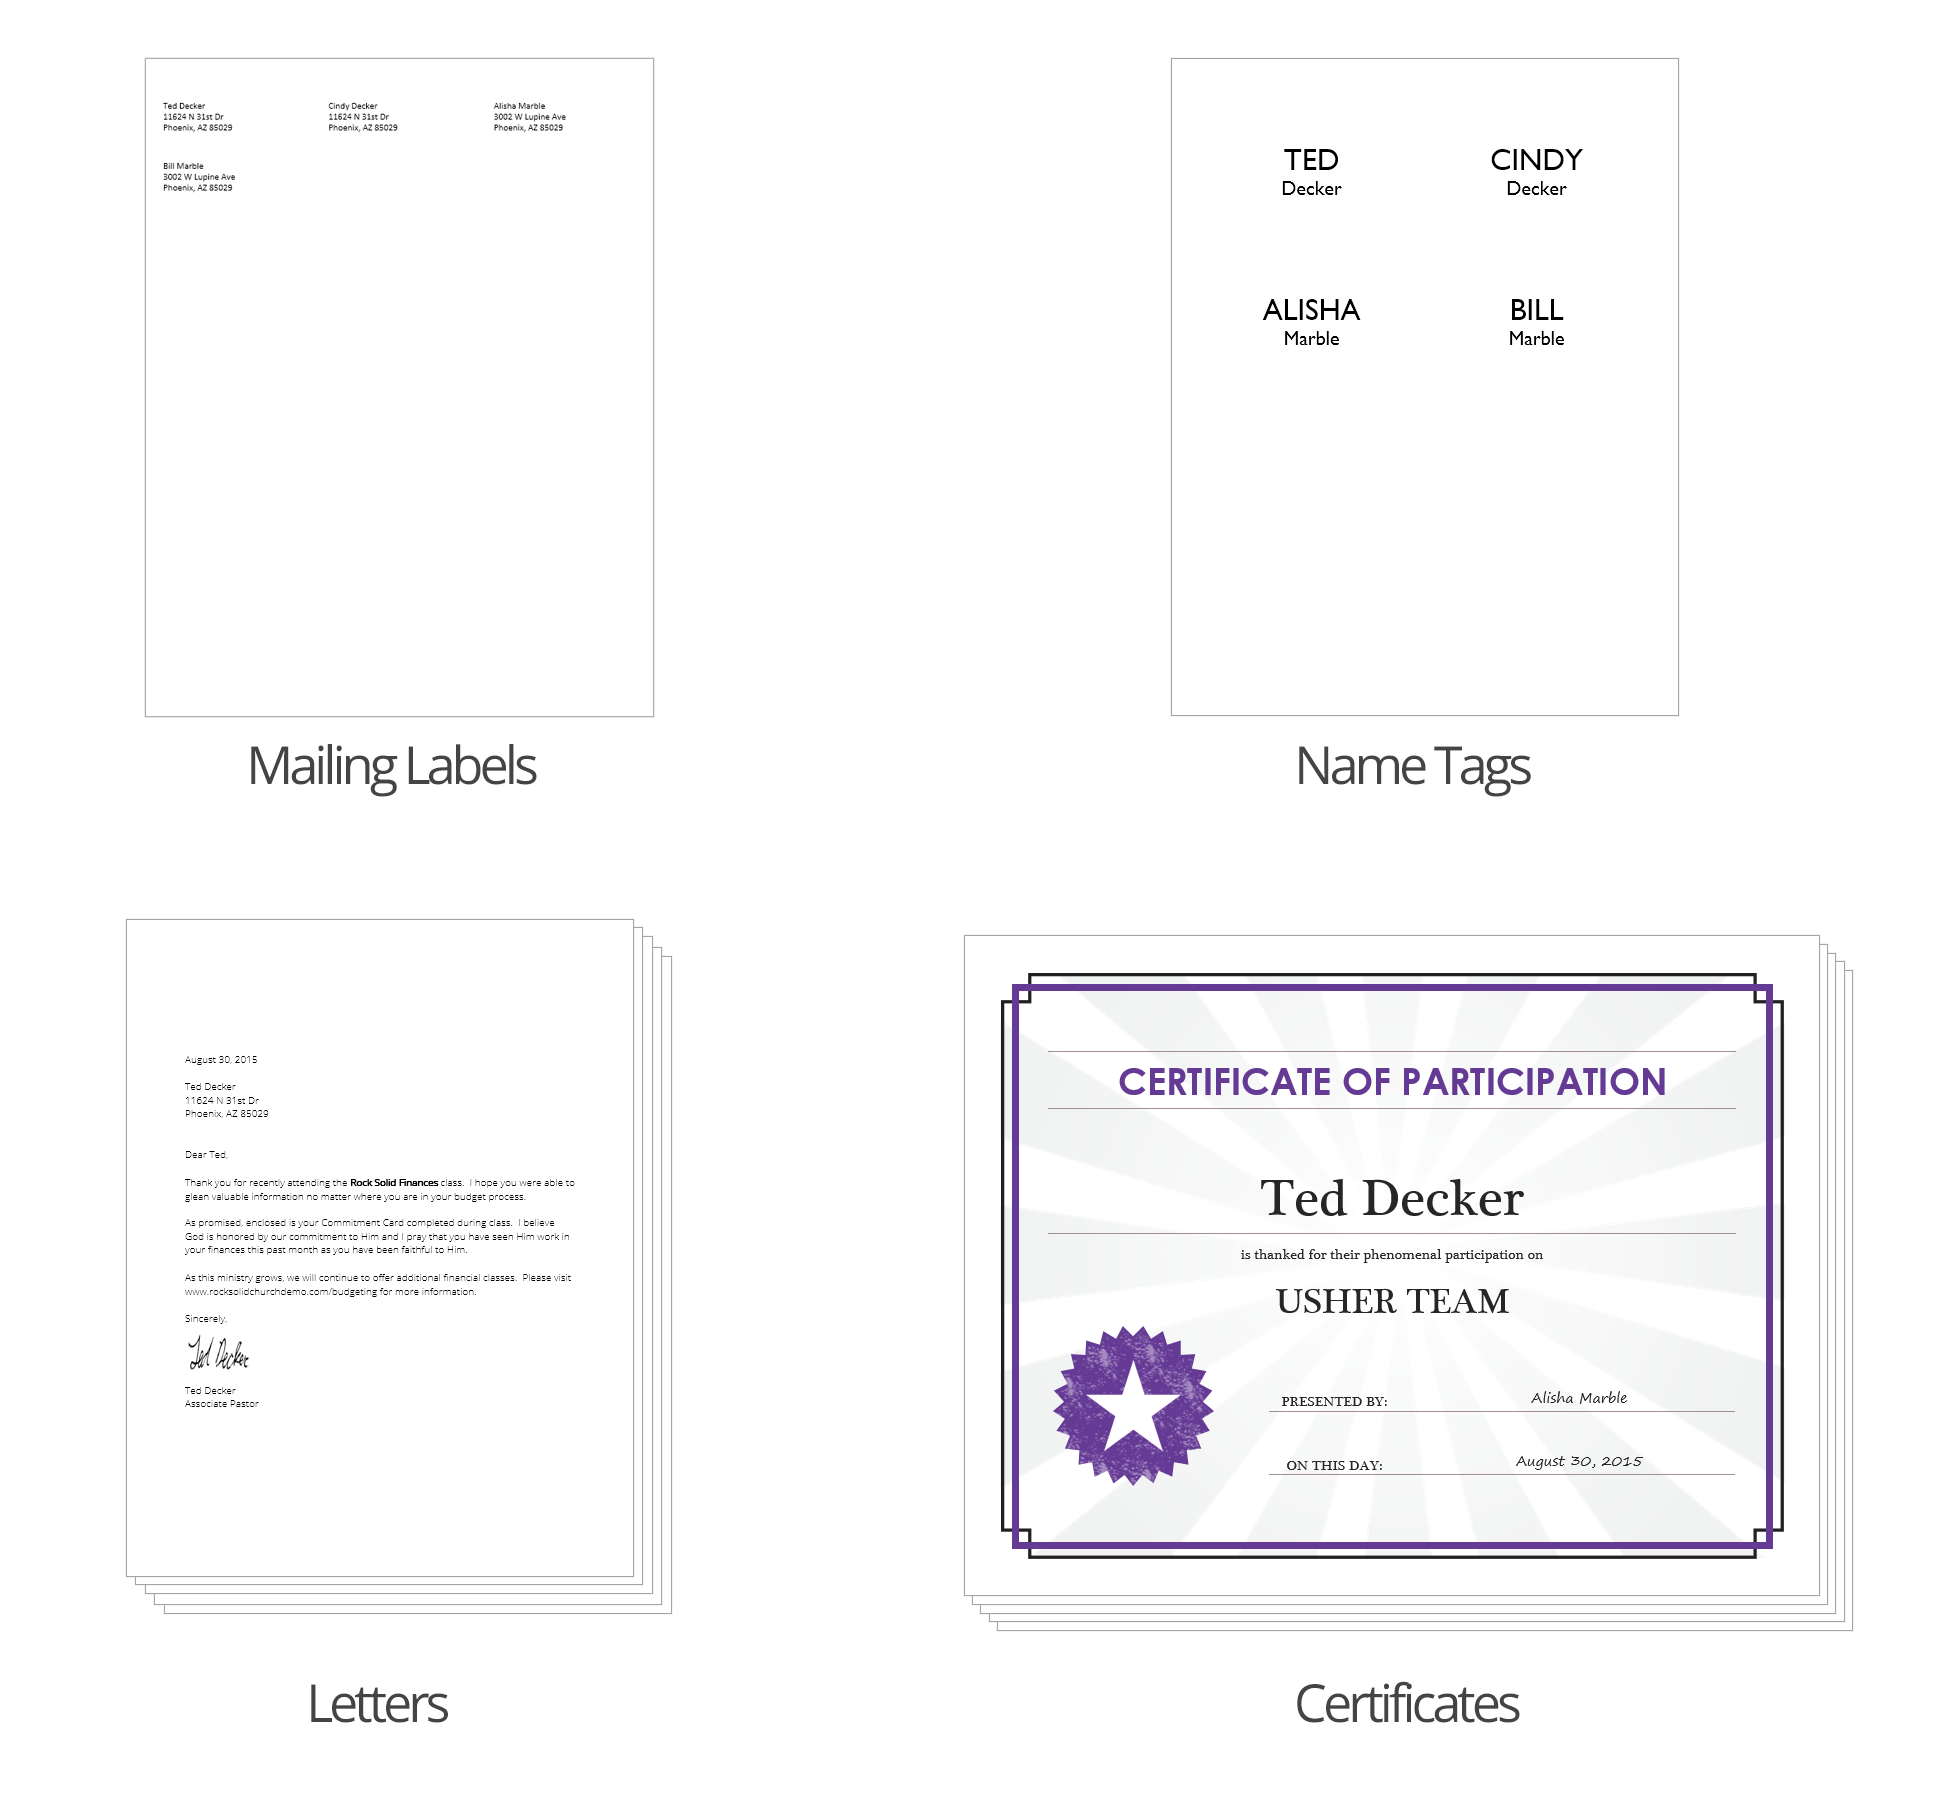
Let's look at how you manage and use merge docs. Then we'll dive deeper into how to create and format them.
Using a Merge Document
You'll notice at the bottom of most grids there's a
button. Pressing this button will take the contents of the grid and make it available to
import into a merge document.
Merge Document Page
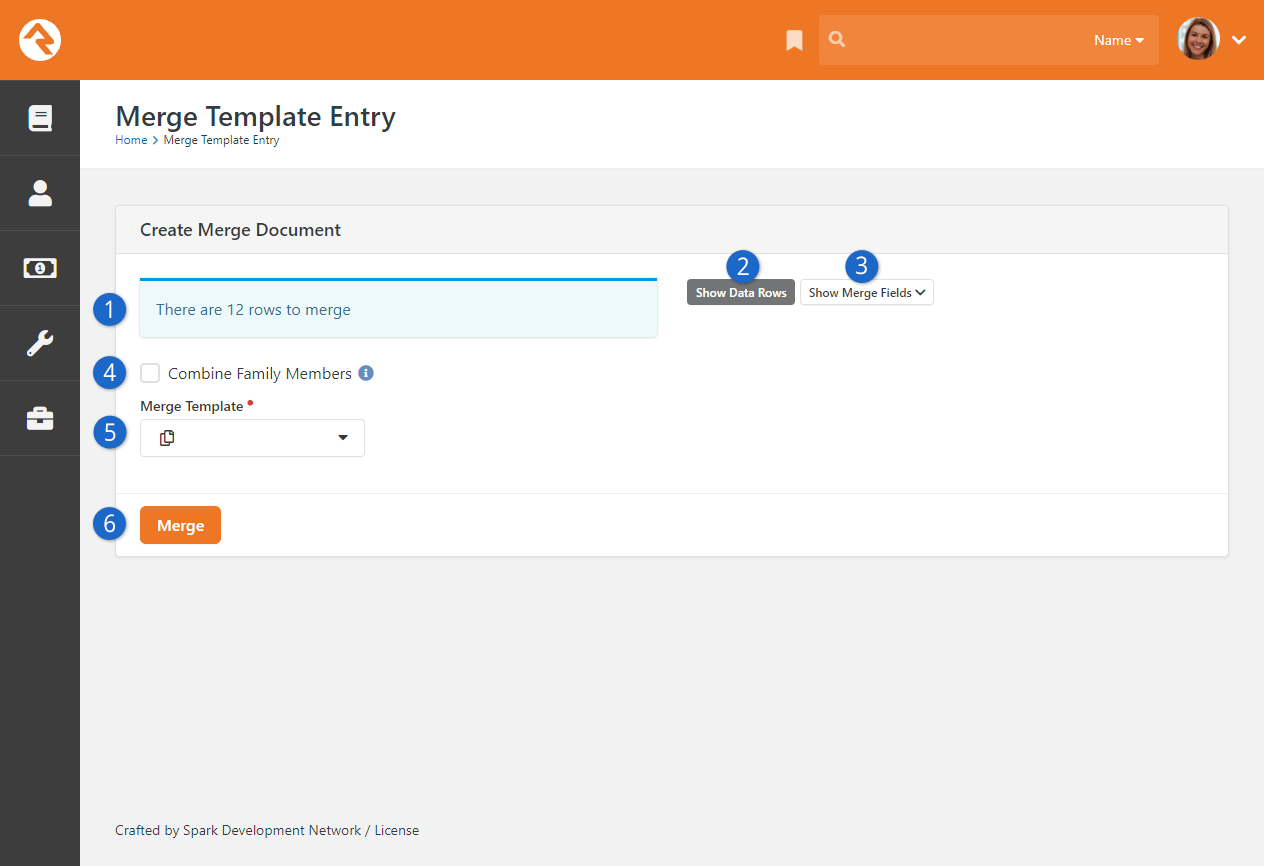
- 1 Count
- Shows you how many records will be merged into the document.
- 2 Show Data Rows
- Shows the first 15 records that will be used for the merge.
- 3 Show Merge Fields
- This is a cheat sheet of sorts to help you create a merge document for the data provided.
- 4 Combine Family Members
- When checked, family members will be combined into a single row instead of one row per person.
For example, when using {{ Row.NickName }} Ted Decker and Cindy Decker would be combined into 'Ted & Cindy'.
- 5 Merge Template
- The template to use for the merge document.
- 6 Merge
- This button will initiate the merge process.
That’s it! Pretty easy, no?
Administrating Merge Templates
Merge documents are created from templates. Some merge templates will be used by everyone;
others, though, can be limited to a specific role or person. To help keep the list of merge
documents from getting out of hand, we’ve created the ability to classify templates as
either global or personal.
Global Merge Templates
You can set up a list of merge templates that are accessible to everyone in the database under
Admin Tools > Settings > Merge Templates.
Global Templates
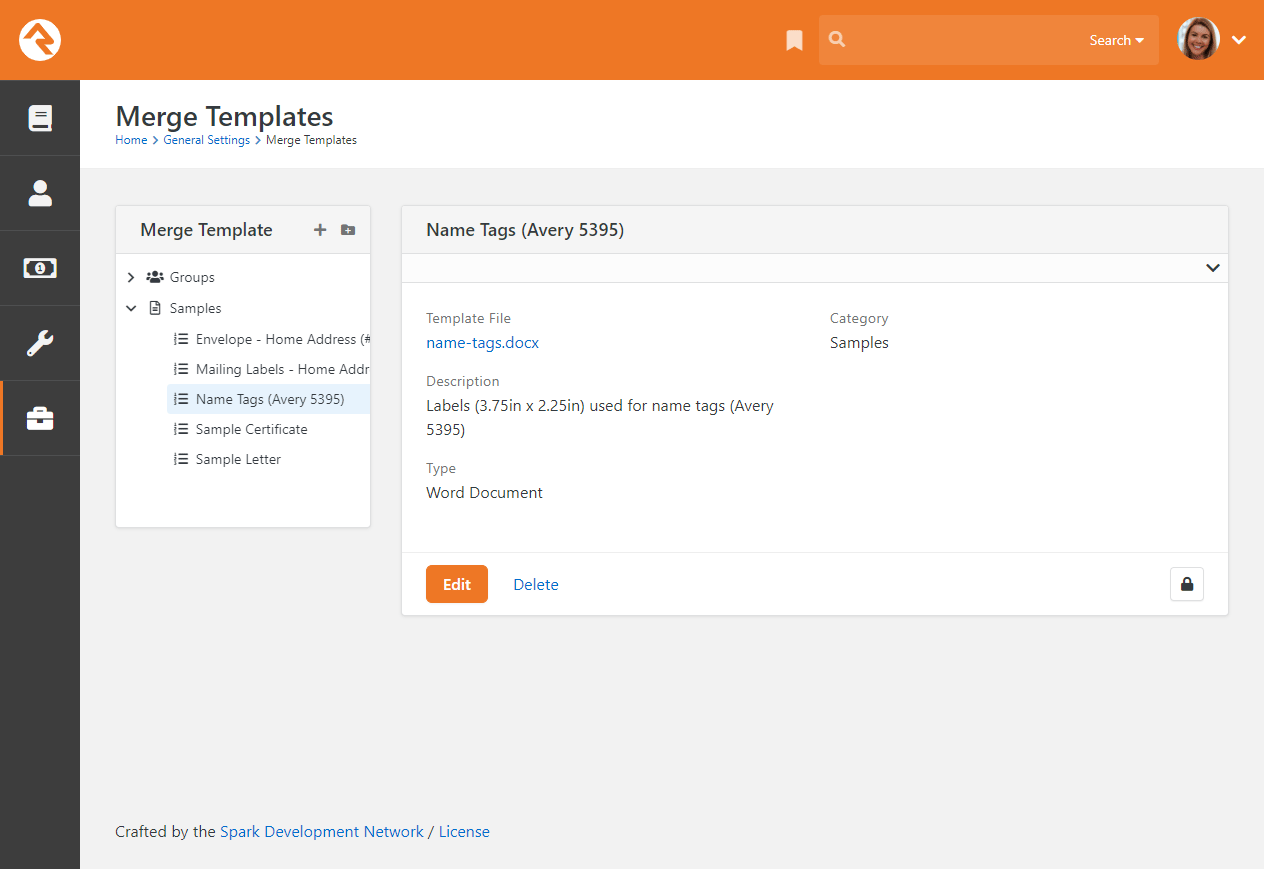
Security can be added to templates on the Merge Template Detail
block. Security settings are enforced whenever a merge document is created.
Personal Merge Templates
You can set up a merge document for your personal use on your
My Settings page
(found under the dropdown in the upper-right corner of the screen).
Personal Templates
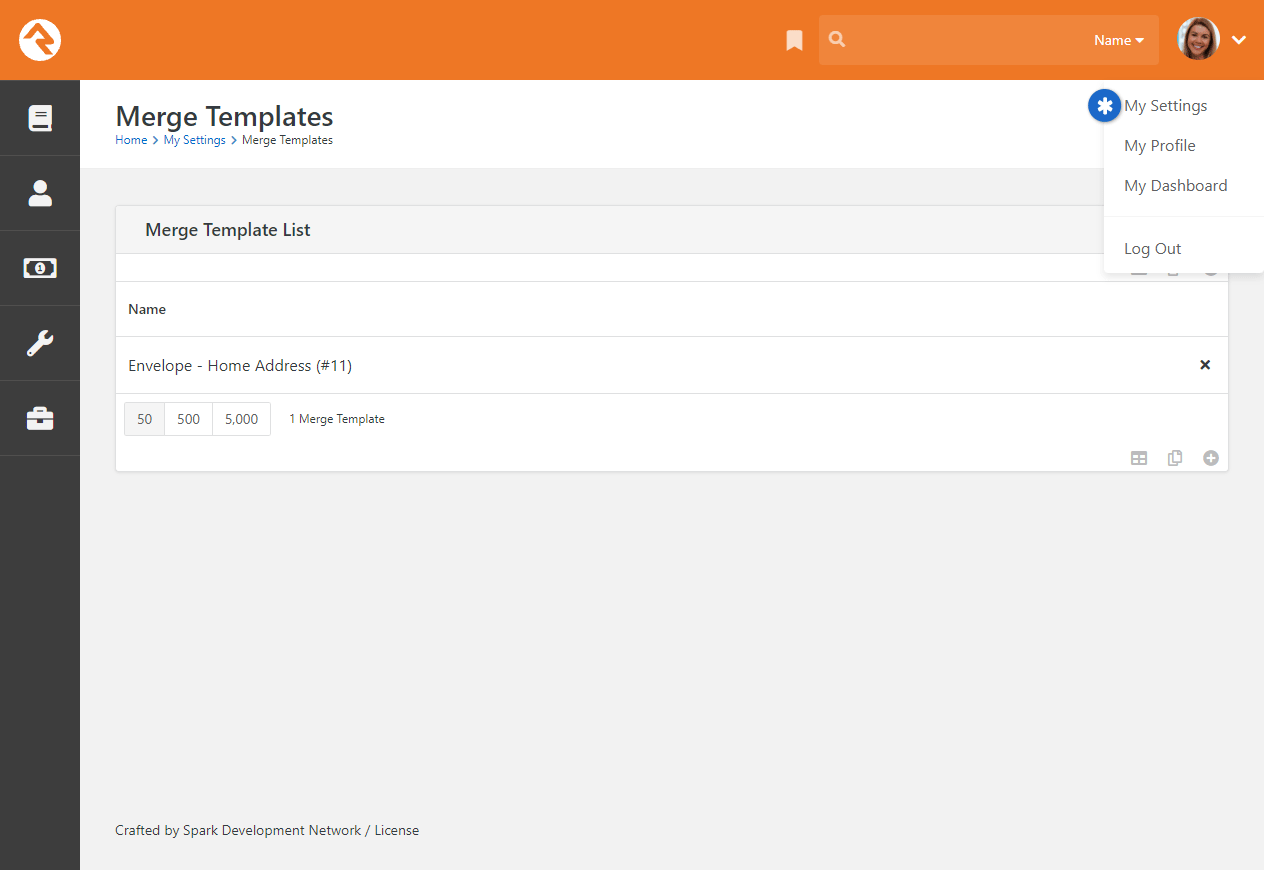
From this screen you’ll see your own personal templates. You can also
access Global templates by updating the block's settings.
Creating a Merge Document
As mentioned previously, Rock currently supports two different merge document formats:
HTML and Word. Below we cover how to create a merge document for each format.
Word
The most common document format is Word. Creating these documents is actually pretty simple. Before we jump in it's
important to talk about the two strategies for merging using Word.
The first strategy is to create a Word document where the whole document acts as a template for each
record. This is most common for things like letters.
Sample Merge Letter Template
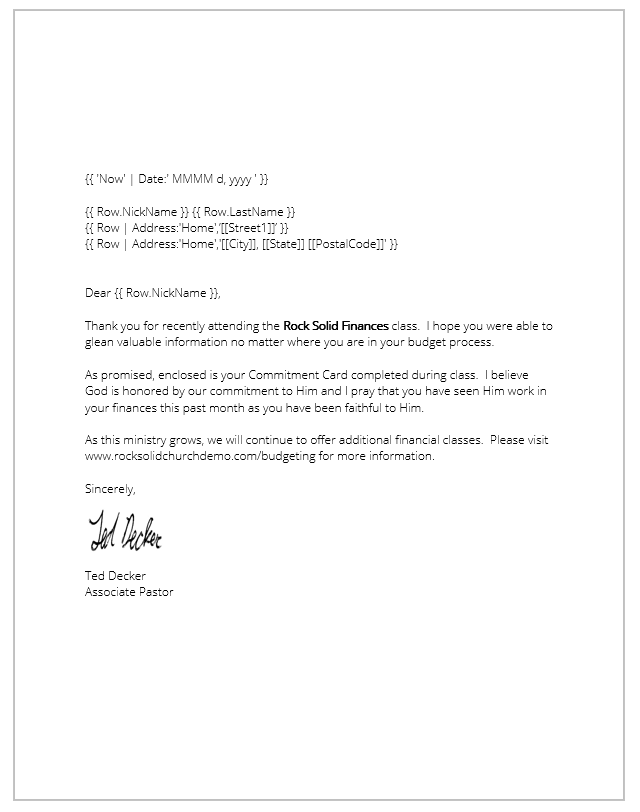
With this type of document, you can simply open Word, type your letter and then add in the Lava where you want the dynamic
text to show.
You have access to several Lava functions in Word. So, things like
{{ 'Now' | Date:' MMMM d, yyyy ' }} will add the current date and time. You can also print data using
the "Row" format, as in {{ Row.NickName }}. That pattern should get you most of what you need. You can additionally
add in variables (like {% assign now = 'Now' | Date %}) and then print those variables. All of the
Lava tags work except if, raw, and lava, while none of the Lava commands
or Lava Shortcodes will work.
The second merge document strategy is for occasions when you want more than one record to be displayed on a
single page. This is often the case for tasks like creating mailing labels. When creating these types of documents
add a {% Next %} code to move to the next record in the list.
Sample Label Merge Template
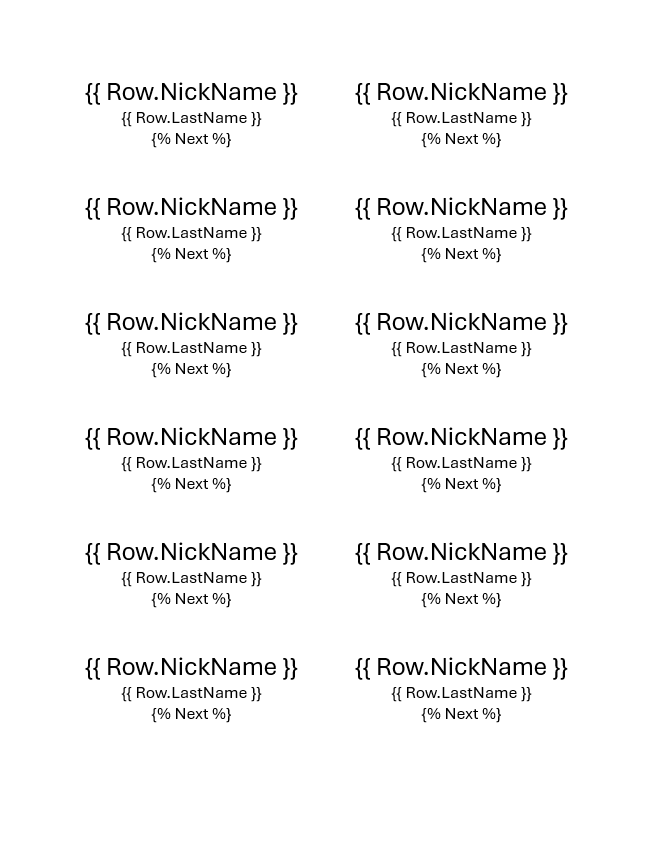
Rock will automatically figure out what strategy your document is using so there's no extra configuration.
HTML
You might be wondering, "Why would I ever want to use HTML for a merge document?" At first blush it does seem a little odd. HTML,
however, is a great tool for incorporating rich media into a format that can easily be printed. It’s often the best
choice when you need to print a report that requires showing maps (easy to display using Google's static map API) or
person photos (links to their photo in Rock).
Below is a quick example of some HTML/Lava that will present a list of people with their photos
(this assumes that the merge document is passed a list of people).
Output of HTML Template
1   <html>
2       <head>
3   		<title>Group Roster</title>
4   		<link rel="stylesheet" href="https://maxcdn.bootstrapcdn.com/bootstrap/3.3.5/css/bootstrap.min.css">
5    	</head>
6
7    	<body>
8    	    <div class="container" style="margin-top: 100px">
9    			<div class="row">
10
11    				{% for row in Rows %}
12    					<div class="col-xs-6 clearfix" style="margin-bottom: 24px; min-height: 200px;">
13   						<div class="pull-left" style="margin-right: 24px; width:20%;">
14    							<img src="{{ 'Global' | Attribute:'PublicApplicationRoot' }}{{ row.PhotoUrl }}" style="width: 100%; border-radius: 100px;" />
15    						</div>
16    						<div class="pull-left">
17    							<h1>{{ row.FullName }}</h1>
18    							{{ row.Email }} <br />
19    							{% for phone in row.PhoneNumbers %}
20    								{{ phone.NumberFormatted }} <small>{{ phone.NumberTypeValue.Value }}</small> <br />
21    							{% endfor %}
22    						</div>
23   					</div>
24    				{% endfor %}
25
26    			</div>
27    		</div>
28    	</body>
29  </html>
Note a few things in the code:
- Line 4: We link out to a hosted version of the Bootstrap CSS file. This provides an easy way to get a default set of styles.
- Line 11: Now we simply run through each of the rows that were passed to us.
- Line 14: Inserting a photo is simple! The PhotoUrl
property for a person even returns a generic image if the person doesn’t have a photo.
As you can see, creating HTML merge documents is easy. Here are a few additional tips:
- Adding map images to your merge documents is also fairly simple. Use the following links for more information:
- HTML merge documents are usually printed. While most people think of HTML as an online-only file
format, it actually does have several print capabilities like page breaks. Here are a few links to point you in the right direction:
Cloud Flare
Enabling Scrape Shield with Cloud Flare will block email addresses in HTML merge documents.
If you're using this service, it will need to be disabled.
Lava Tips With Merge Documents
For the most part your
Lava
skills will all work with Merge Templates. There are a couple of tricks, though, that we'll outline below.
-
While merge templates can be used on any entity type, they'll most often be used on people. To help make your templates work
with as many 'grids' of people data as possible we convert group member entities to people.
-
Should you need access to the group member data (e.g., group member attributes) you can use the GroupMember property on the person like:
{{ Row.GroupMember | Attribute:'attributekey' }}
-
Be sure you're using straight quotes and not curved or stylized quotes. For instance,
{{ 'Now' | Date:'MMMM d, yyyy' }}
is correct, while {{ ‘Now’ | Date:‘MMMM d, yyyy’ }} will likely give you an error.
Campuses
Many organizations operate out of more than one location. While there are many terms for these "sites" we've chosen
to call them campuses within Rock.
Single Campus
Generally, the display and selection of campus information throughout Rock will be hidden if you have
only one campus. If a campus value is required by a particular block, then the single
campus you have configured is automatically used (otherwise it’s left blank).
Managing Your Campuses
You can create or maintain campuses from
Admin Tools > Settings > Campuses.
There you'll see a list of campuses that you can manage or add to. Selecting a campus will bring up the
campus details screen.
Locations
Before adding a new campus, you must first add its address under
Admin Tools > Settings > Named Locations.
Campus Details Screen
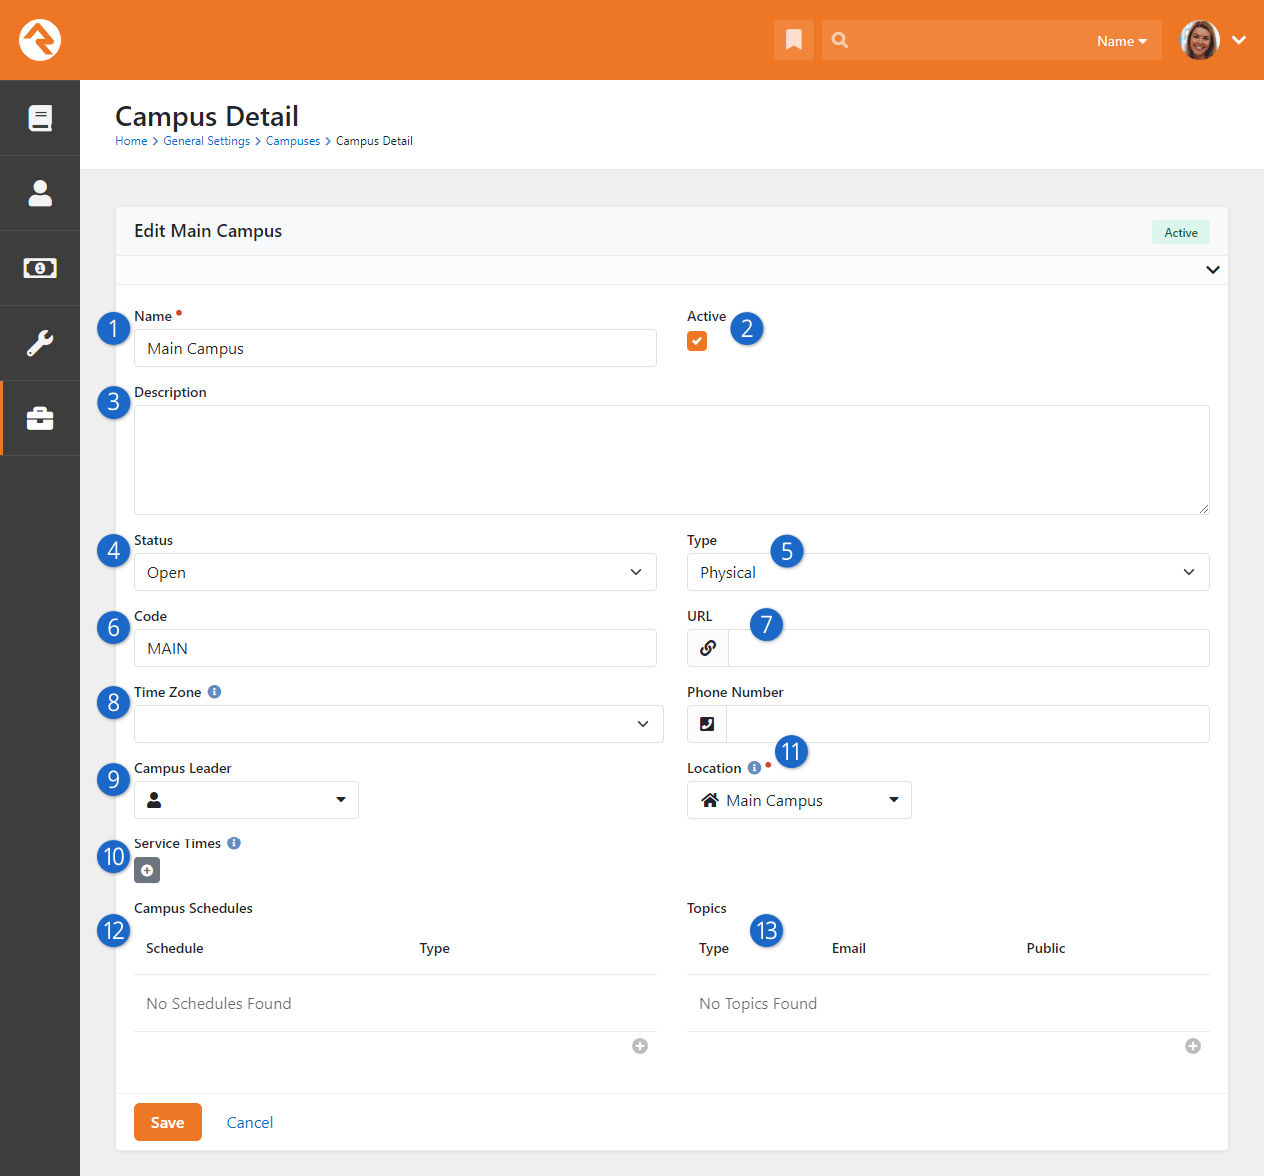
- 1 Name
- Even if you only have one campus, choose a name that will still
make sense if you ever expand. A simple name like "Main" or "West"
typically works well.
- 2 Active
- As you bring new campuses online, you may want to add them as
inactive until you have time to configure them and prepare for the
announcement.
- 3 Description
- You can use this field to provide a description for your campus.
This might be something you display to your website guests.
- 4 Status
- Sometimes there are pending campuses that are not yet open that you want
to begin configuring, or which are now closed but important to keep
for record-keeping. Campus statuses use the
Campus Status
defined type.
- 5 Type
- You may want to easily differentiate between different types of campuses –
whether Physical, Online or some other type. Campus types use the
Campus Type
defined type.
- 6 Code
- When you grow beyond two or three sites, it's common to develop a
shorter naming convention to help you refer to a campus. For example,
if your campus is named “Main Campus” then you might choose “MAIN” as
a short code.
- 7 URL
- The web address for the campus.
- 8 Time Zone
- You’ll see this if you’ve enabled support for multiple time zones
in the System Settings. You can leave this blank if campus time zones
are all the same.
- 9 Campus Leader
- Here you can optionally indicate the person who's in charge of
running the campus.
- 10 Service Times
- Here you can list the days and times that this campus offers
services.
- 11 Contact Information
- If the campus has its own phone number, you can provide it here. You
must provide a location, which is why you have to set up the location
before you add a campus.
- 12 Campus Schedules
- Here you can associate Schedules directly with the campus. This can be
done for reference, but also can be used by blocks like Service Metrics Entry.
- 13 Campus Topics
- Here you can associate an email address with a campus topic. The
Topic Type is a defined value. This can be used to send notifications of
Rock
form submissions.
Campus Status & Campus Type
A lot of the setup for Campuses is pretty straightforward, but there are some important points
you'll want to keep in mind about the Status and Type fields.
Rock ships with three Campus Status values (Closed, Open and Pending) and two Campus Type
values (Physical and Online). These are ready for you to use out of the box as Defined
Types. However, these values can't be deleted through Rock and shouldn't be deleted by
other means. That said, how you use them is entirely up to you. If needed, you can add new
values to the Defined Types lists or change the names of the existing values.
Note
Even if the Type is "Online" you're still required to have a Location value. As
with any campus, the Location Type assigned to the Location you choose must be "Campus".
If you’re not sure what Location to use for an online campus, best practice is to
choose the one most closely associated with the website.
Upgrading Rock?
If you’re upgrading Rock from an older version that doesn't have Status and Type
configuration, then your existing campuses will have these values automatically
assigned. Any active campus will get a Status of
Open
and an inactive campus will get a Status of
Pending.
The assigned Type will be
Physical
for all campuses, except
Online
will be assigned if the name of the campus has "online" or "on-line" in it.
Campus Teams
Associating people with a campus helps you easily identify key staff, and their roles, at that campus.
This is accomplished using the Campus Team
system group type. Each campus functions like a group, with its own members and roles.
Campus Team
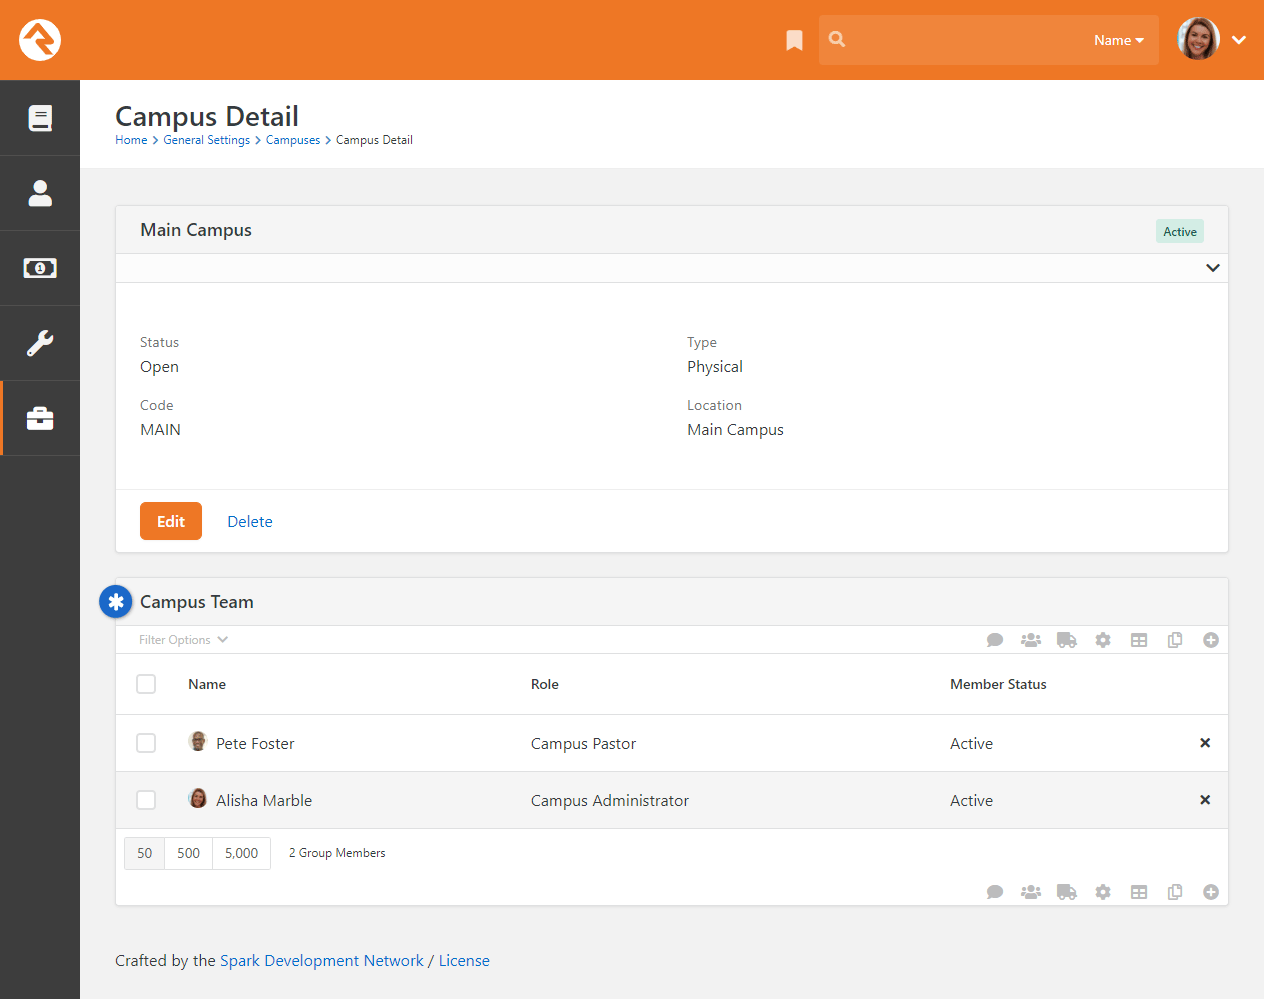
Adding a person to a campus is just like adding members to other types of groups. Click the
button on the grid to add new members and define their role at the campus.
Add Campus Team Member
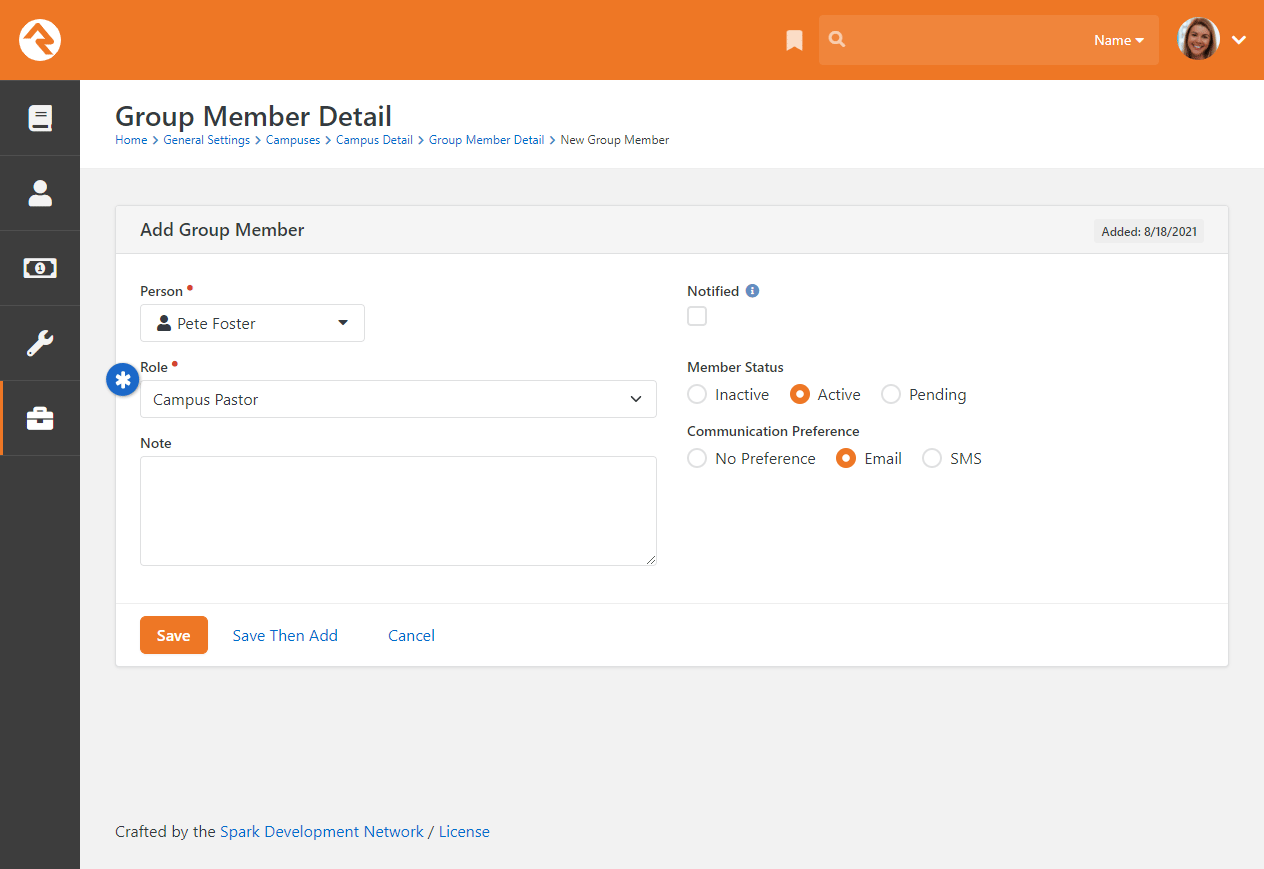
Teams for your campus can be created with either single-campus or multi-campus setups.
Adding Attributes to Campuses
You can add attributes to your campuses to track information about them beyond the settings
described above. To do that, just follow these steps:
- Go to Admin Tools > Settings > Entity Attributes.
- Click the button to add a
new attribute.
- Select the Entity Type of "Campus" and set up the attribute
information. You don't need to add a value for the Qualifier Field or
Qualifier Value fields.
- After clicking Save, you can configure security for the attribute if needed.
- You'll now be able to set a value for this attribute in the Campus Details
page described above.
Jobs
Jobs allow you to run a sequence of code on a defined schedule. A good example of this is the
Rock Cleanup job that
comes configured to run every day at 1:00 am. This job runs through a series of clean-up steps
(like trimming the Audit Log)
to help keep the Rock database clean and tidy.
Below is a list of jobs that ship with Rock.
| Name |
Description |
Default Schedule |
| Auto Open Locations |
Related to check-in, this job will automatically reopen rooms that have been closed.
This allows closed rooms for one service to be open for the next service. You can select
a Parent Location to
limit which rooms are opened. You can also set a
Re-open Period which
tells the job to only open rooms that have been modified (e.g., closed) within this
amount of time. This job only works for Locations that are of type
Room. |
None |
| Calculate Family Analytics |
This job populates Rock's family analytics. See our
Person and Family Field Guide
for more information.
|
At 8:00 pm, only on Tuesday |
| Calculate Group Requirements |
This job processes group requirements defined in the system. You can read more about this in the
Rock Your Groups
manual.
|
Every day at 3:00 am |
| Calculate Metrics |
This job runs any metrics with a defined schedule. You can read more about this in the
Taking Off With Reporting
manual.
|
Every 15 minutes |
| Calculate Person Duplicates |
This Run SQL job scours your Rock database on a nightly basis looking for possible duplicates. Those that are found
are listed under Rock's data integrity tools. You can read more about these tools in the
Data Integrity chapter.
|
Every day at 3:00 am |
| Calculate Person Signals |
Re-calculates all person signals to ensure that the top-most signal is still the current one. To learn more
about signals, see the Person Signal Types section.
|
Every day at 3:15 am |
| Campaign Manager |
Handles the processing of all configured
connection campaigns,
creating new connection requests and assigning them to connectors as needed.
|
Every day at 7:00 am |
| Charge Future Transactions |
Charge future transactions where the
FutureProcessingDateTime
is now or has passed.
|
Every 10 minutes |
| Collect Hosting Metrics |
This job can only be activated by navigating to
Admin Tools > Settings > System Configuration > Web.Config Settings
and toggling the Enable Database Performance Counters setting. This job will collect
metrics related to the usage of resources like the database connection pool. See the
System Configuration section for details. |
Every five minutes |
| Communication Queue Alert |
Sends an email to a list of recipients when there are communications that have been queued to send for longer than a specified time period.
See our Communicating With Rock
guide for more information on working with communications in Rock.
|
Every 15 minutes |
| Complete Workflows |
Closes all the Workflows of the configured type that are older than a certain number of minutes.
You can read more about this in the
Blasting Off With Workflows manual.
|
None |
| Connection Requests Automation |
If you have any Status Automation rules configured on a Connection Type, this
job will process them and make updates as needed. For more details see the
Engagement
guide.
|
Every day at 11:00 pm |
| Connection Request Workflow Triggers |
Connection Request workflows that are triggered by
Future Follow-up Date Reached
are launched by this job. The job also changes the state of these requests from
Future Follow Up to Active and adds a "Future Follow-up Complete" action.
By default, the Number of Days to Look Back
setting is set to '1'. This means if the job is run today, it will launch workflows and change states for connection
requests where the Future Follow Up date was yesterday. |
Every day at 7:00 am |
| Content Channel Item Self Update |
This job helps automate showing or hiding certain content channel items. For full details see the
Designing and Building Websites Using Rock
guide.
|
None |
| Data Automation |
Updates person and family information based on Data Integrity settings. To learn more
about Data Integrity settings, see the Data Integrity chapter.
|
Every Tuesday at 4:00 am |
| Database Maintenance |
Performs routine SQL Server database maintenance.
See the Care and Feeding of Rock section for more information.
|
None |
| Data View to Workflow |
Starts a workflow for each entity in a specified Data View.
|
None |
| Get Scheduled Payments |
This job downloads transactions from the payment gateway for any scheduled transactions. You
can read more about this in the
Rock Solid Finances
manual.
|
None |
| Giving Automation |
This job updates giving classification attributes and Giving Journey stages. It also creates giving alerts.
For more information check out the
Rock Solid Finances
guide.
|
Every day at 10:00 pm |
| Group Attendance Reporting |
This job will create new Person attributes to track a person's
First Attended Date,
Last Attended Date,
Times Attended in Last 12 Months and/or
Times Attended in Last 16 Weeks
for groups specified by a Data View. These attributes can be manually assigned categories and
security as needed. This job considers all attendance in the specified groups, regardless of
whether the person is currently an active member of the group. For more information see our
Rock Your Groups
guide.
|
None |
| Group Leader Absence Notifications |
This job sends an email to group leaders in the specified group type with a list of group members
who haven't attended group meeting occurrences a specified number of times. See our
Rock Your Groups
guide for more information.
|
None |
| Group Leader Pending Notifications |
This job sends out emails to group leaders with pending notifications. You can read more about this in the
Rock Your Groups
manual.
|
None |
| Group Sync |
This job syncs any configured groups. You can read more about this in the
Rock Your Groups
manual.
|
None |
| Index Entities (Universal Search Re-Index) |
Re-indexes the selected entity types in Universal Search.
See our Universal Search guide for more information.
|
Every day at 5:00 am |
| Index Rock Site |
Configures Rock to index a specified site. Includes
the option to set login credentials to allow indexing of
password-protected pages.
|
None |
| Job Pulse |
Runs continuously to help monitor the jobs engine. Don't
disable this job.
|
Every 30 seconds |
| Launch Workflow |
Will start a new workflow of the type selected in the configuration.
|
None |
| Location Services Verify |
Attempts to standardize and geocode addresses that haven't been verified yet.
It also attempts to re-verify addresses that failed in the past after a given
wait period.
|
Every day at 3:00 am |
| PBX CDR Download |
This job downloads CDR information for the specified PBX component.
|
None |
| Populate Interaction Session Data |
This job will update Interaction
counts
and
durations
for InteractionSession records.
|
Every 10 minutes |
| Process BI Analytics |
This job takes care of schema changes (dynamic Attribute Value Fields) and data updates to Person analytic tables.
To read more about BI and Rock, see the
Business Intelligence
guide.
|
Every day at 5:00 am |
| Process Elevated Security |
This job calculates each person's
Account Protection Profile
level.
|
Every day at 3:15 am |
| Process Group History |
Updates group history for enabled group types. To learn more
about group history, see the
Group History
chapter of the
Rock Your Groups manual.
|
Every day at 3:30 am |
| Process Workflows |
Looks at all active workflows and runs the activities of those
that are active.
|
Every 10 minutes |
| Rock Cleanup |
Runs a series of cleanup steps to manage the Rock database.
You can change the settings for many of the steps, but we recommend keeping
the defaults in most cases. For instance, you may want to enable
Fix Attendance Records Never Marked Present
if you're using Presence
with Check-in.
|
Every day at 1:00 am |
| Run Lava |
Runs a Lava template on a given schedule using common merge fields and commands. This is helpful when triggering web requests, performing Lava SQL updates and more.
|
None |
| Run SQL |
This job simply runs a SQL script on a given schedule. This is
helpful if you’d like to automate the changing of data on a
certain schedule.
|
None |
| Send Assessment Reminders |
Sends reminders to persons with pending assessments if the created date/time is
less than the calculated cutoff date and the last reminder date is greater than
the calculated reminder date.
See our Assessments
guide for more information.
|
Every day at 8:00 am |
| Send Attendance Reminders for Group Type |
This job is used to remind group leaders to take attendance for the groups they
lead, for groups of the specified type. You can read more about this job in the
Rock Your Groups
manual.
|
Every day at 4:00 pm for the Small Group group type. |
| Send Birthday Email |
Sends an email to people in the database who have a birthday on that day.
|
None |
| Send Communications |
Sends out queued communications. Communications can be sent in serial or in parallel
according to the
Parallel Communications
setting. We don't recommend changing the number of allowed parallel communications without
careful analysis of your bandwidth usage and limits.
See the
Communicating With Rock
guide for more information on working with communications in Rock.
|
Every 10 minutes |
| Send Credit Card Expiration Notices |
Notifies (by email) anyone with a scheduled credit card transaction that expires in the following
month. It can also be configured to launch a custom workflow. You can read more about this in the
Rock Solid Finances
manual.
|
First of every month at 7:30 am |
| Send Data View Email |
This job will send a System Communication of your choosing to the
list of people returned by the selected Data View.
|
None |
| Send Following Events |
The Send Following Event Notification job sends out emails to specified
individuals when following events occur. When you add a Following Event
of the "Person Note Added" Following Event type, this job will take
longer the first time it runs. This initial run establishes "Last
Notified" dates for followed people and their notes.
|
At 7:00 am, Monday through Friday |
| Send Following Suggestions |
The Send Following Suggestion Notification job calculates and sends following
suggestions to people who are eligible for following.
|
At 3:00 pm, Monday through Friday |
| Send Group Attendance Digest |
This job sends an email containing a summary of attendance data for certain groups. The
groups must be structured a specific way for this job to work, so be sure to check out the
Group Attendance Digest
section of our
Rock Your Groups
guide for configuration instructions.
|
None |
| Send Group Attendance Reminders |
This job is used to remind group leaders to take attendance for the groups they
lead, for groups of any type where the
Send Attendance Reminder
option is enabled. You can read more about this job in the
Rock Your Groups
manual.
|
Every 15 minutes |
| Send Group Email |
Sends out an email to the selected group's active members using the template you choose,
with an option to include members of descendant groups.
If a person is a member of multiple groups in the tree, they will receive an email for
each group. This job works well for sending automated group email reminders.
|
None |
| Send Group Requirements Notification |
Sends out reminders to group leaders when group members don't meet all requirements. You can read more about this in the
Rock Your Groups
manual.
|
None |
| Send Group Schedule Notifications |
Sends Group Scheduling Confirmation and Reminder emails to people that haven't been notified yet.
See our Rock Your Groups
guide for more information.
|
Every day at 4:00 pm |
| Send Note Notifications |
Sends out digest notifications of notes which have been added as a reply to watched notes, as
well as notes which were added and require approval prior to being displayed.
|
Every two hours |
| Send Prayer Comments |
Sends comments added to prayer requests to the requestor.
See our Raising Up With Prayer
guide for more information.
|
None |
| Send Registration Payment Reminders |
The Event Payment Reminders job sends out payment reminders to the registration contacts when a balance is due. See the
Event and Calendar Guide
for more information.
|
None |
| Send Registration Reminders |
Sends out reminders to registrants of upcoming events. You can read more about event registrations in the
Event and Calendar Guide.
|
Every hour |
| Send RSVP Reminders |
Sends a reminder to people who have accepted an RSVP invitation.
|
None |
| Spark Link |
This job fetches Rock notifications from the Spark Development Network.
|
At 57 minutes past the hour, every seven hours |
| Steps Automation |
When this job runs, new steps are created and completed for people in a Data View. The
Data View is added to the Step Type configuration, so each Step Type may use a different
Data View. This job respects the 'Allow Multiple' and 'Prerequisite Steps' configuration
options of each Step Type. |
Every day at 4:00 am |
| Sync Media |
Synchronizes media content from configured Media Accounts. This is how new Media
Elements and folders are added to Rock after you've uploaded new content to your video
provider.
|
At 15 minutes past the hour, every two hours |
| Update Persisted Attribute Values |
The AttributeValue
table in Rock has properties that store persisted versions of the
Value property.
At times, the persisted values may fall out of sync with the actual
Value.
This job finds these cases, and updates the persisted values to reflect the current
Value.
To make sure we don't miss anything, the
Rebuild Percentage
in the job's configuration forces this update on a percentage of
AttributeValue
records, even if it doesn't appear that those records need to be updated.
|
Every day at 2:15 am |
| Update Persisted Datasets |
This job will update the persisted data in any Persisted Datasets that need to be refreshed.
|
None |
| Update Persisted Dataviews |
Runs Data Views marked as "persisted" and caches the results for much quicker data lookups.
|
Every minute |
| Update Personalization Data |
Updates the list of people in personalization segments. You can read more about
personalization and personalization segments in our
Designing and Building Websites Using Rock
manual.
|
Every day at 1:20 am |
Note
You can code your own jobs if you have access to a developer.
Configuring a Job
You can maintain current jobs or add new jobs under
Admin Tools > Settings > Jobs Administration.
There you'll see a list of currently configured jobs. You can click a job to
modify the configuration or click the Add
button in the grid footer to create a new job.
Jobs List
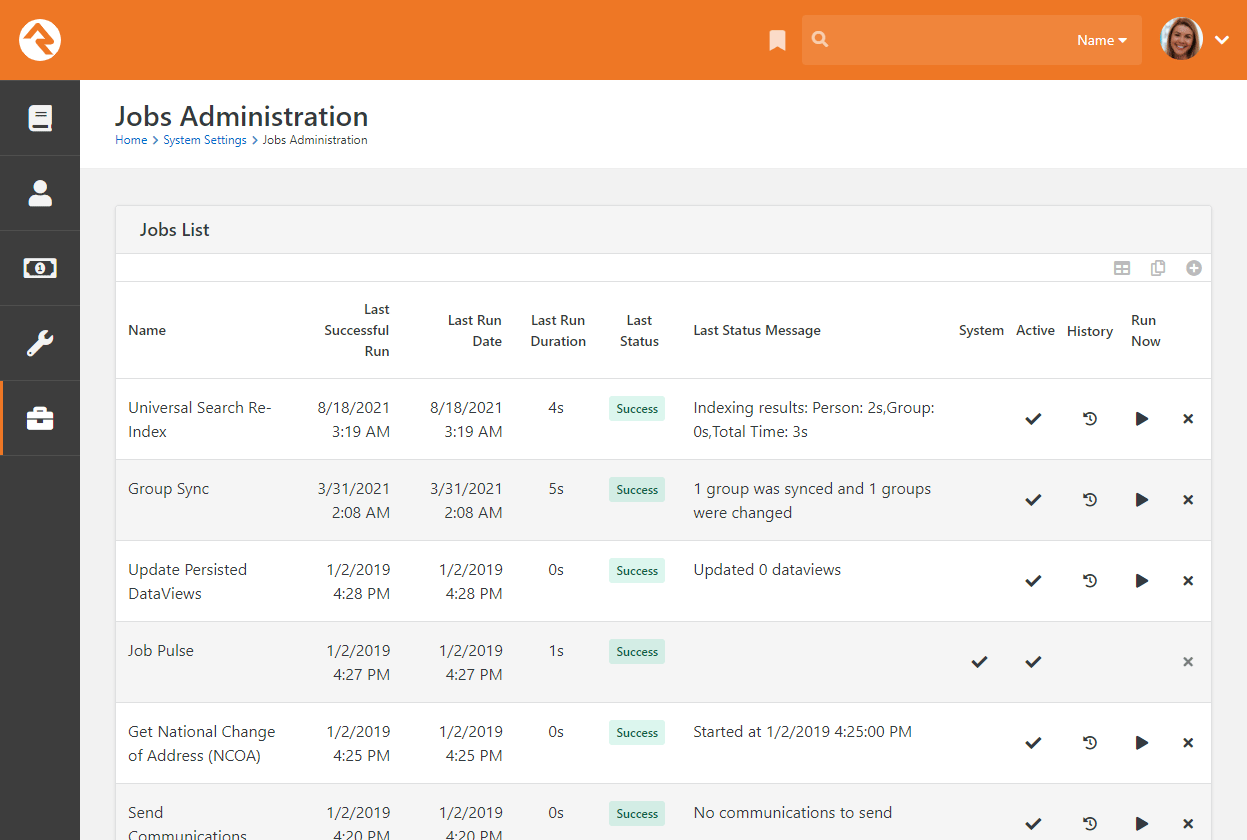
Clicking on an existing job, or adding a new job, will bring you to the page pictured below.
Adding A New Job
- 1Name
- Provide a concise description of what the job is doing.
- 2Active
- Mark the job as active or inactive. Only some of the jobs that
ship with Rock are active by default, so it’s a good idea to check
these statuses to make sure everything you need is active.
- 3Description
- Provide details about what the job does and any background criteria
that you may want to know in the future.
- 4Notification Status
- This defines when a notification email should be sent. Options are:
- Success – when a job finishes successfully
- Error – when a job encounters an error
- All – for both Success and Error
- None – never
- 5Cron Expression
- Cron expressions are a concise schedule pattern that defines when the job
is run. They can be difficult to write without help. We recommend using the
CronMaker.com
website to assist you in creating these expressions.
- 6Notification Emails
- This is a comma-separated list of emails for the job; used when a notification
needs to be sent.
- 7Job History Count
- On the Jobs Administration page, you can view the history of runs for each
job by clicking the icon. By default, this is limited
to the last 500 occurrences,
but you can adjust how much history to retain here.
- 8Job Type
- Select the type of job to run.
- 9Job Settings
- Each job type will have its own set of configuration items. In the example pictured
above, the RunSQL job defines the SQL statement that you want to run when the job
executes.
No Need to Restart
When you add or modify a job there's no need to restart your website.
Changes will be automatically updated within a few minutes.
Pause Jobs
There will be times when you'll need to temporarily stop running a job. Instead of deleting
the job and re-creating it later, simply inactivate the job until you’re ready to run it again.
Care and Feeding of Rock
Just like car engines, sometimes databases get messy and need a tune up. Rock comes with the Database Maintenance job
configured to do just that. Running on a schedule, this job rebuilds database indexes that need tuning. Because this
job comes ready out of the box, you don't need to do any configuring. You can view the details and configuration options,
though, by opening the Database Maintenance job from the Jobs List, located at
Admin Tools > Settings > Jobs Administration.
Database Maintenance Job Detail
Persisted Attribute Values
The Update Persisted Attribute Values
job is an important part of Rock’s system that helps keep your data accurate and up to date.
Let’s take a moment to explain what’s happening behind the scenes. We’ll talk a little about
databases and SQL (a tool for managing data). Don’t worry if you’re not familiar with these
terms—you don’t need to be an expert to use Rock. But having a basic understanding might
help if you ever need to troubleshoot something.
Take the Baptism Date
as an example. This is an attribute you might use in Rock, and all it does is store a date.
Simple, right? Well, behind the scenes, Rock stores that date in a format that the system
can understand. For example, if Ted Decker was baptized on January 12, 2006, Rock saves it
as 2006-01-12T00:00:00.0000000. This format helps Rock organize and process
data, but it’s not very user-friendly.
Note that for certain attribute types, like Group (which displays the group’s name when you see it in
Rock), the persisted values are automatically updated when the underlying data changes. This means that
if you change a group's name, the persisted attribute values will be updated to reflect the new name.
To make it easier for you to read dates, Rock also saves them in a simpler format (like
1/12/2006) using something called the
PersistedTextValue
and
PersistedHtmlValue.
This is the format you’ll see in reports or on pages in Rock. Using these persisted values
makes Rock faster by eliminating the need for additional formatting steps. When you use a
persisted value, it's already in a ready-to-use format, saving you time and ensuring the
dates you see in Rock are formatted consistently.
Rock also has something called
PersistedCondensedTextValue
and PersistedCondensedHtmlValue,
which are shorter versions of the same information. In the case of dates, though, the
condensed and regular formats are usually identical since dates are already short.
Now, here’s where things can get tricky: if you make changes to data using SQL (which
we recommend avoiding), the dates displayed in Rock might not update correctly. For
example, if you changed Ted’s baptism date from 1/12/2006 to 12/1/2006 using SQL, the
system will still show the old date. This happens because Rock’s persisted values (the
ones that make dates easy to read) don’t update automatically when you use SQL.
That’s where the
Update Persisted Attribute Values
job comes in. This job scans for anything out of sync and fixes it. It knows what to update by checking
a setting called
IsPersistedValueDirty. If this
setting says '1,' it means Rock needs to make an update. If it says '0,' everything is fine.
If you do use SQL to change values, make sure you update the
IsPersistedValueDirty property
to '1.' This tells Rock’s job to correct the persisted values so everything stays accurate.
But what happens if someone forgets to make that additional update? Rock has a solution for
that too. The
Update Persisted Attribute Values
job has a setting called
Rebuild Percentage, which
updates a percentage of the records, even if the
IsPersistedValueDirty
setting isn’t triggered. By default, this ensures all records get reviewed and updated
every four days, just in case.
Update Persisted Attribute Values
Note Types
You've probably seen Rock's notes features in use on the
Person Profile page and
also with the workflow features. What most people don't know is that notes can do much
more than you think. Rock allows any entity type (People, Financial Batches, Prayer Requests,
etc.) to have notes attached to them. In fact, it even goes further to allow different types
of notes on a single entity.
Adding Notes to a New Entity
Let's say your finance team asks you to be able to enter notes on batches. Your first
response might be that you'll have to
find a developer to add that functionality.
That in itself is a pretty cool option...right? The fact that you have a system that
you can extend to meet any need...cool! But in this case, you can play the part of the
hero (that's the name of this guide, remember?) and configure it yourself.
Any entity detail page is a candidate for adding notes. Looking at the address for the
page will tell you which entity you can attach the note on. For example, if the address
has BatchId=X then the note can be on the batch entity. Let's walk through the steps of
adding notes to the
Finance > Batches > Batch Detail
page.
-
Once you’re on the batch detail page, add a new
Core > Note block
to the main zone (see the
Designing and Building Websites Using Rock
guide for details).
-
Edit the block settings of this new block. There are several possible configurations
so look through the list. The key, however, is setting the
Context Entity Type
to be Financial Batch.
-
Reload the page for the block settings to be enabled. You should now see an empty
note block.
-
The last step is to add the note type under
Admin Tools > Settings > Note Types.
You can add a note type from the bottom of the grid. Be sure to set the entity
to Financial Batch.
After following these steps your batch screen should look something like the one pictured below,
with a shiny new place to put notes at the bottom of the page.
Batches Note Type
Adding Multiple Note Types to a Single Entity
When you add a note to a person on the Person Profile
page, you're adding a generic Person Note
to the person entity. What if you wanted to be able to add a new type of note to a
person? Say for instance your organization has a hospital visitation team and they
want to have their own notes that stand out from the default ones. Developer needed...?
Nope! You got this. Let's walk through the steps of adding this new
Hospital Visitation
note type.
The first step is to add the new note type under
Admin Tools > Settings > Note Types.
From the bottom of the grid select the Add
button and the Add Note Type page will
be displayed.
Adding a Note Type
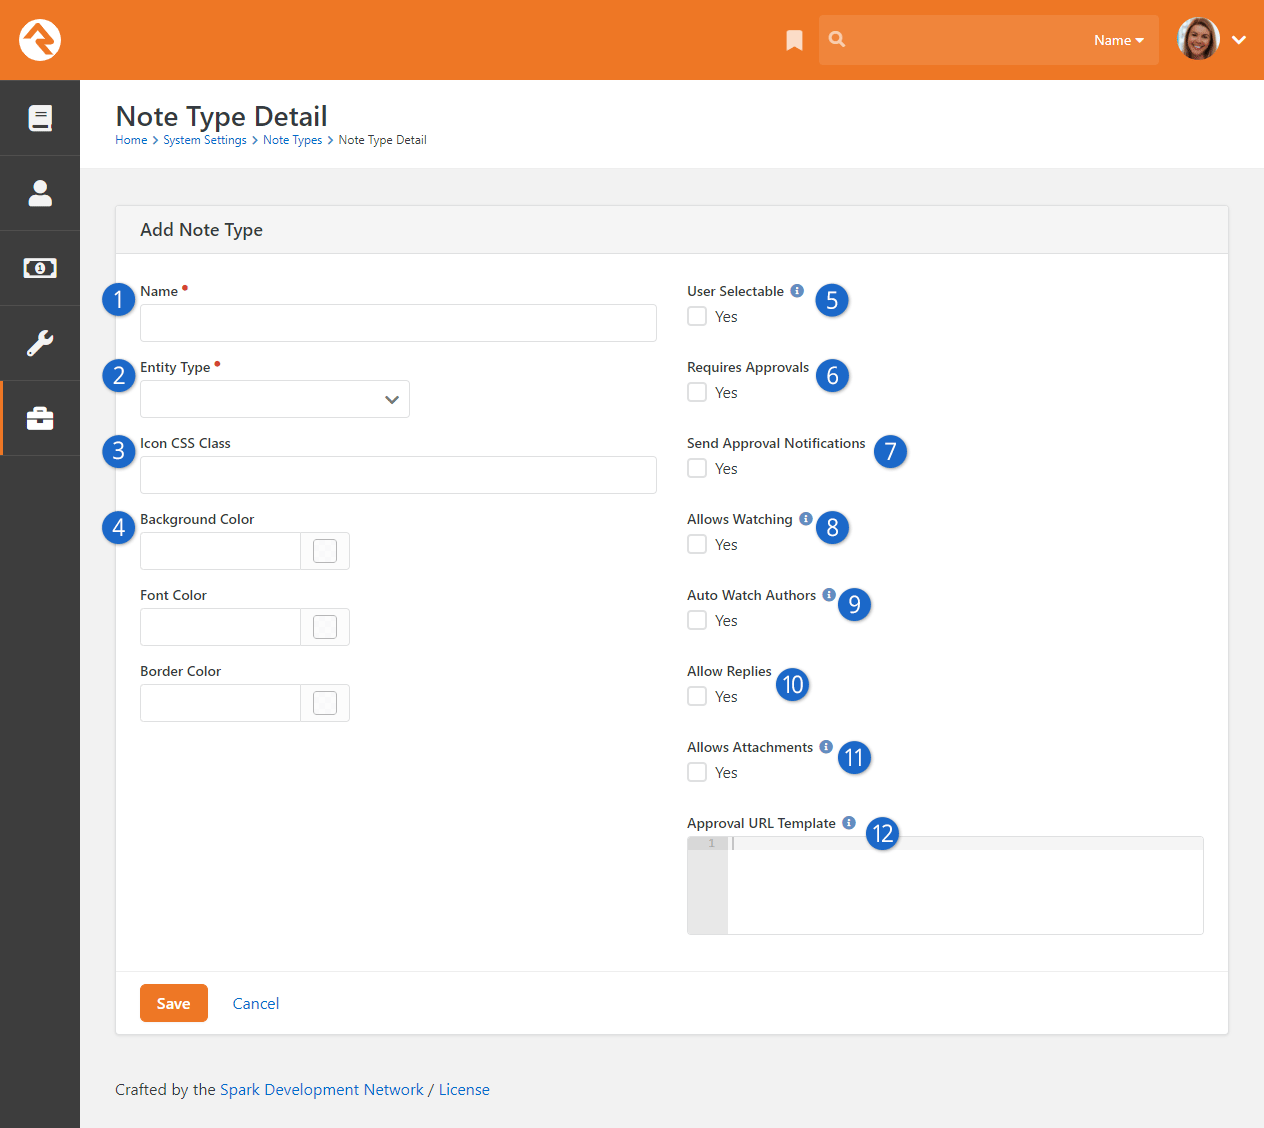
- 1 Name
- Provide the name of the note type that will be used in the various input screens.
- 2 Entity Type
- Select the type of object/entity the note is for. In this case the note is for an
individual, so we'll select Person.
- 3 Icon CSS Class
- This is the icon to display next to the note.
- 4 Colors
- These color options allow you to control the look of your new note. You can use hex colors (such as #0000FF for blue)
or use the color picker to use a color wheel to choose a color for each of the three parts of the note: the background
color, the font color of the note text and the border color around the note.
- 5 User Selectable
- This flag enables the note type to be selected from the note entry screen. There are times when you won't want a certain
type of note to be selected through the user interface. Other note types may only be added through workflows or custom
code.
- 6 Requires Approvals
- Check this box if you would like someone to have to approve notes before they show up. For
instance, you could use notes to allow people to leave comments on your blog. If you wanted these comments to require
approval before they show up on your external site page, you would check this box. Any person or role with "Approve"
access on the note type's security will be able to approve or deny notes.
- 7 Send Approval Notifications
- If you require notes to be approved before they show up, you may want to notify someone that
there has been a new note which they need to review. You can designate the person or role to receive these notifications by
granting them "Approve" access in the note type's security settings.
- 8 Allows Watching
- This option will allow people to get a notification when a reply is made to a note; see the
Watching Notes section for more details.
- 9 Auto Watch Authors
- This option will automatically notify the person who added a note if someone replies to their
note. See the Watching Notes section for more details.
- 10 Allow Replies
- If you would like people to be able to reply to notes with a note of their own, check this
box. You'll be prompted for how many "replies of replies" are permitted.
- 11 Allows Attachments
- Select this box to enable adding attachments to your notes. Keep in mind that this allows attachments,
but there may not be a user interface for uploading attachments in some places.
- 12 Approval URL Template
- If you want to provide an alternate page for your note approver to review notes, you can provide
that address here. Otherwise, it will take them to the page where the note was added (and scroll to the note itself).
Once your new note type has been defined it's ready to be used. At this point you may
consider adding security to it to control who has access to view and edit these notes.
Security for Notes
It's important to understand who will be able to see or edit notes. Below is a full breakdown
of what you can expect.
- Private: Private notes are only viewable by the creator. No one else, no
matter what their permissions are, can see them.
- Approve: The Approve security verb lets you approve notes. You can
view any notes for which you have Approve permission.
- View: You can view a note if you have View security to the note itself.
You can also view notes you have created or modified in the past. Lastly, you can view a
note if you have rights based off of the Note Type.
- Edit: Edit access gives you rights to add a new note and to edit notes
that you have created. Edit access DOES NOT give you rights to edit notes
that were created by someone else.
- Administrate: Administrate permission will let you edit notes,
including notes you did not create.
Watching Notes
You can specify whether a note type Allows Watching.
If it does, anyone who can view a note can choose to “watch” it. This means they will automatically be notified if the note
gets any replies. You can also specify whether authors will automatically watch their own notes.
But that's not all! There's a page in System Settings
called "Note Watches". Here, administrators can see everyone who's watching a note, but you can also add new "watches".
New Note Watch
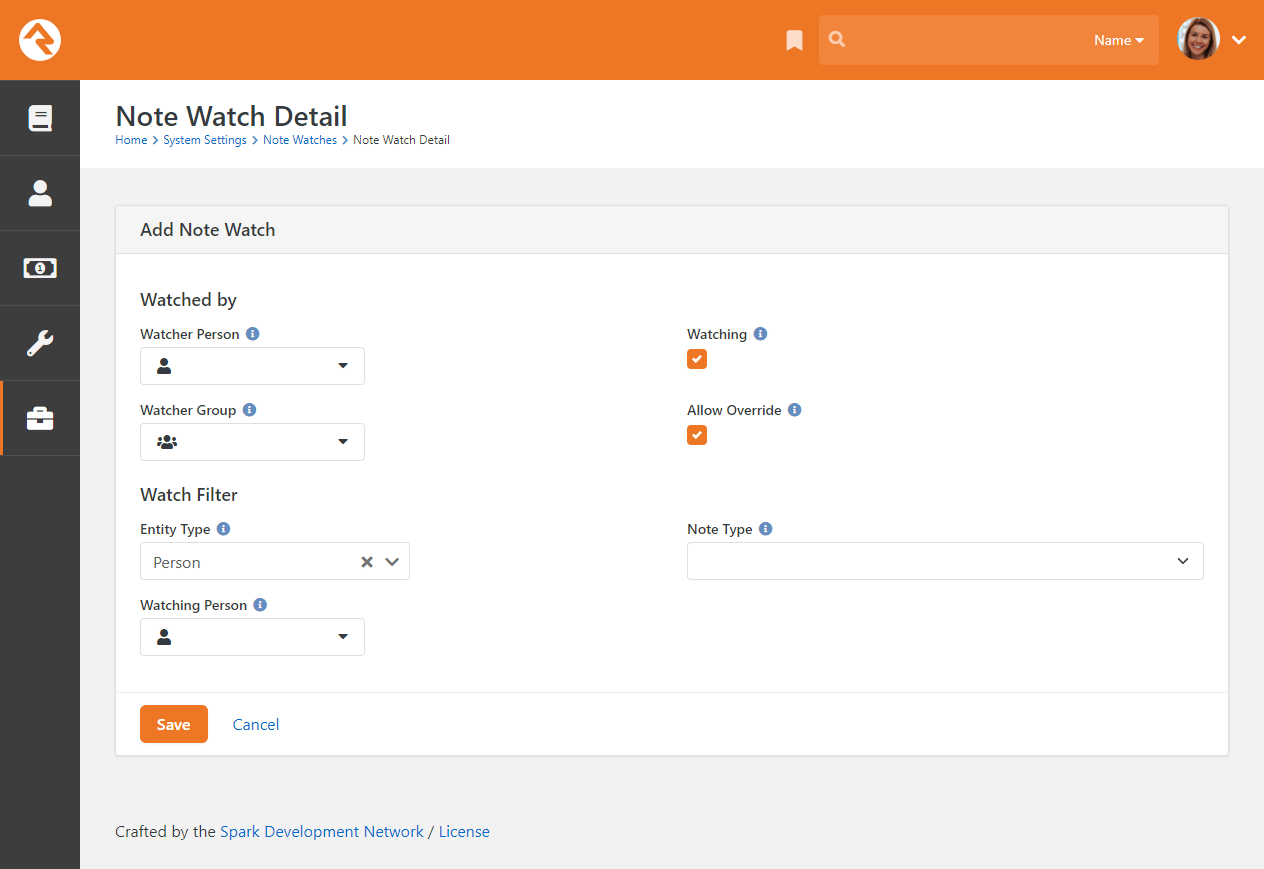
You can select either a single person or all members of a group to watch the notes you specify, by
selecting them in either the Watcher Person
or the Watcher Group fields.
Next, we can specify a specific person to watch by picking them as the
Watching Person,
or we can instead choose a note type to watch. If you want to get very specific, you
can select both a person and a note type to watch; that will serve to only notify
people of that type of note when it's added to that specific person.
You can also create exclusions to the note watch by creating a new note watch and un-checking the
Watching option. For instance,
if you wanted a group of your staff to be notified whenever a communication type note is added to
anyone, you would set that up as normal using the process described above. But maybe you don't want
them to know when someone said they contacted your senior pastor. In that case, you'd add a second
note watch and select your staff group as the Watcher Group,
but un-check Watching and specify
your senior pastor as the Watching Person.
Now your staff group won't be notified of any notes added to your senior pastor's profile, but
they'll still be notified of all other communication type notes added to other people.
Exceptions to the Rule
In the above example, if the Note Watch that caused your staff to get notifications of all
communication notes had Allow Override
un-checked, the second rule with "Watching" un-checked would no longer apply to the first rule. Use this
option if there's a watching rule you want to be really sure won't get turned off by another rule.
All note notifications use the Note Watch Notification System Communications
template, so edit that template if you'd like. You can specify additional recipients of all notifications by adding them to the
To field in the template, or on the
Send Note Notifications job itself. Note notifications will always
be sent as a digest, rather than sending one email for every single watched note reply, which could quickly overwhelm your inbox.
Note Attributes
You can add attributes to the Note entity
to track additional details about the note or to help with automation and data tracking.
Attribute for Person Note
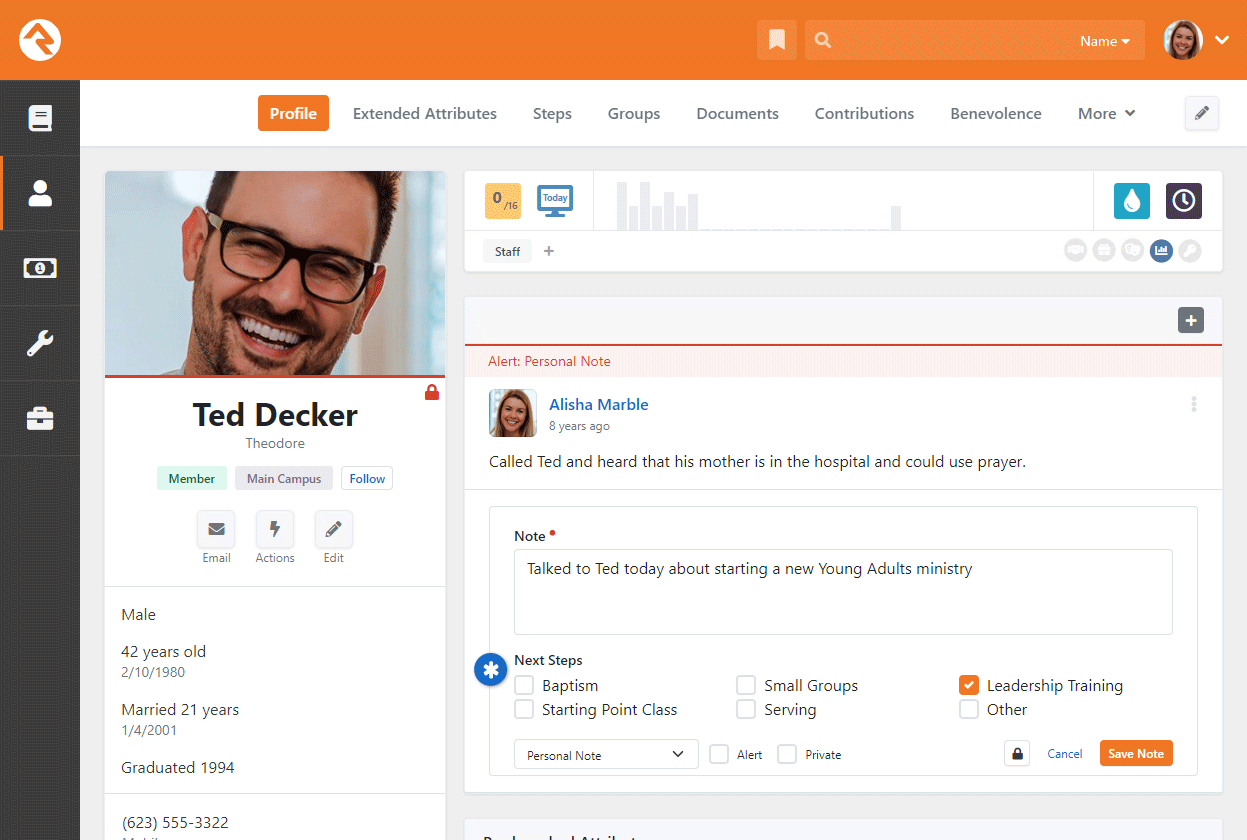
In almost all cases you'll want to configure the attribute to only show for certain types of Notes. As pictured
below, you can specify a Note Type Id to make
sure the attribute only applies to the notes you want.
Entity Attribute for Person Note
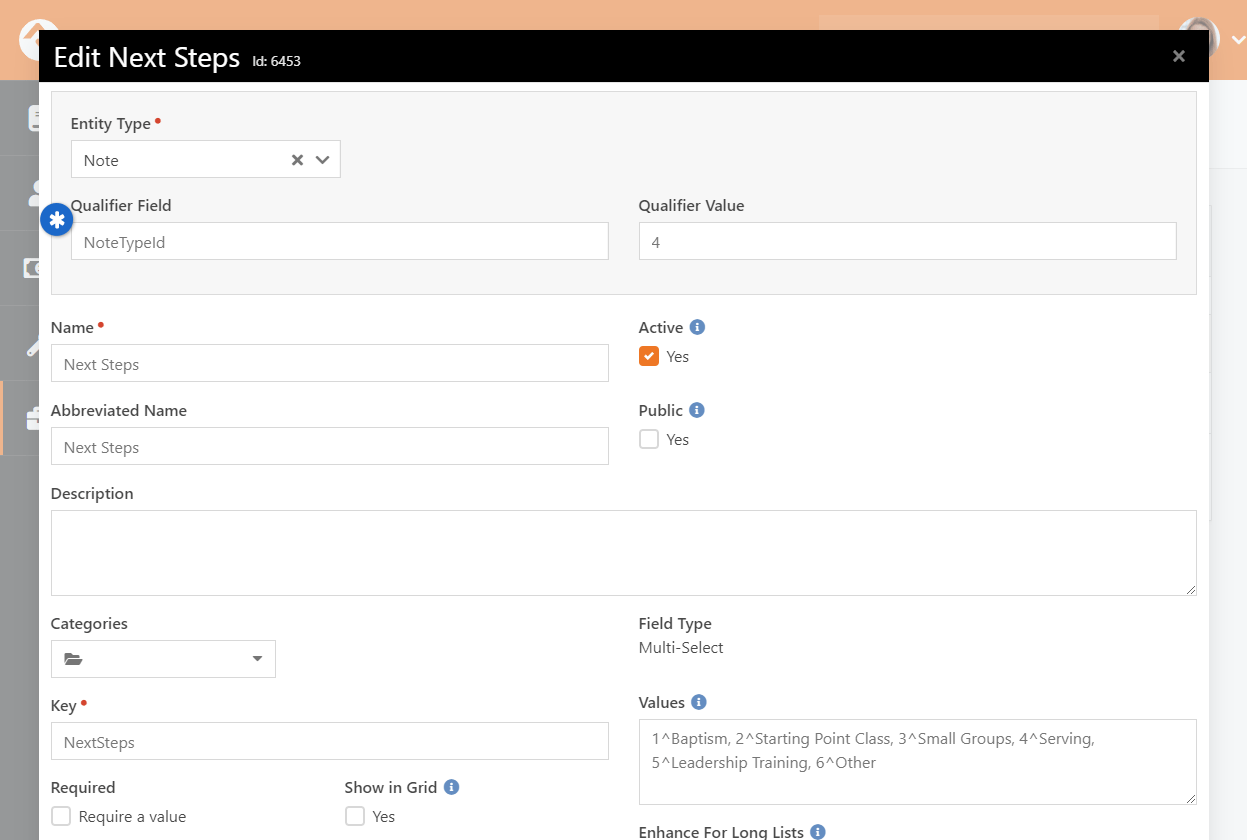
For more information on setting up attributes for entities like Notes, see the
Entity Attributes section of this guide.
Electronic Signatures
Many events and activities require waivers and releases to be signed by participants. Rock
allows you to easily gather these signatures electronically without the need for a third party
service. The requirement of a signed document
can be added to a registration or a workflow. We'll cover how to configure these, and then
we'll walk you through the configuration of the electronic signatures environment.
In Workflows
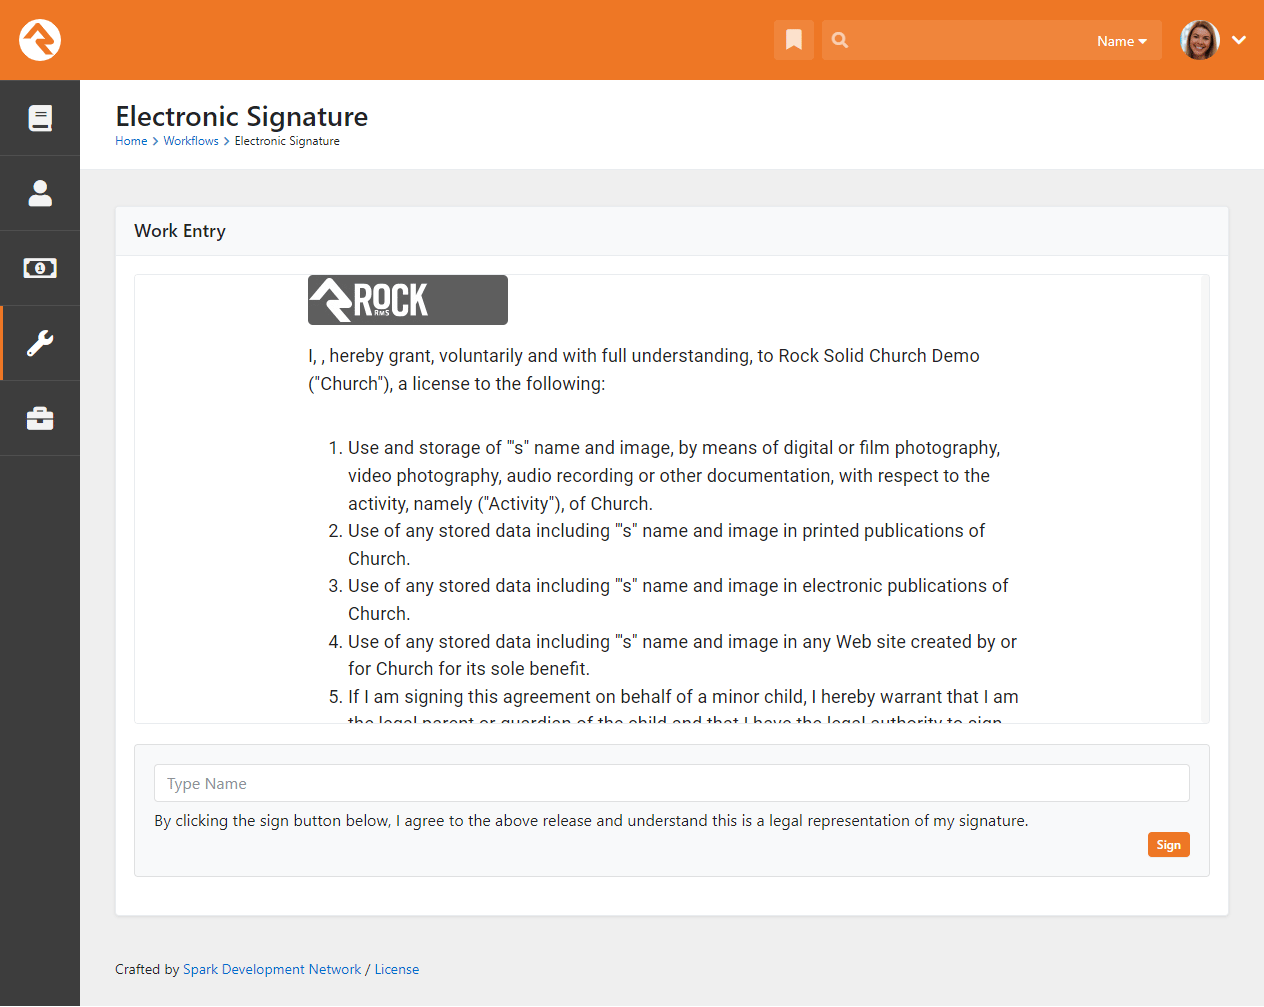
In Event Registration
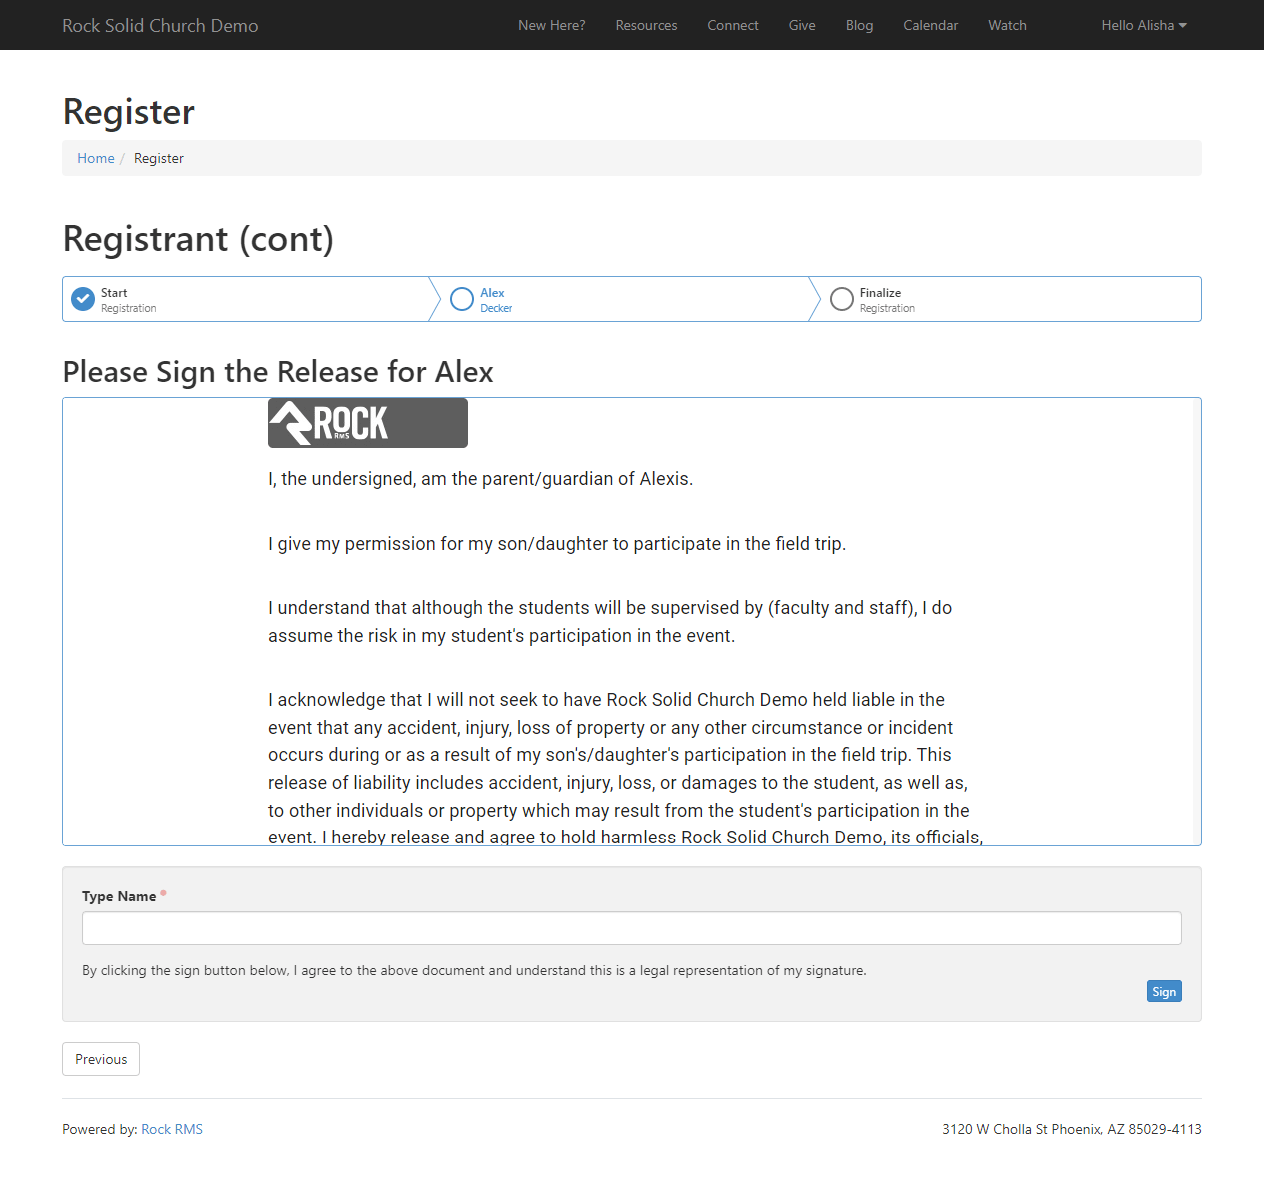
Anatomy of an Electronic Signature
Before we jump in to see electronic signatures in action, let's look at what makes up an
electronic signature in Rock.
-
Signing Document: The person electronically signs a document, which is
based on a template. Each electronic signature will produce a signed document.
-
Applies To: Since the documents that go out for signatures can often be
for minors, Rock distinguishes between the person to whom the document applies and the
person who needs to sign the document. In the case of a camp waiver, the
Applies To field
would be the child going to camp.
-
Assigned To: The
Assigned To
field represents the person who has been assigned to sign the document. In the camp
example, this would be the parent or person who completed the registration.
-
Signed By: This represents the person who electronically signed the
document. This will be the same person that the document was
Assigned To.
Continuing with the camp example, this would be the parent or person who completed the
registration.
Electronic Signatures and Workflows
Often, you'll want to have someone electronically sign a document as part of a workflow. This
is super easy because there's a Workflow Action Type designed just for that. The
Electronic Signature
action type will present the person with a document to sign from within the workflow, similar
to a workflow form.
Electronic Signature Workflow Action
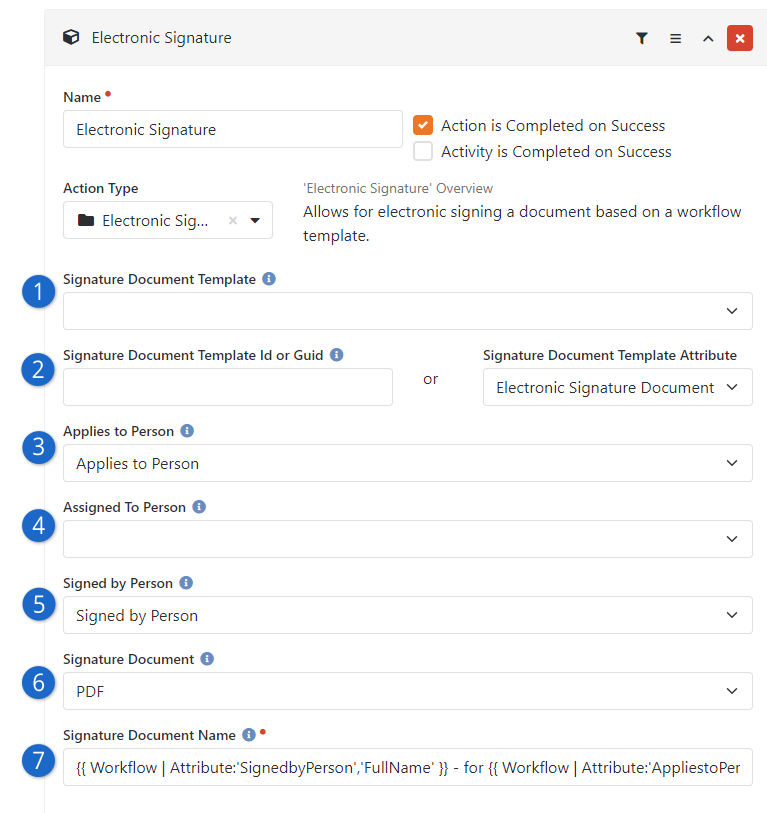
- 1 Signature Document Template
- Select the template for the document the person will be asked to sign. This is
where crafting a clear and concise name for your template pays off. Note,
if you define the template here then the next field below will be ignored.
- 2 Select Signature Document
- Here you can provide either a Signature Document
Template's ID, or its GUID. Or you can use a workflow attribute to assign
the document type. This allows you to have multiple signature documents in
the same workflow. This area of the setup will be ignored if you specified a
Signature Document Template
in the field above.
- 3 Applies to Person
- You can set an attribute of type Person to indicate who the document
applies to. In the case of a parent filling out a form for their child, the child
would be the person the document applies to.
- 4 Assigned To Person
- This is the person who is responsible for signing the form. In the case of a
parent filling out a form for their child, this would be the parent.
- 5 Signed by Person
- Select the Person attribute that represents the person who actually signed the
document. If the person is logged in, then they will be assigned as the
Signed by Person
regardless of the value of this attribute.
- 6 Signature Document
- This is the attribute that holds the signature document itself. This attribute
should be of type
Binary File and
should use a File Type of
Digitally Signed Documents.
- 7 Signature Document Name
- This Lava-enabled field lets you set the name of the document that gets created
using this action. In this example we're using the names of the
Signed by Person
and the
Applies to Person
to dynamically generate the name of the document.
After the electronic signature is captured, the person is asked to provide an email
address so they can be sent a copy of the document for their records.
Electronic Signatures and Event Registrations
Electronic signatures often come in handy for event registrations. When someone
signs up for an event, they can easily sign the form or waiver electronically.
The neat thing? If, say, Cindy Decker is registering Noah Decker for an activity
that requires "Release Form A," and Noah already has a valid signed "Release
Form A," we won't make them sign it again. Rock's standard person matching
logic helps us figure out if the person matches someone in Rock who has already
signed the document. Easy and efficient!
Obsidian Registration Entry
For your electronic signatures to work with event registrations, you must use the
Obsidian version of the
Registration Entry
block on your external website. Similarly, if you try to use the Obsidian version
of the block with a legacy signature document, your registration process will break.
Stick with the most up-to-date block and Electronic Signature features to
keep things running smoothly.
You can define the signature document that's required for an event registration on the
registration's template. You can find this under
Tools > Event Registration
and then by editing the registration template you wish to configure. Under the
Details panel select the
signature document you want to use by picking one from the
Required Signature Document
list.
The logic for determining the
Assigned To and
Applies To is as follows:
-
Applies To: Will always be the registrant of the registration. Each
registrant will have their own form that needs to be signed.
-
Assigned To: This is a bit more complex. If the registrant is an adult,
then the Assigned To
will be the registrant. If the registrant is a child, the
Assigned To will be
the person completing the registration.
Adults and Children
Because the signature logic distinguishes between adults and children, you may want to
include a required Birthdate field on your registration form.
You can monitor the results of the electronic signature from the registration instance under
the Registrants tab.
From this screen you can see the completed documents.
Registration Signature Document Example
After the electronic signature is captured, the person is asked to provide an email
address so they can be sent a copy of the document for their records.
Required Login
We recommend that you require logging in if you want to include the current
person's name in the text portion of signature document. This is because
the "typed name" won't otherwise be known until after it's signed.
Setting Up Electronic Signatures
Now that you've seen what electronic signatures can do, let's look at how to set them up.
Your first step in gathering electronic signatures will be to create a
Document Template by
navigating to
Admin Tools > Settings > Signature Documents.
The template will be used to generate the individual documents a person will sign. Out of the
box, Rock ships with an example
Photo Release template
and a Field Trip Release
template. You can use these templates as a reference for creating your own.
Signature Input Type
As described below, we very strongly recommend using a
Typed signature
and not a Drawn
signature. Both are equally valid in terms of legal representation, however a drawn
signature is considered Personally Identifiable Information (PII) and storing it in
Rock may have additional legal consequences.
Signature Document Template
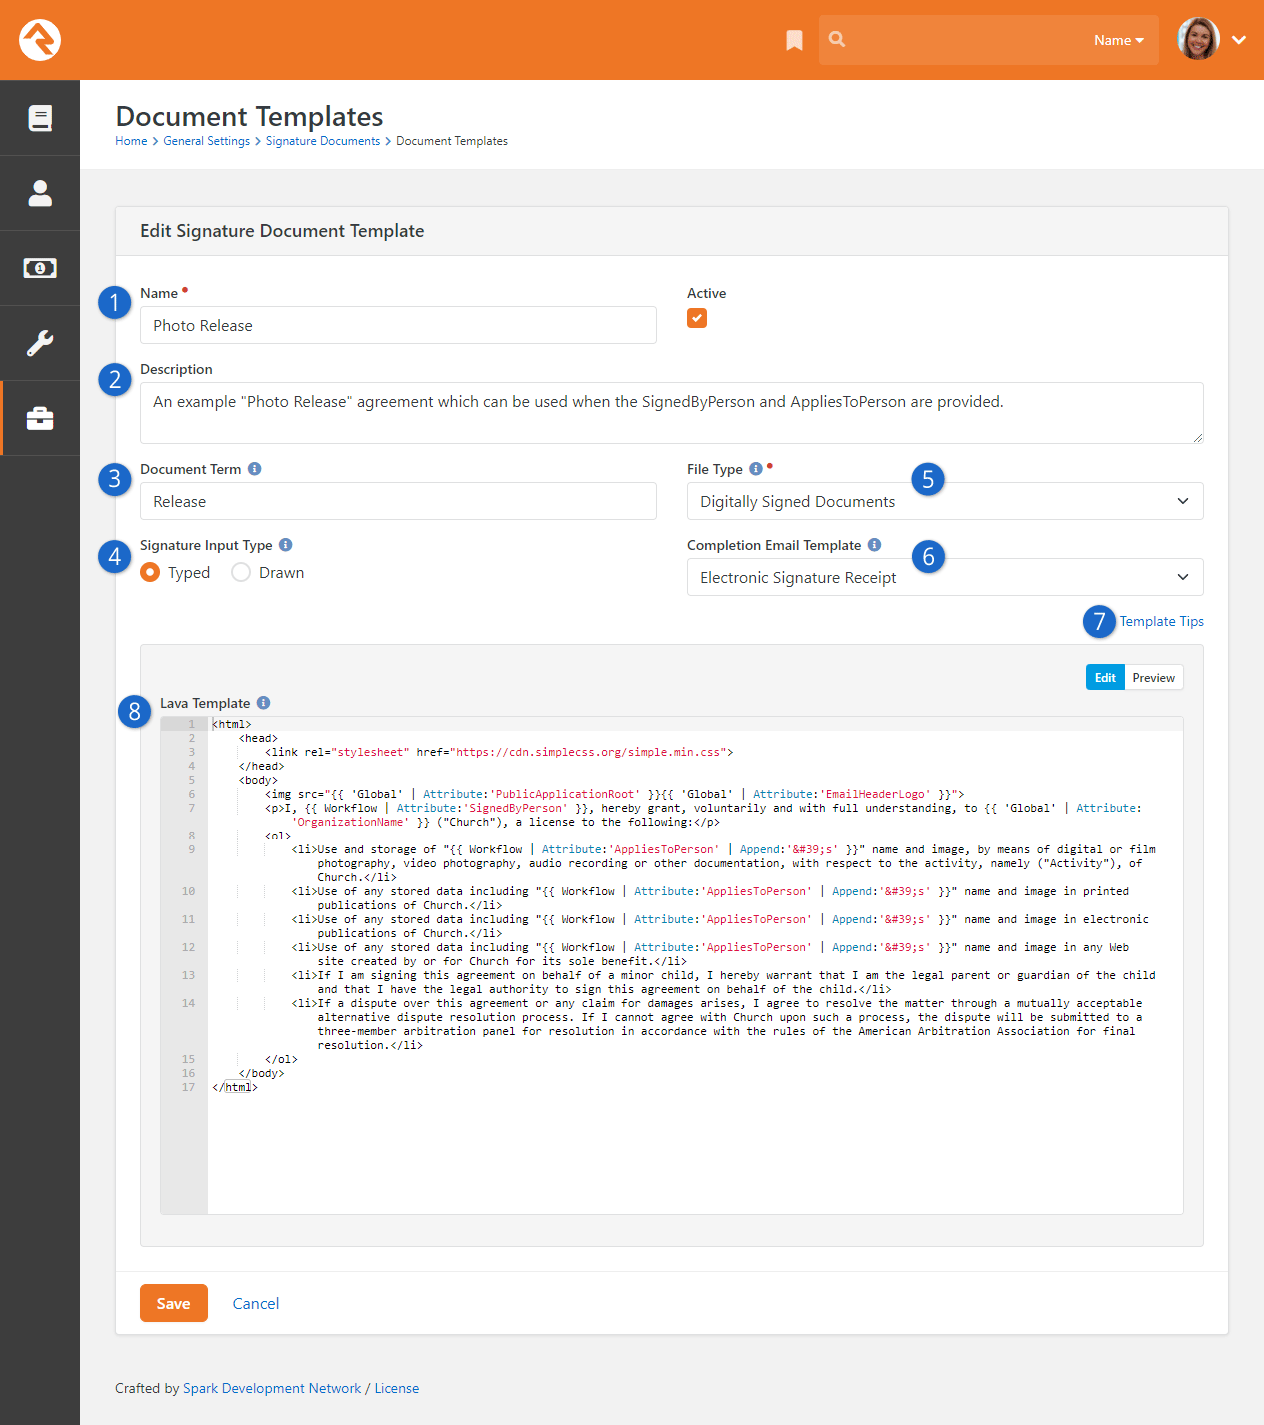
- 1 Name
- Be sure the name of the document is clear and concise. This name will appear
elsewhere in Rock when you need to select a template to use. The name is also
included in the
Electronic Signature Receipt
System Communication.
- 2 Description
- A good description can help avoid problems or confusion in the future. In this
example it's made clear in the description that the template needs to be provided with
the
SignedByPerson
and the
AppliesToPerson.
- 3 Document Term
- Out of the box the
Document Term
is used by the
Electronic Signature Receipt
System Communication. The
Document Term
appears after the name of the Signature Document in the communication. You'll also
see it in other places, like during event registration when the person is asked to
"Please Sign the [Document Term] for [Person]".
- 4 Signature Input Type
- Here you can select whether the signature should be
Typed (the person
types their name) or
Drawn (the person
uses a mouse or finger to draw a signature). Because a drawn signature is considered
Personally Identifiable Information, we strongly recommend using
Typed.
- 5 File Type
- The signed document will be stored in Rock, and this setting determines which type of
file it will be stored as. In most cases this will probably be set to
Digitally Signed Documents,
but you can use other file types if needed.
- 6 Completion Email Template
- This is where you'll select which System Communication should be used to send a copy
of the signed document to the person who signed it (technically the
SignedByPerson).
The
Electronic Signature Receipt
that ships with Rock was created for this purpose.
- 7 Template Tips
- Click here to display some helpful tips for creating your own template. Just
remember the attribute keys in this template will need to match the attribute keys
you have configured in your workflow or event registration.
- 8 Lava Template
- The template provided here will become the body of the document that the person is
being asked to sign. In other words, this is where you'll design your document.
You might notice in the Photo Release example that there are Lava merge fields that
reference workflow attributes. That's because this template is designed to be used
with the
Electronic Signature
workflow action type.
Using Multiple Signatures
By default, the template places a signature at the bottom of your PDF. To change its location, or add a signature in multiple different spots in your document, use <!-- [[ SignatureDetails ]] -->. Each instance of this keyword will be replaced with the signature instead of a single signature appearing at the bottom.
The legacy method of setting up a Signature Document (using a third-party provider like SignNow)
can still be accessed from the page above. Simply edit the block settings and set
Show Legacy Signature Providers
to "Yes". Keep in mind that support for these signature providers is ending, so you need
to transition your documents now if you haven't already. For instance, the
Registration Entry block
(Obsidian) does not work with the legacy documents.
PDF Generation
After a document is signed, a PDF is generated containing both the document's content and the
person’s signature. This is done so the person can be sent a PDF copy of the signed document.
In most cases, Rock handles this process automatically. However, some organizations may require
an external service for PDF generation.
Generating a PDF on the Rock server is resource-intensive, especially during high-traffic events.
For instance, on the day your Kids Camp sign-up launches, the system might be processing thousands
of registrations, collecting signatures, and generating PDFs simultaneously. This added load can
impact server performance. To avoid this, we recommend offloading PDF generation to a third-party
service such as
browserless.io.
Once you're signed up, all you need to do is add a
PDF External Render Endpoint
to your System Settings under
Admin Tools > Settings > System Configuration
as pictured below.
For Some, It's a Must
If you're running Web Services on Azure or operating Rock in an environment that doesn’t support
running Puppeteer/Chrome on the server, using a third-party service is essential.
PDF External Render Endpoint
Managing Signature Documents
OK, so now we've seen how to create electronic signature templates and how to use them in
workflows and event registrations to gather signatures. Let's wrap it up by looking at how
you can view these documents.
To view signed documents, navigate to
Admin Tools > Settings > Signature Documents
and select the document template you wish to view.
Managing Documents
- 1 Document Template Detail
- From here you can edit the template details.
- 2 Documents
- This is a list of signature documents for the template. Note that the name of the document is a combination of
the source and the person's name. The source in this case is the registration instance name.
- 3 Signed Document
- Clicking on a row will show you details about the signed document, and lets you resend
the completion email. You can also click the document icon to see the signed document.
We mentioned viewing documents from the page pictured above. To do this, you'll need the
appropriate security permissions. View access to completed Electronic Signature Documents
is based on the associated
binary file type and not the
document template
security.
External Authentication Services
Rock allows individuals to log in using several different authentication services. The only one active
after an install, however, is the Rock database provider. This provider gives individuals their own Rock username
and password. For many organizations this will be the default service they’ll use for authenticating an individual,
as no additional configuration is required to enable it. Each of the additional services is discussed in more
detail below.
Active Directory
Many organizations already have a Microsoft Active Directory (AD) infrastructure in place for their employees
to log into the network, email and other resources. Rock can use this as an additional authentication source
once configured.
You can set up Rock to use your Active Directory under
Admin Tools > Settings > Authentication Services > Active Directory
Active Directory Setup
- 1Activate
- Be sure to activate the security service by selecting Yes.
- 2Server
- Provide the server name of one of your Active Directory Domain Controllers.
- 3Domain
- Configure the AD Domain on the server to authenticate to.
Once the service is configured, you're ready to create logins in Rock. Active Directory logins can't use
the normal Rock registration process. Instead, you must add the login manually to the user on the
Person Profile page.
Facebook Authentication
Password fatigue is a common problem with sites that require registration. In fact, a recent study found
that 92% of shoppers abandon a website rather than go through the process of recovering a lost or
forgotten password! However, if the website has a social media login option, they are 65% more
likely to return. The same study showed that a majority of individuals prefer Facebook as their credential
of choice. Luckily setting up a Rock website to use Facebook authentication is quick and easy.
Step 1: Create a Facebook App
Before you can add a Facebook login, your organization will need a Facebook "App". Visit the
Facebook Developer website
(https://developers.facebook.com/apps) to
see the Apps that have been configured for your Facebook account. You'll need to designate someone’s personal Facebook
account in your organization to use as the 'admin', but you can choose an organization’s email to be the
contact email when setting this up. If you don't already have an App, follow these steps in the Facebook site to add one:
-
At the top of the screen click the Register Now
button. This will begin the quick start setup.
-
You might need to verify your account with a phone number and provide some additional personal information.
-
Click the Create First App button.
-
You'll be presented with a screen asking for a Display Name and Contact Email for your app. Once you've
entered a name and email, click Create App ID.
-
You'll then have to go through a "captcha" step, just to make sure you're not a robot.
-
The next screen will be the Product Setup screen. Click the
Set Up button for
"Facebook Login".
-
Next, choose the "WWW" Web option.
-
On the "Tell Us about Your Website" panel, enter in your site URL and click
Save and then
Continue.
-
You can then just keep clicking Next to continue
past the "Set Up the Facebook SDK for JavaScript", "Check Login Status", "Add the Facebook Login Button" and
"Next Step" panels. Rock takes care of all these things for you.
-
Now that you've navigated through all the panels under the "Web" setup, over in the left sidebar under
Products, under "Facebook Login", click the Settings option.
-
In the Client OAuth Settings section, enter the URL for your site in the "Valid OAuth redirect URIs" field. You need to include
the port your website runs on (default is 80) such as
http://rocksolidchurch.org:80/. Currently, Facebook has Force HTTPS enabled
by default. As of October 6, 2018, this is required. Port 443 will need to be used instead of 80. You'll also need to add the page
that has the Facebook login button onto the end of the domain (i.e., https://rock.rocksolidchurch.com:443/page/207 or
https://rock.rocksolidchurch.com:443/Login) (Note: Only the Web OAuth Login needs to be enabled in this section. You can turn off
the 'Client OAuth Login' option). Click Save Changes when you're finished.
-
Now, back in the left sidebar, click the "Settings" option (not the "Settings" option under Facebook Login, but the
main "Settings" section above). From the "Basic" screen, note the "App ID" and "App Secret" values. You'll need these two values
when configuring Rock.
-
Before you make your app public, Facebook recommends submitting any additional features or permissions for
App Review -- user_friends is one such feature that will need to be submitted if you would like to use the Facebook Friend Known Relationship within Rock.
-
To submit an item for approval, click App Review on the left-hand menu and then click “Permissions and Features”.
-
A new page will present you with a list of available Permissions and Features. Permissions you can submit. Scroll down to user_friends and click the
Request button.
-
Click the “Continue” link that appears in place of the Request button.
-
You'll be redirected to a Request for App Review page. You may need to add Business Verification.
-
Click each section on the page to provide the requested details according to the instructions provided.
-
Provide "App Verification Details" by describing how a person can test the integration. An example template is provided.
-
For "Requested Permissions and Features" you’ll need to tell Facebook how you'll use the desired permission. You'll also need
to upload a screencast demonstrating how the permission is being used. For user_friends, for example, we did a quick 10 second
screencast showing a Facebook Friend Known Relationship in the Known Relationship block on the person profile page (essentially
just scrolling down the page and highlighting the known relationship). You’ll need to do this for each requested permission.
-
For "Complete App Settings" you’ll need to provide several configuration pieces. Add an icon for your app, and provide the URL
to your privacy policy for the app. Then, select the appropriate “Business Use” (probably “Support my own business”). Lastly,
you’ll need to select an App Category from the list provided.
-
After all of the steps on the Request for App Review page have been completed, you can click the
Submit for Review button at the bottom of the page.
Step 2: Configure Rock
Now that you have a Facebook App, you can start configuring Rock to use the Facebook authentication. Follow these steps:
- Activate the Facebook Authentication Service by navigating to the
Admin Tools > Settings > Authentication Services > Facebook
page.
Enter the Facebook "App Id" and "App Secret" that you saved from the previous steps, and make sure that the service is Active. Save your changes.
- Now enable the Facebook login on any of your login pages by updating the block settings of the login control to enable the "Facebook"
external service provider. Having this block setting allows you to decide which of your sites allow Facebook to
be used (some organizations may prefer not to allow Facebook to be used to login to their internal Rock site). Also make sure the "Redirect Page" setting
is pointed to the default home page for your site. Once enabled, your login screen will now have an additional button to allow individuals
to login using their Facebook account.
Login Screen
Now that you've enabled Facebook login, when someone logs in using Facebook, they will see a screen similar to the one below that links their Facebook account
to your server.
Facebook Account Link Page
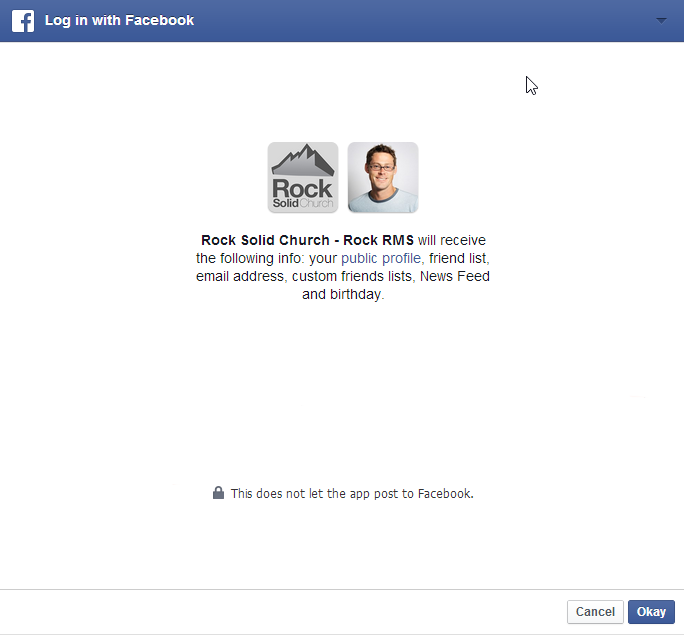
When an individual's Facebook account is used for the first time Rock will apply the following logic to attempt to match
the Facebook account to a Rock record.
- If a person record can be found with the same First Name, Last Name and Email, the login is attached
to this record. As an extra bonus, if no photo exists in Rock for this person their photo from Facebook
will be added to their record in Rock.
- If an exact match can't be made, a new record is created in Rock using the information from their
Facebook account. The record status of this new individual is set to "Pending" so they will show up under the "Pending Individuals" report
Tools > Reports | Organization > Data Integrity > Pending Individuals.
When a new person record is created as a result of a Facebook login, we'll pull the following information from Facebook:
- First Name
- Last Name
- Email
- Gender
Whenever they log in, we'll also do the following:
- If the person doesn't have a photo in Rock and they do in Facebook, their Facebook photo will be added to Rock.
- Their Facebook Media Link will be updated.
- Any of their friends that have also logged into Rock using Facebook will be added as a
Facebook Friend known relationship.
Google Authentication
With the popularity of Gmail, Google authentication is an attractive alternative for many guests. Below are the steps
necessary for Rock to use your guests' Google passwords for authentication.
- Visit console.developers.google.com/start and create a new project for your organization.
If you already have a Google Maps API key, then you'll want to use that project.
- On the left hand of the screen expand the APIs and auth menu, click
on Credentials, and at the top of the screen click on
OAuth consent screen.
- Fill out this screen with your organization’s information. The information given here will be presented to your users when they sign in
for the first time. A preview of the screen your users will see should be on the righthand side of your screen. You’ll want to include
branding that your users will recognize and trust.
- At the top of the screen click on the Credentials tab then click on
the Add Credentials dropdown, select
OAuth 2.0 client ID, and then select
Web Application.
- Under Authorized redirect URLs, you'll need to place the full URL
of all the login pages you configure to use Google authentication. For example,
http://rock.rocksolidchurchdemo.com/page/3 for the
internal site. When you've finished adding URLs click Create.
- You should be presented with a Client ID and a Client Secret. Note these values and add them to the Google service configuration
under Admin Tools > Settings > Authentication Services > Google.
Twitter Authentication
Rounding out the list of popular sites to use for authentication, we also support Twitter. The directions below will get you up and
running quickly.
- Visit apps.twitter.com and create a new app for your organization.
- Give your app a name and a description. This will appear to your users, so make it recognizable. Also put in your organization's
forward-facing website URL, and in the callback URL field put the URL for your primary login page. This will be overridden but the callback
URL field needs to have a value for the authentication service to work (for example:
http://rock.rocksolidchurchdemo.com/page/3). Click
Create.
- Navigate to the Keys and Access Tokens tab at the top and note the
Consumer Key and Consumer Secret values. Add these to the Twitter service configuration under:
Admin Tools > Settings > Authentication Services > Twitter.
- In order for your application to connect Rock user accounts to Twitter accounts, you need to request elevated permission for your application to access
email information associated with Twitter accounts. You can do this via this link
https://support.twitter.com/forms/platform
and select the I need access to special permissions option.
Auth0 Integration
Auth0 is a single-sign-on service that provides a layer of extensibility to your authentication strategy. Why would you need a
service like this? Auth0 solves three primary needs:
-
It allows for a centralized authentication service outside of Rock. For most organizations centralizing their
authentication inside of Rock is a great feature. Others prefer to have all authentication reside in an independent
service. This is often desirable if you have several other systems needing shared authentication and you don’t want
to write Rock integrations for each.
-
The second scenario where Auth0 makes a lot of sense is enabling social logins. Out of the box Rock supports
most of the popular services, but Auth0 supports far more.
-
Finally, if you need passwordless authentication (via SMS, email, etc.) or two-factor authentication Auth0
can provide that for you.
Enough talk, let's get Auth0 configured for Rock. The instructions below assume that you have an Auth0 account with the desired connections
and administrative settings pre-configured.
- The first step is to create a new ‘Client’ in the Auth0 administrator site. Select ‘Clients’ from the left-hand navigation
to get started.
-
Give your client a name and select the ‘Regular Web Applications’ option.
Creating a Client

-
The next screen will show ‘Quick Start’ options. It’s much easier to just fill in the settings so head over
to the ‘Settings’ tab. Here you’ll find the ‘Domain’, ‘Client ID’ and ‘Client Secret’. Keep track of these as
you’ll need them in the Rock configuration. On this screen you’ll need to provide the following settings:
- Allowed Callback URLs – This is a list of Rock Login URLS that will be using Auth0. You can provide
as many URLs here as you need, separated by a comma.
- You can also optionally add logos for the connection. This will help the individual logging in better understand
what's happening.
Configuring a Client
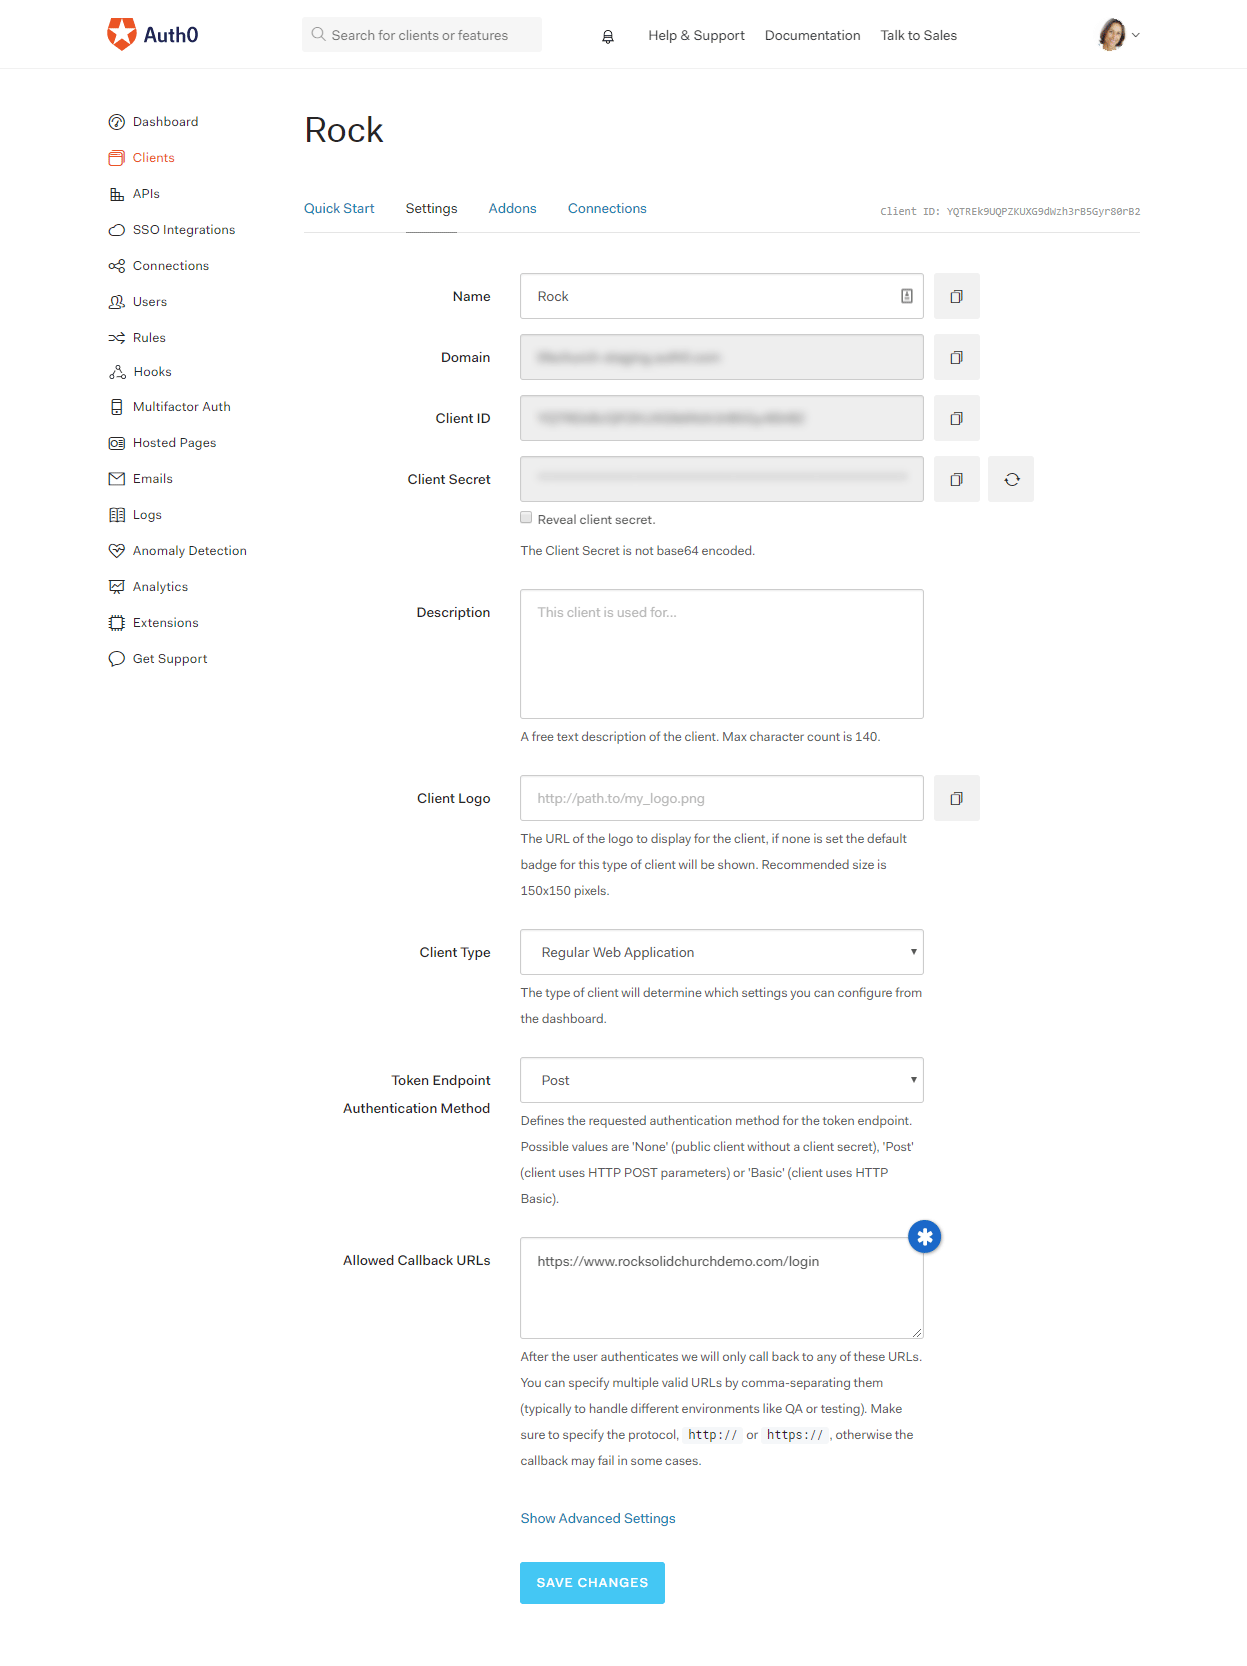
-
Finally, you need to give your client some extra permissions. In the Auth0 manager head over to the APIs link and select
the 'Auth0 Management API'. From the tabs at the top select 'Non Interactive Clients'. You should see your client listed
here. Be sure that your client is 'Authorized'. Next, select the down arrow to authorize specific scopes. You'll need to
enable both the 'read:users' and 'read:users_app_metadata' scopes.
Authorizing a Client
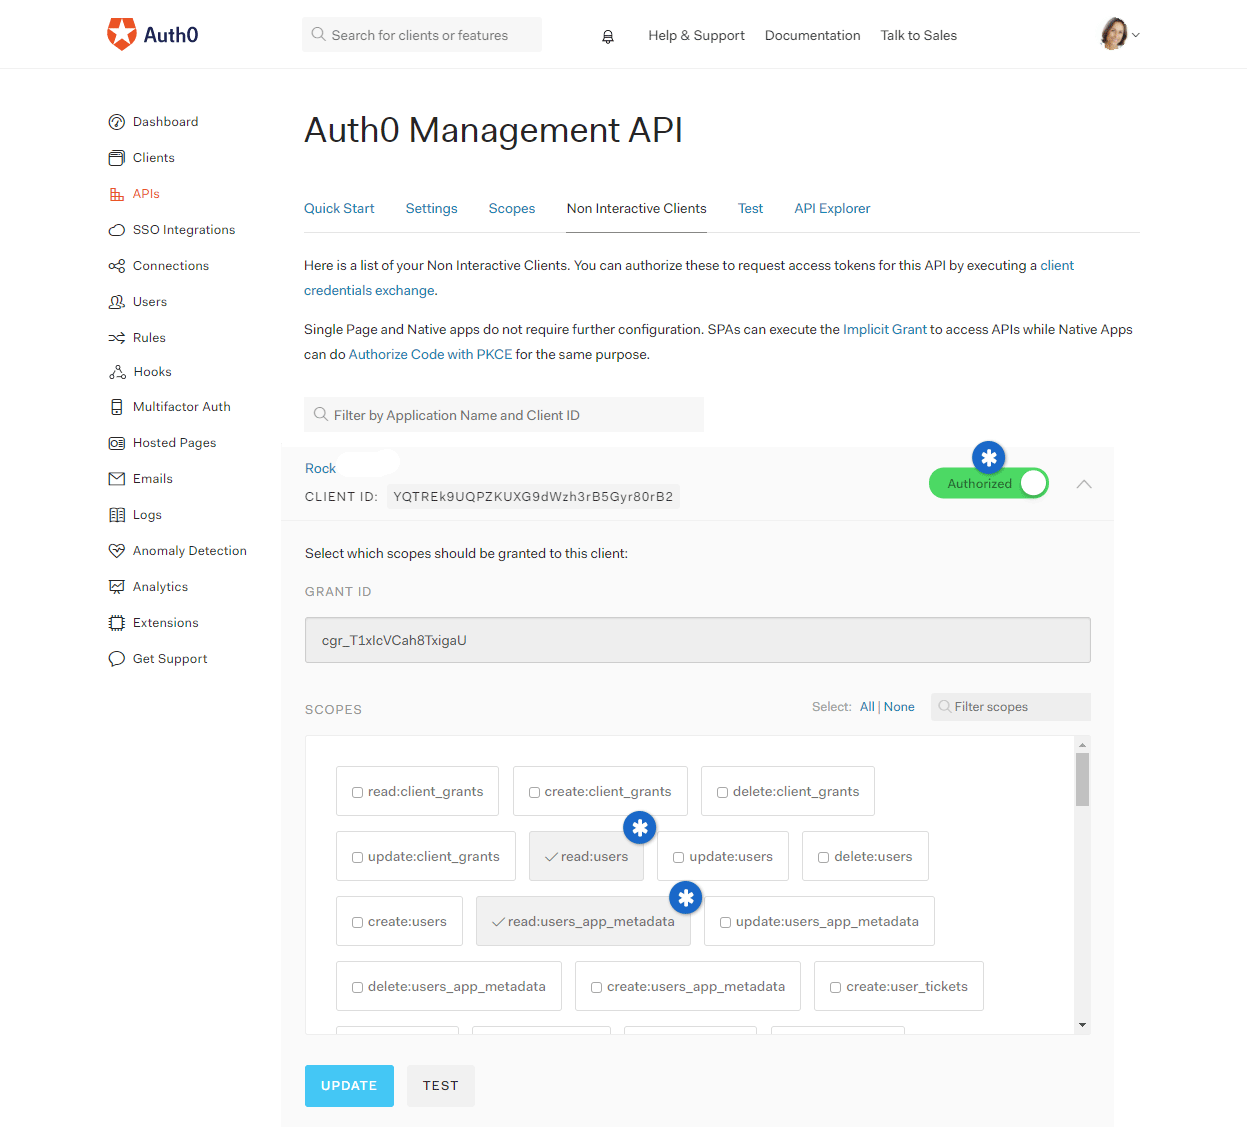
External Authentication Services
After activating the service in Admin Tools > Settings > Authentication Services, open the
login pages you wish to enable the authentication on (/page/207 for External Login and /page/3 for Internal Login), edit the
Login Block Property, and turn on
Remote Authorization Types for the services that you activated.
OpenID Connect
In the External Authentication Services chapter above
we talked about how people can use different external accounts to log in to Rock. But what about the
flip side of the coin, where people can use Rock to log in to other external systems?
That's where OpenID Connect
(OIDC) comes in. OIDC is an open standard for verifying the identity of an individual in one
system based on the authentication performed by another system. Rock ships with an
OIDC Server feature that can allow a third-party system to use Rock as an authorization server.
That means your members can log in to an external site like Church Online Platform using their
Rock username and password.
In the sections below we’ll cover how these features work and what you’ll need to set them up.
Servers and Clients
Before we get too far, it’s important to keep in mind the distinction between
server and
client.
Server applies to the system
that’s doing the authentication. The
client system uses the
authentication provided by the server to grant access.
For instance, let's say a person is using their Rock username and password to log in to Church
Online Platform. In that case, Rock would be the server and Church Online Platform would be the
client.
Rock OpenID Connect Server
Let's see how to configure Rock as the authentication server for an
outside system. You'll probably want to set up Rock at the same time you're setting up the
client system. There's information Rock will need about the client, and the client will need
some things from Rock, so it makes sense to have both up at once if you can.
Adding OIDC Clients in Rock
Each external system you're working with will need their own OIDC Client configuration in
Rock. In the below example, we'll be setting up Rock to interact with Church Online
Platform (ChOP). A little later in the next section we'll show you how things look in ChOP
so you can see how everything connects.
To start, navigate to
Admin Tools > Settings > OpenID Connect Clients.
From here you can view the clients you already have set up or add new ones to the list. In
this example we'll be adding a new client for ChOP.
OpenID Connect Client Setup
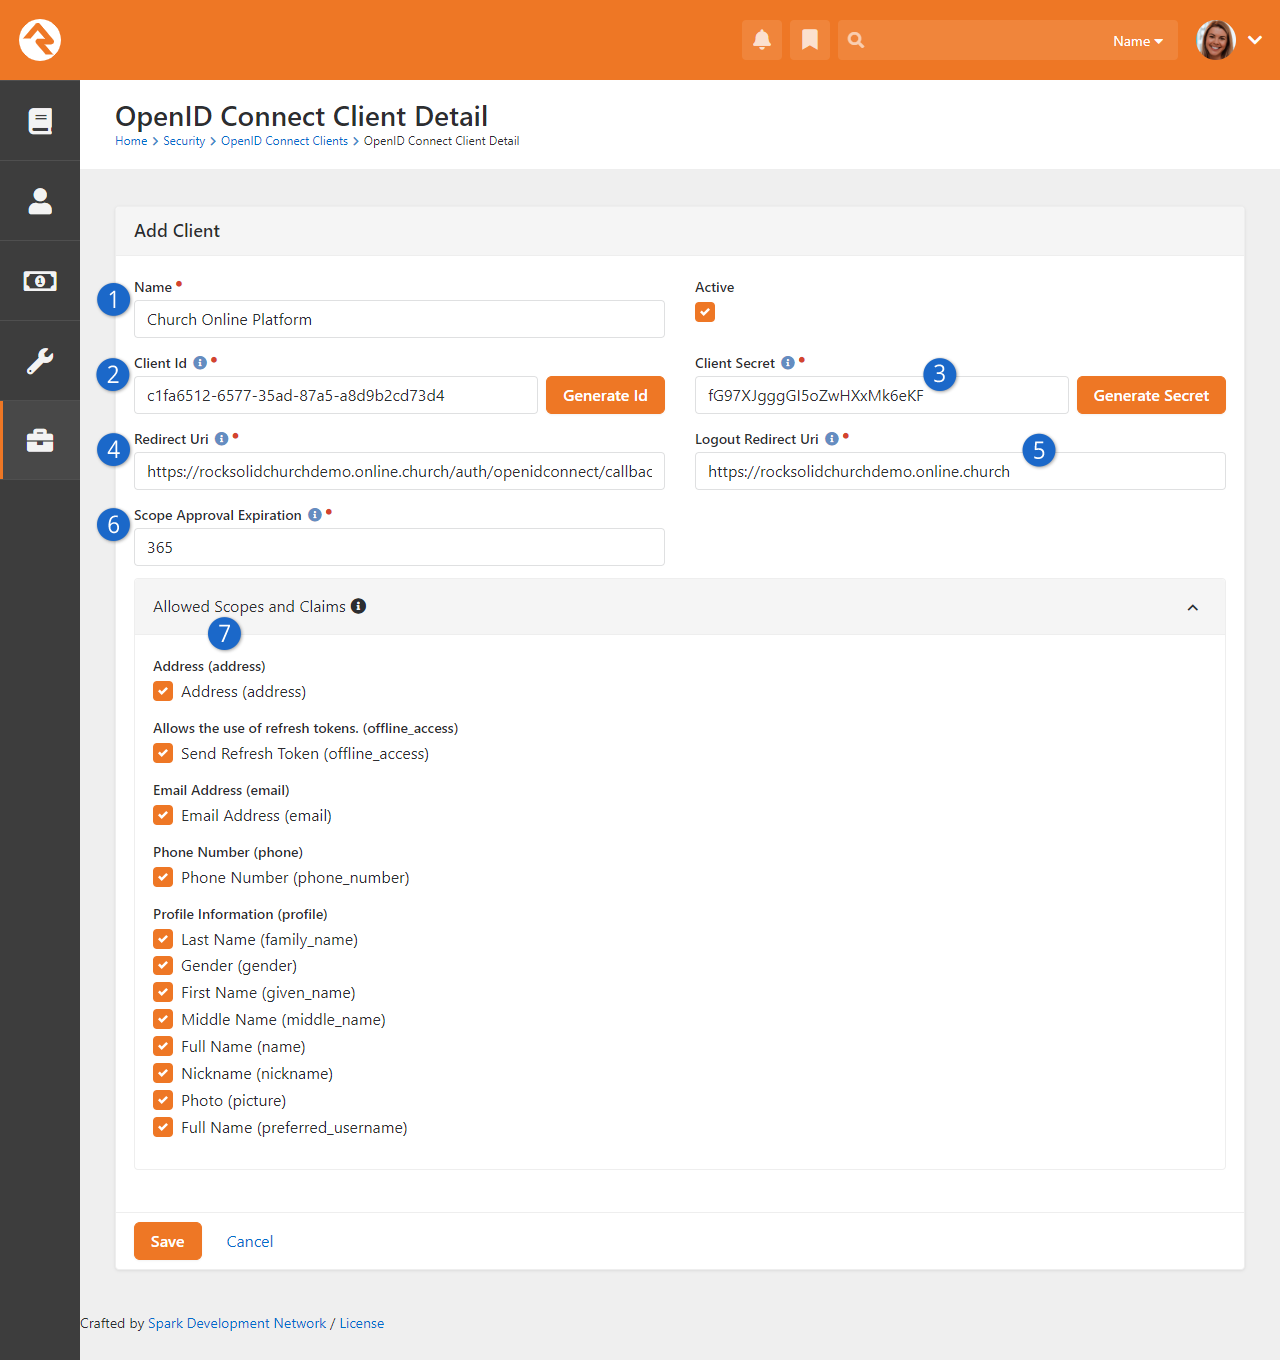
- 1 Name
-
Be sure to provide a descriptive name, so you can easily distinguish between
clients.
- 2 Client ID
-
The Client ID is a critical part of what connects Rock and the client. It must be
exactly the same for both systems or the process won't work. The Client ID should
be created in Rock using the
Generate Id button,
and then copied from Rock to the client system.
- 3 Client Secret
-
If you think of the Client ID as a username, then the Client Secret would be like a
password. Like the Client ID, the Secret must match exactly between both systems and
can initially be generated by clicking the
Generate Secret
button in Rock. You only get one chance to see the Client Secret when you first generate it, so if you
lose track of it, you’ll need to generate a new one.
- 4 Redirect Uri
-
After the person has provided their credentials, they will be redirected back to the client
via the path indicated here. As you'll see in the next section below, this URI is provided
by the client system.
- 5 Logout Redirect Uri
-
When the person logs out of the client system, they can be taken to the URI listed
here. In this case, we're using the "Church Online Platform Origin" provided by
ChOP, but you can choose a different path. Just keep in mind that the client system
chooses whether or not to use this URI. If you log out of the client system and
aren't taken to the path provided here don't worry, it just means the client
system isn't using it.
- 6 Scope Approval Expiration
-
This is basically the amount of time, in days, that we're allowed to send someone's
information. After this time period elapses, permission from the person (scope approval)
needs to be obtained again.
- 7 Allowed Scopes and Claims
-
This is where you can choose what information the client system can get from Rock.
Keep in mind the client must specifically request this information. For
instance, checking the ‘Address’ box doesn’t mean a person’s address will be sent
to the client every time they log in. By checking the box, you’re saying that the external system
is allowed to have that information if they request it.
Changing Scopes and Claims
If you want to get really advanced, Rock lets you change the list of Scopes and Claims. You can access the
OpenID Connect Scopes
configuration from the
OpenID Connect Clients
page at
Admin Tools > Settings > OpenID Connect Clients.
Just remember that this requires coordination with (and possible changes to) the client
system, to support the updates you make.
Example Client System Setup
Each client will be a little different, so it’s challenging to provide specific instructions
that apply to any system that’s out there. In this section we’ll use Church Online Platform
(ChOP) as an example client, but the same key points will apply to any system that supports
OpenID Connect.
First, you’ll need to log in to ChOP. If you don’t have a login,
you can create one here.
When you’re logged in, you'll need to access the Admin menu. If you're not already there,
there's a button near the top-left where you can "Go to Admin". From the Admin menu, click
"Integrations" on the left, then select "OpenID Connect” and click the “Set Up” button.
You’ll then be brought to the page pictured below.
This page has fields for information you’ll need to get from Rock, and it also provides
information you’ll need to add to Rock. As we mentioned earlier, this is why it's a
good idea to set up both systems at the same time.
OpenID Connect ChOP Settings
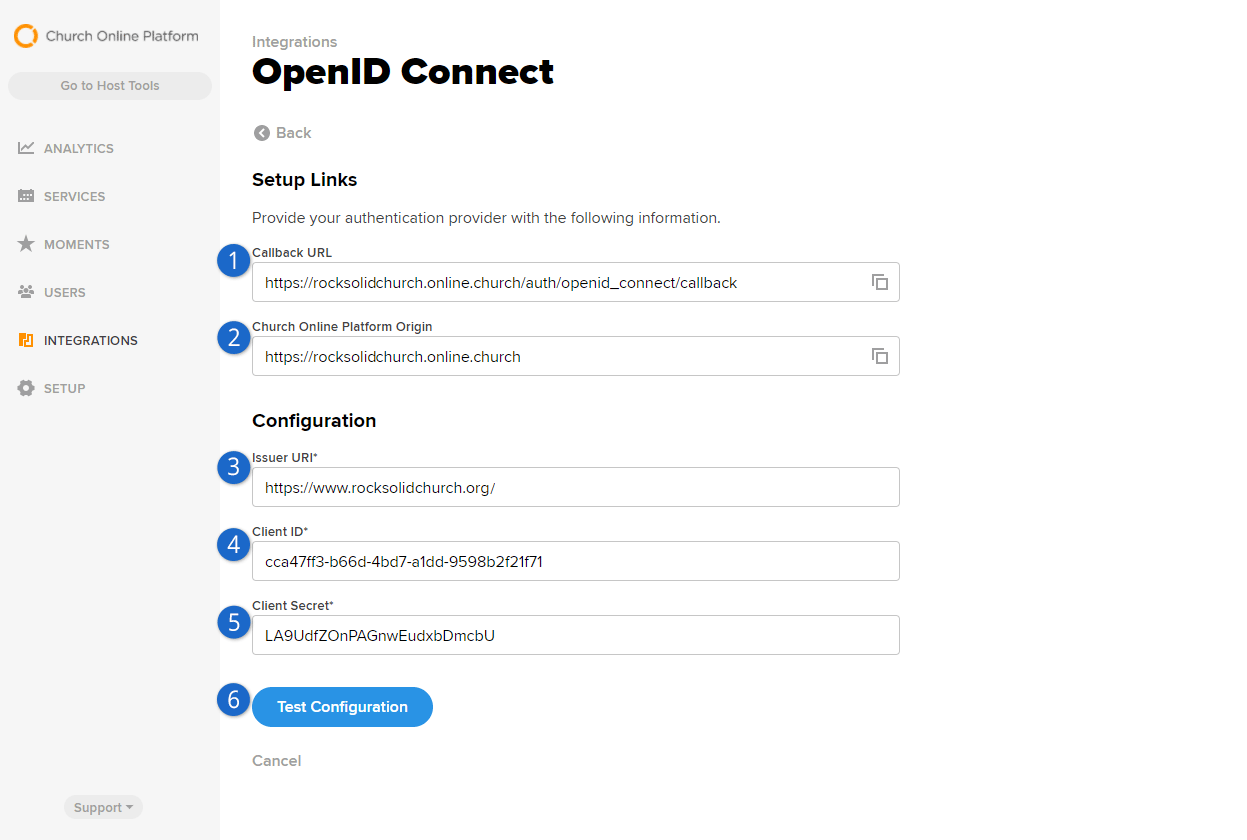
- 1 Callback URL
-
In this example we need to use the
Callback URL
from ChOP as the
Redirect Uri
discussed in the prior section. This will always be pointed to the client site.
- 2 Church Online Platform Origin
-
The Platform Origin is sort of like a homepage. In this case, ChOP has provided us
with the public URL that Rock Solid Church uses for our online services. This is a
logical place to bring people when they log out of ChOP, so we've used this as our
Logout Redirect Uri
in Rock as shown in the prior section above.
- 3 Issuer URI
-
This will be your organization's website. Specifically, this needs to be the
Public Application Root
in Rock's Global Attributes. If you're having
trouble connecting with a client, try using
https instead of
http for your
Public Application Root
and make sure it exactly matches what's in the client system, including the / at
the end.
- 4 Client ID
-
You'll populate this with the Client Id that was generated from Rock, as described
in the prior section above. It is critical to the process that the Client ID is
exactly the same between both systems, so this is one of the first things you should
check if things aren't working.
- 5 Client Secret
-
Just like the Client ID, this will be generated in Rock and then copied over to the
client system. Also like the Client ID, the Client Secret needs to be exactly the
same between both systems. Remember, Rock won't show you the Client Secret after
it's been saved, so if you need it and can't access it, you'll have to generate a new
one and copy it over to the client.
- 6 Test Configuration
-
Church Online Platform gives you a handy
Test Configuration
button to make sure both systems can communicate with each other. If something's
wrong, ChOP will let you know what it is. If the test is successful, all you'll need
to do is confirm your email address to finish the setup.
With the above setup in place, your staff and guests can immediately start using
their Rock credentials to log in to Church Online Platform. Again, we've been using ChOP in
this example, but you'll find any system that supports OIDC uses similar (if not identical)
terminology and configuration.
Unique Email Addresses
Be aware that ChOP has a 'unique email' policy so only one person can have
any particular email address. If people have shared email addresses in Rock,
they will receive an error message when the second person attempts
to log in using OpenID Connect with ChOP.
Person Tokens
There may be times when it’s useful to view either the internal Rock site or the external organization site as an individual
other than yourself. For example, if someone calls needing technical support because of a problem with their person profile,
an admin may want to view the page while logged in as that person. This allows the admin to see exactly what the person sees.
Rather than creating a new login—which can result in duplicates in the database—Rock uses person tokens, which allow Rock
admins to log in as (i.e., impersonate) users without requiring passwords. This not only makes troubleshooting easier, but it
also helps keep your database tidy. Anytime an admin impersonates another user, a record of the login is kept in the user's
history tab.
Tokens are configurable, so you have control over how long they’re valid for and how many times they may be used before expiring.
Let’s take a look at how to do this.
Configuring Person Tokens
Person tokens come preconfigured in Rock and can be found in the Global Attributes screen
(Admin Tools > Settings > Global Attributes).
There are three Person Token attributes: Person Token Expire Minutes, Person Token Usage Limit, and Person Token Use Legacy
Fallback. Click on an attribute to open its configuration settings.
The Person Token Expire Minutes attribute is the length of time the person token is valid,
configured in minutes. The default setting is 43200, or 30 days. If you want the person token
to be valid for a shorter amount of time, enter the value in minutes in the
Person Token Expire Minutes field.
The Person Token Usage Limit is the default maximum number of times a person token can be used.
By default, the value is blank, meaning there's no limit to the number of times the token can be used.
If you want to set a limit, enter a numerical value in the Person Token Usage Limit Value screen.
The Person Token Use Legacy Fallback tells Rock whether or not to use pre-v7 legacy person token settings
if they come through the system. If the Person Token Use Legacy Fallback Value is set to No, those legacy tokens will be rejected.
We recommend keeping the value set to Yes for a few months after updating to v7, just to be on the safe side.
You can also configure and read person tokens using the
PersonTokenCreate and PersonTokenRead Lava filters.
To learn more about how to use Lava for Person Tokens, see the Lava guide.
Now let’s look at how you put the person tokens to use by impersonating another user.
Impersonating Another Person
Impersonation is enabled in the Bio block settings of the Person Profile page.
Enable Impersonation
- 1 Enable Impersonation
- To enable impersonation, select Yes in the
Enable Impersonation
field.
- 2 Impersonation Start Page
- You can configure Rock to automatically take you to a different page when you impersonate
someone. Typically, you would want to set this to your public Rock site (see note below),
but it can be any Rock site/page you desire.
Once you’ve saved your block settings, you’re ready to impersonate another person. To do this, search for the
profile page of the person you want to impersonate, click the Actions
button in the upper right corner of the screen, and select Impersonate from the menu options. Rock will take you to the page specified
as the Impersonation Start Page, and you’ll now view the site as that person. Keep in mind this means you’ll only be able to see what
that person can see based on their security roles and permissions.
Keep in mind that not every person can be impersonated. People with certain
Account Protection Profile
levels can't be impersonated, based on your Security Settings.
Admin Toolbar Restore Button

Impersonation remains in effect until the browser session ends, you log out of Rock, or you click the
Restore button in the
admin toolbar at the bottom of the screen as pictured above.
Note
It's recommended that you set the Impersonation Start Page
on the block to point at your public-facing Rock site if your primary use of this feature will be to impersonate attendees interacting
with your public Rock pages. Failure to set a start page will cause Rock to remain on the internal site when you impersonate someone,
which can lead to "access denied" errors necessitating a browser restart, because the person you're impersonating (most likely) doesn't
have rights to the internal Rock site.
Internationalization & Localization
While true internationalization is beyond the scope of the Rock project, we do want to make Rock friendly
for organizations outside of the United States. Each localization topic is discussed separately below.
Phone Numbers
Post-install, Rock is configured to support only US-formatted phone numbers. When only one country is
configured, the phone entry field looks like the example below.
Phone Entry With Single Country Configured
This field can easily be adjusted to support other countries. Simply add country specific formatting fields to the
Admin Tools > Settings > Defined Types > Phone Country Code defined type.
Each new entry should have the following values.
- Value: This is the country code that's used when dialing the number.
- Description: A short description of the phone formatting pattern.
- Match Expression: This is a regular expression that's
used to match the value you entered and apply the correct formatting to it. For instance, a seven-digit number in the US
would match the formatting rule 555-5555 while a 10 digit number would match to (555) 555-5555.
- Formatting Expression: This string is used to apply the formatting to the matched number. Each grouping of numbers
is represented by a $#.
Phone Configuration
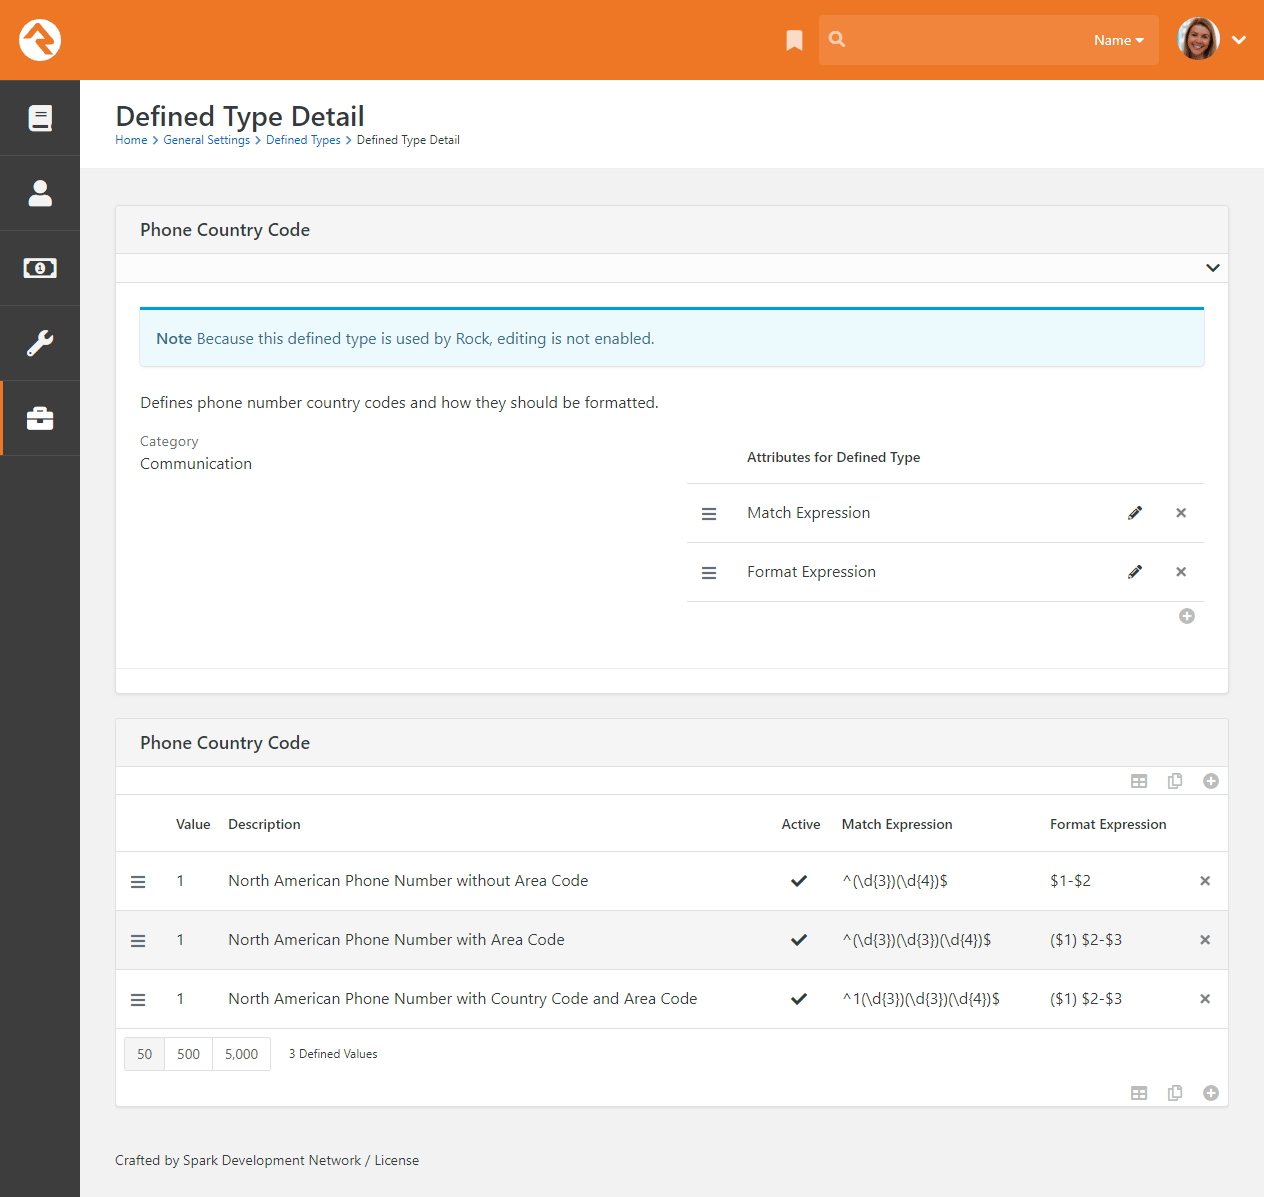
Once you add a second country, the phone number field will change a bit in look. You'll notice the addition of a country code
selection at the beginning of the input. The phone country code listed at the top of the defined type list will become the default country code,
so in the screen shown above grab the hamburger grips to the left of each entry and drag them up and down the list as you desire.
Phone Entry With Multiple Countires Configured
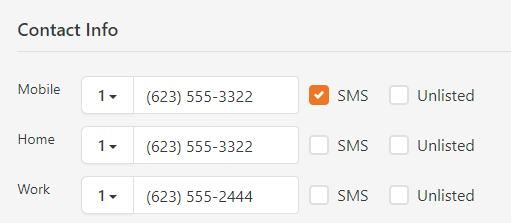
Formatting Phone Numbers on the Person Profile Page
There's a setting on the Bio block used on the Person Profile page that enables the
country code to be prepended to all phone numbers. Enabling this setting may help the formatting for many international organizations.
Dates & Times
We believe the .Net framework that Rock is built on should handle the formatting of dates and times correctly across regions. If you find an area of Rock
that shows a date and/or time in a US format, please let us know by
opening a Rock issue.
Before opening a request, be sure to check the server's culture setting. This can be found on the ‘System Information’ dialog accessed from the Admin Toolbar
at the bottom of each page.
Currency
There really isn't any magic in Rock’s implementation of local currencies. Behind the scenes, currency is stored simply as a number. You can
change the currency symbol displayed within the application under
Admin Tools > Settings > Global Attributes | Organization Currency Code. The
Organization Currency Code
will be set to 'USD' (United States Dollars) for organizations in the United States.
It’s Important To Understand...
Changing the currency code doesn’t have any other effect than changing the symbol in front of amounts when displayed. Be sure that your payment
gateways are properly configured for the same currency as the symbol you're displaying, otherwise individuals will be incorrectly credited in their account.
If you're displaying currency in Lava, use the
FormatAsCurrency
filter to return a numeric value with the appropriate symbol according to your
Organization Currency Code.
International Address Support
By default, Rock is set to accept and display US-formatted addresses. For most organizations operating inside the US, this will be the preferred
configuration. Enabling support for international addresses is simple and remarkably powerful. Let’s take a look.
Enabling International Addresses
The first step is to tell Rock that you would like to use international addresses when editing and viewing addresses.
- Navigate to Admin Tools > Settings > Global Attributes.
- Click the attribute Support International Addresses and choose
Yes in the
Support International Addresses field.
Rock will now display the inputs required for storing international addresses. It will also display addresses in an internationally-friendly way.
That was the simple part—now for the power!
Configuring International Addresses
Unfortunately, we live in a world with few standards. Why the world hasn't accepted the mile is beyond us (5,280 feet in a mile makes
perfect sense. Brilliant really...) Perhaps nowhere is this more evident than with addresses. Some countries have 'states', others 'provinces'; some
'zips', others 'postal codes'. Some put the zip first; others put it last.
Rock allows for a good deal of configuration on how international addresses are entered and displayed. With a few exceptions, the configurations for
each country will need to be adjusted as they change on a seemingly daily basis. To complete the configuration, follow these steps.
-
Be sure that the countries you need are in the country list
Admin Tools > Settings > Defined Types > Countries.
Also ensure that the correct abbreviation is in the
Value field and the proper terms for City, State and Postal Code are correct.
Also adjust the Address Format as needed to fit the requirements of the country.
This format is what will be used to display addresses inside of Rock for the given country.
Country Configuration
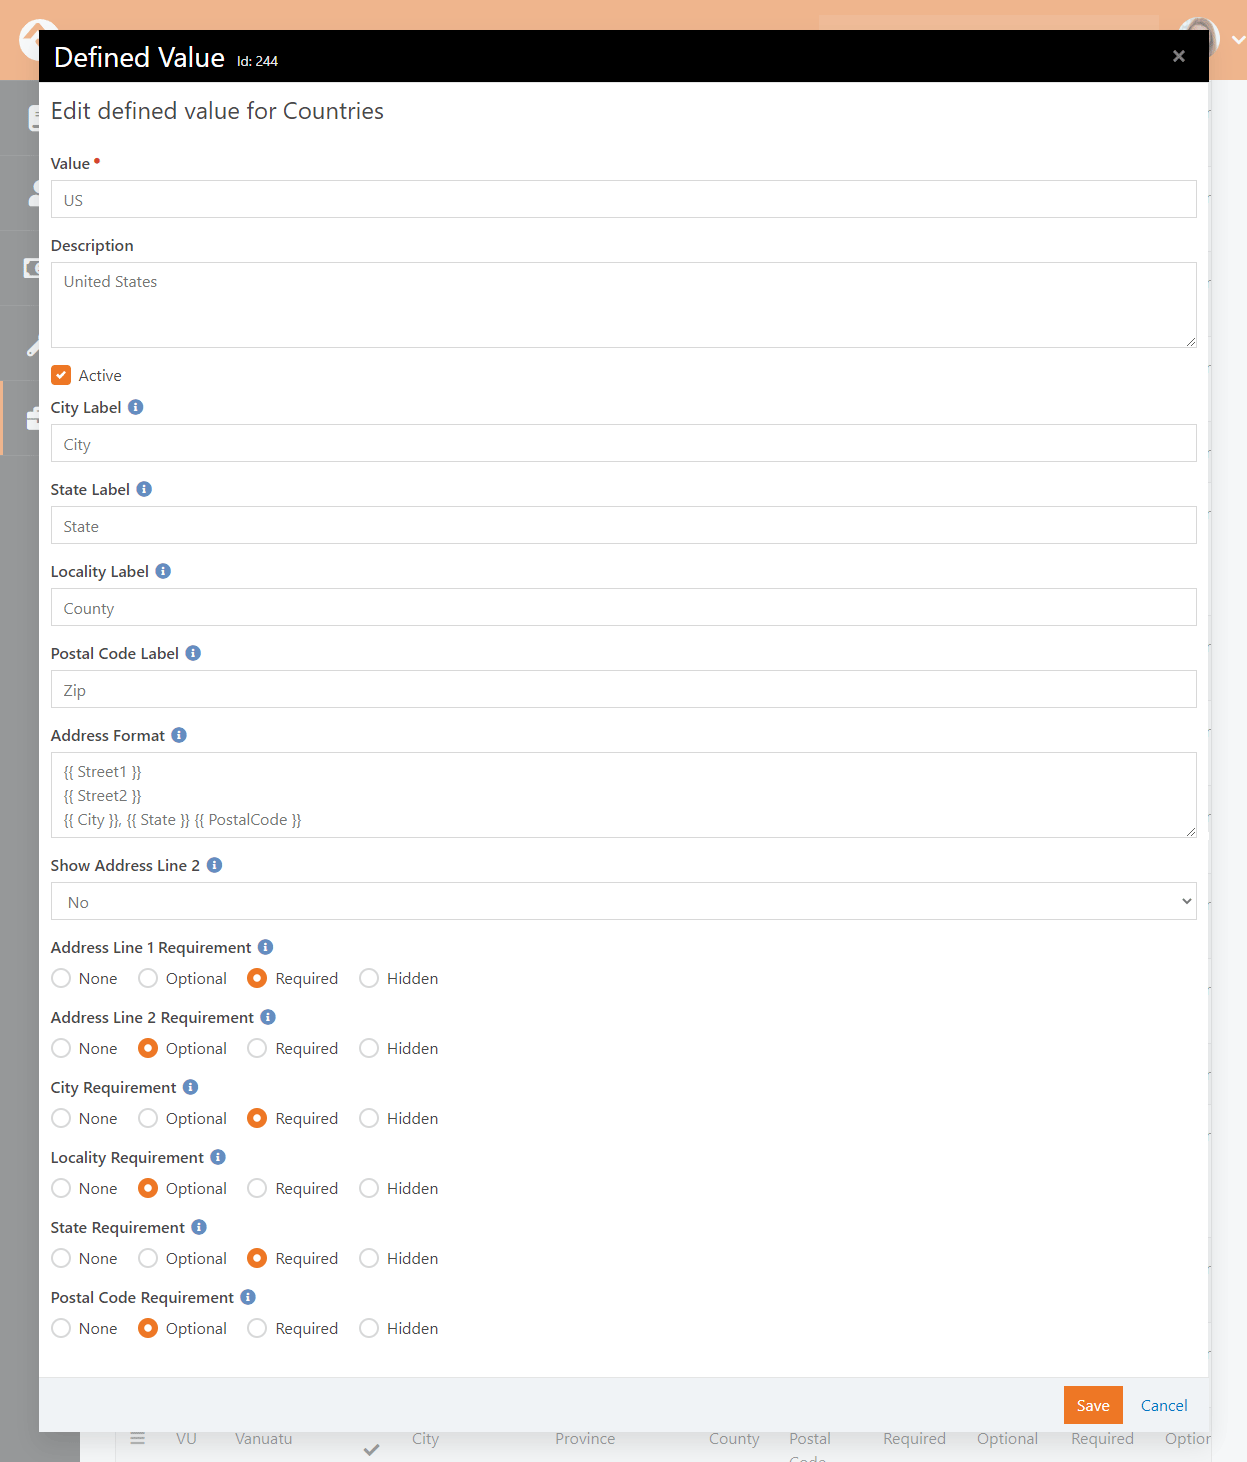
-
Next, enter the Address States for the countries that will be commonly used.
You’ll find these under
Admin Tools > Settings > Defined Types > Address States.
When entering new states, be sure to match them to the country using the country dropdown.
When entering states, you'll enter the state abbreviation (e.g., 'AZ') in the
Value field and the full name (e.g., 'Arizona') in the
Description. Both values are required.
Rock will now display the inputs required for storing international addresses. It will also display addresses in an internationally-friendly way.
Country Preference
When showing a list of countries, Rock will put the country of the organization both at the top of the list and also in alphabetical order. This allows the
most commonly-selected country to be an easy selection for your users.
School Grades
Rock provides a customizable system for determining the educational grade/year an individual is in. You can read more about
how this grade system works in the
Person & Family Field Guide.
Strategies for Full Localization
Full localization, including the support for multiple languages, is outside of the scope of the Rock project. However, it's possible for someone
to fork Rock's source and localize the code and database contents. If you're interested in starting an internationalized port let us know and we'd
be happy to help share your work.
Things You Should Not Do
Learning from the mistakes of others is a painless way to avoid making
mistakes of your own. Based on real-life experiences within the Rock
Community, we have some suggestions for things not to do.
Creating Lots of Fake People
There’s no denying that it can be useful to have fake person records
in your production Rock instance. There are times when you want to try
something out, but don’t want to risk changing or damaging a real record.
That’s understandable, and fairly common. However, having too many of
these records can negatively impact things like reporting, communications
and system performance. Eventually you’ll want to clean up, and that’s
where you’ll run into some challenges.
If you must have fake records, then we strongly recommend that you keep
the count as low as you possibly can. Adding even a single person impacts
many different tables and data throughout Rock. From attributes to addresses,
think of all the things you associate with people and families in Rock,
and then consider having to identify and undo all those things. It’s like
shooting a shotgun into a bale of hay and then having to find and remove all
the pellets without missing any. It’s a manual process; we don’t have a magnet
for you.
Need Some Help?
Removing fake records is very challenging, to the point where you might
need to hire outside help. If you do, our
partners
are ready and able to assist you. However, even for Rock experts this
is a difficult and complex task, so we don’t expect our partners to
guarantee every fake record can be removed entirely from all areas of
your system. The only way to ensure a clean system is to avoid adding
these records in the first place.
Changing Blocks
It’s possible to inject custom CSS / JavaScript to modify Rock’s core blocks
or to change the user interface on a block. While that may be tempting if
you have the technical resources to do it, we advise against modifying blocks
that ship with Rock or come from the Rock Shop. Trust us, your future self
is screaming at you right now not to do this.
Injecting custom code dramatically complicates future troubleshooting and
maintenance for yourself and others. The Rock Community is always willing
to help and support you, but it’s very challenging if you’re using a different
block than everyone else.
Also keep in mind that new Rock releases or fixes could overwrite or conflict
with the changes you’ve made, possibly resulting in broken functionality. Rock
upgrades assume that the core blocks are unchanged. There are ways to mitigate
this risk, but they all require time and resources you wouldn’t otherwise need.
We have a few other suggestions for things to avoid with your website in our
Designing and Building Websites Using Rock
guide.
What To Do When Things Go Wrong
In life there will always be problems. The key is how you go about solving them. Below are a few tips to help you successfully
navigate issues as they arise.
Your best resource in dealing with problems is knowledge. The more you know about how Rock works, the better off you'll be. We
strongly recommend reading each manual that comes with Rock. You even might make it a habit to re-read manuals more than once. With
each reading, your understanding of the material will grow. You may find that new ideas come to you as you cover the material
on multiple reads.
What to Do When Rock Won't Load
You make a configuration change and next thing you know Rock's not loading any longer. What should you do?! First, relax. A calm
mind will lead to a quicker resolution while stress might only dig you in deeper. Below are some things you should try first.
Check for Exceptions in The Database
First check the exceptions log in the database. This is made a bit tricky because you can't use Rock's built-in
screens to check the logs. Instead, you'll have to use SQL Server Manager or a similar tool to view the errors.
Once you connect to your database, look into the ExceptionLog
table. You can also try running the SQL statement below to view the error.
    SELECT TOP 100 *
        FROM [ExceptionLog]
        ORDER BY [CreatedDateTime] DESC
Check for Exceptions in The File System Log
When things are so bad that Rock can't even write to the database, we'll write the exception to a
comma-delimited file on the web server's file system. The file is located at ~/App_Data/Logs/RockExceptions.csv.
Getting 500 Errors to Display
When all you get back from Rock is a server 500 error, you can modify your web.config to return a more
detailed error message.
Be Very Careful
Incorrectly editing your web.config file can cause serious problems. Be sure to make a copy of the
original file before editing. Also be sure to change these settings back when you're done.
Two changes will need to be made before a detailed error will be displayed.
- Immediately after the line
<system.web> add a new line with this text <customErrors mode="Off"/>
- Next, you'll need to comment out the custom error configuration. To do this, simply edit the existing comment from this:
<!-- Add a custom handler for 404 errors to load Http404Error page.
The Http404Error page will check to see if the site has a configured 404 page, and if so, it will then redirect to the custom page.-->
<httpErrors errorMode="Custom" existingResponse="Replace">
   <remove statusCode="404" subStatusCode="-1" />
   <error statusCode="404" path="/Http404Error.aspx" responseMode="ExecuteURL" />
</httpErrors>
to this:
<!-- Add a custom handler for 404 errors to load Http404Error page.
The Http404Error page will check to see if the site has a configured 404 page, and if so, it will then redirect to the custom page.
<httpErrors errorMode="Custom" existingResponse="Replace">
   <remove statusCode="404" subStatusCode="-1" />
   <error statusCode="404" path="/Http404Error.aspx" responseMode="ExecuteURL" />
</httpErrors>-->
What To Do Next
At this point, you should now have more information about what's going on behind the scenes. Hopefully
you can fix it from here. If not, you might try:
-
Posting into the Rock Q&A. Be sure to include any error
message you're getting.
-
Posting on the Rocket Chat.
-
Seeking help from a Rock consultant. You might ask in the Q&A section for a recommendation. We hope to build
a rating system for external resources soon.
Scaling Rock
Large organizations may be interested in scaling Rock using multiple servers. This
not only provides extra capacity but provides failover in case a server goes down.
To learn more about running Rock on multiple servers, check out our
Hyper Scaling Rock RMS
guide.
Under The Hood
While Rock comes preconfigured to run optimally on most systems, here are a few things you should know.
Initial Slow Response Times
Here's the scoop on slow initial Rock load times. Rock uses a database access technology called Entity Framework (EF). On first load (the very first page
that's started when the application loads) it can take a few seconds for EF to check the database to see if any changes are required. Subsequent pages will load
much faster. You'll notice that once a page loads the second load of that page is super-fast. That’s Rock’s caching engine kicking in. So that's all fine and good
until…
IIS's AppPools (think of it as the engine that powers Rock) need to be refreshed on occasion. By default, this happens every 29 hours
(you should reset yours to always occur at a specific time, like 1am). When the AppPool recycles the whole EF start up happens again. For more
information on configuring the AppPool see
this blog post.
We'd recommend that you use an HTTP status tool like Pingdom to constantly poll your site. Not only will this notify
you when it's down, but it will also be the first to load your page after an AppPool recycle.
Once Rock is started there's an internal keep-alive process to ensure your site doesn't go into a sleep-like mode. Once the initial page is
loaded this process will ensure that Rock stays awake and responsive.
Phone Number Lookup
The Phone Number Lookup feature is a
great alternative to traditional methods of identifying a person. Instead of logging in or providing
personal information, all the person needs to do is enter their mobile phone number and confirm they’re
in possession of the device with that number.
Overview
To start, the person enters their mobile phone number in the screen pictured below.
Phone Number Lookup Block
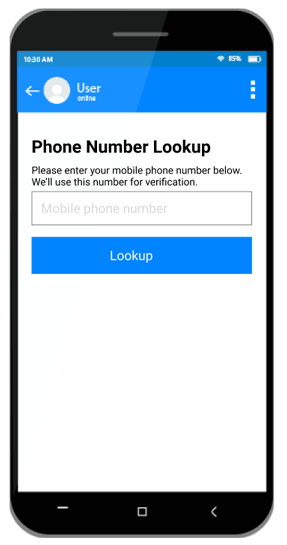
After clicking Lookup, the person
will receive a text message with a verification code. They’ll need to copy or type that code into
the next screen pictured below. This confirms they are in possession of the device with that phone
number.
Enter Confirmation Code
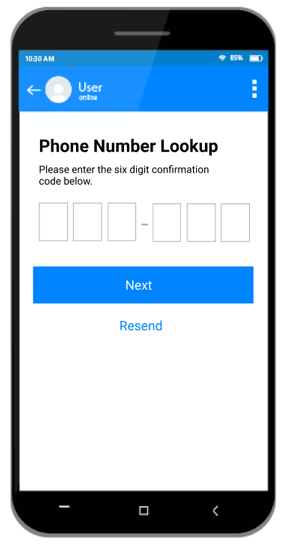
If the person didn’t receive the text, or needs to re-enter their number, they can tap the
Resend button pictured above to try
again.
After providing the confirmation code and clicking
Next in the screen above, the
person will be returned to the area where they started the process. For instance, if this is being
used with Mobile Check-In then the person would be automatically directed to the next steps for
checking in.
Phone Number Matching
Behind the scenes, Rock will check the provided phone number against records in the system. If
only one person has that phone number, then Rock’s job is pretty easy. But, sometimes more than
one person has the same phone number in Rock. Or the person’s phone number might not be in Rock
at all. Rock can still handle either scenario.
If more than one person has the phone number, Rock will ask the person with the device to
indicate who they are. Remember, this happens after the confirmation code is entered in
the prior screen above.
Select Person
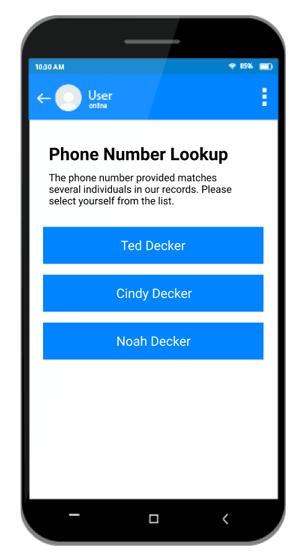
After tapping their name, the person will then proceed with next steps for the process they
originally started (like Mobile Check-In).
If Rock can’t find the provided phone number in the system, then the person will see the screen
shown below. Again, this only happens after they’ve provided the confirmation code.
Phone Not Found
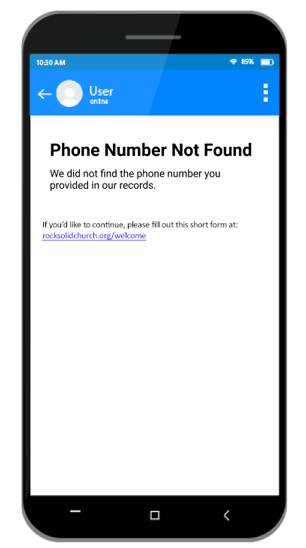
In the next section we’ll show you how to configure the instructions that appear on this screen.
Not Just Mobile
Don’t forget that this block can be placed anywhere on your site. It can be accessed from a
computer, laptop or other types of devices.
Phone Number Lookup Block Settings
Now that you’re more familiar with the process, let’s look at some of the configuration options
you have. These settings let you tailor the experience to your needs.
Phone Number Lookup Block Settings
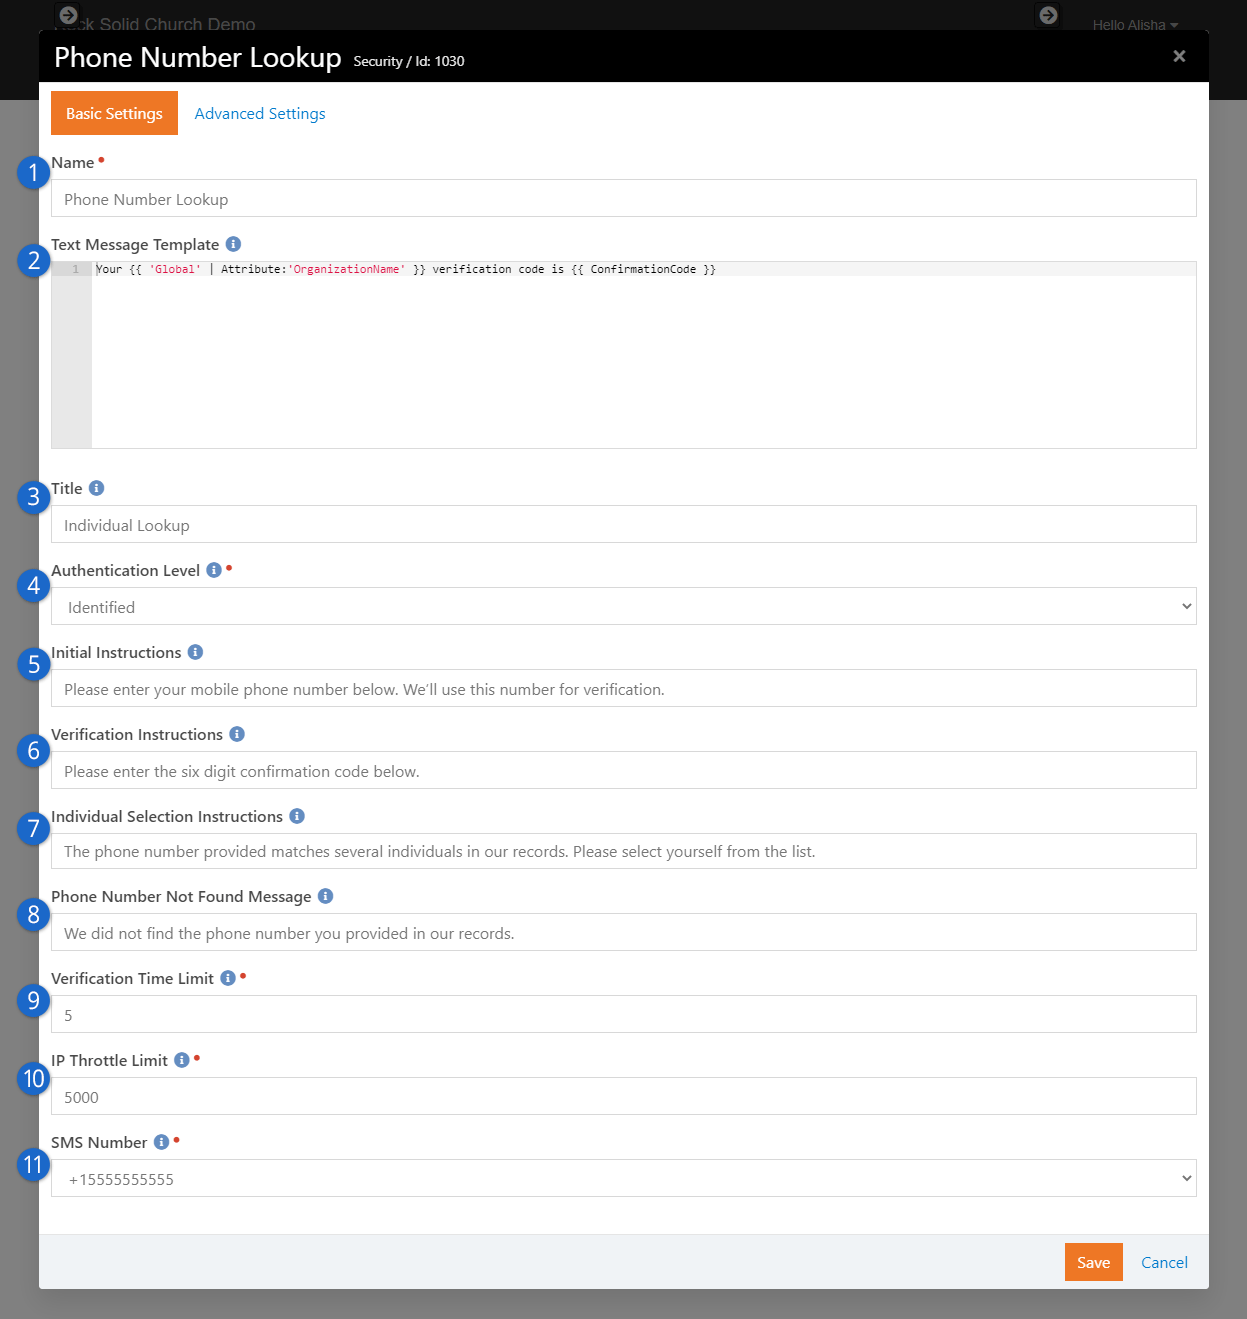
- 1 Name
- The name of the block appears on each screen.
- 2 Text Message Template
- This is where you can configure the confirmation code text message that gets sent to the
person. In this example we’ve used Lava to provide the organization’s name and the
confirmation code itself. We strongly advise against adding any personal information here
(like "Hello, Ted!") because we don’t know for sure who has the device until they submit the
confirmation code.
- 3 Title
- The title you put here will show on each screen. This helps indicate we’re looking for
an individual and not a family.
- 4 Authentication Level
- This setting is very important. It decides what access the person has after they have
submitted the confirmation code (and after selecting themselves, if necessary). You can choose
from one of two settings:
- Trusted Login - This setting will formally log the person into
your Rock website if they have a login account. If they don’t have a login,
they’ll be able to do most (but not all) of the functions a logged-in person
could do.
- Identified - This is the safer setting of the two, but it’s
also more restrictive. In this case the person will be identified for specific
areas of your site, like Attendance Self Entry or Mobile Check-in, but most
secured areas will still require them to log in.
More details on this setting are provided below.
- 5 Initial Instructions
- The instructions provided here will appear on the first screen of the block, where the
person enters their phone number.
- 6 Verification Instructions
- Here you can change the instructions that are shown when the person enters their
confirmation code.
- 7 Individual Selection Instructions
- These are the instructions that will show on the screen for selecting which person is in
possession of the device. This screen only appears if more than one person in Rock has the
provided phone number.
- 8 Phone Number Not Found Message
- If the provided phone number can’t be found in Rock, then these instructions will appear.
You might use this area to request that the person create a profile so they can be
identified in the future.
- 9 Verification Time Limit
- This is the amount of time, in minutes, before the verification code expires. If the
code expires, the person will need to resubmit their phone number and get a new code.
- 10 IP Throttle Limit
- This is the maximum number of times, per day, that a single IP address can submit a
phone number for verification. In many cases, this is helpful to help keep SMS messaging
costs down. An exception will be written to the Exception Log if the limit is reached.
- 11 SMS Number
- This is the SMS Number that will be used to send the confirmation code text message to
the person.
Authentication Level - Identified or Trusted?
Just like a bank, your external website has certain areas that are open to the public and
other areas that are restricted to known people. Anyone can walk into a bank's lobby,
claiming to be a customer of that bank, but the bank (hopefully) won't just take their word
for it when they ask to make a withdrawal.
This is why Rock has different
Authentication Levels.
Sometimes it's enough that the person has simply
Identified themselves,
but in other cases we want to fully
Trust that they are who
they say they are. In other words, these levels decide who stays in the lobby for a nice
chat, and who gets to make a withdrawal from the vault.
Identified
If a person is only
Identified, it means
they're claiming to be someone and we're pretty much taking their word for it. This is the
safer of the two
Authentication Levels
described above in the Phone Number Lookup block. This means they can do certain things like
check in or report attendance in a service, but not much else. In other words, you recognize
they might not be who they claim to be, but their access is restricted so they really can't
do much damage.
Trusted Login
The next level of authentication is
Trusted Login. This
opens the vault, and means you truly trust that the person is who they claim to be. A
Trusted person has
access to their profile, giving and other potentially sensitive areas of your site.
The appropriate
Authentication Level
will vary depending on your organization and your community. If a person really wanted to
impersonate someone else in your external site there might be ways to do it, but those risks
can be minimized with certain data policies and practices. If you're not sure which
Authentication Level is
right for you, play it safe and use
Identified. The person
can still log in like normal if there are secured areas of the site they need to access.
User Login & User Accounts
Logging in to your organization’s external Rock website provides many benefits to your visitors.
Knowing who the person is makes it easier for them to fill out forms, allows them to manage their
account and allows for extensive personalization.
In order to log in, the person needs to have an account in Rock. For an account to exist, the person
needs a record in Rock, and they’ll need a username and password. This can be done on behalf of the
person by having a staff member or volunteer manually
create a record
and
User Account.
However, the person can set this up themselves from your external website.
Login Page
The Login page pictured below can be accessed different ways. Typically, the page is reached by
clicking the Login button near the
top right of your external website pages. The login page can also be accessed directly by going to
https://yourchurch.com/Login.
Login Page
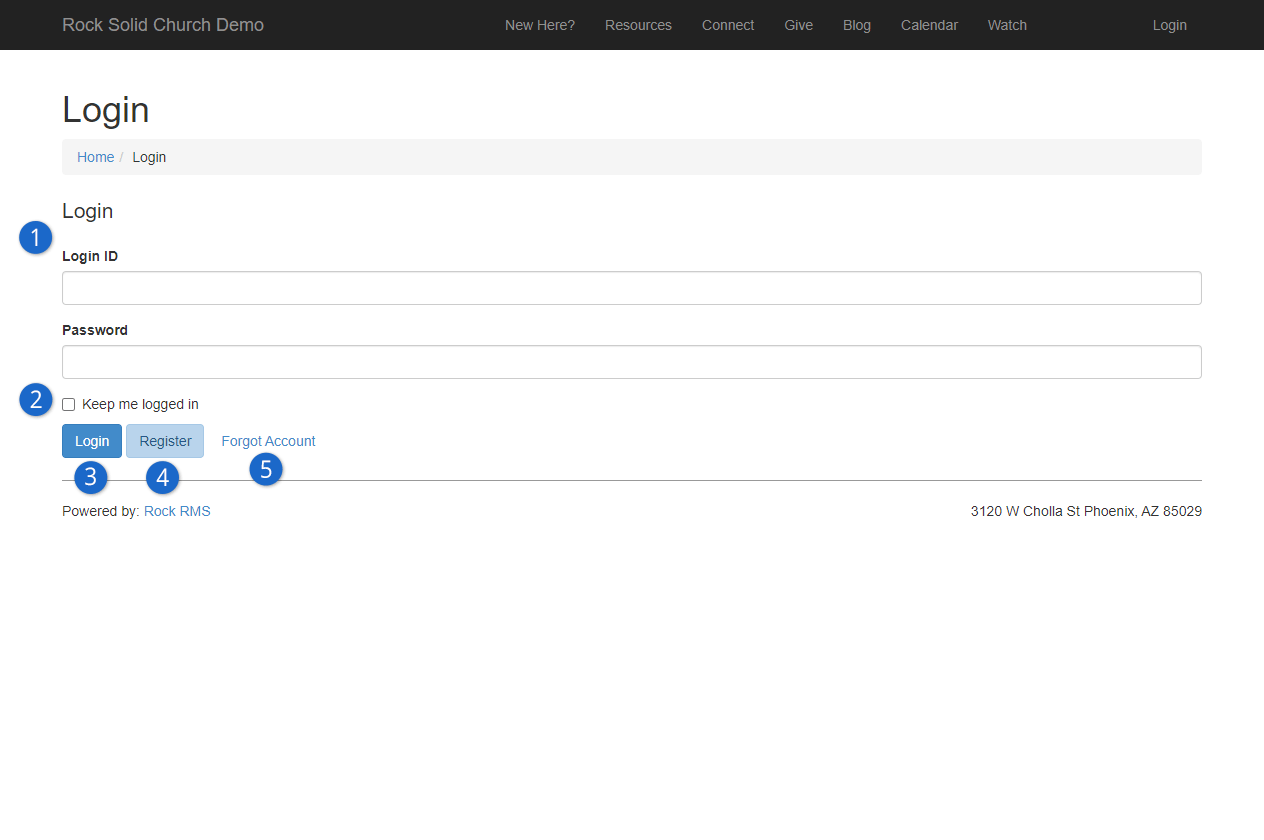
- 1 Login ID and Password
-
The Login ID could be a username or an email address. You can choose which one people
should use when they’re creating an account, which we’ll cover below. The block settings
allow you to change what this is called, so you can change it to say “Email” or
“Username” to add clarity.
- 2 Keep me logged in
-
Checking this box will allow the person to close the window and return later without
having to sign in again.
- 3 Login
-
When a valid Login ID and password are provided, clicking this button will log the
person in. The person will be redirected back to the page where they were before logging
in.
- 4 Register
-
If the person doesn’t have an account, they can click this button to create one. See the
Account Registration section below for details.
- 5 Forgot Account
-
If you’ve ever lost track of your username or password on a website, you’re familiar
with what this button does. Clicking this will take the person to the
Forgot Username
page (
https://yourchurch.com/ForgotUserName). This page will ask the person
to provide their email address so Rock can email them their username and a link to reset
their password. The person must have an email address in Rock for this to work.
Login History
The Login History block lets you audit who is accessing Rock and assist those who might be having trouble by showing detailed records of successful and unsuccessful login attempts.
To view login history, go to Admin Tools > Settings > Security > Login History.
Login History
You can filter login history by date and time, from the year down to the hour, using the filter icon. Additionally, hovering over a column and selecting the Column Filter button lets you refine your results even further.
The Login History block is also visible on the History Tab of the Person Profile page.
Login History Person Profile
The Person Profile Login History block differs from the general Login History block by displaying only the login attempts of the currently viewed profile.
Login Failure Reasons
Go to the Model Map at Settings > Power Tools > Model Map then click on Security. Under 'History Login' you will see the LoginFailureReason property and a list of different possible reasons for login failure. These populate the 'Status' column of the Login History block.
Below is a list of every Login Status:
| Login Status |
Description |
| Success |
Successful login attempt.
|
| Requires Verification |
Additional verification is required, such as two-factor authentication.
|
| User Not Confirmed |
The account is not confirmed.
|
| User Not Found |
The username or email does not exist.
|
| Invalid Credentials |
The provided username or password is incorrect.
|
| Password Change Required |
The password has expired.
|
| Locked Out |
The account is locked due to multiple failed login attempts.
|
| Invalid OIDC Client Id |
The request is from an invalid OIDC ClientId source.
|
| Other |
See the LoginFailureMessage for more details.
|
Passwordless Login (Obsidian)
Say goodbye to the hassle of remembering passwords and hello to seamless access. With passwordless
login, everyone can easily and securely log in to your site with minimal friction. There are different
ways to set it up, but you can give people the option of either a traditional login or a passwordless
login, as pictured below.
Passwordless Login Option
After clicking “Sign in with Email or Phone” the person is prompted for an email address or phone
number. Rock recognizes which one is provided.
Passwordless Login
In this case, Alisha will receive an email because she provided her email address. The email will
have instructions and a button to Continue.
All she needs to do is click the button to log in.
If the person provides a phone number, they’ll get a text message with a code that they’ll need to
enter to complete the sign in process.
Passwordless Confirmation Code
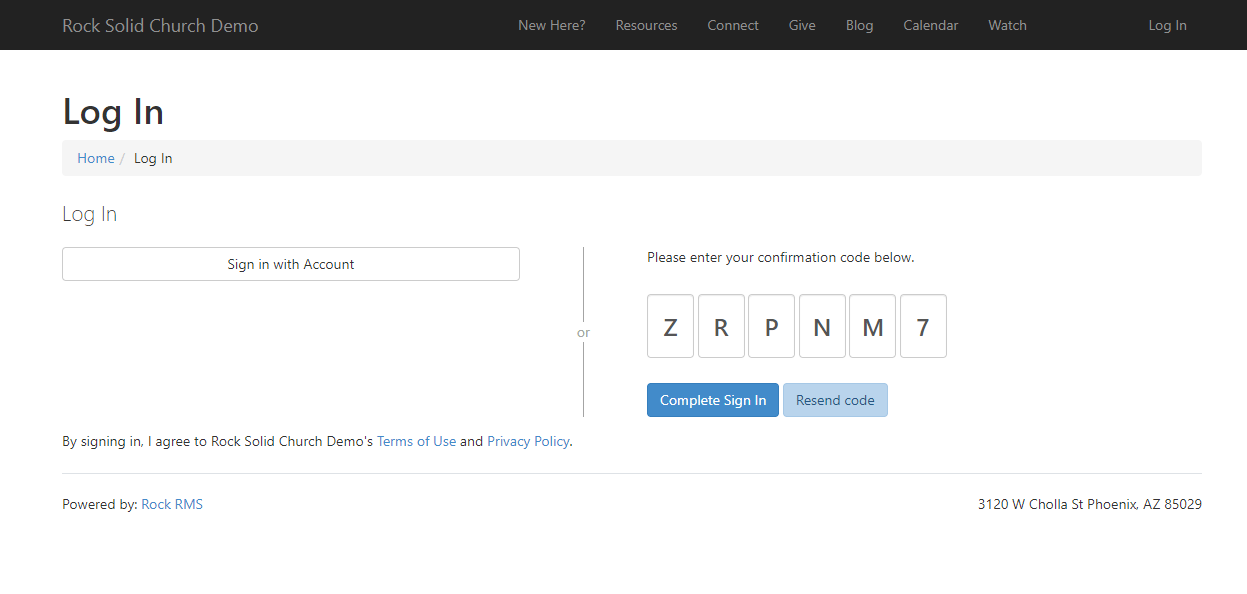
If more than one person shares the same email address, which happens often with families,
the person will be prompted to indicate who they are.
Shared Email Address
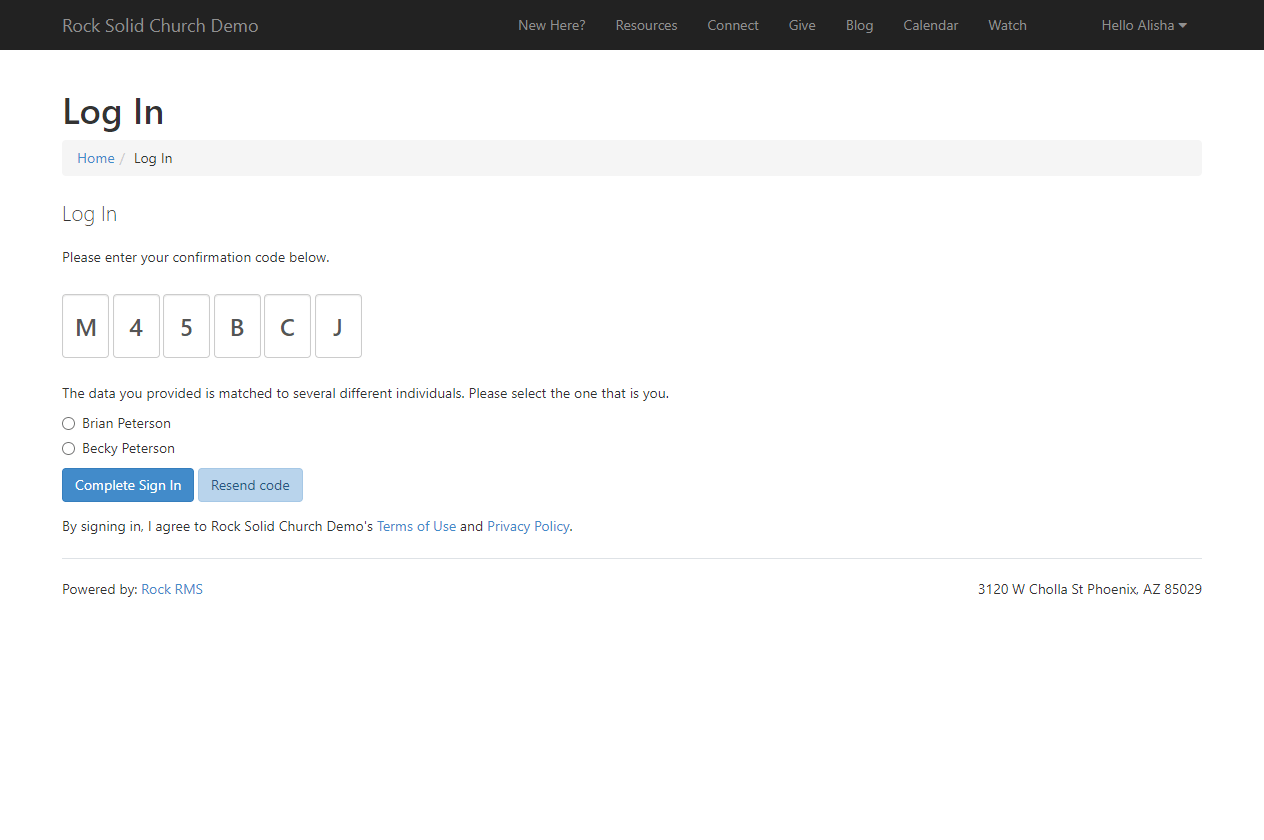
Configuring Passwordless Login
Passwordless login relies on emails and SMS text messaging. If you’re not set up to send and
receive communications in Rock, check out the
Communicating Using Rock
manual before proceeding.
Obsidian Blocks
You’ll need the Obsidian version of the Login and Account Entry blocks to use passwordless login.
See our
Designing and Building Websites Using Rock
manual for details on adding blocks to pages.
System Communication
When a person provides their phone number or email address for passwordless login they’ll get a
response in the same medium. One of the first steps is to provide the SMS number from which that
communication will be sent under
Admin Tools > Settings > System Communications.
Edit the Passwordless Login Confirmation system communication and, under the SMS panel, select your phone number.
System Communication SMS Setup
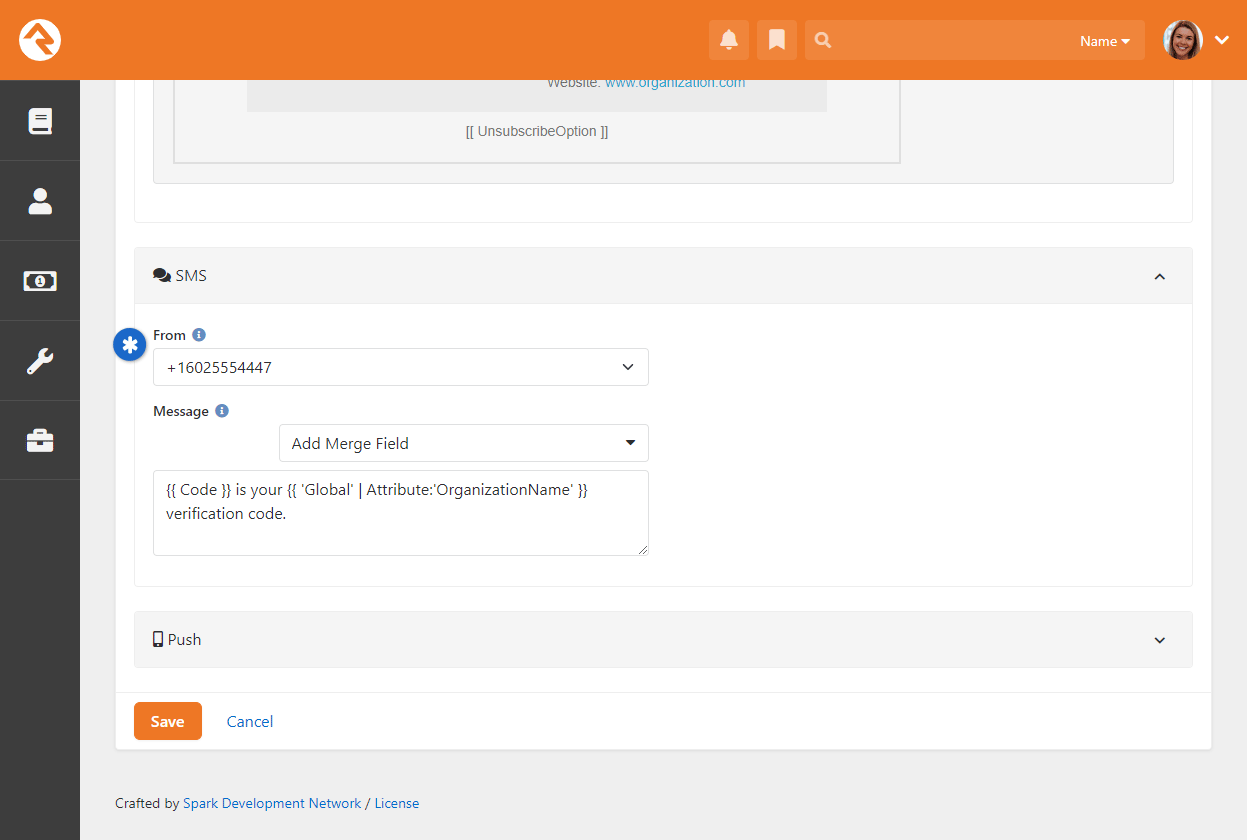
Twilio Shortcodes
Keep in mind that, by default, Twilio 10-digit numbers cannot receive SMS messages
from short code numbers. So, you can't use a Twilio long code phone number for
passwordless login if the message is coming from a short code number based on
your configuration above.
Login Block
The Login block is where the person will go to log in. Here is where you’ll turn on
passwordless logins, by opening the settings for the Login block and enabling
Passwordless Authentication.
Login Block Settings
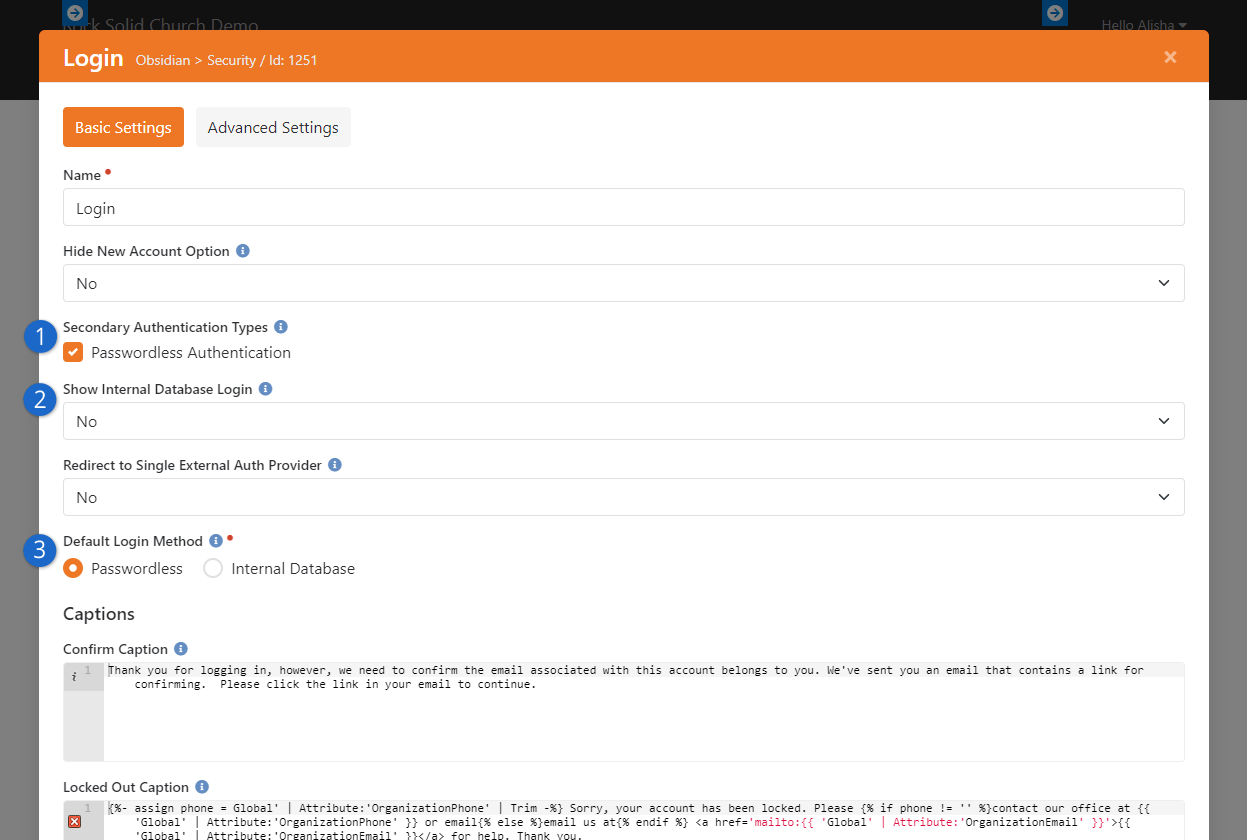
- 1Secondary Authentication Types
- Enable “Passwordless Authentication” to make this option available.
- 2Show Internal Database Login
- If you want to use passwordless login exclusively, then you can hide the normal login method.
- 3Default Login Method
- Rather than clicking to get to it, you can make passwordless login the default option.
In that case, people can still use a username and password, but they’ll need to click a
button to get there.
Passwordless Login Security Settings
Rock ships with the recommended security settings. You may want to familiarize yourself
with how they apply to passwordless login.
Security Authentication Settings
- 1 Passwordless Sign In Daily IP Throttle
- This simply limits how many times the same IP address can use passwordless login in a single day.
We don’t think people will be logging in 1,000 times per day, but this is a security measure to prevent
against certain types of digital attacks.
- 2 Passwordless Session Duration
- Once the person logs in their session will only last this long. After that they’ll need to authenticate again.
- 3Disable Passwordless Sign In for the Following Protection Profiles
- People with access to sensitive areas of Rock should probably be required to provide a password. You don’t
want to make it too easy to log in as an administrator.
- 4Passwordless Confirmation Communication Template
- Rock ships with a Passwordless Login Confirmation communication template (see prior section above) specifically for this purpose.
Account Entry Block
The Obsidian version of the Account Entry block has a couple of settings related to passwordless login
that you probably won’t need to change but should be aware of.
Account Entry Block
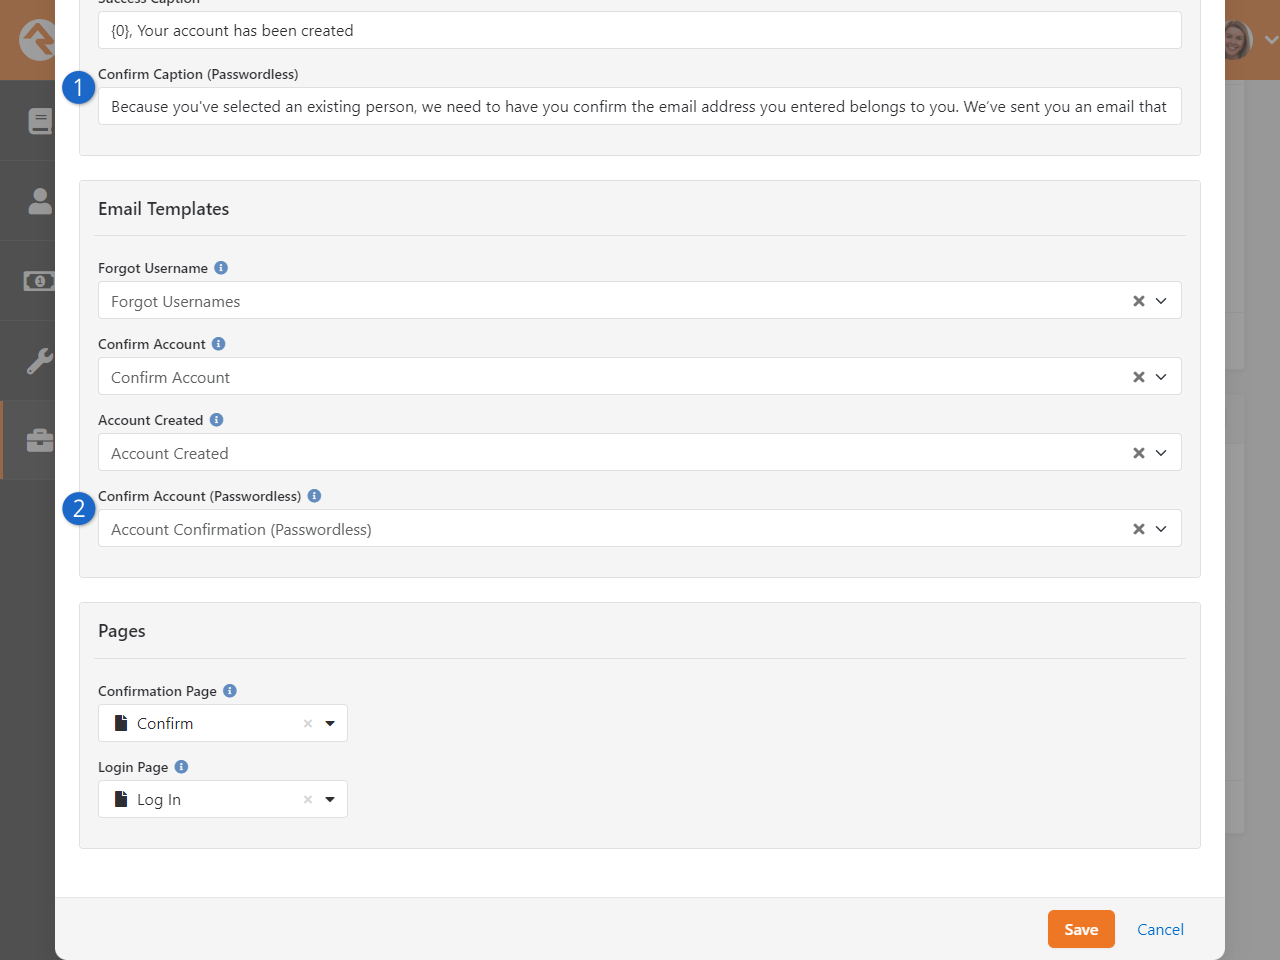
- 1Confirm Caption (Passwordless)
- This is the message that the person will see if they need to confirm their email address.
- 2Confirm Account (Passwordless)
- This is the system communication that will be sent when the person needs to confirm their account.
The email contains a code that they’ll use to verify access to the email address.
Two-Factor Authentication
Two-Factor Authentication (2FA) is your extra layer of login security. With 2FA, logging into Rock
involves more than just a username and password; you'll also need to verify your identity via email
or text. However, this doesn’t apply to everyone. You get to control who is required to use 2FA
based on their
Account Protection Profile.
If you're using Passwordless Login on your site, people needing 2FA will still need to enter their
username and password after completing the Passwordless process.
External Authentication
Built-in external authentication providers like Google or Facebook do not support
Two-Factor Authentication. So, they can’t be used if 2FA is turned on. There is a
customizable message in the Login block that the person will see in this case.
In the below example, the person initially logged in with a traditional username and
password. Now they must provide their email or phone number to proceed.
Provide Email or Phone
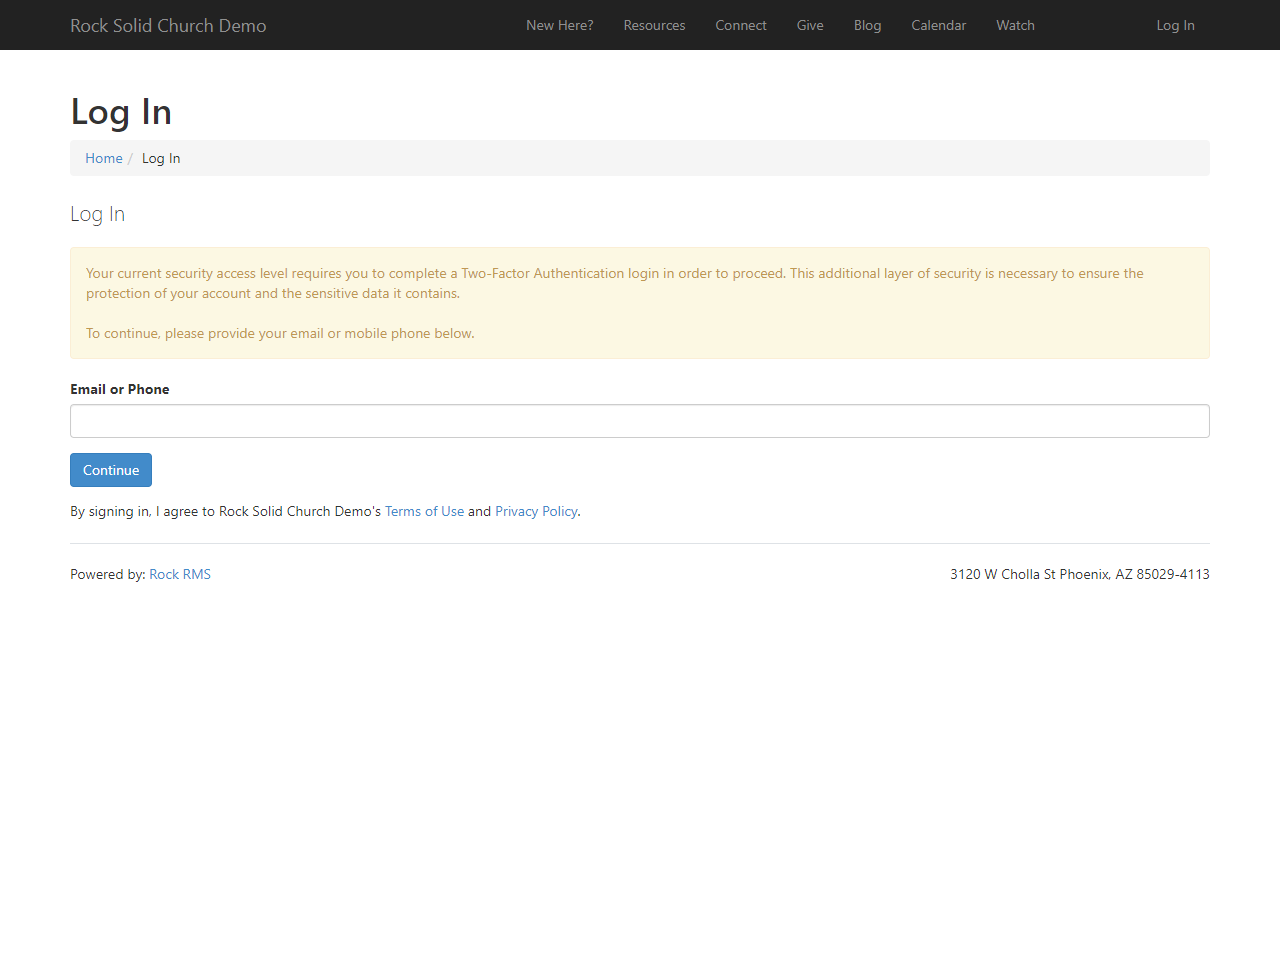
If the person uses their phone number, they will be sent a verification code via
SMS text message.
Phone Login Confirmation
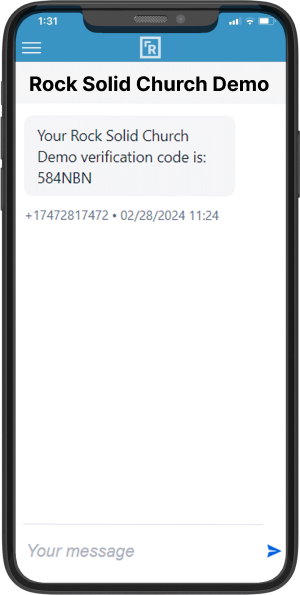
Then, back in Rock, the person will need to enter the verification code from their
phone to finish logging in.
Enter Confirmation Code

If they provide an email address instead of a phone number, there’s a button in
the email they receive that they need to click to finish the sign-in process.
This will log them in promptly and does not require that they manually enter
the code.
Verification Email
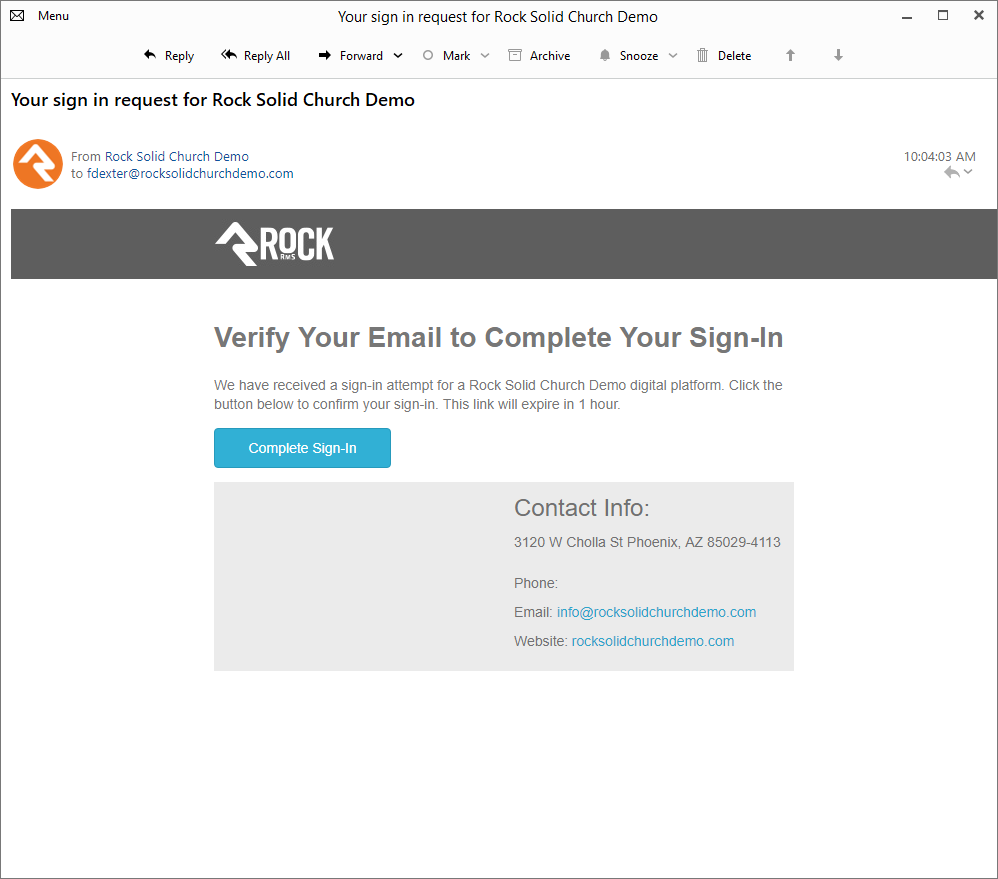
If the email address or phone number they provide doesn’t match what they
have in Rock, or if they don’t have a phone number or email at all,
they’ll be instructed to contact you for assistance, as pictured below.
Missing Email or Phone
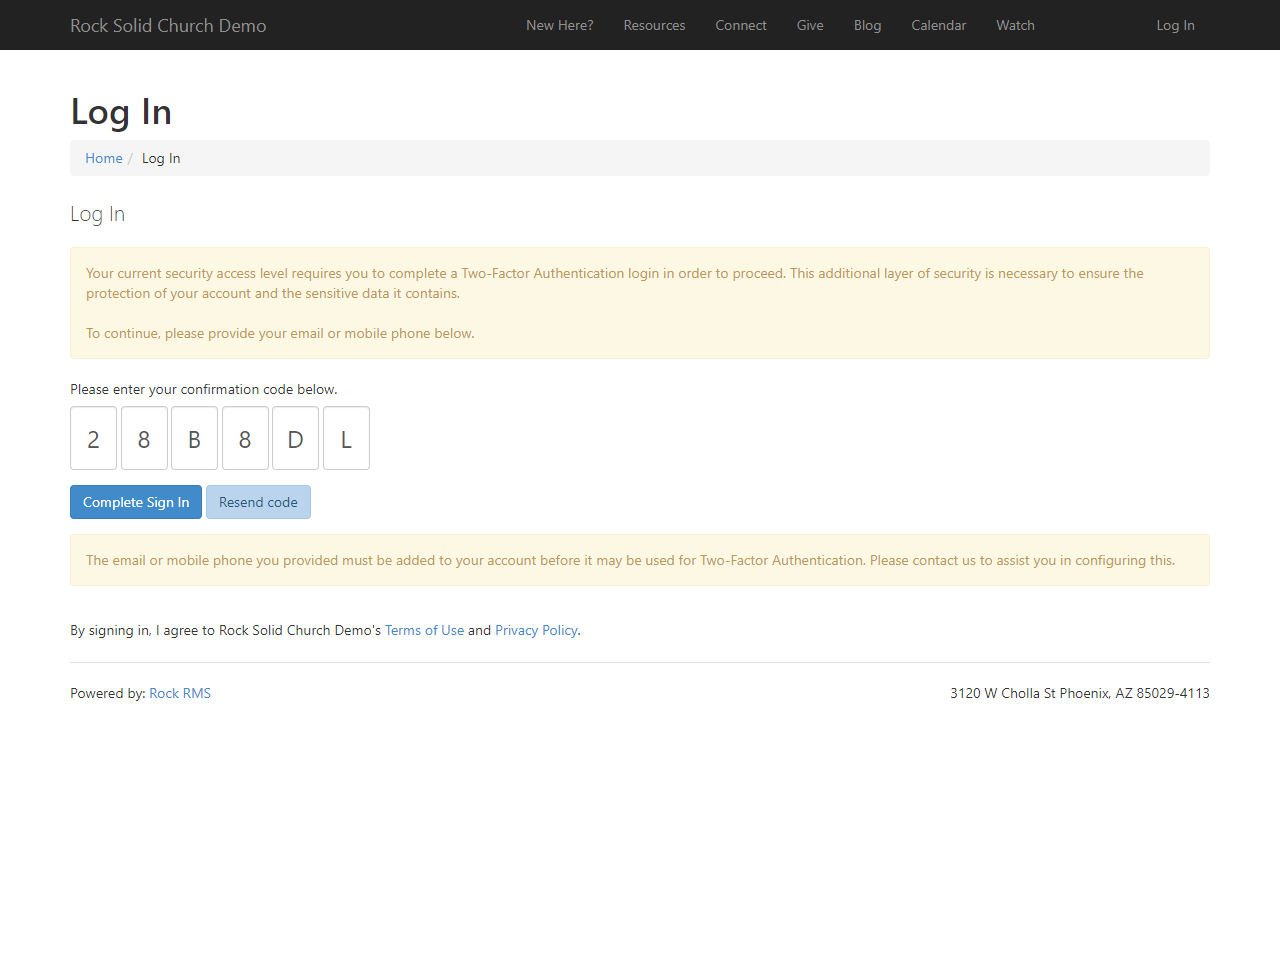
Two-Factor Authentication Setup
We’ll start with the communication configuration. Two-Factor
Authorization utilizes some of the same functionality as the Passwordless
Login process. This includes sending the person an email or SMS message.
So, if you've set up Passwordless Login already, you can skip updating your
communication configuration. If not, then go to
Admin Tools > Settings > System Communications
and add a "From" number to the SMS section of the Passwordless Login
Confirmation system communication.
Update System Communication
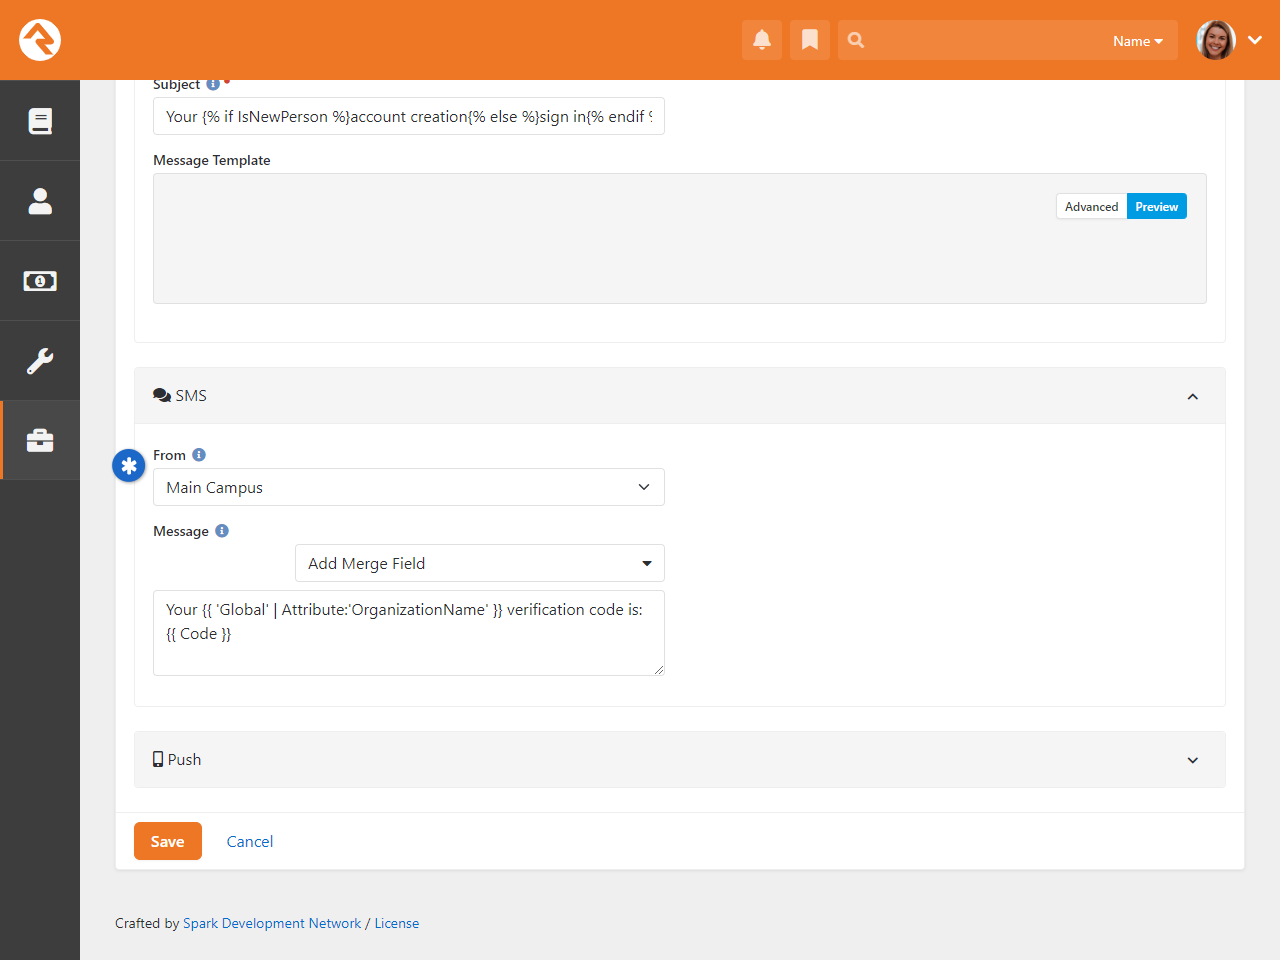
Two-Factor Authorization is turned off by default, partially because it won’t
work without the above configuration. So, your last step is to enable 2FA. You’ll
need to update your Security Settings under
Admin Tools > Settings > Security Settings.
There you’ll choose which Protection Profile(s) should be required to use 2FA.
Check Login Block Settings
If the Login block’s settings have
Show Internal Database Login
set to "No", and
Redirect to Single External Auth Provider set to
"Yes", then you should NOT enable 2FA. If you do, you may lock yourself
or others out of Rock.
Enable for Protection Profiles
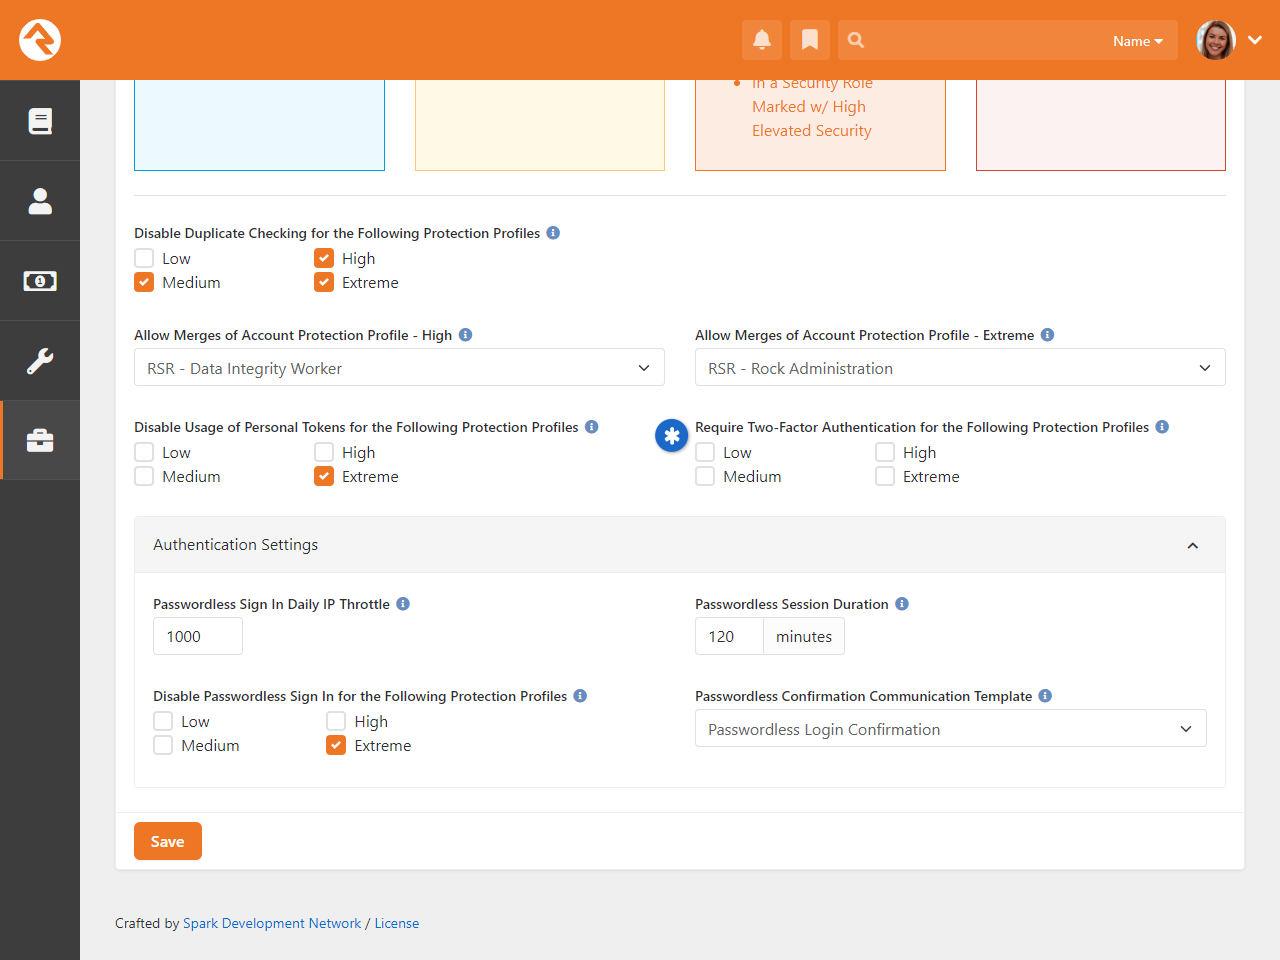
At a minimum, you may want to require Two-Factor Authentication for people
with Extreme Protection Profiles. This helps prevent fraudulent attempts
to log in using accounts with higher levels of access to Rock.
When to Turn On
In the rare event that you turn on 2FA while people are actively
logged in to Rock, and if those people require 2FA, they will be
automatically logged out and must sign in again using 2FA. For this
reason, you may want to turn this on during periods of low activity.
The Login block itself has a few settings directly related to Two-Factor
Authentication. These are messages that the person will see if things
don’t go exactly as planned. The messages include the following
topics/scenarios:
Login Block Settings
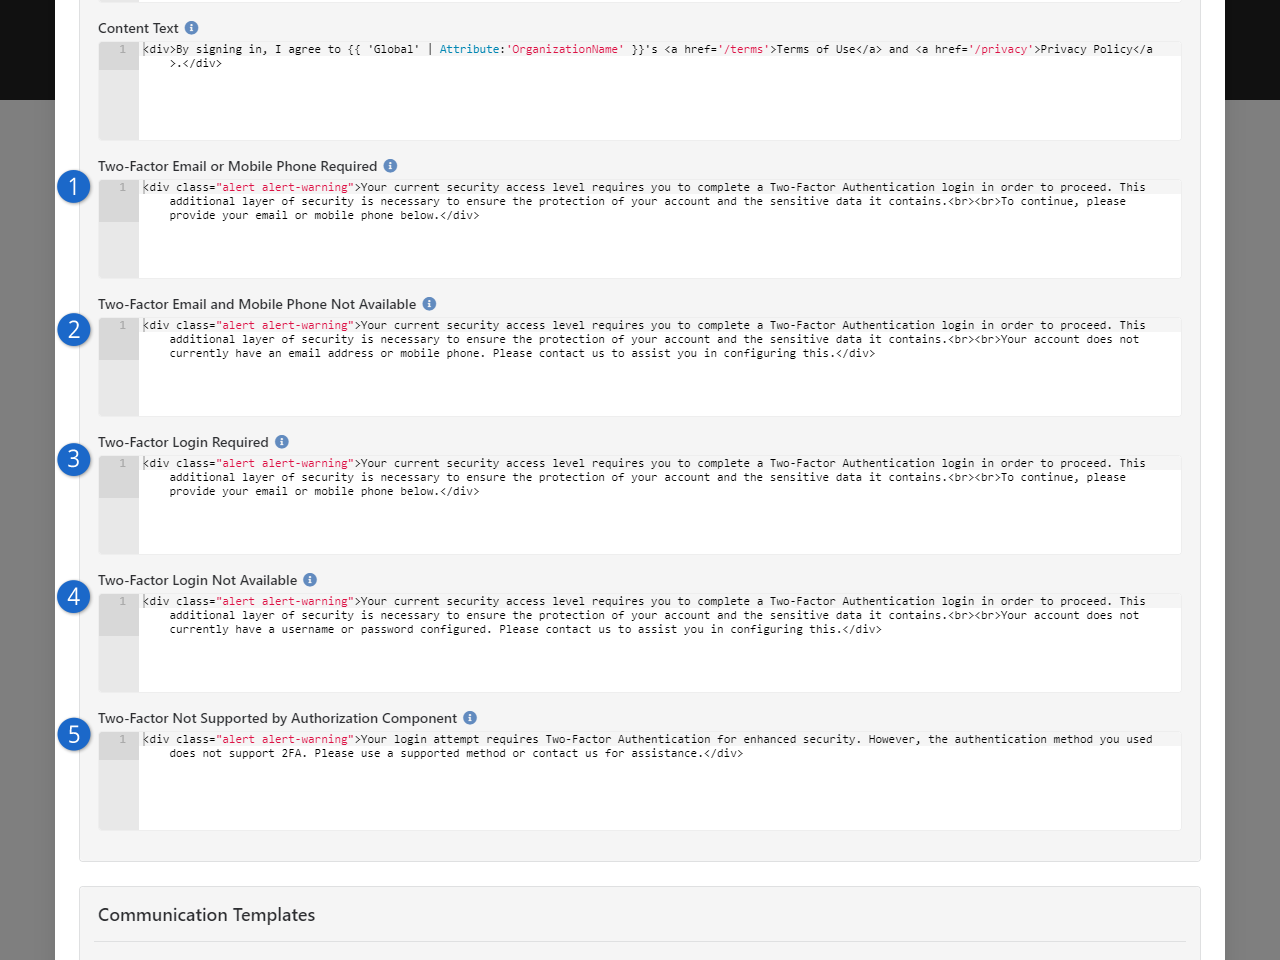
- 1 Two-Factor Email or Mobile Phone Required
- This is the standard message that people see whenever they need
to go through the Two-Factor Authentication process.
- 2 Two-Factor Email and Mobile Phone Not Available
- The person will see this message if they don’t have an email
or phone number in your system at all.
- 3 Two-Factor Login Required
- This standard message simply informs the person that they need
to use 2FA and requests their phone number or email address.
- 4 Two-Factor Login Not Available
- People will see this one if they don’t have a
username/password set up in your system.
- 5 Two-Factor Not Supported by Authorization Component
- This message will appear if the person is required to use 2FA
but attempts to log in using their Facebook account, Google Account,
or similar 3rd party accounts.
Passwordless with Passwords
Note that Passwordless Login will require the person to establish
a username and password as part of that process if 2FA is
turned on.
Things to Remember:
-
Configure an SMS "From" number for the
Passwordless Login Confirmation
communication in
Admin Tools > Settings > System Communications.
-
Activate 2FA in Security Settings under
Admin Tools > Settings > Security Settings,
selecting relevant Protection Profiles.
-
For people using Passwordless Login, note that enabling 2FA
requires establishing a username and password as part
of the process.
Account Registration
The Account Registration
block can be accessed by clicking the
Register button from the
Login page, or by going to
https://yourchurch.com/NewAccount.
As pictured below, the person will be asked to create a Username and Password, as well as some
information about themselves. This page is simple and easy to understand, which is by design. If
account creation is a complex process, people may be less likely to complete it.
Account Registration Page
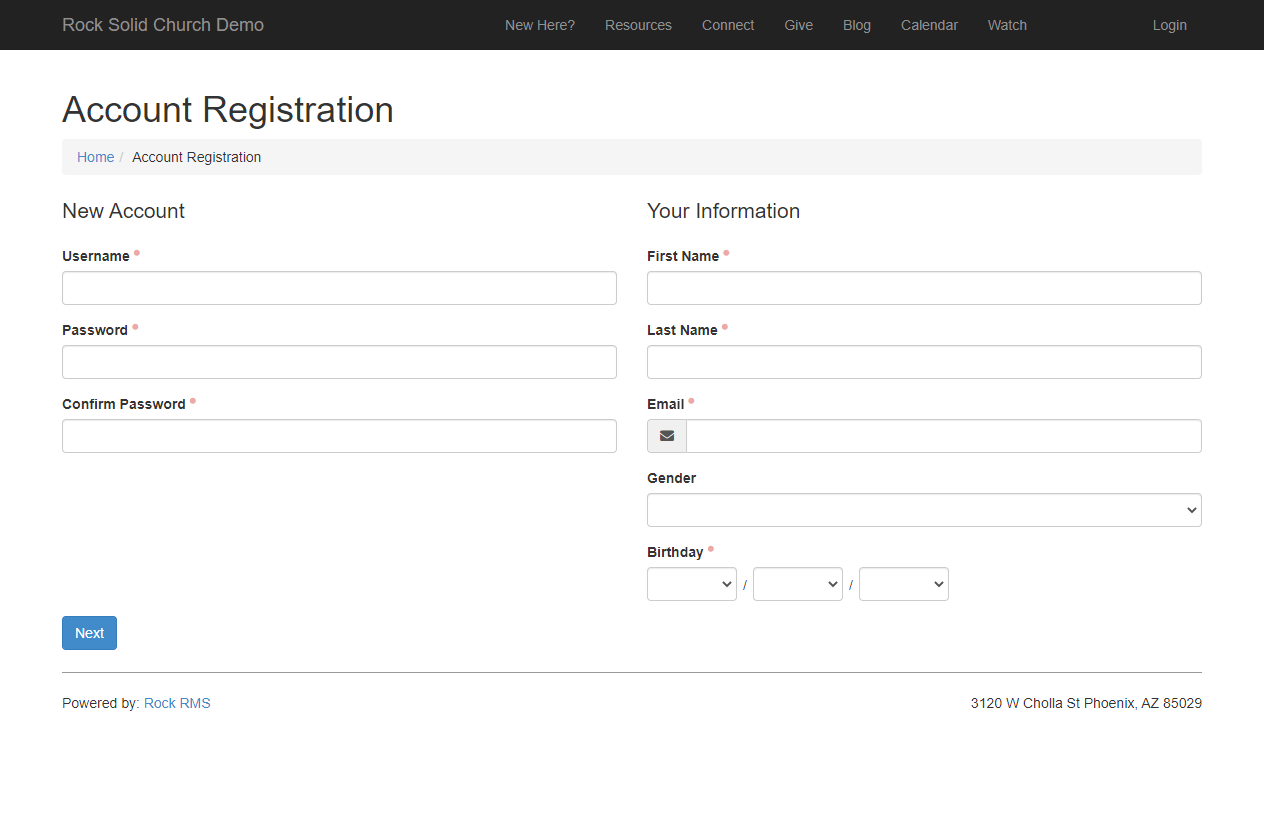
While the page looks simple, there’s actually quite a bit going on behind the scenes. The block
settings pictured below give you an idea of what this block does, and lets you change it to suit
your needs.
Account Registration Block Settings
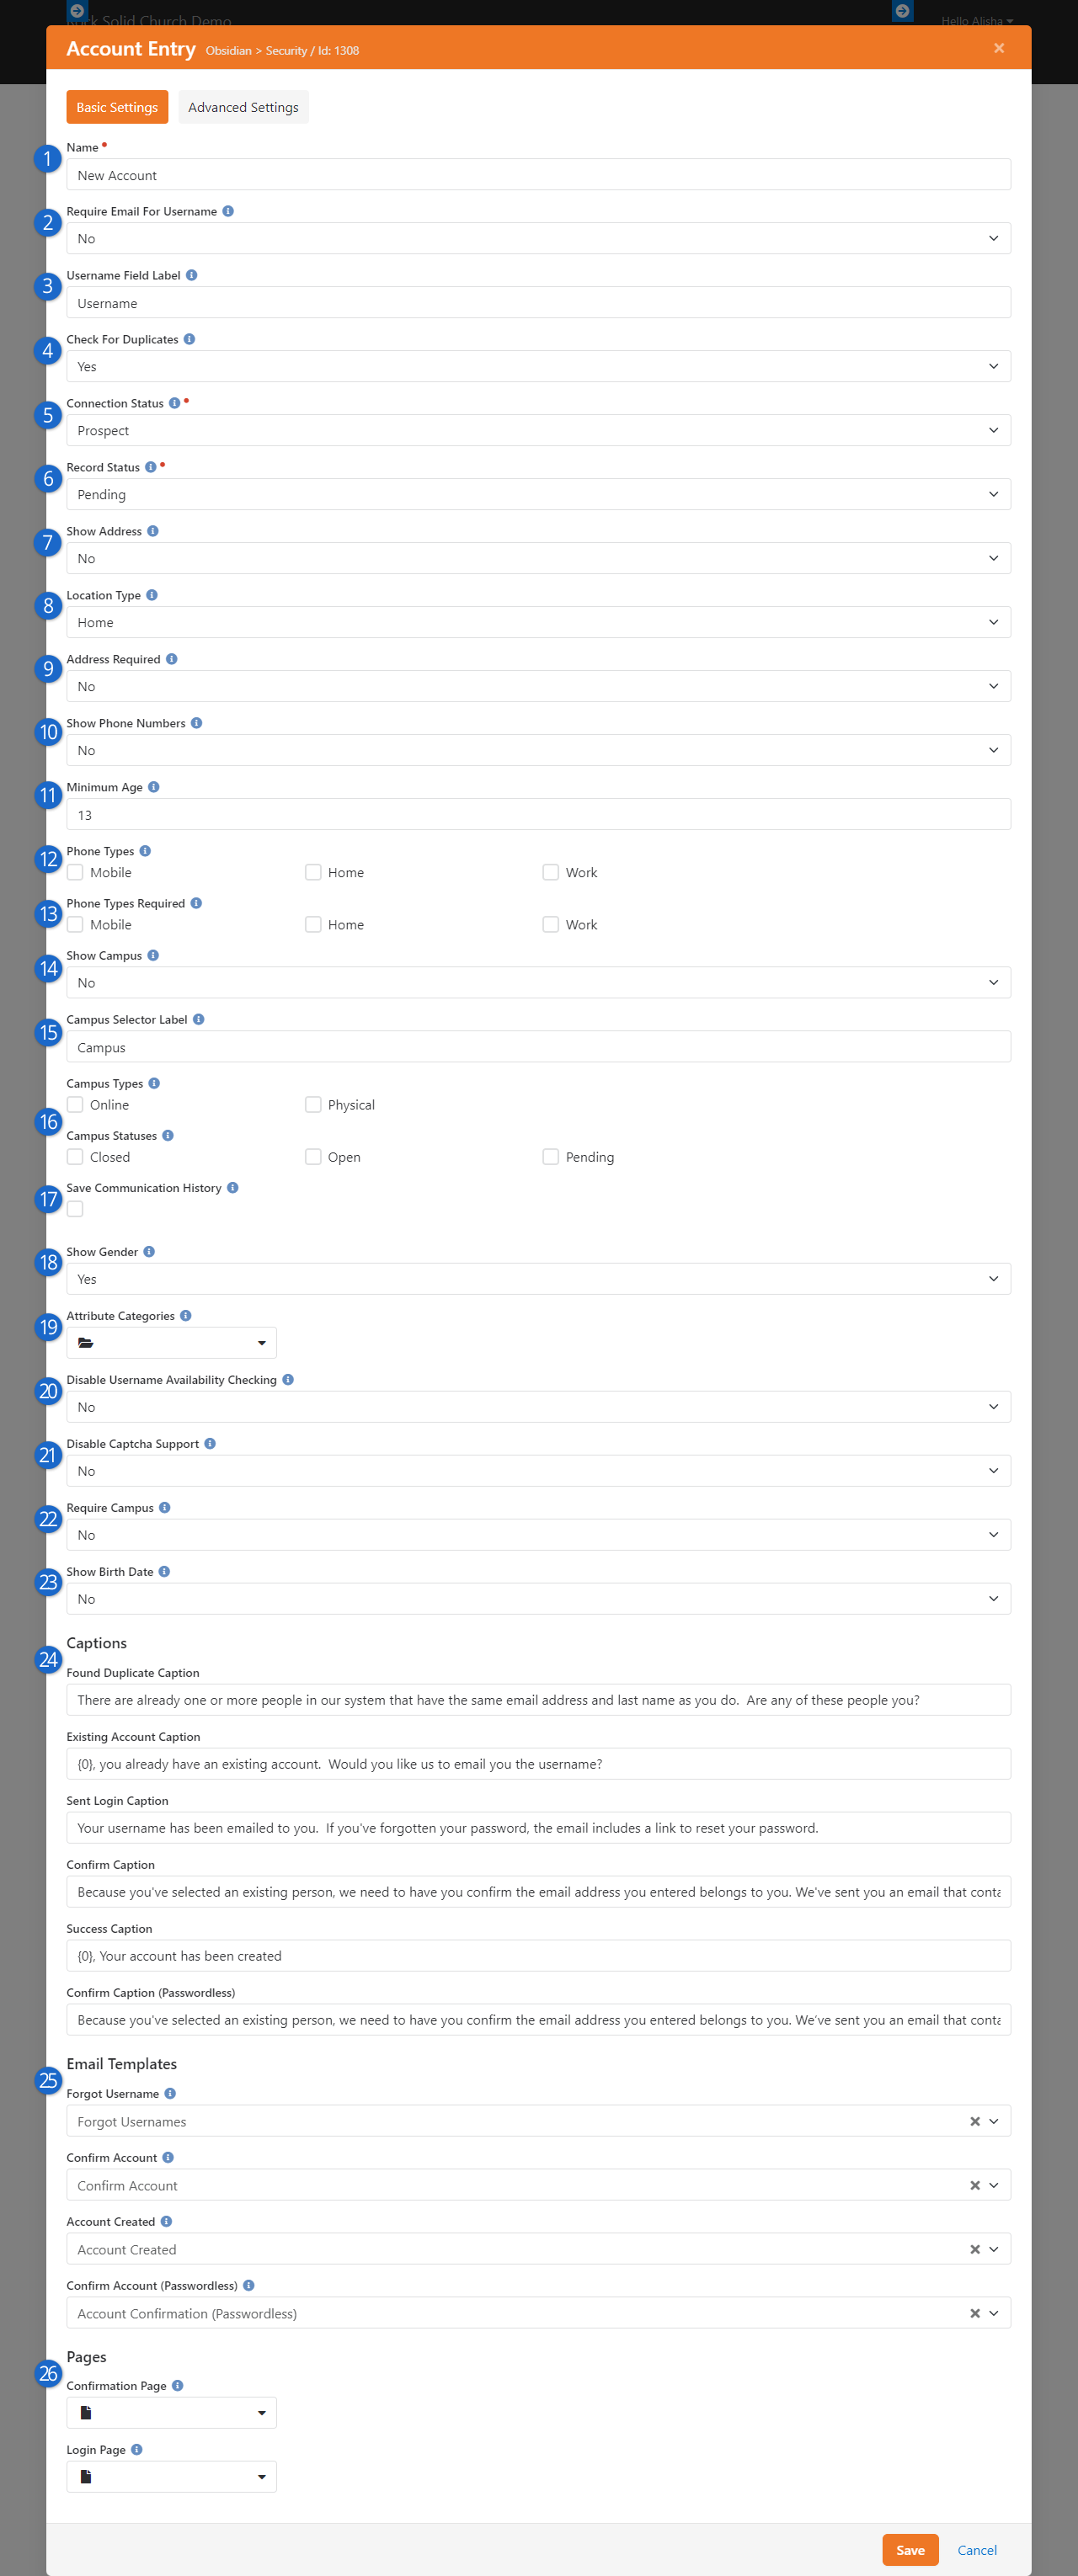
- 1 Name
-
You can change the name of the block here. Typically, the block name is only visible to
administrators.
- 2 Require Email For Username
-
Enable this option to force an email address to be used as the person’s username. That
means the person will log in with
ted.decker@rocksolidchurchdemo.com rather
than tdecker. A person can still provide an email address as their username
if this option is disabled.
- 3 Username Field Label
-
Instead of the "Username" label, you can change it to something like "Email Address" or
"Username/Email". You might want to change this if you’ve enabled the
Require Email For Username setting described above, to ensure the person knows
what they’re being asked to provide.
- 4 Check For Duplicates
-
Enabling this will compare the information provided by the person to existing records in
Rock. If a match is found, it’s likely the person already has a record. The person will
be given a list of existing records with matching information, so they can
select themselves if they already exist. This duplicate checking is disabled for people
with certain
Account Protection Profile
levels, as defined in your Security Settings.
- 5 Connection Status
-
If a new record is created in Rock according to the information the person provides,
this is the connection status that will be applied to the record.
- 6 Record Status
-
Like the Connection Status, this is the status that will be applied to a new
person’s record.
- 7 Show Address
-
The address fields will be added to the page if this is enabled, allowing the person to
provide their address.
- 8 Location Type
-
This setting only applies if Show Address is enabled. This will be the type of
location assigned to the address the person provides.
- 9 Address Required
-
You can choose to make the person’s address optional or required by adjusting this
setting. This setting only applies if Show Address is enabled.
- 10 Show Phone Numbers
-
Similar to the Show Address setting, you can choose whether or not the person
can provide one or more phone numbers. There are additional settings related to phone
numbers, which we’ll describe below.
- 11 Minimum Age
-
Only people who are this age or older can create a new account. We very strongly
recommend keeping this set at 13 or higher. The Children's Online Privacy Protection Act
disallows children under the age of 13 from giving out personal information without
their parents' permission.
- 12 Phone Types
-
If Show Phone Numbers is enabled, this is where you can select which phone
types to display.
- 13 Phone Types Required
-
You can select which phone types are required or optional.
For instance, you can make a mobile number required, while home and work phone numbers
are optional.
- 14 Show Campus
-
Enabling Show Campus allows the person to select a campus when filling out the
form.
- 15 Campus Selector Label
-
You can also change the Campus Selector Label if you call your campuses
something else. For instance, you could call it “Home Church” or “Site”.
- 16 Campus Types and Statuses
-
If you're displaying campuses, here you can limit which campuses are shown by
Type and Status. For instance, you may want to show only
Physical
campuses that are
Open.
- 17 Save Communication History
-
This simply indicates whether communications from this block should be
saved to the person's communication history.
- 18 Show Gender
-
Gender is shown by default, but you can choose to hide it by changing this setting.
- 19 Attribute Categories
-
Attributes associated with the categories you select here will be available on
the account registration form for the person to fill out.
- 20 Disable Username Availability Checking
-
Selecting Yes
does not mean multiple people can have the same username. This only affects the
real-time warning that appears when the person provides their desired username,
prior to submitting the form. Disabling this may help avoid performance issues
because Rock won't need to scan all usernames in the system while the person
completes the form.
- 21 Disable Captcha Support
-
If Yes
is selected, Captcha verification will be skipped. For more details see the
Rock Captcha chapter.
- 22 Require Campus
-
If you're including a Campus field, this setting determines whether it's
required. If the Campus field is disabled based on the
Show Campus
setting above, this setting has no effect.
- 23 Show Birth Date
-
If you want the person to provide a birthdate you can enable that here.
- 24 Captions
-
You can customize the messages that people see by changing the text here. There are
different messages depending on the person’s scenario. Generally, you shouldn’t need to
make changes to these settings.
- 25 Email Templates
-
Rock ships with email templates for forgotten usernames, account confirmations and
account creation. If you want to use a different template for any of these, you can make
the change here.
- 26 Pages
-
By default, these are blank. You can direct the person to Confirmation and Login pages
of your choosing by selecting the desired page here. If no other page is selected,
Confirmation Page
will take the person to
/ConfirmAccount and
Login Page will take
the person to /Login.
After an account has been created it can be viewed from the
Person Profile Security tab
and the User Accounts page. Staff can add new accounts or modify
existing accounts from these pages.
Unrecognized Browsers
Rock is always looking out for your safety. One of the ways it does this is by keeping
track of the browser you normally use to log in. If Rock notices that you’re logging in
from a new or different browser, it will send you a friendly email to double-check if
it’s really you. It’s like having a security guard who’s always making sure no one
else is trying to access your account. Think of it as Rock saying, “Hmm, this looks
like a new browser—just checking if it’s you!”
To do this, Rock uses something called browser cookies. These cookies safely help Rock
remember which browser you normally use. The cookies expire after a year, but don’t
worry—Rock automatically renews them every time you log in.
Obsidian Only
This feature is available in the Obsidian version of Rock’s Login block.
Configuring Browser Checks
By default, this feature is turned off, but it’s easy to turn it on. Just follow the
steps to update the block settings for the Obsidian version of the Log In block, as
shown below:
Login Block Browser Checking
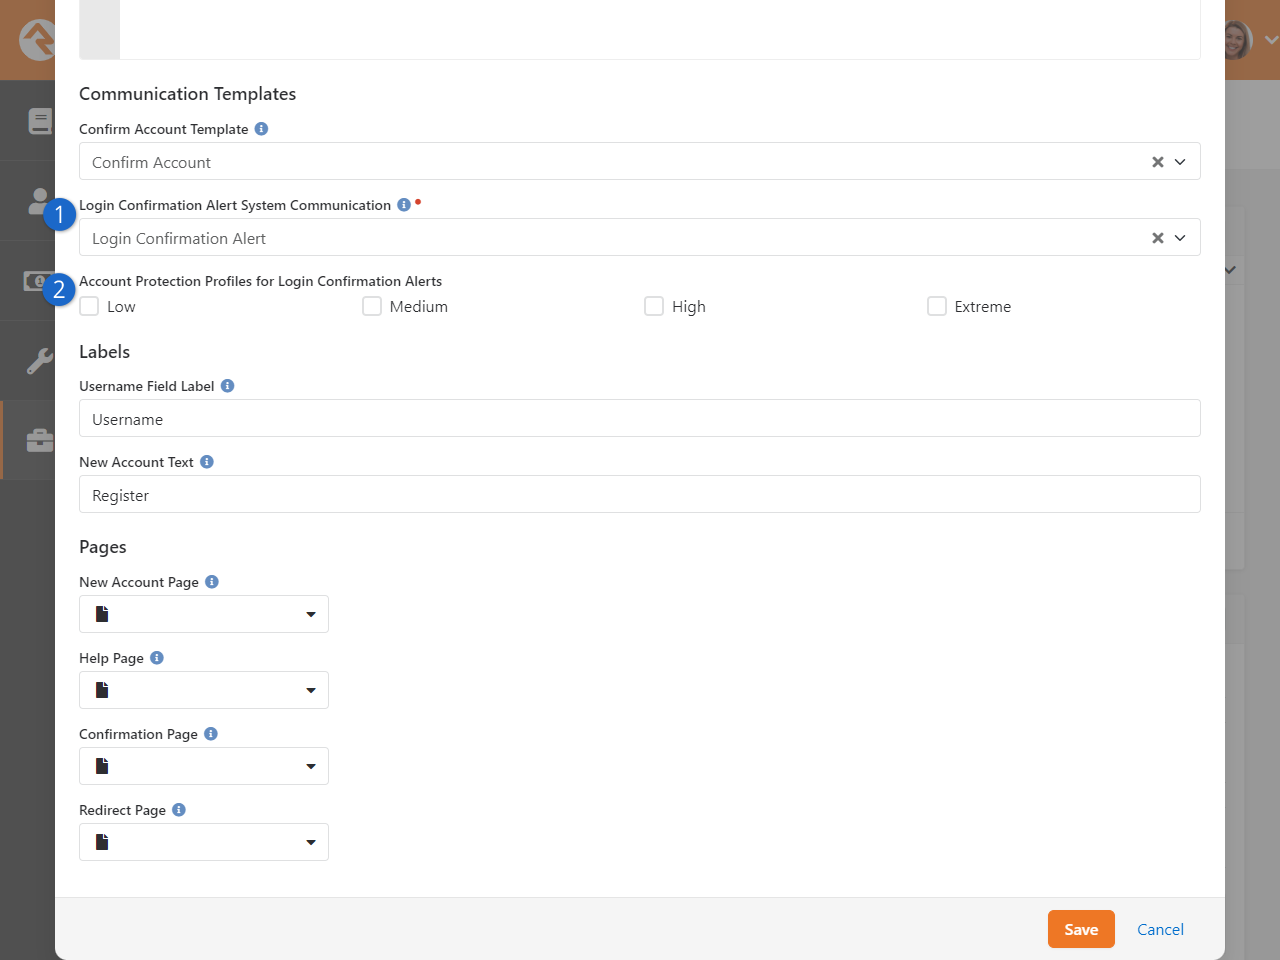
- 1 Login Confirmation Alert System Communication
- Rock comes with a ready-to-use system communication designed specifically
for browser checking. This email alert is already selected for you when you
access the block’s settings.
- 2 Account Protection Profiles for Login Confirmation Alerts
- At first, none of the profiles will be selected, meaning browser checking
is turned off for everyone. You can enable this feature by checking the box
for one or more
Account Protection Profiles.
Only people in those selected profiles will have their browsers checked.
And that’s all there is to it! As soon as Rock detects a new browser, the email alert will be sent.
So, next time you switch browsers, you can relax knowing Rock is keeping an eye out. It’s always
working in the background to make sure your account stays safe and secure.
Digital Media
Video is a must in any modern digital strategy. Not only do Rock's media features help with the
playback of digital assets, they also give you full access to data about plays, engagement and
overall effectiveness of your videos. Not to mention, Rock can automatically create a Content
Channel Item to post videos you've uploaded to a video service provider. This
makes it easy to get videos on your site and to track engagement for those videos, all within
Rock. In this chapter we'll look at the media features available to you, but to see more on
implementation check out our
Designing and Building Websites Using Rock
manual.
Media Analytics
Let's start by taking a look at the wealth of information available at your fingertips from
the Media Element analytics
page. From here you can see who engaged with a video. As you learn about this page, you'll find
it quickly becoming a critical part of your digital strategy. You can navigate to this page by
going to
Admin Tools > Settings > Media Accounts > [Your Account] > [Your Folder] > [Your Media Element].
For instance, in the screenshot below you can see engagement on a sample training video. The
graphs overlayed on top of the video show us a spike in engagement and rewatches
near the beginning of the video, telling us something important happened there (that's
where the navigation to the Campus configuration is provided). Pretty insightful, right?
Imagine how your digital strategy could be informed by the knowledge you gain about what
people are actually watching in each of your videos. What's more, you can move your mouse over
the video to view the thumbnail at any given point in the video, telling you exactly what
content people are engaging with.
We can also see overall engagement, a play count, and the total minutes watched. The
Plays Per Day graph is a
great tool for easily monitoring engagement with your video over time. Down below we can also
see Ted Decker watched 100% of the video and, shown in dark blue, rewatched certain portions
near the end. On the other hand, an unknown person watched 88% of the video, having skipped
over the first part. Having this level of detail for each individual is something you won't
find with other digital media services.
Media Analytics
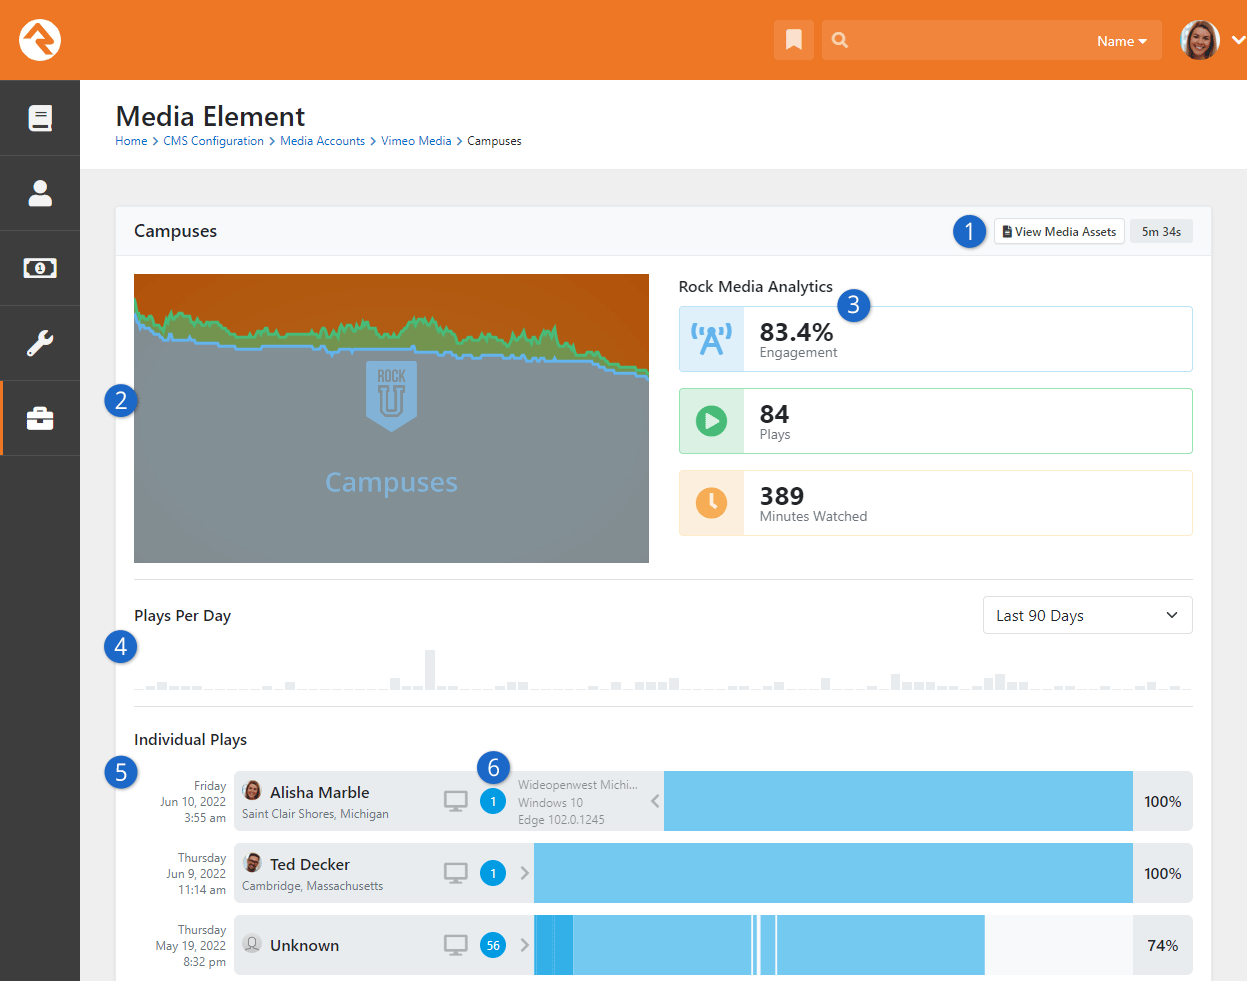
- 1 View Media Assets
- Click this button to view the files associated with this Media Element. This is
where you can see details about the different types of files (e.g., HD, SD, HLS) and
thumbnail images for your media.
- 2 Video Engagement
- In this area you can see the video itself, with two timeline charts overlayed on top
of it. The green line represents rewatches, which counts how many times a portion of the
video has been watched more than once. The blue line represents engagement, showing
what percentage of people who engaged with the video have viewed a particular portion.
Hovering your mouse over either of the lines will show the engagement percentage or
rewatch count for that point in time in the video.
- 3 Rock Media Analytics
- At a glance you can see vital statistics for the video. Engagement is a measure of
how much of the video is watched on average. You can also see the total number of times
the video was played, and how many cumulative minutes have been watched.
- 4 Plays Per Day
- This bar chart shows how many times per day this video has been played. This makes
it easy to identify viewing patterns and gauge the overall popularity of your video
over time.
- 5 Individual Plays
- At the bottom of the page is a listing of everyone who has watched the video. More
than that, you can see when they watched it and how much of it they watched. You can even
tell if the person skipped around in the video and only watched certain portions. The
areas in darker blue show points in the video that were rewatched by the same person.
- 6 Session Information
- In this area of the individual plays, you can see an icon indicating whether the
media was viewed from a desktop or a mobile device. In the blue circle you can see a
count of the number of interactions that the person logged. Hovering your mouse
over the
icon will expand the info pane to also show information about the Internet Service Provider
(ISP), operating system and browser the person used.
Bringing this all together, simply looking at the analytics and engagement patterns brings you
insight into why some videos are more popular than others. It could be that certain speakers
or specific topics garner more engagement than others. With all of this data provided for you,
you can easily find where to refine your digital strategy to increase engagement.
There's another feature we should mention here that you can't actually see but is very
important (and pretty cool). Rock's Media features work across platforms. That means someone
can start watching a video on mobile, then switch over to web and pick up right where they
left off, even days later. You can choose to have those separate watches combined into a
single watch or multiple watches on the analytics page by a simple update to the Media Player
shortcode Lava, which we'll discuss later.
Configuring Media Accounts
It all starts with the
Media Account. If you have
media coming from different sources, like YouTube or Vimeo, then you’ll need a separate
Media Account for each.
Typically, your first step will be a visit to the Rock Shop. There you'll find the plugins
you'll need to sync Rock with your external video hosting provider. Our
examples in this guide use the Vimeo plugin, but you could also use the YouTube plugin.
More may be added in the future by plugin developers.
To add or manage accounts, navigate to
Admin Tools > Settings > Media Accounts.
Click the
button to add a new account. Refer to the plugin documentation for details on initially setting
up your Media Account,
typically requiring getting an API key.
Out of the box Rock ships with a Local Media Account
Account Type that you can
use to manually set up video and audio assets. To add this account simply give
it a name and select
Local Media Account as the
Account Type. Keep in
mind that if you're using the Local Media Account it will be a very manual process. You'll
need to create the folders and meta data yourself, which is all automated if you're using a
video provider plugin.
Media Folders and Media Elements
Rock uses
Media Folders to group
and organize individual
Media Elements. For
instance, the screenshot below shows the "RockU - Core" folder, which contains several
videos (i.e., Media Elements) like the one for Campuses described at the start of this
chapter.
The video service provider plugin that you're using will automatically create
and manage your folders and elements for you. This is done through Rock's
Sync Media job. This
job will go out to your external video provider account and update Rock with additions
or changes you've made. That means when a new folder or video gets uploaded to your
account you don't need to do anything to get it added to Rock.
For each Media Folder
you can choose what happens when new videos are added. For instance, you can have Rock
automatically create a new Content Channel Item for the new video. You can also launch a
workflow to perhaps alert someone that the new Content Channel Item needs their review.
Let's take a closer look at these options.
Media Folder
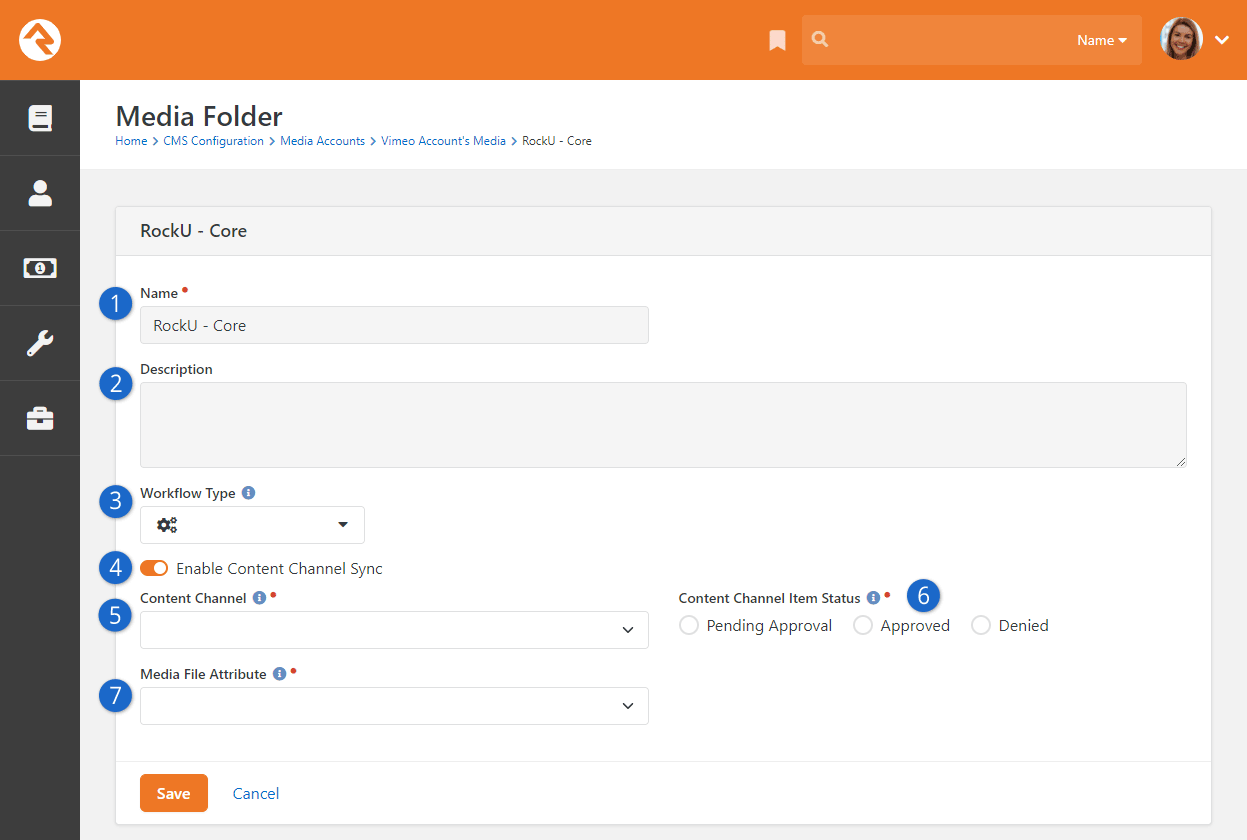
- 1 Name
- The folder name will be automatically synced over from your video service
provider. In these cases, you won't be able to edit it from within Rock. If you're
using a Local Media Account this would need to be created manually.
- 2 Description
- Like the folder's name, the description (if one exists) will automatically be
synced over to Rock, where it can't be edited. A detailed description helps ensure
the purpose of the folder is clear.
- 3 Workflow Type
- A workflow can automatically be launched whenever new media is added to this
folder. This is a great way to alert people in your organization that a new video
has been added. The Media Element entity is passed as the workflow's entity.
- 4 Enable Content Channel Sync
- If this is enabled, then you’ll see the next three settings described below.
Syncing with a content channel means that a new Content Channel Item will
automatically be created for new media elements that get added to this folder.
- 5 Content Channel
- This is where you’ll select which Content Channel to add new Content Channel Items
to when new media files are added to the folder.
- 6 Content Channel Item Status
- You can select which Status the Content Channel Item should be when it is created.
Typically, you'll want this set to "Pending Approval" to make sure someone can
review and edit the item before it gets published to your website.
- 7 Media File Attribute
- The Content Channel you use must have an Item Attribute of type "Media Element".
This is how the new media element will be stored on the new Content Channel Item
that gets created.
Publishing Media
Once you have your media in Rock, you'll want to give people access to it. Depending on your
digital strategy, there are different options for doing this.
As described in the prior section above, you can automatically create a new Content Channel
Item whenever a new media element is added to a folder. This is a great way to publish your
content using familiar tools and features that
ship with Rock. Just remember that your Content Channel needs an Item Attribute of type "Media
Element" to store the video.
For more details on publishing your media using the methods described above, see our
Designing and Building Websites Using Rock
manual.
Digital Media in Workflows
For many organizations, digital media is part of a training process. For instance, a new
volunteer might need to watch certain videos to better understand the organization and how it
works. Or you might have employees or volunteers who are required to watch a video as
part of their job. Either way, you can accomplish tasks like these using Rock's media features
and workflows.
All you need to do is use an attribute of type "Media Watch" in your workflow's form, and
you're ready to go. The way it works is you can set a Completion Percentage, which indicates
how much of the video the person is supposed to watch. This means the workflow form won't
validate until the person has reached the percent of completion you set. The individual must
actually watch that percentage of the video...skipping ahead doesn't count because the
percentage represents unique seconds of the video.
Media Watch Workflow Attribute
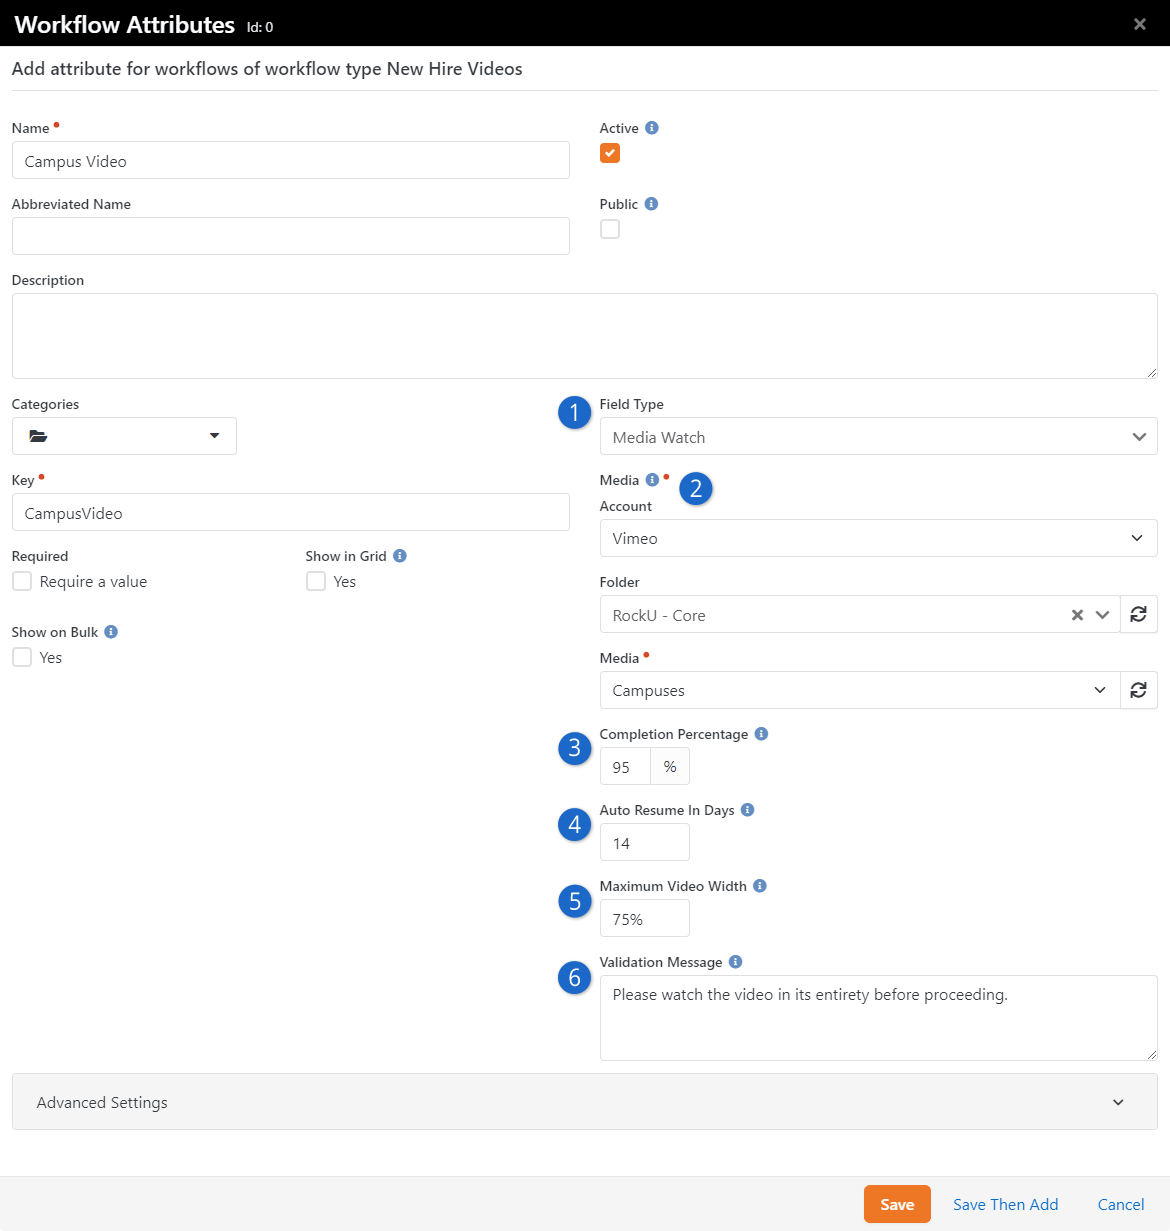
- 1 Field Type
- The type of attribute must be "Media Watch".
- 2 Media
- This is where you'll set which video should be watched after selecting the Account
and Folder to which it belongs. Each attribute relates to only a single video, so
you'll need multiple attributes of this type for multiple videos.
- 3 Completion Percentage
- Here you'll set the percentage of the video that must be watched. If this attribute
is set as Required on your workflow's form, the person must watch this much of the
video before they are able to submit the form. This is optional and can be left
blank if there is no minimum watch requirement.
- 4 Auto Resume in Days
- This is where you specify how many days to look back for the auto resume feature, so
the person can pick up right where they left off. Leaving this field blank is the
same as looking back zero days, which effectively disables the auto resume
feature.
- 5 Maximum Video Width
- Setting a maximum width for the video player is helpful in places like workflows where
you won't want the video to end up taking over the whole screen.
- 6 Validation Message
- If someone tries to submit your workflow form without watching the minimum required
length of the video (set using the
Completion Percentage
field) then the message you provide here will be displayed. This only applies if
the attribute is Required on the form.
Media Watch on Workflow Entry Form
When you're setting up the Form action on your workflow,
make sure that the media watch attribute is both
Visible
and Editable.
Real-Time Engine
Welcome to the future! In this chapter we’ll be discussing Rock’s real-time capabilities. With this
feature, certain areas of the system will be updated in real-time, providing you with the ability to
see changes made by other people, live as they're being made. Imagine being able to collaborate with
team members in real-time and see updates to your database as they happen.
Real-Time Engine
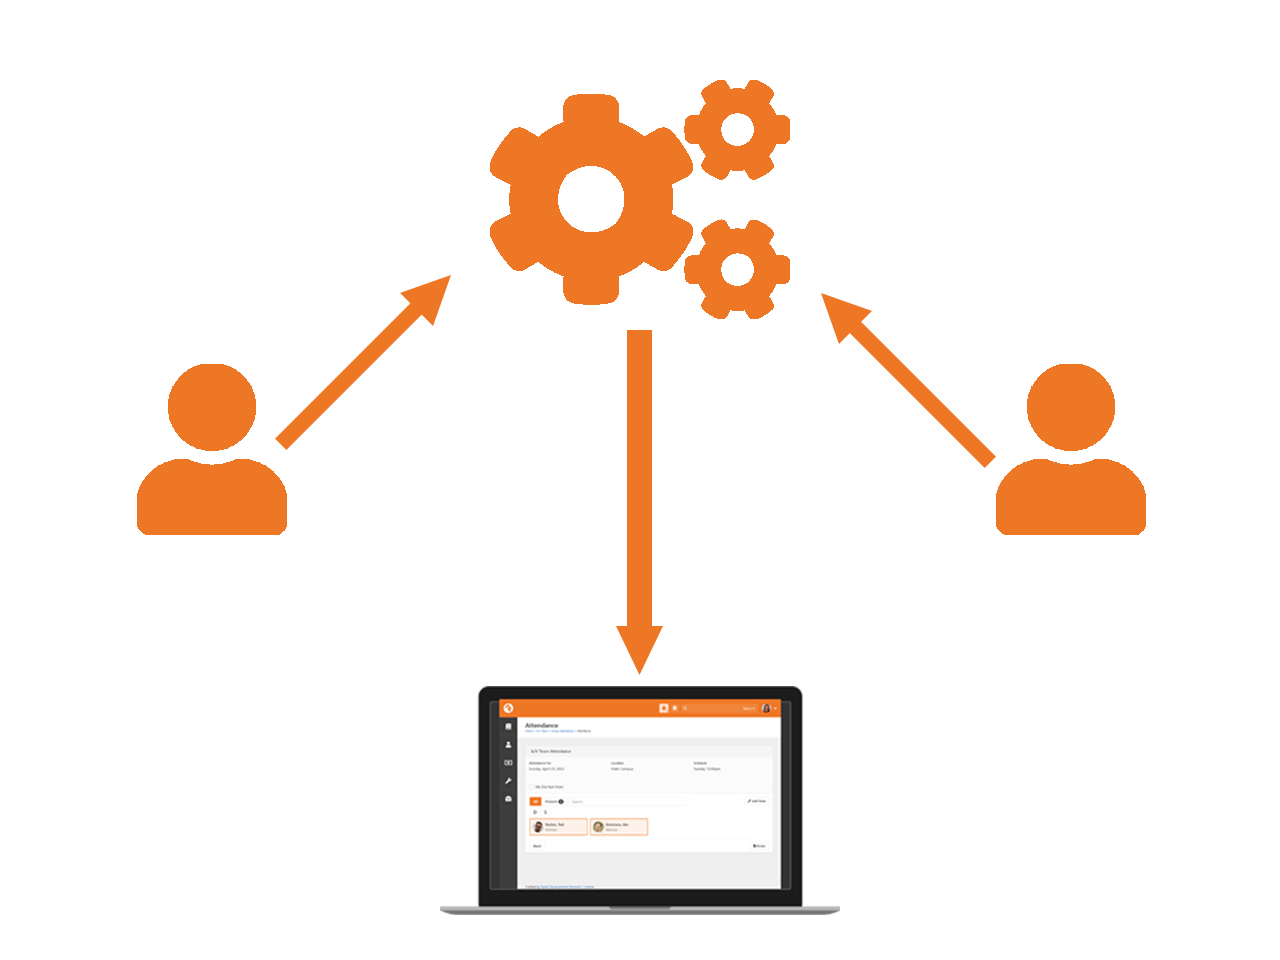
Real-Time in Rock
Not everything in Rock can be updated in real-time. That’s very difficult to do, especially in
an environment like Rock that we want to be extensible. However, there are a few strategic areas
that you’ll see updated in real-time.
Group Attendance Detail
With real-time updates, the Group Attendance Detail block can be kept up-to-date more
accurately. This means that those taking attendance can have an accurate view of who is
present in real-time, which can help with things like taking roll and monitoring attendance
trends. Changes to attendance data are reflected almost instantly, without the need to
constantly refresh the page.
Group Attendance Detail
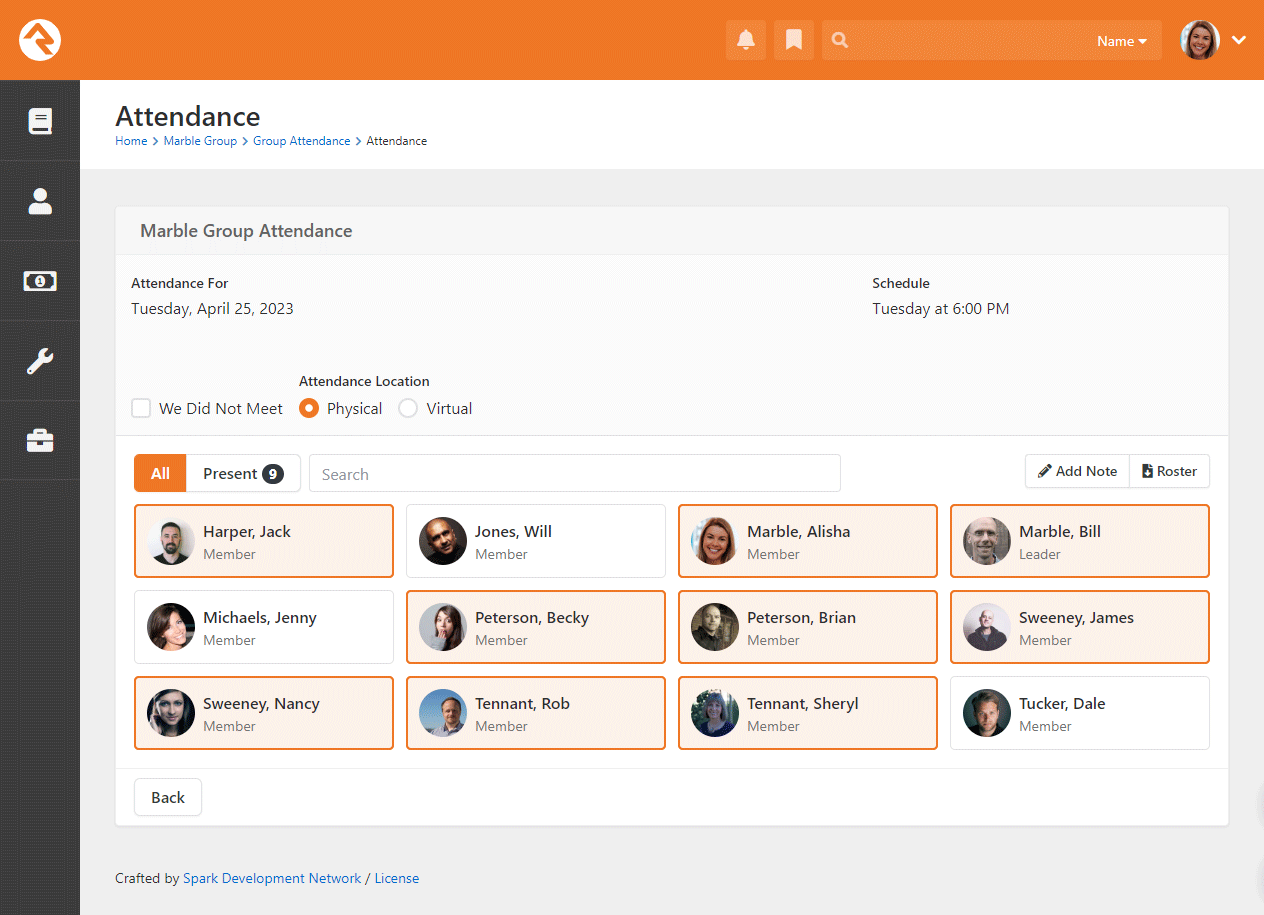
Under the Hood of the Real-Time Engine
To understand how the real-time engine works, you’ll need to know a little bit about what
happens when you visit a webpage.
Let's say you're in a restaurant and you want to order some food. Normally, you would call the
waiter over and place your order. The waiter would then go to the kitchen, get your food, and
bring it back to you.
This is like a regular HTTP request. You (the browser) send a request to the server (the waiter)
asking for some information or data (your order). The server (waiter) then goes and retrieves
the data from a database or other source (the kitchen) and sends it back to you (the food) as a
response. Bon Appétit.
But what if you wanted to ask the waiter a question about the menu, or make a special request
for your food? With regular HTTP requests, you need to wait until the waiter comes back with
your food. But with WebSockets, it's like having a direct line to the waiter. You can ask
questions or make requests in real-time, without having to wait for the server to respond to
your original request.
So, using the restaurant analogy, WebSockets are like having a direct line to the waiter that
you can use to make requests or ask questions in real-time, while regular HTTP requests are like
placing an order and waiting for the waiter to bring your food back to you. WebSockets allow for
faster and more efficient communication between the browser and the server, making real-time
updates and interactions possible.
Configuring Real-Time
There are different ways to do WebSockets, and one of them is SignalR. In order for SignalR to
work properly, you may need to update your web server configuration to enable WebSocket
Protocol.
Enable WebSocket Protocol
If you’re in a web farm environment, you can’t just get a WebSocket to any one node. That
wouldn’t work because that one node might not know about all the things that are going on
elsewhere. So, in that case, you need to get Azure SignalR, which is a service of Microsoft.
Even for a very large setup it should be less than $50/month.
Azure SignalR Service Mode
As you're going through the setup process, you'll be prompted to select a
Service Mode. Select "Default" when you're given this option.
Once you’re signed up with Azure, you’ll come to Rock under
Admin Tools > Settings >
System Configuration and add your Endpoint and AccessKey.
System Configuration
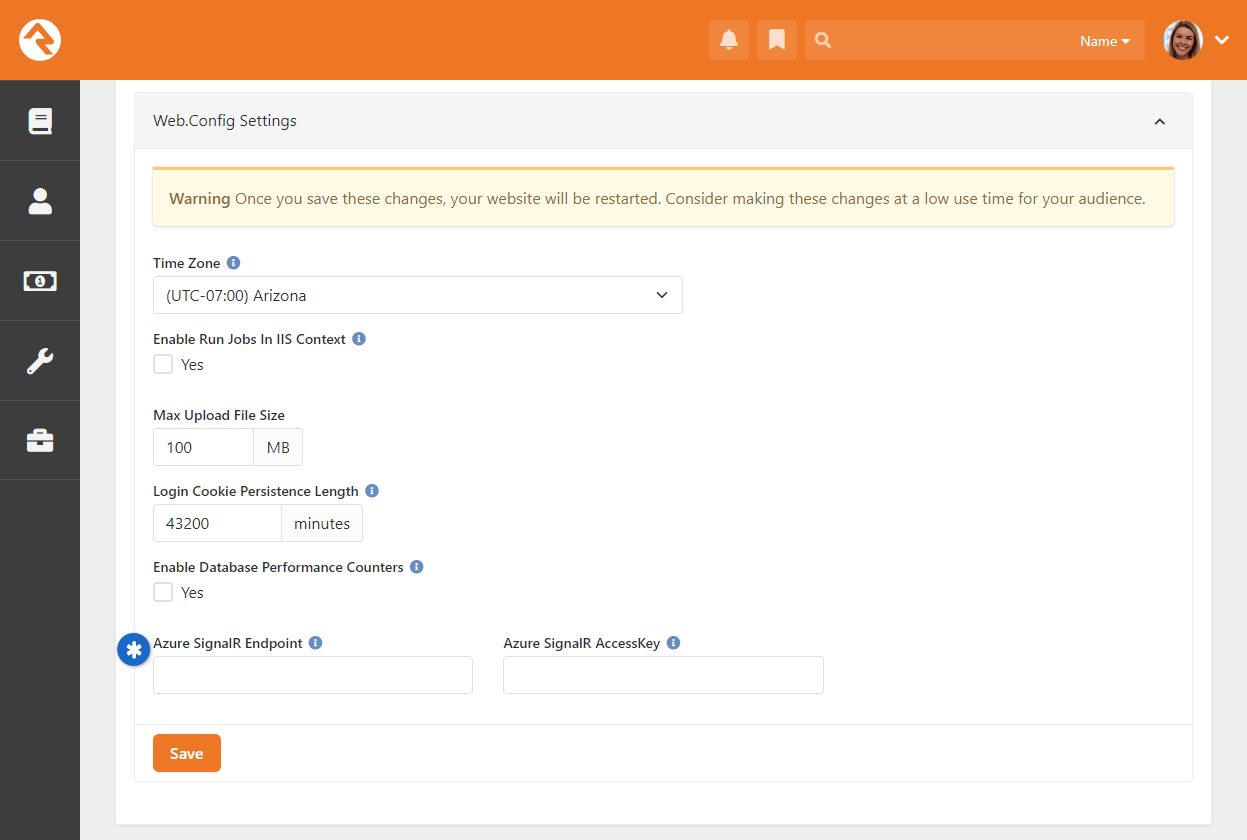
Observability
Rock's Observability feature unveils system performance insights. It tackles the challenge of spotting and
resolving performance hiccups in Rock. With Observability you can track page loading speed, individual block
load times, database transaction duration, and job efficiency. What's unique about Observability is that
it's in tune with Rock's architecture—pages, blocks, and jobs—offering precise, relevant, actionable data.
Observing Rock in New Relic
Observability is like having a backstage pass to see how Rock does its thing and how efficiently it does
it. However, you need an outside helper to see what’s happening. We recommend New Relic – it's free,
though there are a few caps on data and the number of people using it. Better yet, New Relic has a
free non-profit program, and
that will probably be all you need. For larger organizations, New Relic offers various pricing options,
which you can check out at
newrelic.com/pricing.
To start, you’ll want to go to
All Entities > All Entities in New Relic
as pictured below, to keep an eye on whether you’re sending telemetry data as expected. Your view should
look very similar, with “rock-rms” under the Open Telemetry service.
New Relic - All Entities
Go ahead and click the link within
Services – OpenTelemetry. This will
get you to the meticulously designed graphs and charts that unveil your system's performance metrics.
Note, you might not spot any data here until telemetry starts rolling in, which might take a few minutes
after you've set up New Relic.
New Relic - Observability

Traces
Traces give you the details of how a query works step-by-step, following a request (like a SQL query)
as it moves through your database. It is displayed in a stack where you can see each step of the request.
From the above page, focus on the "Trace groups" section, where key transactions and activities are highlighted.
You’ll see items in the Trace Groups section that start with “DB: SELECT” or similar. These are queries the
system is processing. These will have a series of numbers following the title, which we can use in our
Rock setup, so just be aware of that number for now.
You’ll see other trace groups that start with something other than “DB: SELECT”. For instance, you might see
WEB or PAGE GET. If you pull up a PAGE GET you can drill down into a specific page load to spot any performance
issues.
Lastly, but very importantly, we want to mention the search bar near the top of the page. This is a powerful
tool that you can use to access all kinds of data. Start off by searching for the word “Rock” and looking at
the options.
Date Range
Note in the screenshot above a blue box with a date range in it, near the top right of the page.
Be sure to keep an eye on this to ensure current data is being captured. If you’re not seeing the
data that you’re expecting, this could be why.
Metrics
Think of your system as a player and metrics as the game stats. They track performance (system), highlight weaknesses (bugs), and help
you fine-tune your strategy. Just like a coach reviews stats to improve the game, you can use metrics to optimize queries and fix performance issues—because what’s measured is managed.
If you are using New Relic, navigate to APM&Services>Database>Metrics Explorer.
New Relic - All Entities
There are a variety of metrics that can be tracked. Some of the notable ones are:
-
hosting.cpu.total: Tracks the total CPU usage of your IIS (Internet Information Services) hosting environment as a
percentage. Rising CPU usage could indicate that your site is overloaded by visitors or inefficient background processes.
-
hosting.sql.cpu: Tracks the total CPU usage generated by SQL queries in your SQL hosting environment as
a percentage. If you notice the percentage is higher than normal, this is an opportunity to investigate your SQL queries.
-
rock.request.all: Tracks the number of page loads, API requests or refreshes per minute.
A high request volume signals your site is having frequent interaction. Unusually high numbers could be a good
sign, the traffic is high. Low numbers may signal a problem with your site, prompting further investigation.
New Relic isn’t the only service that does this. Enter OpenTelemetry, the superhero of observability data.
OpenTelemetry lets Rock team up with other vendors, not just New Relic. So, you've got the power to pick
the monitoring sidekick that's right for you.
Keeping Your Data Secured
Every database request from Rock is monitored through its observability feature, revealing the specifics
of each SQL statement made. While Rock typically parameterizes your SQL, ensuring request filters aren't
relayed to the observability platform, custom SQL embedding personal data will be transmitted and stored
there. To safeguard such information, consider modifying your SQL to utilize parameters or think about not
activating the observability feature.
Configuring Observability
Much of the configuration happens in your observability service of choice. We'd love to help, but keeping
tabs on all those external services is like herding cats. But don't sweat it, we've got your back for the
Rock side of things. And on the New Relic side of things, you’ll find it’s pretty easy. Just go to
newrelic.com and click the “Get Started Free” button.
Back in Rock, head over to
Admin Tools > Settings > System Configuration.
Look for the Observability section, nestled beneath UI Settings. This is where your Rock setup will take place. Ready to dive in and
get things rolling?
System Configuration
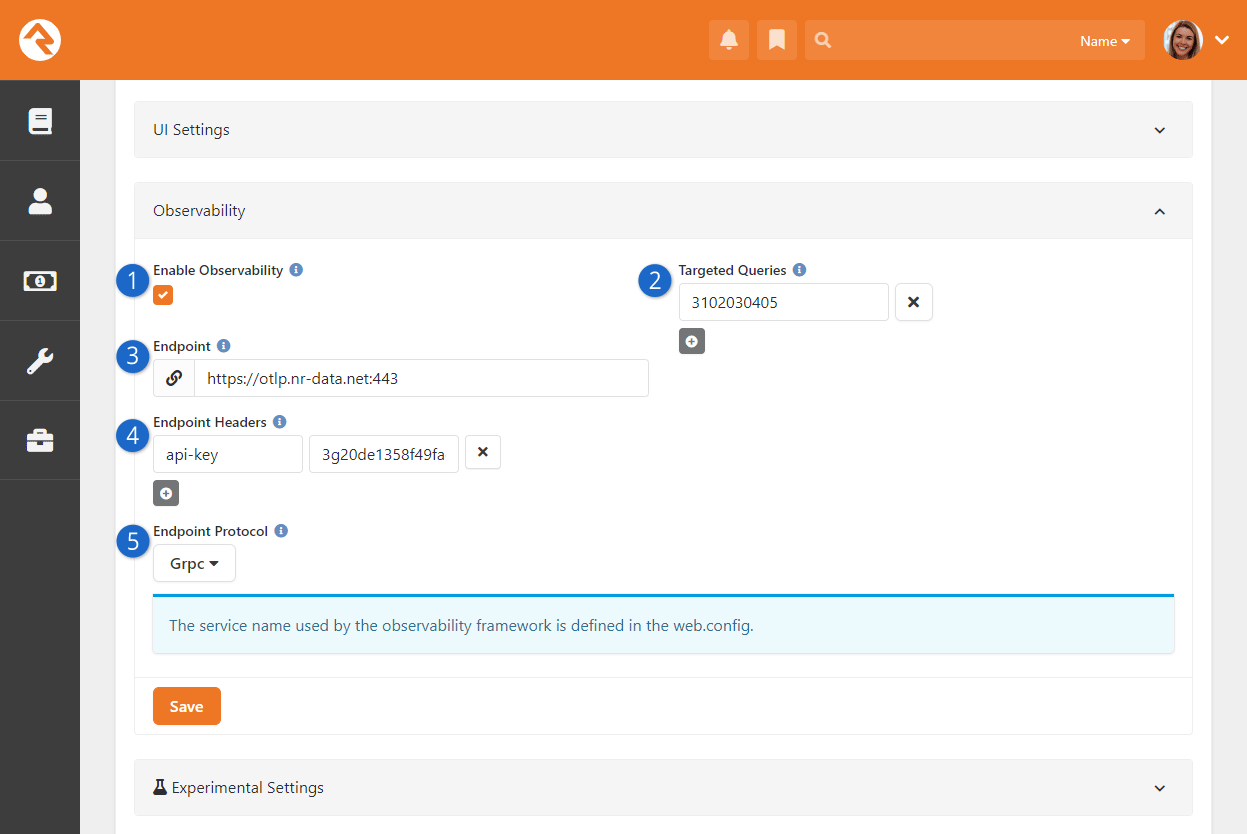
- 1 Enable Observability
- Be sure to Enable Observability or you won’t get very far.
- 2 Targeted Queries
- You can list queries to gather more data, including their origin
(displayed as a full stack trace). You’ll need to enter the query’s hash,
which you’ll find associated with the query in New Relic or other services.
Displaying a stack trace will slow down performance slightly, so we recommend
having Targeted Queries only temporarily while actively investigating
a specific query. Targeted queries will display the parameter values within the statement. Exercise
caution when enabling this option for queries containing personally identifiable
information in the parameters.
- 3 Endpoint
- Here you’ll enter the Endpoint provided by the service you’re using.
If you’re in North America and using New Relic, the endpoint will be
https://otlp.nr-data.net:443.
- 4 Endpoint Headers
- Insert a row with Key labeled as "api-key." As for the Value, that's
where the actual API Key comes into play, something you'll acquire from the
service you're partnering with. If you're following the New Relic route,
they refer to it as a "license key." You can find the link to access it
here under Step 1.
- 5 Endpoint Protocol
- Select the protocol that your provider says to use. If you’re using New Relic, select “Grpc”.
And that’s it! Filling out this one panel is all you need to do to get
connected and start sending telemetry data.
We should mention that there’s also an optional setting called "Observability
Service Name" under "Web.Config Settings" in System Configuration. It's set as
"rock-rms," but you can adjust it to differentiate between production and sandbox environments
if necessary.
Service Name
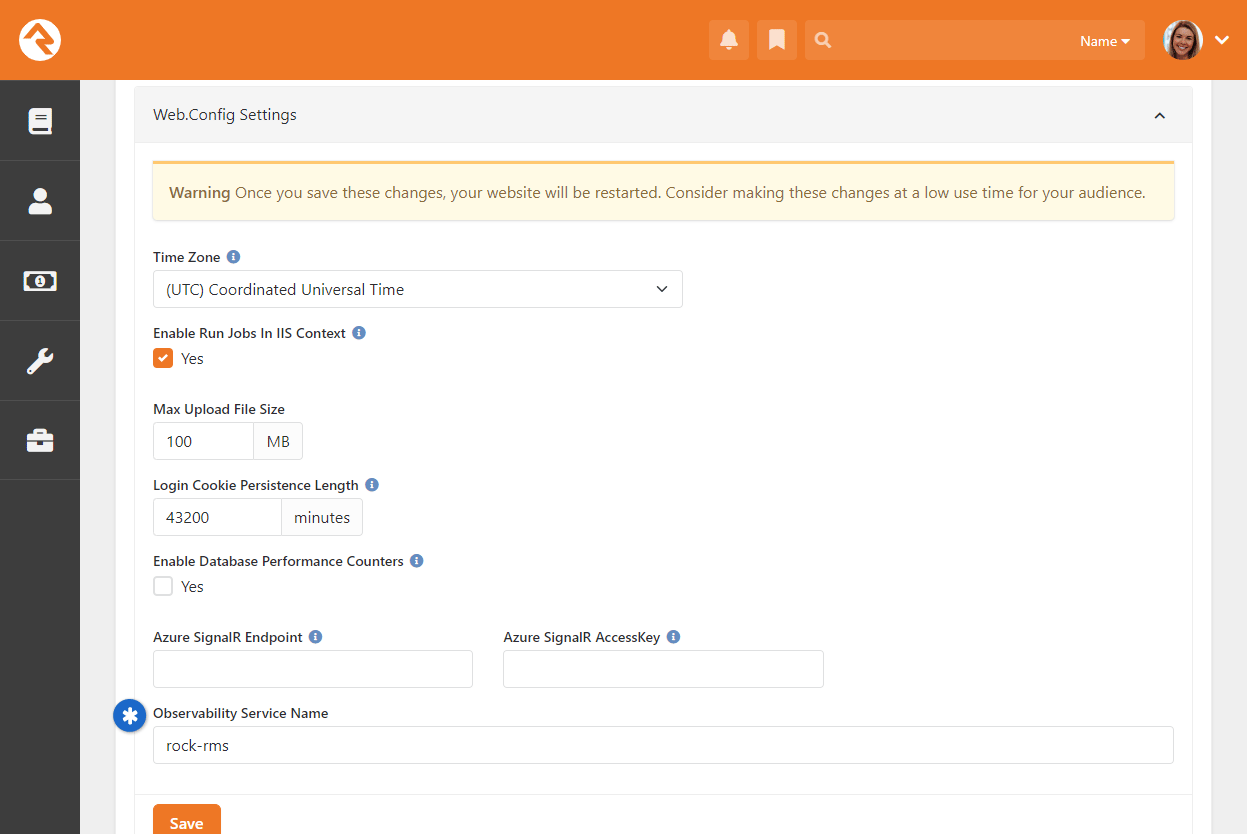
Finally, there’s one last setting you might need to know about. Head over to
Admin Tools > Settings > HTTP Modules.
Now, don't stress, you usually won't have to
tinker here. Just know it's a thing. Your job? Make sure the Observability item is Active,
as pictured below. If it’s not, just click on the Observability row and set it to Active.
HTTP Modules
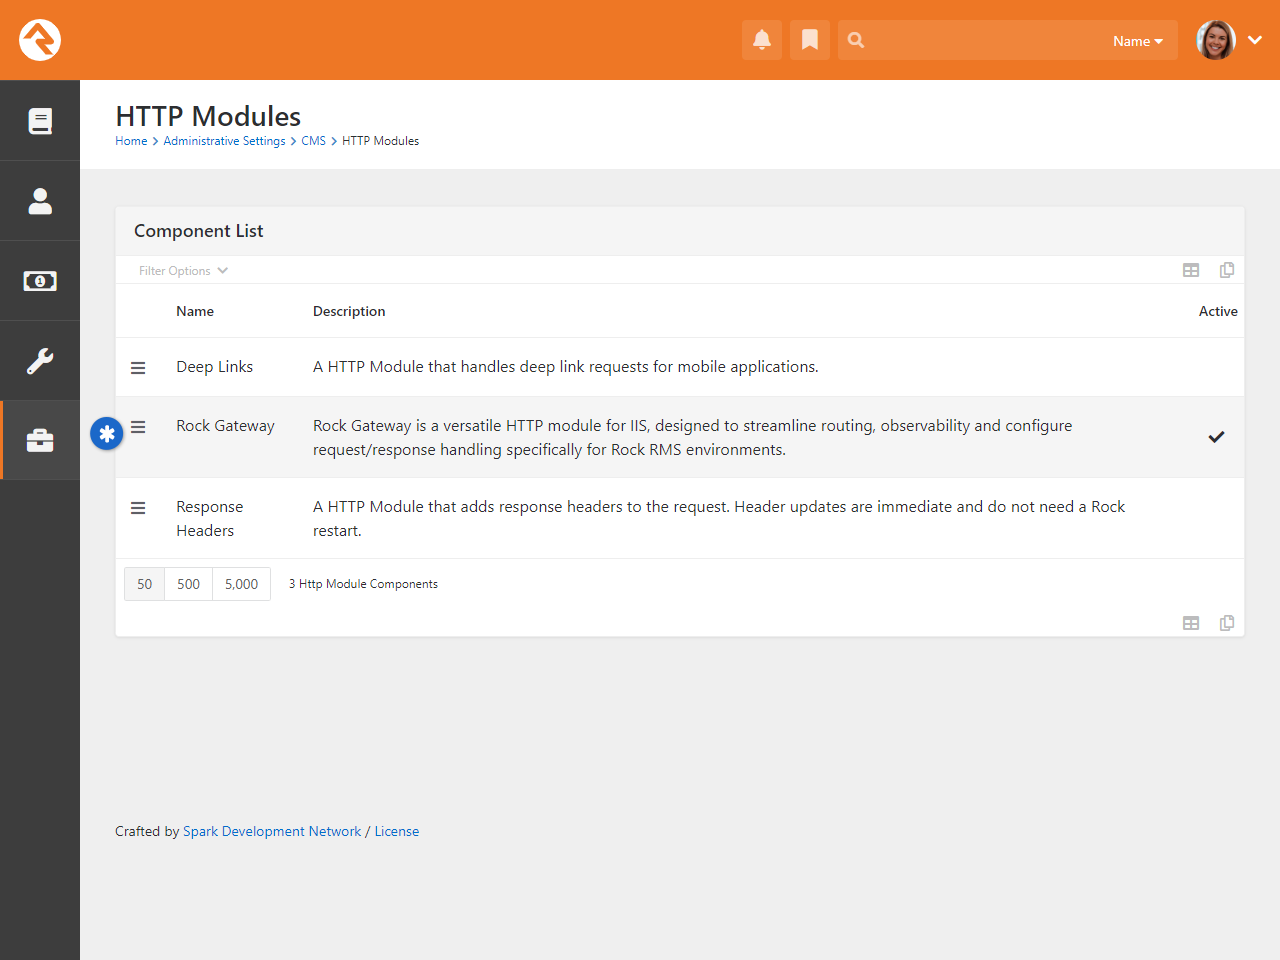
API
Whether you're a developer or someone integrating a third-party app with Rock, the APIs unlock Rock’s full potential. With built-in tools to secure, test, and extend your endpoints, you can integrate and innovate with ease—no extra setup required.
Why would I use an API with Rock?
- Data Integration: Connect Rock to other apps and services for seamless data exchange.
- Custom Development: Build custom tools and features to meet your unique needs.
- Data Access: Programmatically retrieve and update Rock data for reports, syncing, and dashboards.
- Automation: Save time by automating tasks like imports, user management, and reporting.
- User Experience: Create custom interfaces that fit your ministry’s needs.
- Flexibility: Build solutions that grow and adapt as your needs change.
To start using APIs in Rock, notice there are two different options:
API v1
Navigate to Admin Tools > Settings > API Docs. For new integrations, we recommend using API v2, as it offers expanded capabilities and improved consistency.
API v2
Navigate to Admin Tools > Settings > API v2 Docs. You will find a list of entities and the corresponding endpoint. Each one has a list of methods available such as:
- Get: Gets a single item from the database
- Put: Performs a full update of the item. All property values must be specified.
- Delete: Deletes a single item from the database
- Patch: Performs a partial update of the item. Only specified property keys will be updated.
- Post: Creates a new item in the database.
Understanding API Operations
If you're unsure about what an operation does, check out the help text in the API documentation. It explains each operation clearly and even lets you test it out with real values!
Secure API Endpoints
Your Rock database holds sensitive information. In Rock, sensitivity equals security. Here's how to secure your REST API endpoints.
See the Rest Controllers settings at Admin Tools > Settings > Security > REST Controllers. Select to configure the settings.
REST Controllers
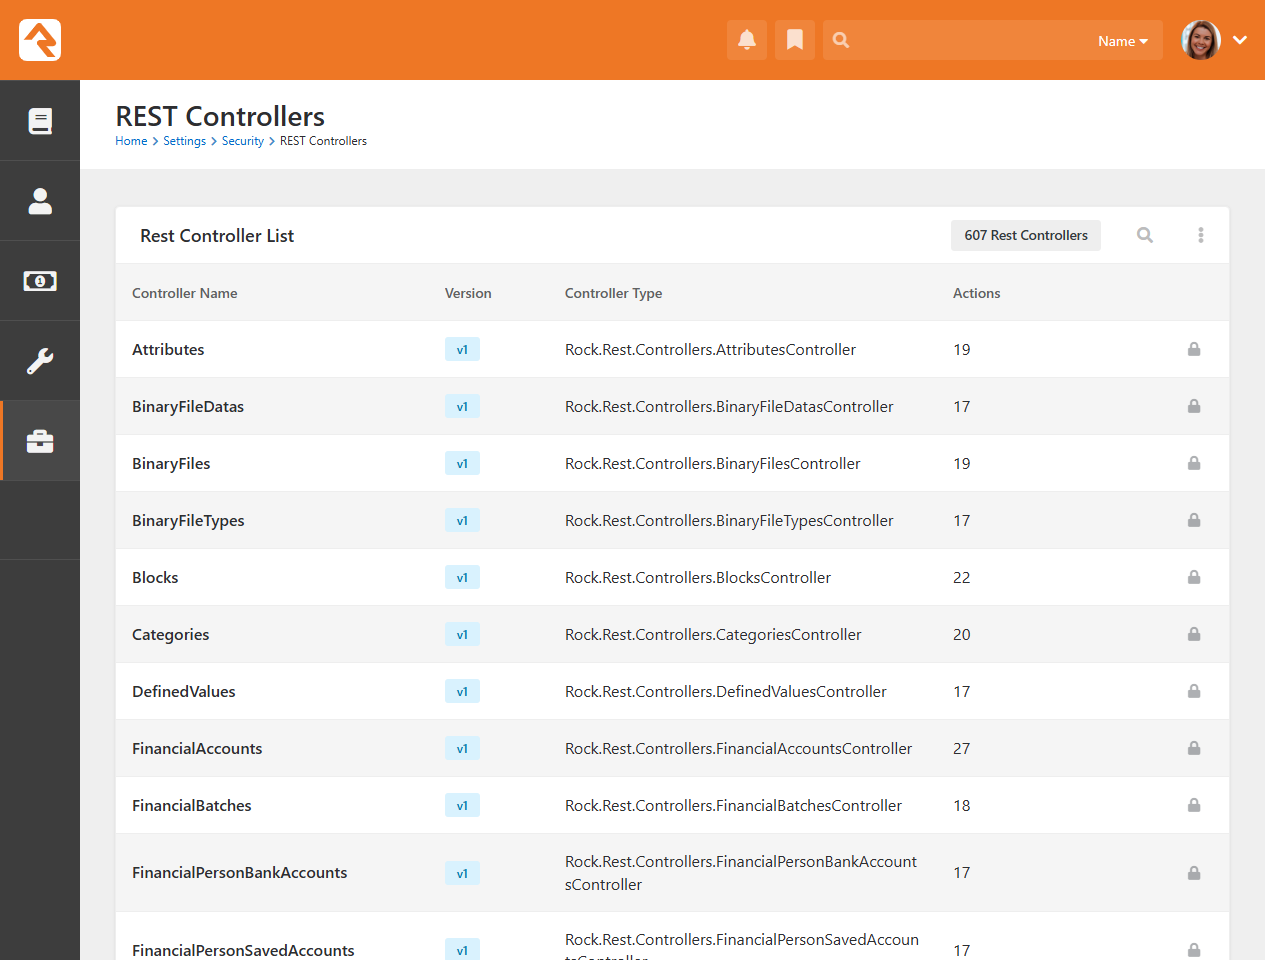
You will notice that a different settings page pops up depending on whether you are securing a v1 or v2 API controller.
v1 API
v1 API Security
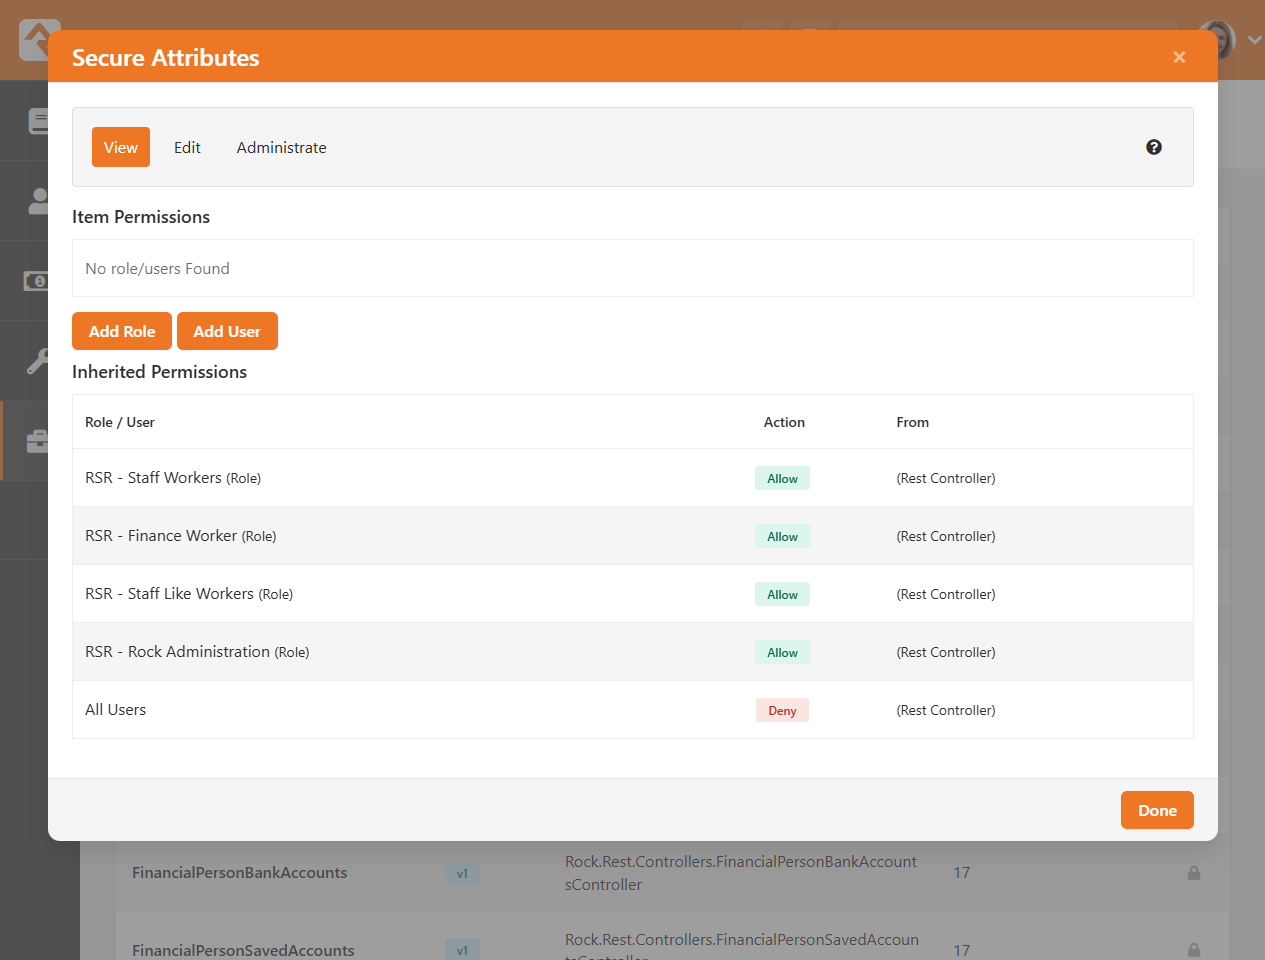
v2 API
v2 API Security
Understanding v2 API Controller Security
By default, the v2 API Controllers are locked down for all users. That’s intentional, we wanted to start with strong security so you have full control over who gets access to your data. Before you open things up, it’s important to understand what each permission does:
- Execute Read: Allows users to view data when executing any read statement (e.g.:
GET) with the v2 API.
- Execute Write: Allows users to edit data when executing a write (e.g.:
PUT, DELETE, PATCH, POST) statement with the v2 API.
- Execute Unrestricted Read: Allows users to view data—without performing entity security checks—when executing any read statement (e.g.:
GET) with the v2 API.
- Execute Unrestricted Write: Allows users to edit data—without performing entity security checks—when executing a write statement (e.g.:
PUT, DELETE, PATCH, POST) with the v2 API.
- Administrate: The classic permission, allowing selected users to administrate all things related to this controller, including security permissions.
Entity Search
Entity Search makes querying Rock feel less like writing code and more like getting answers.
With just a few simple expressions, you can refine and fetch exactly the data you need, right when you need it.
When you're building custom tools, Entity Search gives you a flexible way to work with Rock records—no SQL required.
You can use the Searches you write with API v2 or even Entity Commands in Lava. We'll explore both options in a bit.
To add an Entity Search, navigate to
Admin Tools > Settings > Entity Search.
Entity Search List
To add a new Entity Search, press .
Entity Search Detail
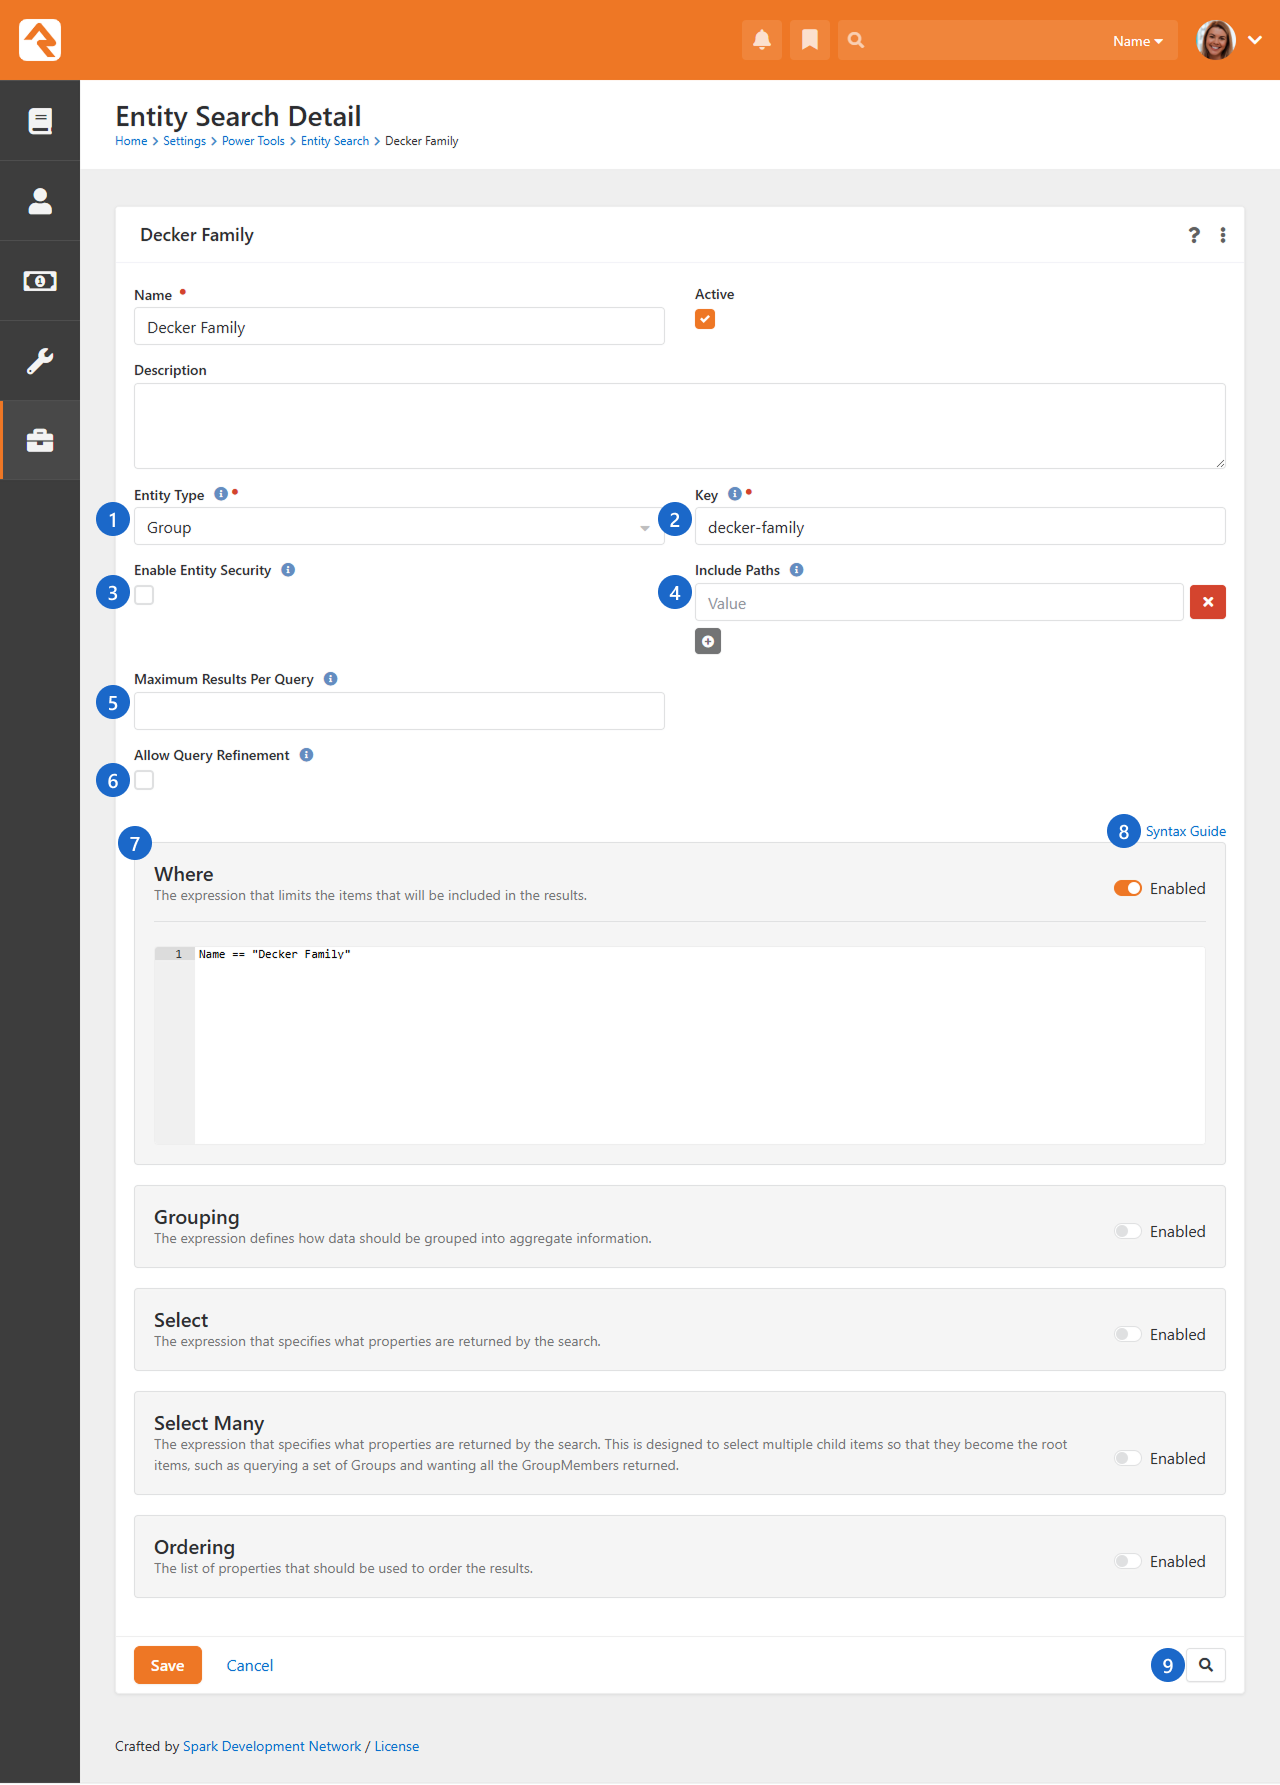
- 1 Entity Type
- Select the entity type you want to search for.
- 2 Key
- The key that will be used when accessing the search query in the future whether it's a Lava Entity Command or an API v2 call. Make sure it makes sense and is easy to remember.
- 3 Enable Entity Security
- Checks security individually for each entity to ensure searches are authorized. Only enable entity security if you need it—loading all matching records into memory can seriously slow down your queries.
- 4 Include Paths
- Specifies which property paths to include in the initial query. Use Include Paths to avoid extra (lazy-loaded) queries when entity security is enabled but always test it with the button first—sometimes eager loading can slow things down instead of speeding them up.
- 5 Maximum Results Per Query
- Set the upper limit for search results. Increasing this can reduce the number of pages returned—be careful not to overload the system with too many results at once.
- 6 Allow Query Refinement
- If enabled, additional refinement will be allowed once the query is executed. More on using payloads to extend search below.
- 7 Query Expressions
- These expressions define the output of your search query.
- 8 Syntax Guide
- Quickly access the Dynamic LINQ syntax page.
- 9 Preview
- See the search results of the search query you are designing.
Make sure to click Save once you are done, and you have a Search that is ready for API v2 usage!
Our Entity Search uses Language Integrated Queries—also known as LINQ—a way to query data in the programming language C#.
More on how to use LINQ on our Dynamic LINQ syntax.
If your expression is accurate, it will display JSON data when you select .
Preview Results
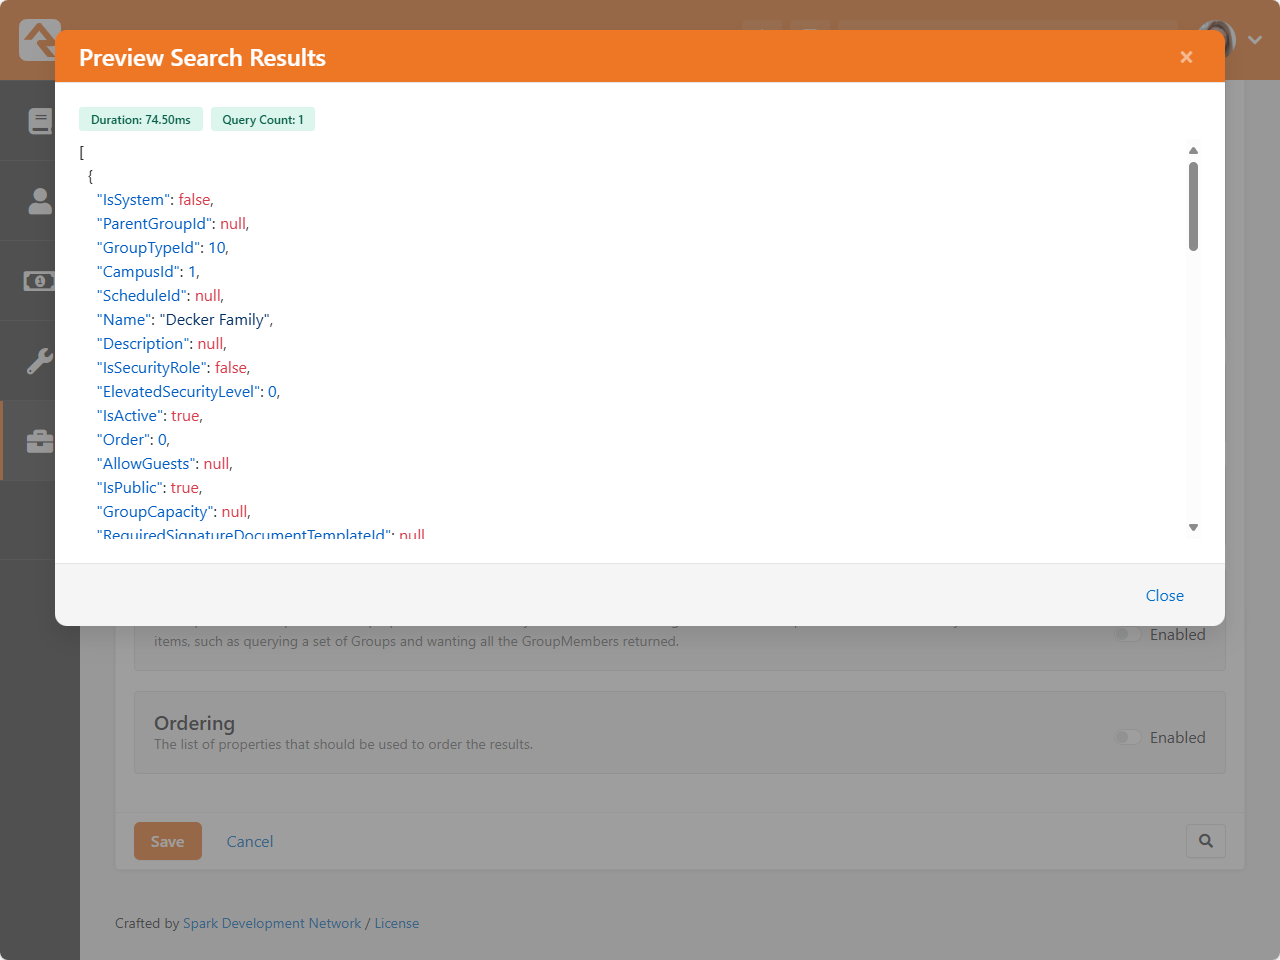
When you create a search query, you can configure its security by pressing .
Secure Entity Search
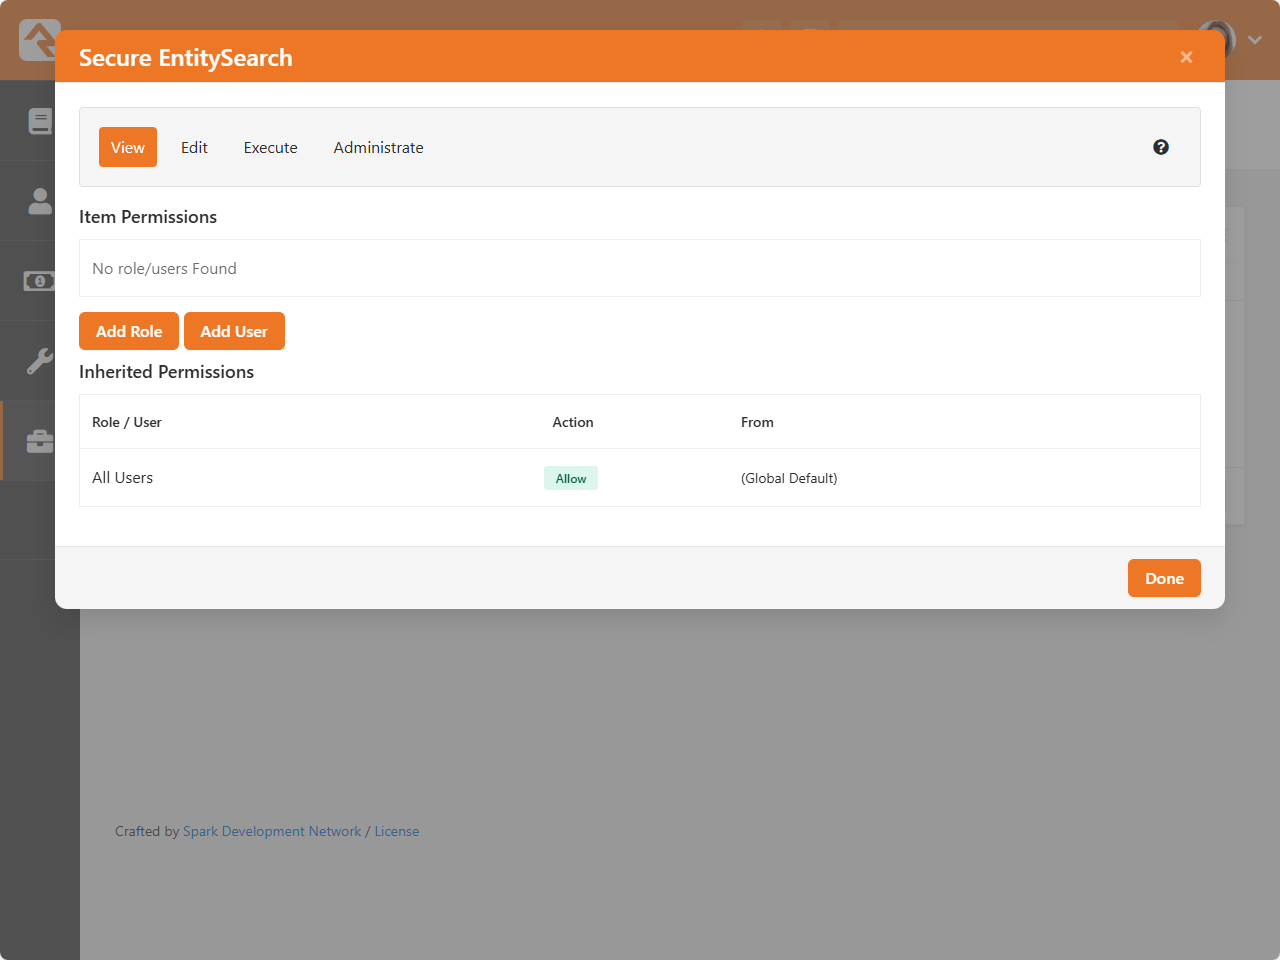
By default, only View permissions are given to all users. To use this query in an API call or Entity Search, you must give Execute permissions.
Reuse Searches with Entity Search
Define your search once using Entity Search and reuse it across Rock with the entitysearch parameter.
It keeps your Lava cleaner, your logic centralized, and your filters consistent. You can still customize results with expressions or parameters like groupby, select, and sort.
For more on using an Entity Search query with Lava, see the Lava Docs on
Entity Commands.
Extend Entity Search with Payloads
Once you've created an Entity Search in Rock, you've built a reusable query that refines and retrieves data.
But sometimes, the built-in UI options don't give you quite enough flexibility.
That's where payloads come in.
A payload is a block of JSON you can attach to a request to customize how your Entity Search behaves.
Instead of replacing your query, the payload lets you refine, override, or extend it—just for that specific use case.
Example: Simple Filter and Select
{
  "where": "id < 10"
  "select": "new (Id, Guid, Name, GroupType.Name as Type)",
  "order": "id, name desc, type.name",
  "skip": 2,
  "take": 1
}
- Filter: Include only items where
Id < 10.
- Select Fields:
IdGuidNameGroupType.Name (renamed to Type)
- Sort the results by:
Id in ascending orderName in descending orderGroupType.Name in ascending order
- Skip the first
2 items after sorting.
- Take only
1 item from the remaining results.
{
  "id": 2,
  "guid": "628c51a8-4613-43ed-a18d-4a6fb999273e",
  "name": "RSR - Rock Administration",
  "type": "Security Role"
}
Example: Group and Count
{
  "where": "GroupTypeId == 1 || GroupTypeId == 10",
  "groupby": "new (GroupTypeId, GroupType.Name)",
  "select": "new { Key.GroupTypeId, Key.Name, Count() as Total }",
  "order": "Total desc",
  "skip": 0,
  "take": 10
}
What it does:
- Filter the
Group records where GroupTypeId is 1 or 10.
- Group the filtered records by:
GroupTypeIdGroupType.Name
- Select the grouped values:
GroupTypeIdGroupType.Name
- Attempt to sort the results by
Total in descending order.
- Skip the first
0 records (i.e., start at the top).
- Take the first
10 results after sorting.
{
  "count": 2,
  "items": [
    {
      "groupTypeId": 1,
      "name": "Security Role",
      "total": 25
    },
    {
      "groupTypeId": 10,
      "name": "Family",
      "total": 42
    }
  ]
}
Unique Payload Properties:
| Field |
Description |
take |
Maximum number of results to return |
skip |
How many results to skip (for paging) |
Use Entity Search With the v2 API
You can find all entities with available REST endpoints in the API v2 Docs, located at
Admin Tools > Settings > API v2 Docs.
These endpoints can be used with your custom code.
API v2 Execution
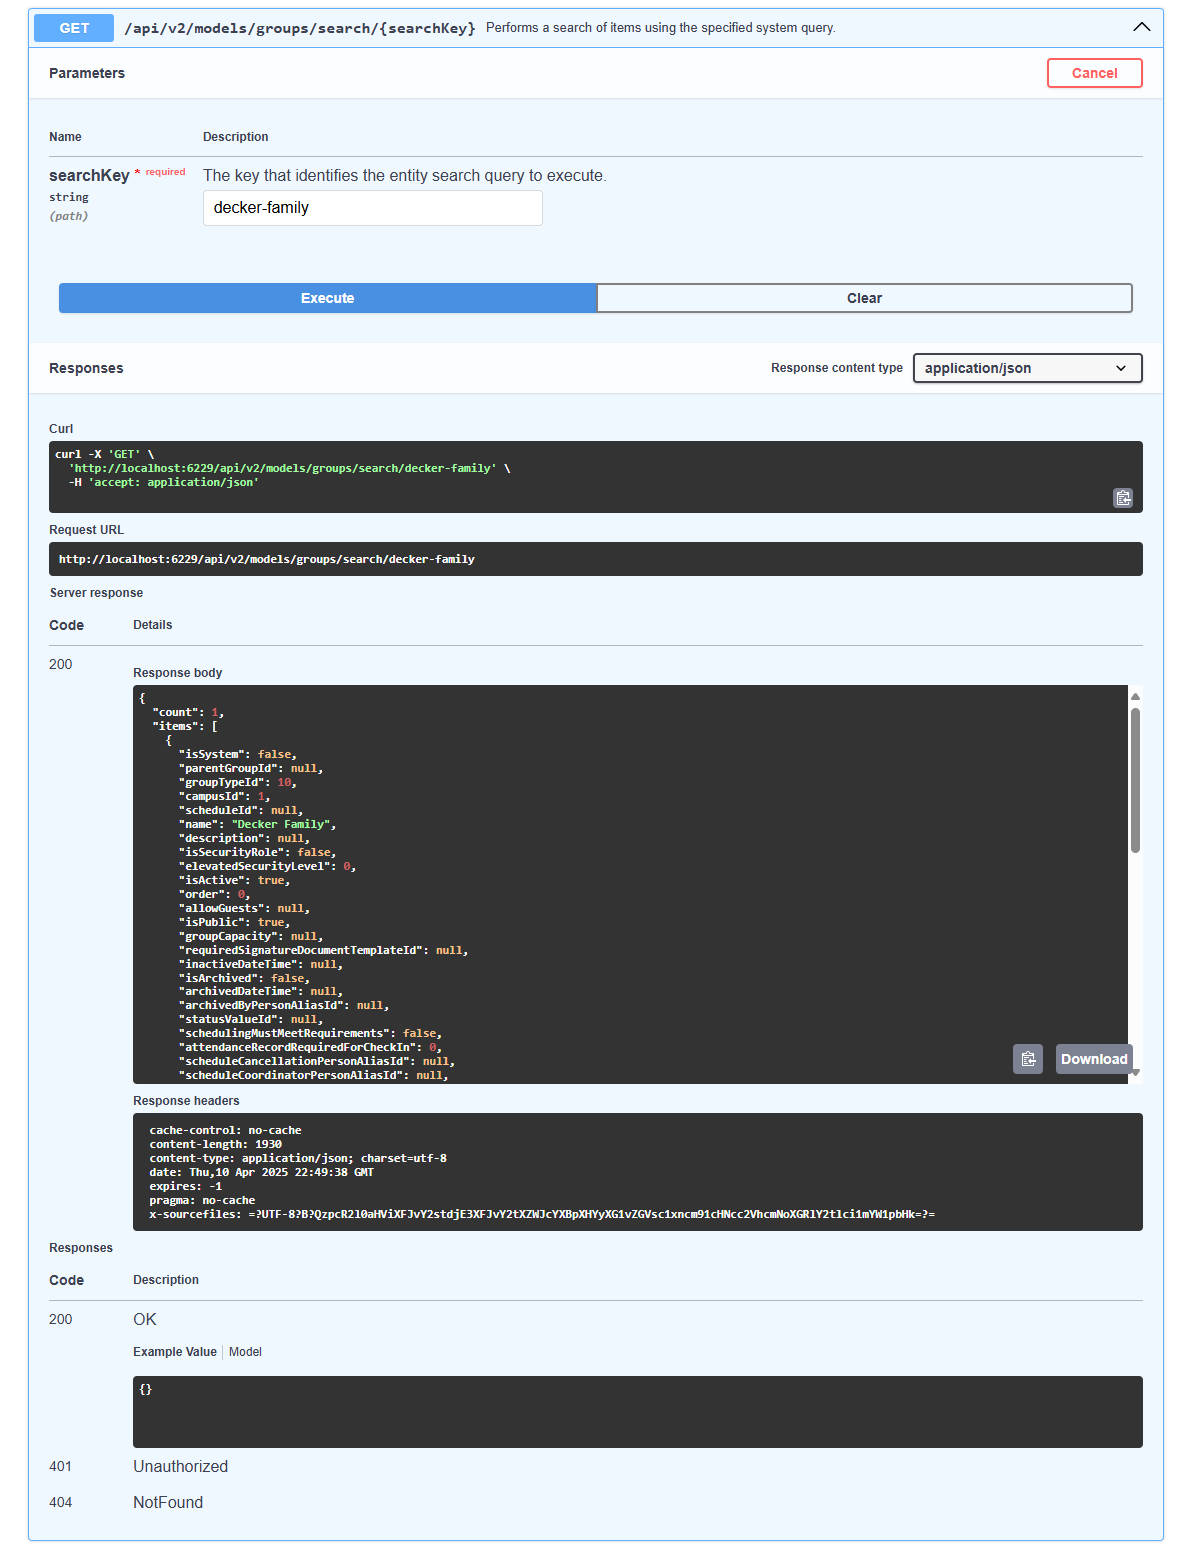
To try an operation that uses a SearchKey—such as a GET or POST—this is what you will do:
- Find the endpoint for your created SearchKey—in this case we are using Groups.
- Click on a statement that has
{searchKey} appended to the end of the method.
- Click Try it Out.
- Type in the key created for your SearchKey.
- Click Execute.
- You should see an output in the Response Body reflecting your search query.
Match Your Endpoint and Entity
Be sure the endpoint you’re using exactly matches the Entity Type you set when configuring Entity Search. A mismatch here can cause unexpected results.
Proximity Attendance (Mobile)
Sunday mornings are buzzing, volunteers are helping guests, kids are checking in. You’re focused on the message ahead. With Proximity Attendance, your church gains a new kind of presence: quiet, automatic and incredibly powerful. When people walk into your building, their phones (with a Rock mobile app installed and Beacon Monitoring enabled) quietly register their arrival. You get real-time, accurate attendance with no lines, no kiosks, no friction.
Using a Rock Mobile app, Proximity Attendance brings location-aware check-in to life. Once someone has opted in, their attendance is tracked auto-magically every time they enter your space. It’s fast, invisible and freeing for your team and volunteers. Stop counting heads and start capturing insights.
How does this work?
The tech powering this effect is... beacons. You can place Bluetooth beacon devices around your chosen space to capture attendance data for those who step into it. It only takes a couple to cover a large space, capturing accurate attendance info based on location.
How It Works
- A beacon continuously broadcasts its iBeacon signal.
- A nearby mobile device detects this signal and triggers the app to wake up in the background.
- The app then automatically checks the person in or out of the event or service.
This is especially helpful for busy check-in stations or children's ministry check-ins where speed and simplicity matter.
This Section is Technical!
This configuration includes technical terms and is best suited for users with some IT experience. If terms like "UUID" scare you, you may want to back away slowly. That said, we’ve streamlined the process to make setting up Proximity Attendance as clear and manageable as possible.
What Is iBeacon?
iBeacon is a protocol developed by Apple that allows Bluetooth Low Energy (BLE) devices in this case the beacon to broadcast small packets of data, known as advertisements.
Each iBeacon signal includes a payload with the following components:
- UUID (Universally Unique Identifier): A 128-bit value shared among a group of beacons (e.g., an organization).
- Major: A 16-bit integer used to identify a subgroup within the UUID (e.g., a campus).
- Minor: A 16-bit integer used to identify a specific beacon within a Major group (e.g., a room or kiosk).
Major and Minor values are used strictly for identification. They do not transmit any actual data beyond their numeric values.
How Rock Uses iBeacon
In our setup:
- UUID → RockInstanceId: This is shared across all organization-wide beacons and represents the entire church or organization.
- Major → CampusId: Identifies the specific campus or building.
- Minor → Location BeaconIdentifier: Identifies a specific location, such as a room, kiosk, or classroom.
Think of it like this: the UUID is the church organization, the Major is the building or campus, and the Minor is the room.
Beacon Behavior and Boundaries
Beacons are an excellent way to accurately track attendance with just your phone, but we want to note a few boundaries to guide your approach to Proximity Attendance.
Limit The Number of Beacons in One Area
A good rule of thumb is this, when two spaces are more than 1 minute in travel time apart, you can have a new beacon set. If they are too close, the beacons may get confused and say you checked into the children's ministry when you accidentally stepped into the wrong hall.
Beacon Overload
Sticking to having one or only a few areas tracking attendance rather than capturing many closely-knit areas will keep data simple and accurate. We know you may be tempted to use the power of Bluetooth to track attendance for each individual room: the children's ministry, the green room, the bathroom, but beacon devices aren't yet capable of that intricacy.
Be Aware of Overlapping Services
To simplify configuration and reduce confusion, schedule selection happens automatically. This provides ease of use so that attendees don't need to pull out their phone and select which service they are attending. With this in mind, please note that if two services overlap, it may go the one that starts and ends latest. If your attendance history looks a little off, that’s likely the reason.
Configure Proximity Attendance
To get Proximity Attendance up and running for your organization, there are a couple quick steps.
- Rock Configuration - Checking all the right boxes to use beacons for attendance
- Beacon Hardware Configuration - Getting the info you need to set up a beacon
- Mobile Shell Configuration - See more on this in the Mobile Docs
Step 1: Rock Configuration
When you're ready to use proximity attendance, start by enabling it for check-in.
Head to Admin Tools > Settings > Check-in > Check-in Configuration, then look under the "General Settings".
Enable Proximity Check-in in General Settings
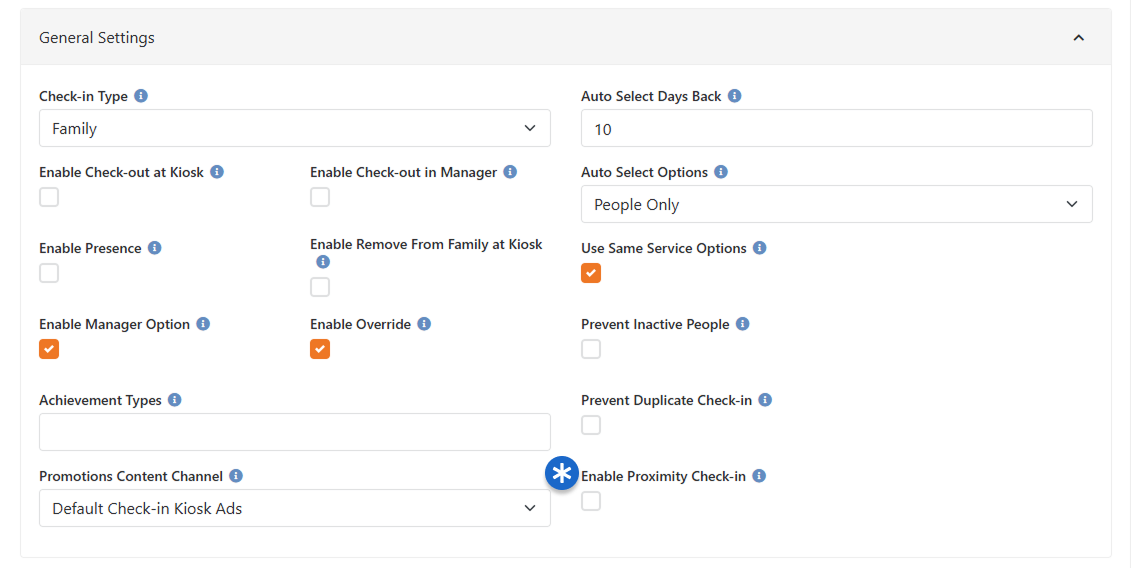
You must select "Enable Proximity Check-in" to use beacons as an attendance tracking method.
UUID:
- No action needed — the UUID is automatically pushed to the mobile shell.
Major (Campus)
- No action needed — Rock maps the CampusId to the Major value.
Minor (Location Beacon Identifier)
- Navigate to the Named Location where the beacon will be used.
- In the location settings, set the Beacon Identifier to a 16-bit integer (range: 0–65,535).
This value will be used as the Minor value when configuring your physical beacon.
Beacon Identifier as Minor value
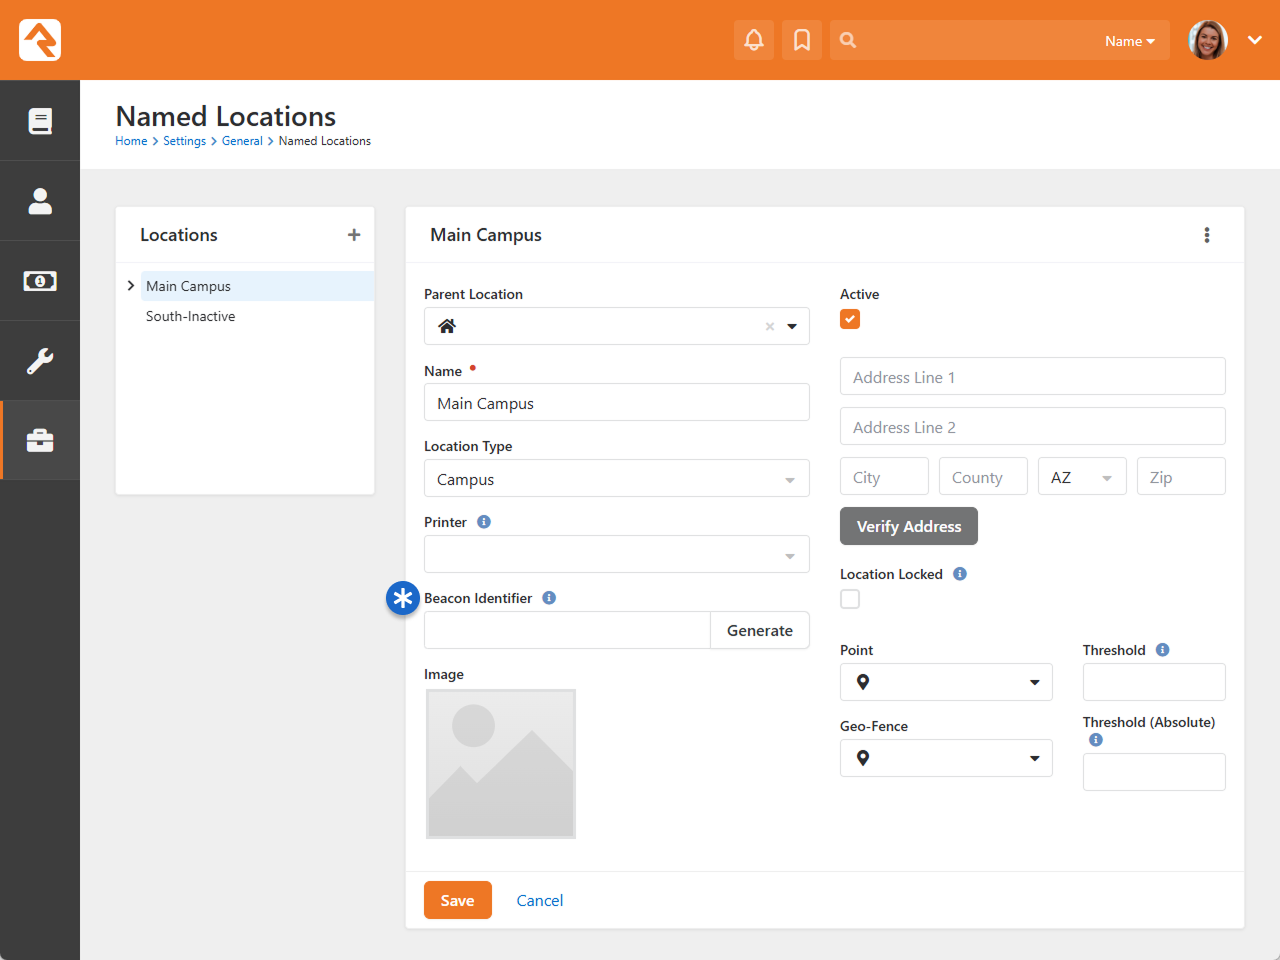
Proximity Attendance is set up in Rock, yay! Now for the beacons themselves.
Step 2: Beacon Hardware Configuration
Since configuration tools vary by manufacturer, please refer to your beacon’s documentation. Below, we show how to obtain the values you'll need from Rock.
Beacon UUID (RockInstanceId)
Use the following SQL query to retrieve the RockInstanceId from your Rock RMS database:
SELECT
    [Guid]
FROM
    [Attribute]
WHERE
    [Key] = 'RockInstanceId'
    AND [EntityTypeQualifierColumn] = 'SystemSetting';
- Use this value as the UUID when configuring your beacon.
All beacons in your organization should use the same UUID, regardless of location. Differentiation happens via Major and Minor.
Major and Minor
- Major: Set this to the CampusId where the beacon will be deployed.
- Minor: Use the Beacon Identifier value from the Named Location you configured earlier. This uniquely identifies the beacon's specific location within the campus.
You can configure multiple beacons with the same UUID/Major/Minor to cover larger spaces (e.g., auditoriums, hallways).
While Bluetooth beacons are opening doors to powerful new ways of tracking attendance, they’re not the only tools on the horizon. Some enterprise Wi-Fi systems—like Cisco Meraki or Juniper Mist—already offer beacon-like tracking through their advanced access points. These systems use signal triangulation to detect nearby devices and can provide location insights with surprising accuracy. As technology continues to evolve, churches have more ways than ever to make check-in seamless, smart and entirely hands-off. Proximity Attendance is just the beginning.
Learn More About Proximity Attendance
If you want to start tracking attendance with Rock Mobile or for technical details on configuring your Mobile Shell for Proximity Attendance, see the Rock Mobile Docs.