Improve
Updates for Rock 8.0
Below is a summary of the updates for this version.
- Clarified the Sync Data View callout in the Group Sync Settings screenshot.
- Updated the Group Sync Settings screenshot in the Group Sync chapter.
- Updated the Group Sync chapter with new options and settings.
- Added Group History chapter.
Updates for Rock 1.0
No updates made.Updates for Rock 2.0
No updates made.Updates for Rock 3.0
Below is a summary of the updates for this version.
-
Added reference to the new group schedule options and exclusion dates
for group types.
- Added group attendance and reminders features.
- Added a group leader toolbox that are customizable with Lava.
- Added group finder and registration blocks.
- Added information on the new security settings for group member roles.
- Expanded the discussion of Group Member Roles.
Updates for Rock 4.0
Below is a summary of the updates for this version.
- New chapter on the various service jobs related to groups.
- Add tips for using the new features built into the group finder.
- Documented the new Group Member Add from URL block.
- New chapter on automatically syncing groups.
- Documented the new Group Following features.
- Additional information on Group Members including Group Member Workflows.
- Added information on the new Alternate Placements features.
- New chapter on Group Requirements.
- Added a note to filter on Did Attend when reporting.
Updates for Rock 5.0
Below is a summary of the updates for this version.
- Added new Inherited Permissions section in Securing Groups
- Documented a new setting on the Group Sync job that requires a person to reset their password
on first login if enabled (default is disabled).
- Added details on the new group tree features.
- Documented the new group capacity features.
Updates for Rock 6.0
Below is a summary of the updates for this version.
- New group type setting that will require all groups of that type to have a campus set.
- Documented new group type settings that will require a location/schedule when entering attendance for a group of that type.
- Added information on the new digital signitures feature and how it interacts with groups.
Updates for Rock 7.0
Below is a summary of the updates for this version.
- Documented the change in how group requirements notifications are sent.
- Updated Group Requirements section to include Applying Group Requirements to Group Types.
- Updated Group Type screenshots to include Group Requirements.
- Added Fundraising Progress documentation to Fundraising Groups section.
- Added Show Marital Status option to Advanced Group Type Settings table in the Group Types chapter.
- Added Rapid Attendance Entry section to the Group Attendance chapter.
- Added "Manage Members" security action information in the Securing A Group section of the Securing Groups chapter.
Updates for Rock 9.0
Below is a summary of the updates for this version.
- Added "Show Administrator" to common group type settings
- Added the Group Scheduler Chapter
- Updated Group Type screenshot
Updates for Rock 10.0
Below is a summary of the updates for this version.
- Added details to describe single-campus behavior
- Updated to include Group RSVP features and settings
Updates for Rock 11.0
Below is a summary of the updates for this version.
- Added the ability to opt individual groups out of scheduling or the Schedule Toolbox
- The frequency of Group Sync can now be set for each group individually
- Added option to stop accepting group fundraising donations after a chosen date
Updates for Rock 12.0
Below is a summary of the updates for this version.
- Financial transactions can be transferred from one fundraising opportunity to another when the participant is moved to the new group
- Updated the Group Scheduler to support scheduling more than one group at a time
- Added Group Scheduler Roster and Group Schedule Communication blocks for Group Scheduling
- Added a new "Attendance Types" Defined Type to classify an attendance occurrence as physical (in-person) or virtual (online)
Updates for Rock 13.0
Below is a summary of the updates for this version.
- Scheduling Confirmation and Scheduling Reminder communications can now be sent via email or SMS message
- New Group Attendance Reporting job will create and populate person attributes to track group attendance data
Updates for Rock 14.0
Below is a summary of the updates for this version.
-
A new Group Type setting lets you require capacities for
groups of that type when a Group Capacity Rule of Hard or
Soft has been set
-
A new template for the Scheduling Confirmation Email
allows the recipient to 'Accept All' or 'Decline All'
-
Participation in Fundraising Groups can now be
for either an individual or a family
-
Enhancements to group requirements, including the
ability to set due dates and launch workflows
-
A Quick Communication can be sent to individual
group members
-
Scheduling preferences for serving teams can be edited
on the Group Member Detail page
-
The new Auto Accept option on the Group Type allows group scheduling
assignments to be automatically accepted as soon as the person is
scheduled
Updates for Rock 15.0
Below is a summary of the updates for this version.
-
The Group Attendance Detail block has an updated look and feel
-
The Send Group Attendance Reminders system job sends attendance
reminders to group leaders across multiple group types
Updates for Rock 16.0
Below is a summary of the updates for this version.
- Individual groups can be manually synced on demand
- The Search feature lets you quickly find people when making assignments in the Group Scheduler
Updates for Rock 17.0
Below is a summary of the updates for this version.
- Group Copy functionality now includes related entities and (optionally) child groups
- Individual groups can be excluded from receiving attendance reminders
- Confirmed schedule assignments can be cancelled and declined assignments can be accepted
Updates for Rock 18.1
Below is a summary of the updates for this version.
- Group Placement provides a flexible tool for sorting individuals into groups, accessible from the Group Viewer or a standalone block, with features like drag-and-drop, multi-select, and URL query strings for streamlined group management.
Overview
Groups are used whenever two or more are gathered. You'll find groups to be
simple but incredibly powerful. Rock comes pre-configured with the following
types of groups:
-
Families: Each family is stored as a group. This is incredibly
powerful because families get the same power and functionality as any
other Group Type.
In the beginning you'll want to leave families configured just the way you found them.
As you create new Group Types
and gain more experience with groups, keep in mind that you can add new attributes and
additional functionality to the family Group Type.
-
Security Roles: These groups help secure Rock data. While you'll
use these groups a majority of the time for security, you'll soon discover that any group
in Rock can act as a security role.
-
Check-in Groups: Rock's check-in features use groups to store the locations where kids
can check in and to track attendance.
-
Serving Teams: While we have big ideas for how serving teams will work in the future,
we have configured a simple group type to get you started with tracking your groups.
-
General Groups: It's likely that you'll be creating several groups that don't warrant
their own specific group type. In these cases feel free to create them as 'General Groups'.
-
Application Groups: Rock needs to keep track of various lists of people. For instance people
who have opted out of getting future photo requests. These 'lists of people' are stored as
Application Groups.
Application groups can be viewed/managed under
Admin Tools > System Settings > Application Groups.
-
Small Groups: We've added a generic Small Group group type.
Feel free to use this as a base to build from if your church has a groups ministry.
-
Small Group Sections: This group type works in conjuction with the
Small Group type and acts
as a leadership level to provide hierarchy for your groups. Again, feel free to use this type as a launching point for
getting started.
Searching for Groups
As you add more and more groups to Rock, it may be tedious to locate a specific group.
Never fear, you can use the Smart Search
at the top of each page to help find the specific group you are looking for.
Smart Search

Be sure to choose the Group Name
option from the drop down and then enter the group name you are searching for. You don’t need to
enter the full group name, since the search will return any group that has the search term you entered.
Say you were looking for the Bible Study group that Ted Decker leads (named "Ted Decker's Bible Study Group").
Any of the searches below would be valid, although some may return several other groups in the results, as well.
- Decker
- Bible Study
- Ted Deck
If the search term you provide only matches a single group, you will be taken
directly to that group. However, if several groups match, you will have to select
one from the list of groups provided.
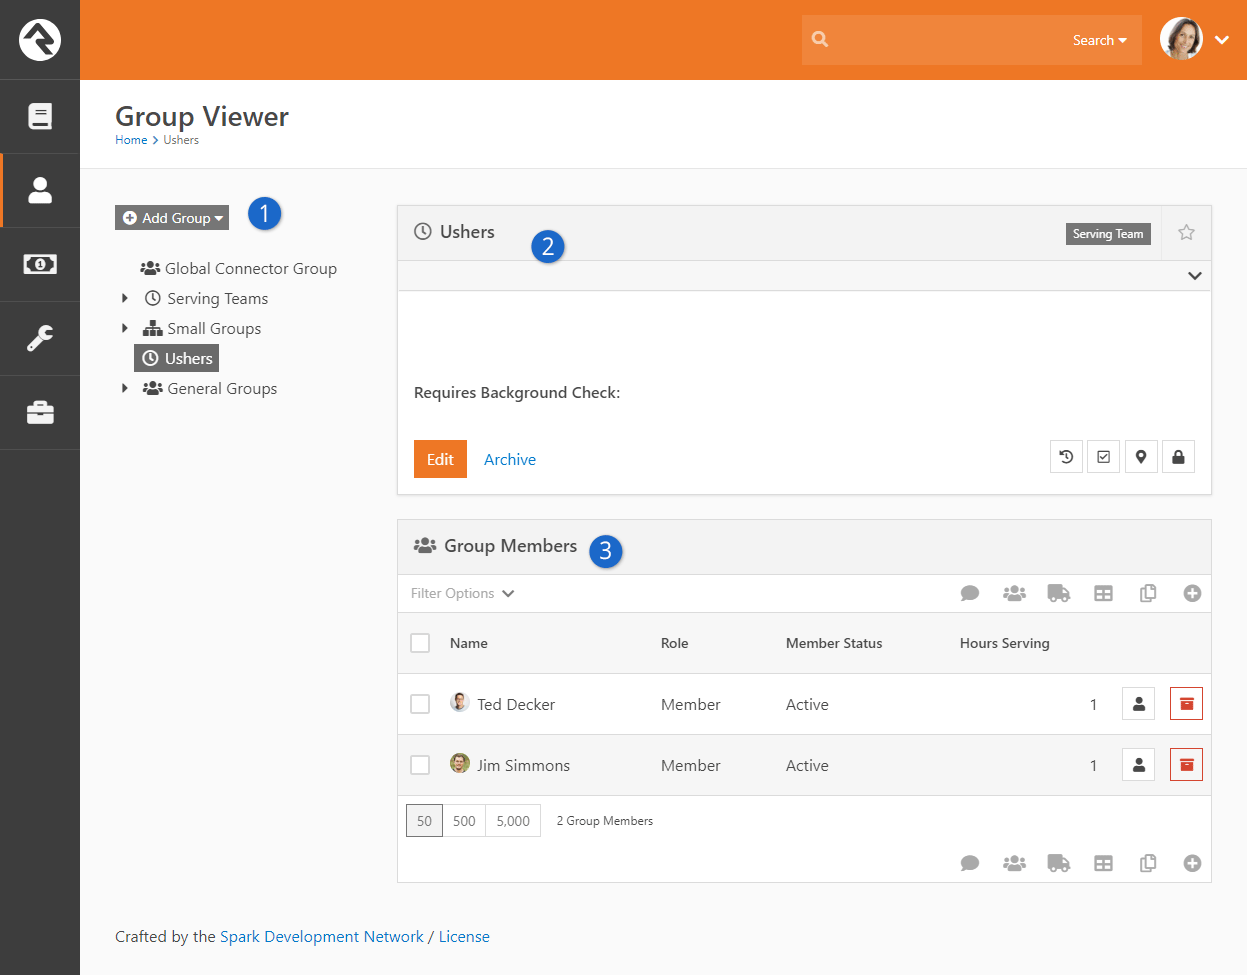
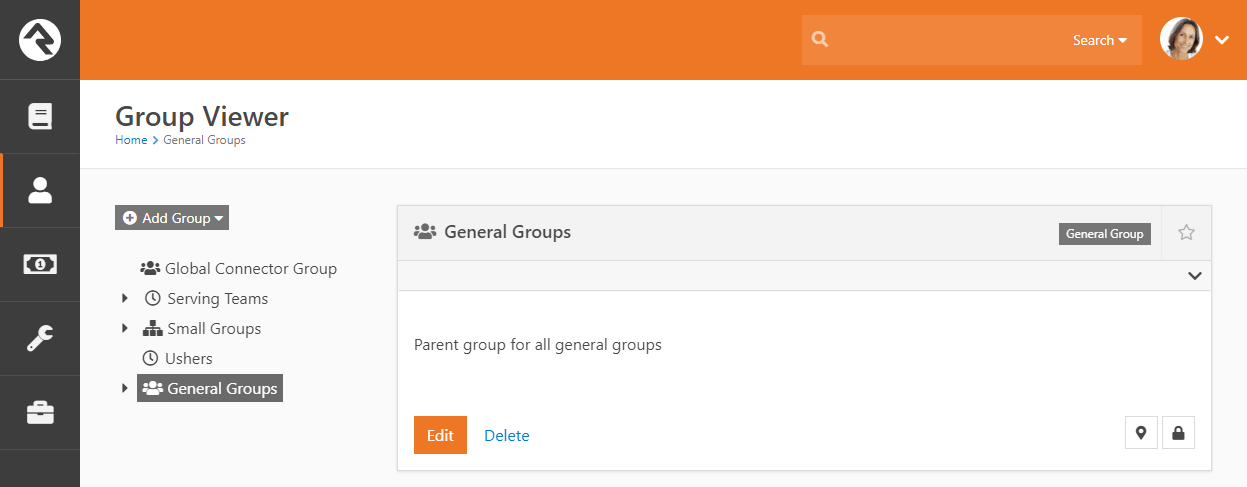
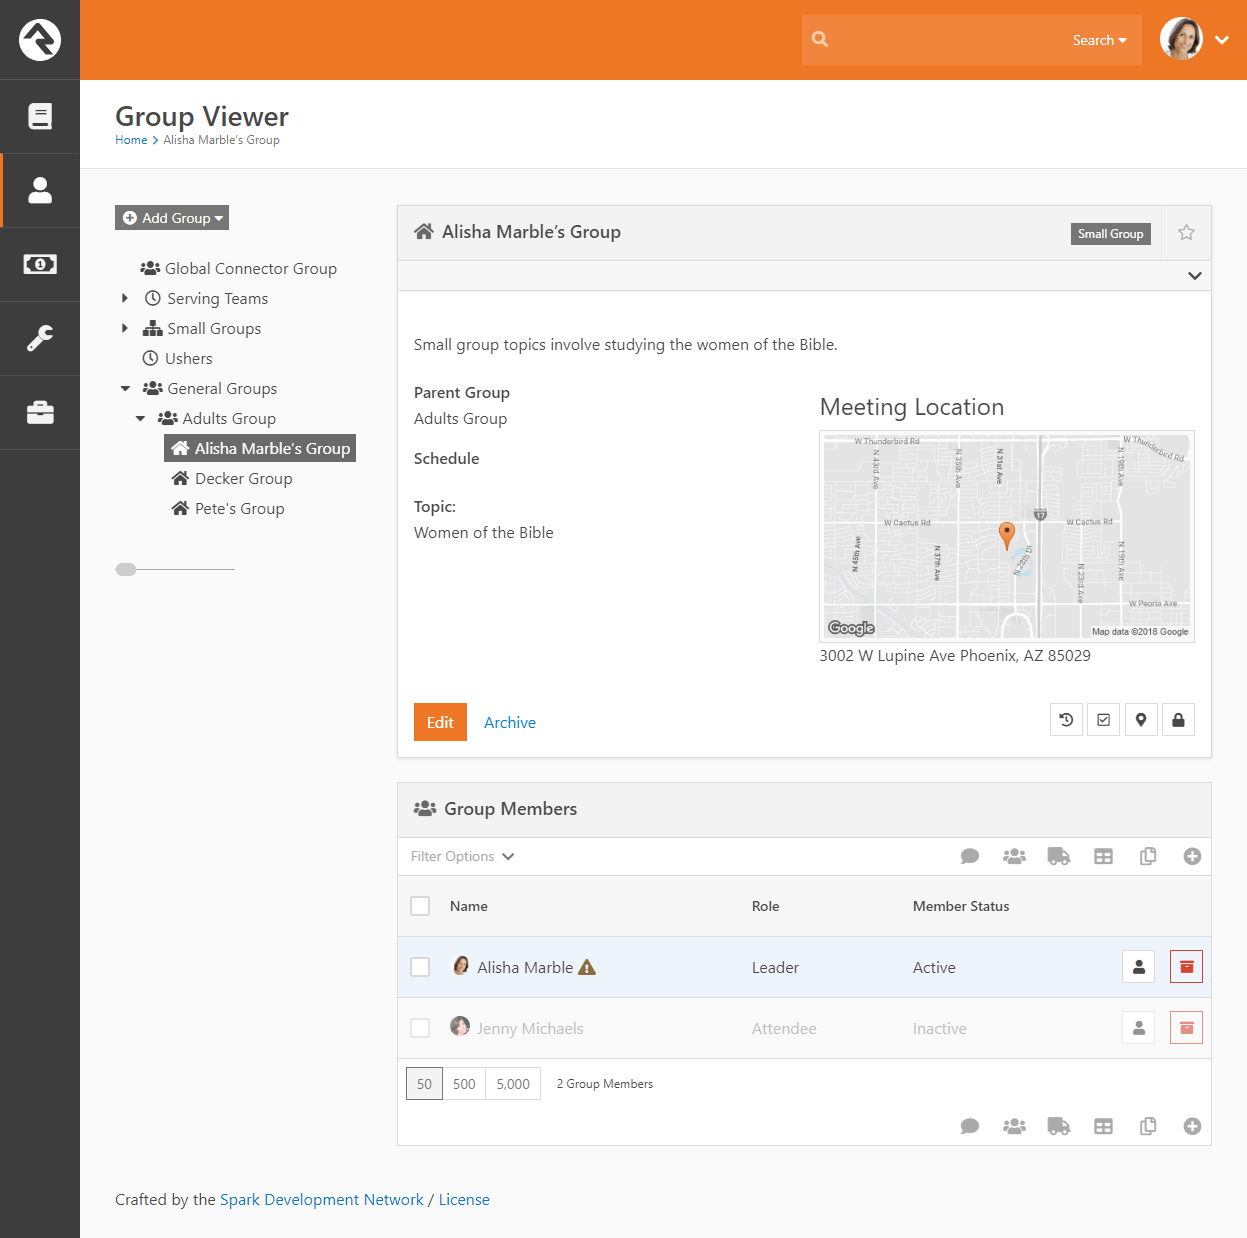
Group Viewer
The group view People > Group Viewer
is the primary window for viewing and editing groups. Below, we will discuss each
section of the group viewer in detail.
Group Viewer
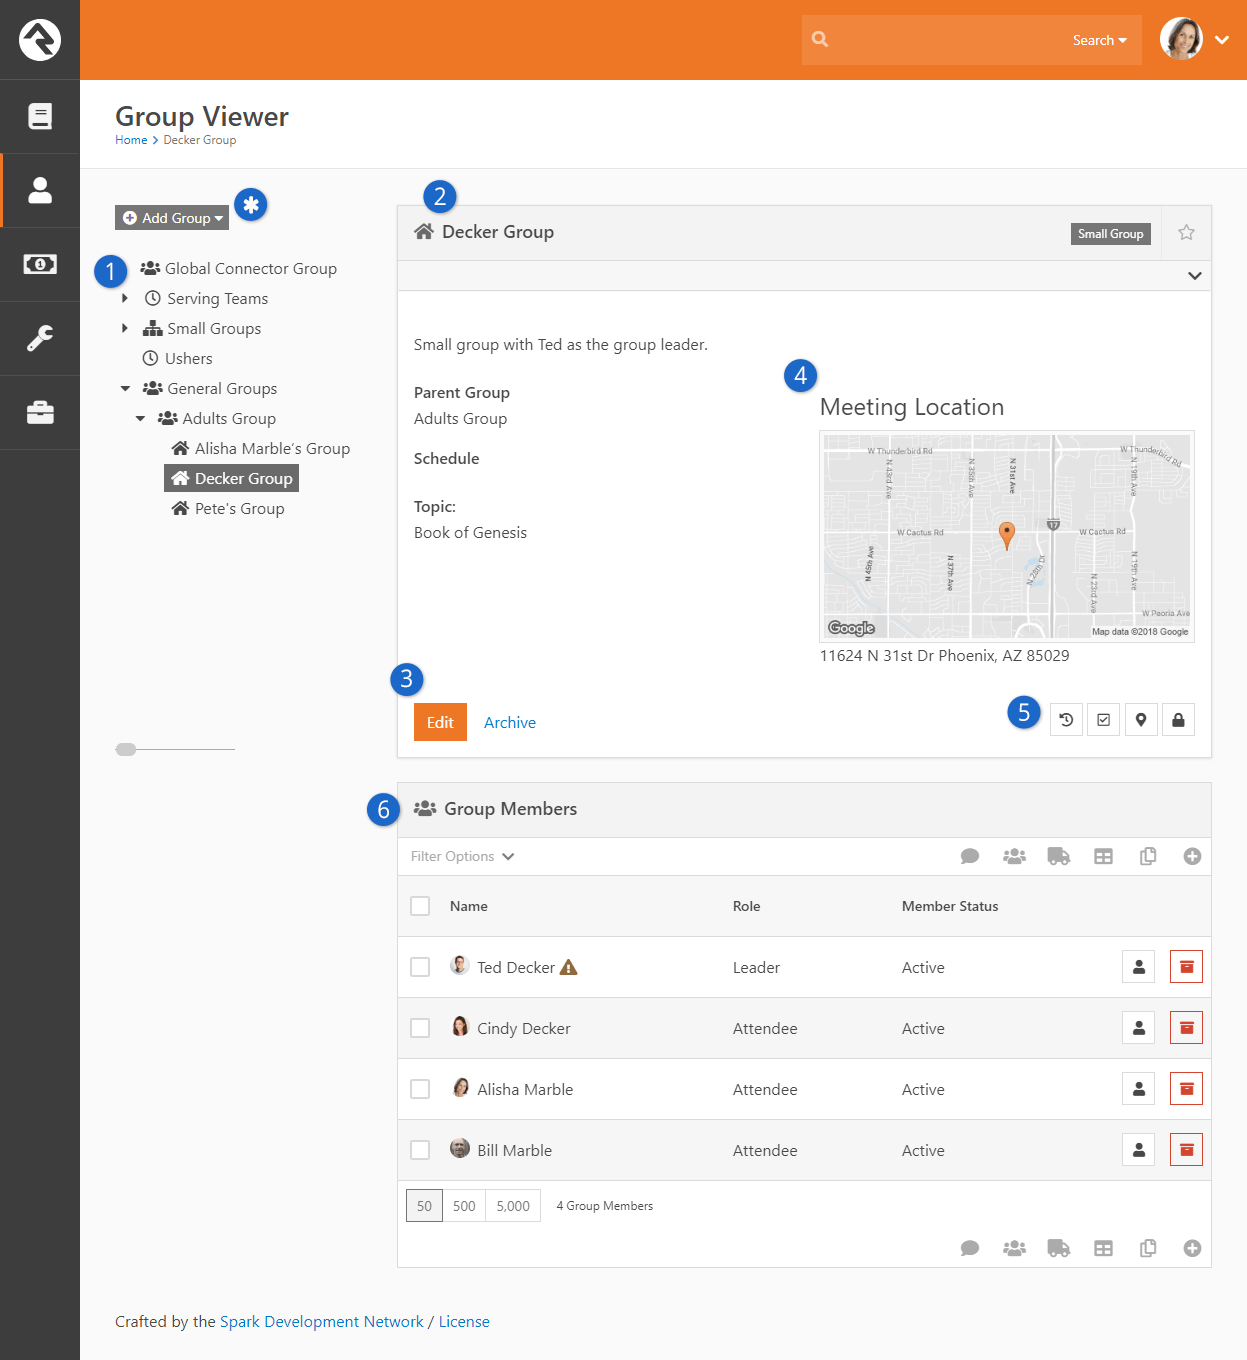
- 1Group Tree
- This control
allows you to drill down through your group hierarchies. You’ll want to
plan your hierarchies to achieve a good balanced approach. Too deep of a
hierarchy will lead to too many clicks to drill down. However, if your
hierarchy is too broad, then you will have to scan through long lists of
groups to find the one you want.
- 2Group Details
- Displays information about the group.
- 3Action Bar
- Options to edit or delete a group.
- 4Group Maps
- The viewer will display maps for each group location that is able to be mapped. You
can click on the map to see a larger interactive map. You can also click on the map
marker button directly below the maps to see the interactive map.
- 5Actions
-
Below the maps you'll find buttons for a few key actions.
- Allows you to manually enter in attendance for the group.
- Takes to you an interactive map where you can view all the people who are members of the group.
- Using the security button you can control who has access to view and edit this specific group. See
the Securing Groups section below
for more information on how you can secure your groups.
- 6Group Members
- List of member inside the group.
The group view has a couple of other interesting features you should be aware of. Notice the
icon next to the asterisk call out in the figure above. This gear only shows when you hover near the area. Clicking it
will show you several advanced features in the tree view. Let's open it up and see what's inside:
Group Viewer
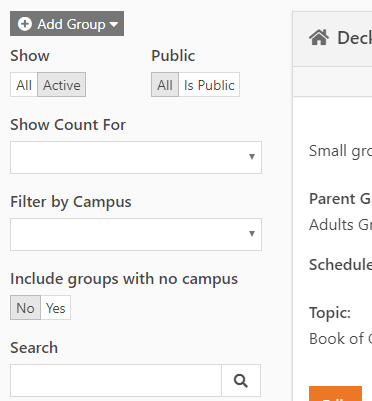
You'll notice:
- Show This determines if inactive groups should be shown.
- Show Count For The tree can also display counts of the number of members in the group or the number of child groups a group has.
Archived Groups
When a group has been marked as Archived and you want to bring it back go to:
Admin Tools > General Settings > Archived Groups
Click on the icon to unarchive the group.
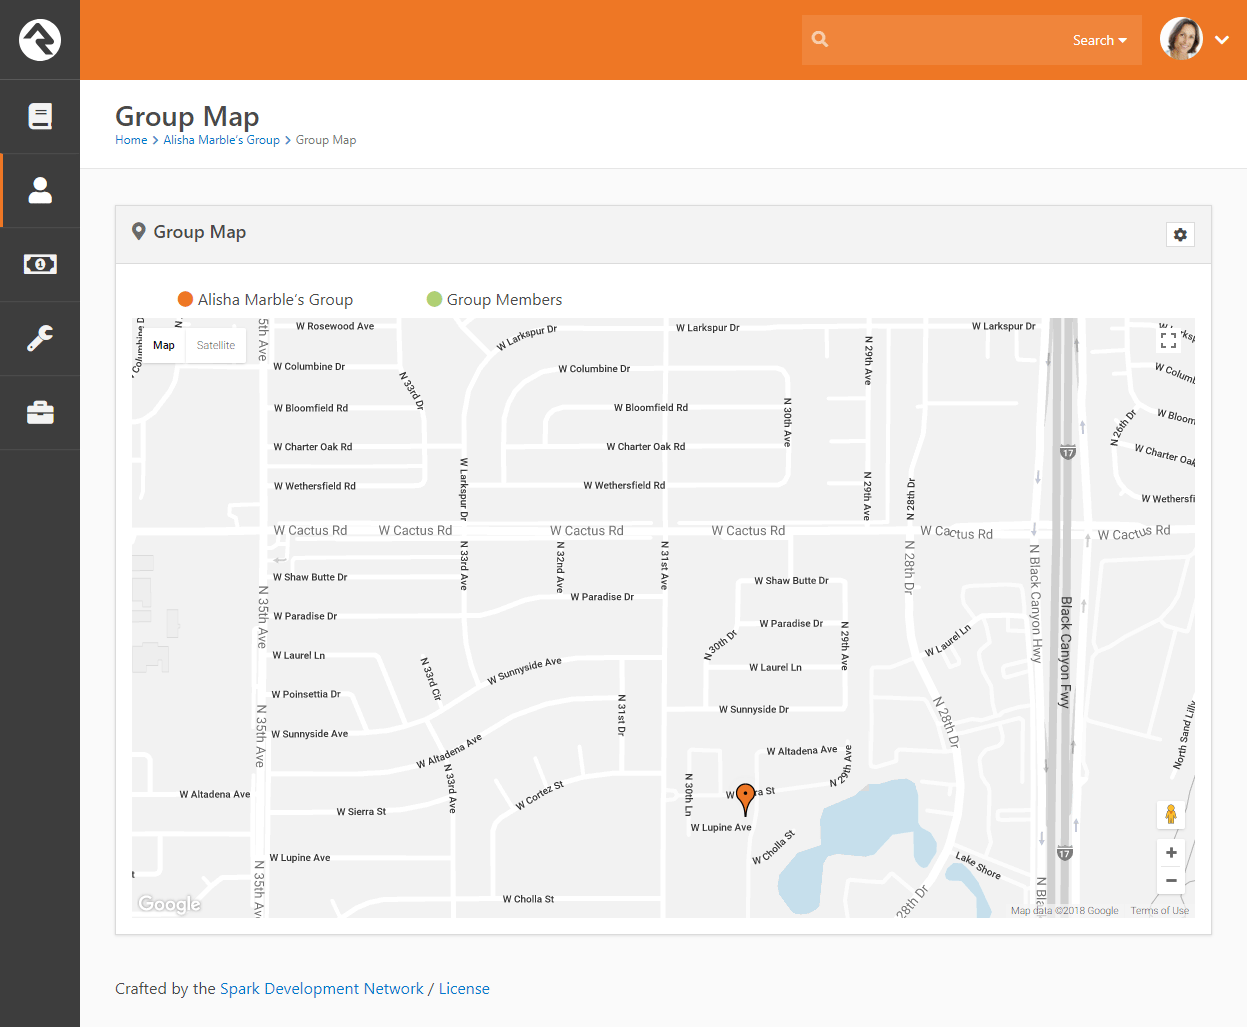
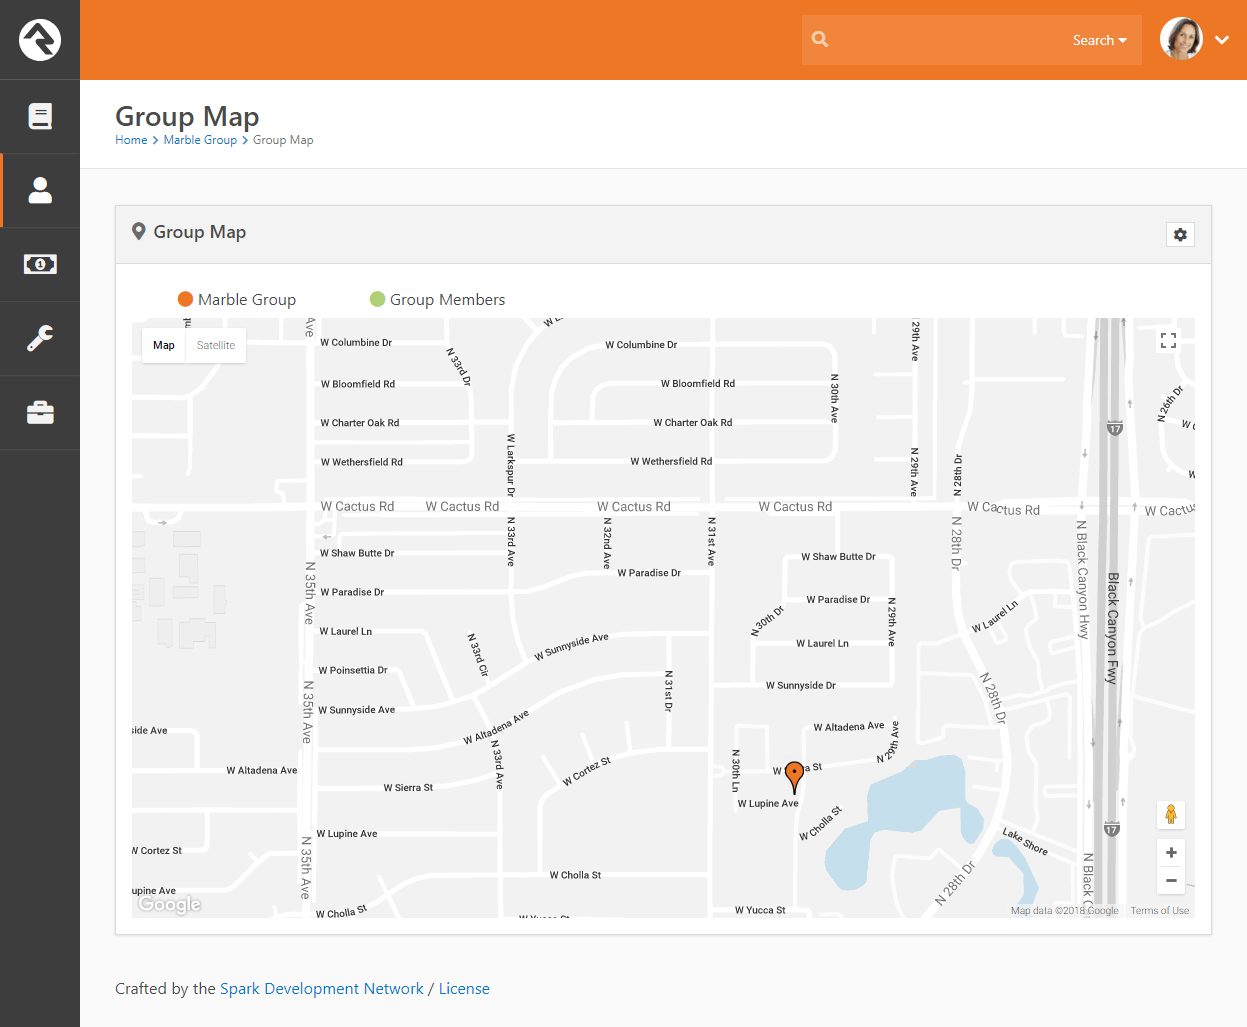
Group Maps
Clicking the map marker button will take you to an interactive group map showing the members of the
group. Depending on the configuration of the group other features may be enabled.
If the group has a geopoint (determined through the address geocoding process or by selecting the point on
the map) the location of the group will also be present on the map.
If the group has a defined geofence this fence will be shown on the map. The presence of the geofence will also
enable the display of connection status checkboxes at the top of the map. Checking these boxes will show everyone
with that connection status in the database who lives within the geofence. This allows you to view possible
'prospect' group members.
Limiting The Display of Certain Connection Statuses
In order for a connection status to be displayed as a checkbox the status must be configured with a 'Color'
attribute. This helps determine the pin color for the map marker as well as acts as a global setting to help
determine which connection statuses should be mapped. You can set the color for a connection status under
Admin Tools > General Settings > Defined Types >
Connection Status.
Group Map
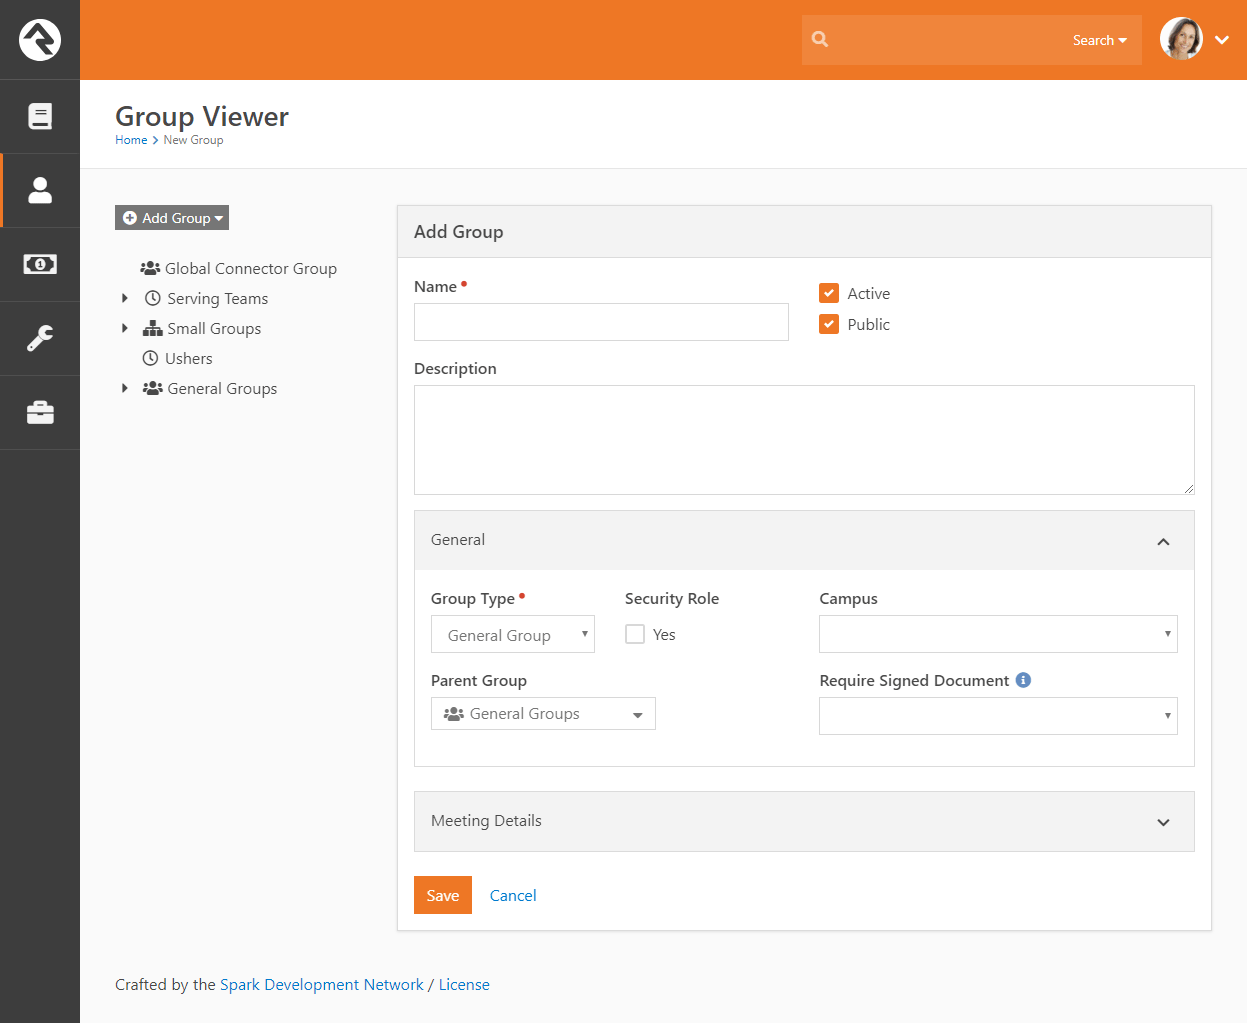
Adding a Group
You can add a new group to the tree by clicking the
Add Group
dropdown and then selecting the location from the list. Adding a group to
the Top-Level
will place the group at the root or top of the tree. Selecting
Child to Selected
will place the group under the currently selected group.
Note
If you have a group selected but Add Child to Selected
is disabled, then this group type does not allow child groups.
See the
Group Types
section below for more on group hierarchies.
Adding a Group
Group Details
The group details section displays all of the information about the group.
The group type and campus (if configured) will be shown as labels in the
banner at the top. A map of the group’s location will also be shown, if
configured.
Editing a Group
Clicking the Edit
button from the detail section will allow you to edit information about
the group and provide additional configuration settings. From here you can also change the group name and set whether a group should be active or inactive. If you mark a group inactive you also change the active status of all child groups to inactive as well. Each area of the
edit screen is discussed below.
Editing a Group
General
-
Group Type: Changing the group type of an existing group
is possible, but it does have some consequences. All group attribute data
for the group will be lost if the group type is changed.
-
Parent Group: This will move the group to a new parent
in the hierarchy. Removing a parent group will move the group to the root
or top of the tree.
-
Campus: Providing an optional campus will link the group to a specific campus.
-
Security Role: This option will enable the group to
operate as a security role. The members of the group will be granted
access to whatever privileges the group is granted.
-
Require Signed Document: This setting determines if the members of the group require a signed
document/waiver to be in the group. Rock can automate the sending
of requests to get digital signatures after each registration. We cover this topic in detail in the
Admin Hero Guide.
Meeting Details
This area allows you to add locations and times based on the configuration provided
through the group type.
Group Attributes Values
Any group attributes values added by the group type will be available here for editing.
Member Attributes
In this area, you can configure attributes to be assigned to each member
of the group. These attributes will be available for edit when
adding or editing group members.
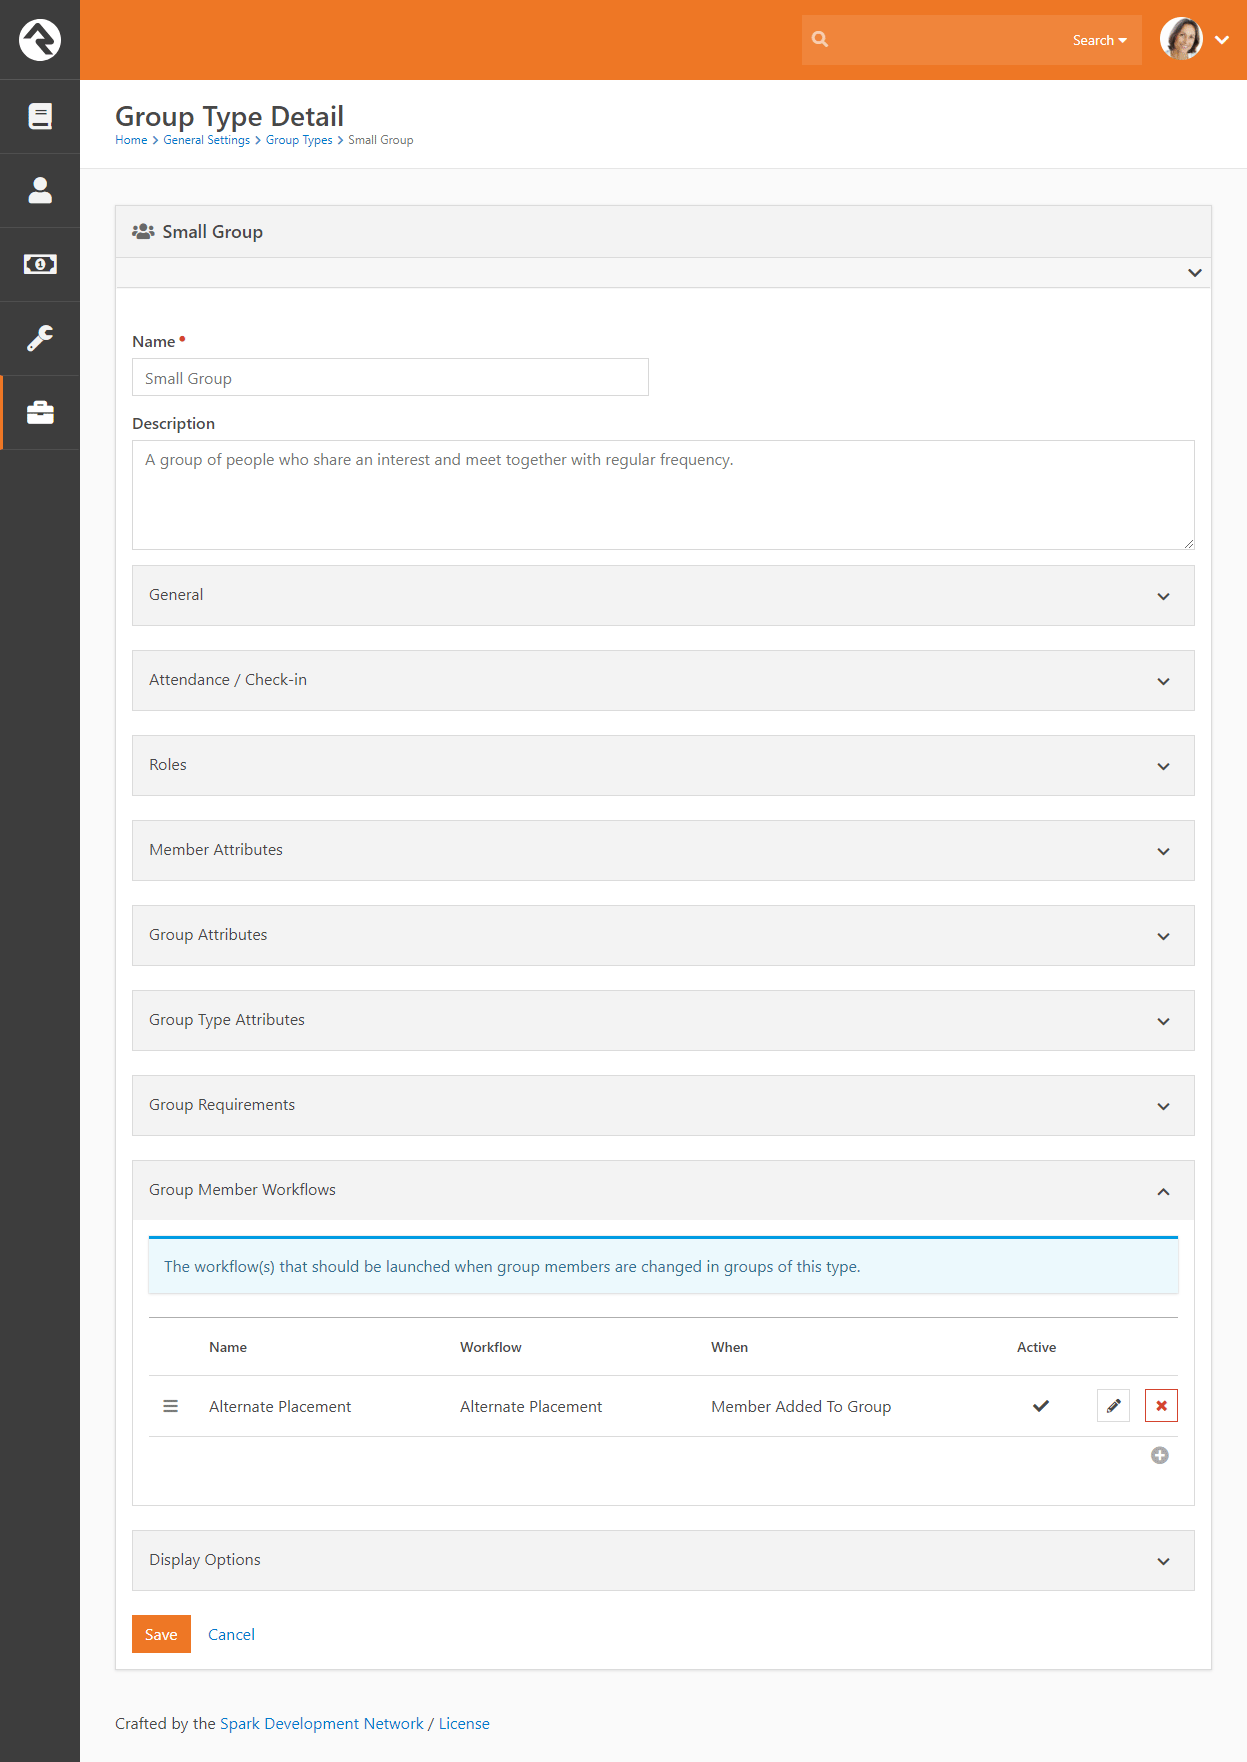
Group Member Workflows
This section allows you to configure workflows that will be launched when specific events occur with group
members.
More Information Below
You may notice that we skipped over a few sections above. Additional information
on these sections will be covered below.
Group Types
As you start to customize Rock for your ministry, you'll want to define new
group types to match your various ministry areas (small groups, ministry groups, etc.)
Tip:
Once you realize the power of group types, you’ll be tempted to start
creating many custom types to fit each of your ministries.
Don't do it! Resist this temptation at first. Less is more.
Look for common points within your many ministries. This will
help you reduce the number of group types that you’ll need. In general,
it’s easier to add new group types later than it is to merge group types
in the future.
Group Hierarchy
One of the most important concepts to understand as you create new group
types is the relationship that groups have to each other. There are two
basic hierarchy types to choose from:
-
Structured Hierarchy: In this configuration,
the levels of hierarchy are defined and limited. For example,
you may want to define the hierarchy of your small group ministry
to have a single leadership team, under them a level of lay leaders
who act as coaches to the groups, and then the groups themselves.
In a structured hierarchy you can be sure that this structure is
enforced.
Example of Structured Group Heirarchy
-
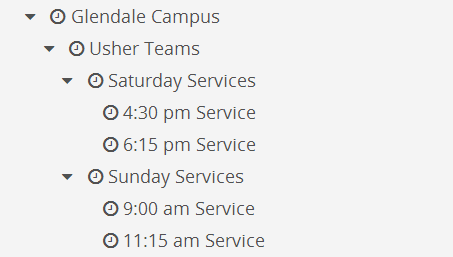
Flexible Hierarchy: For some ministry types,
you want your groups to have a more unstructured hierarchy.
An example of this might be how you set up serving teams. You may
want serving teams to be able to have sub-teams that might have additional
sub-teams themselves. These hierarchies may be very deep in some
ministry areas (like First Impressions) but shallow in others.
Example of Flexible Group Heirarchy
You define these hierarchies by configuring what child groups each group
type can have. In the structured example, you would create a group type
called Small Group Leadership,
which would allow child group types of Group Coaches,
which would allow child groups of Small Groups.
The Small Groups
would not allow any child types, ensuring that your hierarchy was fixed at the third level.
In the flexible hierarchy example, you would configure Serving Teams
to have child-types of itself. This guarantees that you can have an unlimited hierarchy.
Administering Group Types
You administrate group types under Admin Tools > General Settings > Group Types.
When adding or modifying a group type, you can provide the following types of configuration:
Group Type Editor
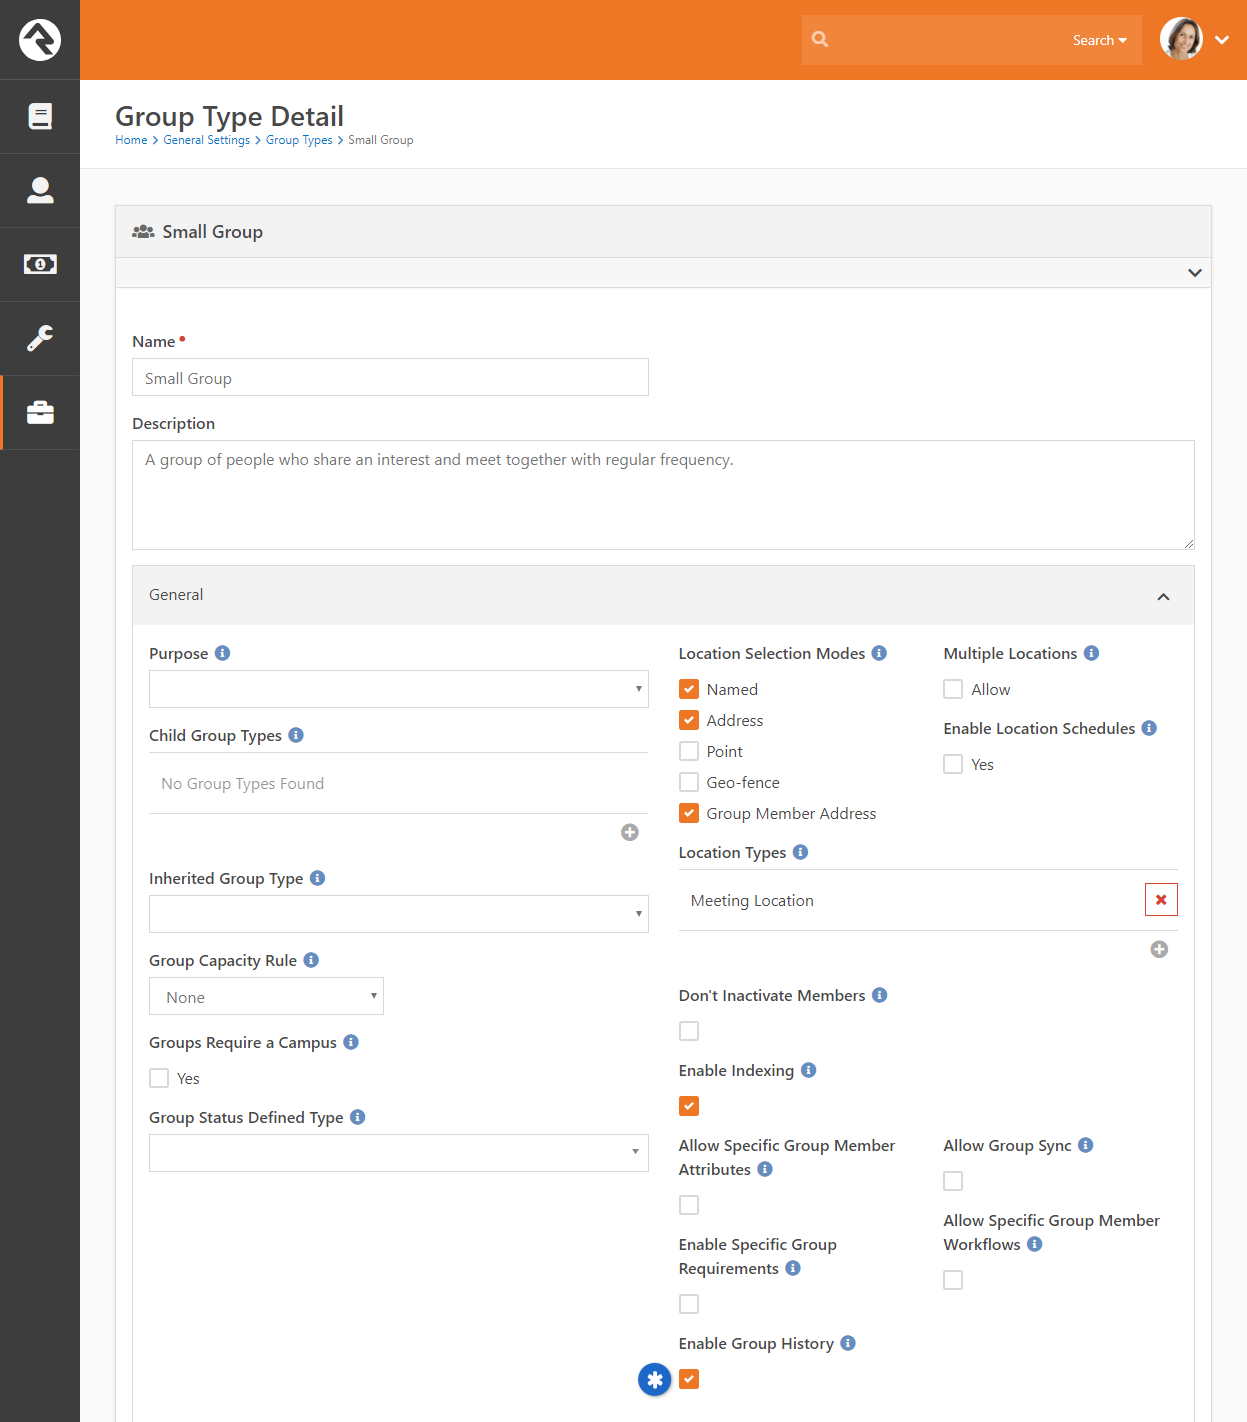
Let's look at the different Group Types settings you can configure in the Group Type Detail block.
Show/Hide Group Type Settings
The following Group Type settings, located in the General section of the Group Type Detail block, control which panels and options should be shown or hidden in that block.
| Setting |
Description |
| Allow Specific Group Member Attributes |
Determines if specific groups are allowed to have their own group member attributes. If selected, the Member Attributes section will be shown. |
| Enable Specific Group Requirements |
Determines if the Group Requirements section will be shown on the Group Details block. |
| Allow Group Sync |
Determines if groups of this type are allowed have Group Syncs. This will show/hide the Group Sync Settings section. If a group of this type already has group syncs, they will be kept. Unchecking this box will not prevent them from running. |
| Allow Specific Group Member Workflows |
Determines if groups of this type should be allowed to have Group Member Workflows. If
selected, the Group Member Workflows section will be shown. |
Common Group Type Settings
| Setting |
Description |
Example |
| Group Term |
This is what Rock will use to describe the group on the various screens. |
Group, Family, Event, Team |
| Group Member Term |
This is what Rock will use to describe the people in the groups on the various screens. |
Member, Individual, Participant |
| Roles |
Roles describe the relationship of the individual to the group. Are they a leader? Or just a member? |
Leader, Member, Prospect |
| Default Group Role |
The default role to use when someone is added to the group. |
Selection of one of the roles defined to the group. |
| Child Group Types |
As we discussed above, child group types help determine the hierarchy of the group tree.
This tells Rock what kind of groups can be added as children of the current group. |
Serving Teams may allow Child Serving Teams |
| Location Types |
The types of locations that can be assigned to the group. |
Meeting Location |
| Location Selection Mode |
Determines how locations should be selected in Location Picker. |
The following options are available:
-
Named - Allows you to pick from named locations that have been defined
under Admin Tools > General Settings
> Named Locations
-
Address - Allows the input of a new street address for the location.
-
Point - Displays a map that allows for the selection of a specific latitude/longitude point.
-
Geo-fence - Also displays a map that allows for drawing a polygon shape to use as a geo-fence.
-
Group Member Address - Lists all of the addresses associated to the group members of the group. Note that
if the address of the group member changes the meeting location will not be automatically updated to this
new address.
|
| Multiple Locations |
Determines if the group can have multiple locations. |
True/False |
| Group Attributes |
The custom attributes that each group will have. |
Meeting Day, Meeting Time, Topic of Study |
| Group Member Attributes |
The custom attributes that each group member will have. |
Hours Per Week Serving, Assigned Bus |
| Group Capacity Rule |
Rock allows you to set individual capacities for groups. This configuration setting determines how the capacity should be
enforced.
|
The following options are available:
- None - This disables the group capacity features.
- Hard - This places a hard limit on the capacity. Once the capacity is reached no additional group members can be added.
- Soft - The soft option will warning you when adding a member that is over the groups capacity but still allows you to add them.
|
| Groups Require Campus |
This setting will require that all groups of this type have a campus when adding and editing. |
True/False |
Attendance and Check-in Settings
| Setting |
Description |
Example |
| Takes Attendance |
Determines if the group takes attendance. This will help to
enable check-in and metrics features. |
True/False |
| Weekend Service |
Determines if attendance for this group should be counted towards
attending a weekend service. For example the attendance badge on
person profile will only consider attendance to groups with this
value enabled. |
True/False |
| Group Scheduling Options |
This setting is used when you want to configure a schedule for the groups of this type. The schedule is used for
features like group attendance and group member scheduling. The options you select here help determine the types of
schedule that can be configured for the groups.
|
Schedule type options include:
- Weekly: This options allows a simple weekly schedule to be selected. When configuring a group one
only needs to select the day of the week the group meets and the start time. We highly recommend
that you use this setting as it is the only schedule option that is usable as a filter in the group
finder.
- Custom: With this option enabled each group can select its own repeating schedule. This option allow for the
most power and flexibility, but when used the schedule created can't be used as a filter in the group finder.
- Named: The named option allows you to pick the group's schedule from a list of preconfigured schedules. These
schedules are configured under Admin Tools > General Settings > Schedules.
Like the Custom option this setting can't be used as a
filter in the group finder.
|
| Schedule Exclusions |
This setting allows you to define a set of date ranges when all of the groups of this type will not meet regardless of the
specific group schedules.
This allows you to easily configure breaks and holidays without having to edit each groups schedule.
|
Set of date ranges when groups of this type will not meet.
|
| Attendance Rule |
Determines how check-in will work if the person is not already in the group. |
Add on Check-in (adds the person to the group if they are not already in the group),
Already Belongs (the individual must already belong to the group) |
| Group Attendance Requires Location |
This option will require that all attendance occurrences have a location. |
True/False |
| Group Attendance Requires Schedule |
This option will require that all attendance occurrences have a schedule. |
True/False |
Advanced Group Type Settings
These settings will be rarely used, but it's helpful to know they exist as
you define your group types.
| Setting |
Description |
Example |
| Purpose |
The purpose helps categorize different group types together. This allows you the flexibility of creating
multiple group types but at the same time providing a way of 'linking' these various types together with
a single 'purpose'. To add a new purpose simply add a new
Defined Value under
Admin Tools > General Settings
Defined Values > Group Type Purpose.
|
While we recommend that you start with a single group type to manage your various serving teams you could
over time add new ones. You would then create a purpose to descibe them all as serving opportunities.
|
| Group Type Attributes |
Custom attributes that will be shared by every group of this type. In other words every group of this
type will have the same value of these attributes.
|
Group Type Attributes are used by the check-in system. Most group types won't have a need for them. |
| Attendance Prints To |
Determines the device / location where check-in labels will be printed. The options are:
- Default - Uses the print location configured in the check-in workflow.
- Kiosk - Overides the check-in workflow to always print at the check-in kiosk.
- Location - Overrides the check-in workflow to always print at the location configured in the group.
|
This setting will have limited value outside of configuring check-ins. |
| Inherited Group Type |
This allows you to create a group that inherits its attributes from another group type.
This is helpful when you have two group types that are very similar but one needs a few more attributes.
|
Say you have a Serving Team
group type that covers most of your serving groups. Your worship teams, however, would like to
add a special attribute for Instruments Played.
You want this new group type to have all of the same attributes of the current Serving Team.
To solve this, add the Serving Team
group type as the Inherited Group Type
of the new Worship Serving Team group type.
|
| Show Connection Status |
This allows you to show a person's connection status in a column on group member lists. |
This comes in handy for trying to understand a person's connection to your organisation at a glance. |
| Show Marital Status |
This allows you to show a person's marital status in a column on group member lists. |
This comes in handy for quickly viewing a person's marital status. |
Group Member Roles
People often have special roles in groups. Some are leaders; others have unique duties. To help differentiate the members of a group,
you can give each a Group Member Role. The list of possible roles
are defined on the group type. For more information on the roles available, you can
check out the chapter on Group Members.
Securing Groups
Most groups you create will need to have some level of security added to them. They may or may not
contain the world’s secrets, but you’ll want to control who can add, edit and/or delete them at the very least.
Securing Group Types
By adding security to a group type, you control the base security of every group of that type.
Let's say your organization adds a new type of group to help manage some classes you're starting.
You may want to create a new group type for this initiative where every class is a group of this new
type. By adding security to the group type, you can ensure that every group can be viewed and
edited by a select handful of people.
To add security to a group type, go to Admin Tools >
General Settings > Group Types. There you will see
a list of group types in a table. In the far right column you will see an
button.
Clicking this will allow you to set the security for the selected group type.
Securing A Group
There may be occasions where each group will need different security settings. Don't worry, this is
super easy in Rock. To secure a specific group, find the group in the group viewer
(People > Group Viewer). On the group details
page you'll find the same button. Clicking
this button will bring up the Rock security dialog where you can adjust the security settings. Anyone with permission to
edit security roles also has access to the Manage Members tab,
where they can add, edit and delete group members (but not edit or delete the group itself).
Note the inherited
permissions at the bottom of this screen. Inherited security is a very powerful concept with groups. By default,
a group will inherit the security of its parent groups and group type. This limits the amount of security
configuration each group requires. These inherited rights are only a starting point. You can either build
on top of these permissions or override them. The choice, and power, is up to you.
At first you may be tempted to go overboard with your group's security settings. In general it's best to keep
them simple. For instance, in the case of home-based Bible studies you may be tempted to secure each group
differently to only allow the leader to edit them. While in certain cases you may need to do this, you
could also secure all groups with a generic Small Group Leader role. You could then limit which groups
a leader was able to navigate to through the configuration of your leader toolbox blocks.
Group Member Roles
Group member roles play an important role in how groups are secured. Each role can be configured to
provide View and / or
Edit rights. This is
configured under Admin Tools > General Settings > Group Types.
Inherited Permissions
When determining the security of a group it’s important to consider not only the specific permissions of the group but also
the inherited permission rules. The inheritance rules for groups is:
Current Group > Group Type Security > Parent Group Security > (continue up the hierarchy till it reaches the root group) >
Group EntityType Security > Global Default.
The primary inheritance rules come from the group’s hierarchy but the system has a built in ‘choke point’ check on the
security of the group type first. Why is this? Adding a quick check of the group types security allows specific types of groups
to have unique security considerations. Take for example a group type for ‘Addiction Classes’. Adding a check for the group
types security allows a way for limiting visibility to these groups without having to worry about inconsistencies in the
security of the group hierarchy. In most cases the group type will not have specific security so this check will not matter,
but it’s there if you need it.
If when checking the group’s security the person is blocked access there’s still one last check to be done. Roles defined
on the group type can be configured to provide access to the group. For instance you can configure the leader of a group to have
view/edit rights to that group. Likewise the member of a group could be setup to have view access. This allows a very simple and
flexible way of providing access to external individuals.
Group Strategies
The flexibility built into Rock groups is very powerful. But like a puzzle when
you open the box and dump out the pieces, it can be a little overwhelming to get
started. Below are a few strategies for you to consider first. Don’t
be afraid to ask others how they have configured their groups. The Ask
section of the Rock website is perfect for these kinds of discussions.
Multiple Group Viewers
Rock comes preconfigured with a general group viewer People > Group Viewer,
but you can add more. Say, for instance, your church has a strong small group ministry.
You may want to create a new Group Viewer page just for this ministry. You can do
this by adding a new page under People
(or any other page you like) and add the group viewer blocks to the page.
Group Viewer Blocks
The following blocks are used to make a group viewer. We recommend that you use the
LeftSidebar Panel
page layout.
- 1 Group Tree View
- Add a group tree view block to the sidebar zone to help you navigate your
group heirarchy.
- 2 Group Details
- Add the group details block to the top of the main zone.
- 3 Group Member List
- Next add the group member list block under the group details.
When you set up the Group Tree Block
you can set the root group to start with and limit which types of groups it will display. This allows
you to make a very specific small groups viewer with just a couple of clicks.
Group Folders
As you start to think about your group hierarchies, make sure that you plan for growth.
This might mean that you create special groups in your hierarchy to help to categorize
your groups. You can think of this like using folders on your computer to help manage
all of your files. You could throw all of your files in one folder, but you’d never find anything.
Adding folders helps you arrange and sort your groups. While folders add little value
to your computer’s file-system, these category groups
can actually be beneficial beyond just organizing. For instance, if you add these
category groups to your serving teams, the categories can act as leadership teams
for their sub-groups. Take a look at this example of the first impressions serving teams
at a large multi-campus church:
Sample Serving Heirarchy
Notice how each campus and ministry area has a leadership group. These groups not only help
arrange the serving teams, but they can also have members of their own that represent the
leadership team for each area.
Group Schedules
The ability to define a group's schedule in Rock allows it to enable new features
like group attendance and, in the future, group member scheduling. Let's take a
brief moment to see the various scheduling options for groups and how these settings
affect the features available.
Types of Group Schedules
There are three types of group schedules that can be configured for a group.
To help simplify the editing of a group we allow you to configure which of
these options are available to groups of each particular type. For instance,
you'll probably want to configure your
Small Groups
to only be configured to allow the
Weekly
schedule. You can select which of these options are available for a specific
group type under
Admin Tools > General Settings > Group Types
Weekly
This option allows a simple weekly schedule to be selected. When configuring
a group, one only needs to select the day of the week the group meets and
the start time. We highly recommend that you use this setting because it
is the only schedule option that is usable as a filter in the group finder.
For example, if you set your small groups to the
Weekly
schedule option, your website visitors can find groups that meet on a specific
day of the week that's convenient for them.
Custom
With this option enabled, each group can select its own repeating schedule.
This option allows for the most power and flexibility, but the schedule
created can't be used as a filter in the group finder.
Named
The named option allows you to pick the group's schedule from a list of
preconfigured schedules. These schedules are configured under
Admin Tools > General Settings > Schedules.
Like the Custom option, this setting can't be used as a filter in the
group finder.
Schedule Exclusions
Picture this: you've just finished entering all of your small groups into the
system with their correct schedules and your supervisor just announced that,
"groups are taking a two-week break." Not a problem! Adding a
Schedule Exclusion
to the Small Group
group type will add the exclusion(s) to the schedule of all groups of this
type. This is done under
Admin Tools > General Settings > Group Types.
This not only keeps the schedule accurate it also keeps attendance reminders
from being sent while groups are not meeting.
Group Attendance
Whether you're following the leadership principle of inspect what you expect
or you simply want to keep a pulse on the health of a group, the group attendance
feature can simplify the process of gathering participation details of your group
members.
Configuring a Group for Attendance
Before a group can take attendance, its group type must first be configured
to enable attendance tracking under
Admin Tools > General Settings > Group Types.
From here you should select the group type you'd like to configure check-in
for. Under the General
tab enable setting Takes Attendance.
While this one setting is all you need to enable the attendance features, there
are a couple of other settings that help improve the attendance tools:
-
Group Schedule Options: While a group schedule is not
required to take attendance, having a schedule will simplify the attendance
entry because it will guide the user to enter attendance on those dates
when the group meets.
-
Schedule Exclusions: While each group can set its own
schedule (including exclusion dates) you may want to set exclusion
dates for every group of this type. This is especially helpful when
using the simple schedule option where you only specify the day of the
week and start time for a group. Adding these group type schedule exclusions
help to keep email attendance reminders from being sent.
-
Send Attendance Reminder: This checkbox will enable the
sending of an attendance reminder email to the group leader the day
the group is scheduled to meet.
Entering Attendance Information
Internal Attendance Features
There are several ways to collect group attendance. The first is to use
the internal attendance features built into the group viewer under
People > Group Viewer.
You'll notice an attendance button on the group details block for groups
that are configured to take attendance.
Group Attendance Button
Selecting this option will bring up the group attendance grid. This grid
lists the previously entered attendance for the group and allows you to
enter new attendance records from the add button in the grid's footer.
Attendance List
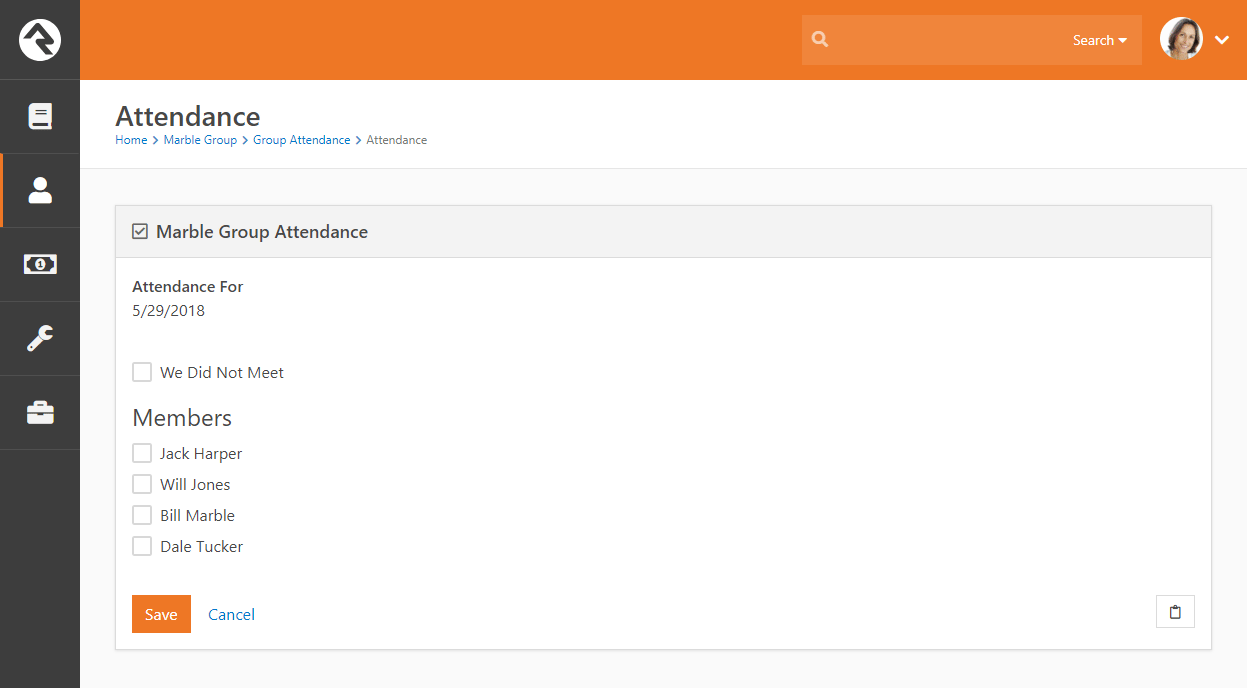
Selecting the
button will take you to the attendance entry screen below. From this
screen you can check off all those who attended the group or note that
the group did not meet on its scheduled time. You can also print an attendance sheet which allow attendance to be collected via a register.
Attendance Entry
External Attendance Features
Entering attendance on this internal screen is great for staff-entered
attendance. Often times you will want to push the responsibility of
attendance entry to the group leaders. One way to do this is to allow
them access to the leader toolbox. See the Group Leader Toolbox chapter
for details on this set of tools.
Rapid Attendance Entry
The Rapid Attendance Entry method of recording attendance may come in handy for your groups.
To learn more, see the Rapid Attendance Entry
chapter of the Checking Out Check-In manual.
Attendance Reminders
As noted in the configuration section above, you can also configure Rock to
send an email to the group leader on the day that their group meets to remind
them to take attendance. This email will include a link to take them straight
to the attendance detail screen. Since each group leader gets an individual
email, we have enabled this link to not require a login to help simplify the
process (the user however must have edit rights to the group to enter attendance).
There are two other configuration points for attendance reminders. The first
is the system email that is used as the template for the email. This template
can be edited under Admin Tools > Communications > System Emails > Group Attendance Reminder.
The other configuration point is the job that is run to send the emails on a
daily basis. This job must be created for every group type that requires
reminders. For more information on this job see the
Service Jobs Relating To Groups
section below.
Before You Report
When running reports on attendance data be sure to filter on Did Attend to show those who
attended the event.
Group Sync
Have you ever thought,
"How am I going to
keep the member list of this group up to date?" Well, the Group Sync might
just turn out to be your next best friend.
There are times when the members of a group can be automated. Take, for instance,
a security group created to give access to a toolbox for your group leaders. Those
leaders are already set up in Rock. Keeping this in sync manually would be nearly
impossible as you add and remove new groups. With the Group Sync feature this can
all be automated for you. In fact if you can create a
Data View
of people you can sync them to a group. Here’s how.
First create a Data View of the people that should be synced as group members. Next
go to the group you'd like to sync to and edit its details. If you have
Administrate
access to the group you'll see a panel labeled Group Sync Settings. This
panel is displayed if there is at least one Group Sync set up for the group, regardless of whether Allow Group Sync is enabled
in the Group Type Detail screen. Below are the different configuration options available.
Group Sync Settings
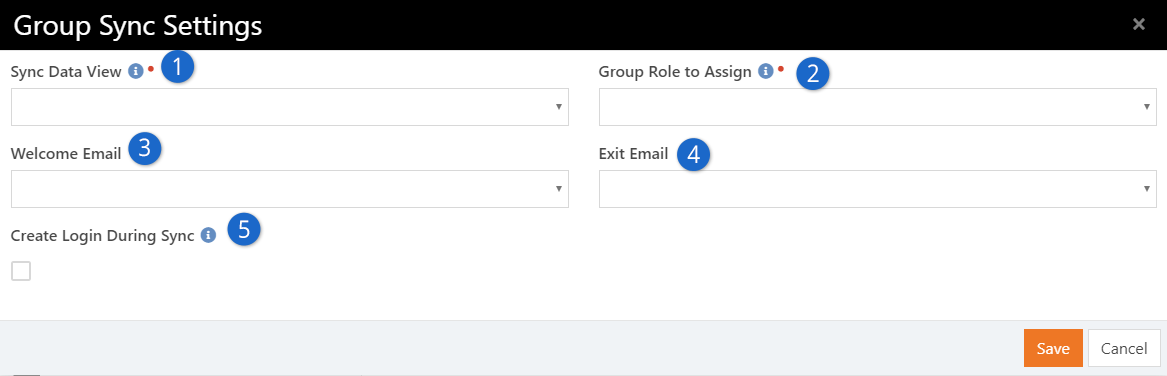
- 1 Sync Data Viewer
- This is the data view you created to use as the source of your sync. This
data view will be run and compared to the active member list of the group each
time the Group Sync.
job runs. (By default this job runs every 20 minutes. You can change this setting in the
Schedule Job Detail screen located at
System Settings > Jobs Administration > Schedule Job Detail.)
- 2 Group Role to Assign
- Select the role you want to assign members added by the selected Data View.
A sync is performed for each Group Role.
- 3 Welcome Email
- If you'd like to notify new group members of their new status in life you can
configure an email to let them know. We've provided a good template called
Sync Welcome To Group
that covers most cases. If the member already had a login it even reminds them
what their username is (not their password though, we store that in a super-secret
way that not even we can decrypt it). If you selected to create logins and they
didn't already have one, we'll send them their new username and password
(since we just created it we do know what this is).
- 4 Exit Email
- You can also choose to send a notification that they're no longer a part of the group.
- 5 Create Login During Sync
- When syncing with security roles you may also want the job to create logins
for new group members. This will give them access to use their new permissions.
Once a Group Role is managed by a sync, members cannot be added to that role manually; however, members not assigned that Group Role can still be added by hand.
When adding a member manually, any Group
Roles that are synced will not be included in the Role dropdown menu. A person can be assigned multiple roles in a group using a
combination of manual adds and group syncs. You’ll also notice a
icon on the member list to notify you that the group and that member are being automatically synced. The icon is also displayed in the upper-right corner of the list. If you hover your cursor over the icon,
Rock will display the roles being used to sync the members of the group.
Security Tip
The System Job that runs the sync as a setting to create new logins in such a way that the individual will need to reset their
password on their first login. This setting is initially set to not require a reset. Feel free to change this if you'd like.
Group Following
Hopefully by now you've seen how to follow a person. If not stop what you're doing and
read this.
You can also follow a group. Why...? Following a group allows you to put that group into easy reach from your
My Dashboard'.
How To Follow
Following is super simple. First navigate to the group you'd like to follow. Then, press the follow star in the upper right of the group detail
block.
Following A Group
Following a group also enables several other features. For instance, when you have an event registration that places registrants into a
group, you can configure the registration to also notify all individuals who are following that group.
Group Members
Group members are a key component of groups. Like groups they come with a ton
of options for customization.
Group Member Roles
People often have special roles in groups. Some are leaders; others have unique duties. To help differentiate the members of a group,
you can give each a Group Member Role. The list of possible roles
are defined on the group type. Each role has the following configuration options:
-
Is Leader: Determines if the individuals in this role are considered leaders within the group. This option
enables additional functionality within Rock.
-
Can View: This gives the members of this role the ability to view the group information in various group toolbox blocks.
-
Can Edit: Allows members to edit group information in various group toolbox blocks.
-
Minimum Required: Rock allows you to have rules on how many individuals can have certain roles. This setting configures
the minimum number of individuals who must have this role. This will keep you from deleting a group member if the deletion will
drop the number of individuals with this role below the minimum.
-
Maximum Allowed: This setting is like the minimum but limits the number of people who are allowed this role. For instance,
you might configure a group type to only allow one person to be the leader. You can also use this option to limit the number of adults in a
family. A family is a group type.
-
Default: When someone is added to a group, this will be the default role they'll be assigned to. Note: Some blocks will
have a block setting that overrides this default. This setting will handle cases when a block does not provide an overriding setting.
Group Member Status
The status of the group member tells you the person's standing within the group.
The available statuses are:
-
Active: The individual is currently participating in the group.
-
Inactive: The individual is not currently participating
in the group. Usually this status denotes that the person did participate
at one point but isn't doing so anymore. How you choose to use
this is up to you.
-
Pending: The individual has not yet fully joined the group.
Group Member Attributes
Group members can also have attributes. This allows you to track custom data
points for each person as it relates to their membership in the group.
Usually these Group Member Attributes
are defined on the Group Type
under Admin Tools > General Settings > Group Types.
When they're configured here, the attributes will apply to every group
member of this type. You can also add Group Member Attributes to a specific
group under People > Group Viewer > Group
if you have Administrate access to the group.
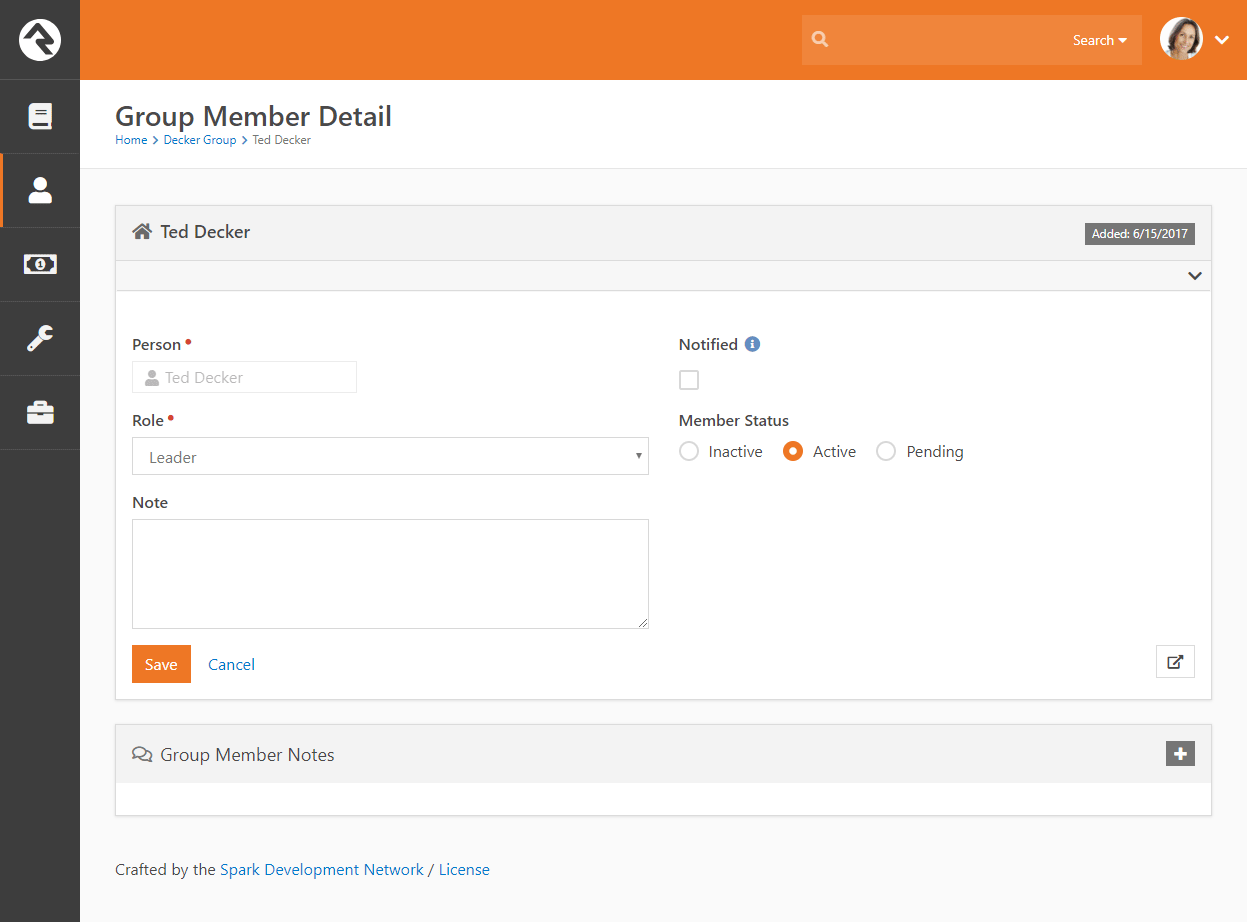
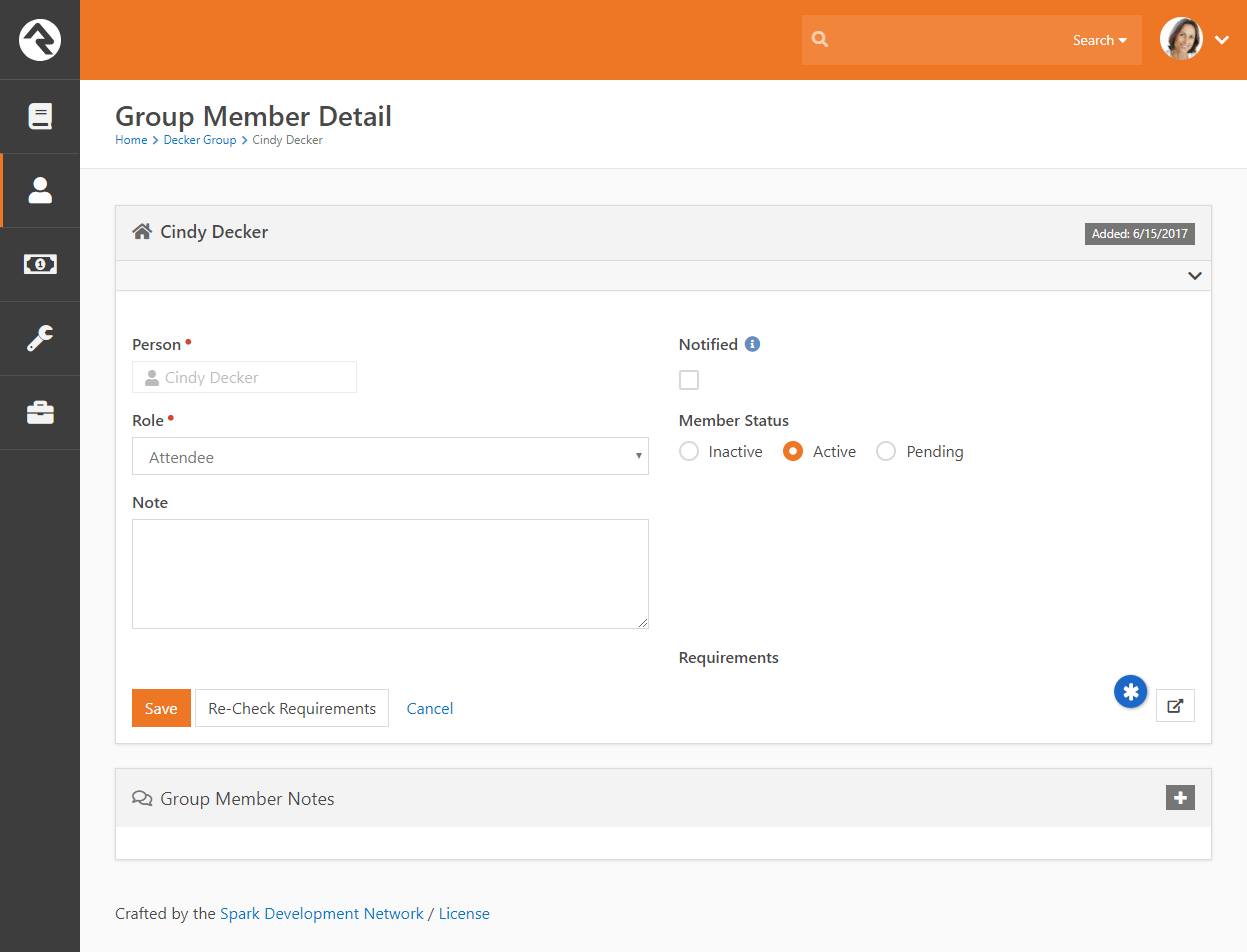
Editing a Group Member
Selecting a group member from a group member list will take you to the group
member detail screen show below. From here you can change the role and status
of the group member. You will also be able to modify any of the
Group Member Attributes
defined for the group. You will also see a note field for the group member.
This is useful for keeping basic notes. Rock uses this field to provide
specific information about the group member when processing things like
workflows and alternate placements.
Editing a Group Member
If a group member has a note attached, a small note icon
will display on the group member list to help identify this face.
It is also possible to move a group member from one group to another. When you do you will be given the option to transfer any group member notes to the new group.
Group Member Attributes
If the group member's current group and the destination group share group member attributes with the same key then those attributes will be retained. Otherwise, when the group member is moved the member's attribute information will be lost
Group Member Workflows
By now you realize that groups are the backbone of Rock. So it makes sense
that we'd invest in making them as powerful as possible. Group Member
Workflows are one of these investments. So what do they do?
Group Member Workflows are an easy way to trigger workflows to launch when
the state of a group member changes for a specific group. These events
include:
- Being added to a group
- Being removed from a group
- Member status changes (e.g. status changed from Pending
to Active)
- Member role changes (e.g. role changed from Attendee
to Leader)
- Member attendance
- Member alternate placements (discussed in detail in the next chapter)
The workflows you define for these triggers can be configured for all
groups of a specific type under Admin Tools > General Settings > Group Types
or for a specific group under People > Group View > Group.
Below is the screen you'll see in either case.
Required Access:
You must have Administrate
access to a group to be able to configure Group Member Workflows.
Group Member Workflow Settings
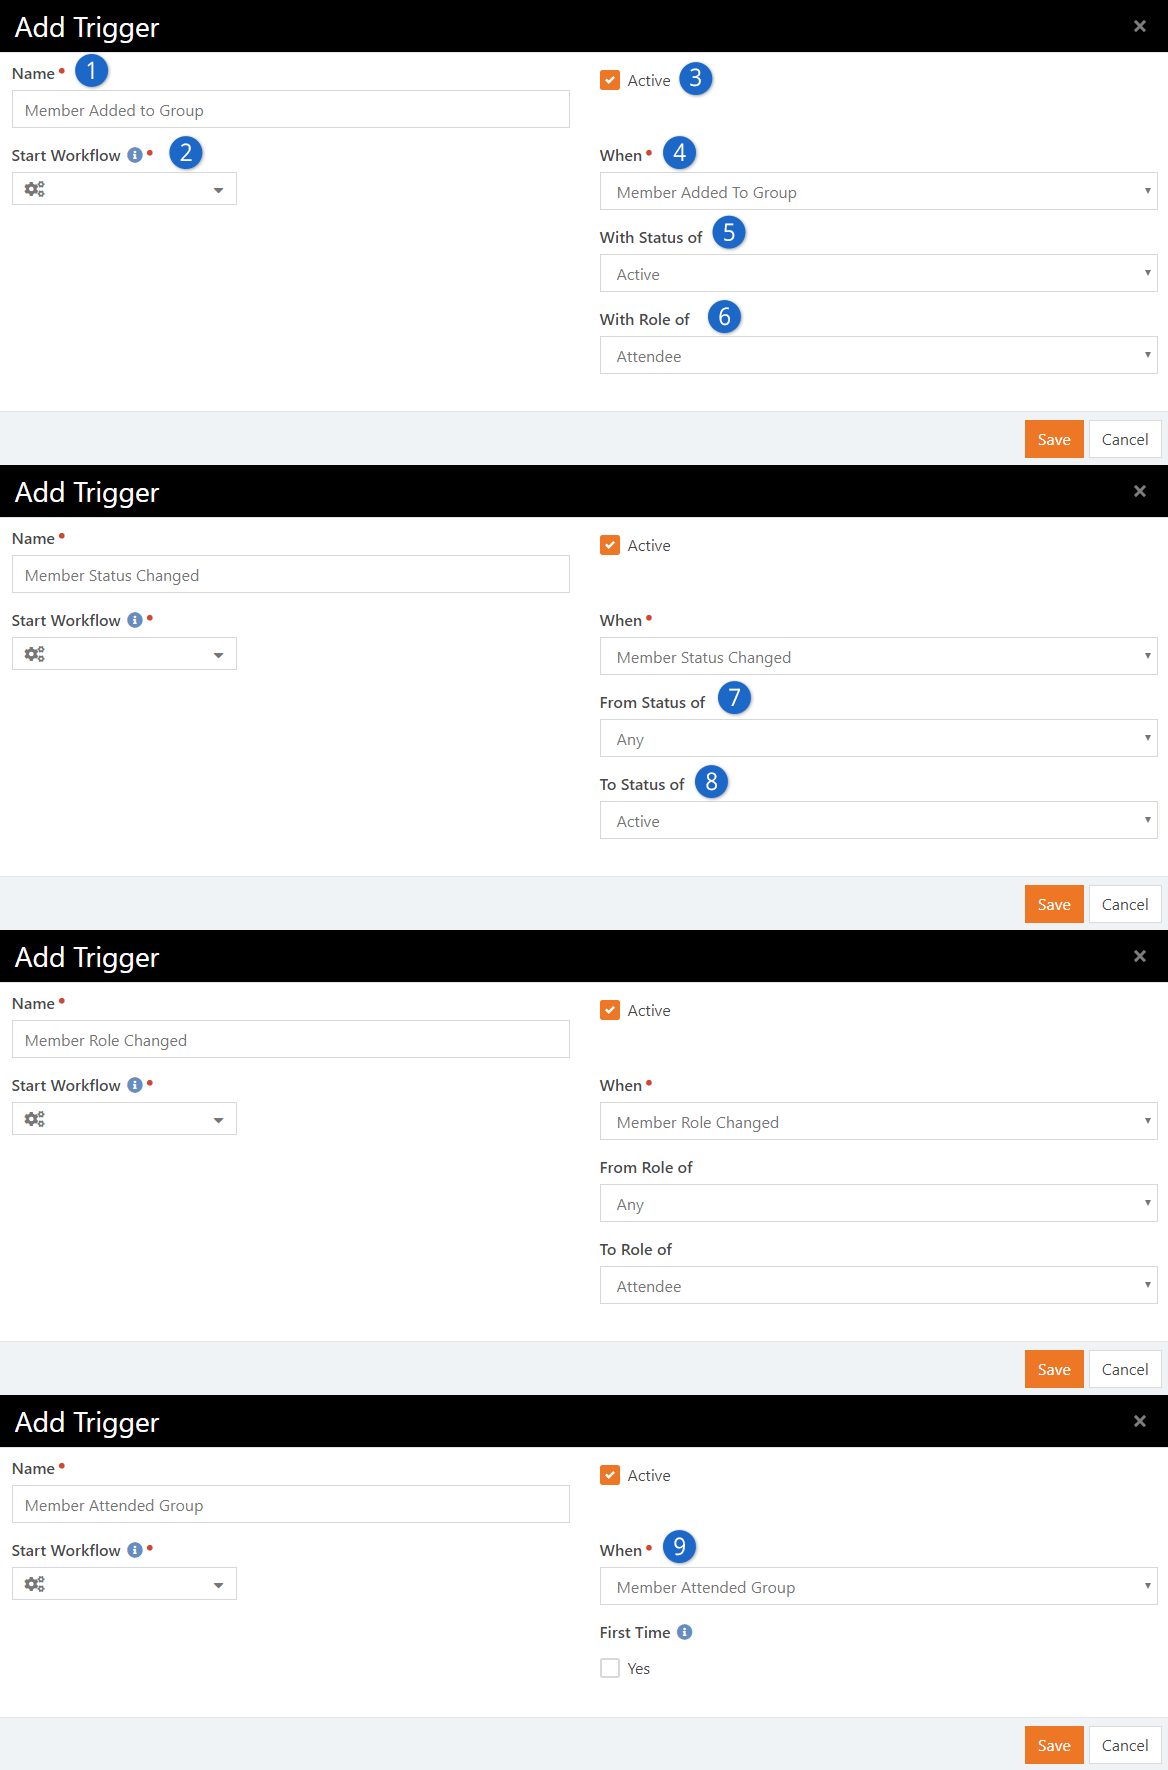
- 1 Name
- This is the name you want to use to describe the trigger.
- 2 Active
- Indicates whether this trigger is currently active.
- 3 Start Workflow
- The workflow type you'd like to start when the trigger conditions are met.
- 4 When
- This determines when the trigger should be considered.
- 5 With Status Of
- This allows you to filter when the trigger is applied for members with a specific status.
- 6 With Role Of
- This allows you to filter when the trigger is applied for members with a specific status.
- 7 From Status/Role Of
- Determines what the original status/role was to use as a trigger filter.
- 8 To Status/Role Of
- Determines what the new status/role must be for the trigger to fire.
- 9 First-Time
- Determines if this trigger should only be activated the first time a person attends this group or everytime.
Tips For Creating Triggered Workflows
When workflows are started from the group member triggers, they will pass in a few
attributes for your convenience (as long as the attributes are definded). These include:
- Person: The person that the group member represents.
- Group: The group that the person is a member of.
- AttendanceDateTime: Only applies to the Member Attended Group trigger type and is the date/time that person attended the group.
Whenever possible, the workflow will also pass in the Group Member
model as the entity of the workflow. You can access the group member properties
and attributes by using the Attribute Set From Entity
action with the following lava:
{{ Entity | Attribute:'HasBook' }}
{{ Entity.GroupMemberStatus }}
{{ Entity.GroupRole.Name }}
When Group Member Won't Be Passed:
Some member workflow triggers won't pass the group member as the entity. For
instance, for the Member Removed from Group
and Alternate Placement
workflow types there won't be a group member left to pass when these events are launched.
Alternate Placements
In some group usage scenarios you may want group leaders to be able to remove someone
from their group but not have the group member fall to the wayside. Alternate placements
allows you to do just that.
The first step is to configure the group type to have an alternate placement group
member workflow. We discussed creating these workflows in the previous chapter. This
member workflow type has two options: Show Note
and Note Required.
This allows the group leader to notate the reason why they are seeking to place the
group member elsewhere.
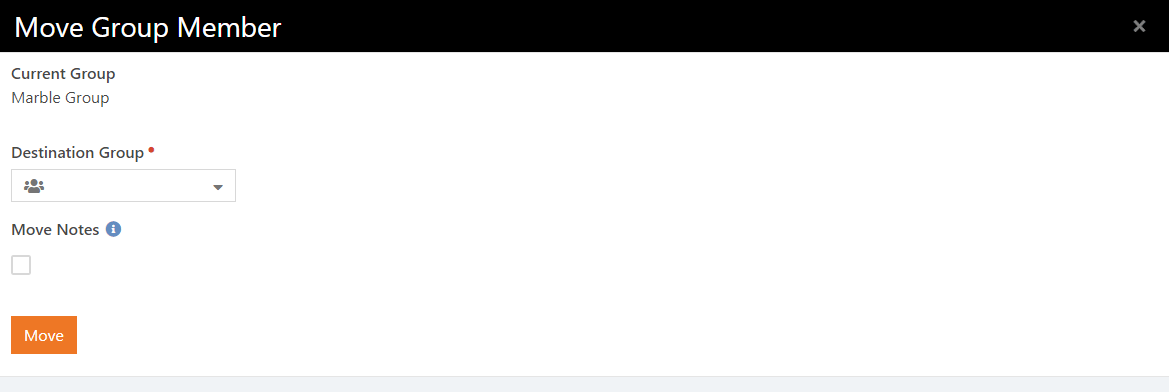
Configuring an Alternate Placement Workflow
The Group Member Detail
screen contains a button that allows you to initiate
an alternate placement workflow. When you click this button, Rock displays the
Move Group Member window, where
you can select which configured workflow to launch (if there is more than one)
and allow the leader to enter a note (if it's configured to do that).
Alternate Placement Button
 Alternate Placement Note
When the Move button is click, the workflow is launched and the person is removed from the group.
Tips For Creating Triggered Workflows
When workflows are started from the group member triggers, they will pass in a
few attributes for your convenience. These include:
- Person: The person that the group member represents.
- Group: The group that the person is a member of.
- Note: The note that was entered by the group leader.
- Group Member Status: The status that the group
member was when the workflow was launched.
- Group Member Role: The role name of the group member
when the workflow was launched.
- Any attributes that match those of the group member attributes configured
for the group.
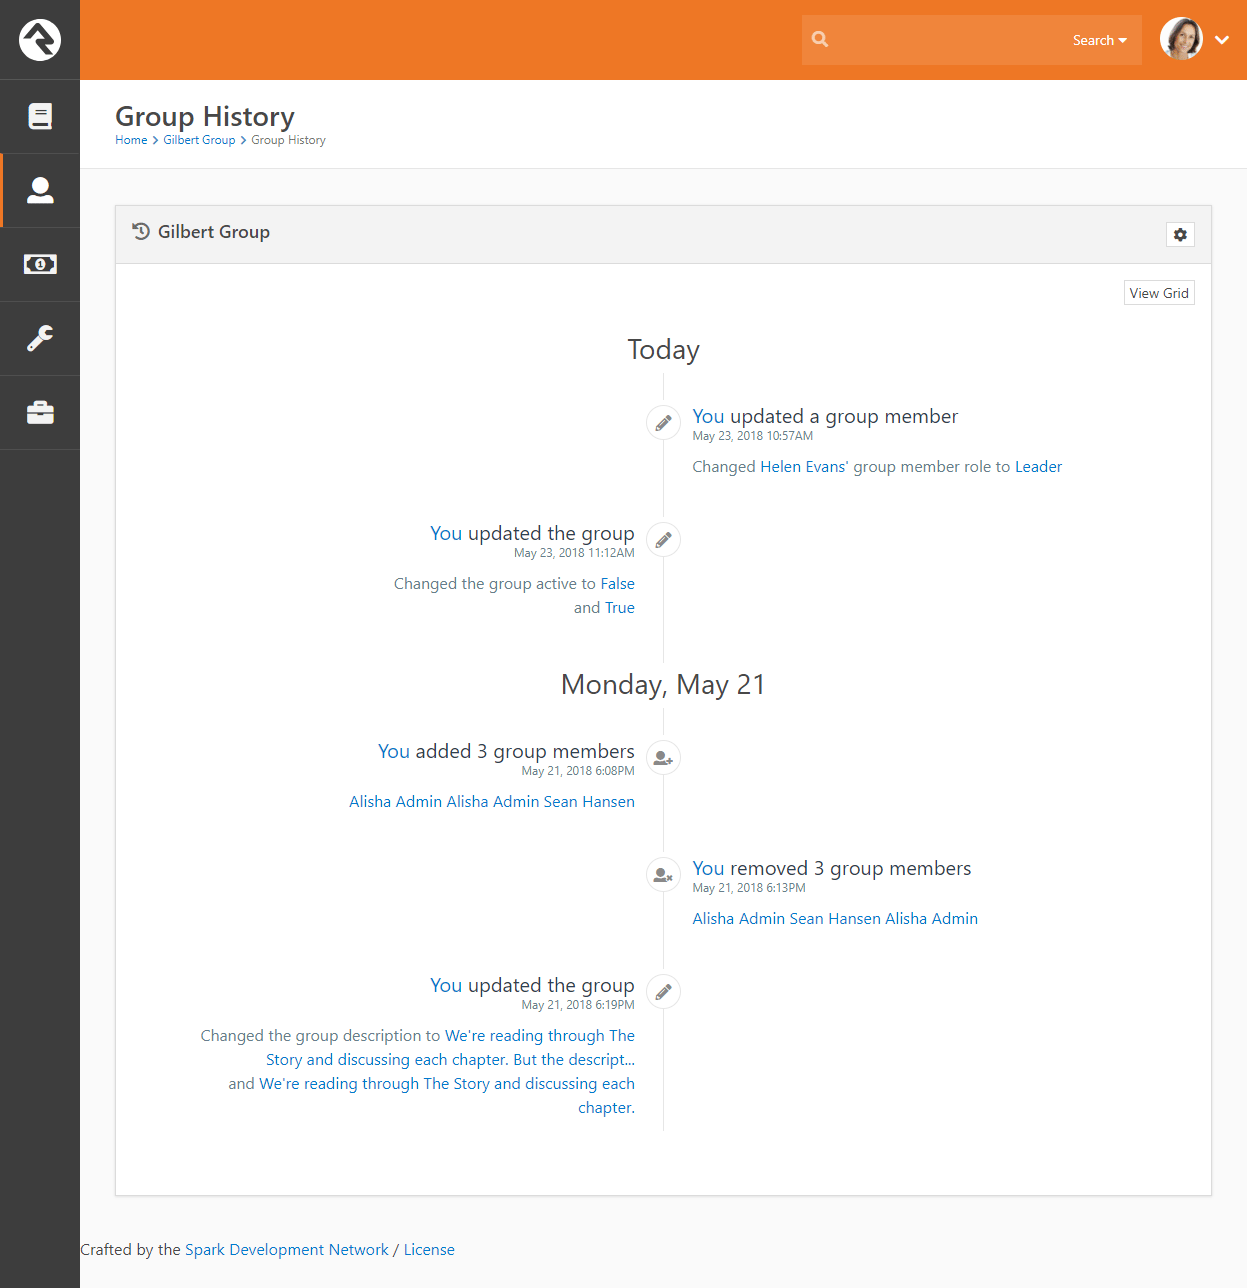
Group History
As you work with groups—adding and removing members, adjusting schedules and member roles, etc.—there may be times when you want to get a 40,000ft view to see how they're doing. Rock's Group History feature allows you to do just that.
Group History takes all of the configurations and changes made to a group and compiles them into timeline and table views that let you easily view the life and health of that group. Here's an example of a Group History timeline view.
Group History
Rock ships with Group History enabled for small groups and serving groups. You can enable and disable Group History for any group type. However, because a lot of data can build up quickly, we recommend using it only with your more regular, stable groups. For example, enabling Group History for a Sunday School group where different children are in attendance each week would lead to crowded (and potentially messy) timelines and tables. Enabling it for a security team or other serving group that experiences fewer fluctuations makes a lot more sense.
OK, let's take a closer look at how to set up and use Group History.
Enable Group History
To enable Group History for all groups of a certain group type, begin by locating the group type in
Admin Tools > General Settings > Group Types. In the General section of the Group Type Details screen, check the Enable Group History checkbox. You can customize the group type's display options in the Display Options section by assigning it a color and icon. These options come into play in a number of the Group History views, but we'll get into that later. For now, click
Save and Rock will enable the history and options for that group.
Enable Group History
View Group History
Now that you have Group History enabled, you can jump to that 40,000ft view. Locate the group in the Group Viewer and click the
button.
View Group History
Archived VS Delete:
Groups with group history turned on, will have an Archive button rather than deleting the group completely. Archived groups can be seen by Admins under
Admin Tools > General Settings > Archived Groups.
This brings up the group's timeline view, shown earlier, including both member and group history information. The Group History screen shows the history of the group by day for the lifetime of that group. Each event on the timeline has an icon that corresponds to a type of action.
- - Member added
- - Member removed
- - Group edited
- - Other/general group action
If there is more information than space available for an event on the timeline, you can view the entire contents by hovering your mouse over the text. For multiple occurrences on the same day, Rock will display link to expand the area to display all of the actions for that day.
To hide member history and view only actions made on the group level, click the button.
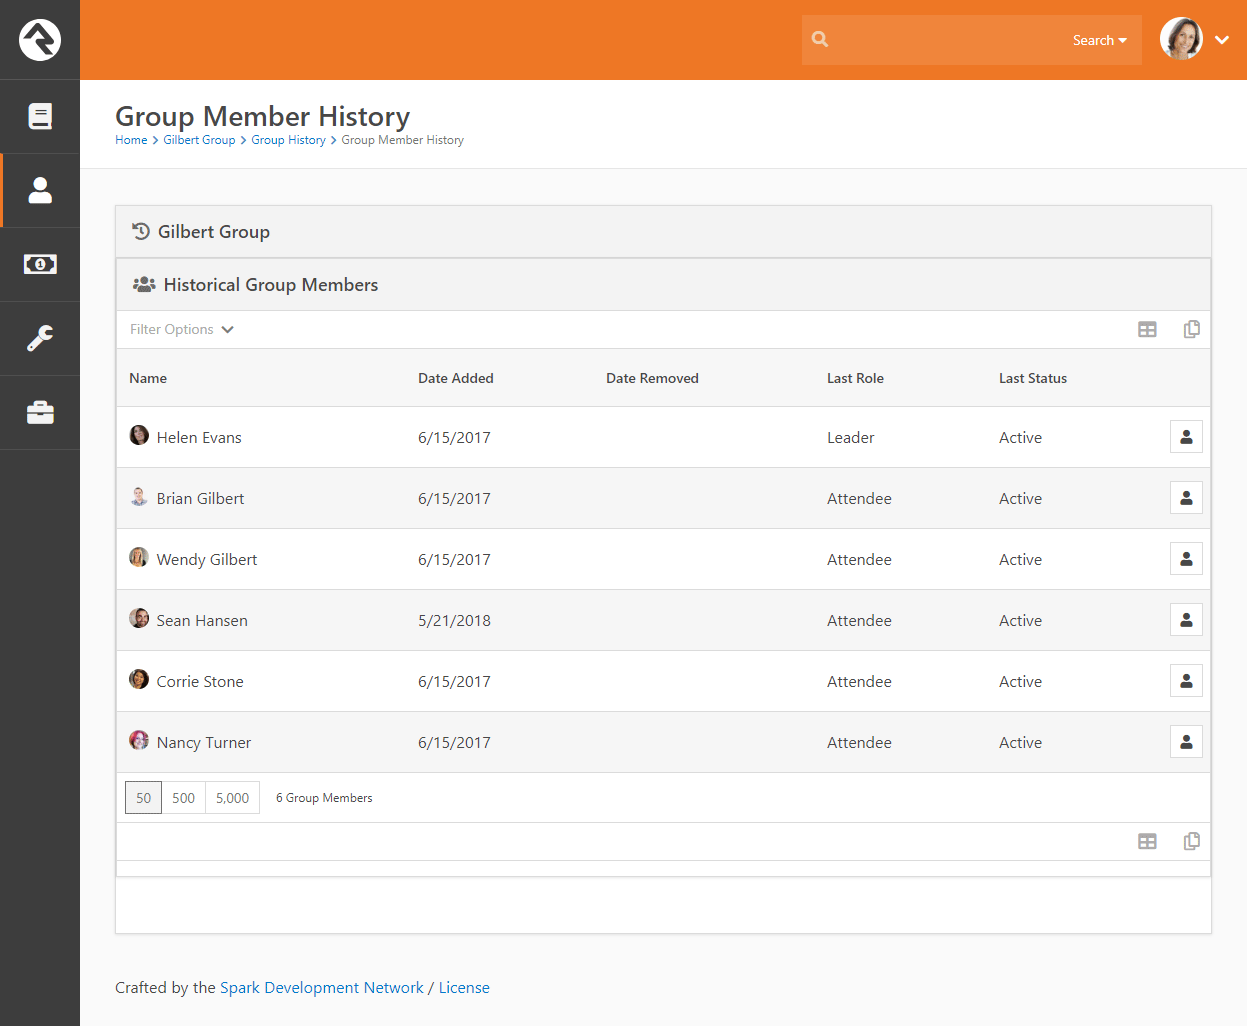
You can also zoom in from that 40,000ft view and get a closer look at the history of the members of a group. Click Member History to display a group's members and the history/dates of their involvement in the group. Click on a specific person to view a timeline of their involvement with the group.
Group Member History
View Group History in a Person's Profile Page
Individual group history is also available on the Person Profile, under the Groups tab.
Group History in Person Profile
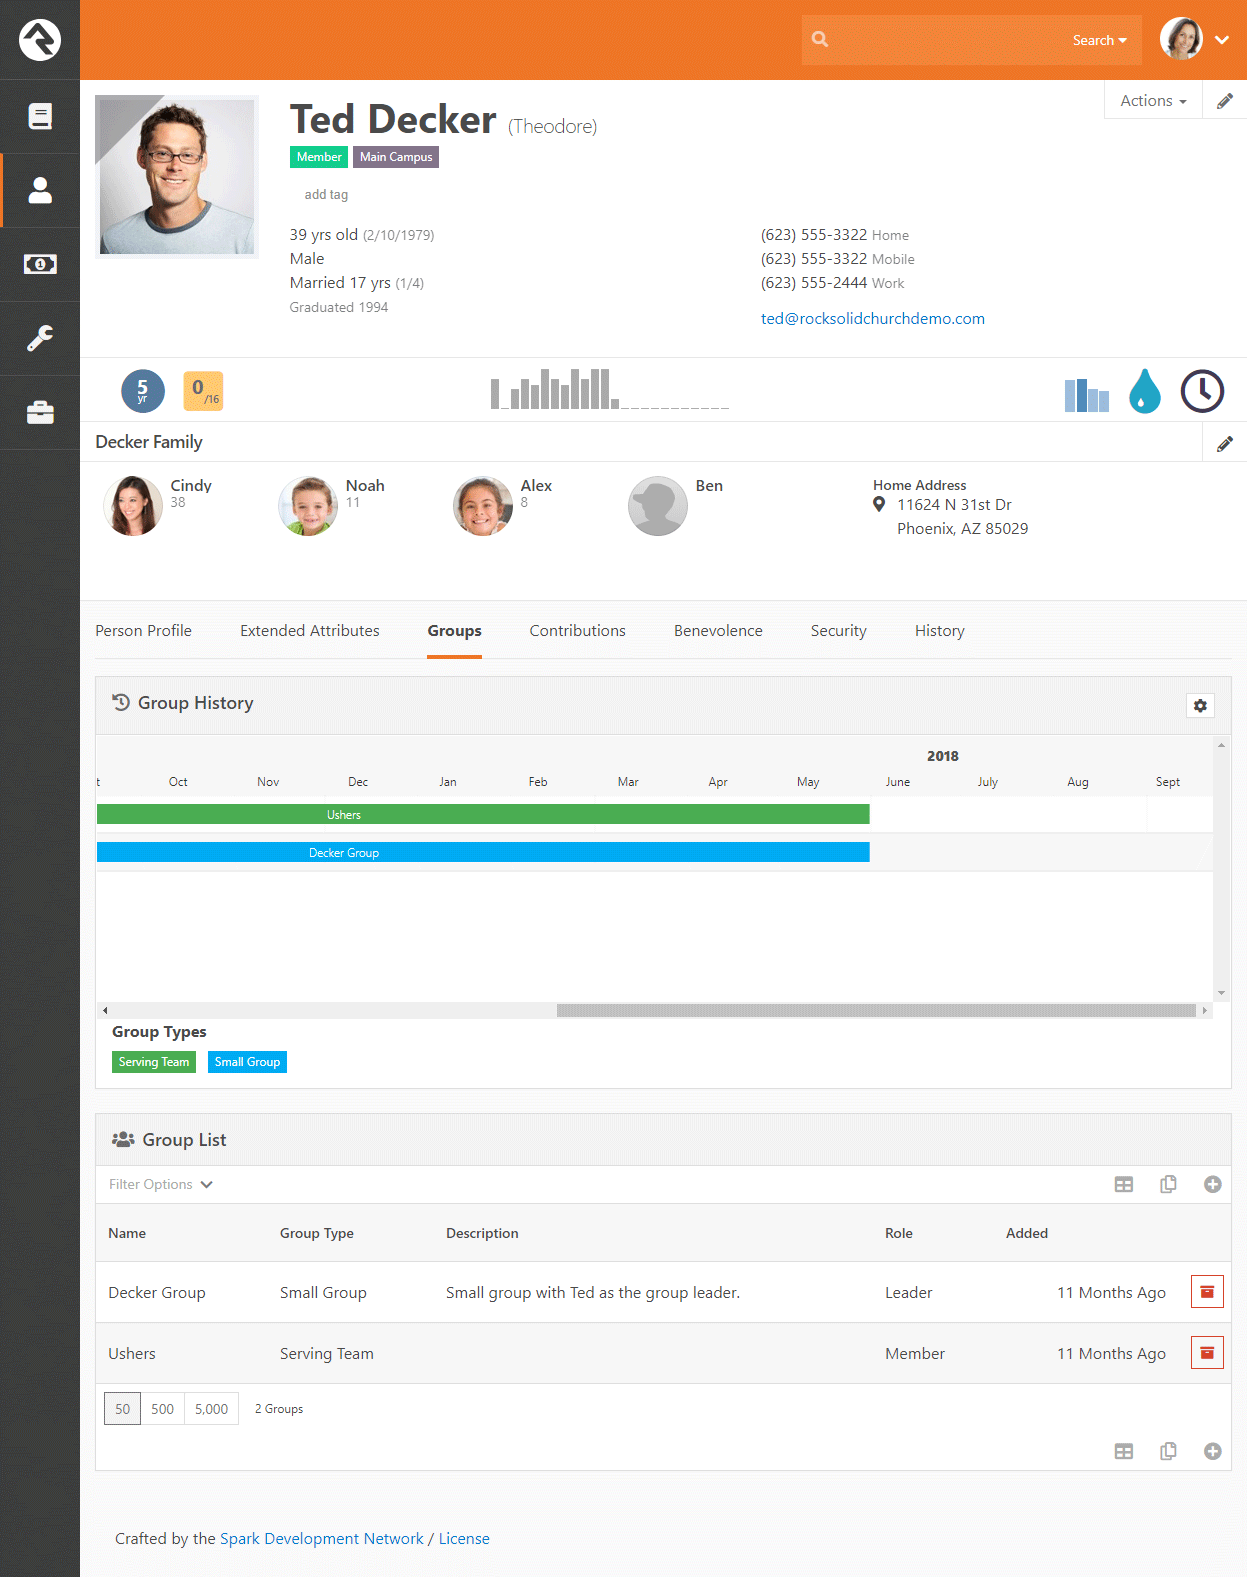
Hover your mouse over any of the events on the person's timeline to display the details of that event. Note the timeline colors correspond to the color assigned to the group back when Group History was enabled. If the person is a group leader, the color will be slightly darker. You can also click on a specific event to drill down into the group. As with all of the tabs on the Person Profile, the information is filterable. Click the button to display the filter options.
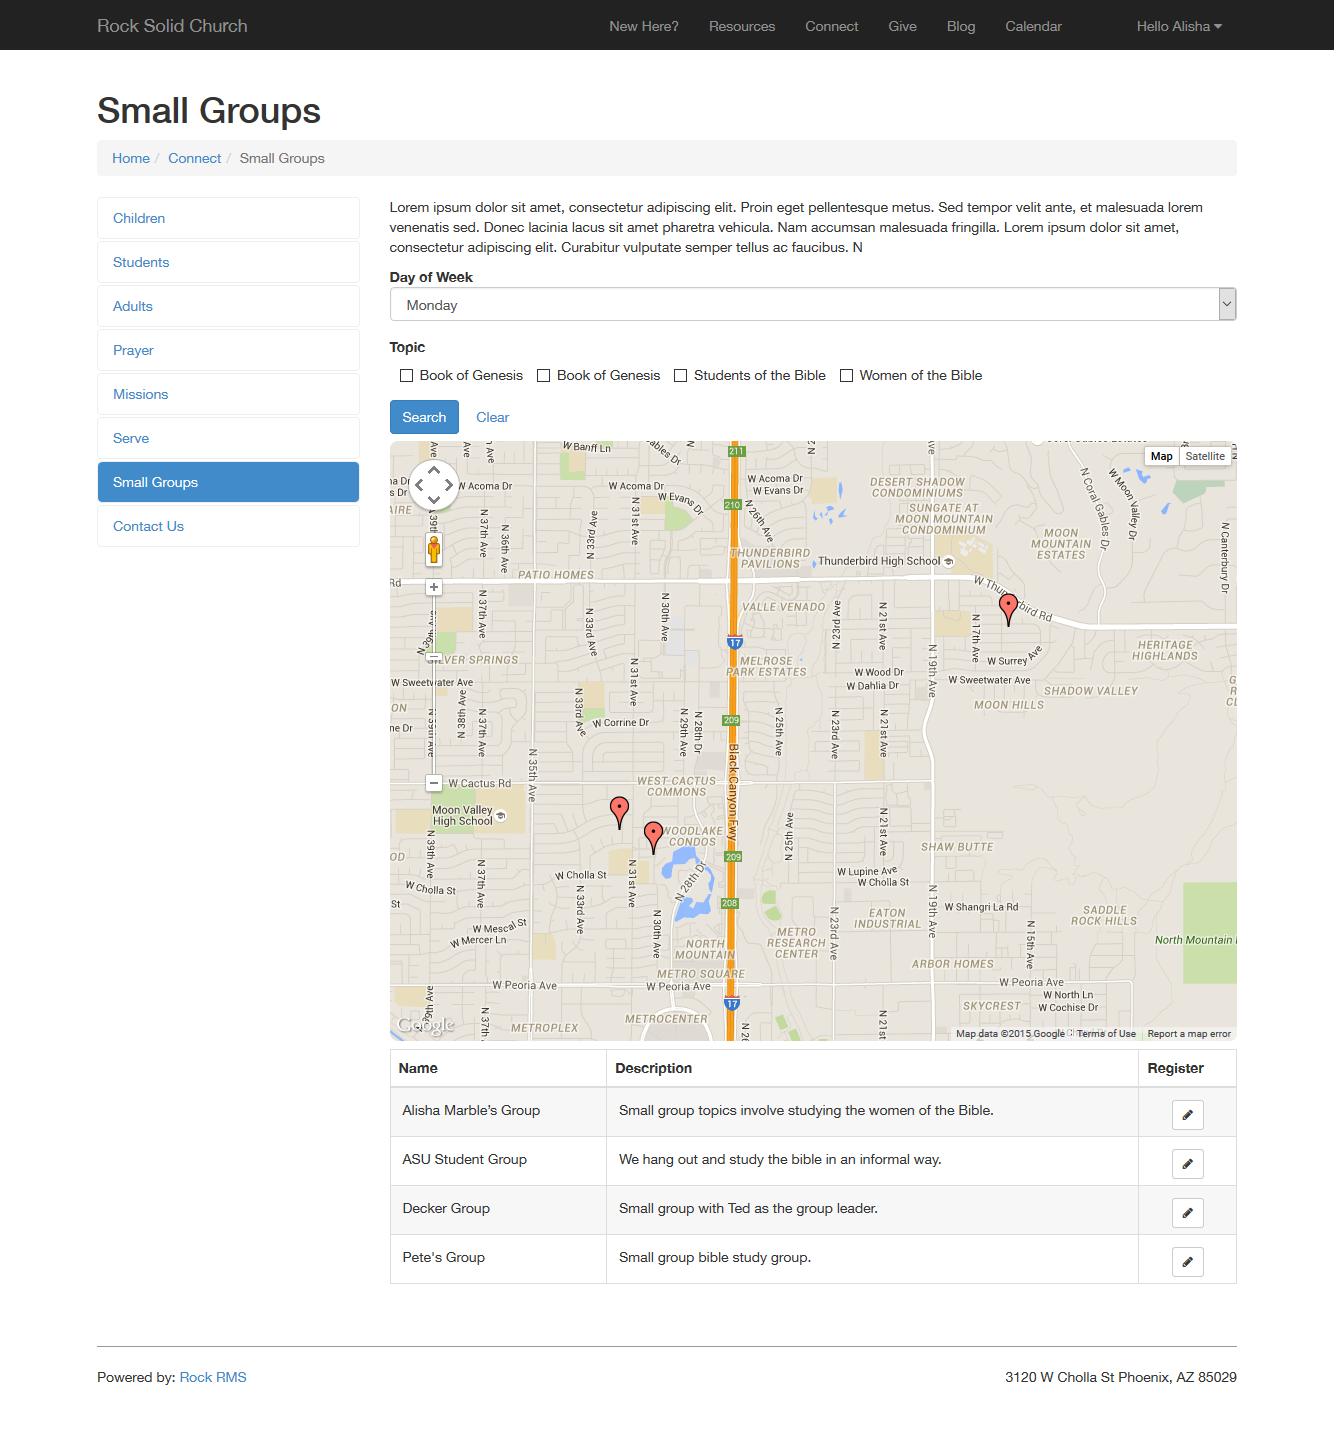
Group Finder
The group finder is another very powerful block that allows your website visitors
to search for a group and register quickly. The group finder has been configured
on the external website under Connect > Small Groups.
As configured out-of-the-box, it allows for search by the day of the week that the
group meets and the study topic. Selecting your criteria and clicking
Search
returns all of the groups that match that criteria. From there you can choose to
register for a group.
Public Groups
Only groups that are marked
Is Public
can be viewed in the group finder. You can change the public setting by
editing the group.
Group Finder
While this default configuration should work for many organizations, there are a
number of ways you can alter the experience by modifying the settings of this
block. Let's take a look at what's possible in the Block Settings:
Group Finder Block Settings
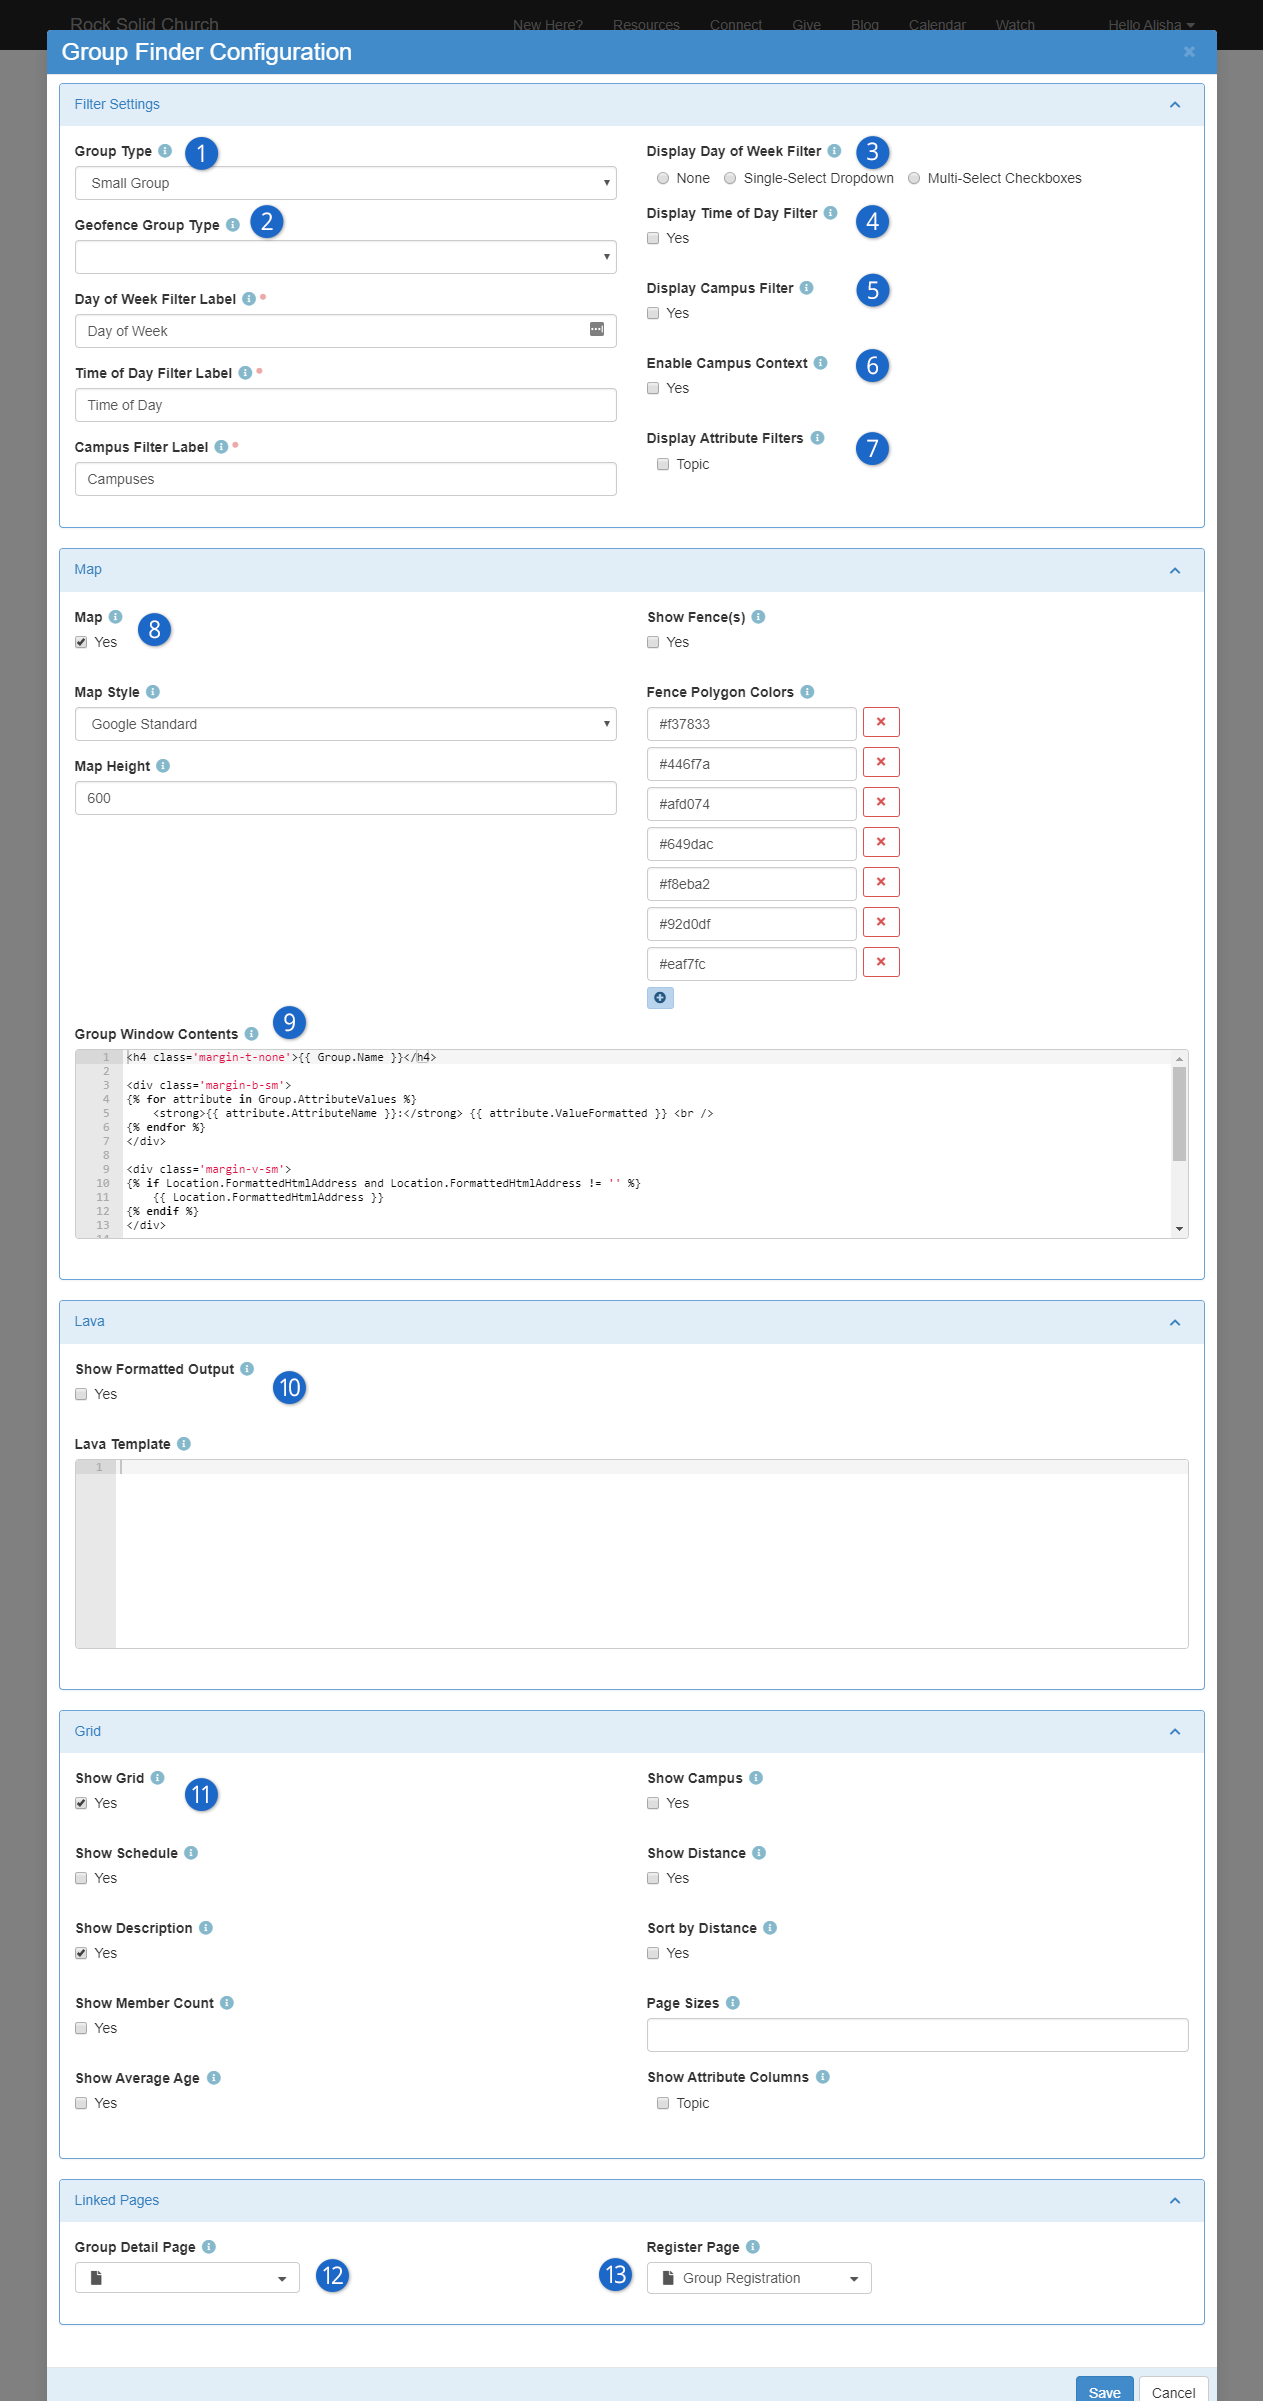
- 1 Group Type
- Start by choosing the GroupTypes you would like to be available through the group finder
- 2 Geofence Group Type
- Some organizations may want to limit the results
to certain geofenced areas that are close to an address that is provided
during the search. For instance some churches with neighborhood ministries
may only want to show groups that meet in a person's neighborhood. These
churches would create a group type to manage these
neighborhoods,
each as a group of that type. Selecting this group type would then prompt
the user to enter their address as part of the search criteria. This
address would be used to determine which neighborhood geofence they live
in so that only groups in that fence are displayed.
- Below the two Group Type selectors, you have options for changing what your filters are called
- 3 Display Day of Week Filter
- If your groups have a "weekly" type schedule, you can offer people either a single-select or a series of checkboxes they can use to find groups which meet on the day they choose
- 4 Display Time of Day Filter
- If your groups have a "weekly" type schedule, you can offer people the ability to filter for groups meeting at a specific time. They can choose Greater Than 5:00pm to find groups which meet in the evening, for instance.
- 5 Display Campus Filter
- Allows people to filter the list of groups according to the campus they belong to
- 6 Enable Campus Context
- Configures the block to automatically filter for groups belonging to a specific campus, if you've set the Campus Context for the page
- 7 Display Attribute Filters
- Allows you to choose which Group Attributes people can filter the list by
- 8 Map
- This section allows you to display or hide the map on which the filtered groups will be shown. You can choose the Map Style and size, whether you show the fences from the GroupType you chose in item #2 above, and define a list of colors through which the fences will cycle
- 9 Group Window Contents
- The HTML and Lava used to display a pop-up window on the map when a group is clicked. By default it will show the group name, location, attributes, and a list of members.
- 10 Lava: Show Formatted Output
- Allows you to configure your own output based on the groups matching the filters. If you enable both the
Lava and grid the Lava results will be shown above the grid. Your Lava will have access to an array called Groups which you can loop through to display groups matching the filters.
- 11 Show Grid
- Configures whether the grid (table) of groups will be displayed once filters are chosen. If it's shown, you can also configure whether other information about each group is included in the grid, such as the Schedule, Description, Member Count, Average Age (of members), the Campus, the distance from their address, and whether the groups are sorted according to how close they are to the person's address. You can also choose how many groups are shown on each page and which Group Attributes you'd like to display in the grid.
- 12 Linked Pages: Group Detail Page
- Specifies a page the person will be taken to if they ask for more details about a group. This page is available to your Lava using the LinkedPages.GroupDetailPage object
- 13 Register Page
- Specifies a page the person will be taken to if they click the "Register" button. This page is available to your Lava using the LinkedPages.RegisterPage object
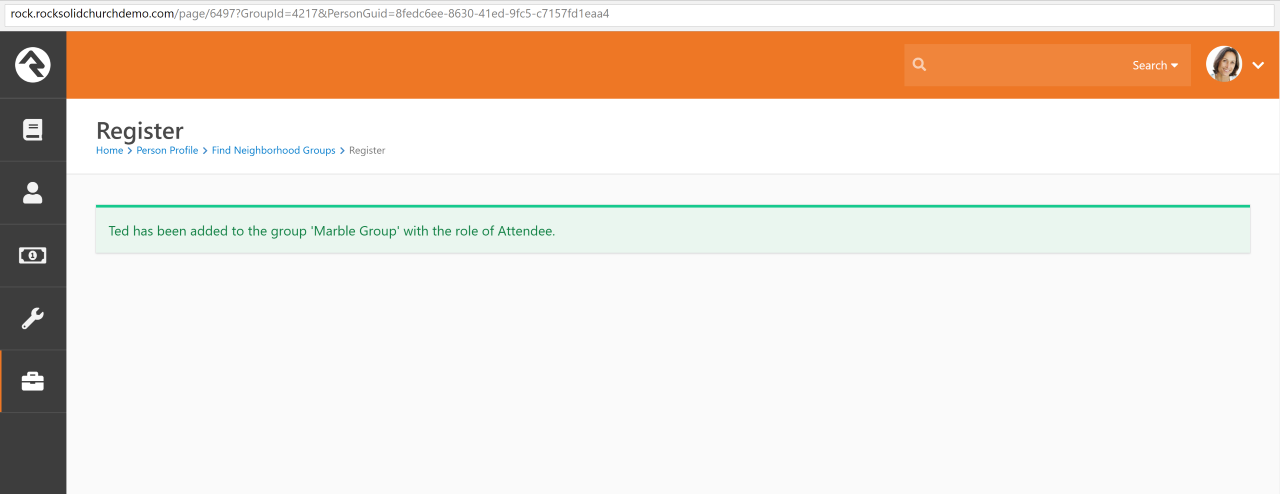
Another Way To Use the Group Finder
If you pass a 'PersonGuid' through the page's query string you can use the group finder to register that person for a
group. You can use this trick to say link from a group badge on the person profile page if they are not already in a group.
This allows a staff person to quickly register them for a group without a lot of clicking around.
Consider using the
Group Member Add From URL
block with this feature.
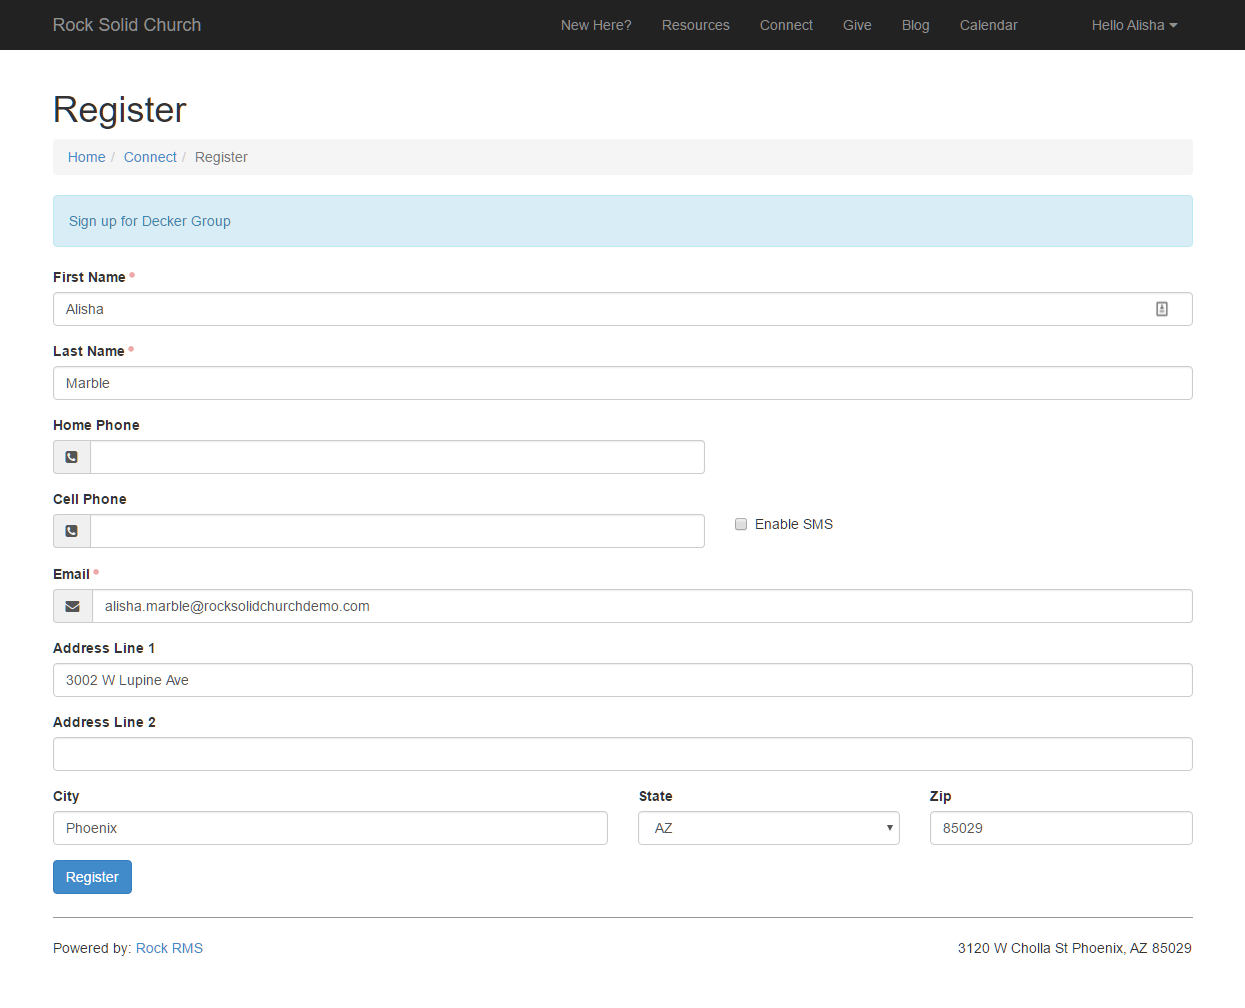
Group Registration
Registering for a group is a simple process using Rock's Group Registration
block. Out-of-the-box this block will ask for basic contact information for
the individual and their spouse. By adjusting the block settings you can
customize this block in several different ways. Let's walk through each one:
-
Mode: There are three entry modes for the registration form.
-
Simple: This mode only asks for the individual's first name,
last name and email address.
-
Full: This mode additionally asks for more
contact information including home phone, cell phone and
address.
-
Full With Spouse: This mode is identical to
the normal Full
mode but adds the spouse's first name, last name, cell phone
and email.
-
Group Member Status: This setting determines the group member status that
will be used when they are added to the group. Options include Pending,
Active or Inactive.
-
Connection Status: The registration form will attempt to find
a matching record in the database using the first name, last name and
email. If a record cannot be
found, a new record will be created in the database. When that occurs,
this will be the connection status that is used for these new records.
-
Record Status: This represents the record status that will be used for
new records. It's best to leave this as Pending
so individuals on your data integrity team can manually review them for
possible duplicates and merge the records if needed.
-
Workflow: This option allows you to launch a workflow after
the registration. The group member will be attached to the workflow as the Entity.
-
Lava Template: This is a Lava template that will be applied
to the top of the registration block. This allows you to customize the
experience for the individual.
-
Result Lava Template: This Lava template is used to craft
a response message after the registration is completed.
-
Result Page: You can optionally send the individual
to a new page after the registration is processed.
Group Blocks
By now you've seen the power of groups in Rock. Hopefully, you're starting to see all the different ways they can bend and flex to meet
the demands of your organization. The real power is when you break free to see what is
and start to comprehend what could be. While
we've attempted to pre-configure groups with
some standard best practices, you shouldn't limit yourself to what is configured out of the box.
The best way to see what''s possible is to understand what group blocks are available in Rock. Start thinking of these blocks as your
own box of Legos. How you arrange and build with these blocks is limited by your imagination. If you're unfamiliar with blocks and
how to add them to a page, take a minute and read about them in the
Designing and Building Websites using Rock guide.
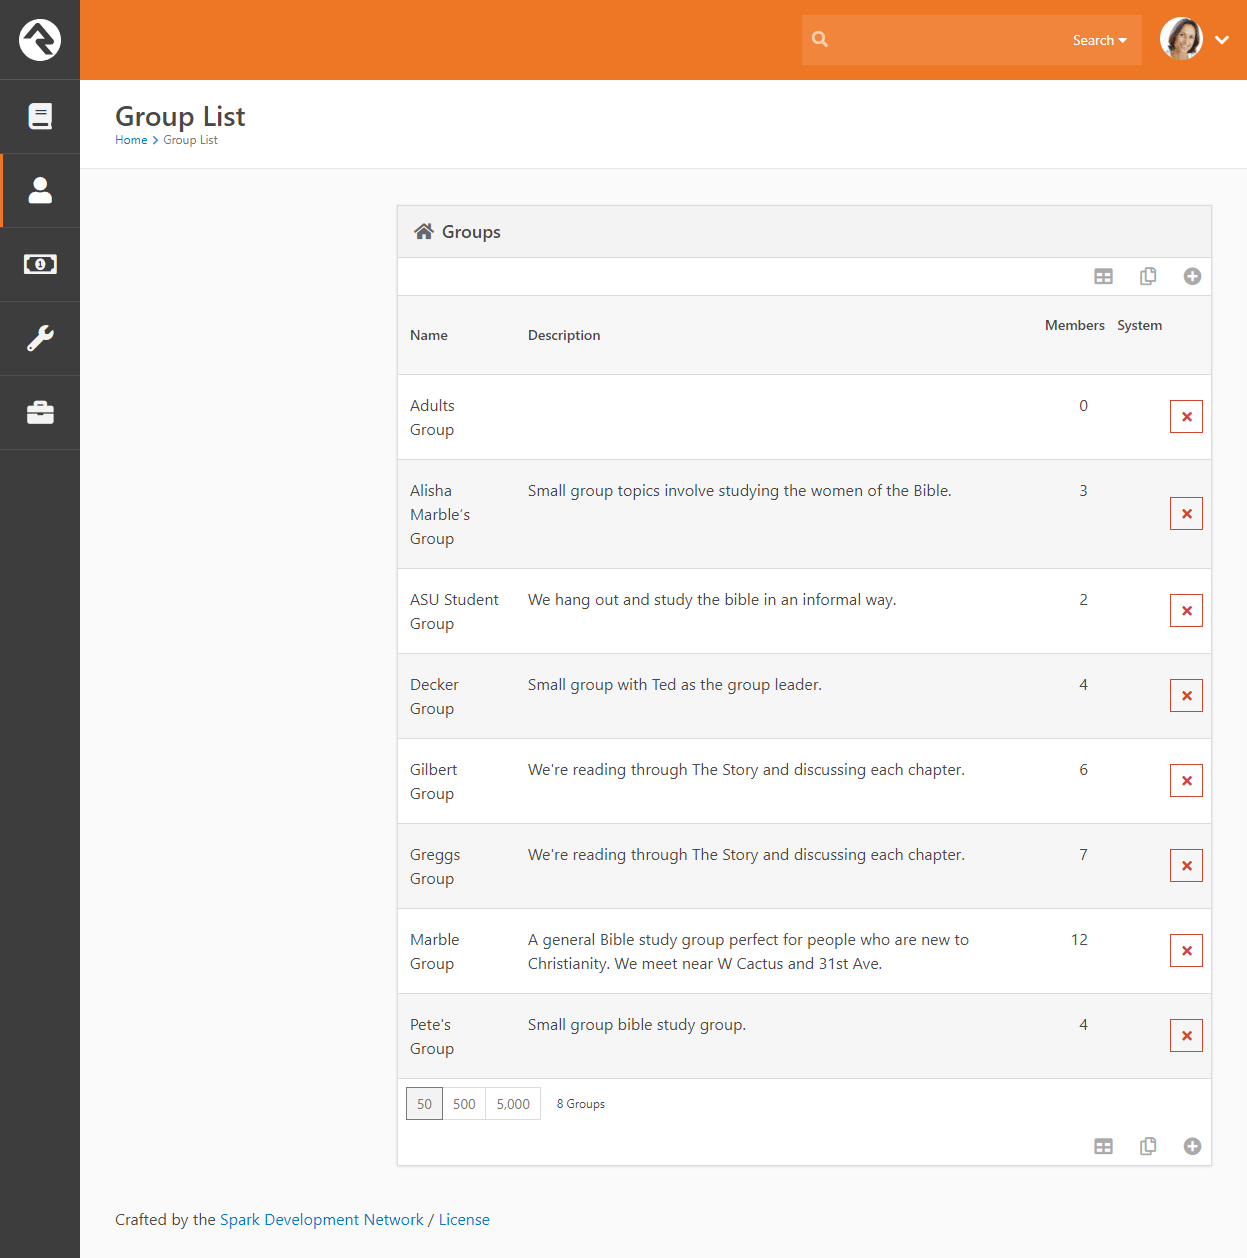
Group List
Like its name suggests, Group List block
lists all groups that match a specific filter. The power of this block lies within its block settings. They
allow you to:
- Include Groups Of Type: Specify which group types to include in the list.
- Exclude Groups Of Type: Specify which group types not to show in the list.
- Detail Page: The page you would like to navigate to when someone selects a group from the list.
- Limit to Security Groups: Remember that security groups are a bit special. While there is a group type for
security groups, any specific group can be configured to act as a security group. This setting shows groups that meet any
of these criteria.
- Display Filter: Determines if the filter panel should be displayed above the list.
- Display XYZ Column: This block also has several block settings to hide or display columns for displaying
group type, group description, active status, group member count and system status.
Below is an image of a sample group list.
Group List Block
Group Tree View
The Group Tree View block
is very similar in configuration to the
Group List block except that it displays the groups in a hierarchical tree view. Below is a sample
of what this block would look like.
Group Tree View Block
Group Details / Group Member List / Group Member Details
While these are three different blocks they are usually used together to fully display the contents of a group
with the ability to edit.
Group Details & Member List Blocks
Group Type Map
The Group Type Map block maps the location of every group of a specfied
type. While not included on a page out of the box, this is a very powerful block for mapping all of your small groups. Small organizations
could even use it to map all the families in the database (remember families are groups too). Below is a sample of this block in action.
Group Type Map Block
Group Member Add From URL
Say what? OK, this is easy... this block when passed a PersonGuid and GroupId through the query string will add the person
to the group and display a Lava template of your design. This is very useful in crafting various group registration scenarios.
To get the juices flowing think about all the things you could do with this using the
Dynamic Data
and Group Finder blocks.
There you go!
Add Group Member From URL
Group Member Remove From URL
This block is just like the Group Member Add From URL block - but the opposite. It takes a PersonGuid and GroupId through the
query string and will remove the person from the group and display a Lava template of your design. This allows you even more
flexibility in creating group registration situations. Alright!
Group Simple Register
This block is another block that's handy for registration scenarios. It provides a simple form that accepts a first name, last name, and email address, registers the person to a group, and then forwards them on to a confirmation page.
This block is most useful when it's used on an external facing site as a simple first point of contact but is flexible enough for many other scenarios!
Simple Register Block
Simple Register Confirmation
This block is designed to pair with the Simple Register block as a confirmation page. When a user is redirected to this page it provides either a success or a failure message. It's that simple!
Group Registration
This block is the big brother of the Simple Register block. This block takes a GroupId as a query parameter for context and allows you to do a few neat things like fire off a workflow when a user registers and use Lava options to format the registration form.
It also has a full mode that takes down address details and phone details and a full with spouse -- which does exactly what you might expect. Use this mighty block when you want to get more than your standard information about a person or when you want to use a specific workflow process for your registrants.
Group Registration Block
Group Map
The Group Map block maps the members of a specific group that is
passed through the query string (aka passed in through the address of the page http://server.com/page?GroupId=12). While this block
isn't too powerful on its own, it can be very helpful when used in conjunction with other blocks like the
Dynamic Data block. Below is a sample of what this block looks
like with with a sample group.
Group Map Block

You'll notice two sets of checkboxes on this block. These allow you to map various groups and families that live in these areas. Below is
a description of how and when these checkboxes will appear.
Group / Group Member Checkboxes (top left)
-
If the selected group has a valid geopoint, or geofence location, that group's name will be displayed as a checkbox option
in the upper left which can be used to toggle the display of the group. The group will be displayed on the map either as a marker
or a polygon depending on whether the selected group had a geopoint or geofence. The color of the marker or polygon is determined
by the first color specified in the Colors attribute of the
selected mapstyle defined value. Note: this option will not appear if the selected group does not have a geopoint or geofence defined.
-
A Groups checkbox will be displayed if the selected group
has any child groups with a valid geopoint or geofence location. The child groups may also be either a marker or a polygon.
The color of markers is determined by the second color specified in the Colors
attribute of the selected mapstyle defined value. The color of polygons is determined by the
Polygon Colors block setting.
-
A Group Members checkbox will be displayed if
the selected group has any members with a valid geopoint location. The checkbox will toggle the display on the map of
those members. Note, if the selected group is displayed as a polygon, these members may or may not be within the boundaries
of the polygon. The color of the markers is determined by the third color specified in the
Colors attribute of the selected mapstyle defined value.
Connection Status Checkboxes (top right)
-
If the selected group has a geofence location and is displayed as a polygon on the map, then the block will also
display a list of Connection status checkboxes
to toggle the display of families whose locations fall within the boundaries of that polygon.
-
The connection statuses that will be included as checkbox options are determined by the Connection Status Defined Values. Only
those defined values that have a value specified in the Color
attribute will be displayed. The color value is also used to determine the color of the markers.
-
Only families with at least one active record will be included.
-
If family members have different connection statuses, they will be ordered by the connection status defined value order, and the
first connection status found will be used for the family. For example, if a family has a member and a visitor, the family will
be displayed when the Member checkbox is selected.
Service Jobs Relating to Groups
Service jobs allow you setup reoccurring tasks that run on a schedule you define. Below are jobs that relate to groups.
Send Attendance Reminders
This job sends reminders to group leaders to enter attendance. All individuals in the group with a role that has the 'Is Leader' setting will
receive this reminder.
'A couple of key configuration options for this job are:
-
Group Type: The group type that the reminders are for.
-
System Email: The system email that you would like to use for sending the reminder.
-
Send Reminders: By default, a reminder will always
be sent the day the group meets. By adding values here you can configure
additional reminders if the attendance has not been entered. For
instance, entering 2,4
would send reminders 2 and 4 days after the group has met if no attendance
has been entered.
Group Leader Pending Notifications
This job allows you to notify group leaders of newly pending members in their groups.
This provides the following customization options:
-
Group Type: The group type to filter off for limiting the
groups that are checked for pending members.
-
Include Previously Notified: This determines if only newly
pending members should be emailed to leaders or if pending members who have
already been sent once should also be considered. Note that when you initially
set up this job, none of the current pending members will have been marked as
sent, so they will all be emailed to leaders on the first run.
-
Notification Email: This is the system email template that
should be used. A sample one is provided out of the box for you to use or edit
as you see fit.
-
Group Role Filter: This is an optional setting that allows
you to only include pending members of a specified role. If you don’t select a
role, all roles will be considered.
The email notification will be sent to all group members of the group whose role has
been configured as Is Leader.
Keeping Your Options Open:
Keep in mind that you can set up multiple instances of this job. This allows you to
send one scheduled email for newly pending members and a separate for older pending
members that the group leaders have already been made aware of.
Group Requirements
Group requirements allow you to place criteria on who should be allowed to be in a
group. For instance, it's a pretty common feature that to be on a serving team
around children you need to have an active background check. Administrating this
need manually can be daunting, but with Rock why would you EVER consider doing it
by hand?
Setting up group member requirements is a two-step process.
- Define a Group Requirement.
- Apply the requirement to each group that needs it.
When a group member is checked to determine if they meet a requirement, the result
will be one of the three conditions:
-
Positive: The group member meets the requirement.
-
Negative: The group member does not meet the requirement.
-
Warning: Something in the middle. The specific definition
of warning will depend on the configuration. For a background check,
warning might mean that they have a passing background check, but it's
about to expire.
Group requirements can be set at the Group Viewer level, which applies member requirements to one specific group,
or at the Group Type level, which applies the member requirements to all groups of a certain type.
Both options are explained in detail below.
Defining Group Requirements
You manage group requirements under
Admin Tools > General Settings > Group Requirements.
Group Requirements List
Editing a requirement allows you to provide the following configuration options.
Editing Group Requirements
- 1 Name
- This is the name of the requirement.
- 2 Description
- Be sure to provide a good description of the requirements and any of
the underlying criteria that are used to determine whether a group member
meets the requirement. A little documentation now will save you headaches
in the future.
- 3 Positive Label
- This is the label text that will be show when a group member meets the
requirement.
- 4 Negative Label
- The label used when a group member does not meet the requirement.
- 5 Warning Label
- The label text that should be shown when the check meets the warning condition.
- 6 Can Expire
- Some requirements, once met, will always be true - say for instance a
requirement that you take a specific class before serving. Other requirements
may expire. A good example of this is a background check or CPR
certification.
- 7 Expire in Days
- When a requirement can expire, you can set the number of days in the
future to wait before re-checking the requirement. For something like a
background check you don't need to look every day to see if the background
check is still valid.
- 8 Check Type
-
So how do we determine the logic of whether someone meets a requirement?
Rock gives you three options:
-
SQL: In this case you provide a SQL statement.
This statement should return a list of Person Ids in the database
that meet that requirement.
-
Dataview: You can also select a dataview that
returns a list of all the people who meet the requirement.
-
Manual: This requires someone to manually
determines if a person meets the requirement.
You'll notice that the SQL and Dataview options give you a separate
property to determine the warning state. You can leave this blank if
your requirement doesn't have a warning state.
Tips for Creating Data Views and SQL Expressions
When creating dataviews and/or SQL expressions for group requirements keep these two things in mind:
- Meets The dataview/SQL expression for meets should return a list of all the people
in the database that meet this requirement.
- Warning This dataview/SQL express should return a list of all the individuals in the database in a warning state.
Applying Group Requirements to Individual Groups
Once you have defined your requirement, you can apply it to groups. If you
have Administrate
access to a group you'll notice a panel on the edit screen entitled
Group Requirements.
You can add group requirements from this panel. There is also a setting to
keep group members who don't already meet the requirements from being added
to a group.
Limited Restriction:
This restriction on adding group members only applies to manually adding
people to the group. Workflow actions that add someone to a group will still
be able to add people who don't meet the requirement to the group.
Applying Group Requirements
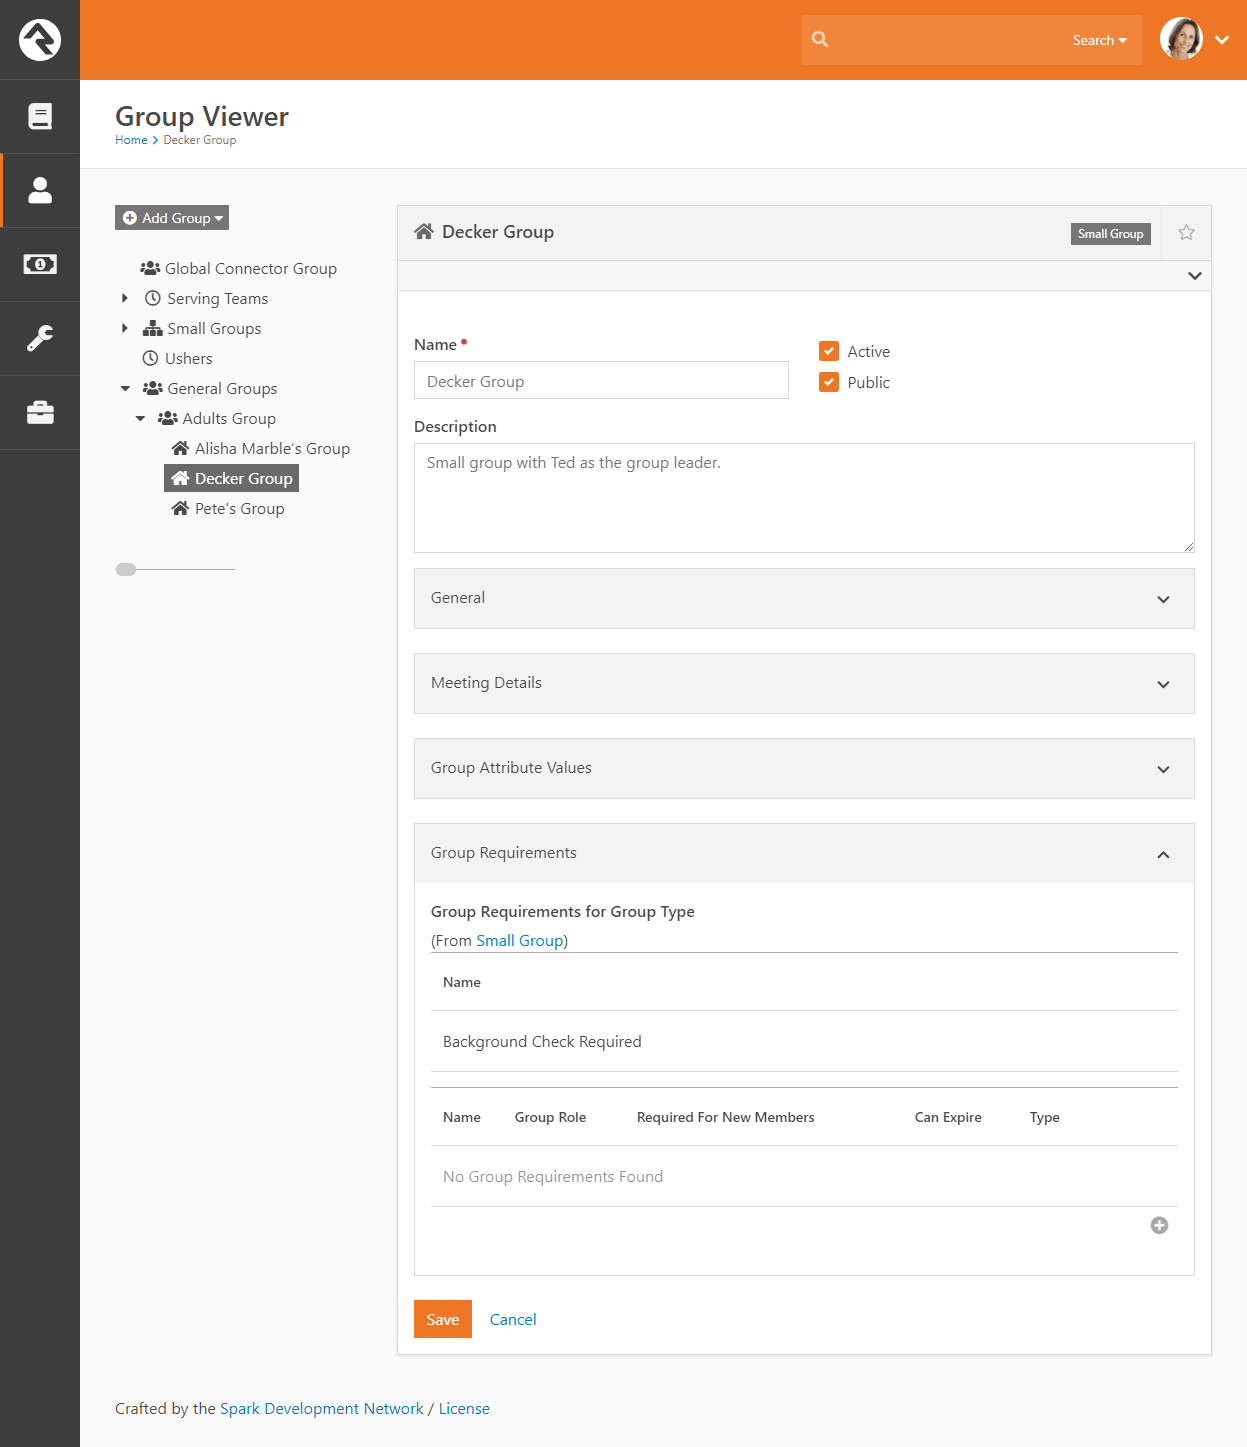
Applying Group Requirements to Group Types
You can also set group member requirements at the Group Type level. This allows you to
apply member requirements to all groups of a certain type rather than to each individual group.
Group Requirements Section - Group Type Detail Screen
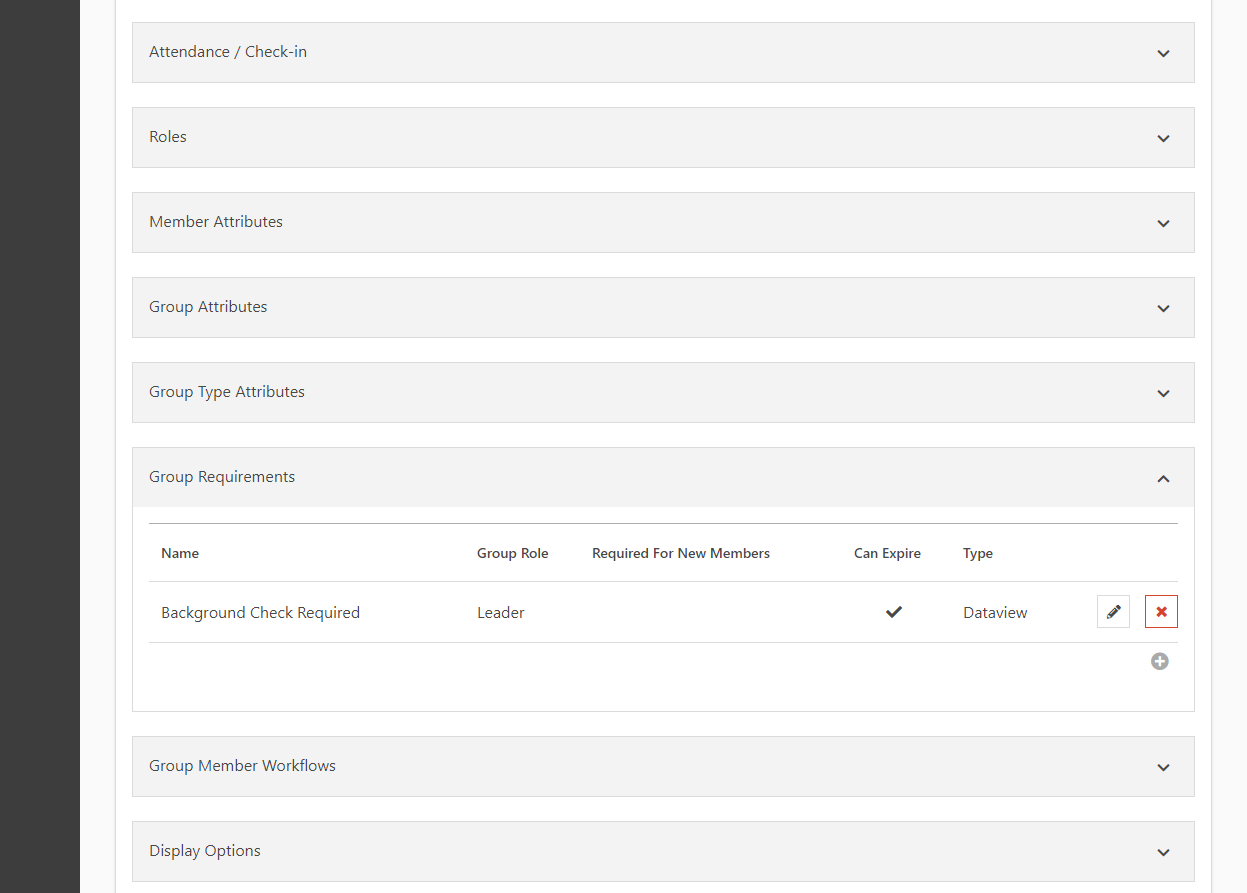
To access your group types, go
to Admin Tools > General Settings > Group Types.
Select the group you want to add requirements to from the Group Type list. In the Group Type Detail screen, expand
the Group Requirements section. From here you can either select an existing group requirement to edit or
click the
button to add a new requirement.
Adding New Group Requirement
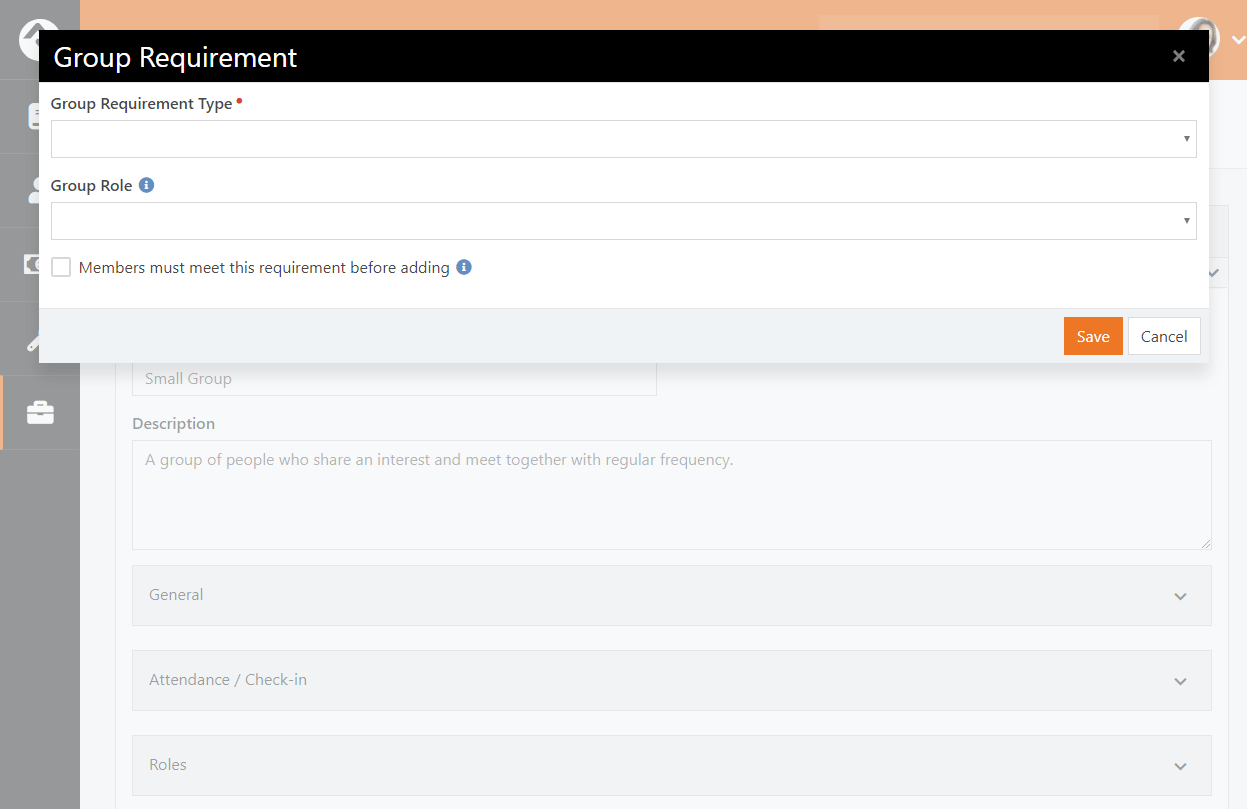
Viewing Group Requirements
Once you enable group requirements you'll notice in the Group Viewer that certain group members
may have warning icons next to their names. This yellow icon denotes that the
group member either does not meet the requirements or is in a warning state.
Viewing Group Requirements
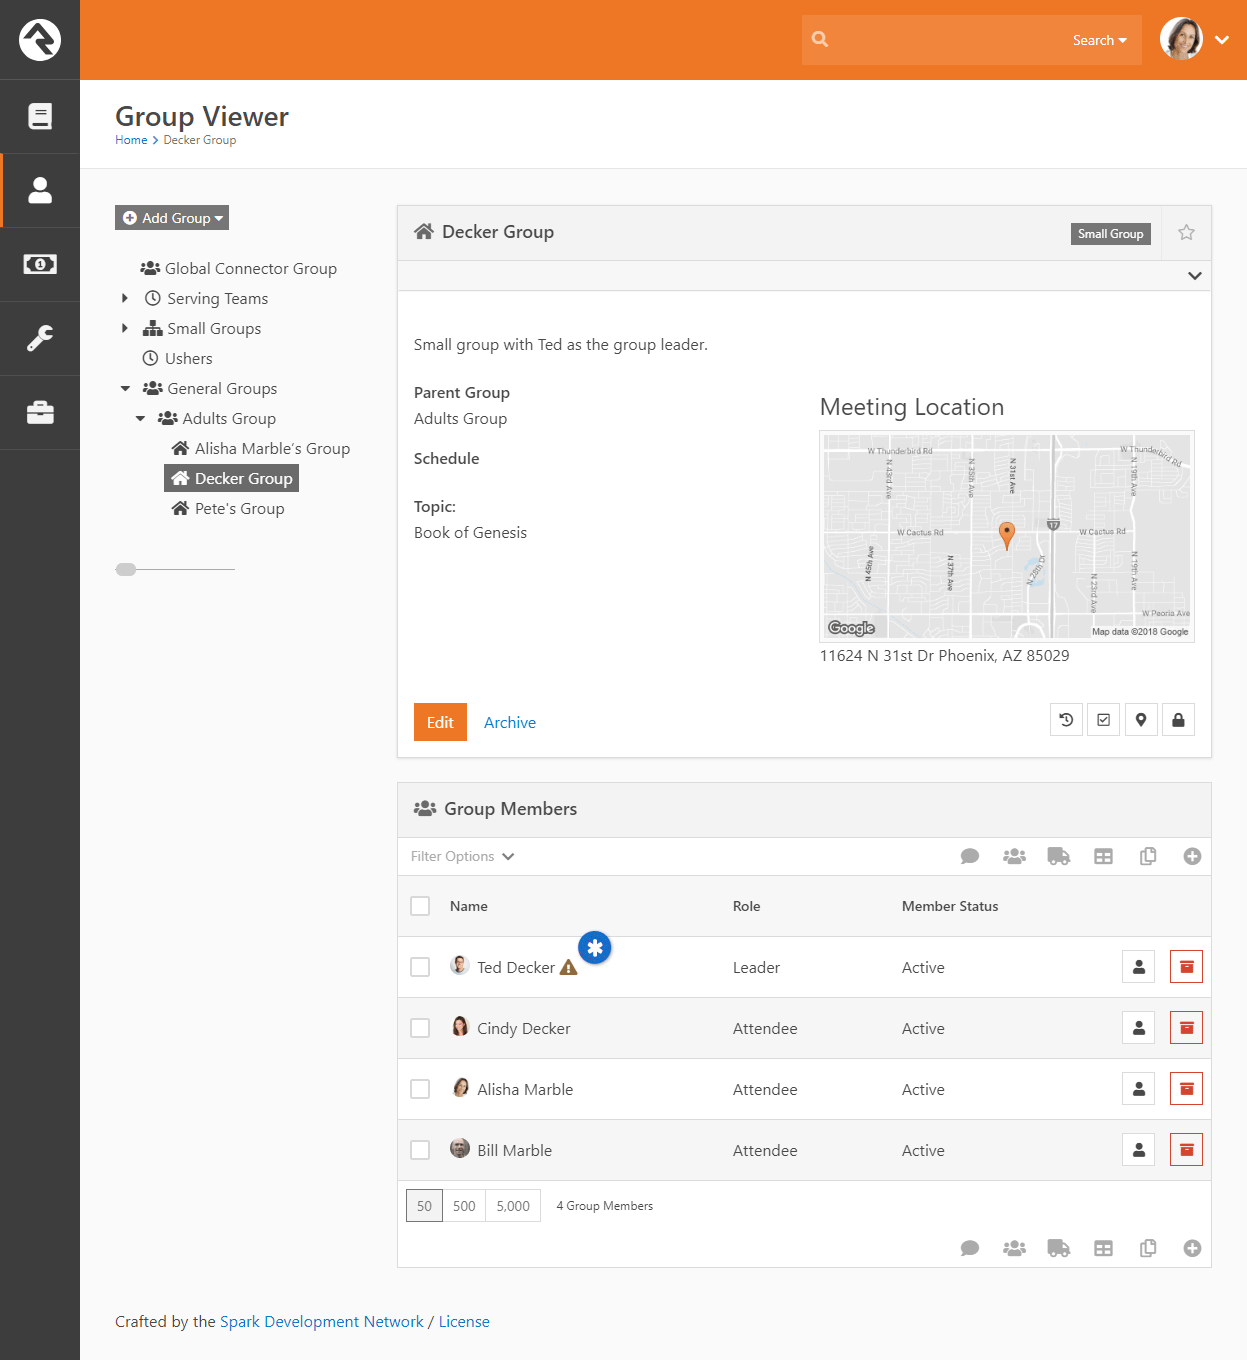
Group Requirement Jobs
The Group Requirements features rely on two system jobs. These jobs can be
configured under Admin Tools > System Settings > Service Jobs.
Calculate Group Requirements
This job comes pre-configured and running in Rock. Every night it runs to
check that all the group members met their requirements.
Send Group Requirements Notifications
This job does not come pre-configured. You can configure this job to send
a warning email to group leaders when a group member does not meet the
requirements. These emails will go to group members whose role has been
configured with the 'Receive Requirements Notifications' setting. This
can be configured under Administration > General Settings > Group Types.
Below is a listing of settings for this job.
-
Notification Template: This is the system email
template that you want to use to format the email. Rock provides
a sample email entitled Group Requirements Notification
that's configured to meet most needs.
-
Group Types: The group types you want to check the requirements on.
-
Notify Parent Roles: This setting will notify
the roles of parent groups of the group. This follows the
hierarchy of the group structure all the way to the top. This
ensures that top-level group leaders will receive notifications
for all the groups under them.
-
Accountability Group: The group you select here
will get a listing of all group members not meeting requirements.
Some might call this fascism but we prefer "inspect what you expect."
Fundraising Groups
It's unfortunate, but sometimes it takes money to do good in this world. Whether it's money to pay the travel
expenses of a mission trip or the small salary of an internship, costs can become a roadblock for many
individuals. But when the community can be made aware of these needs, the burden of costs can be shared. The
problem then becomes promoting the need and managing the transactions that are generated. Rock's fundraising
features make quick work of both problems. Think of it as a mini Kick-starter just for your organization's
needs! Let's dive in and see this feature at work.
Fundraising needs are stored as a new group inside Rock. These groups are created with the group type
Fundraising Opportunity. This group type
provides several group and group member attributes that will drive the fundraising features within Rock.
Each group will represent a specific type of fundraising activity. Examples include:
- A specific mission trip (e.g. Summer China Mission Trip)
- A specific type of fundraising (e.g. Summer Interns,
Fall Sports Season)
Fundraising Walk Through
Keep in mind that each fundraising opportunity is a group. You'll manage the opportunities from the Group Viewer.
Fundraising Opportunities
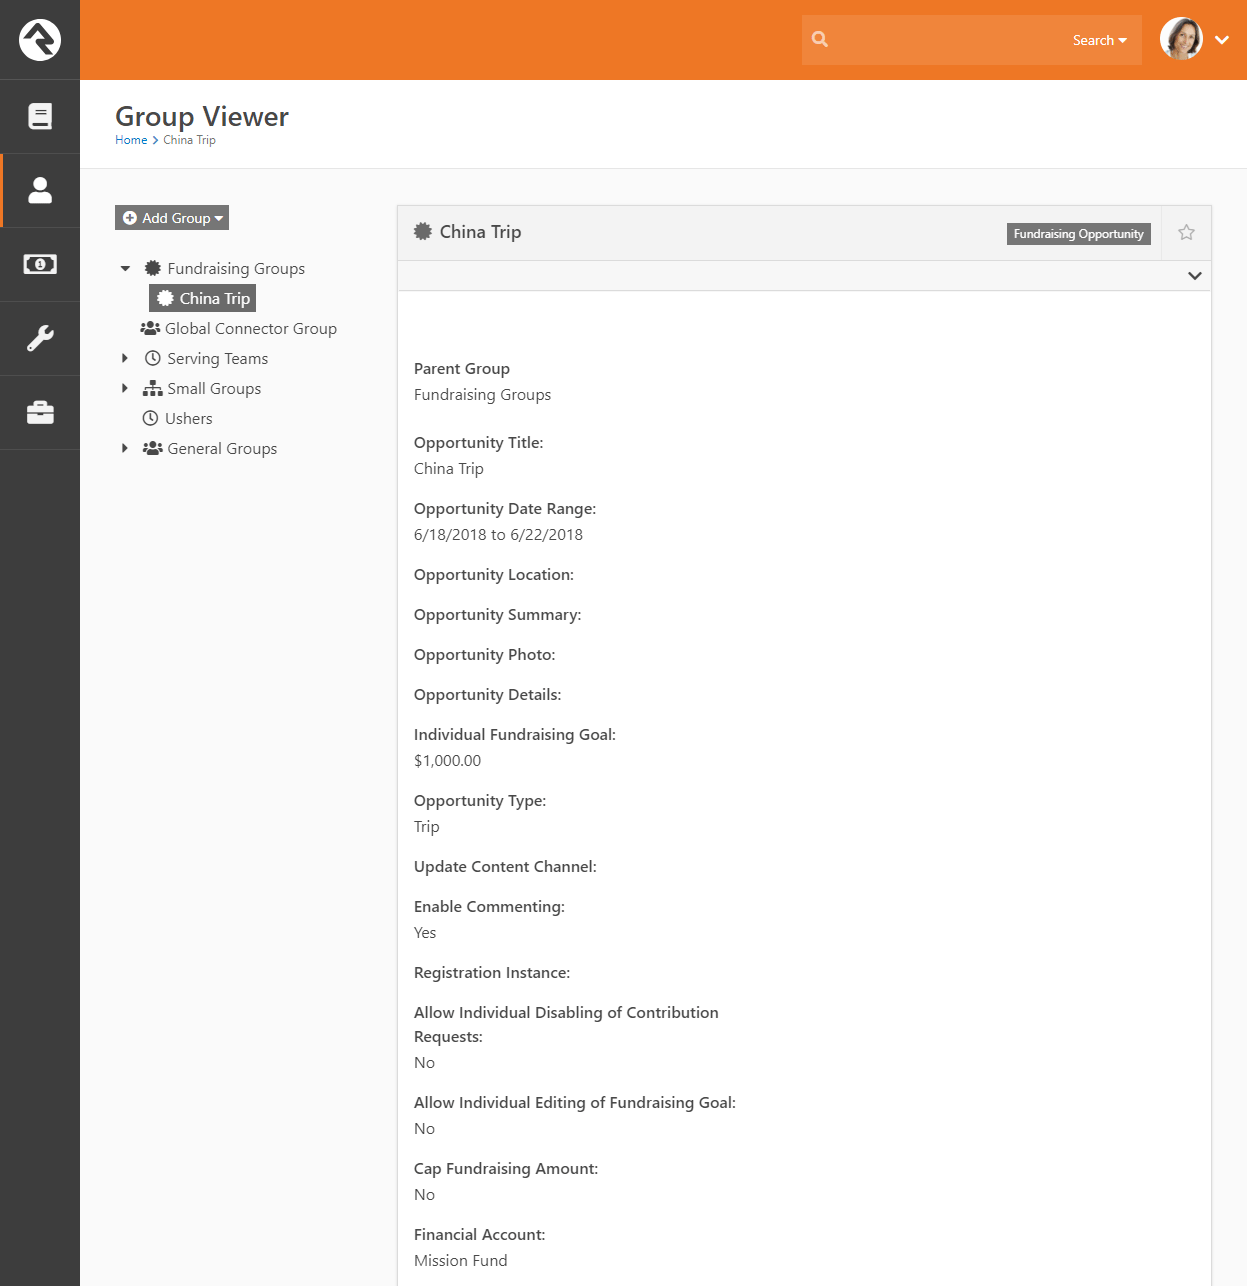
Ok, but that's the boring part. Let's start looking at how these groups are displayed on your external site! Out of the box
Rock configures several pages to view fundraising opportunties. The pages are display under the Missions pages (found under the
Connect menu item). The missions page lists the various opportunites that are marked
Show Public. Keep in mind that this block
can be filtered by Opportunity Type.
Fundraising Opportunities
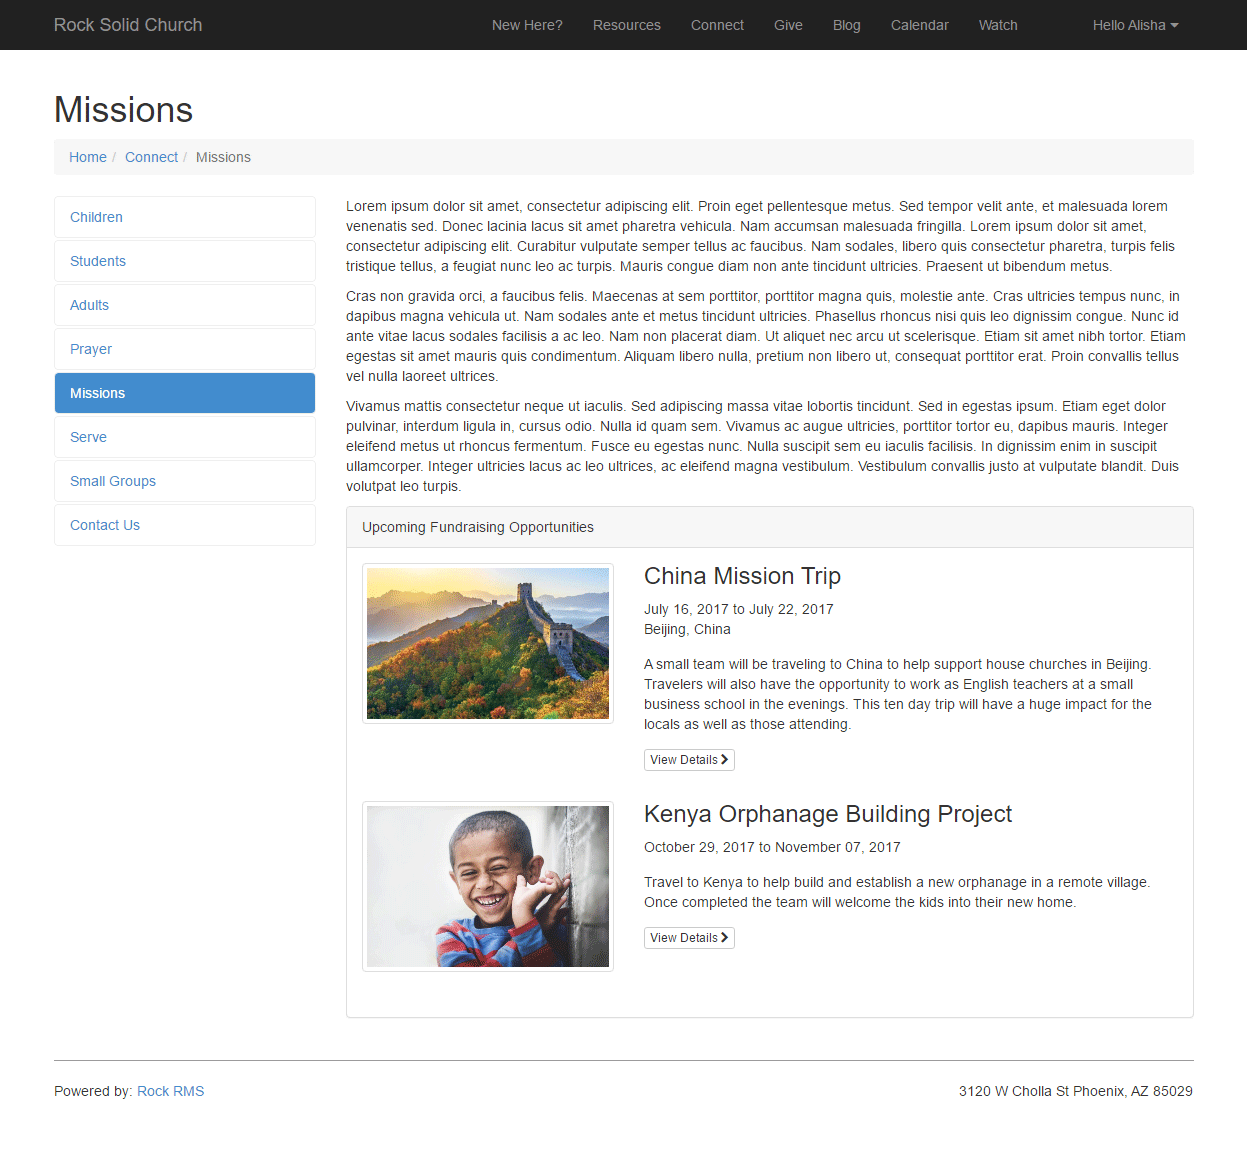
Selecting one of the opportunities will take you to its detail page. In the example below, Ted (who is leading this particular
mission trip) is viewing the page. Since we know it's Ted, a summary of his Fundraising Progress is shown. Links are also displayed to
take him to his participant's page and for him to make a payment. Also, note that since Ted is a leader for this opportunity, he has
access to a leader toolbox.
This page is also used for the general public to view. It allows them to easily register for the opportunity if a registration
instance was provided.
Fundraising Opportunity Detail
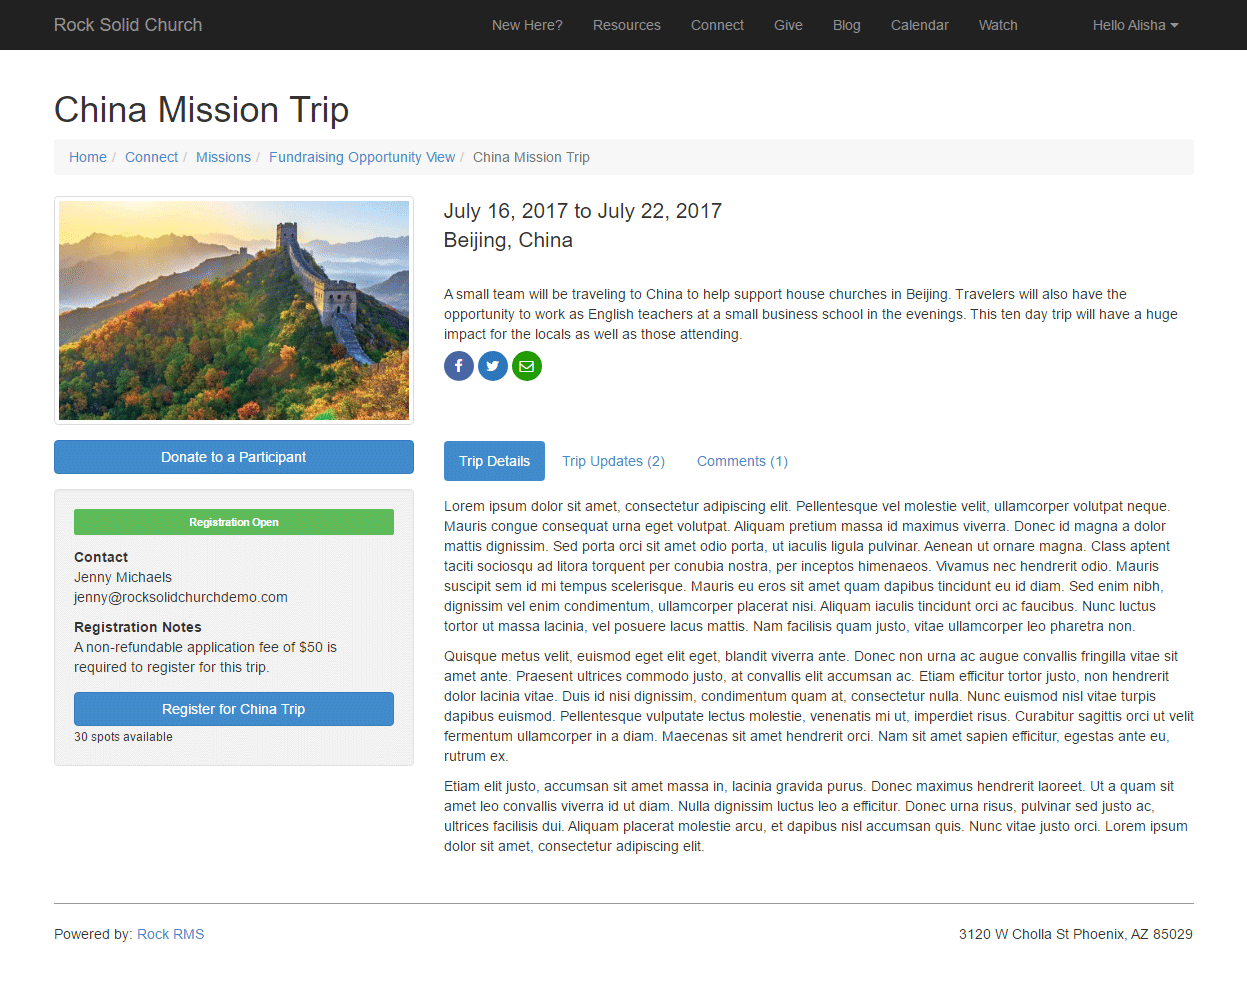
Fundraising Opportunites can also optionally be configured with a Content Channel for providing updates. When configured,
a new tab will be shown to display these updates.
Fundraising Opportunity Detail
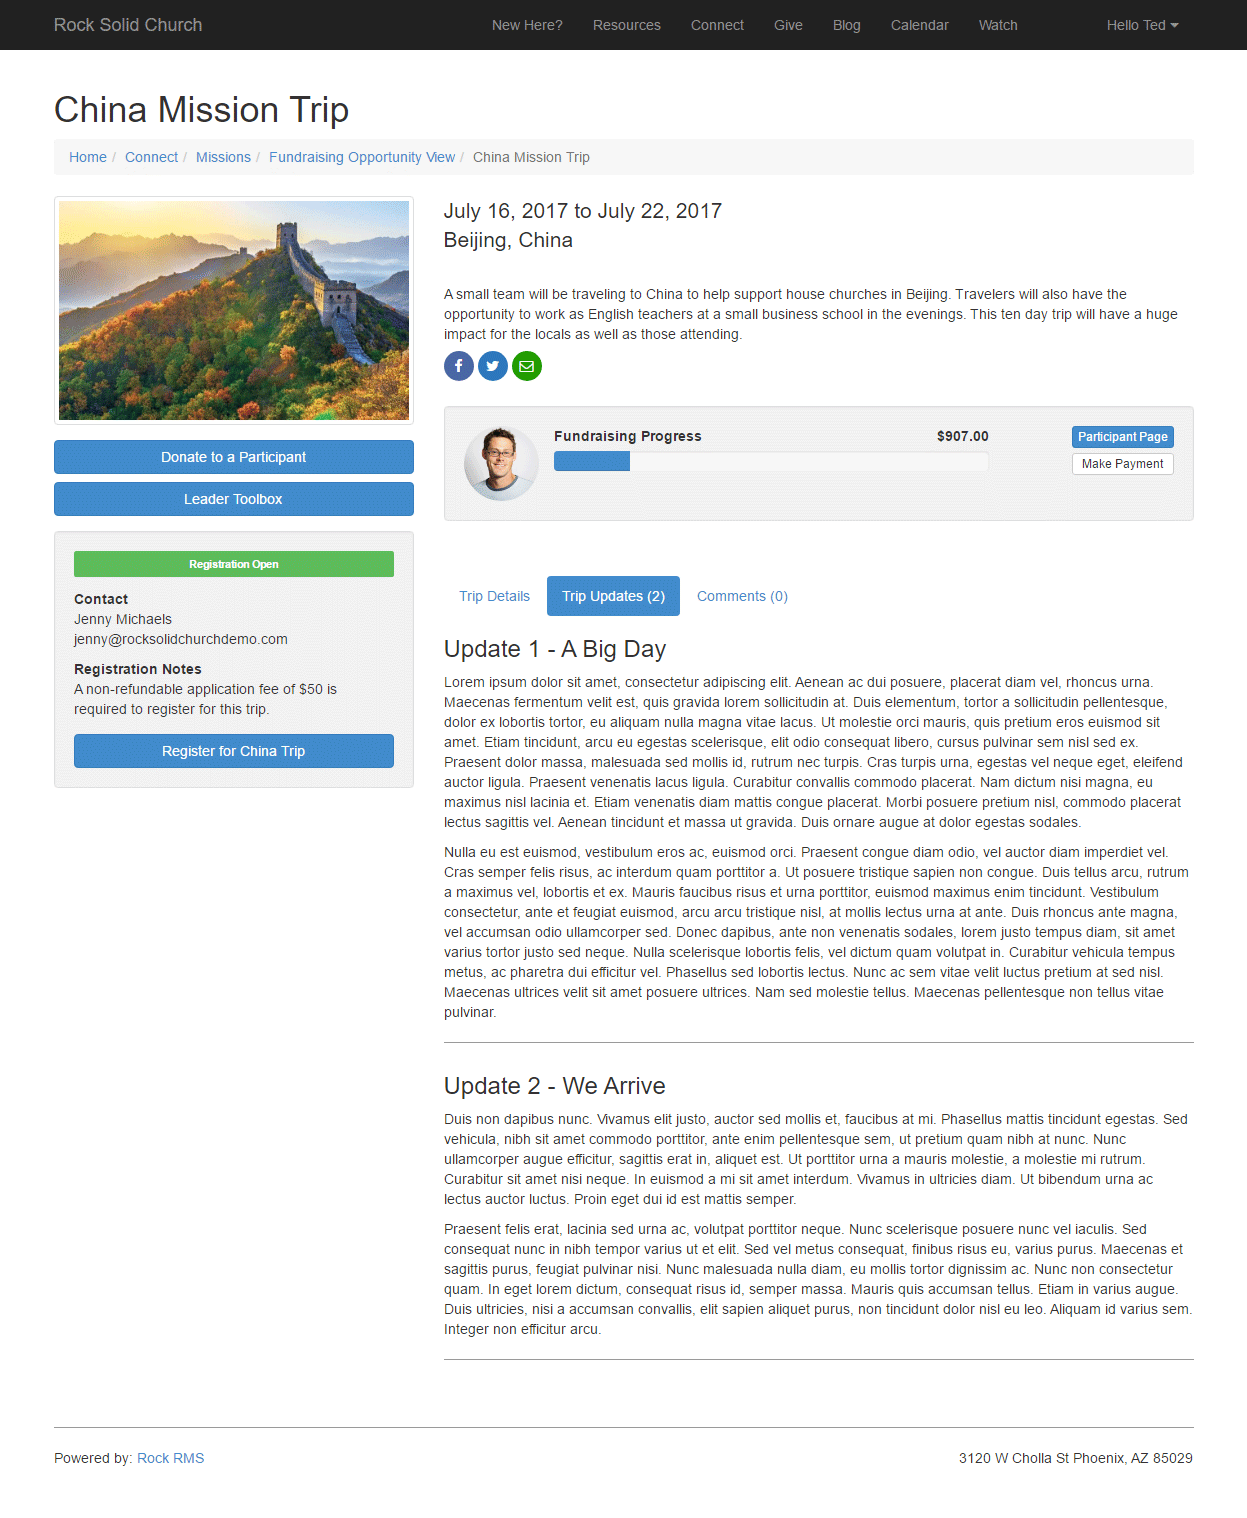
Another optional setting is to allow commenting on the opportunity. This tab will display a Rock notes control. Keep in
mind that this feature currently doesn't allow for approving comments and does not email when new comments are added.
Fundraising Participant Detail
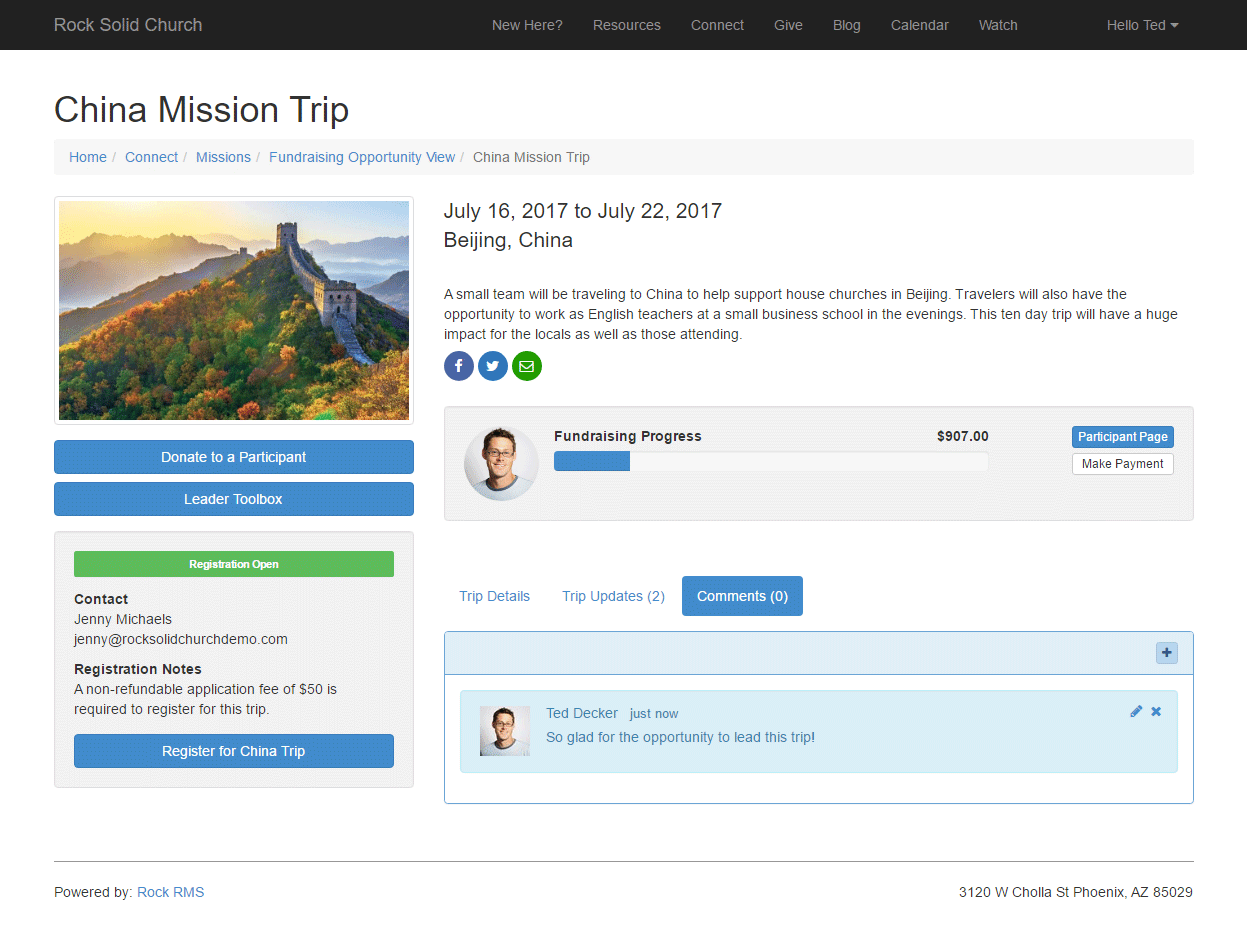
Each opportunity participant has a personalized page that they can share with others to help generate interest and help
encourage funding.
Fundraising Participant Profile
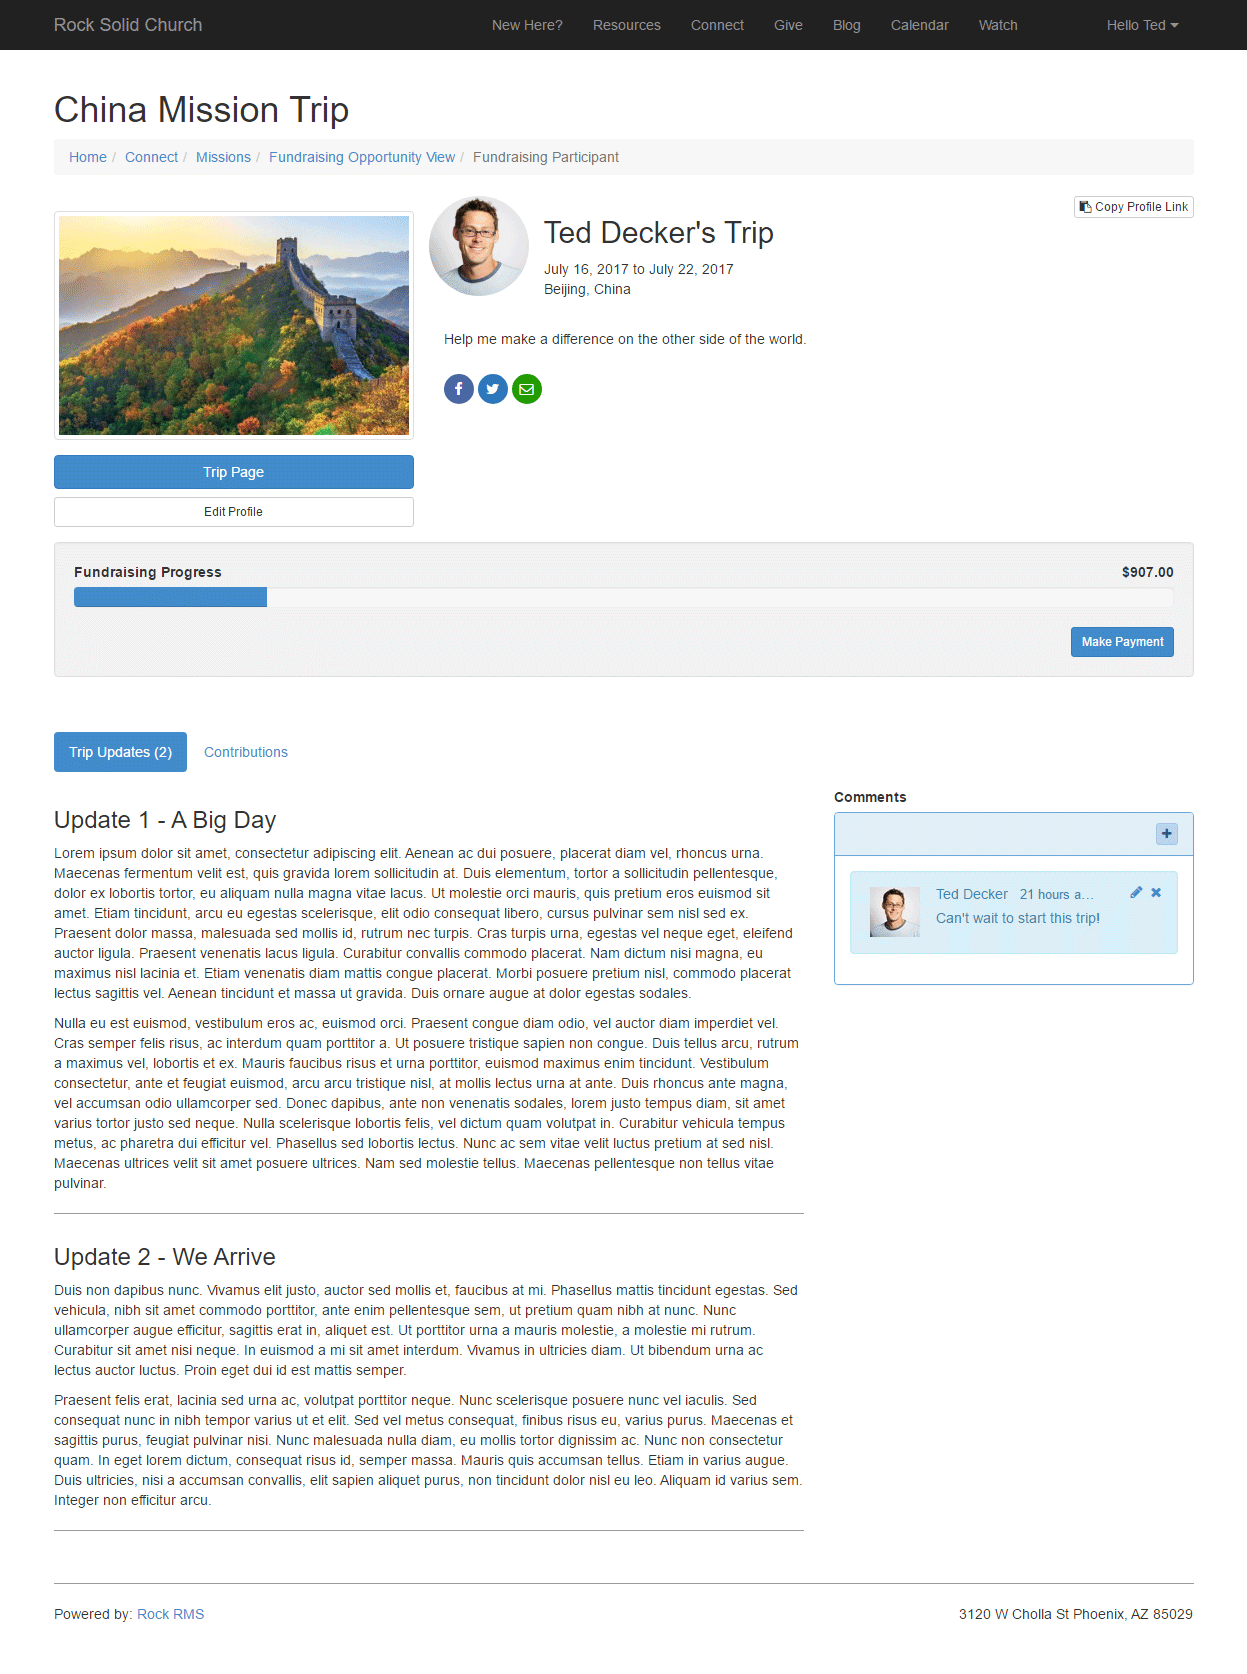
Each participant can provide a custom opportunity introduction and edit their profile image from their personalized page. This block can
also be configured to edit specific person attributes if you wish.
Fundraising Participant Profile
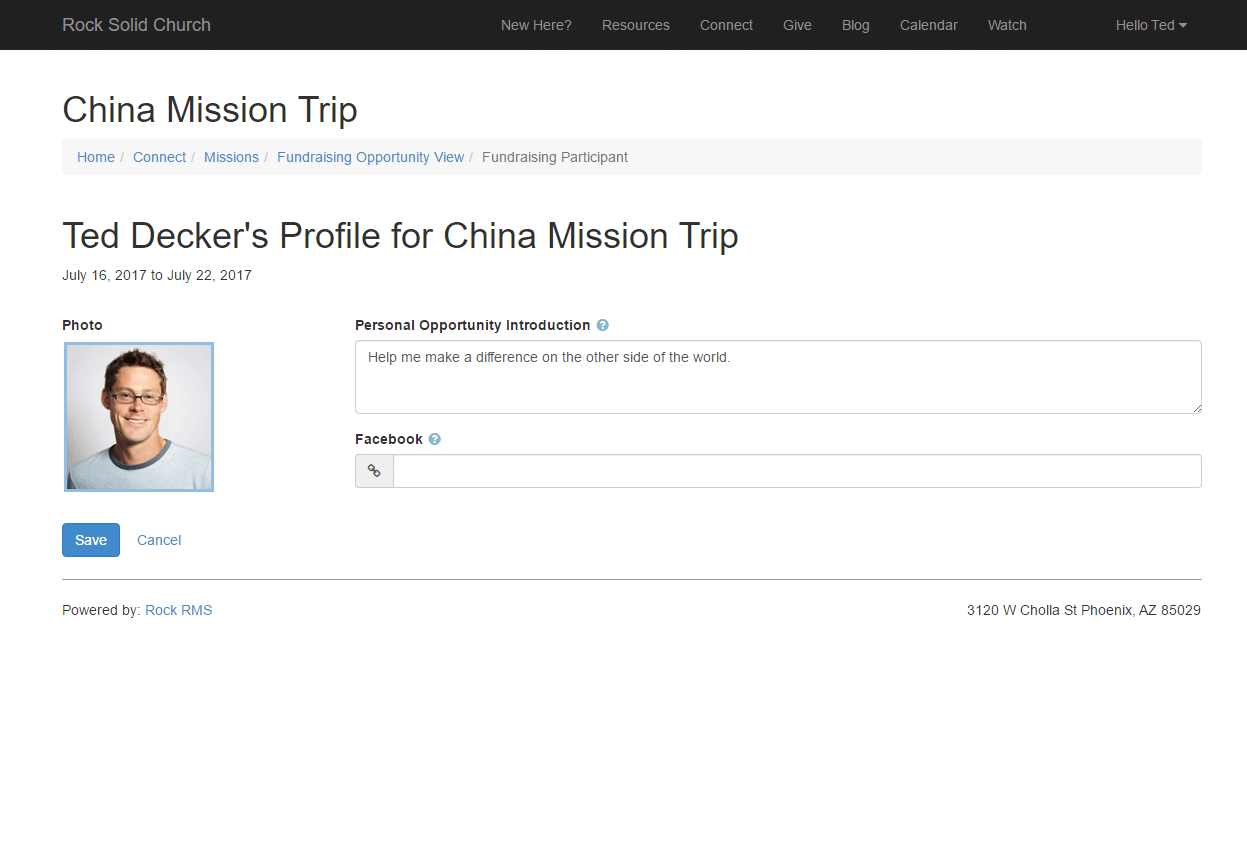
If the person logged in is the participant, they can also view the gifts that have been given.
Fundraising Participant Transactions
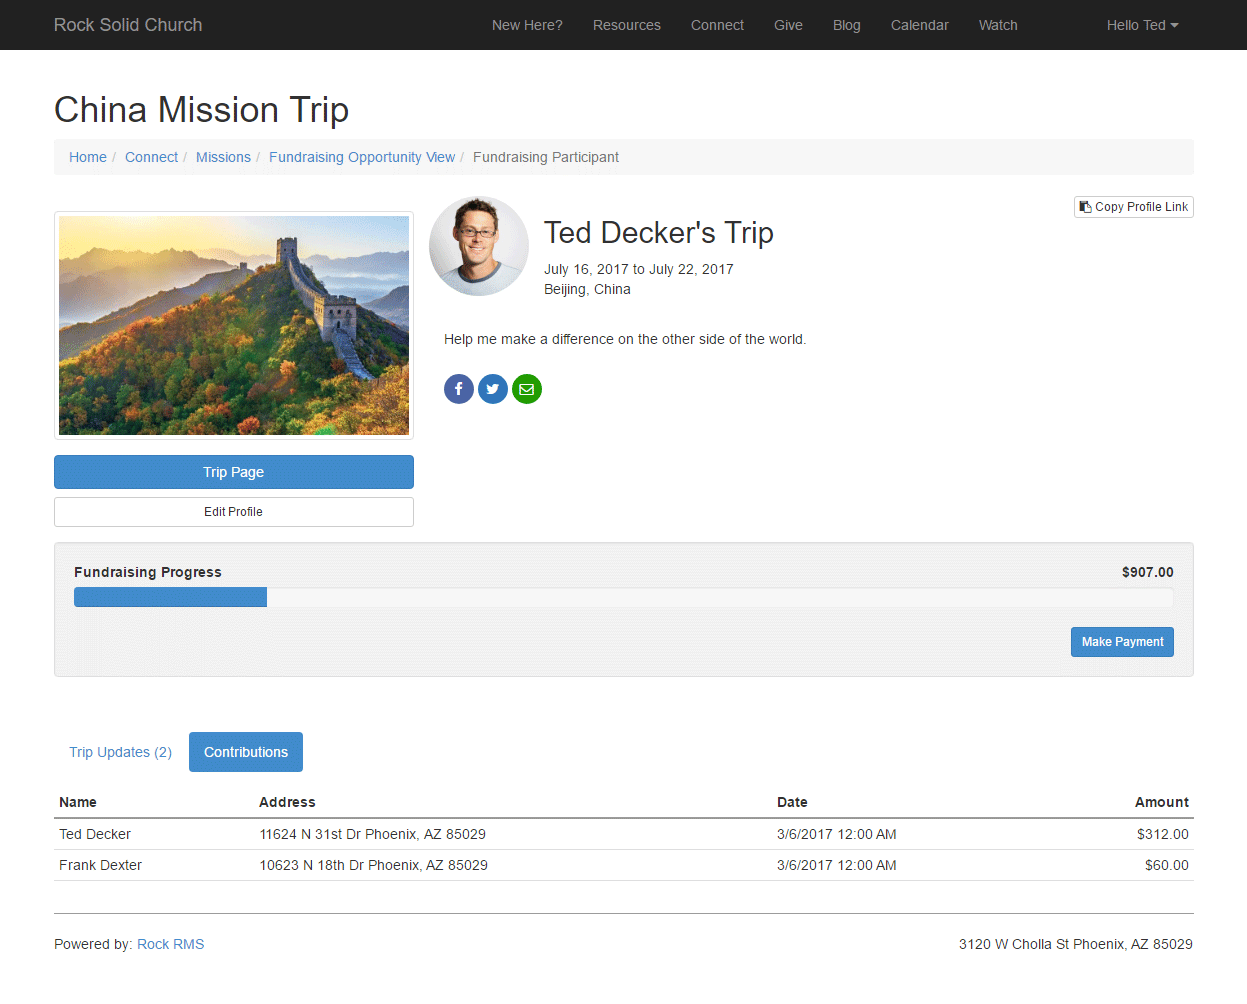
If someone doesn't have a link to a participant's profile page they can choose to give from the opportunity detail page
and select the participant they would like to fund.
Donate to a Participant
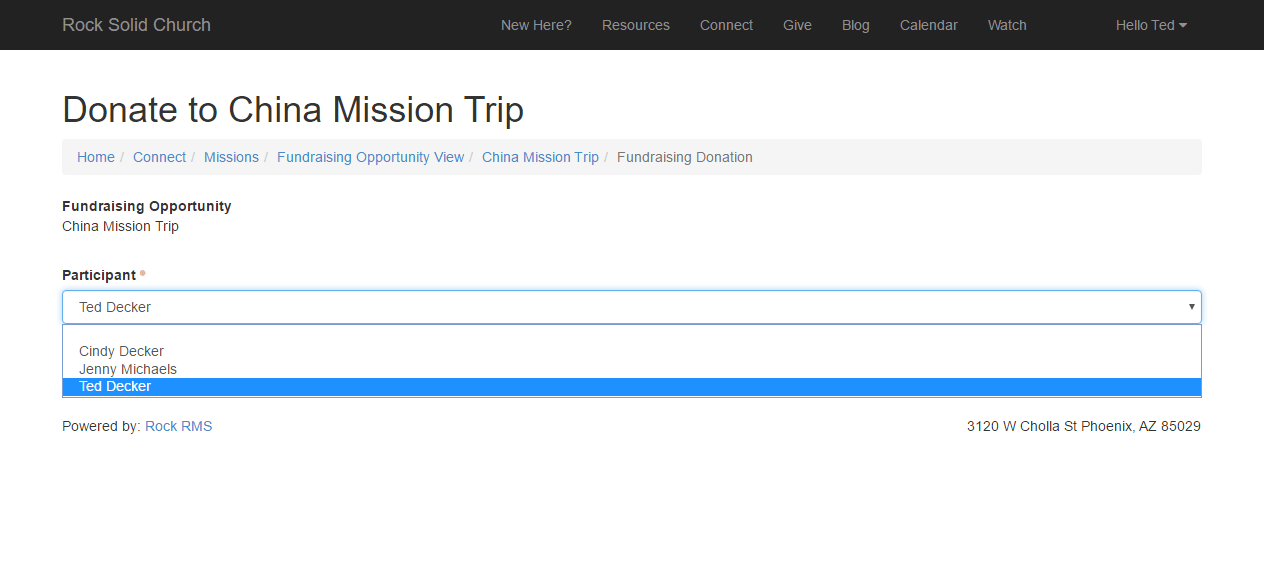
Fundraising Opportunity Configuration
As we mentioned earlier, Rock's fundraising features are driven by a set of group and group member attributes.
Let's take a look at these settings to see how you can customize each fundraising opportunity to meet your
individualized needs.
Keep in mind the group and group member attributes below are specific to a single fundraising opportunity
(each one is a group). This allows you to have several types of opportunities, each with their own unique
settings and configuration.
Group Attributes
Below is a detailed discussion of each setting for the group that represents the opportunity
(Mission Trip, Internship Season, etc.)
| Name |
Type |
Description |
| Opportunity Title |
Text |
The group name is mainly used internally. This attribute of
Opportunity Title
is what will show on the external site when opportunities are listed.
|
| Opportunity Date Range |
Date Range |
Used to show the start and end dates of the opportunity. For a mission trip, we
would recommend that you put the trip dates here. This date range doesn't control
when the opportunity is shown externally; it just describes when the opportunity
occurs.
|
| Opportunity Location |
Text |
This is the location of the opportunity. For a mission trip, this would be the
city or country. Feel free to leave this blank if it doesn't make sense in your
situation.
|
| Opportunity Summary |
Memo |
A brief description of the fundraising opportunity.
|
| Opportunity Photo |
Image |
If a picture is worth a thousand words, then we'd better include one.
|
| Opportunity Details |
HTML |
Now we get to the nitty-gritty of what this opportunity is all about.
|
| Individual Fundraising Goal |
Currency |
This field determines how much money each person is trying to raise. If each person
in the opportunity is raising different amounts, you can provide those unique
amounts on their group member attribute (discussed below).
|
| Opportunity Type |
Defined Value |
The opportunity type helps group-like opportunities. Rock ships with three options
(Trip,
Internship and
Project). You
can add your own under
General Settings > Defined Types > Fundraising Opportunity Type.
This setting has two roles:
-
Acts as a filter for opportunities on the external website (e.g. show only
mission trips on this list)
-
Provides a label to describe the opportunity type. For instance, should
this opportunity be referred to as a
Trip,
Project, etc.
|
| Update Content Channel |
Content Channel |
You may want to provide updates on the status of your opportunity. For example,
if your opportunity is a mission trip, you might want to file trip reports. Or if
it's a project, you might want to provide updates on the overall funding level or
project status. This setting allows you to configure a content channel to manage
these updates. If you don't provide a channel the updates tab will be hidden.
|
| Enable Commenting |
Boolean |
Sometimes you want comments, sometimes you don't. When enabled, a notes block will
be added to the opportunity detail. Just remember that there is no automatic email
when new notes/comments are left and no approval process. These features may be
added in a future release.
|
| Registration Instance |
Number |
This is what ties in a registration to the fundraising opportunity. You must provide the registration instance ID (currently there isn't a registration
instance picker).
|
| Registration Notes |
Memo |
This short description will show up on the opportunity details page to provide any
quick notes about the registration (e.g.
A $200 deposit is required).
|
| Allow Individual Disabling of Contribution Requests |
Boolean |
Opportunity participants can have their own personalized fundraising pages. Some
participants may want to use this page to share the opportunity and provide updates,
but not want to communicate the financial needs. This setting allows you the option
to allow them to disable the sharing of their funding status.
|
| Allow Individual Editing of Fundraising Goal |
Boolean |
This allows individuals to set their own fundraising goals from their external
fundraising profiles. The default for this is not to allow editing.
|
| Cap Fundraising Amount |
Boolean |
This setting determines if an individual can raise more money that their goal.
|
| Financial Account |
Financial Account |
This configures which financial account the fundraising opportunity should use to track their
money.
|
| Show Public |
Boolean |
This flag determines whether the opportunity should be displayed on the external
website. Since it's common for an opportunity to be displayed long before it starts,
and for a brief time after it ends, this flag is used to determine when an
opportunity should be displayed.
|
Since many of these attributes drive the external display of the opportunity, let's look at
an example and where each value this shown.
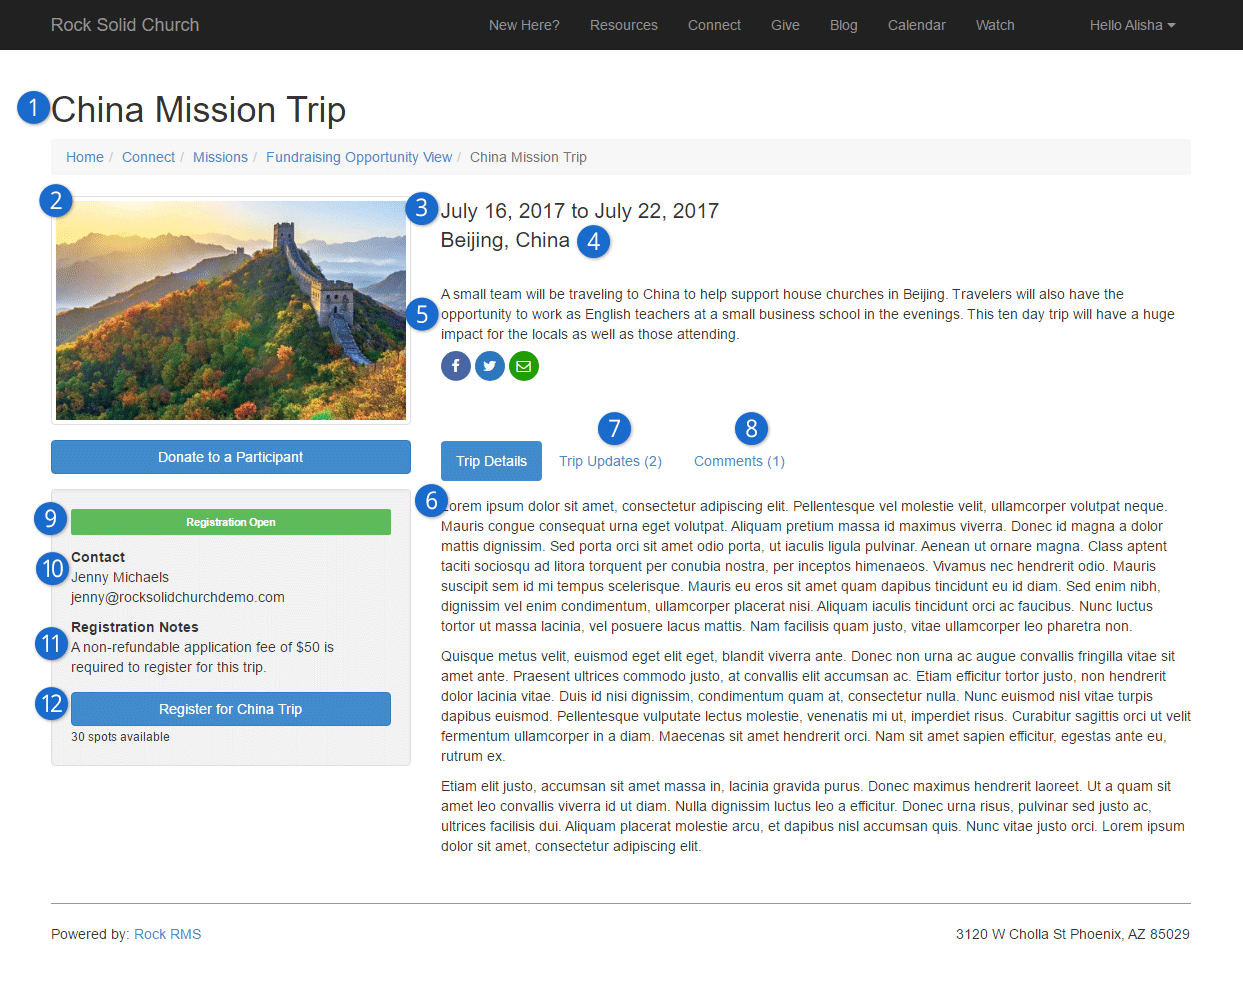
- 1 Opportunity Title
- 2 Photo
- 3 Date Range
- 4 Location
- 5 Summary
- 6 Details
- 7 Trip Updates
- 8 Comments
- 9 Registration Status
- This is determined by looking at the dates on the registration instance. If the
registration is not yet open, the future opening date will be displayed.
- 10 Registration Contact
- The contact comes from the Registration if it is configured.
- 11 Registration Note
- 12 Spots Available
- This is calculated by looking at the number of registrant openings available for the registration.
Group Member Attributes
The following group member attributes are available to help configure the opportunities.
| Name |
Type |
Description |
| Individual Fundraising Goal |
Currency |
This allows you to provide an individual goal that is unique to each person. This
attribute is only available to the internal administrators and cannot be edited by
the individual.
|
| Personal Opportunity Introduction |
Memo |
This is a short message that the person can provide to provide a personalize note
on their individual trip page.
|
| Disable Public Contribution Requests |
Boolean |
This allows an individual to hide their name when listing people to fund. It also
hides many of the features on their personal opportunity profile that are intended
to encourage someone to give. This allows them to use their personal page to
communicate updates if they are self-funding the opportunity.
|
Fundraising Financial Transactions
Financial Transactions that are created from the fundraising features will all default to the
Contribution type. The account for the
transaction will be applied based on the opportunity group setting. It is possible to change the
transaction type to a different value than Contribution.
To do so, you'd need to create a new page with a Transaction Entry
block on it. This block has a block attribute to set the transaction type on the advanced setting panel.
You'd then need to configure your fundraising pages to use this new page for processing financial
transactions.
In Rock, financial transactions can be tied to another entity (event registration, etc.). Donations that
are made as a part of fundraising will be tied to the Group Member
of the Fundraising Opportunity group.
The is no financial linkage to registrations. This is an important point to understand as there is no way
to link money coming in to a registration with that given as a fundraising opportunity. Below we cover
several ways you can configure event registration to work with the fundraising tools for maximum impact.
Financial Transactions Matching
We've already discussed that Financial Transactions for fundraising are Contributions that are tied to the Group Members of the
Fundraising Opportunity Group. The Rock tools mentioned above do all of the connecting of the group member to the transactions. You might
asking, "What about checks or gifts that need to be entered manually?" And that... is a GREAT question!
After entering contributions (either scanning and matching or through another process), you can link a contribution to a
fundraising opportunity participant using the Fund Raising Matching block found under
Finance > Fundraising Matching
Donate to a Participant
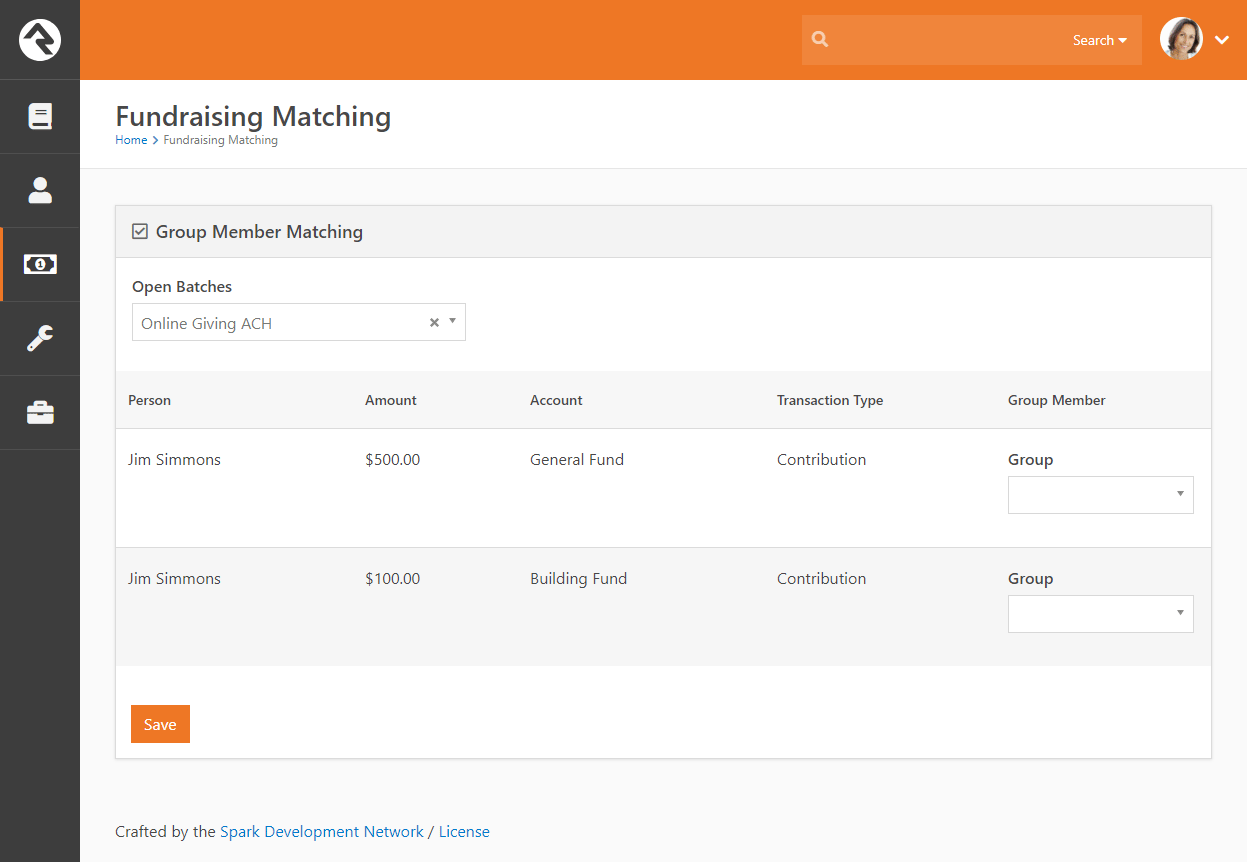
Fundraising Progress
You can quickly track the progress of fundraising campaigns for fundraising groups. Start by going to the
Group Viewer page (People > Group Viewer). From this screen you can view the individual fundraising donations for each group member.
Fundraising Group
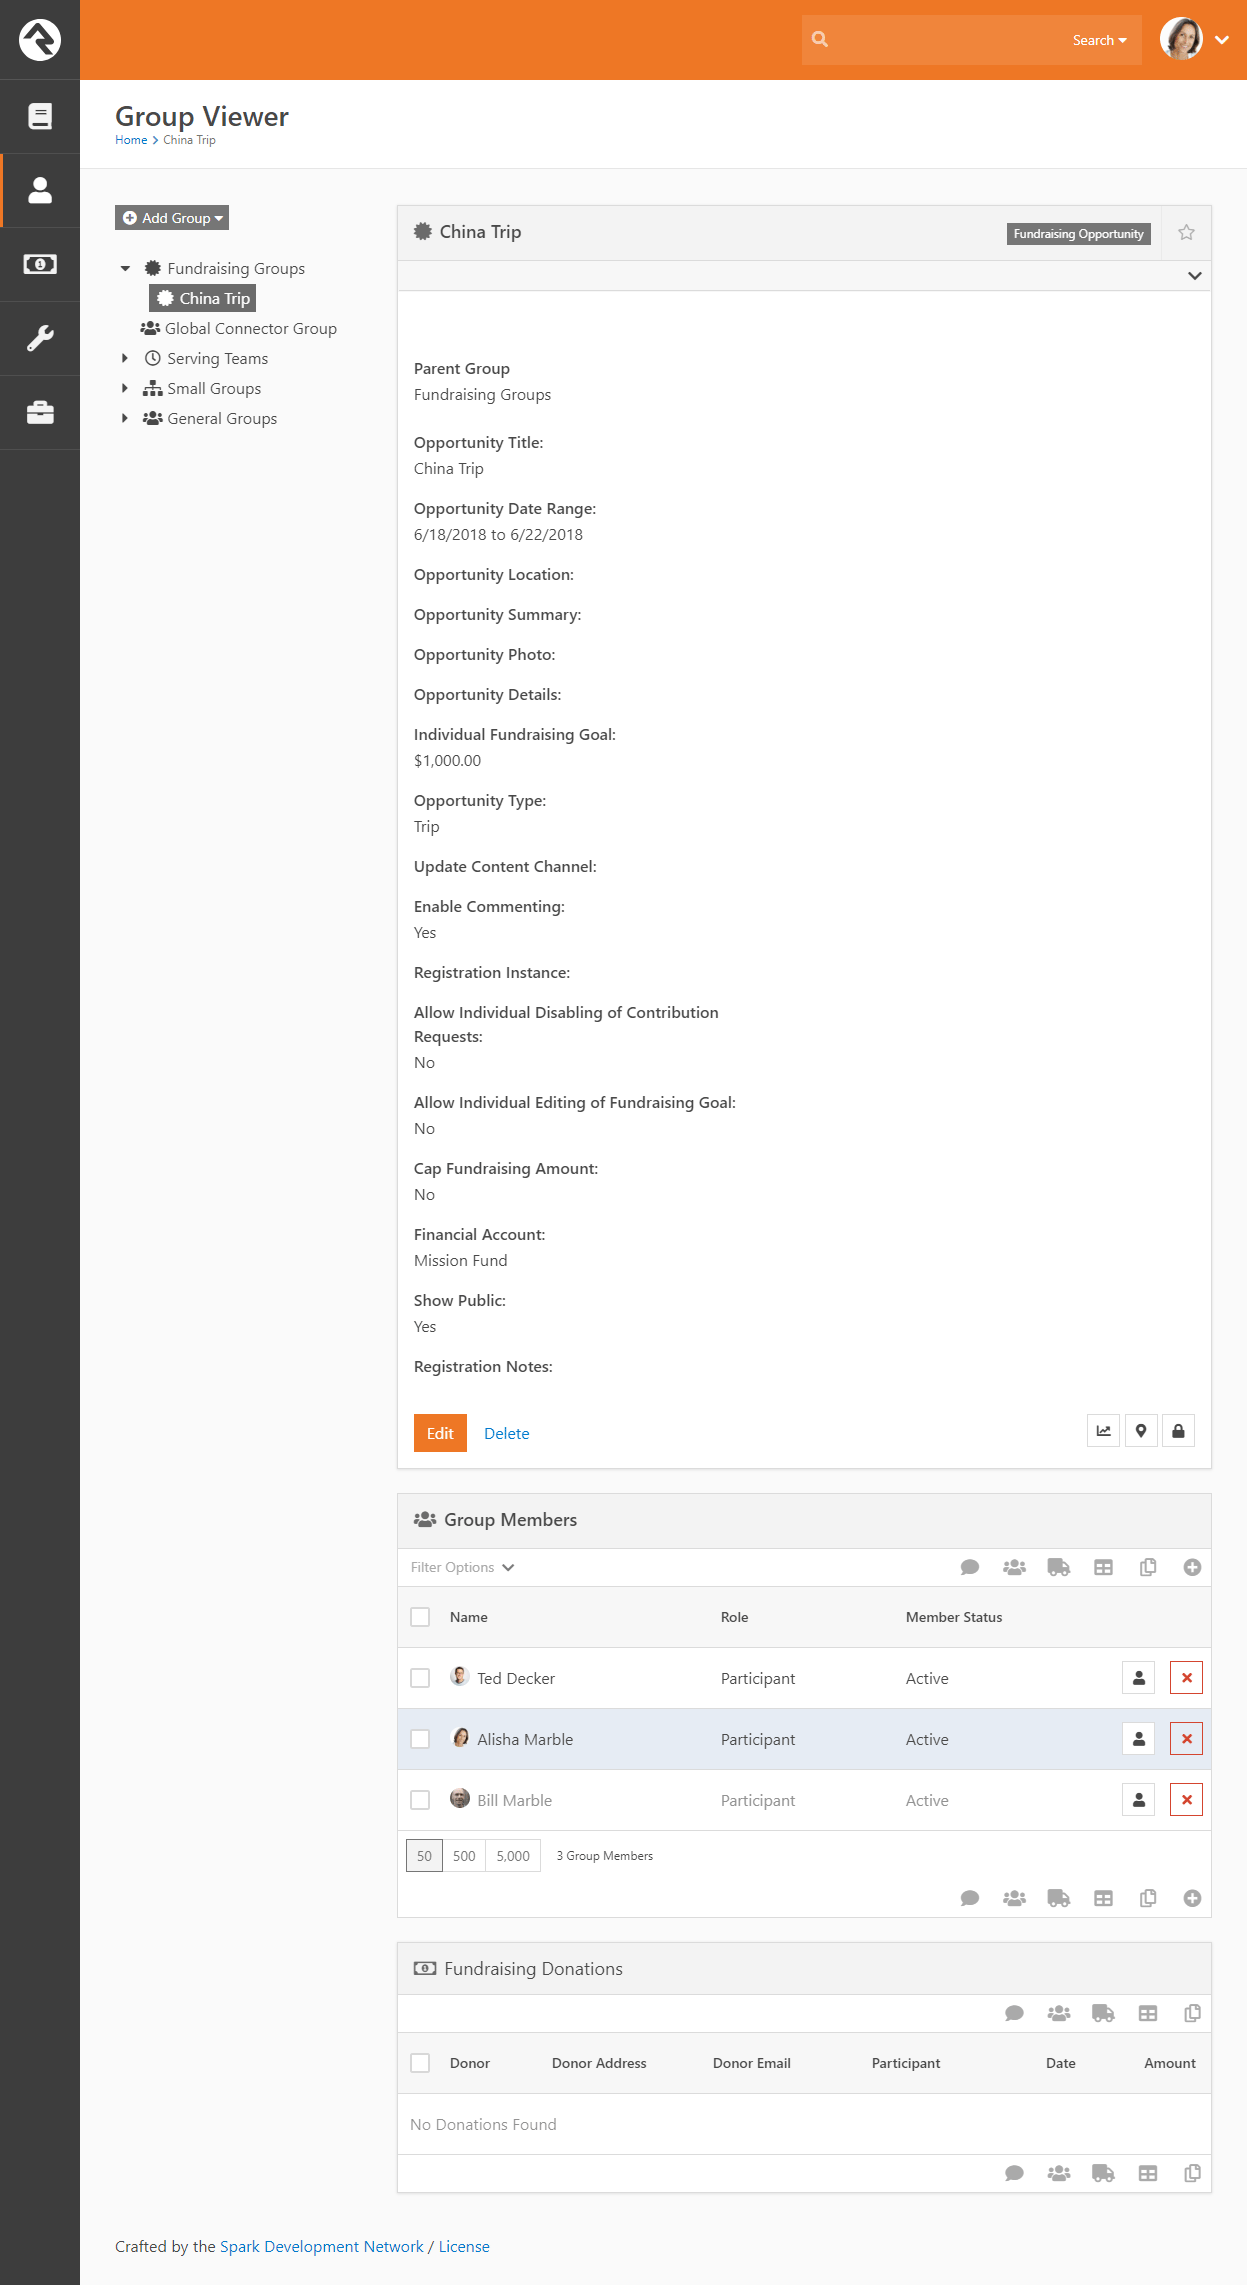
You can also quickly view the group's overall fundraising progress. Click the
button to display a snapshot of both the combined and individual fundraising progress.
Fundraising Progress
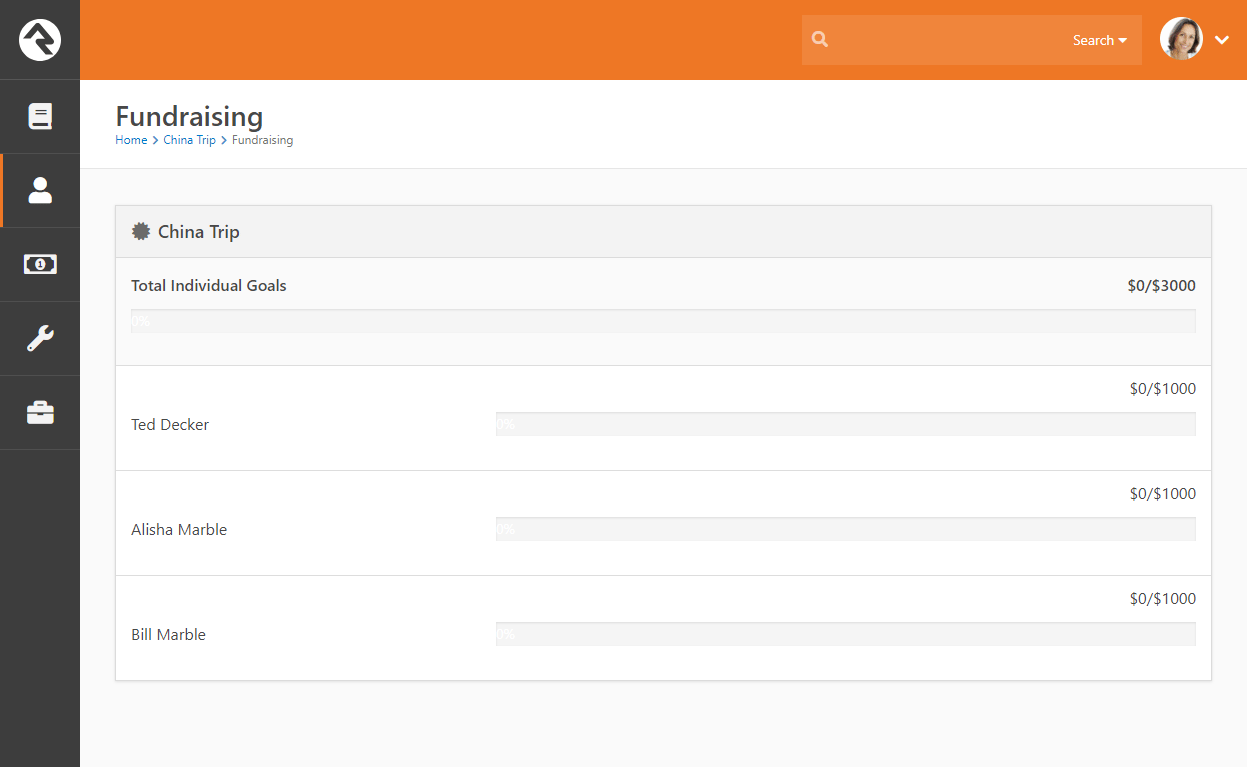
How Registration Can Work with Fundraising
As mentioned above, Rock's registration and fundraising tools were meant to work together. That said,
financial transactions from these two features don't tie directly together. Below are some use cases to
show how you can get these two features to sing in perfect harmony.
Basic Mission Trip
In a basic scenario you would create a new event registration to capture information about the trip
participant and have the registrant drop directly into the fundraising group. To enable this direct
link to the fundraising group, be sure you define a linkage on the registration instance to the
group. The fundraising blocks are smart enough to use these linkages in the registration process.
Pro Tip
You can actually provide multiple linkages to have individuals drop into different groups. The
linkage name will be used on the registration button on the fundraising page.
Mission Trip with No Cost Application Process
Say you wanted to configure a mission trip in which a person needed to register and be approved
before they could begin fundraising. You could use an event registration to take their application
information. Once their application was approved, they would be added to the
Fundraising Opportunity group
(using the group placement tools would help with this) and they could then start their fundraising.
They would use the same Donation
page to submit their own payments for the trip.
Mission Trip with Required Costs Paid by the Participant
Now let's say that the trip costs $1,000 and that $200 is due upfront and should be paid by the
trip participant. Also, suppose that there is an optional post trip safari that a person could
choose to add. In this case, you would setup an event registration for $200 with an optional fee
for the safari. You would then setup the
Fundraising Opportunity
group to have an Individual Fundraising Goal of $800.