Improve
Updates for Rock 9.0
No updates made.Updates for Rock 4.0
No updates made.Updates for Rock 5.0
Below is a summary of the updates for this version.
- Added information about the new color alert badges shown
in My Connection Requests
- Describe new 'request considered idle' and
'requires placement group' features on Connection Types
Updates for Rock 6.0
Below is a summary of the updates for this version.
- Updated Connection Request screenshot and callouts in Working with Requests chapter.
Updates for Rock 7.0
Below is a summary of the updates for this version.
- Added updated information on new settings for Placement Groups.
- Added Displaying Connection Badges section to Working with Requests chapter.
- Updated Connection Request screenshot and callouts in Working with Requests chapter.
- Updated Transfer Request screenshot and callouts in Working with Requests chapter.
Updates for Rock 8.0
No updates made.
Welcome
Many of your organization's strategies are about helping people move from one state to
another. Often this movement isn't a straight line, but more of a meandering path. When
the path takes an extended period of time it's possible for people to fall through the
cracks.
This is where the Connections tool comes to our rescue. While workflows can be a great
help by connecting people through automated processes, they can quickly become complicated
and unwieldy in complex situations. The Connections tools provides a backbone that allows
you to build advanced processes. As you'll soon see, workflows still play an important
role in Connections but more so as an extension of the foundation instead of the
foundation itself. But enough talk... let's see for ourselves what the Connections
feature can do.
Working With Requests
The Connections tools can be found under
People > Connections.
This page shows you the working environment for the connectors.
Request List
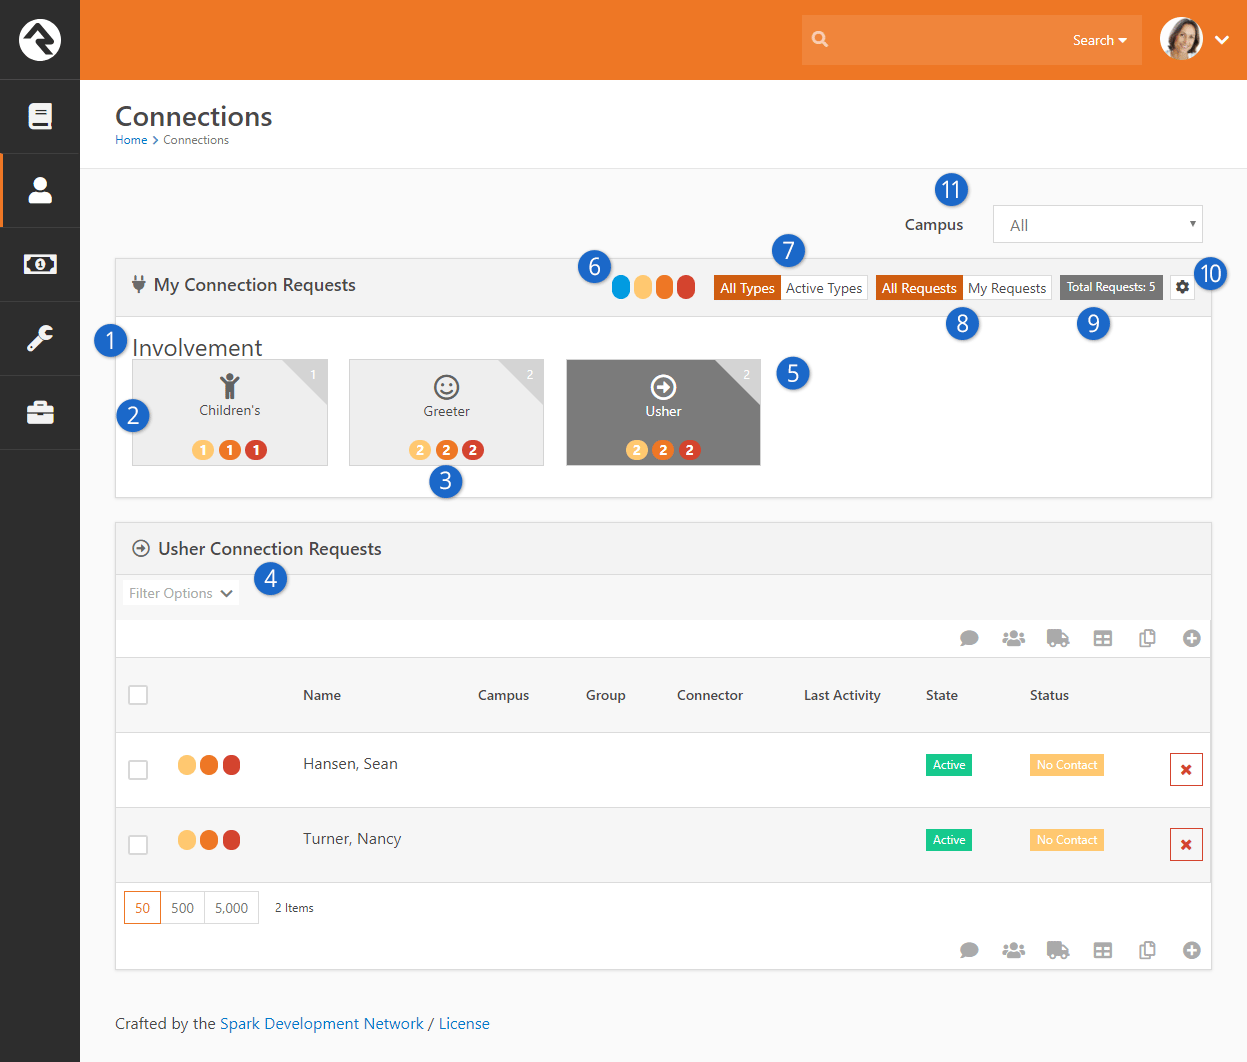
- 1Title
- The title of the Connection Type
that the opportunity list belong to.
- 2Opportunities
- The Connection Opportunities
that the logged-in user is a connector for.
- 3Badges
- Colored badge(s) with a number shows the total count of requests in a particular state/status.
- 4Request List
- A listing of Requests
for the selected opportunity.
- 5Total Requests
- Each connection opportunity has a corner badge displaying the number of total connection requests.
- 6Badge Color Key
- This legend key explains what the color number badges represent.
- Blue - assigned to you
- Yellow - unassigned
- Orange - critical status such as No Contact
- Red - idle (no activity in a configurable number of days)
- 7Type View Toggle
- This toggle allows the user to select if they want to see
All Types
in the connection opportunities or
Active Types,
which would show only active requests.
- 8Request View Toggle
- This toggle allows the user to select if they want to see
All Requests
in the connection opportunities they are a connector for or
My Requests,
which would only show requests in which they are assigned as the connector.
- 9Total Requests
- This badge displays the total number of connection requests, across all connection types.
- 10Configure Connection Types
- Those in the RSR – Connection Administration
security role will also be allowed to configure the connection types. More on this
later.
- 11Campus Filter
- The campus filter toggle allows you to select which campus connections to view.
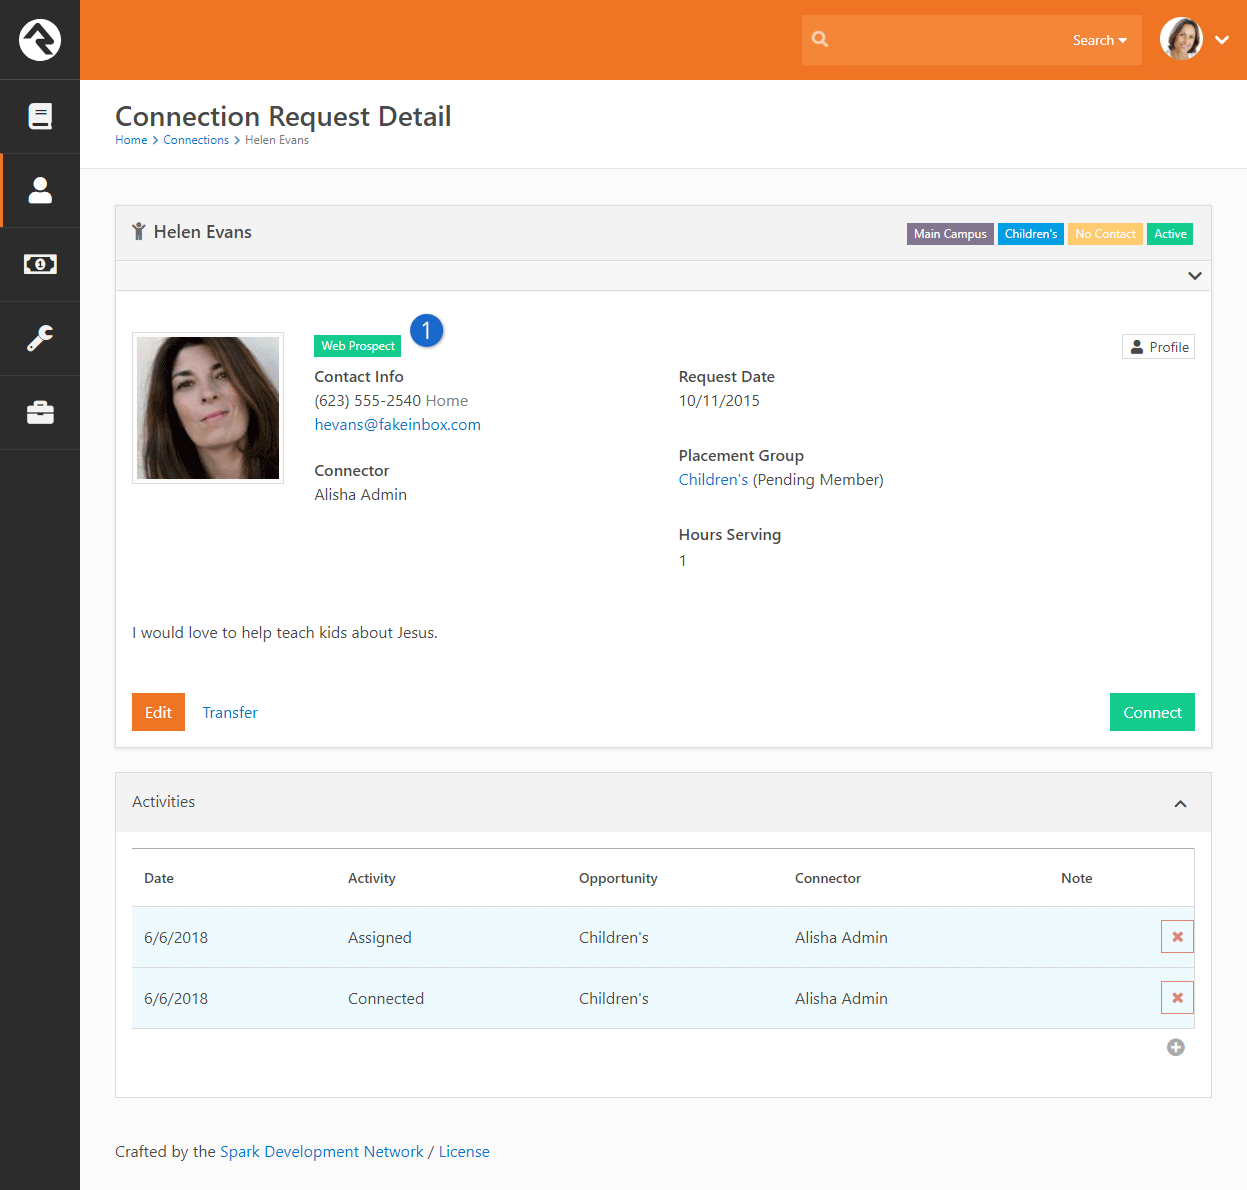
Selecting a request will show you its relevant details.
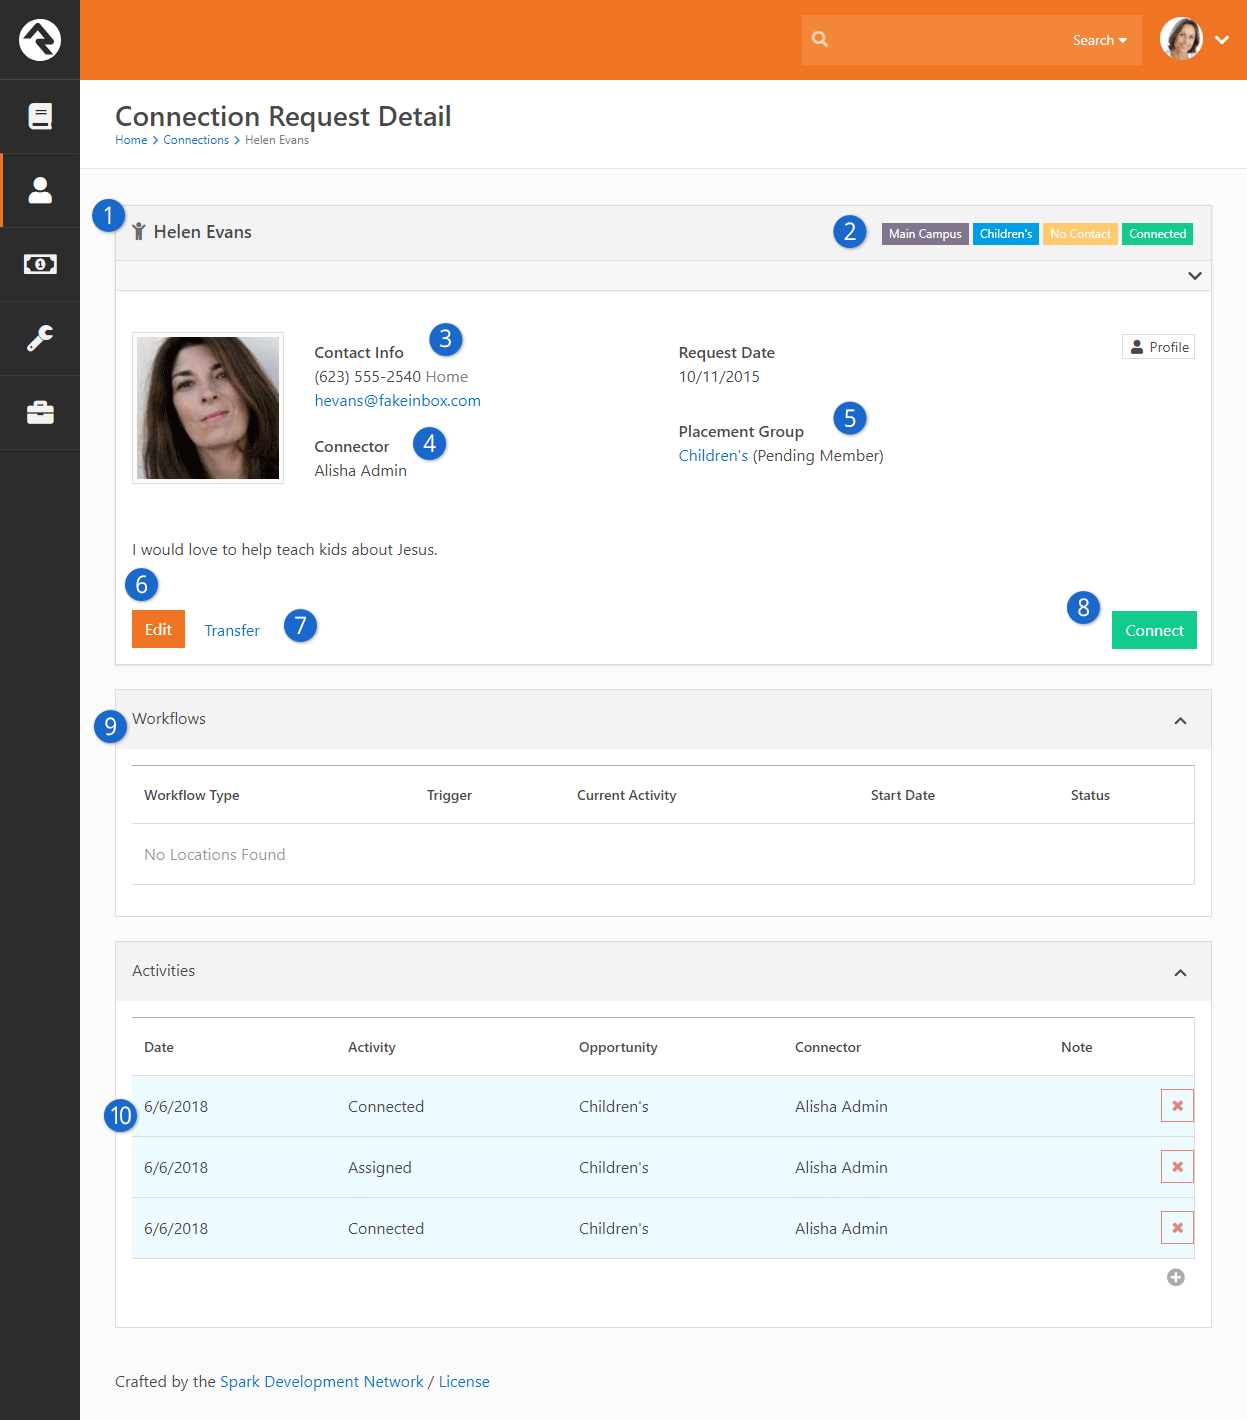
- 1 Requestor
- This is the person that is in the process of being connected.
- 2 Request Labels
- At the top of the details screen you'll also note several labels. These include (in order):
- Campus
- Connection Opportunity
- Status
- State
- 3 Contact Information
- The contact information for the requestor is shown to help speed up the process of
contacting the individual. You'll also note that there is a quick link to the right
that will take you to the requestor's full profile.
- 4 Connector
- The currently assigned connector.
- 5 Placement Group
- This is the group that the person will be added to when the request is connected.
The groups that display in this list are configured on the
Connection Opportunity Detail screen.
You will learn more about these settings in the
Configuring Connection Types
chapter. For now, just know that you can limit the groups displayed here. Also note
that this list of groups will be filtered by the campus of the request.
- 6 Edit
- This allows you to edit the Connector, State, Status and Assigned Group.
- 7 Transfer
- This allows you to transfer the request to another
Connection Opportunity.
We'll talk more about transferring later.
- 8 Connect
- Select this button to complete the connection process. This will drop the person
into the group and mark the state as Connected.
- 9 Workflows
- If any workflows have been initiated for this request, you will see their current
state here.
- 10 Activities
- This is a list of activities for the request. You may notice that some
requests' activities are highlighted in blue while other activities are white. The
activities with a blue background color represent those that are for this specific
request. Activities without the blue highlights are activities that are from other
requests in the same connection type. Additionally, you can only remove the activities you've
added, the red x will be greyed out otherwise.
You might be wondering why you'd ever want to see these activities. It's not uncommon
for overly ambitious requestors to sign up for multiple connection opportunities at
once. Viewing the activity in other opportunities allows you see that they are being
contacted by more than one connector.
This functionality can be disabled if needed. More on that later.
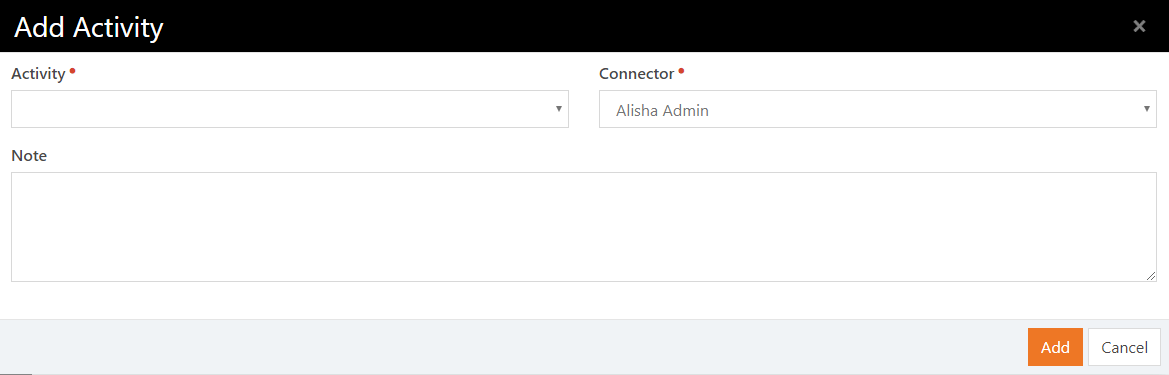
Adding Activities
You can add new activities by selecting the
button. This brings up the Add Activity window.
Adding Activities
Transferring a Request
During the connection process it's common that the requestor (or connector) decided
that this opportunity isn't a great fit. The transfer feature is a quick and powerful
way to ensure the requestor is able to find a new opportunity that works for them.
Selecting the Transfer
button will bring up the transfer screen below. While it looks pretty simple, it
has some powerful capabilities.
Transfer a Request
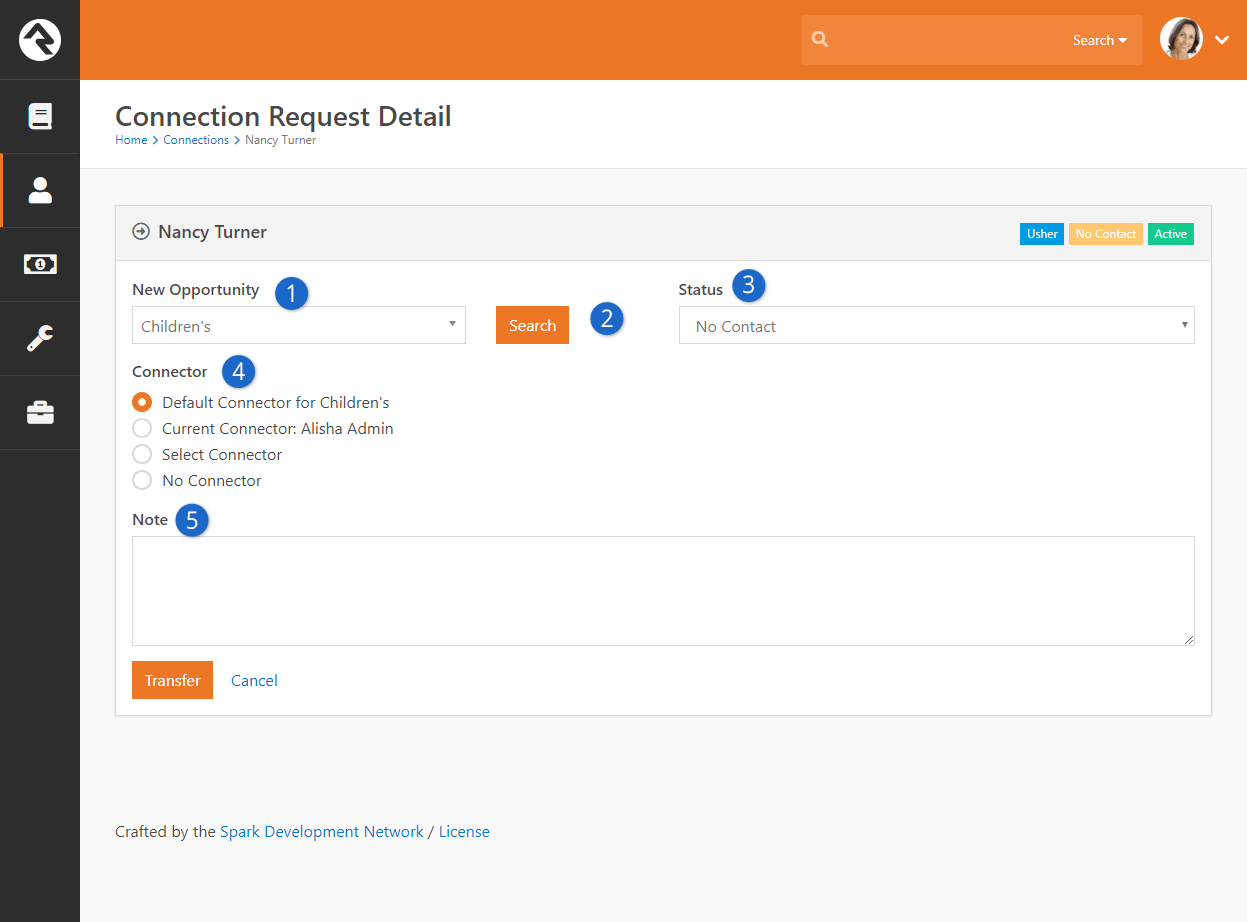
- 1 New Opportunity
- This is where you'll select their next opportunity.
- 2 Search
- This allows you to find the best next opportunity. We'll dive deeper into this next.
- 3 Status
- This allows you to select the new status when the request is dropped into the new
opportunity. The default status is already selected for you so in most cases
you won't want to change this.
- 4 Connector
- Most of the time you'll want to clear the current connector when you transfer the
request. Sometimes you'll want to select a new connector. The options provided here allow you
to select:
- The default connector for the opportunity
- The current connector (whose name, if available, will be displayed here)
- A new connector (which you can choose from the dropdown that displays when the option is selected)
- No connector
- 5 Note
- This allows you to send a note on to the new connection team.
Through the transfer process you want to make sure you find each individual the
right next opportunity. Otherwise they might feel like a hot potato. The
Search button
allows you to look at all of the new opportunities to help coach them on what might
be best for their personality and situation. Below is the search screen for the
involvement connection type.
Transfer Search

Displaying Connection Badges
Connection badges allow you to quickly view a person's connections. The badges are
displayed on the Connection Request Detail screen.
Connection Badges
- 1 Connection Badges
- Shows which connections are associated with a person.
You can choose which connection badges to display by editing the Connection Request Detail block settings.
Connection Request Detail Block Properties
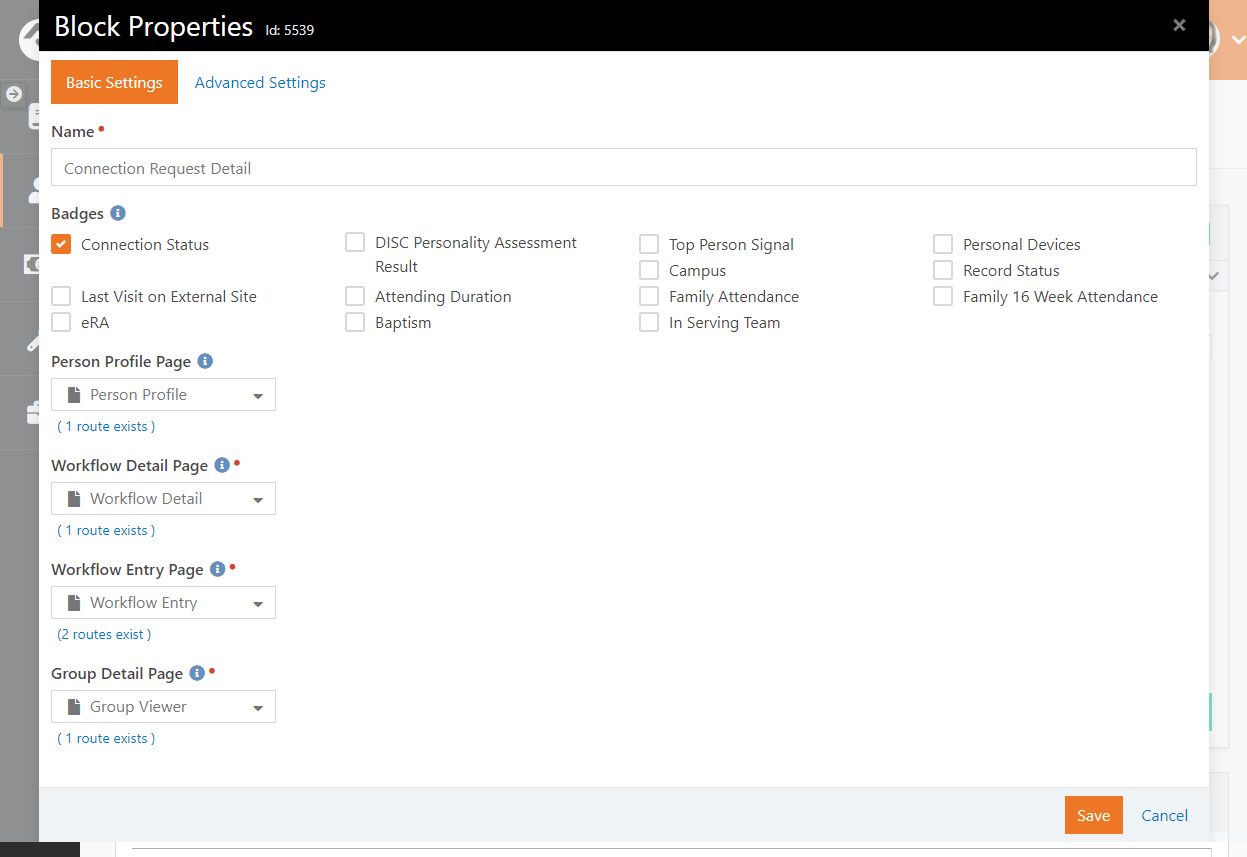
From the Connection Request Detail screen, turn on block settings and open the Connection Request Detail block properties.
Select which badges you want to display and click the Save button.
Those badges will now be displayed for anyone with those connections. Super easy!
Entering New Requests
There are three ways to enter new connection requests. Let's look at each one in detail below.
Self-Service
Rock ships with blocks that allow you to create a self-service entry to the
connection process. This has been pre-configured on the external website for the
involvement connection type under Connect > Serve.
Opportunity Search
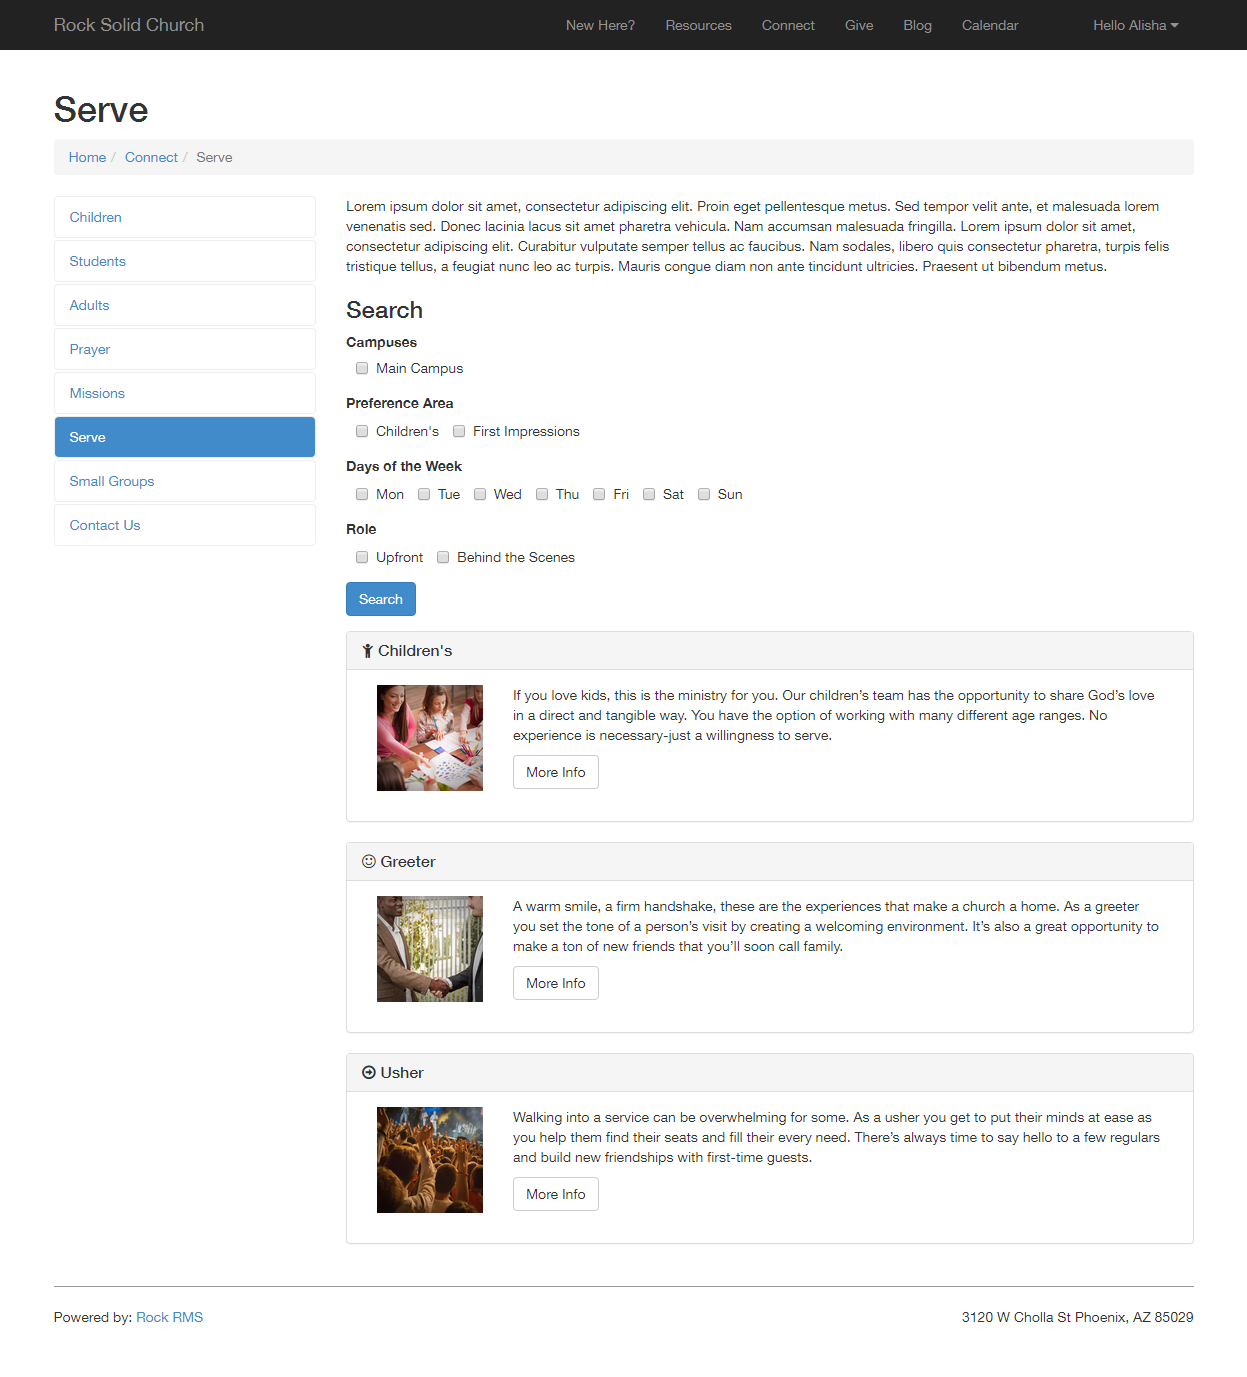
Here you will see the search page for finding involvement opportunities. It allows
you to filter by campus and also by various attributes about the opportunity (we'll show you how to
configure these below). Selecting an opportunity will display its details.
Opportunity Detail
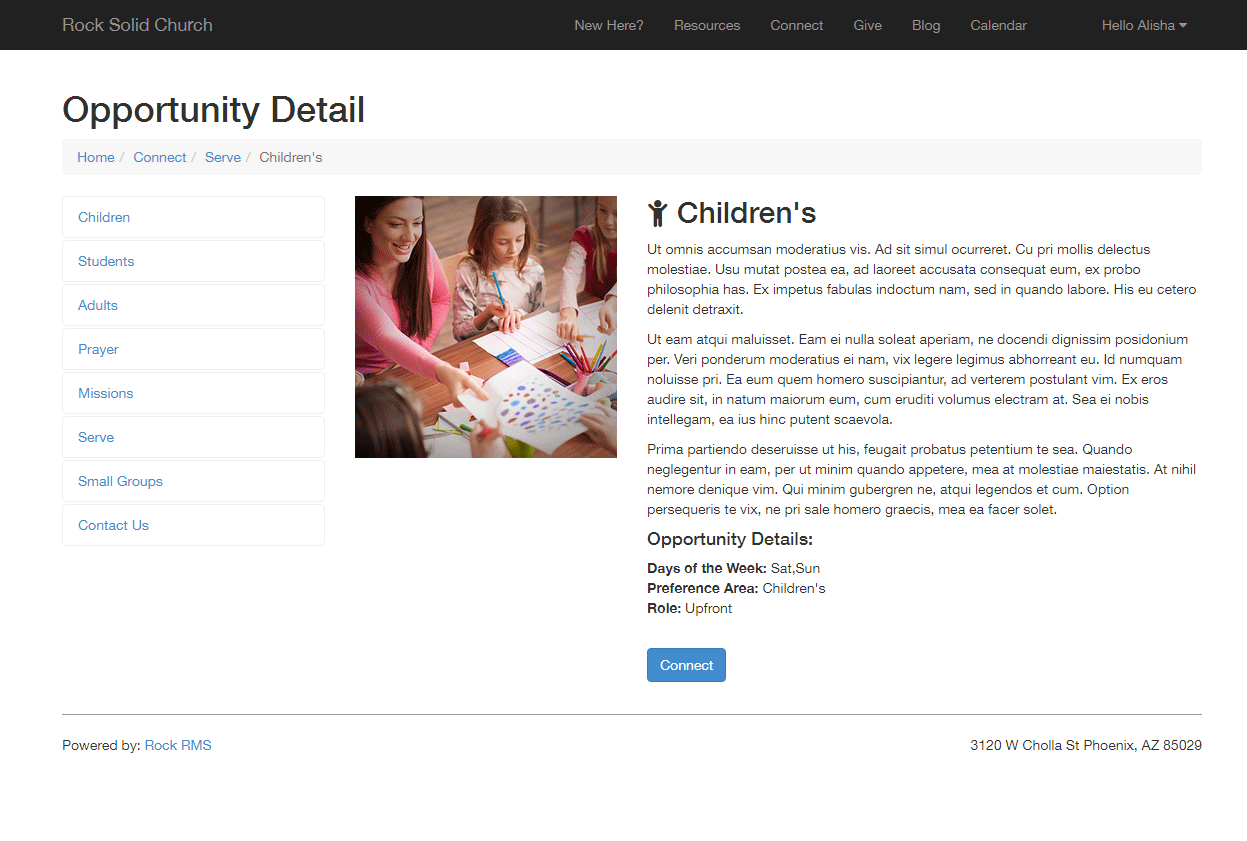
From the details page, the guest can then choose to connect with the opportunity.
This action creates a connection request.
Staff Entry
As discussed above the staff can also enter requests from the internal site under
People > Connections.
Workflows
Rock also ships with a workflow action that can create a new request. This is a
powerful way of creating your own request screens using the workflow entry actions.
See the Connection Workflows
chapter below for more information on how you can configure workflows to best use the
connection features.
Configuring Connection Types
Out of the box Rock ships with a single connection type for Involvement. But that's just a
starting point for all the options within connections. Let's walk through the
configuration capabilities of the connections features to see what's possible.
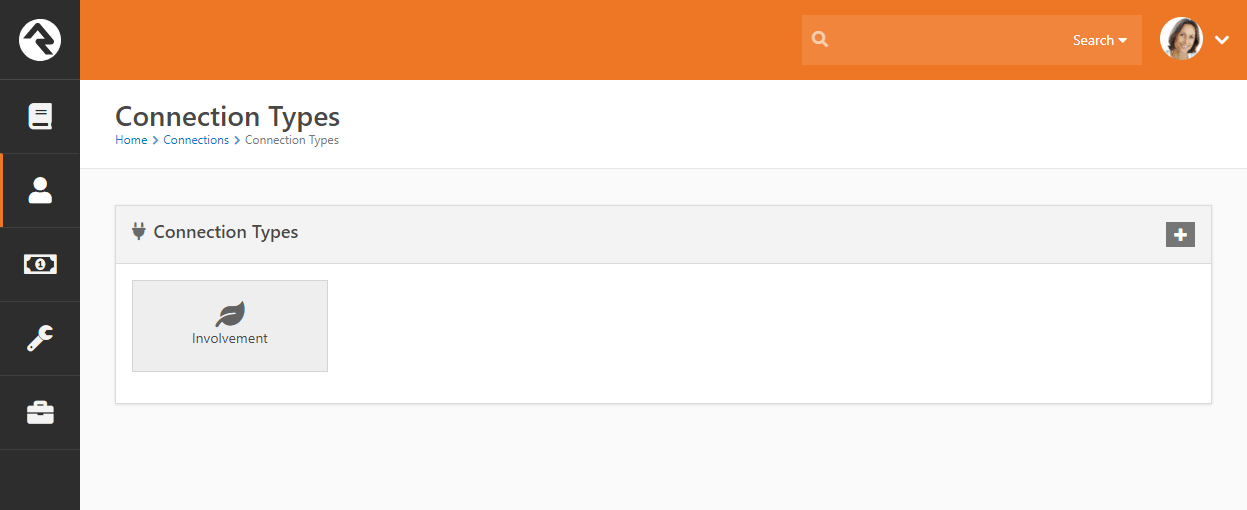
The first step is to see a listing of all the connection types that have been configured
in the system. You can see this screen by clicking the
from the My Connections
page under People > Connections.
Connection Type List
Selecting a connection type from the list will display the details for the type as well
as a list of all the connection opportunities that have been defined.
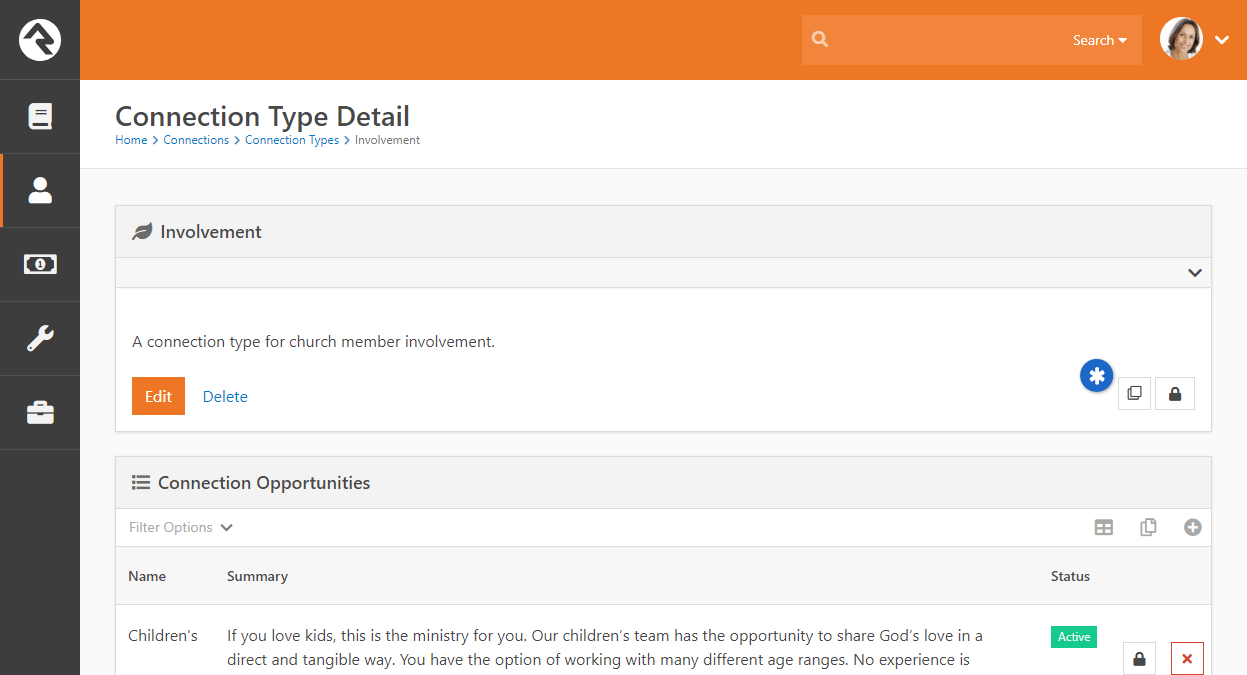
Connection Type Detail
Let's start by looking at the configuration options available for a connection type.
Connection Type Edit
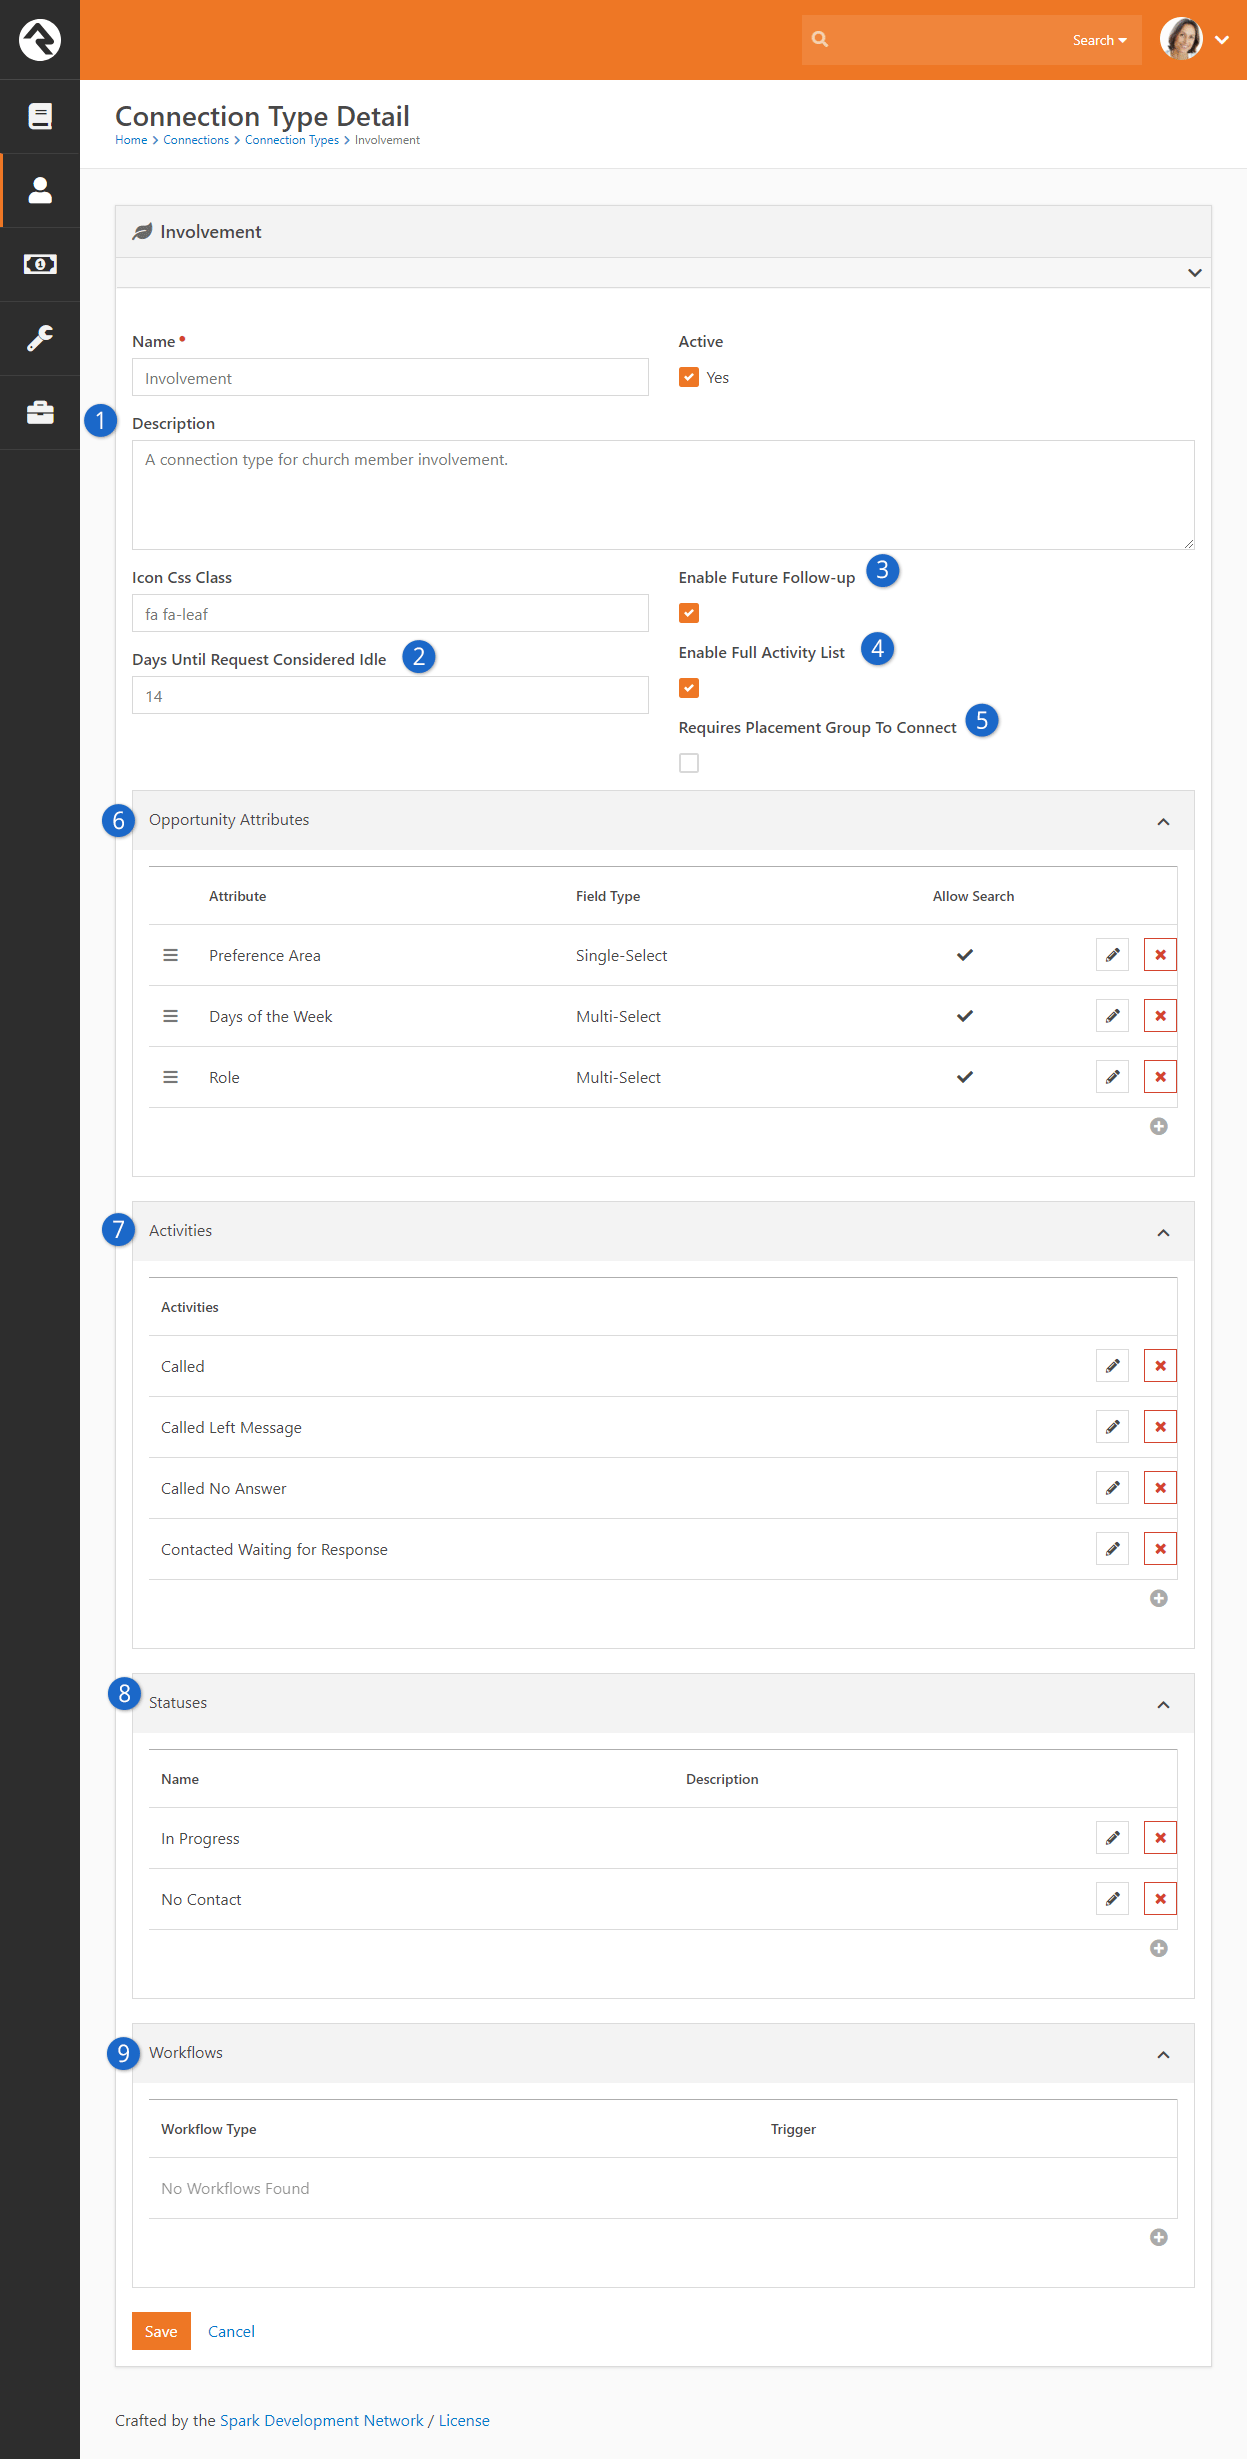
- 1 Basic Configuration
- The first few items cover the basics like Name, Description, Active/Inactive
and an icon for the type.
- 2 Days Until Request Considered Idle
- Setting this number determines how the red (idle) colored badges shown in the My Connection Requests area are totaled.
- 3 Enable Future Follow-up
- We discussed the future follow-up feature previously. It allows a request to be
frozen until a specific date. You can decide whether that feature is available on
each connection type you set up.
- 4 Enable Full Activity List
- We also talked about how a request can show activities from other requests made
by the same individual. You have the option to disable that functionality on a
connection type basis.
- 5 Requires Placement Group To Connect
- If checked, this will prevent the Connect button from activating on a Request unless a
Placement Group is set.
- 6 Opportunity Attributes
- Here you will define attributes about the opportunities. These attributes are mainly
used to power the opportunity search screens.
Enabling Allow Search allows
the attribute to be filtered on by a user using an opportunity search.
- 7 Activities
- Each connection type allows you to define types of activities that a connector
can make on a request.
- 8 Statuses
- You can create as many request statuses as you like for your requests.
- 9 Workflows
- Next you will define any workflows that you would like to be able to trigger from your
request. Configuring workflows here will apply the workflows to requests of every
opportunity type. We'll talk about these workflows in detail in the next chapter.
You're going to love what you can do with these!
So there is the connection type. Now let's look at creating and editing opportunities.
Selecting an existing opportunity or clicking to add a new one will bring up the screen
below.
Connection Opportunity Detail
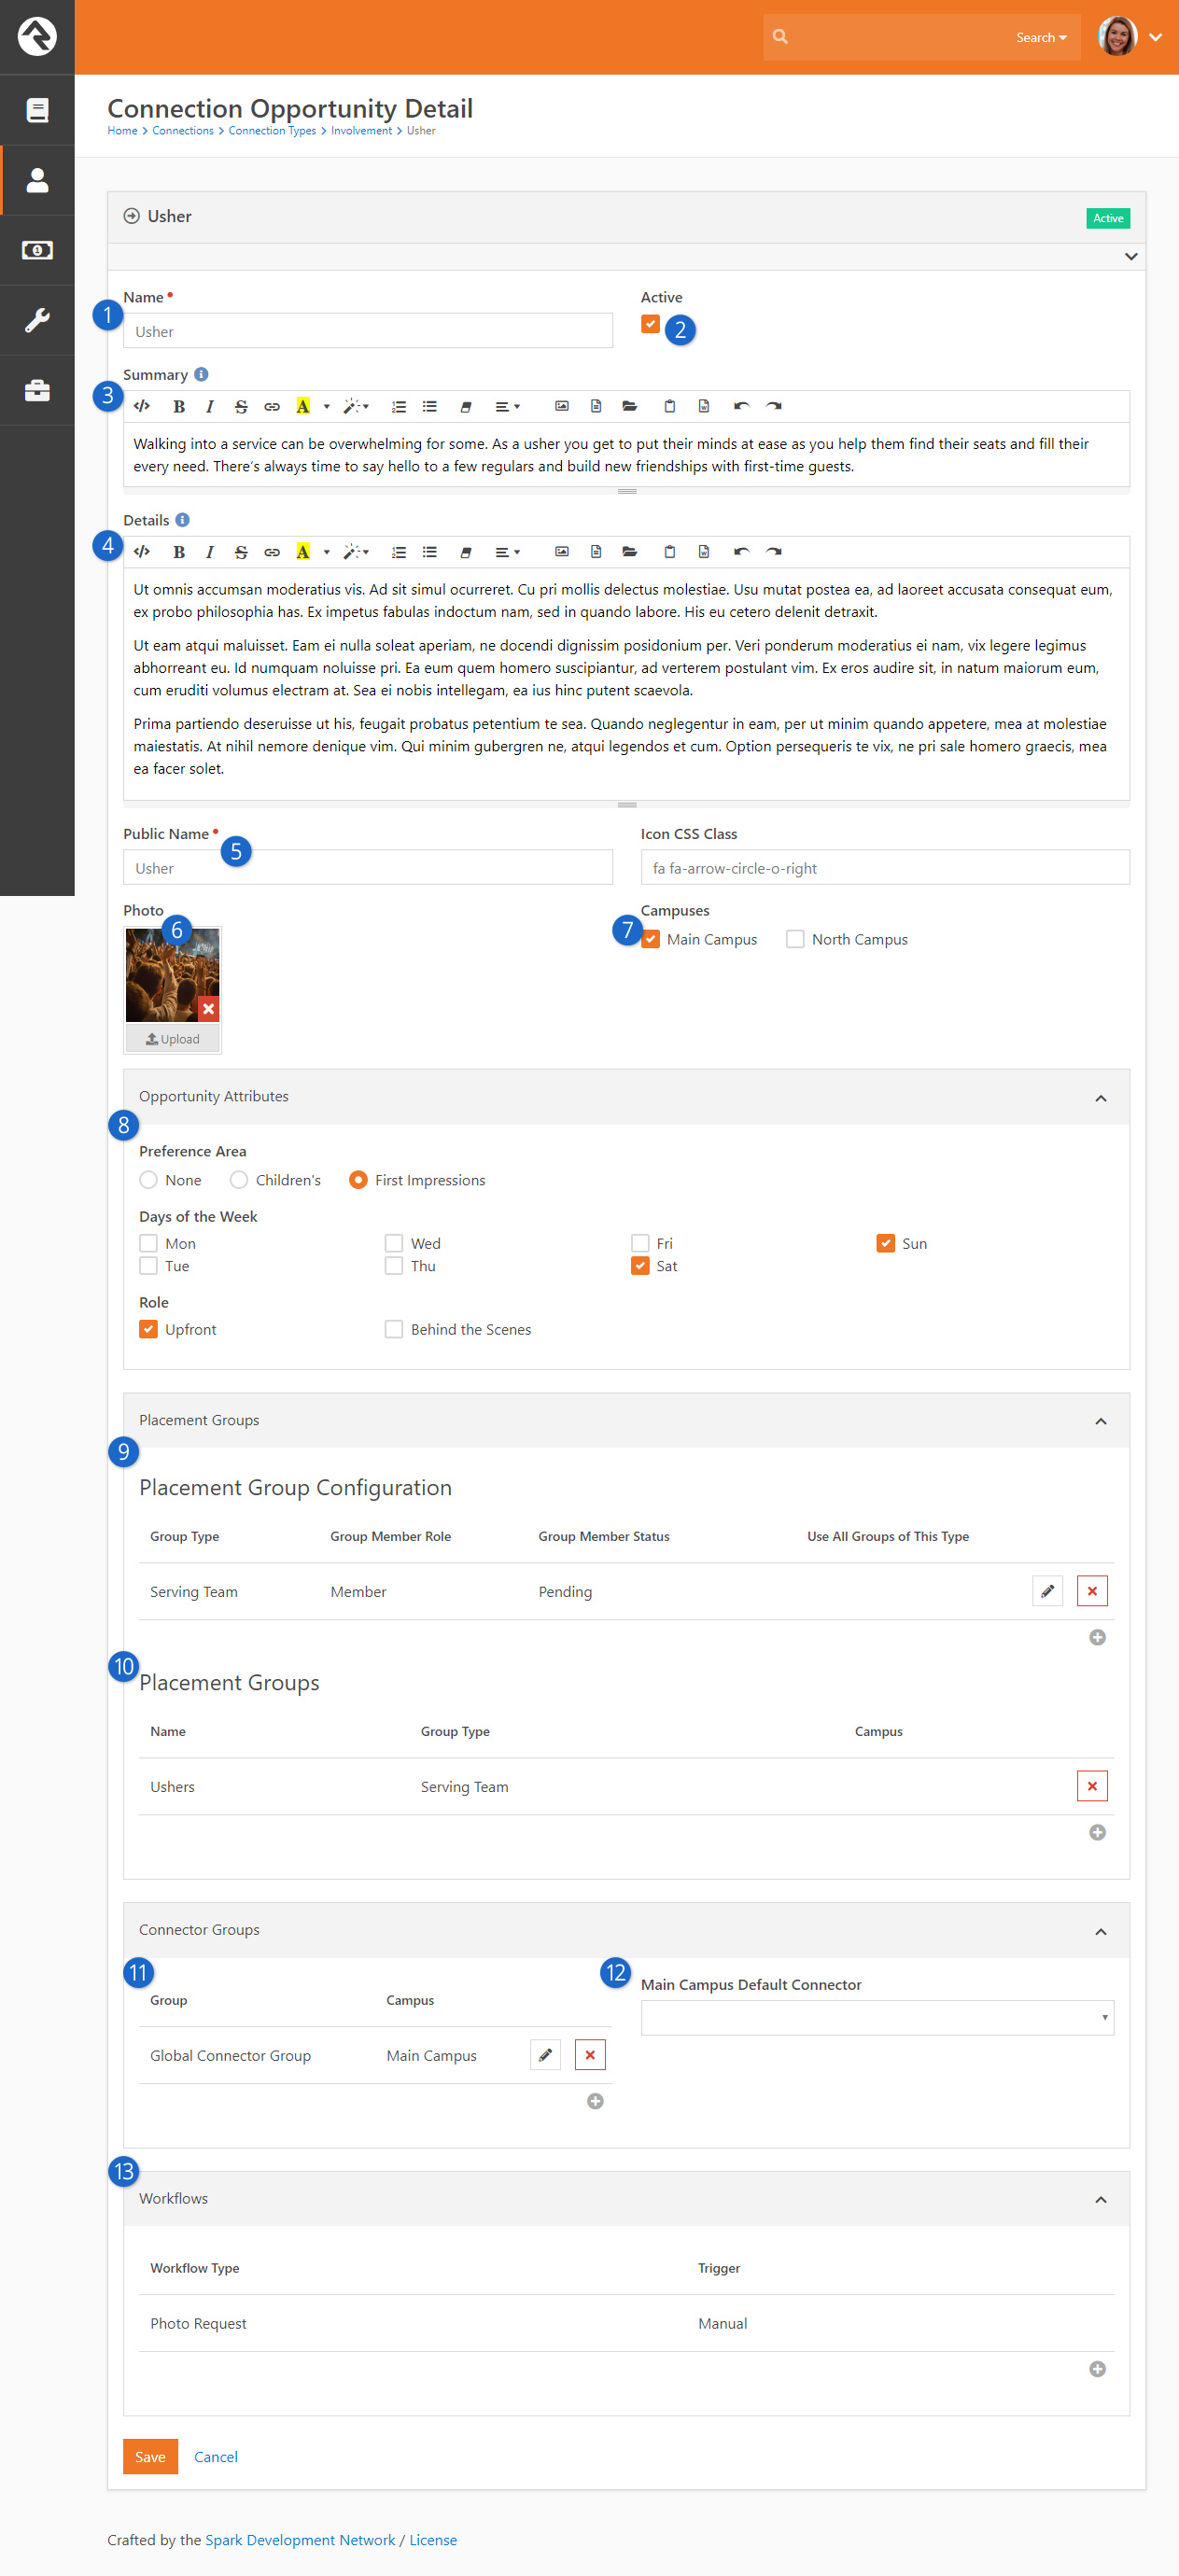
- 1 Name
- The name of the opportunity.
- 2 Active
- This determines if the opportunity is active. This is helpful if you have seasonal opportunities.
- 3 Summary
- A brief summary that will display on the search results page.
- 4 Details
- This gives more information about the specific opportunity.
- 5 Public Name
- This name will be used on the blocks that are displayed to the general public.
- 6 Photo
- Sometimes the best way to sell an opportunity is to show it in action.
- 7 Campuses
- This defines which campuses the opportunity is for.
- 8 Opportunity Attributes
- Remember setting up the opportunity attributes for the
Connection Type?
This is where you'll provide their values.
- 9 Placement Group Configuration
- The next few settings help to configure how the request will process the adding to
groups when the request is marked Connected.
Let's review each setting:
- Group Type: This defines which group type the available groups will be.
We need to know this so we can personalize some of the other settings like
role and status.
- Group Member Role: The role the person will be assigned when
they are connected, or added, to the group.
- Group Member Status: The configured status the person will receive
when they are added to the group.
- Use All Groups Of This Type: Each opportunity will have a selected
list of groups that a person can be connected to. This setting says instead
of our having to select every group of a certain type (and keep it current)
just use all of them.
- 10 Placement Groups
- These are the groups that will be displayed as options to connect the requests to. The
campuses defined on these groups is important as they will be used to filter for
the campus of the request. You'll define this campus from the group details page
of the group.
- 11 Connector Groups
- Next we'll define the various groups that contain the connectors who will work
the requests as they come in.
- 12 Connector drop down
- You can optionally define a default connector for each campus. Any new requests originating at a campus will then default to the specific campus' connector.
The drop down will show a list of active members from the connector group listed.
- 13 Workflows
- We saw that we could define workflows when configuring the connection type.
Configuring it there would apply the workflows to all opportunities of that type.
You can also configure workflows for a specific opportunity here.
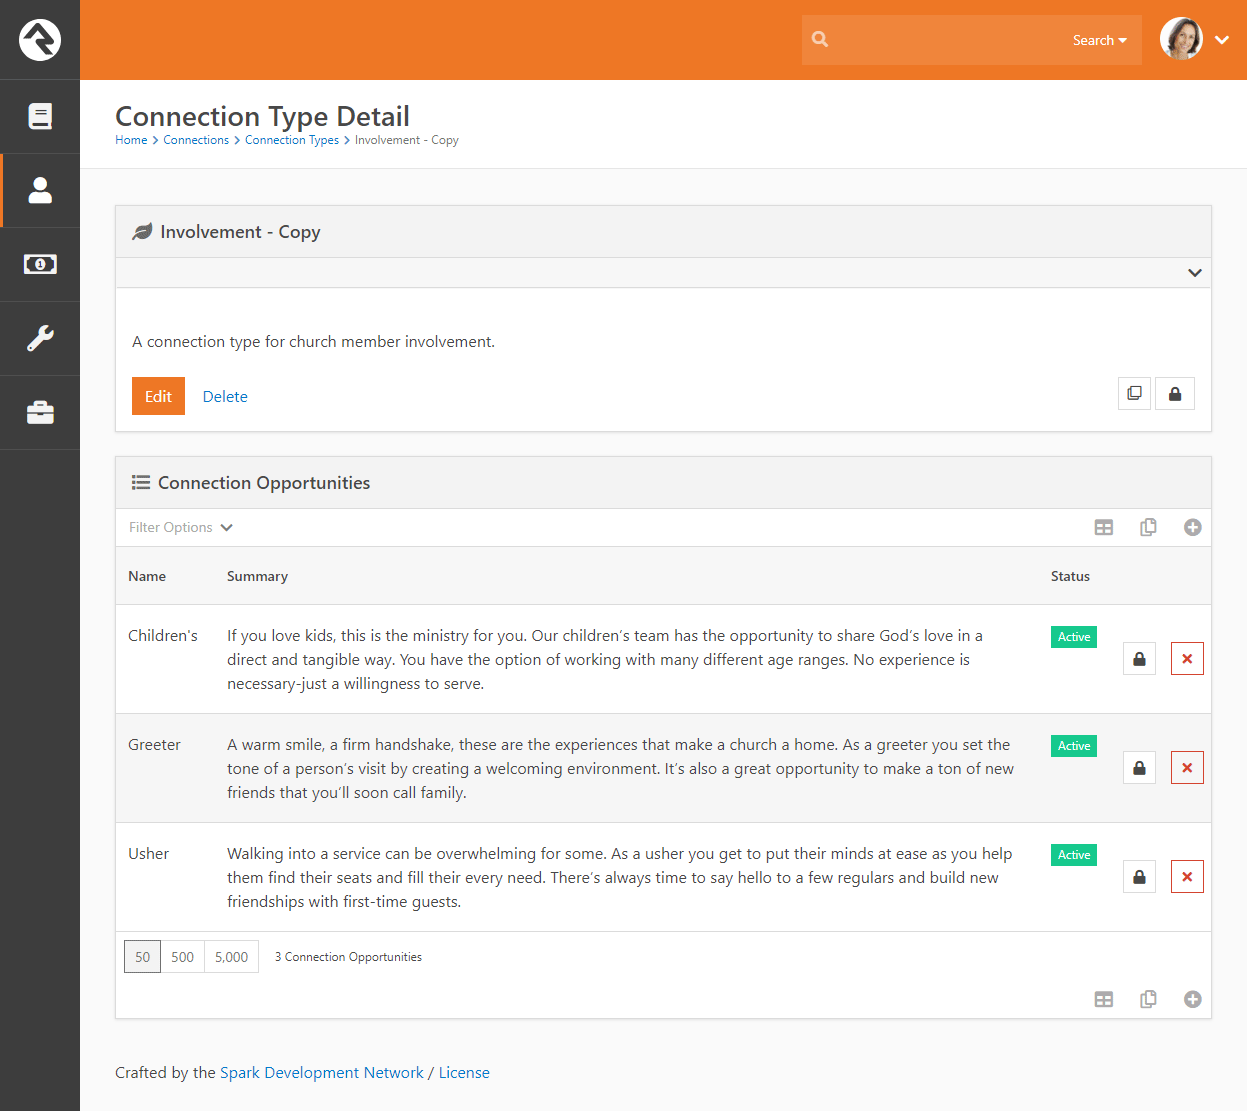
After setting up a connection type, you can duplicate it to create additional types. To duplicate an entire connection type, click the
button on the
Connection Type Detail screen.
Connection Type Copy
Once copied, the duplicated connection type is displayed in the
Connection Types screen. From there you can edit its settings in the Connection Type Detail screen. Note, if you need to delete the duplicated connection type, you'll need to first delete all of the Connection Opportunities listed in its
Connection Type Details screen.
Placement Group Configuration
An important part of the connection process is the selection of a group to place the person in when they are
connected. The definition of these 'selectable' groups is highly configurable. Knowing all of your options
will increase the power of your connections processes.
Configuration
Let's say for instance that we’d like our Children's
connection opportunity to allow placement into three different
serving teams. We'd also like the connector to be able to place them into the groups as either a
Leader or a Member.
Finally, if they are a
Member of the group we'd like for the connector to be able to place
them with the member status of
Active or Pending.
That's quite a list of requirements... let’s see how we can configure the Children's
opportunity to do just that.
You can set up placement groups in the Connection Type configuration screen. Here you'll find a panel for setting placement
group options. The screen below shows the configuration for the example given above.
Placement Group Configuration
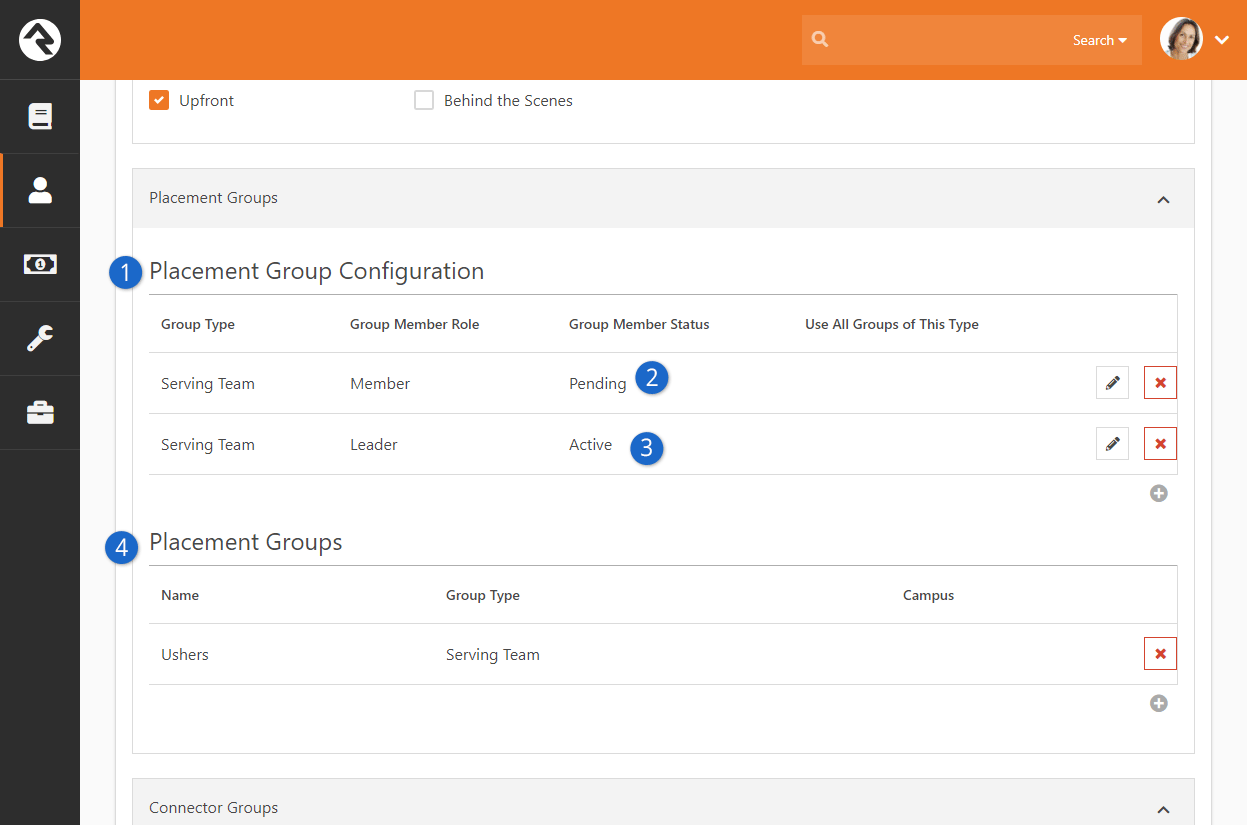
- 1Placement Group Configuration
-
The first things we configure are the group types, roles and statuses that will be options for our placement groups.
- 2Group Member Status
-
Note that we configured two different options for the role of
Member for the group type of
Serving Team. One option allows for the Group Member Status of
Active the other for Pending.
- 3Group Member Role
-
Next, we configure the one option for the Leader role.
- 4Placement Groups
-
With our roles and statuses configured we can now select the specific placement groups for the opportunity. In this
example, you'll notice that we've selected three different serving teams.
In our example above we specifically picked each placement group that is an option for the connection opportunity. This will work in
most cases. But if you wanted the list to show every group of a specific group type, you could configure that as well. This eliminates the need to
configure new groups when they are added.
Results
With our configuration in place, let's see the fruits of our labor. The screen below shows the editing of a connection request
for Helen Evans who is interested in helping in the Children's area. Let's walk
through how the placement group settings drive the process of selecting a group.
Placement Group Example
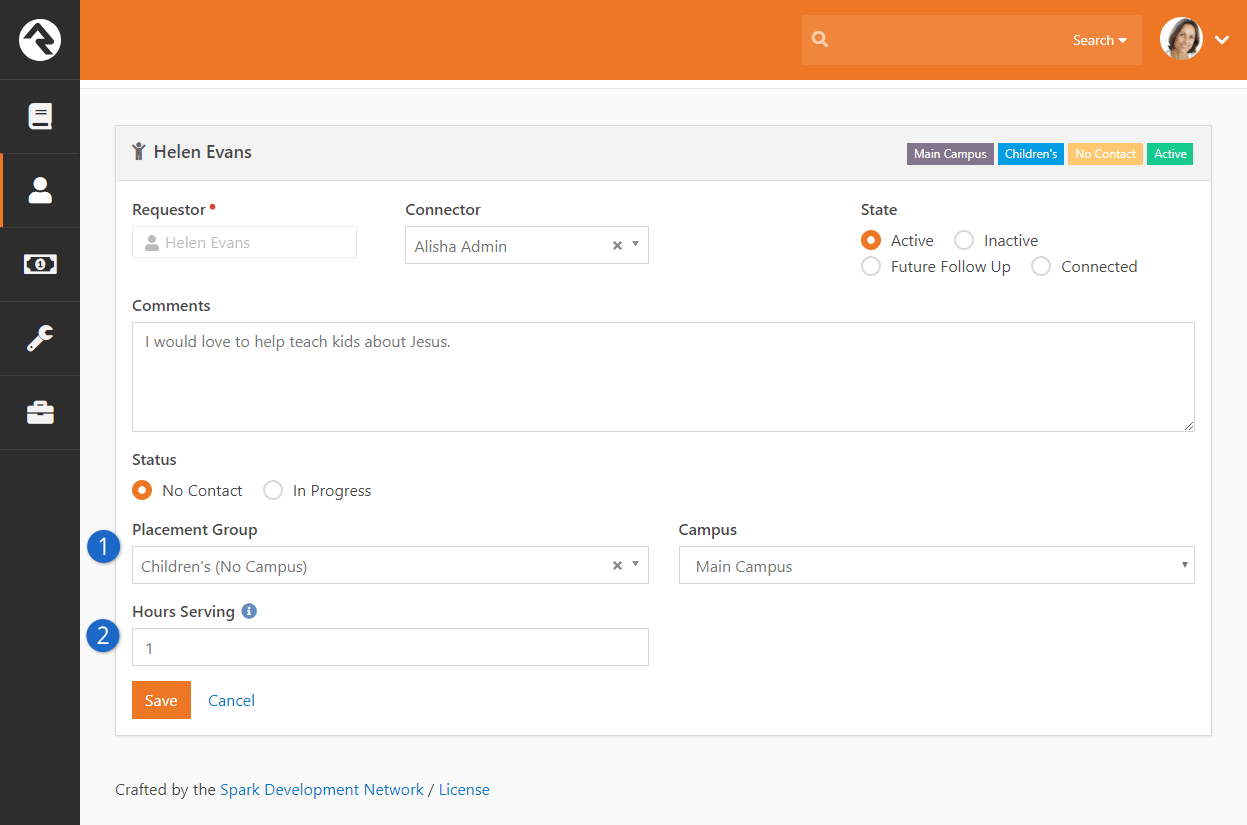
- 1Placement Group
-
Once you select a placement group, options will appear below allowing you to select roles and statuses. The screen
will only show these settings if more than one option exists. So, for instance since the
role of Member is selected, the option of
Group Member Status is displayed since we can choose
to add them as Active or
Pending. If on the other hand, we selected the role of
Leader, the
Group Member Status option would disappear since the only option is
Active.
- 2Hours Serving
-
You'll also note that group member attributes are shown on this screen. This allows you to set these values quickly
as you place the individual into the group.
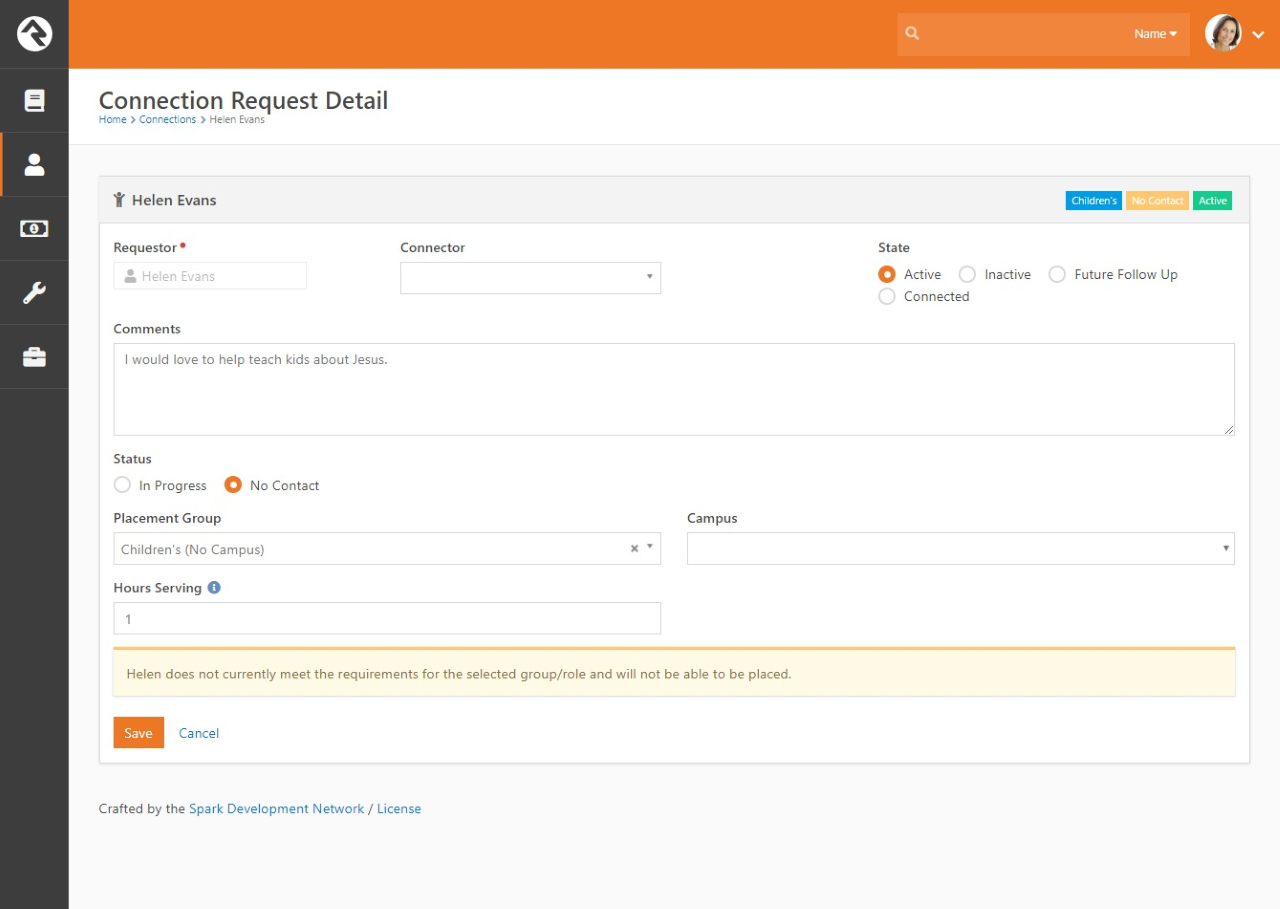
Group Requirements
If a group has specific requirements to join, these will be checked before saving the placement group. If they do not meet the requirements,
you will not be able to save the placement group.
Placement Group Requirements
Connection Workflows
On their own, the connection features are very powerful. Adding workflows to the mix
though magnifies what you can do. Let's take a look at how you can set up workflows for
your connections.
You can define workflows for your requests for the connection type (in which case they
will be applied to all request in all opportunities) or for a specific opportunity.
In either case the configuration is the same.
Connection Workflows
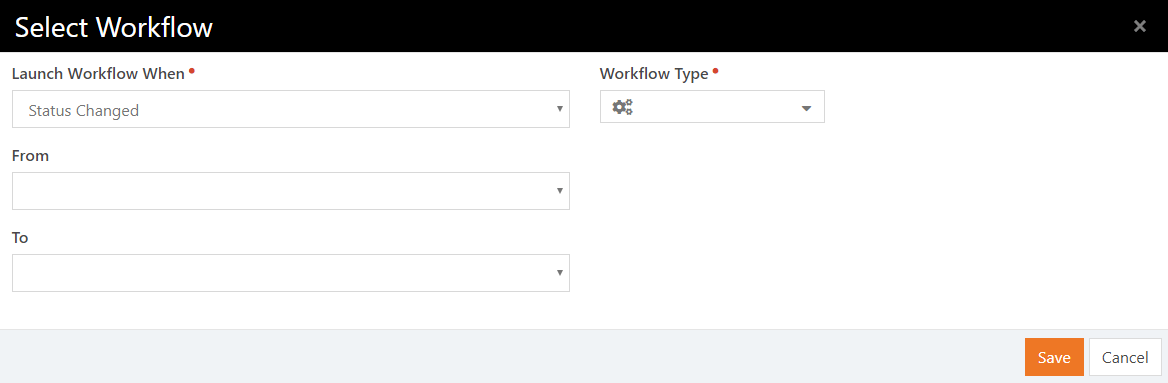
There are two basic items that you'll need to configure:
-
Trigger: This defines when the workflow should be started. The options are:
- Request Started:Executed when the request is first started.
- Request Connected: Fired when the request is marked as
connected.
- Status Changed: This workflow is launched when a
status change has occurred. You optionally have the ability to limit
this trigger to certain pre/post status values.
- State Changed: Like the status change trigger but
this time for state.
- Activity Added: This trigger will be launched every
time an activity is added to a request. You can also filter this to a
specific kind of activity.
- Placement Group Assigned: This workflow will be
launched when a placement group is assigned.
- Manual: This workflow will be added to the request
detail screen to allow the connector to manually execute it.
-
Workflow: This is the simple part. This defines which workflow
will be executed when the trigger condition is met.
Building Connections Workflows
When the workflows above are executed, the initial activity of the workflow will have
access to the connection request through the workflow entity property. It's
important that this initial activity gets the information it needs to process from
the request. The main action you'll use to get the properties from the request is
Set Attribute From Entity.
You can use the Lava Template
field of this action to pull each request. Below are a few samples:
Get The Requestor – Attribute Type: Person
{{ Entity.PersonAlias.Guid }}
Get the Connector Person (if any) – Attribute Type: Person
{{ Entity.ConnectorPersonAlias.Guid }}
Get the Connector Group – Attribute Type: Group
{{ Entity.AssignedGroup.Guid }}
Opportunity Type – Attribute Type: Text
{{ Entity.ConnectionOpportunity.Name }}
Status – Attribute Type: Text
{{ Entity.ConnectionStatus.Name }}
State – Attribute Type: Text
{{ Entity.ConnectionState }}
The 'Add Activity' Workflow Trigger is a Bit Different
While most of the workflow triggers pass the opportunity request through the workflow entity the 'Add Activity' actually
passes in the new activity. If you'd like to set a 'Connection Request' attribute with the value of the opportunity request you can use the following
Lava:
{{ Entity.ConnectionRequest.Guid }}
Connection Attribute Types
Rock provides several attribute types to help you build workflows. These include:
- Connection Request - Set by Guid
- Connection Status - Set by Guid
- Connection State - Set by Enum value
- Connection Type - Set by Guid
- Connection Opportunity - Set by Guid
- Connection Activity Type
Connection Workflow Actions
To facilitate even more power with connections we've added several workflow actions. They're outlined below.
Create Connection Request
Creates a new connection request with the following settings.
- Person Attribute - The Person attribute that contains the person that connection request should be created for.
- Connection Opportunity Attribute - The attribute that contains the type of connection opportunity to create.
- Connection Status Attribute - The attribute that contains the connection status to use for the new request.
- Connection Status - The connection status to use for the new request (when Connection Status Attribute is not
specified or invalid). If neither this setting or the Connection Status Attribute setting are set, the default status
will be used.
- Campus Attribute - An optional attribute that contains the campus to use for the request.
- Connection Request Attribute - An optional connection request attribute to store the request that is created.
Transfer Connection Request
Transfers a connection request to a new opportunity type.
- Connection Request Attribute - The attribute that contains the connection request.
- Connection Opportunity Attribute - The attribute that contains the type of the new connection opportunity.
- Transfer Note - The note to include withthe transfer activity.
Set Connection Request Status
Changes the status of a connection request.
- Connection Request Attribute - The attribute that contains the connection request.
- Connection Status Attribute - The attribute that contains the connection status.
- Connection Status - The connection status to use (if Connection Status Attribute is not specified).
Set Connection Request State
Changes the status of a connection request.
- Connection Request Attribute - The attribute that contains the connection request.
- Connection State Attribute - The attribute that contains the connection state.
- Follow Up Date Attribute - The attribute that contains the follow-up date when state is being set to Future Follow Up.
- Follow Up Date - The follow-up date when state is being set to Future Follow Up (if Follow Up Date Attribute is not specified).
Add Connection Request Activity
Adds a new connection request activity.
- Connection Request Attribute - The attribute that contains the connection request.
- Connection Activity Type Attribute - The attribute that contains the activity type to add.
- Note - The note or an attribute that contains the note for the new activity.
- Person Attribute - An optional Personattribute that contains the person who is adding the activity.