Improve
Updates for Rock 16.0
Below is a summary of the updates for this version.
- You can now choose to use an existing group in the Event Wizard
- The Recent Registration block is now Registration List Lava and offers broader options
- Payment Plans can be used to pay registration costs over time
Updates for Rock 4.0
No updates made.Updates for Rock 5.0
Below is a summary of the updates for this version.
- Added chapter on registration payment reminders.
- Added information on disabling the editing of the information on already saved registrations.
- New chapter on the Registration Placement Group features.
- New information on the new Registration Template field for setting the batch name prefix.
- Documented the new registration instance and following features.
Updates for Rock 6.0
Below is a summary of the updates for this version.
- You can now add a workflow to a registration instance and
template that will be fired at the completion of the registration
process.
- New "Show Family Members" option on Registration Template when registrants are in the same family.
- Documented the new digital signatures feature.
- Added Set Group Member Attribute information to Group Placement chapter and updated screenshot.
Updates for Rock 7.0
Below is a summary of the updates for this version.
- Added information on the new wait list feature.
- Updated Event Registration screenshot.
- Updated Event Occurrence screenshot.
- Added information on linking to existing content channel items in the Event Occurrence detail screen in the Calendars chapter.
- Added Set Group Member Attribute information to Group Placement chapter and updated screenshot.
- Added filtering options and Group Placement Tab information to Managing Event Registrations chapter.
Updates for Rock 8.0
Below is a summary of the updates for this version.
- Updated list of Person Fields available for Event Registrations in the Registration Templates chapter to include "Connection Status".
- Updated Fee Editor screenshot and callouts.
- Added iCalendar Feed chapter.
- Broke Registration Fees out into its own chapter.
- Broke Discounts out into its own chapter.
- Updated the Registration Template General Settings documentation to include the Registrar Options feature.
Updates for Rock 9.0
Below is a summary of the updates for this version.
- Added Default Payment Amount note
- Added "Use Current Person" for registrar
- Updated "Registrant form's" image and "Registrants form fields" image
- Added Registration Attributes
- Added Conditional form fields
- Added Maximum Attendees information in the Instances Image
- Updated Registration Fees Chapter with new fee types
- Added Event Occurrence Attribute in the event details section
- Added Event Item Occurrence Attributes
- Added chapter on Event Wizard
Updates for Rock 10.0
Below is a summary of the updates for this version.
- Added details for using Discount Codes after registration.
- Added new features and configuration for group placement
Updates for Rock 11.0
Below is a summary of the updates for this version.
- Registrants can optionally replace an auto-applied discount code with a different code
Updates for Rock 12.0
Below is a summary of the updates for this version.
-
Updated the process for adding linkages to an Event Occurrence,
including a new "No Registration Required" option that lets a
slug be linked without a registration
Updates for Rock 13.0
Below is a summary of the updates for this version.
-
A new optional setting on the Registration Template allows for launching a workflow for each registrant when a
new registration is completed
Updates for Rock 14.0
Below is a summary of the updates for this version.
- Rock now ships with electronic signature features for use in event registrations
- Registrations now include a Campus linkage
Updates for Rock 15.0
Below is a summary of the updates for this version.
- Information about using the "Tokenized" NMI Gateway
Updates for Rock 17.0
Below is a summary of the updates for this version.
- New family members or guests can be added during the event registration process
Updates for Rock 18.1
Below is a summary of the updates for this version.
- The guide has been updated to include the revamped Registration Group Placement, which simplifies the process of sorting registrants into groups for events like sports teams and camps.
Welcome
The power of Rock's tools is the synergy they bring when they work together. This is certainly
true in the area of event management. So as not to overwhelm though we’ll start by describing each
of the available tools as a stand-alone component. Once we have that complete, we'll dive into how
you can use them together for mind-blowing results.
Enable SSL
Be sure to enable SSL on your website before taking registrations with payments.
Event Registration Overview
For many events it's good to know who will be coming. Rock's event registration features provide a
simple tool to not only know who is planning to attend, but also to take care of many of the
mundane tasks like event payments. The first thing that people want to know about event registration
is the feature list. While not inclusive (you'll have to read further for that), below is a list
of the major features contained in event registration:
- Free/Paid Registrations
- Partial Payments
- Additional Fees
- Single or Multiple Registrant Registrations
- Discounts (Percentage and Fixed Amounts)
- Notifications
- Custom Entry Forms
- Confirmation and Reminder Emails
Didn't see a feature you need? Keep reading...it's probably in here.
The Basics of Event Registration
Before getting too deep, let's establish some of the key terms and concepts related to event registration.
Registrar vs. Registrant
There are two parties involved with every registration that occurs. The registrar, the
person who is actually entering the registration, and the registrant, the person who is
registered for the event. In some cases, this could be the same person. For instance, Ted
Decker may register himself for an upcoming event. Many times, though, this will not be the
case. Ted Decker might register his two children for camp. In this latter case, Ted would
be the registrar
while his two children, Noah and Alexis, would be registrants.
While we're often most interested in the registrants
for an event, we also need to be able to store and report on the registrars.
Registration Templates vs. Registration Instances
As you use the event features, you'll find that many of your registrations are actually
identical in terms of costs, fees and fields. To simplify the process of creating new
registrations in these cases we've created the concept of a Registration Template. The
template is where you'll configure the majority of the settings for a registration (things
like costs, required entry fields, fees, etc.). Once the template is complete, you can create
instances of them that
configure the settings that would be specific to the event (registration start and end
dates, contact info, etc.). Still a little confused? Let’s look at some examples.
It's likely that you'll create an event registration for events like a new members class.
These classes happen often, but their event registration configurations will all be the
same. You would create a registration template for this class, then create registration
instances from this template with the proper dates and contacts.
On the other hand, an event like summer camp is probably different each year. In this case
you may have a custom template with a single instance each year.
The Role of Groups
By this point you've probably seen how important groups are in Rock. Groups also play a
role in event registration. In many cases the end point of the event registration process
is the placement of the registrants into a group that you configure. While you're not
required to have your event registrations add people to groups, in most cases you'll
want to so you can enable things like event check-in.
You can also do other clever things with the relationship between registrations and
groups. Since nothing is keeping you from having more than one registration linked to a
single group, you can handle complex registration scenarios. Say that your summer camp
can only take so many boys vs. girls. In Rock you could set up two different registrations
with separate caps for boys and girls. Both of these registrations can also put their
registrants into the same group, giving you a single list of all children attending camp.
After the registration is complete, you can then add the registrants to one or more additional
groups using the Group Placement features.
See our Rock Your Groups
guide for more information.
URL Slug Required
The URL Slug must be used in order to have registrants be automatically placed
into the correct group. We'll talk more about that
below.
A Typical Event Registration
Hang in there - we're almost to the meat. First, we'll do a quick overview of what an
event registration will look like to your members. The example below uses the default
registration out of the box. While you'll see that this experience is simple and
mobile-friendly, we plan to create even simpler experiences for very basic registrations
(think: give me your name and we're done).
Let's get some background on the registration we're walking through below. In this case
Ted Decker will be registering his two children Noah and Alexis, as well as Alexis' best
friend Katie for camp. The camp costs $200 but also has an optional fee for a t-shirt.
Registration Walk-through
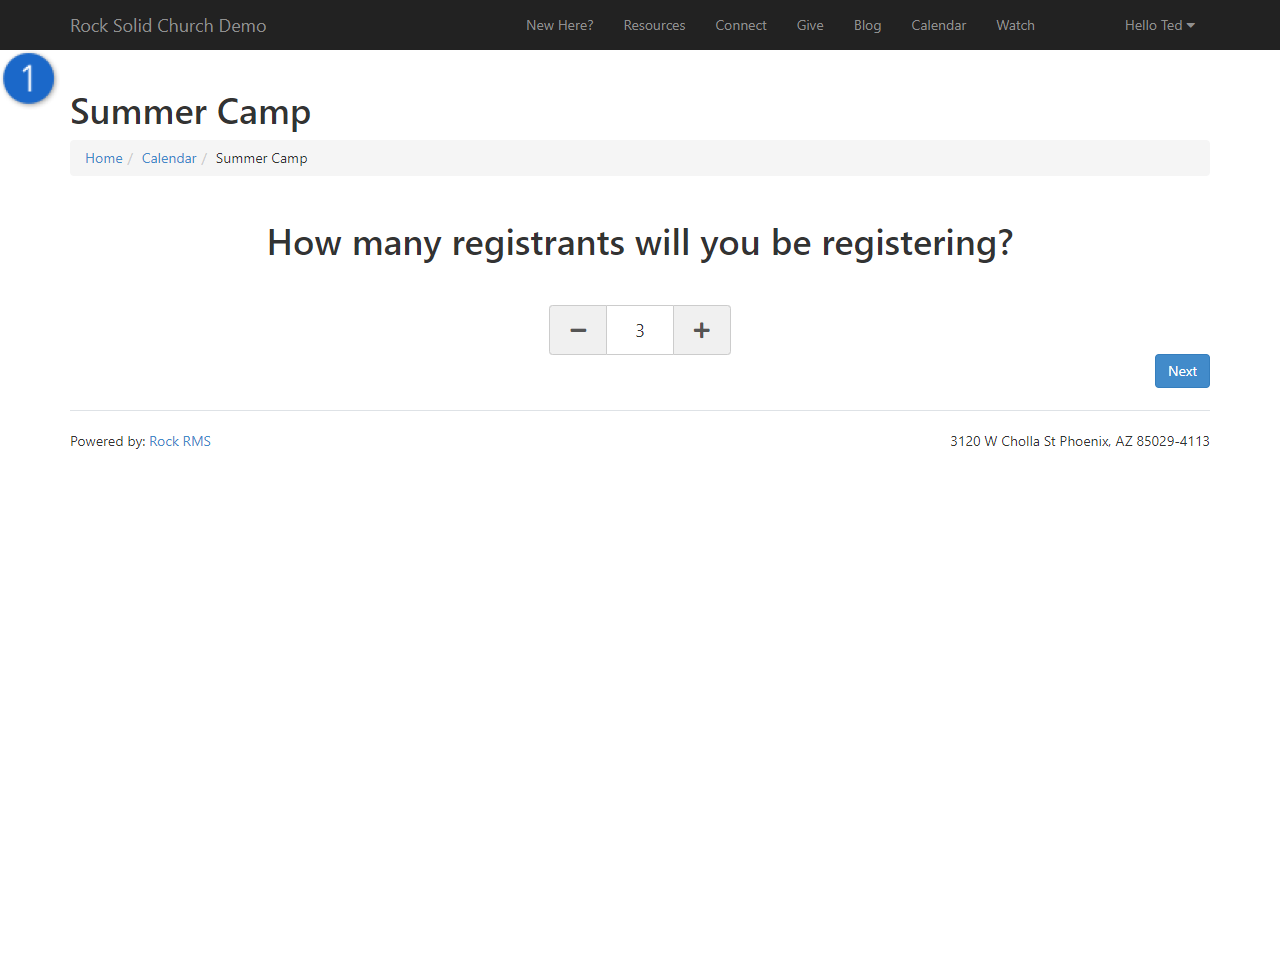
- 1Step one
- Tell us how many people you plan on registering. Technically, you'll
only see this screen if you've enabled Allow Multiple Registrants.
Otherwise, you'll be limited to a single registrant. As you can see, Ted has selected
three registrants.
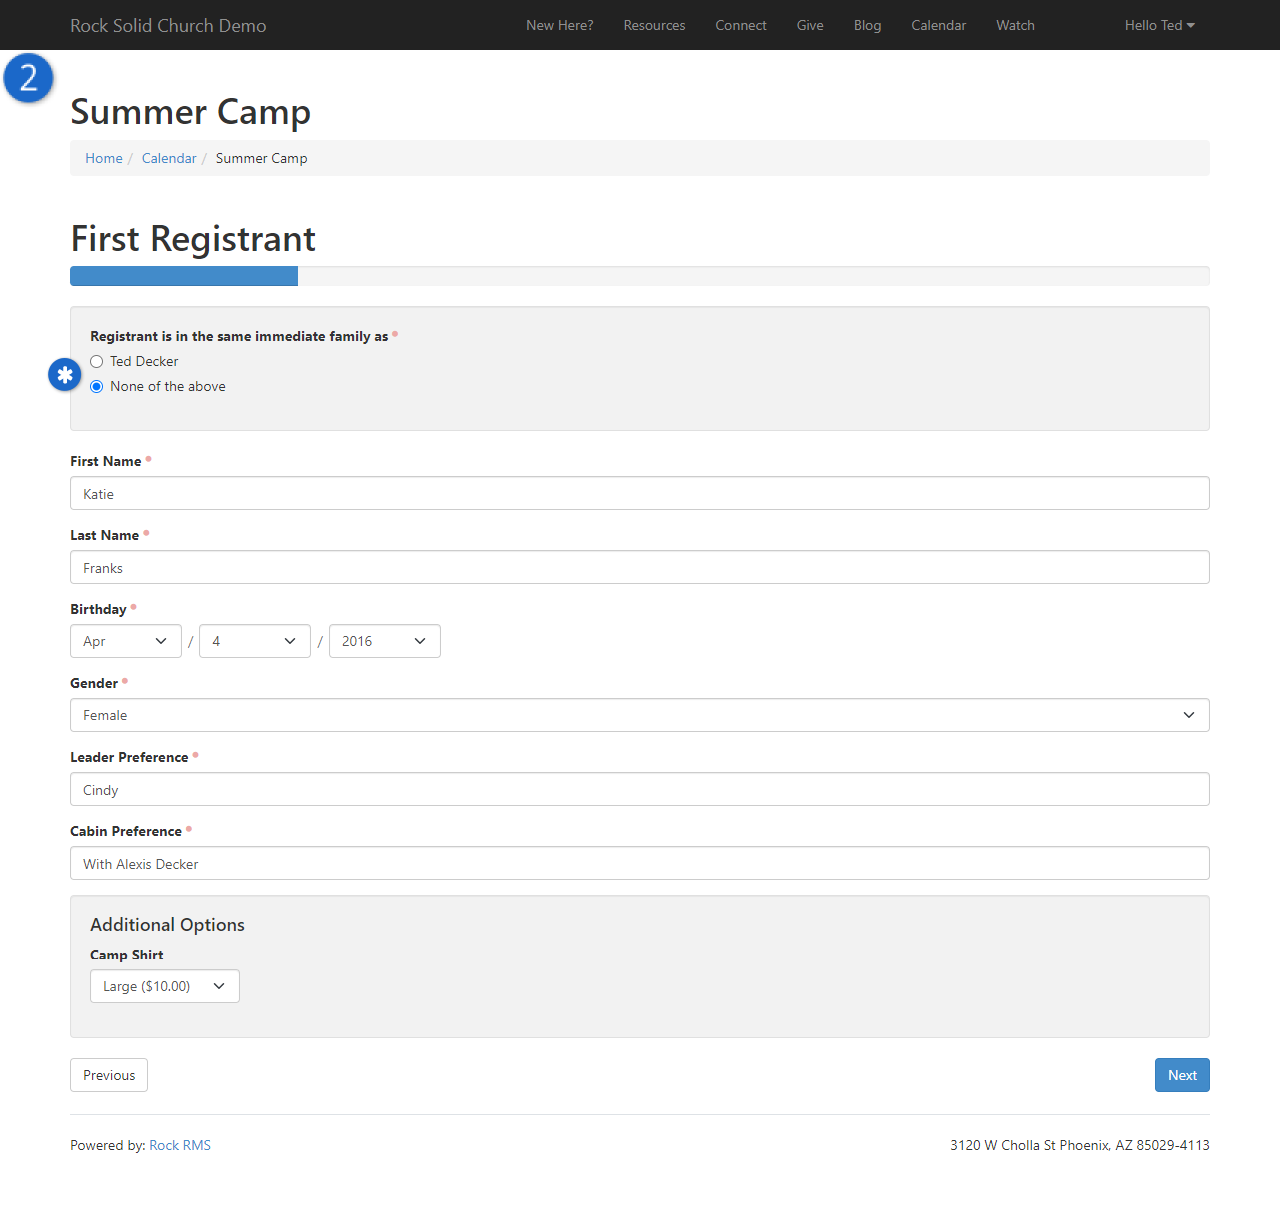
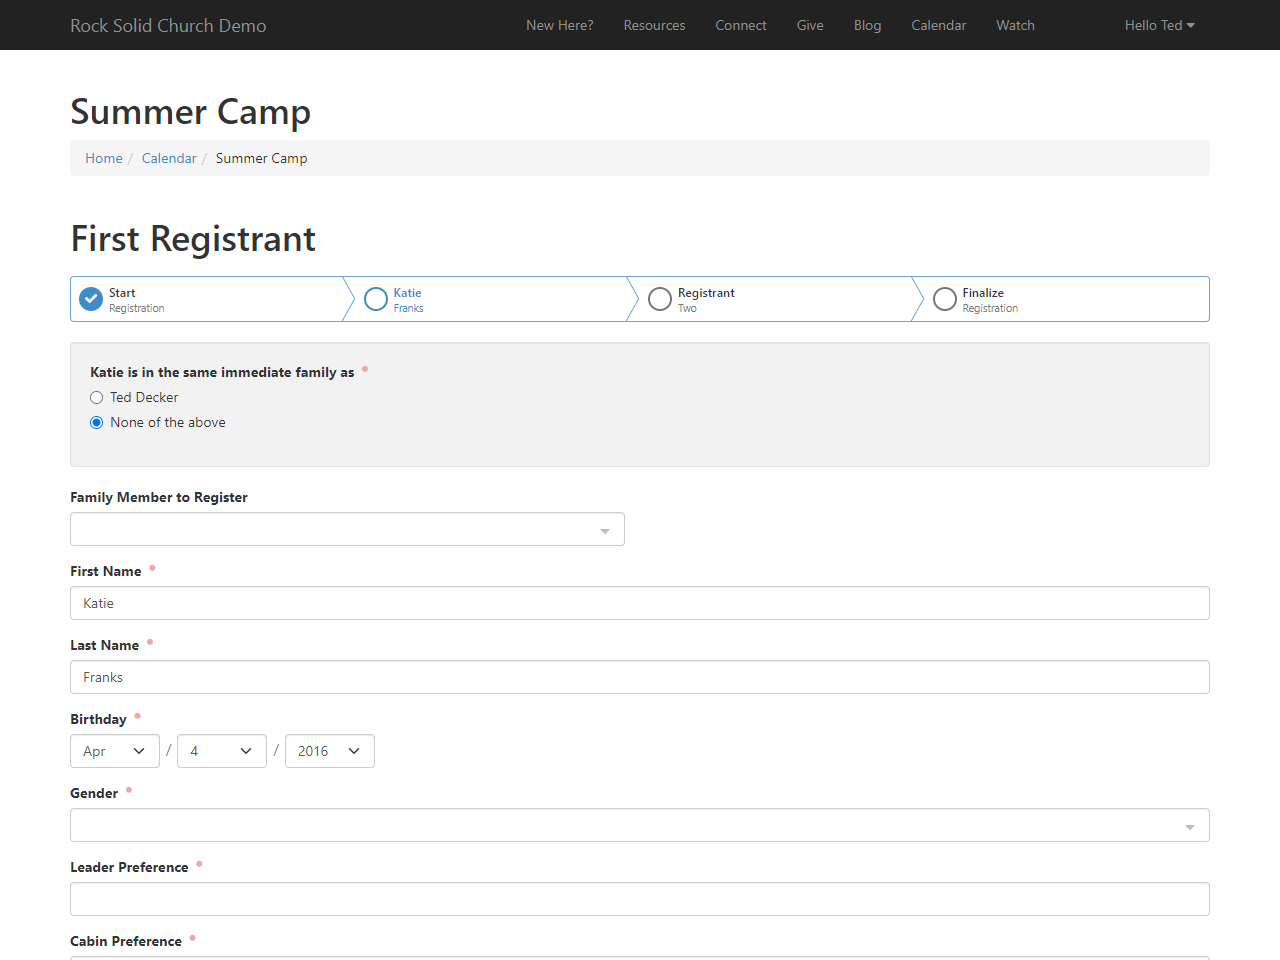
- 2Information 1
- And we’re off! We'll start by entering the information required for the first
child. In this case Ted has entered Katie's information. Because the registration
was configured to
Ask if registrants are in the same family,
that's exactly what it's doing. This will help make sure that the data that is
entered into Rock is consistent with the actual family structure of the individuals
being registered.
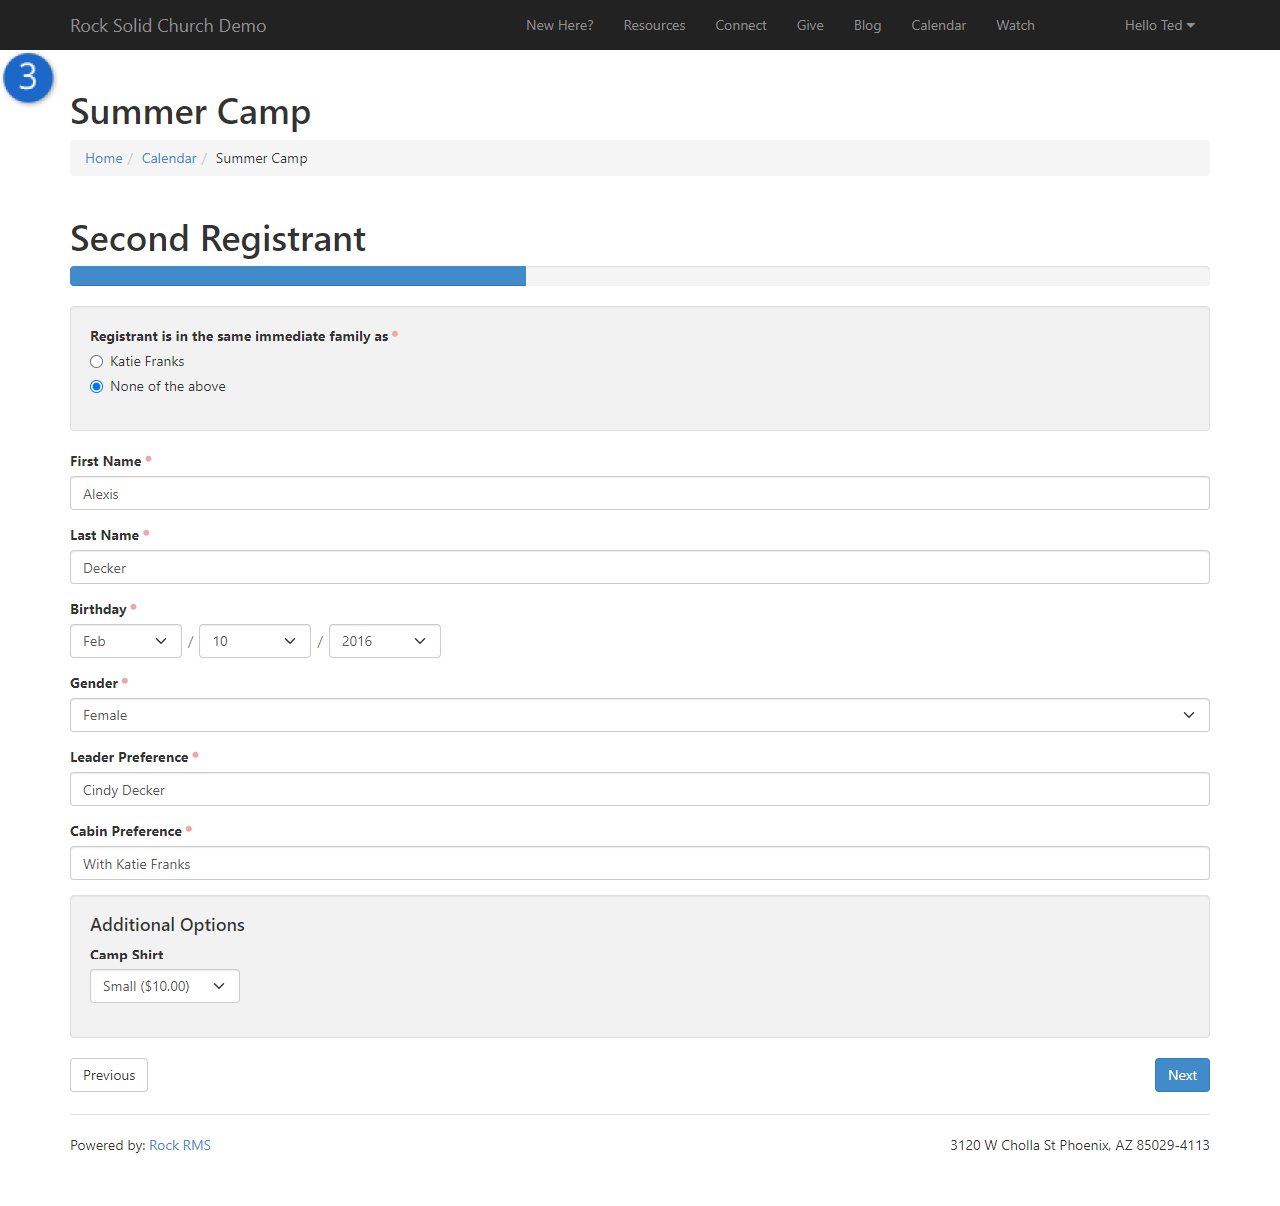
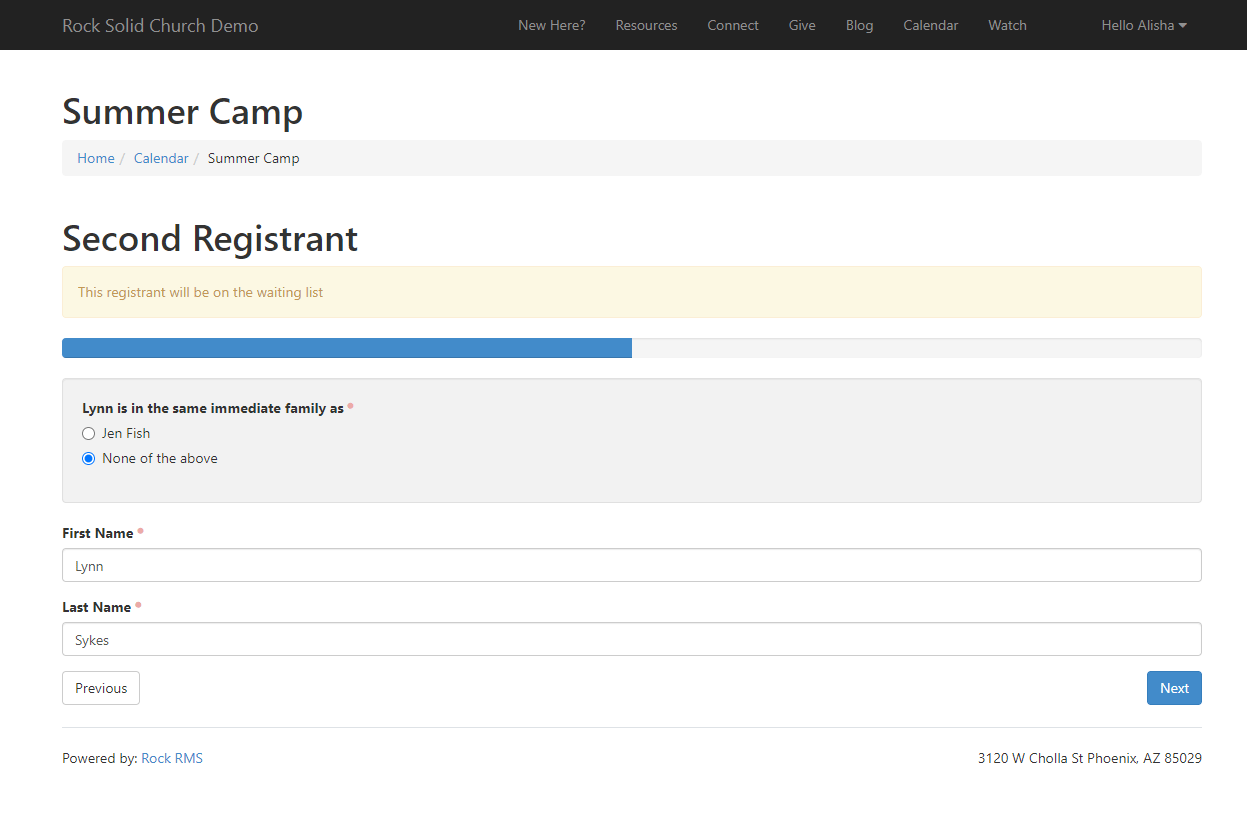
- 3Information 2
- Now we see the entry form for the next child. Let's pause here for a second
and mention that while this case has one form for each registrant, Rock allows you
to configure multiple entry screens for each registrant. OK, back
to the registration. You'll see that Ted has entered Alexis' information and has
indicated that Alexis is not in the same family as Katie.
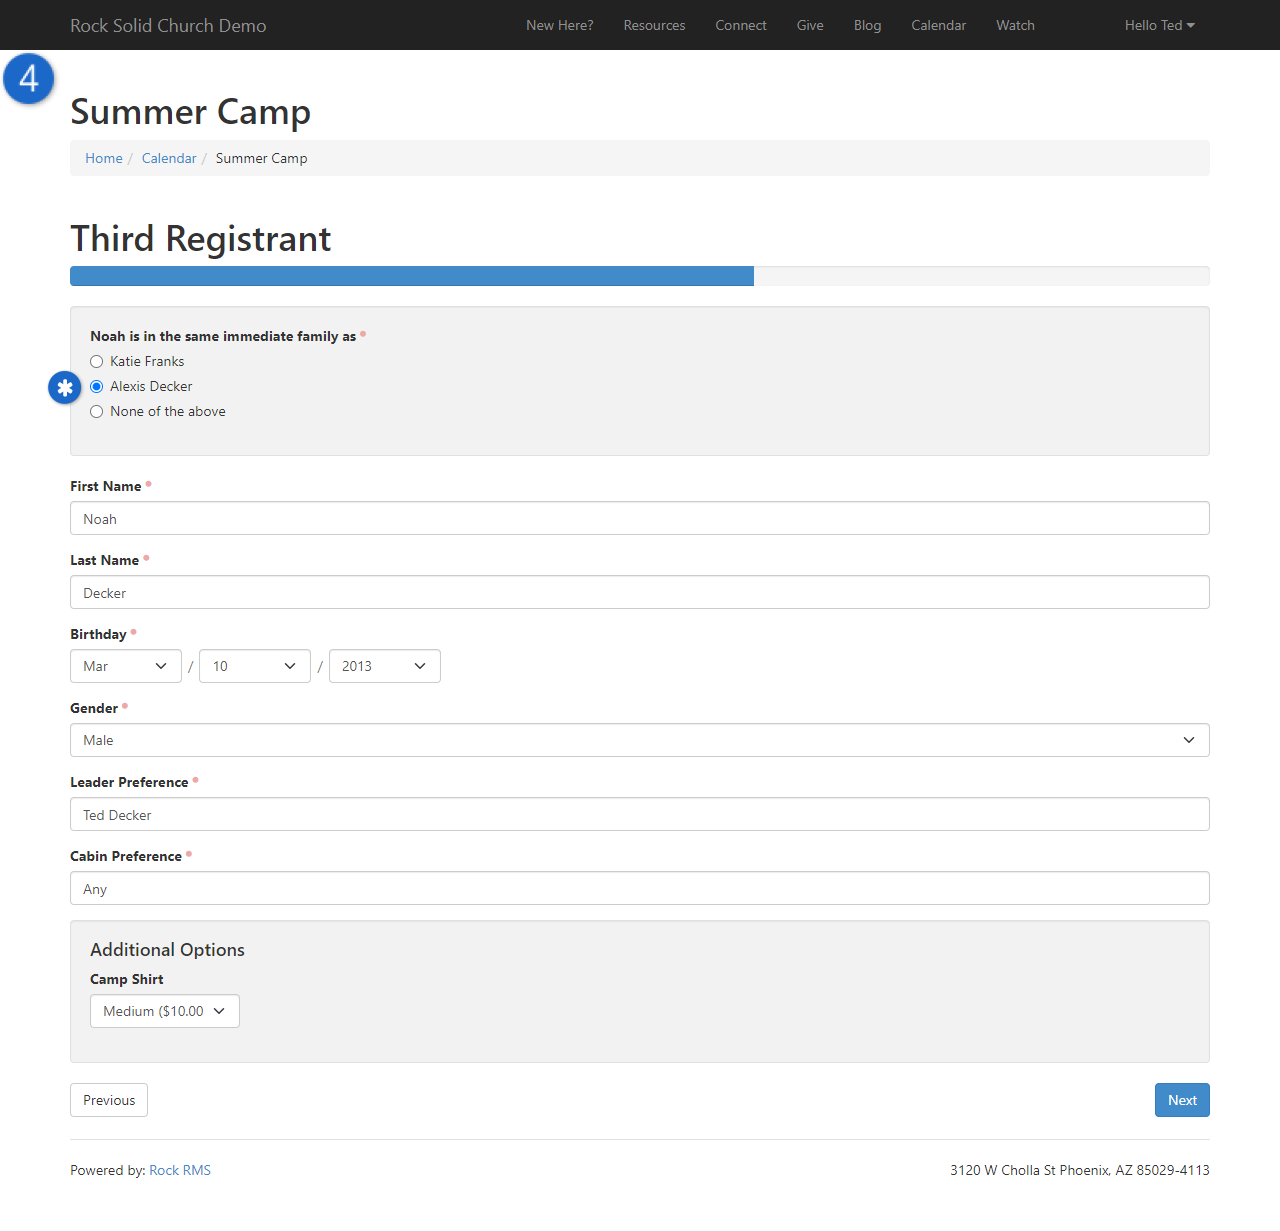
- 4Information 3
- Now it's Noah’s turn. Again, notice the family selection. Ted has selected that
Noah is in the same family as Alexis.
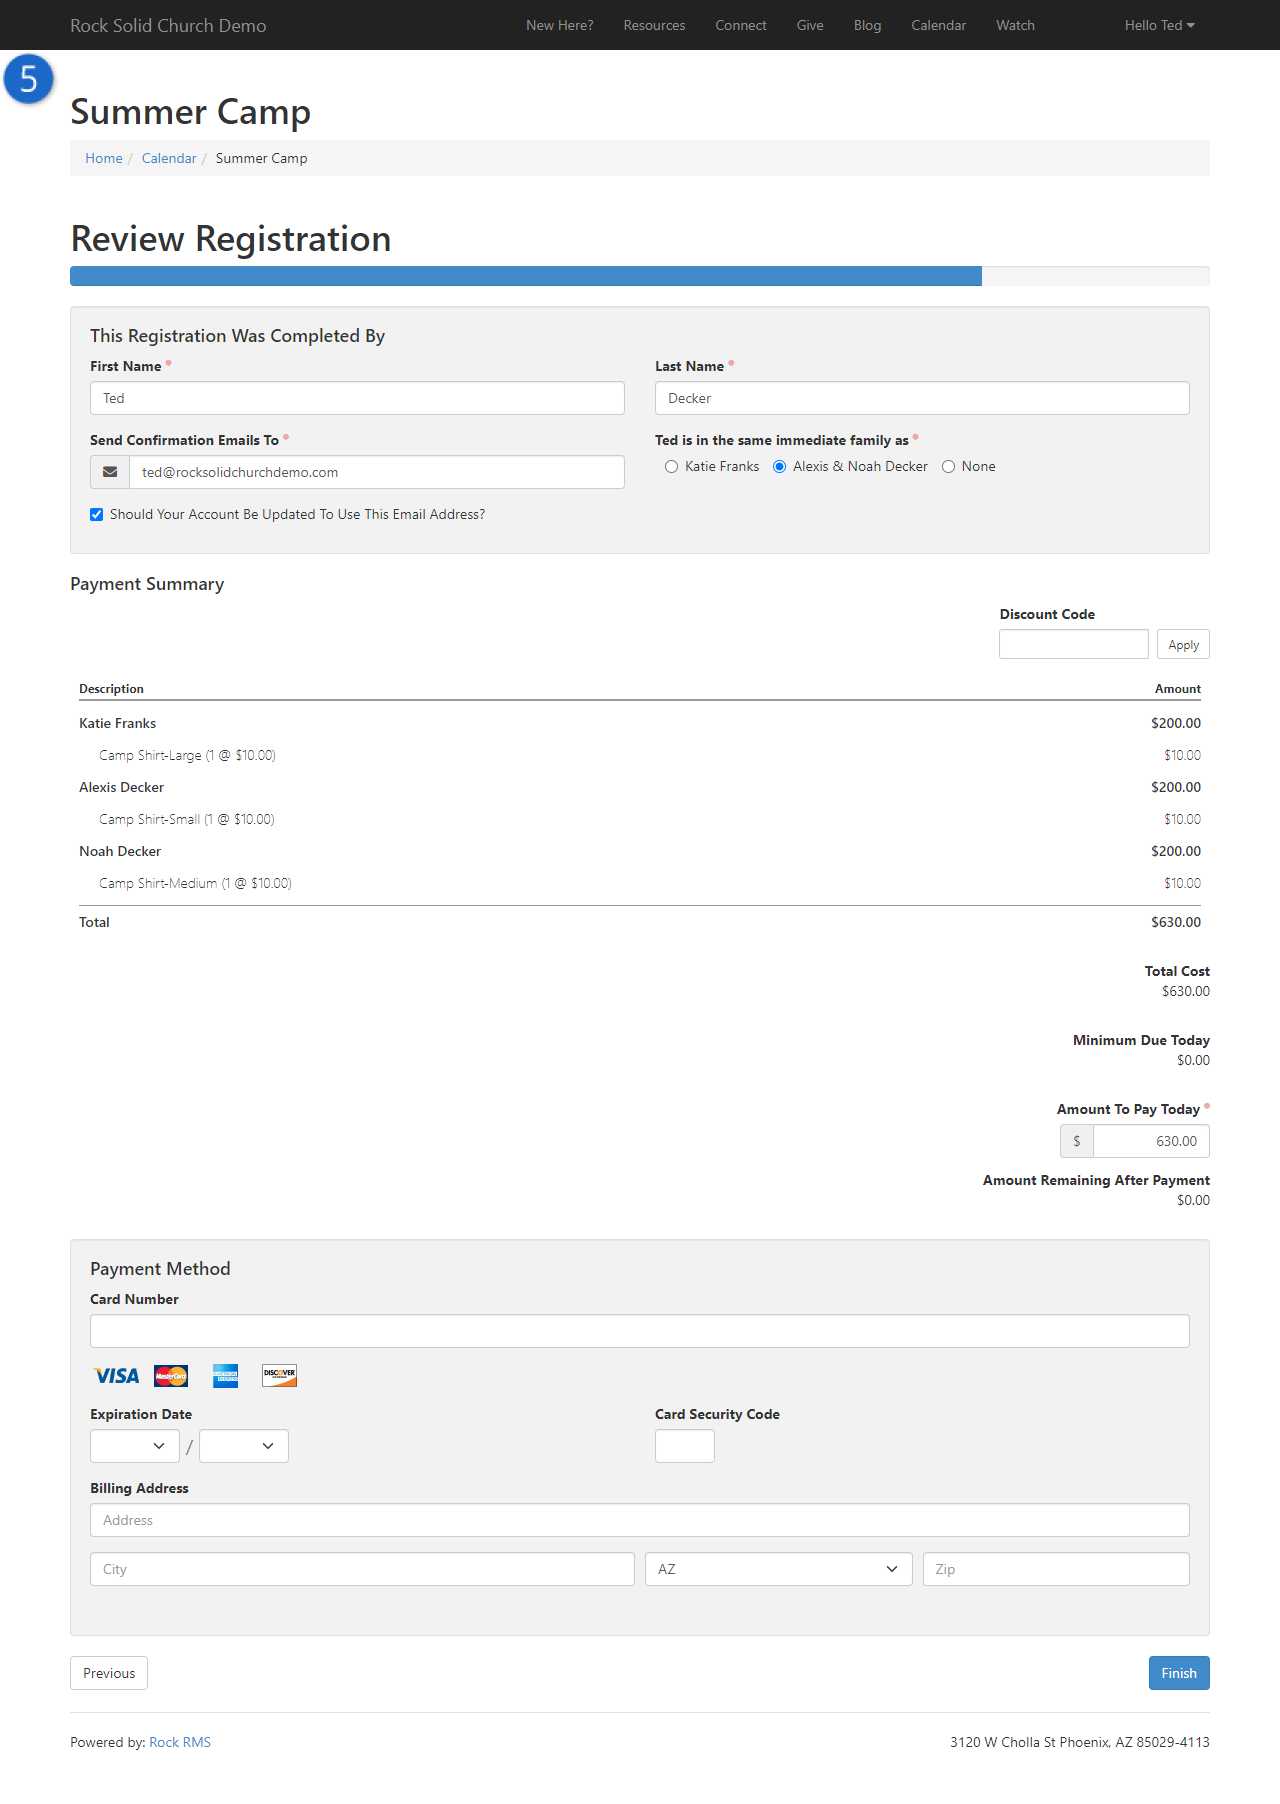
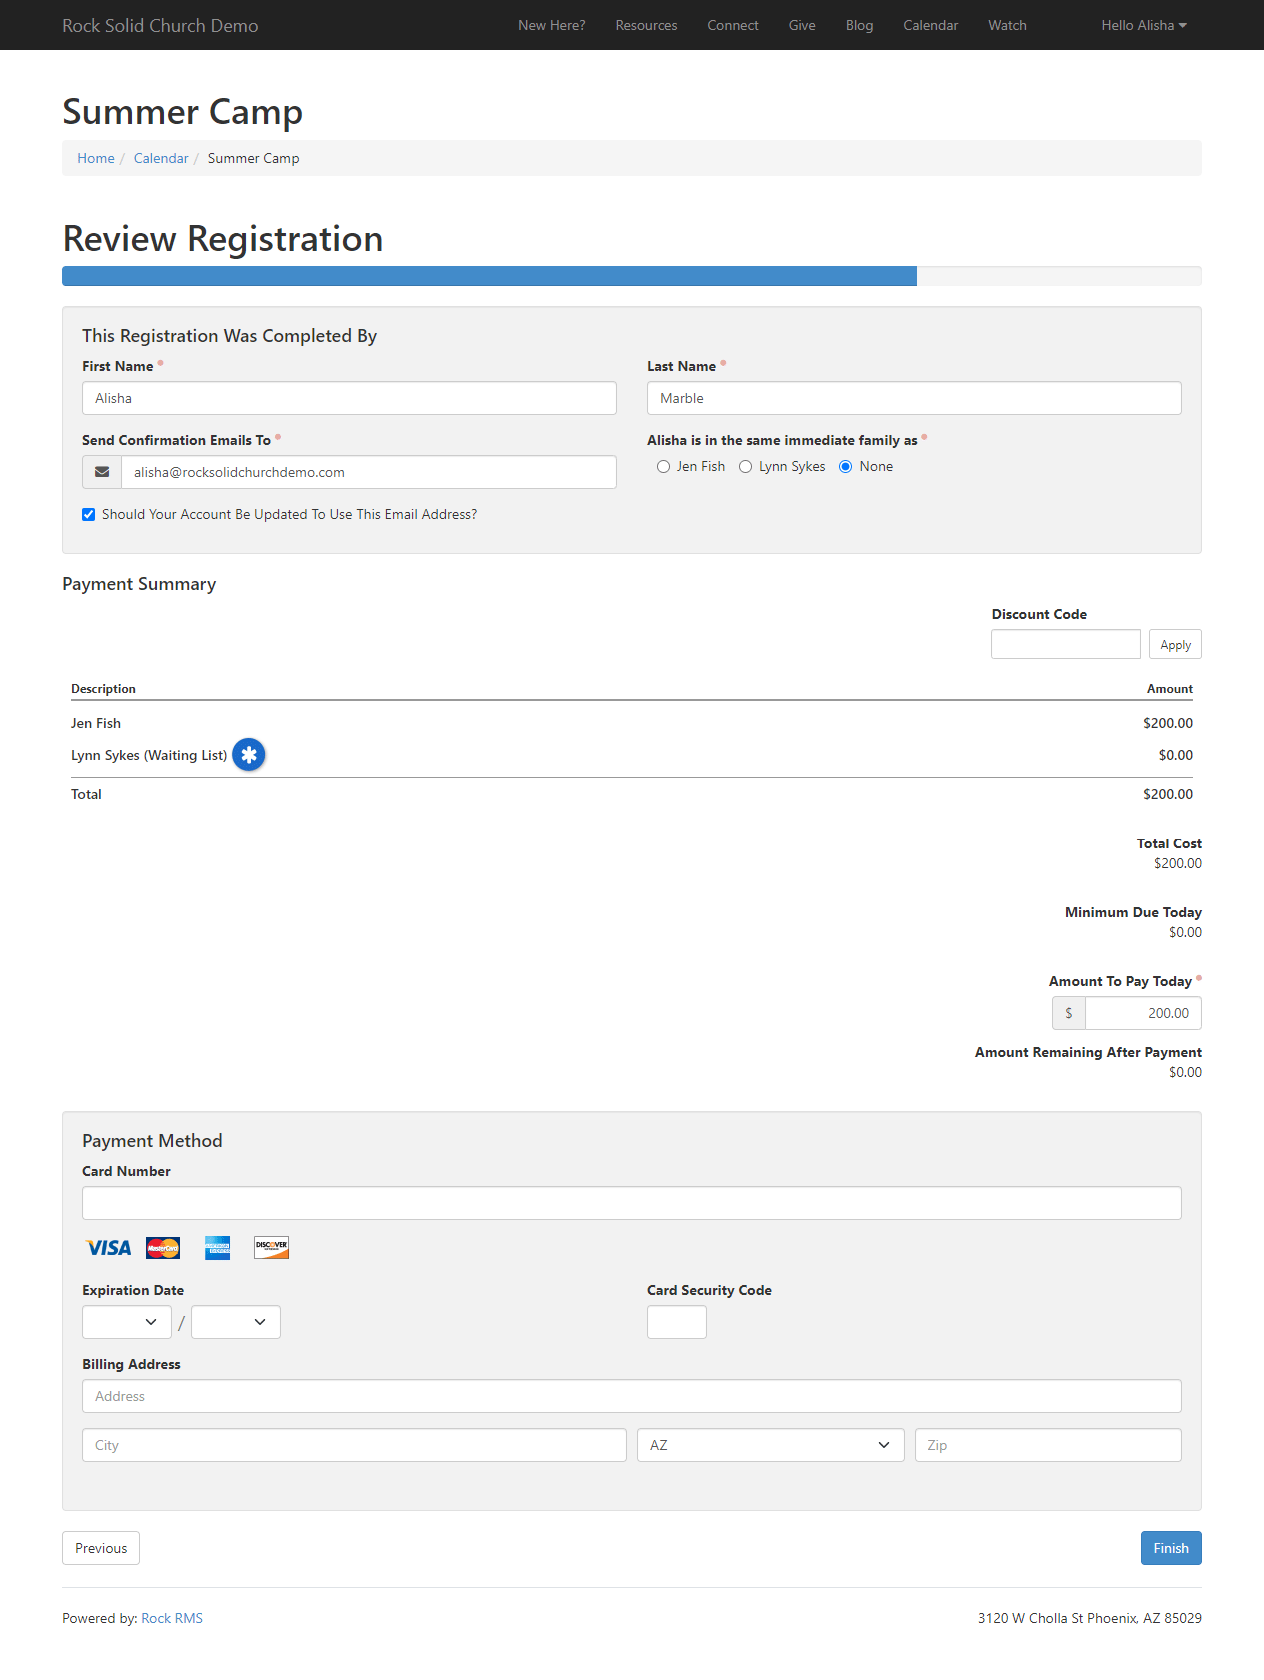
- 5Payment
- Now it's time to pay up! Here we see a nice breakdown of the costs and fees. We
have the opportunity to enter a discount code as well as
enter the amount we wish to pay today. You'll also note that the registrar can enter
their information here too. Like the registrants, they can select which family they
belong to.
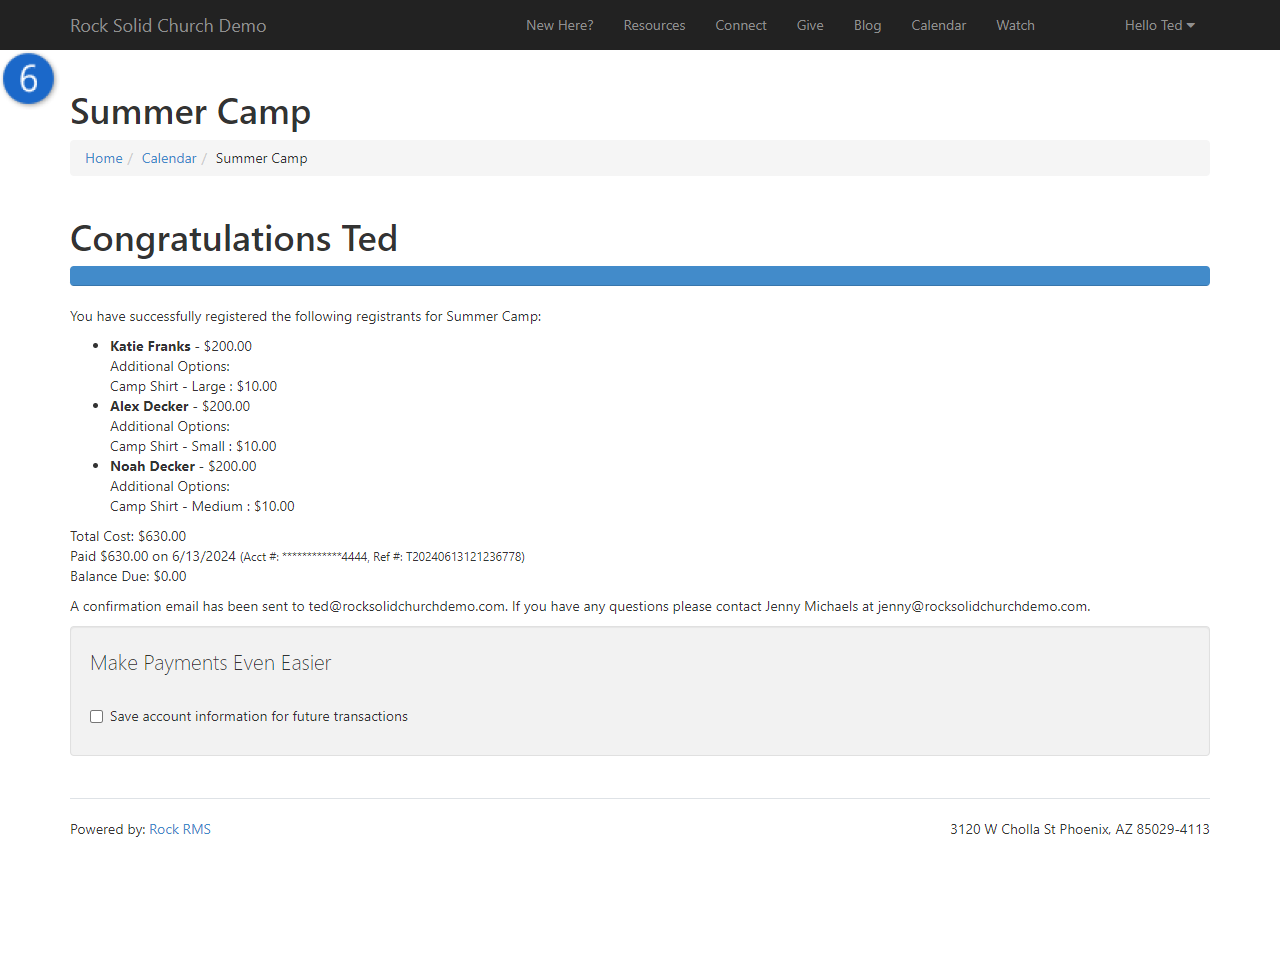
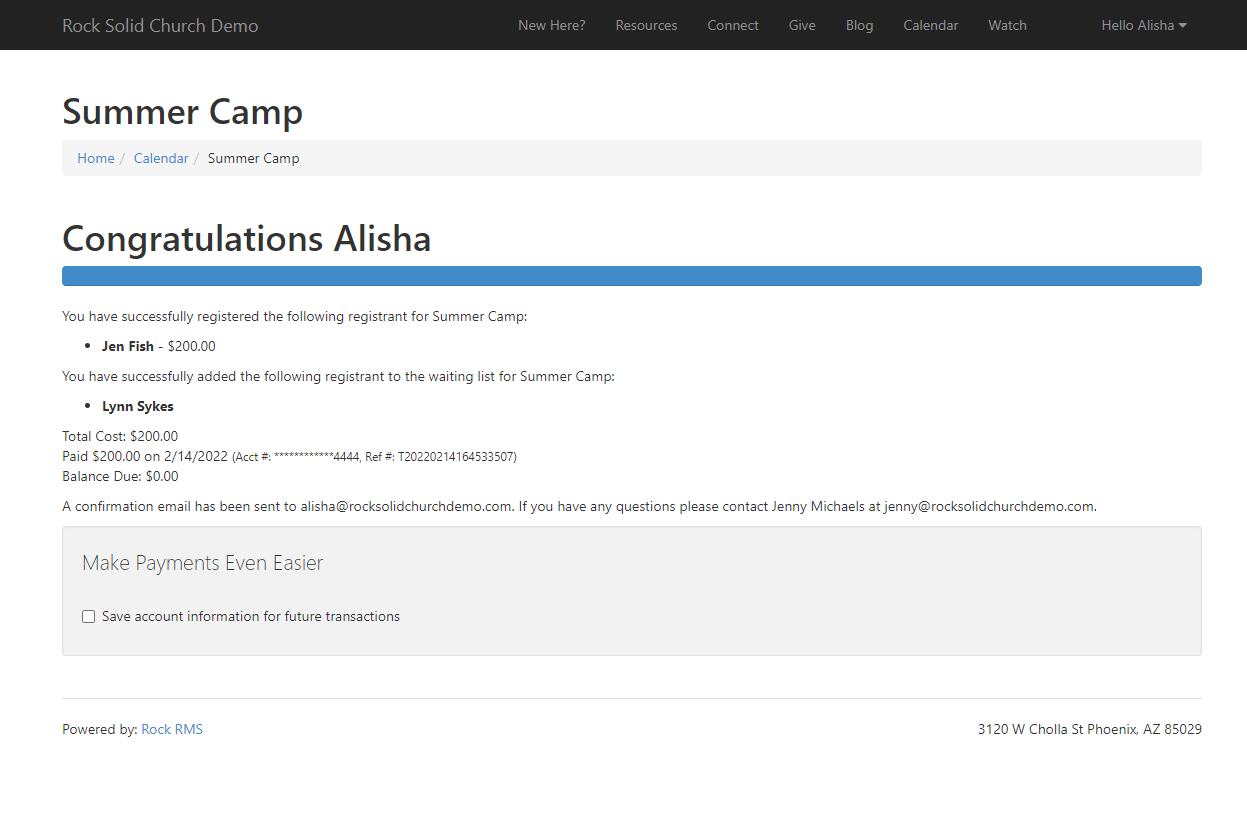
- 6Confirmation
- Done!
Event Wizard
The process to create an event has a lot of moving parts, and it’s essential to include all the right information in them.
The Event Wizard is a tool designed with your staff in mind. This gives administrators an easy way to train the rest of the team on how to create events.
You might be thinking, “When would I ever need to use this tool?” Great question. The fact is you don’t need this tool to create event registrations,
but once you see its capabilities, you’ll be asking, “Why would we ever create events any other way?”
Overview
Creating events involves much more than the event details. Events include but are not limited to, registrations, groups, calendar occurrences, and well... finances.
Let’s jump right in and look at this tool, and all it has to offer.
Take the Step
Summer is coming, and that means camp is right around the corner. You’ve had camps in previous years, so the registration template
is solid with everything a registration needs for this event to be successful.
This year, you and the rest of the administrative staff have decided to pass the baton to staff members to create their registrations in Rock.
This is a huge deal, pat yourself on the back for this great handoff.
But wait! The Students Director isn’t the most tech savvy person to be creating registrations in Rock. Are you sure this is a good idea?
Yes, it’s still a good idea; in fact, it’s the best idea you’ve had in a while. It takes five simple steps to create a typical registration, and some of these steps are even optional.
Administrators have no fear, check out the
Event Wizard Block Properties
section for details on customizing this tool for the whole staff.
As for the rest of your staff, use the below steps for training purposes on using this tool.
Wizard in Use
Ted Decker has recently stepped into the temporary role of overseeing all students’ and kids’ events,
and they are making plans for this year’s summer camp.
With all the details in hand, Ted is going to log into his Rock account and begin creating the registrations for camp.
He’ll open the Event Wizard page (that you have so kindly configured for him) and he’ll begin by choosing the registration template.
Mentioned above, the registration templates will already be created and ready for use. If for some reason someone needs a
different template, you’ll want to create that for them and make sure it’s allowed on their Event Wizard block settings.
Follow along the step-by-step settings on the Event Wizard below.
Registration Template

- 1 Registration Template
- A drop down with preconfigured registration templates. This will populate the Registration tab with the needed information for the type of event.
- 2 Campus
- Choose a specific campus that the registration belongs to or choose “All”.
- This option is only enabled if calendar events are enabled in the block settings.
- If this option is enabled and a specific campus is selected (rather than “All”), it will also set the campus for the group created in step 3.
- 3 Contact
- Use the person picker to choose the primary contact for the registration. This will be the logged in person automatically.
Registration Instance
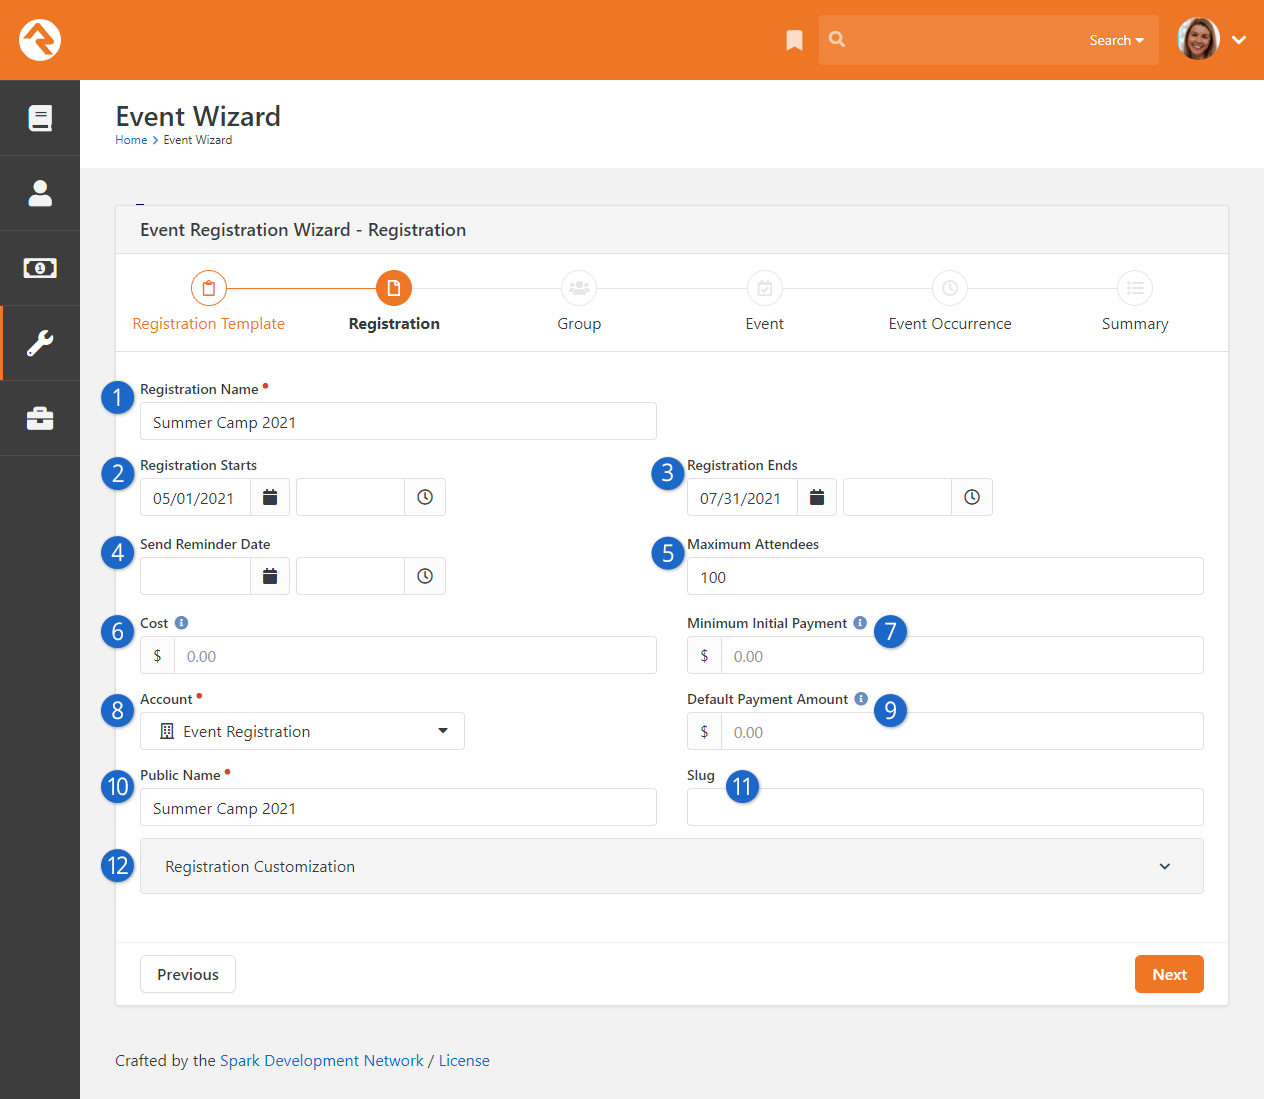
- 1 Registration Name
- This is the name that will be shown during the registration process. It’s used to describe the event that you are registering for.
- 2 Registration Starts
- The date the registration is open.
- 3 Registration Ends
- The date the registration is closed.
- 4 Send Reminder Date
- The date and time a reminder will be sent.
- 5 Maximum Attendees
- The total number of people allowed to attend the event.
- 6 Cost
- Registration Cost. This will only appear if the cost is not set on the template.
- 7 Minimum Initial Payment
- The minimum amount a person must pay to register for the event. Leave this blank if the
full amount is due at the time of registration.
This will only appear if the cost is not set on the template.
- 8 Account
- The account where the payments will be collected. This can be set by default in the template. It is a required field.
- 9 Default Payment Amount
- Setting an amount here will default the payment amount for the person who is registering to the amount you choose.
Often, you'll want the Minimum Initial Payment and
Default Payment Amount to be the same.
This will only appear if the cost is not set on the template.
- 10 Public Name
- This section will autofill from the registration name. It can optionally be changed to something different from the registration name.
- 11 Slug
-
A slug is a standard web term that refers to a part of a web address that identifies a page
or component of a page using human-readable keywords. In most cases the slug can be whatever
you want but try to use only letters and numbers if possible because some special
characters may cause issues with browsers. Dashes are okay to use in slugs if needed.
- 12 Registration Customization
- Contains the Registration instructions, additional reminder details, and additional confirmation details.
Review the Registration Instances chapter in this manual for more details.
Group
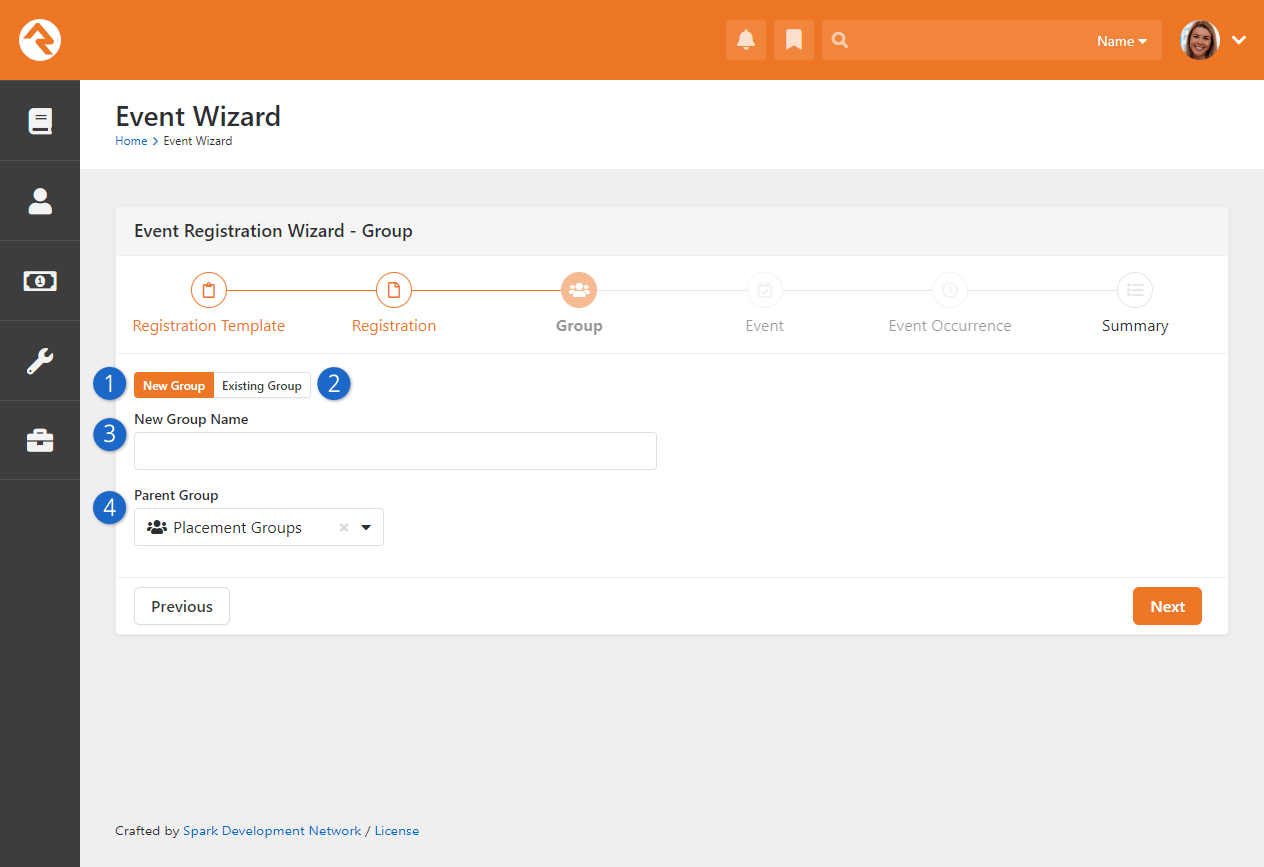
- 1 New Group
- You can either create a new group, or use an existing group. In this
image we're creating a new group.
- 2 Existing Group
- Alternatively, you can use an existing group into which registrants
will be placed.
- 3 New Group Name
- Create your event group that the registration will place registrants into.
- 4 Parent Group
- Choose a parent group for the new group to be under.
Event
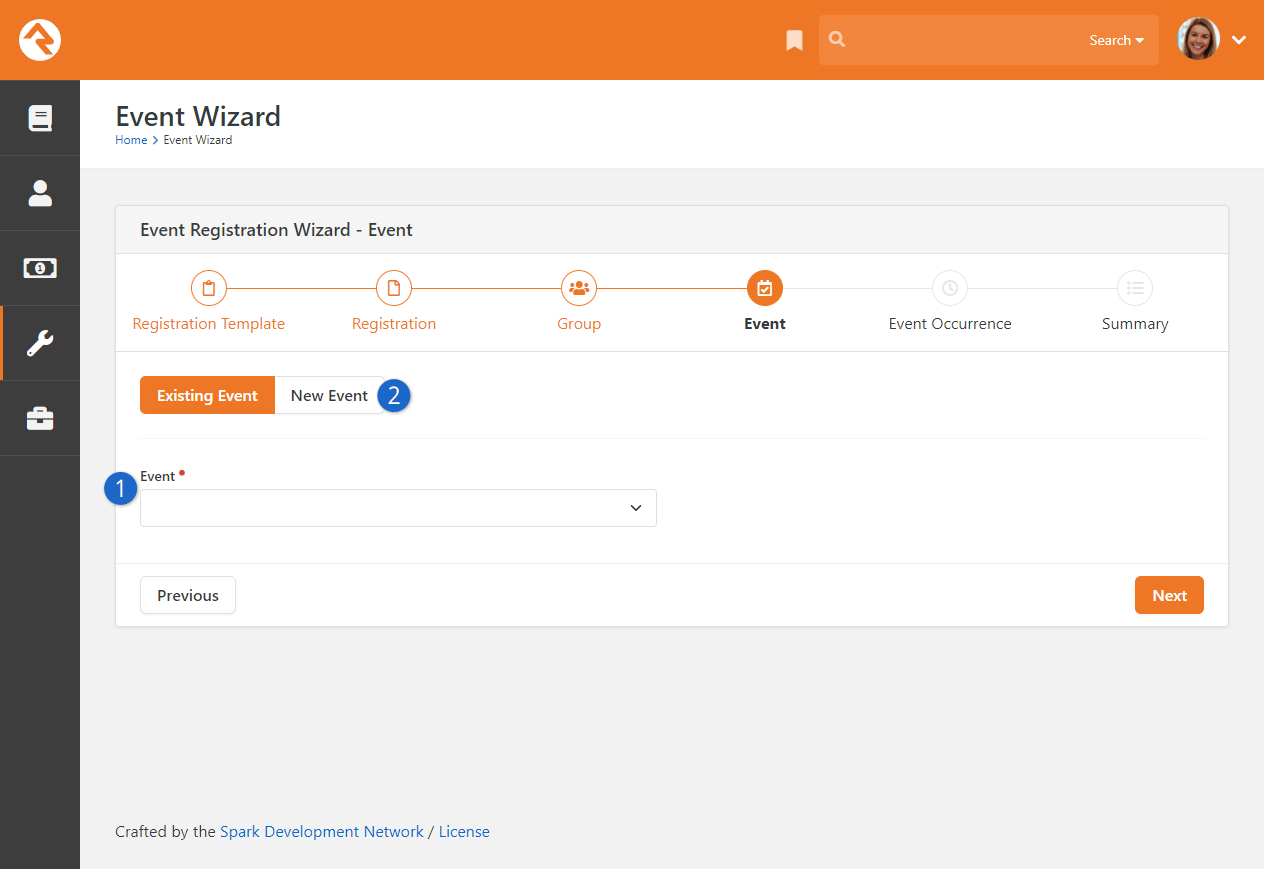
- 1 Event
- Dropdown to choose a preconfigured Event Item from the calendar list.
- 2 New Event
- If the block setting allows for it, you can create a new event on this page.
Event Occurrence
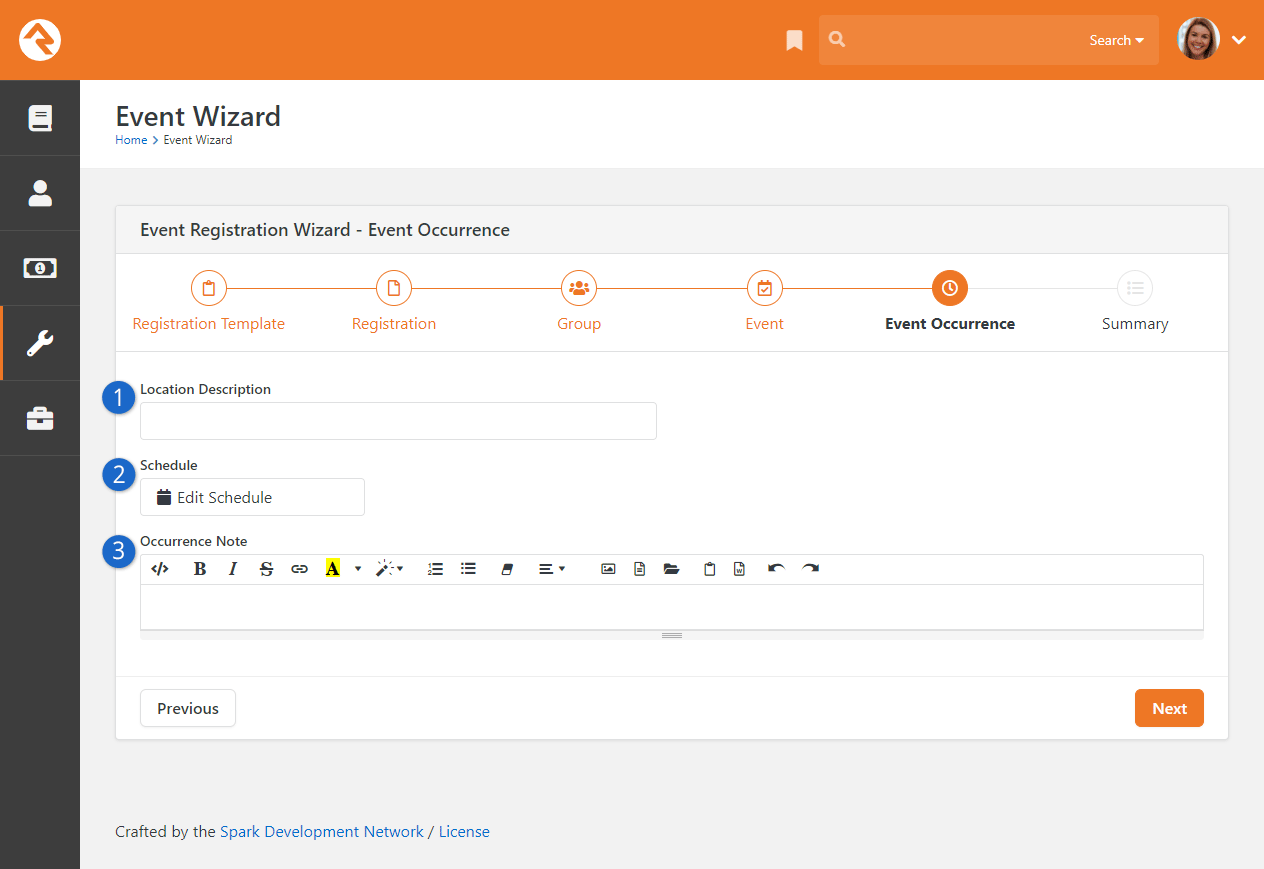
- 1Location Description
- The description of where the event will be held.
- 2Schedule
- When will the event occur? Check out the
Event Occurrences
section for more details.
- 3Occurrence Notes
- This note will be shown on the calendar details screen on the public website.
The rest of this document provides more details for the steps above with some additional settings that can be set. However, this tool will get any event off the ground and ready for registrants.
Event Wizard Block Properties
Event Wizard Block Properties
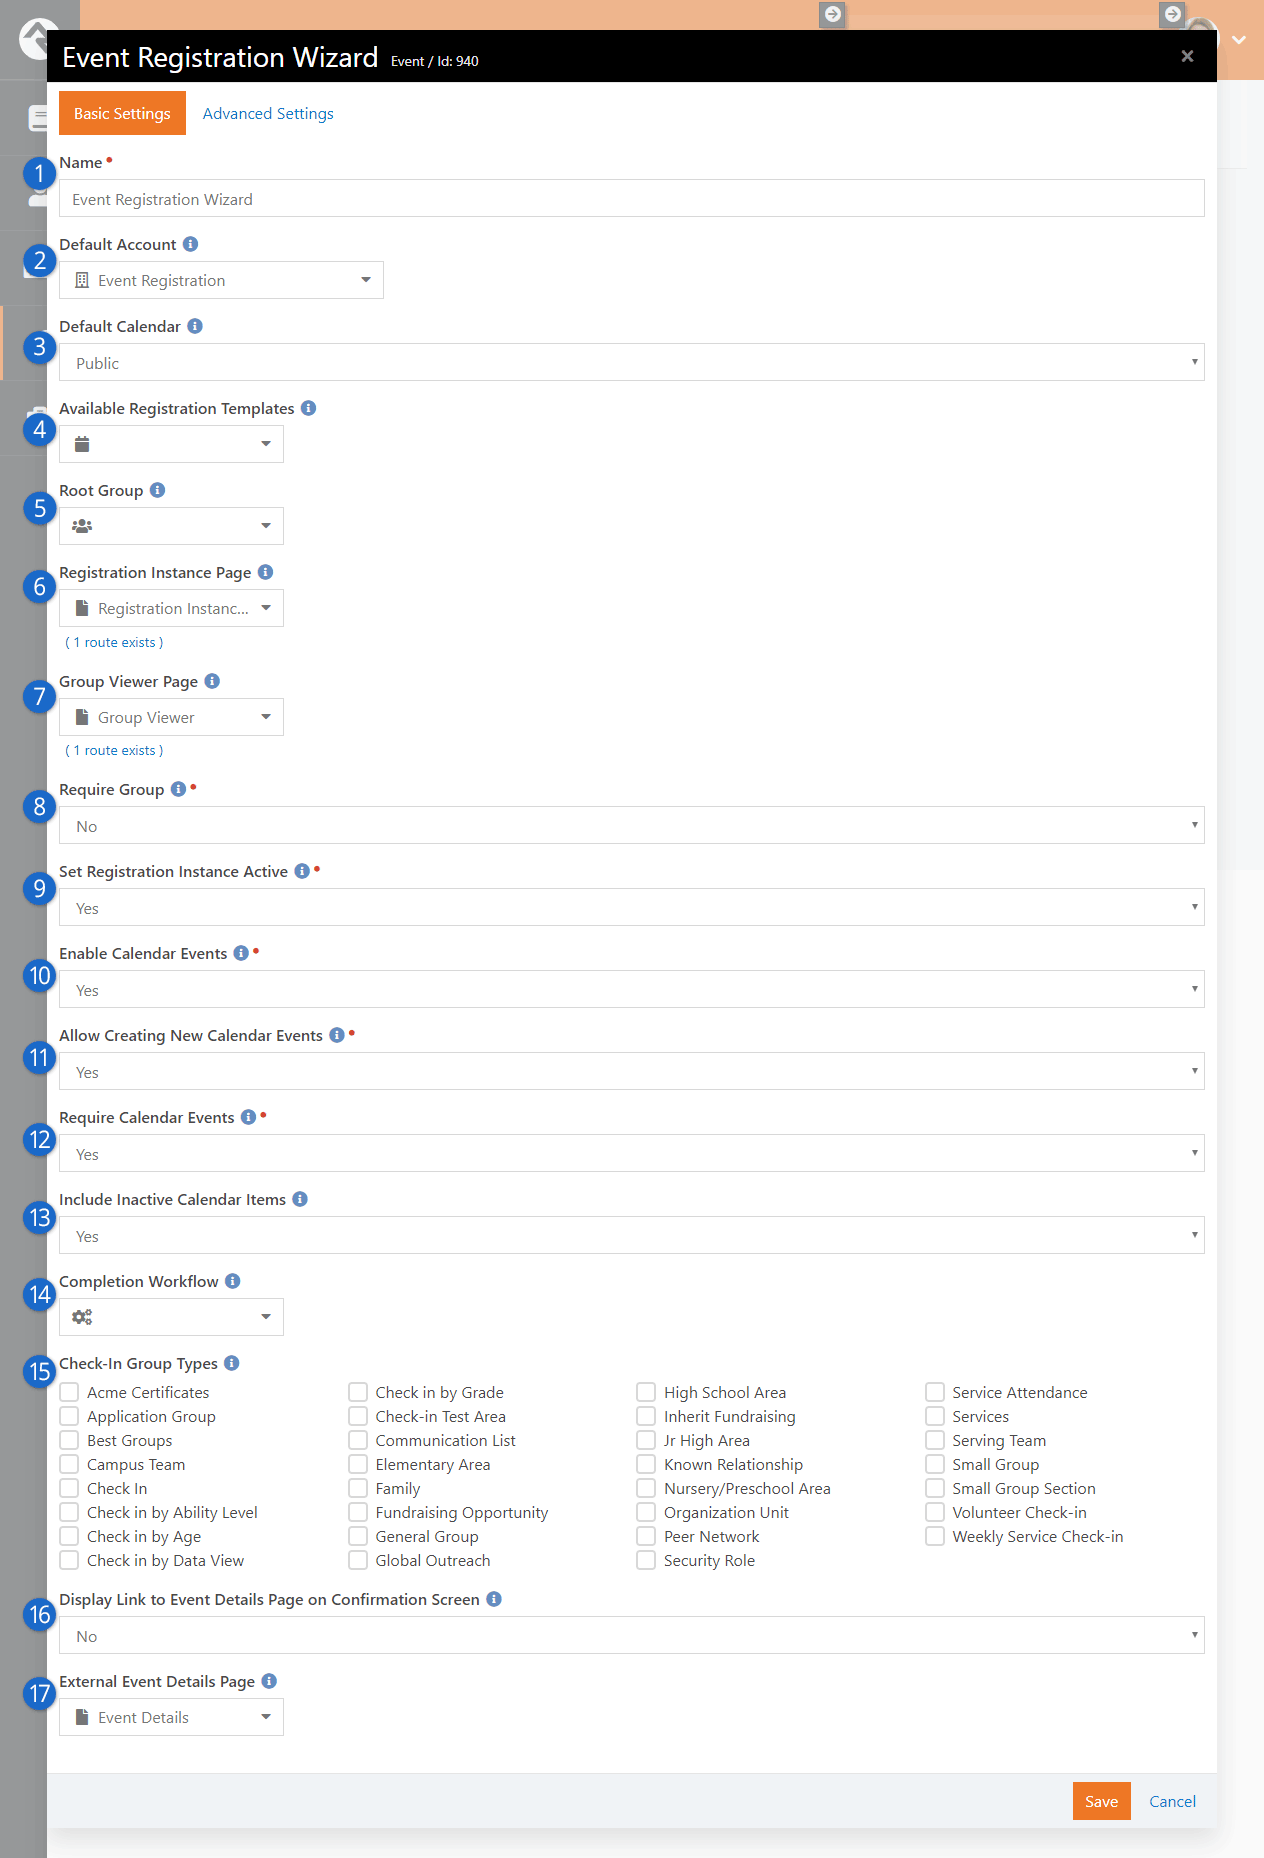
- 1 Name
- Block property name.
- 2 Default Account
- Selects the financial account which will be pre-filled on page two if the cost is set on the instance.
- 3 Default Calendar
- This calendar will be pre-selected by default if the staff person is permitted to create new calendar events.
- 4 Available Registration Template
- The list of templates the staff person can pick from.
- 5Root Group
- The start of the group tree for the staff person to pick a parent group.
- 6 Registration Instance Page
- Determines which page the "View Registration Instance" link in the final confirmation screen will take you to.
- 7 Group Viewer Page
- Determines which page the "View Group" link in the final confirmation screen will take you to.
- 8 Require Group
- Yes or No to require a group for created event registrations.
- 9 Set Registration Instance Active
- If set to "No", the new registration instance will be created, but marked as inactive.
- 10 Enable Calendar Events
- If calendar events are not enabled, registrations and groups will be created and linked, but not linked to any calendar event.
- 11 Allow Creating New Calendar Events
- If set to “Yes” the staff person will be offered the “New Event” tab on page four and will be able to create both a new event and a new occurrence for that event.
- 12 Require Calendar Event
- Select "Yes" or "No" to require the staff person to put this registration in an event.
- 13 Include Inactive Calendar Items
- Show inactive calendar items to choose from in the list.
- 14 Completion Workflow
- A workflow that will be launched when a new registration is created.
- 15Check-in Group Types
- Select group types which should enable check-in. If the selected registration template is one of these types, check-in options will be enabled for the group.
- 16Display Link to Event Details Page on Confirmation Screen
- Set this to "Yes" to show the link to the event details page in the wizard confirmation screen.
- 17External Event Details Page
- Determines which page the link in the final confirmation screen will take you to if the Display Link option (above) is enabled.
Registration Templates
As you've already read, templates contain a majority of the Event Registration's configuration.
There's a lot to cover, so let's get started. To keep it simple, we'll break the screen down
into bite-sized chunks.
You can edit registrations under Tools > Event Registration.
General Settings
General Settings
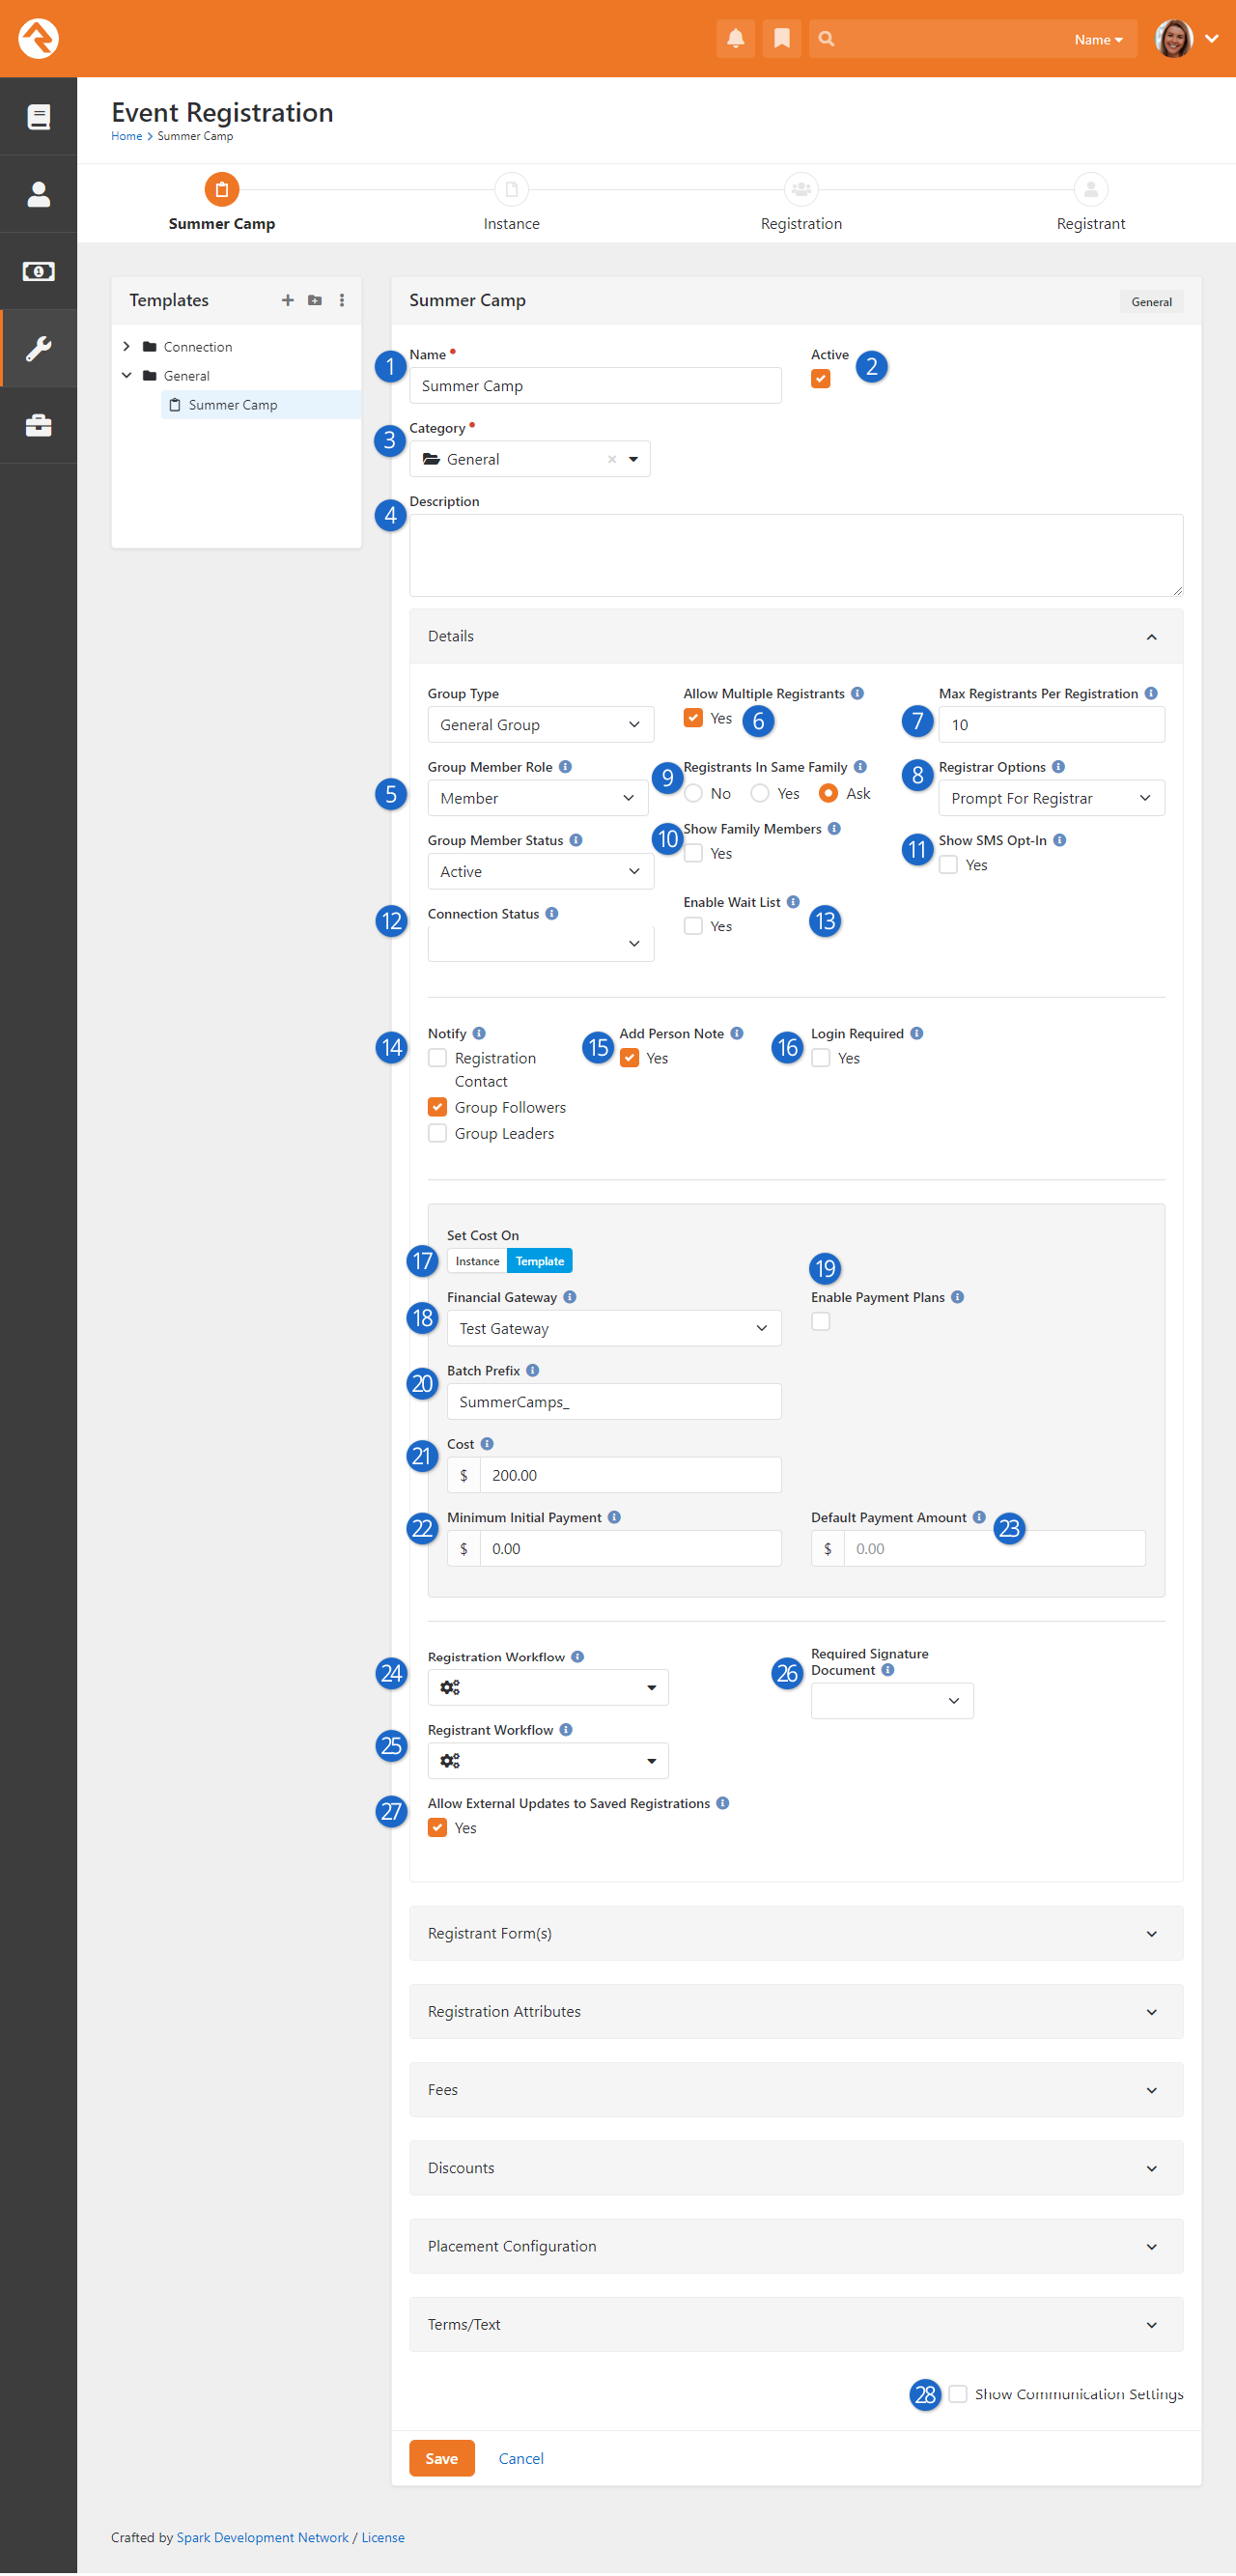
- 1 Template Name
- The name of your template.
- 2 Active
- When a template should not be used anymore you can deactivate it. You could also
delete it, but that would also delete all the registrations that use it.
- 3 Category
- To help organize registrations, you can organize and secure them by category.
- 4 Description
- You can optionally provide a description for the template.
- 5 Group Type / Group Member Role / Group Member Status
- These fields help tell Rock what settings to use when it drops the person into a
group. In this case they will be placed into the group with the Role of
Member
and the Status of Active.
- 6 Allow Multiple Registrants
- Fairly straight forward.
- 7 Max Registrants Per Registration
- This indicates how many people you can register at one time. This only applies if Allow Multiple Registrants
is enabled.
- 8 Registrar Options
- This option allows the event coordinator to auto-complete the registrar's information with the first registrant's information as well as hide the registration form altogether. This is useful and streamlines the process when the person registering is also the registrar (say, for example when someone is registering themselves for an event). The options for this setting are:
- Prompt for Registrar - This default setting displays the standard registration form and process.
- Prefill First Registrant - This setting auto-completes the registration with the first registrant's information. This is helpful when the registrants don't log in to register for the event, but you still want to auto-complete their information.
- Use First Registrant - This setting also auto-completes the registration with the first registrant's information, but it also hides the registration panel during the Review Registration step of the process unless the form doesn't collect the registrant's email address. In this case, the registration panel will be displayed during the Review Registration step since that information is required for registration communications.
- Use Logged In Person - This setting will use the information of the person who is currently logged in to your website. Any information that is known about the registrar will be "locked" and unable to be edited, but any missing information (for instance, if their email address is blank on their record) will be able to be filled in during the Review Registration step, as above.
- 9 Registrants In Same Family
- Creating the family structures during the registration process can be tricky. This
setting allows you to give Rock hints about the people who are registering for the event.
If you're hosting a pastors' conference, you'll probably want to enter
No
since the registrants are most likely not in the same family. Rock will then create new
families for each registrant. Yes
will assume that all the registrants are in the same family. Ask
enables the cool functionality you saw during the walk-thru above. It provides a very
elegant way for the registrar to tell you about the family make-up.
- 10 Show Family Members
- Selecting Yes or
Ask on the previous
Registrants in same Family option, will enable
this setting. Checking Yes here
allows people who are logged in to select one of their existing family members for each registrant in a
convenient drop down list -- a real time saver for family events. If you choose
Ask, the family list will not be available until you
indicate that the current registrant is in the same family as the currently logged in person.
- 11 Show SMS Opt-in
- When enabled a checkbox will be shown next to each mobile phone number allowing the registrar to enable SMS messaging
for this number.
- 12 Connection Status
- If a new person record is created as part of the registration process, this is the Connection Status
that will be assigned. Selecting a status here will override the Connection Status setting in the
Registration Entry block's settings.
- 13 Enable Wait List
- Checking this box will enable the wait list functionality. See the
Wait Lists chapter below for more details.
- 14 Notify
- When someone registers for an event, we often can't wait to find out. This setting allows you to notify several different parties.
- Registration Contact: This is configured on the registration instance.
- Group Followers: The groups that the registration is linked to can be followed by people with view permissions.
- Group Leaders: All of the individuals that have roles that are marked
Is Leader in the group
linked to the registration will receive an email.
- 15 Add Person Note
- When checked, registrars and registrants will have a note added to their timeline that denotes that they
have registered for the event.
- 16 Login Required
- Requiring the guest to log in ensures that a duplicate record is not created for the
registrar, but it does come at the cost of requiring the guest to log in (and possibly
register for a login) on your site.
- 17 Set Cost On
- This setting determines where the cost will be set, on the template where all registration instances will share it, or on each individual instance.
- 18 Financial Gateway
- The financial gateway you would like the financial transactions to be processed with.
- 19 Enable Payment Plans
- If you want people to be able to pay for registration costs over time, you can enable this
to allow the creation of Payment Plans. We discuss Payment Plans in the
Payment Plans chapter.
- 20 Batch Prefix
- Optional prefix to add to the financial batches. If left blank the prefix from the registration block will be used.
- 21 Cost
- The cost of the registration.
- 22 Minimum Initial Payment
- This is the minimum amount that must be paid at the time of registration. Leaving the
field blank will have the effect of requiring full payment. A minimum initial payment
amount is required to allow partial payments.
- 23 Default Payment Amount
- This is an optional setting that lets you specify the amount to be filled in by "default" when registering for an event. The amount you configure here will be filled in automatically, but the registrar will have the option of changing the amount down to the Minimum Initial Payment, if they wish. Note: this only works if the Minimum Initial Payment is greater than zero.
- 24 Registration Workflow
- This setting allows you to set a workflow to be run with each
registration. A similar setting exists on the instance if you need a different
workflow per instance. Note that the workflow is only launched if the registration is
done through the
Registration Entry
block on the external site. The Registration entity is passed to the workflow.
- 25 Registrant Workflow
- Here you can specify a workflow to be launched for each
registrant within a registration. Both the 'RegistrationRegistrantId' and the
'RegistrationId' will be passed to the workflow. Note that the workflow is only
launched if the registration is done through the
Registration Entry
block on the external site.
- 26 Required Signature Document
- Here you can set an electronic signature document to be signed for each registration.
Currently all signature documents are "in-line" and will appear as their own step within the registration process.
You'll want to use Rock's native
Electronic Signature Document
functionality, as well as the Obsidian version of the
Registration Entry block, for this to work.
- 27 Allow External Updates to Saved Registrations
- This setting keeps individuals from editing a registration once it has been saved. It's common that someone may come back to a registration to make a remaining payment. While there they can change any of the registrant information. Disabling the feature keeps these edits from occurring.
- 28 Show Communication Settings
- Since the communications settings for a template are rarely changed, we've hidden them from everyday viewing. Select
this checkbox to view these settings.
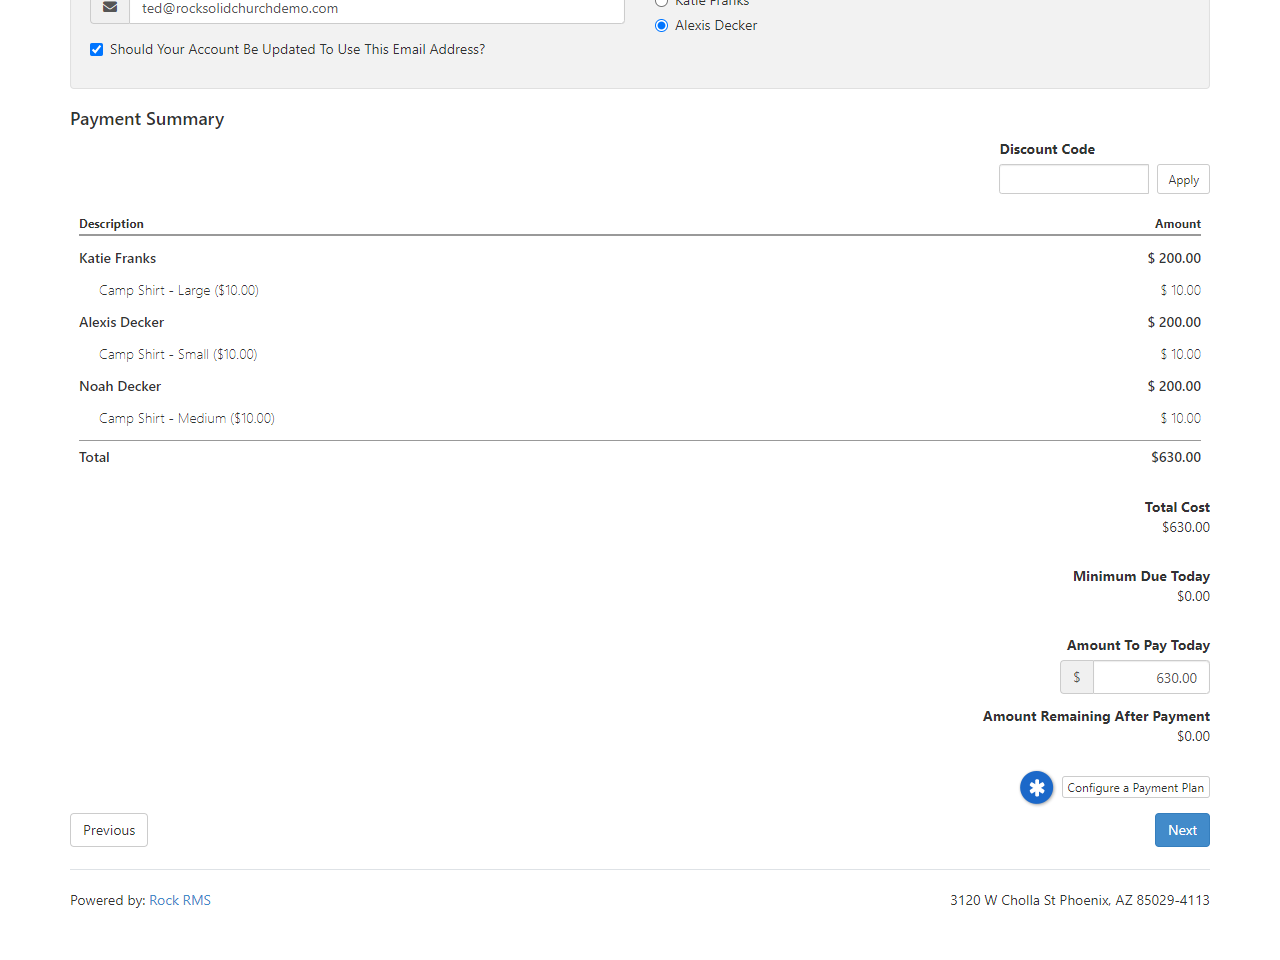
Minimum Due Today and Amount To Pay Today
The Cost and
Minimum Initial Payment
fields described in the prior section above have a direct impact on the
Minimum Due Today
and
Amount To Pay Today
fields seen during the payment stage of the event registration process. Let's take a quick
look at how these fields work together.
Let's say that you configure your template (or instance) so that it has a total
Cost of $200
and a
Minimum Initial Payment
of $100. When the person goes to register and pay, they are limited by these settings.
The Minimum Due Today
field, which comes from the
Minimum Initial Payment
setting, means exactly what it says. The person will not be able to pay
any less than $100 (in our example) no matter what. However, the person can pay more than
the minimum. The limit to how much they can pay is the total
Cost of $200.
So, in our example, the person can pay any amount between $100 and $200.
Whatever amount is chosen would go into the
Amount To Pay Today
field. If a person in this scenario pays $150 today then they will be making a
partial payment and will need to provide
the remaining $50 at a later time. They could split that $50 into two
$25 payments by making another partial payment.
Electronic Signatures
Let's take a moment to point out a really powerful feature that we glossed over a bit. Rock can automate the process
of requiring electronic signatures after each registration. We cover this topic in detail in the
Rock Admin Hero Guide.
Forms
Now for the fun part - creating the entry form. When you see the power here, you'll have
no choice but to smile.
Form Field List
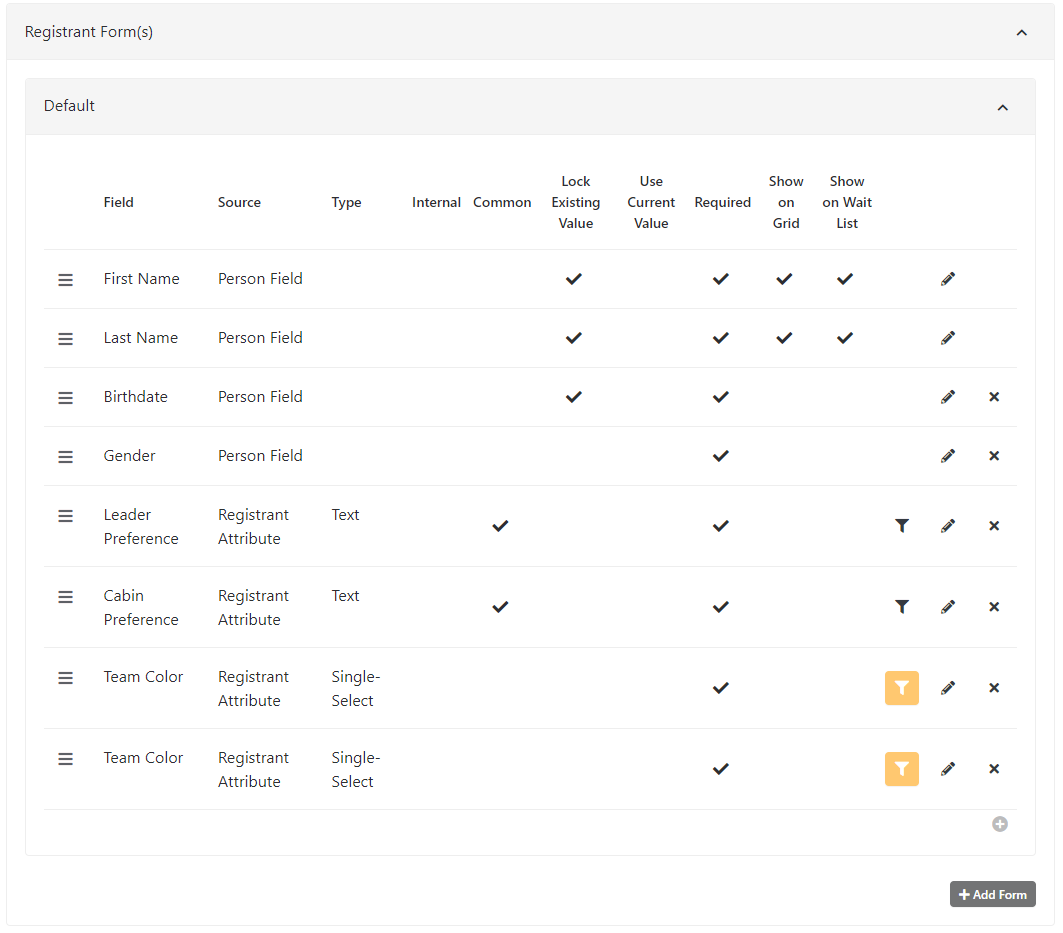
At a minimum you must collect the registrant's first and last name. But in most cases,
you'll want to add at least a couple more fields. When adding fields, you have your choice
of where and how they're stored. Let's look at the options.
Form Field Editor
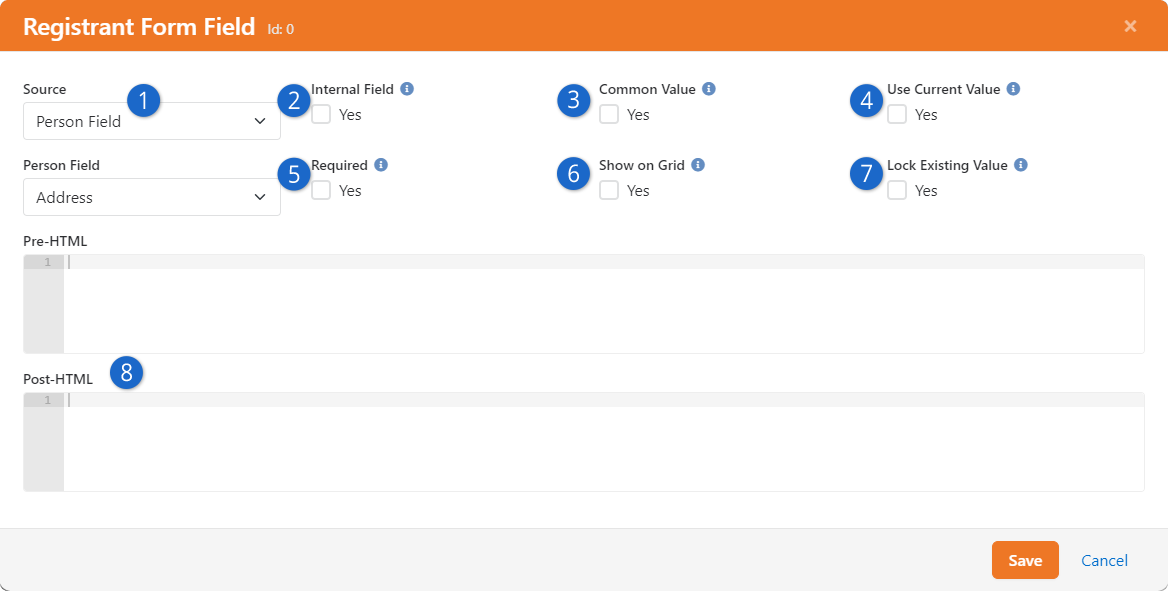
- 1 Source
- Your selection here drives what you ask on the form for this question,
and how it's stored.
There are four options:
- Person Field: These fields come right off the person's record. They
include things like:
- Campus
- Address
- Email
- Birthdate
- Gender
- Marital Status
- Phone Numbers
- Connection Status
- Person Attribute: This type allows you to take what they've
entered and place it into a person attribute.
- Group Member Attribute: This allows you to store their entered values
into a group member attribute of the linked group.
- Registrant Attribute: The final type allows you to configure new
attributes that will be stored with the registrant.
- 2 Internal Field
- This setting allows you to define the attribute
but keeps it from being displayed on the external registration form. It will be made
available however when editing the form internally. This is used for internal fields
that will be entered after the registration takes place, or for simply displaying,
for example, an existing person attribute on the grid for event-administration
purposes.
- 3 Common Value
- Filling out forms can be tedious. This setting allows
you to take the entered value from the first registration and auto-populate the same
field for the subsequent registrants.
- 4 Use Current Value
- In an effort to reduce the amount of data that
must be entered, this setting takes the current value from the registrar's record.
This is especially helpful for attributes like 'Address'.
- 5 Required
- This simply indicates whether the person must fill out
this field before proceeding with the registration.
- 6 Show on Grid
- This will place this attribute on the grid of
registrants. It can be very helpful as long as you limit the number of items you put on
the grid.
- 7 Lock Existing Value
- If you enable this setting, the person's
record will not be updated to reflect what they enter for this field. How this looks
to the person registering can vary (see below).
- 8 Pre-HTML / Post-HTML
- Like the workflow entry forms, these fields
allow you to surround your entry fields with custom HTML markup. With some basic web
design knowledge, you can use these fields to create richer experiences.
Lock Existing Value
As noted above, when adding a form field you can choose to
Lock Existing Value.
This simply means the person's existing record in Rock will not be changed to match
what the person enters during the registration process for the given field.
Let's say you enable this feature on the Birthdate field, and Ted Decker is
registering his son Noah for camp. Noah has a record in Rock already, with
a birthdate of 3/10/2014. If Ted gives a birthdate of 3/11/2014 during the
registration process, it will essentially be ignored and Noah's birthdate
will remain locked at 3/10/2014.
Enabling
Lock Existing Value
on a form field will sometimes mean the field can be seen but not changed.
In the example pictured below, this applies to the First Name, Last Name, and Birthday
fields.
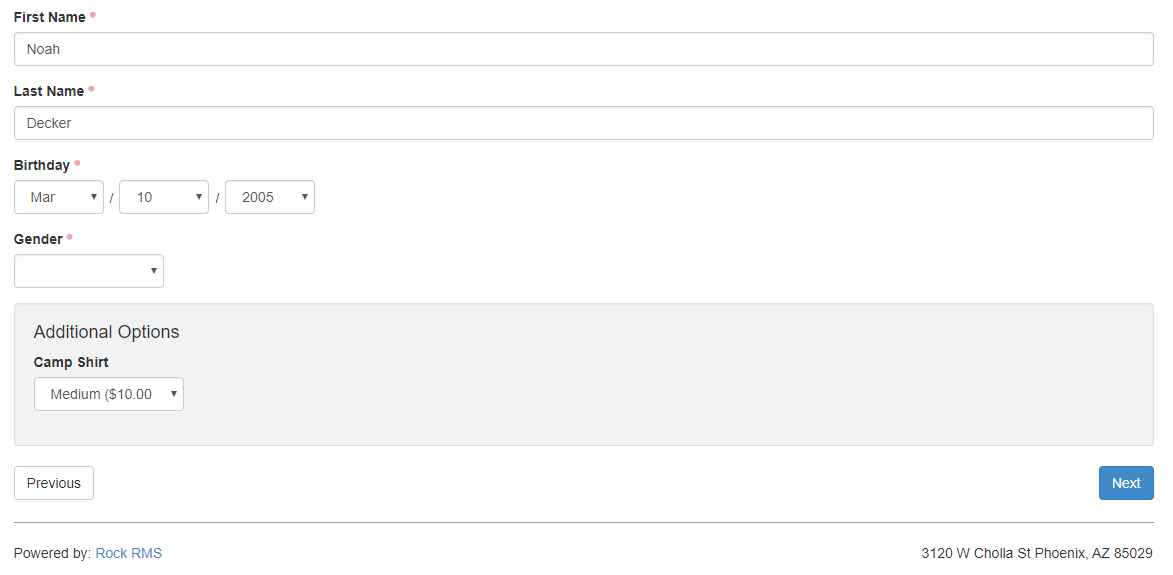
Locked Fields During Registration
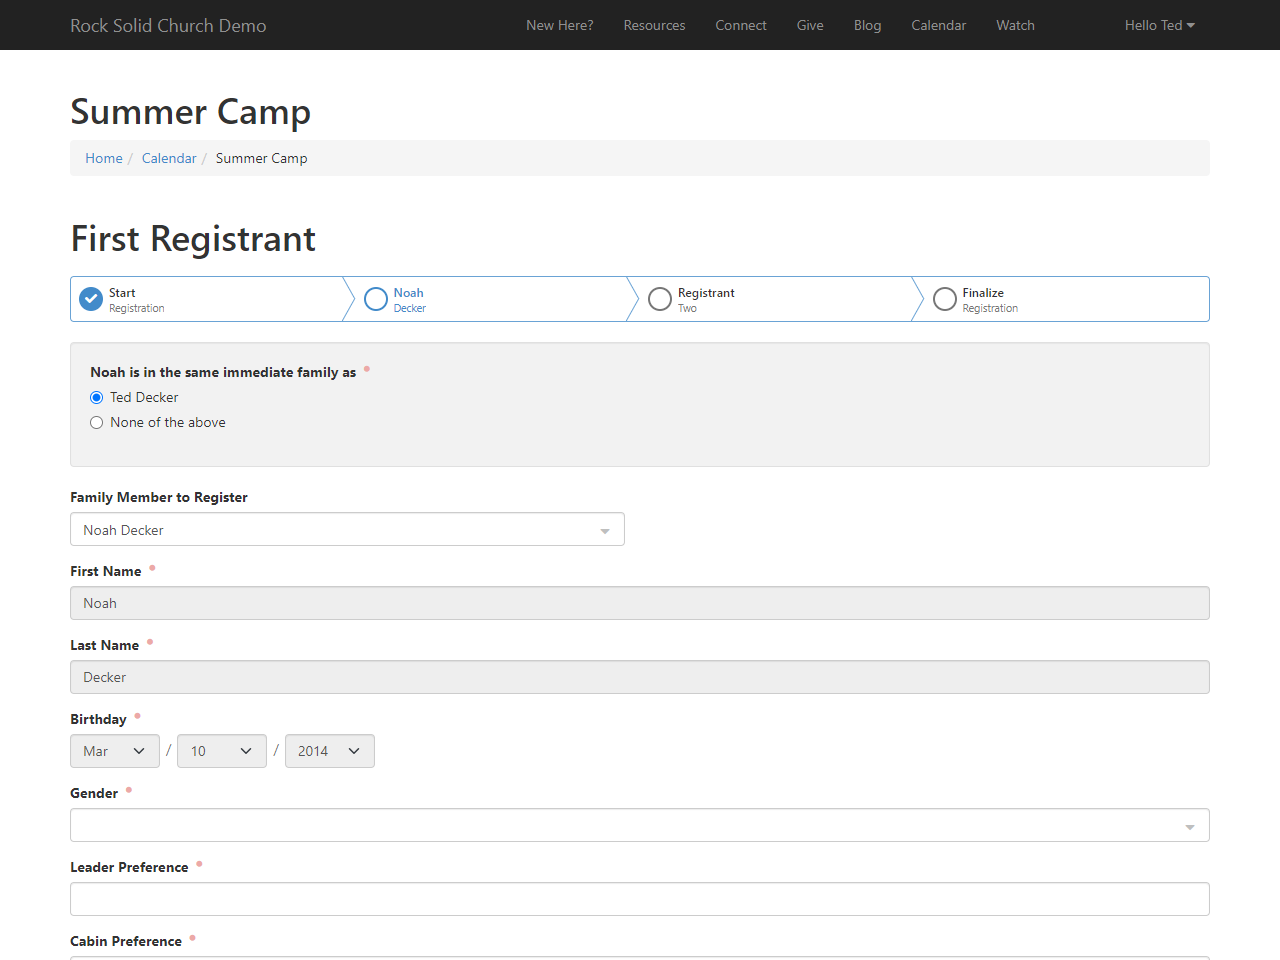
In the image above it's important to note that Ted used the
Family Member to Register
drop-down, where he selected Noah Decker. This means Rock knows right away who the registration
is for, so the fields with
Lock Existing Value
are not editable.
However, if the registration template is not configured to
Show Family Members
then Ted won't have that drop-down list to choose from. In that case, the
Lock Existing Value
fields will be editable so Ted can provide Noah's information manually. But just because
they can be edited on the form doesn't mean the
Lock Existing Value
setting is ignored for these fields. When the registration is submitted and Noah's
record is found, his existing data will still be unchanged. The same is true if
Show Family Members
is enabled, but Ted is registering someone outside of his family, as pictured below.
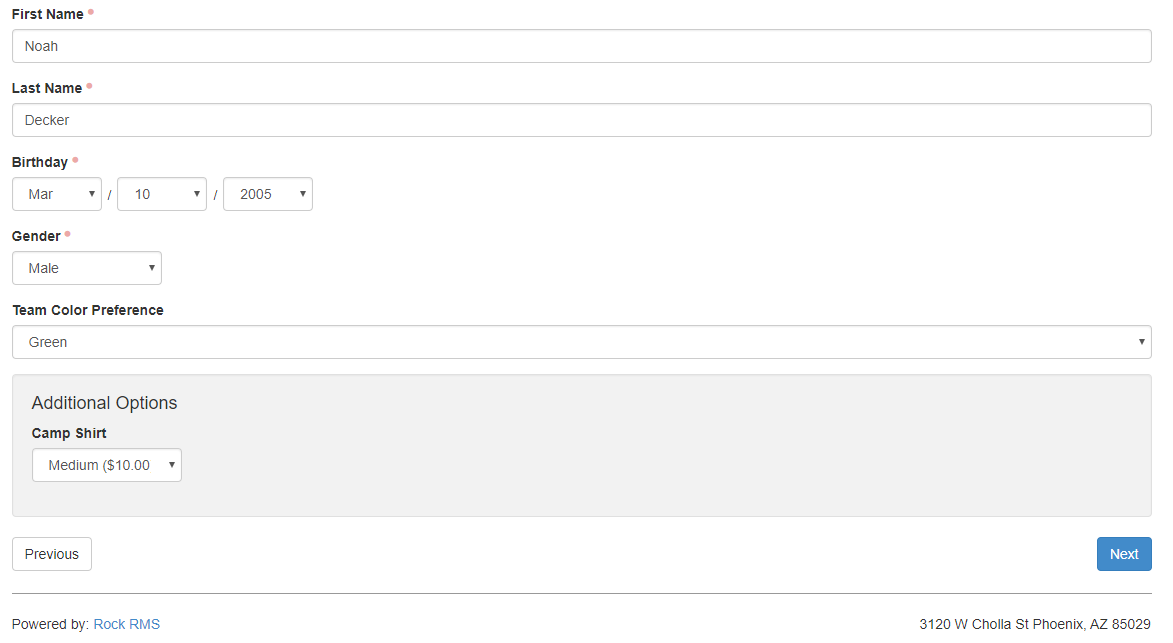
Editable Fields During Registration
Just remember that in the example pictured above, Katie's name and birthdate will not
be changed if that information is already in Rock. Those fields can be edited during the
registration process, but that's only to allow Ted to complete the form for people outside
his family. The
Lock Existing Value
functionality remains in effect.
Conditional Registration Fields
In many cases unique information will apply to each registrant. Event registration form
fields have conditions that control whether they are shown/hidden based on the registrar’s selection of a prior form field value.
Gender field
The conditional field options will be different based on the Gender selection.
Conditional field from Gender selection
First, we'll have to add the form field on the event registration template. After creating the field, a filter icon-button will be shown on the forms grid.
Registrant Attribute
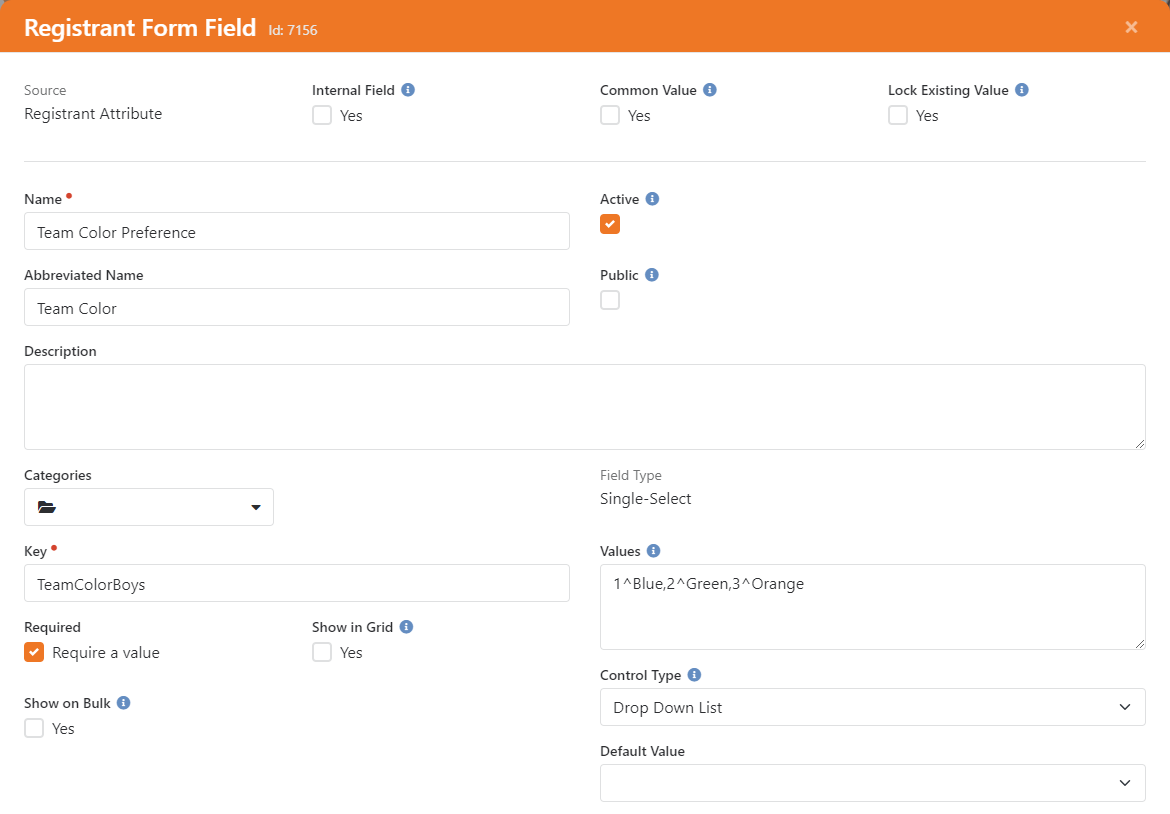
Clicking on the icon on
the Form Field List will display the criteria selection for that field.
Limitations on Conditional Fields
You may have noticed in the Forms section above that not every field in
our example registration form has the icon next to it. That's
because you can’t apply conditions to every type of field on your form.
Only attribute fields that use a control which is text, list, checkbox, person
picker, or date pickers can have criteria applied. In other words, if you don’t see the
icon then the field type you’re using can’t have conditional
logic applied.
Add Criteria

Click save.
Now you can see that the fields with conditional rules have a highlighted filter button.
Registration Attributes
While customizing the template for your event, you can add Registration Attributes directly from the same section.
This would allow for the collection of attributes about the registration that do not pertain to a specific registrant.
Use the icon to open the attributes page.
Registration Attribute Editor
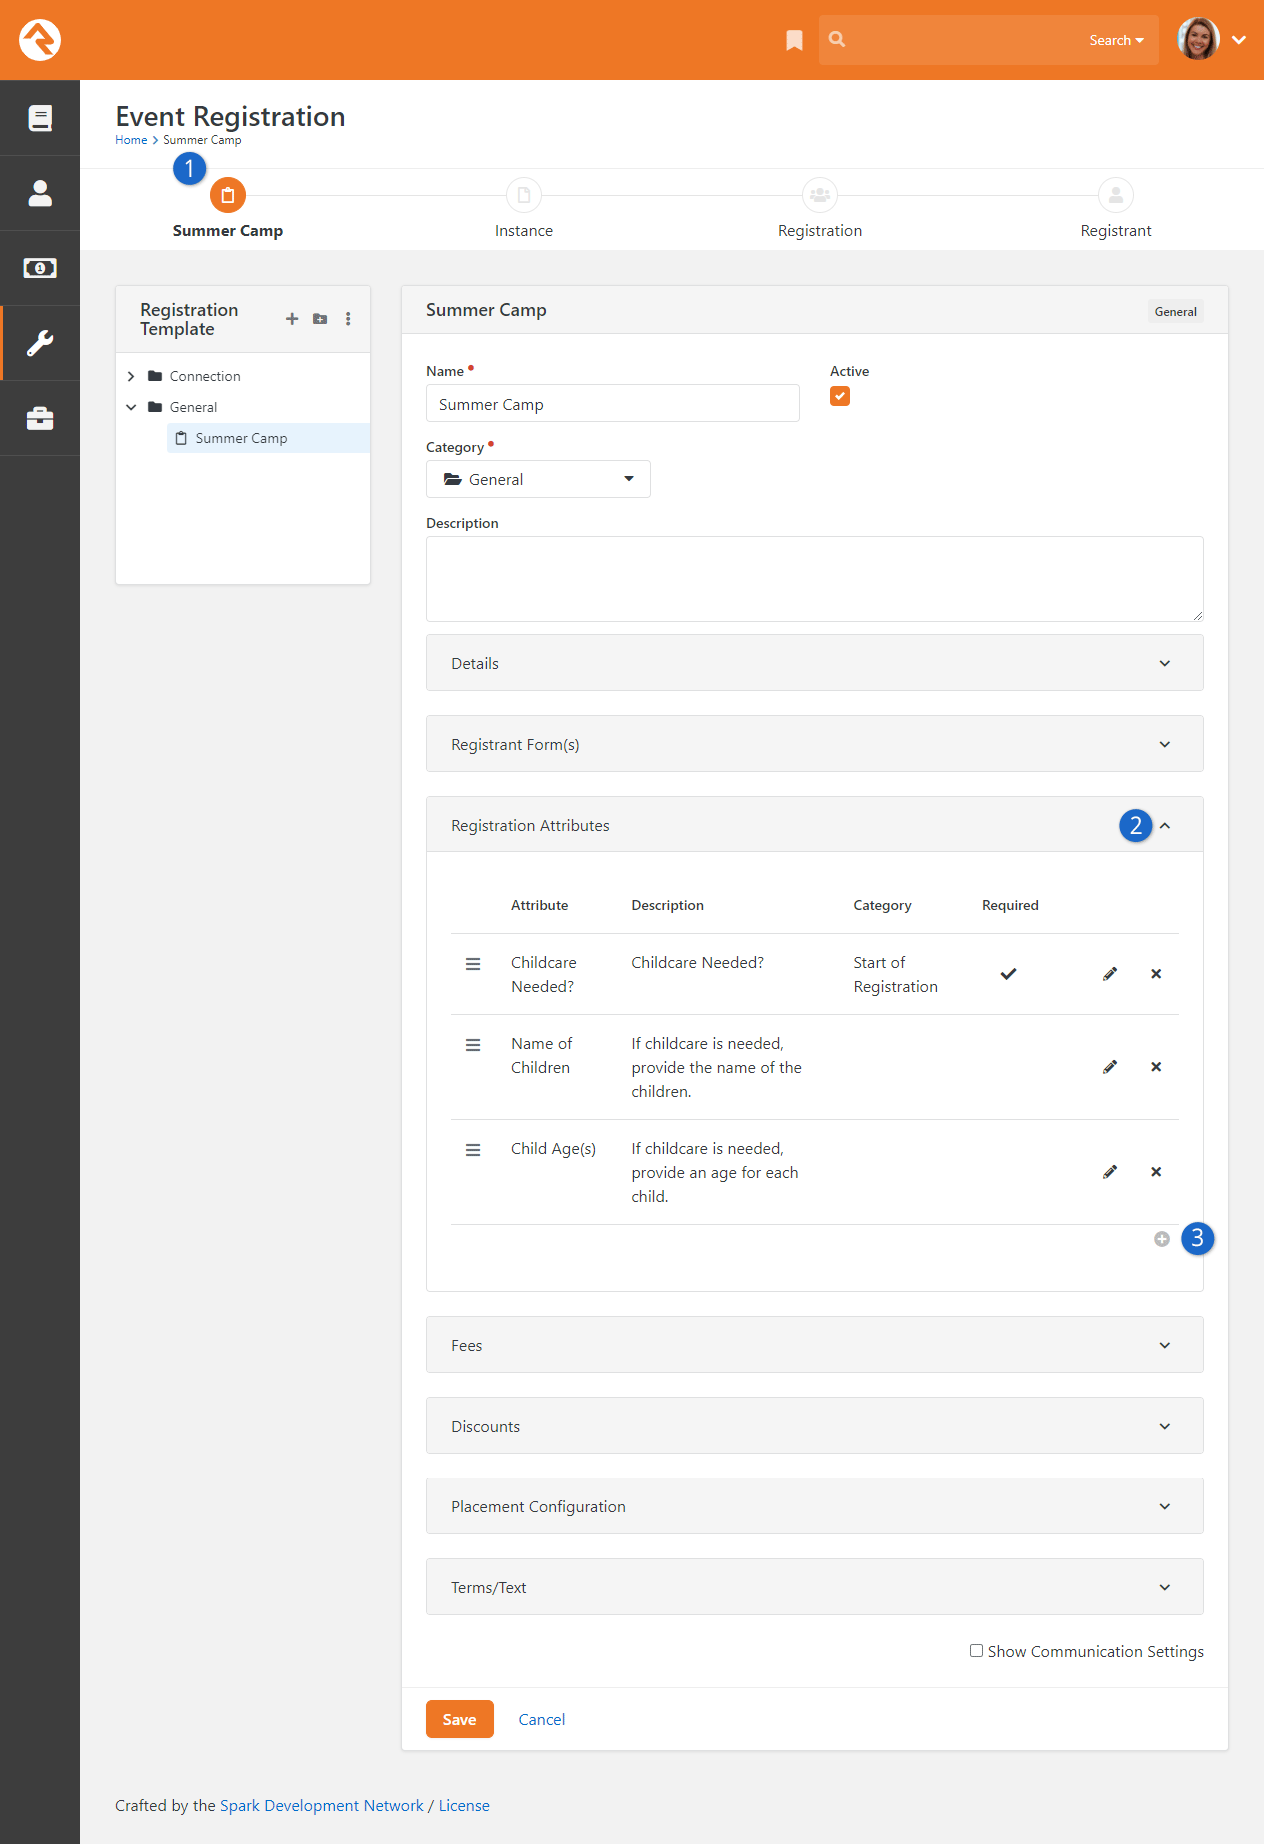
- 1 Template Name
- The name of your template.
- 2 Registration Attributes
- Attribute drop down, located on the main template section below the registrant forms.
- 3 Add Attribute
- Clicking on the plus button opens the attribute window to configure attributes for this event template.
Below you can see the Registration Attribute window open. Here you will create the attribute for the event.
In the Categories
drop down, you can choose to show this attribute at the start or end of the registration.
If a category is not selected, the attribute will display at the end of the registration.
Attribute Page
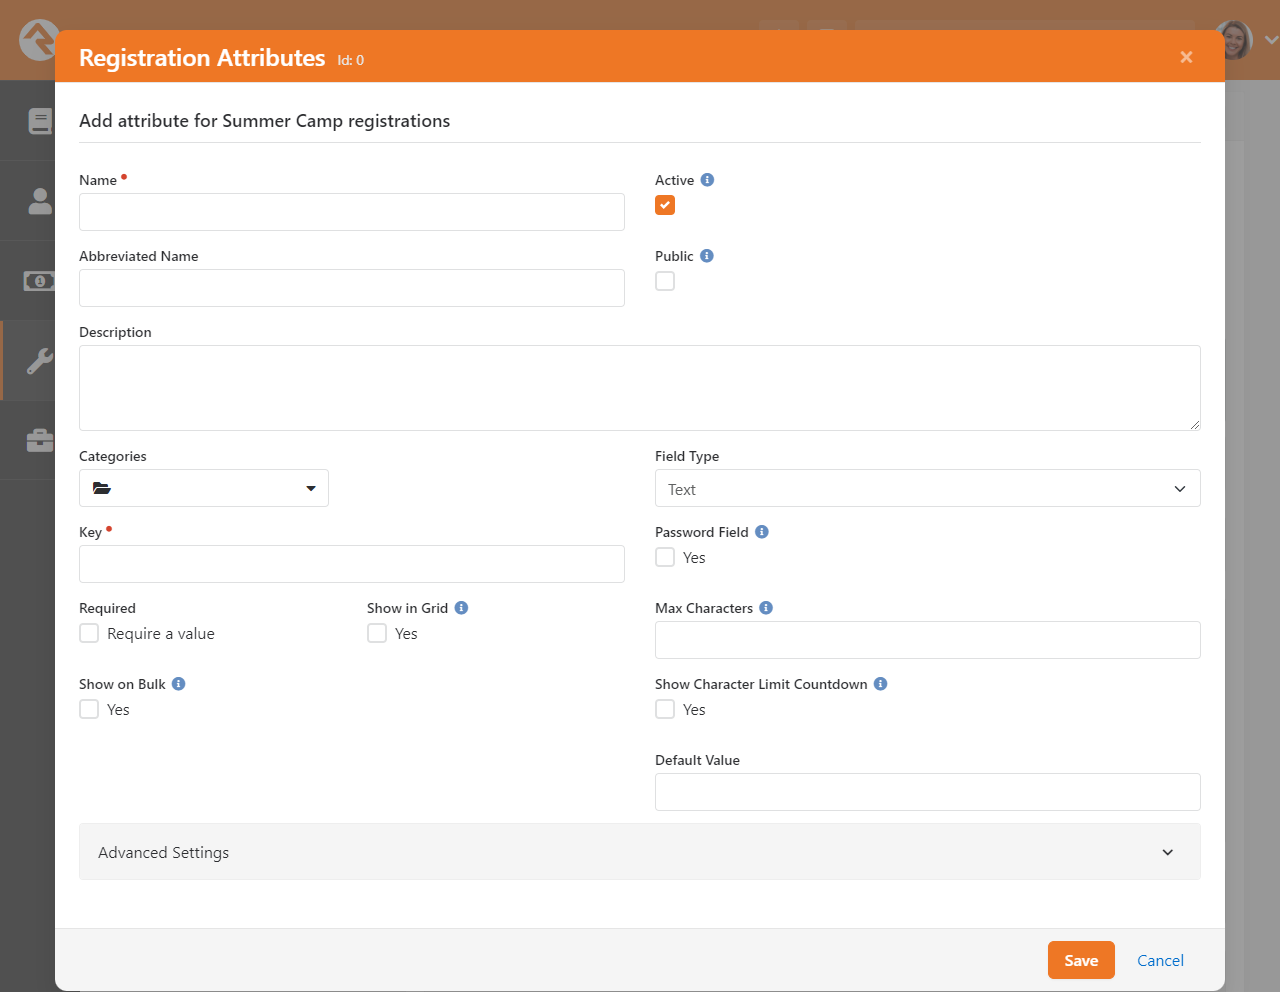
Attribute visibility is mainly controlled by security settings. The 'Public' checkbox pictured above
acts as an override for situations where a person has rights to view an attribute, but we want to
restrict visibility to attributes on public blocks. To hide a registration attribute, update the
attribute's security to staff-only.
Great, now in this event template, every instance will have the same attributes on the registration.
To add a "hidden" or "staff-only" registration attribute to your template, create the desired attribute
like normal and save the template. Then, edit the template and click the lock icon next to the attribute.
Establish the appropriate permissions (i.e., only staff can view/edit) then save the template again.
This will hide the attribute from the general public during registration, while allowing staff to view and
edit it when managing registration details.
Confirmation Email
After completing the registration, you can set up a confirmation email. This email also
acts as an emailed receipt. Remember that the below settings are only visible if you
enable
Show Communication Settings
at the bottom of the page under the 'Terms/Text' section.
Confirmation Email Settings
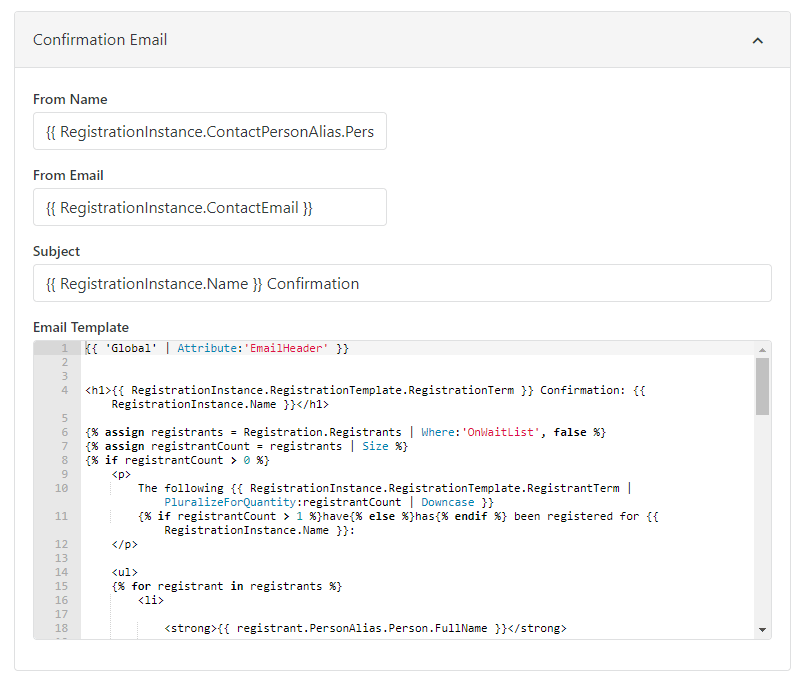
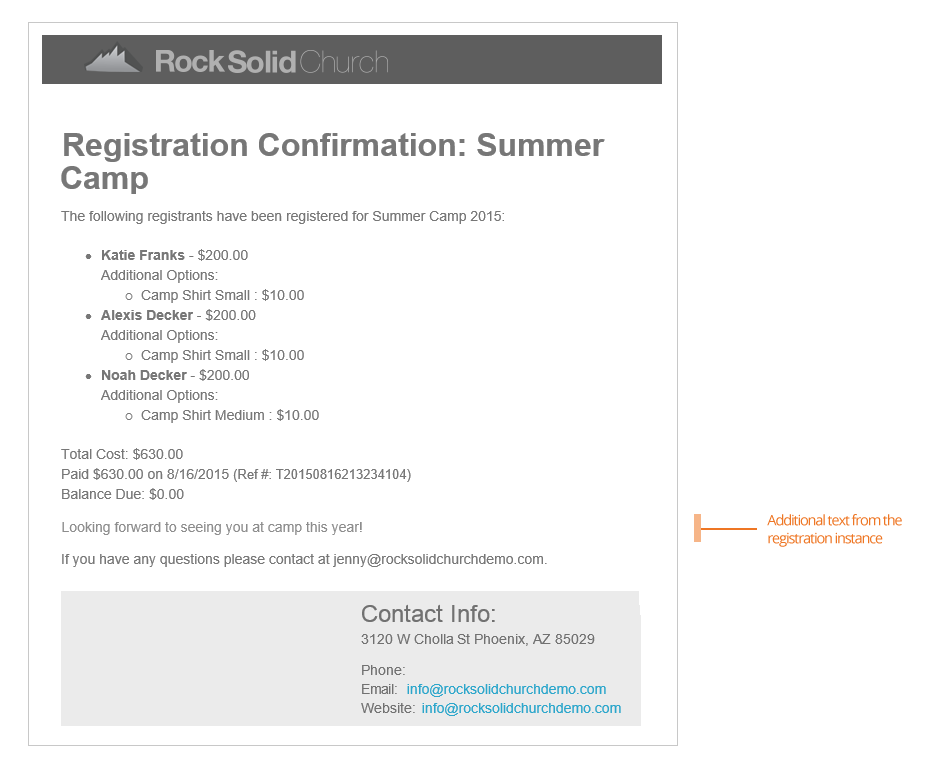
While you're free to modify this email, we've provided a template that should work in most
cases. Below we've shown what this sample email will look like. Note that the highlighted
section comes from the Additional Confirmation Details
field of the registration instance.
Default Confirmation Email
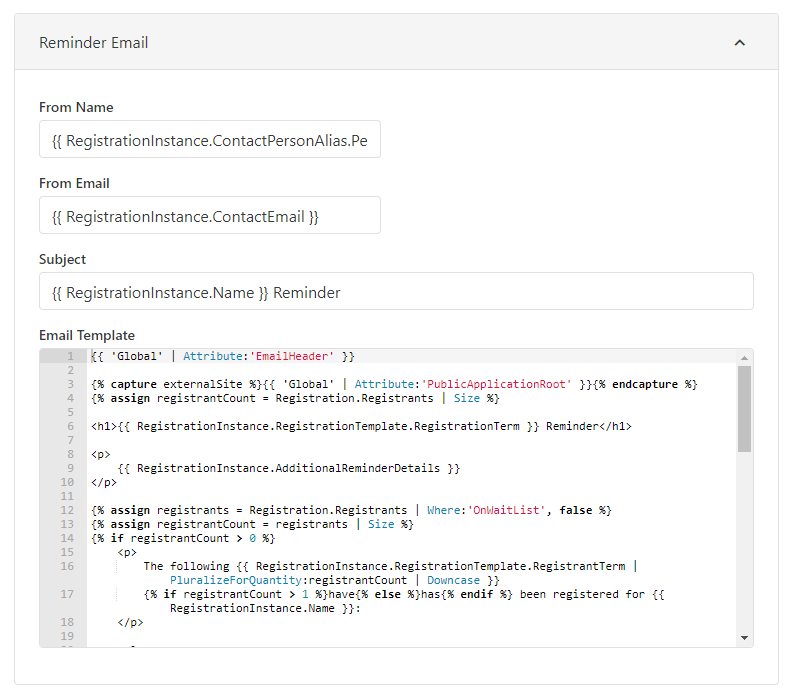
Reminder Email
We all appreciate reminders. Especially for events we may have registered for long ago.
On this screen you can edit the reminder emails. When you create the registration
instance (discussed next), you will configure when this email will be sent. Like the
other communications, these settings are only visible if you enable
Show Communication Settings
at the bottom of the page under the 'Terms/Text' section.
Reminder Email Settings
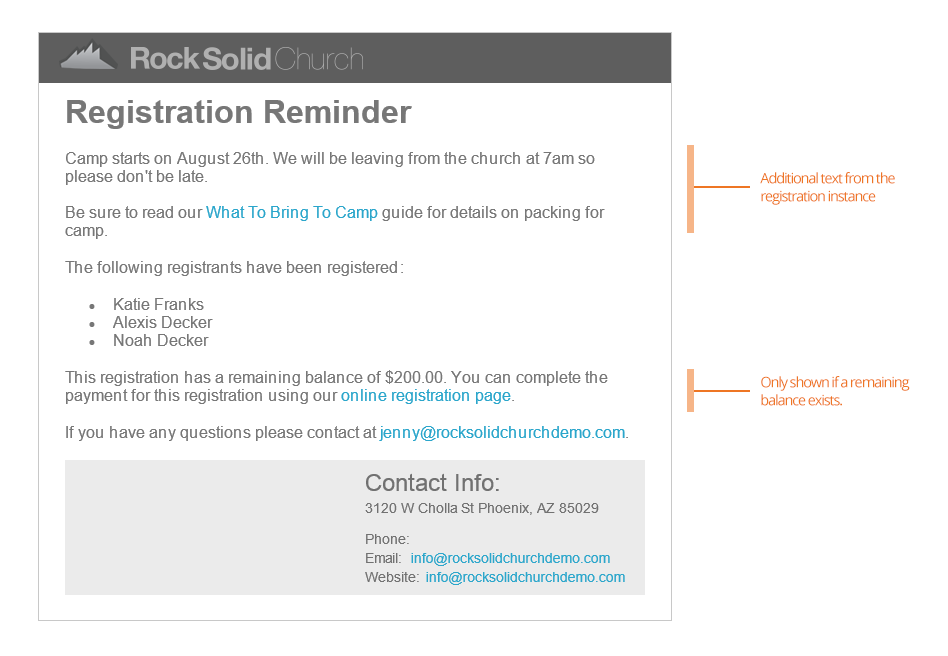
Again, we’ve provided you with a capable template. One thing to note here
is that the template relies on the registration instance's
Additional Reminder Details
to set when the event will occur. We've highlighted this part in the email below.
Reminder Email
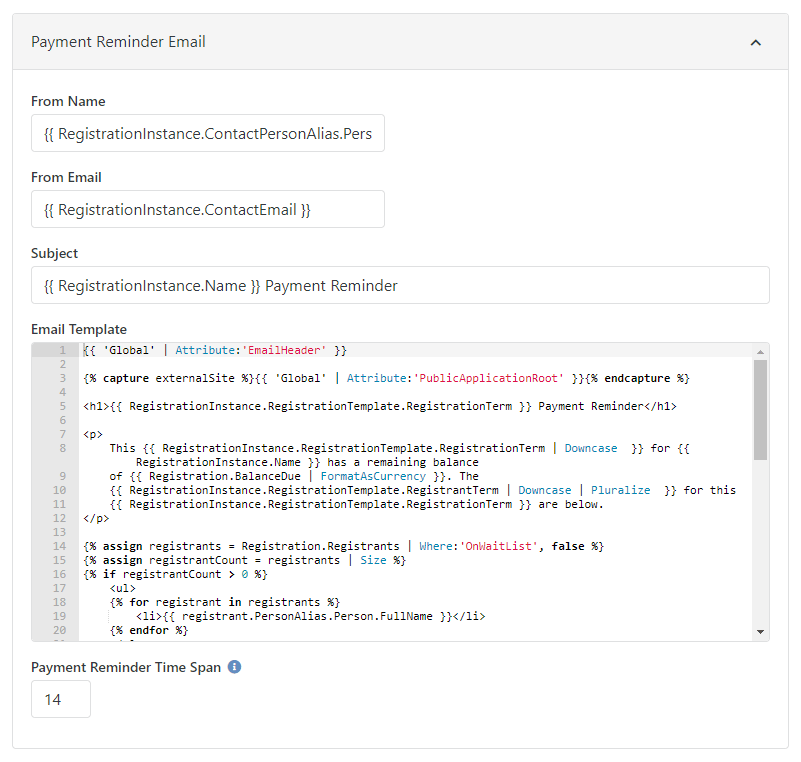
Payment Reminder Email
Allowing partial payments is great, but getting the remaining balance has always been difficult. That was
until Rock came around. With Rock you have several tools for getting the remaining balance quickly and easily. The
configuration items in this section help set up the communication tools for these reminders. For the most part
you can leave them as is. You can read more about these tools in the Payment Reminders
section below. Remember that the below settings are only visible if you
enable
Show Communication Settings
at the bottom of the page under the 'Terms/Text' section.
Payment Reminder Email Settings
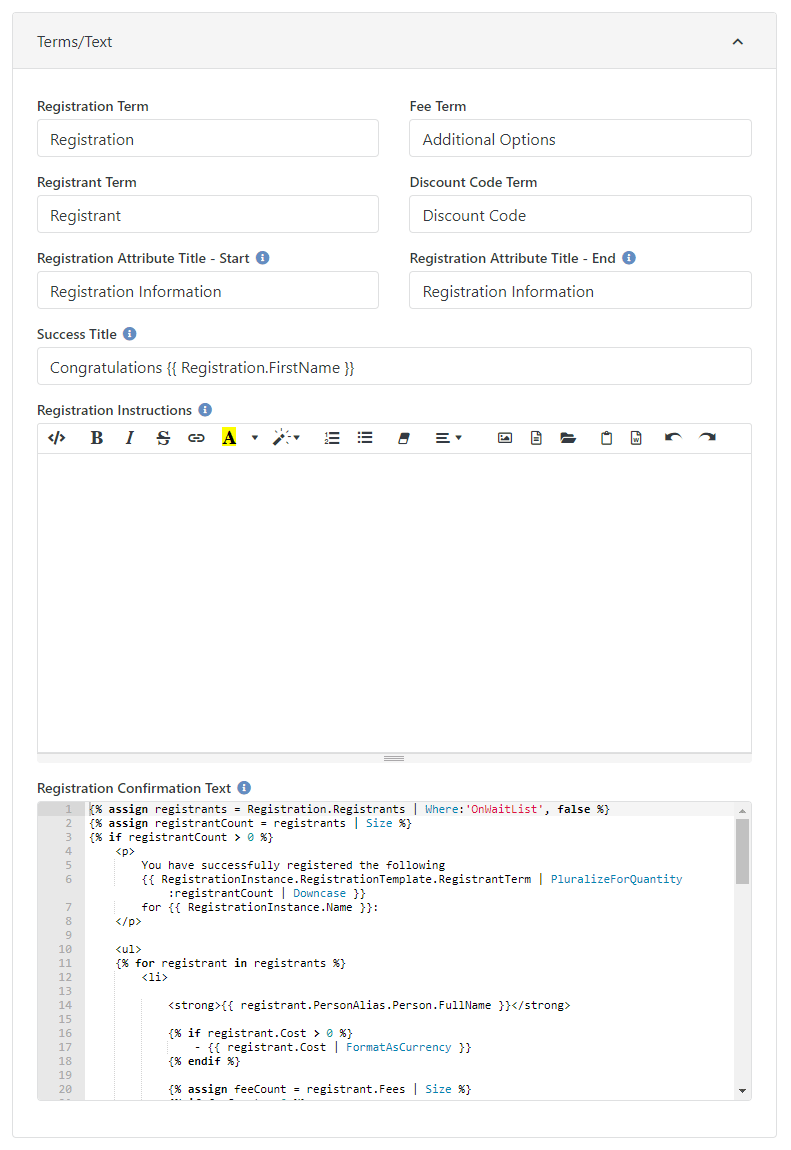
Terms / Text
Event registrations can be used for several different kinds of events. To help fit
different types of events, we allow you to customize many of the terms used during the
registration process. In this section you can also configure the
success
text that displays on the final page of the registration screen.
Terms and Text Settings
Registration Instances
Now that we understand how to make registration templates, we're ready to implement them for
specific events. There are several places where you can create registration instances. Since
we're already familiar with the registration template screen, let's first create a new
instance here.
Instance Settings
Clicking the
from the instance grid will bring up the instance editor shown below.
Registration Instance Settings
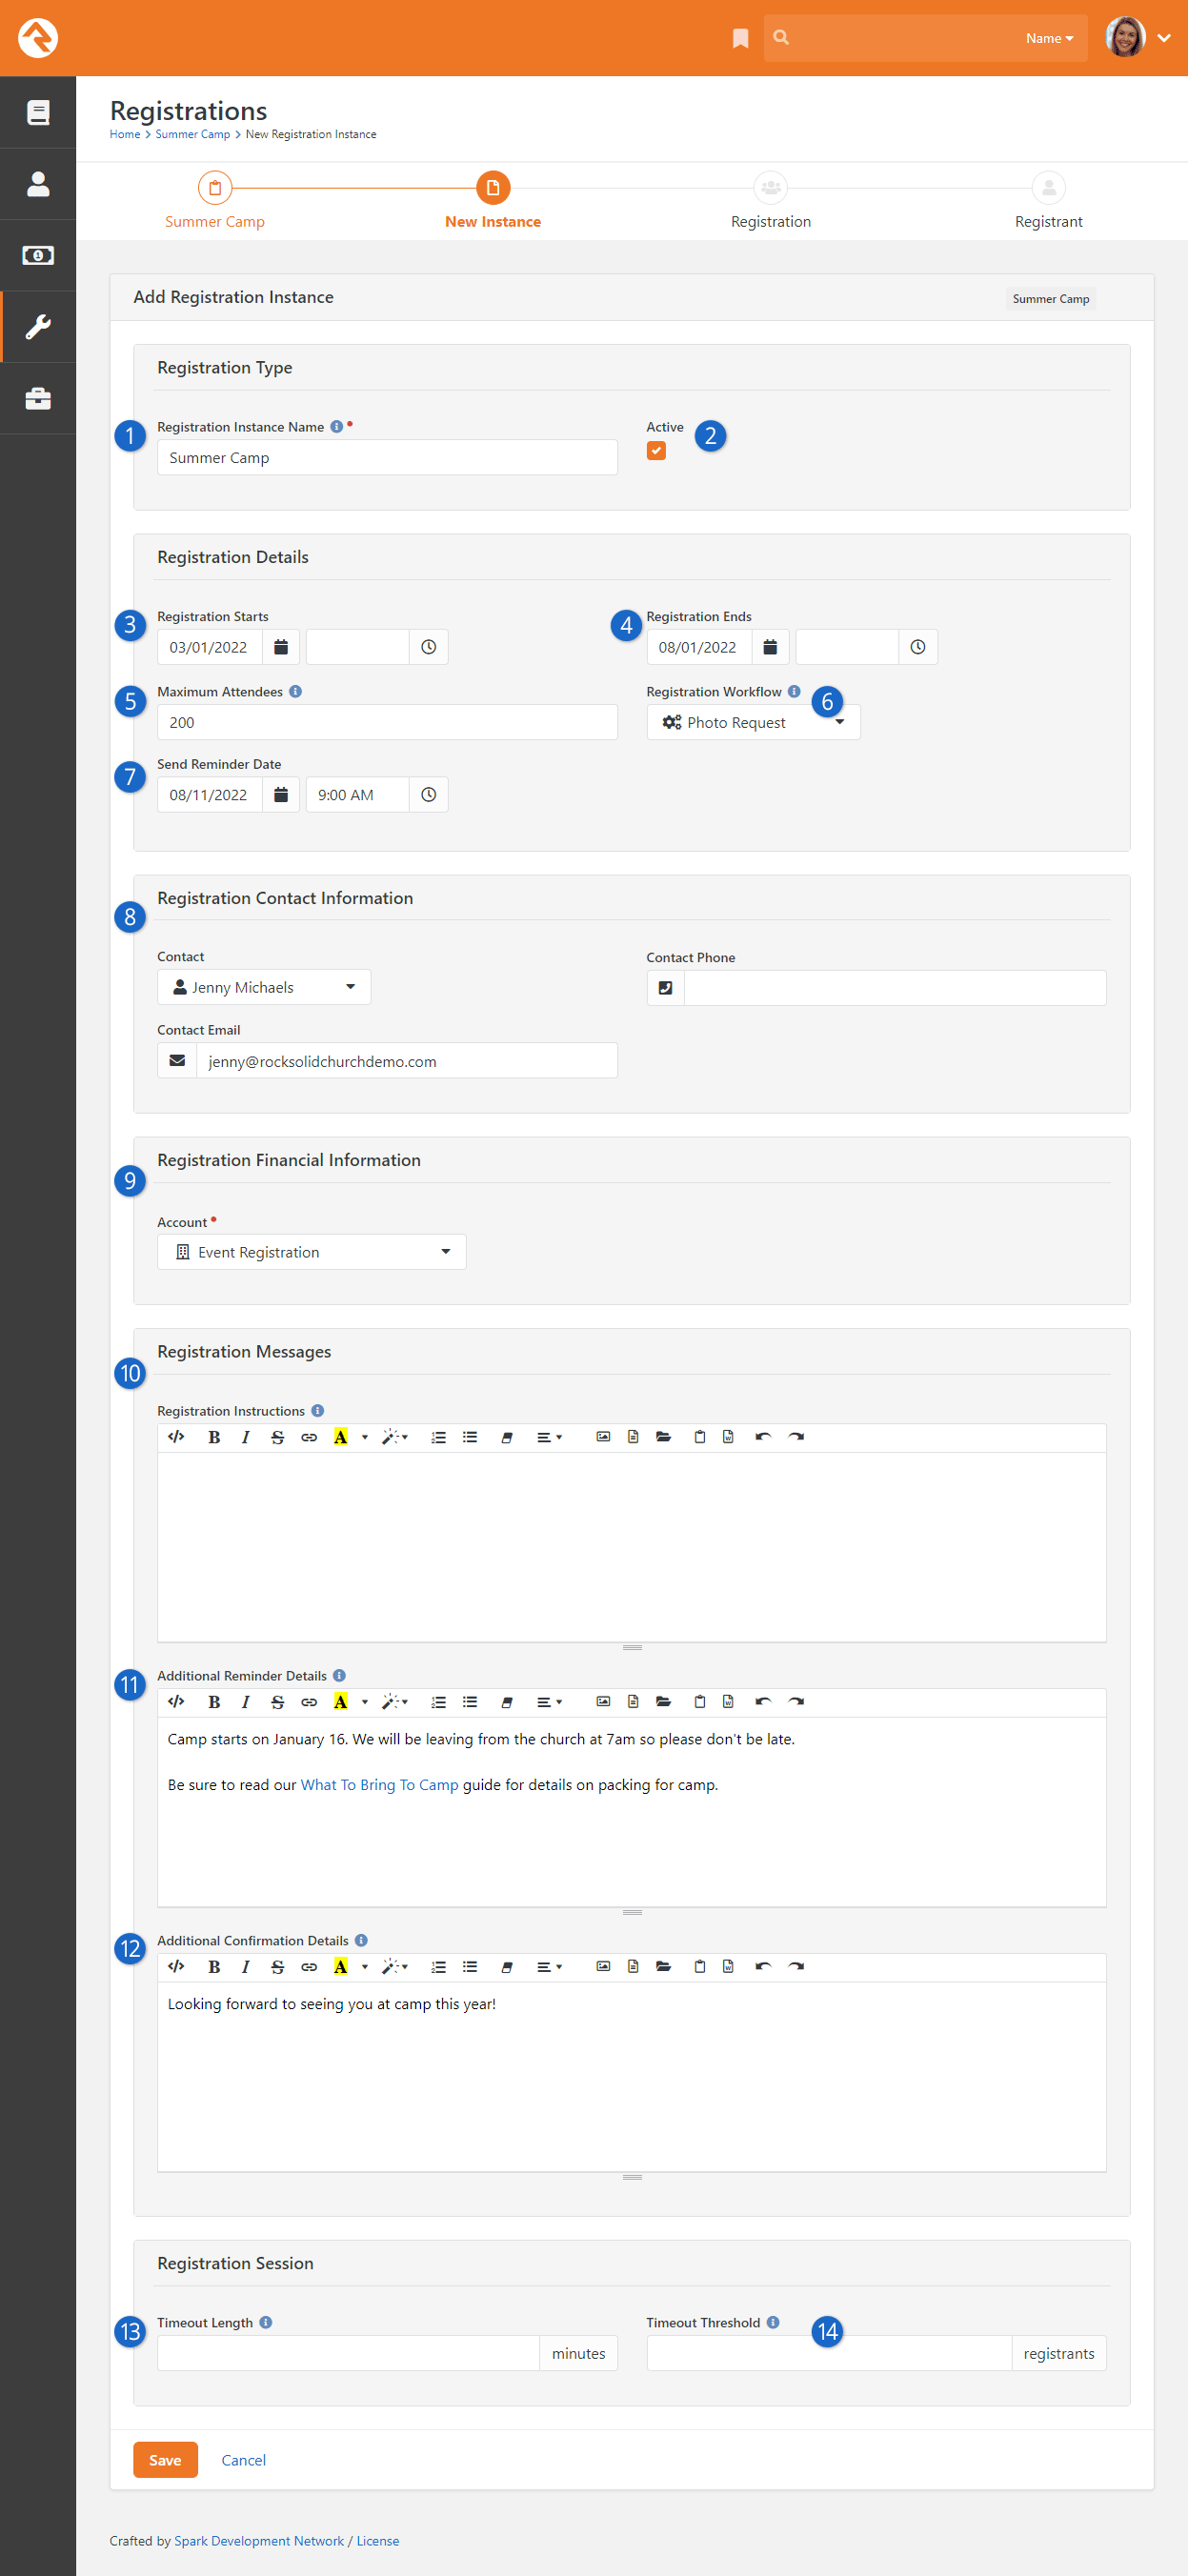
- 1 Registration Instance Name
- This is actually an important field that will be shown during the registration
process. It will be used to describe the event that you are registering for (e.g.,
Thank You for Registering for " ").
- 2 Active
- This determines if the registration instance is currently active.
- 3 Registration Starts
- The date and time that the registration starts.
- 4 Registration Ends
- The date and time that the registration ends.
- 5 Maximum Attendees
- Indicate the total number of people that can register for the event.
- 6 Registration Workflow
- You can optionally configure a workflow to run at the end of each registration. The registration will be
passed in as the entity on the workflow. A similar setting exists on the template if you would like to ensure that
all instances have the same workflow.
- 7 Send Reminder Date
- The date and time that the reminder should be sent.
- 8 Registration Contact Information
- The information that should be displayed as the contact for the registration process.
- 9 Account
- The financial account that the registration costs/fees should be tied to.
- 10 Registration Instructions
- These instructions will be shown to the person when they start the registration process. Remember, the
template has Registration Instructions also. If you have Registration Instructions in both places, the
person will only see the instructions from here at the instance level, not the instructions from the template.
- 11 Additional Reminder Details
- This text is used in the reminder email template defined on the registration template. It's
important that you include information on when and where the event will occur. For more
information on the reminder email, see the template section above.
- 12 Additional Confirmation Details
- Like the reminder details, this field is used to provide additional, instance-specific,
information to the email template stored on the registration template.
- 13 Timeout Length
- You'll typically only need this if there are limited spots available in your registration instance. Setting
a timeout length ensures spots aren't being held up by someone who has stopped or walked away from
the registration session. When setting a Timeout Length, be sure to remember to give registrars enough time to complete forms,
particularly if they're lengthy. See the Timeout Settings section below for additional details.
- 14 Timeout Threshold
- Timeout Threshold is intended for use with limited capacity events, in order to prevent an oversold event. This setting
determines the minimum number of available slots that must be reached before the registration session functionality
(like Timeout Length) becomes activated.
Setting the Price on the Registration Instance
As we discussed in the chapter on Registration Templates, you can optionally
set the cost of an event on the Registration Instance. When configured, the
price options will be shown on the screen above.
Clone Registration Instance
To create a registration instance you can use the process above, or you can use an alternative method described in the
Bringing It All Together chapter. There is also a third way to create registration
instances, which is to clone them from an existing instance. When viewing an instance, click the
button to create a clone of that instance.
Many of the settings will be copied from the original instance into the clone, such as Maximum Attendees, Registration Start/End Dates,
Contact Information, and more.
Clone Registration Instance
Timeout Settings
By default, the registration process will ensure that events don't oversell. The default behavior of the registration
process is to check the number of registrants desired against the number of spots available at the start of the
process. This can lead to situations where if multiple people are registering at once someone could be left without
a spot after completing the registration. If there is a waitlist, they would be placed on it, but they would not know
that there wasn't room until the very end.
To provide a better experience for these surge scenarios Rock has added the concept of registration sessions. When
enabled, the registration process will hold registration spots for an individual while they are in the process of
completing the registration. This ensures that a person has room before they start the process of registering.
When enabled, a session countdown timer will be shown on the registration page. The countdown timer resets after
each page of the registration. If a registration expires the person is notified that the session has expired and
is given a chance to request an extension. If there is still room for their registrants, the extension will be
granted, and they can continue on where they left off. If only a portion of their registrants have slots, a
message will be displayed allowing them to determine how to proceed.
Obsidian Registration Entry Block
It's important to note that the
Timeout Length and
Timeout Threshold settings
only apply if you're using the Obsidian version of the Registration Entry block
(Obsidian > Event — Registration Entry). This block ships with Rock but will need to be
manually placed on your external website. Aside from supporting timeout features, this
block is also compatible with the new (as of this update) Pushpay plugin. Keep in mind
that the Obsidian Registration Entry block does not work with Internet Explorer.
Also, not every kind of attribute field is compatible with Obsidian yet. We're
working hard on this too but most of the common ones have been working since this block was released.
Follow A Registration Instance
After saving a registration instance you can choose to follow it by selecting the
icon in the upper right corner of the details block. This will add it to the list of followed instances on
your dashboard.
Now that we've shown you how to make a new registration instance from this page, we should
tell you that you'll rarely ever create an instance from here. More about that later in the
chapter Bringing It All Together.
Registration Fees
We get it - events are tricky and often come with odd requirements for additional fees.
We've tried to think of as many combinations as possible when creating the features here,
so we have a lot to cover.
Fee Types
Below is a chart of the various types of fees that are available. You can use any combination of these to create the fee structure you need for each registration event.
Types of Fees
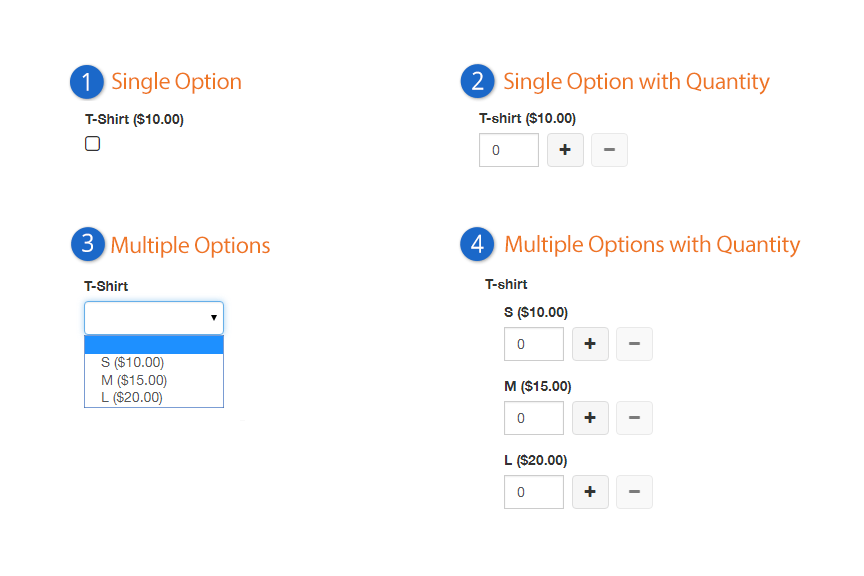
- 1 Single Option Fee
- You either want it or you don't.
- 2 Single Option Fee with Quantity
- You can get as many as you want.
- 3 Multiple Options
- Variety is the spice of life.
- 4 Multiple Options with Quantity
- What's better than a little spice? A whole lot!
Now that we see what's possible, let's look at how to set up fees.
Setting Up Fees
You can add, edit and delete fees in the Fees section of the Registration Template.
Fee List
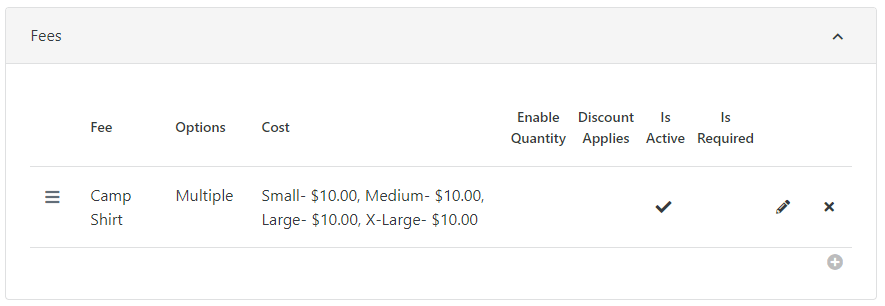
Click the button to create a new fee.
Fee Editor
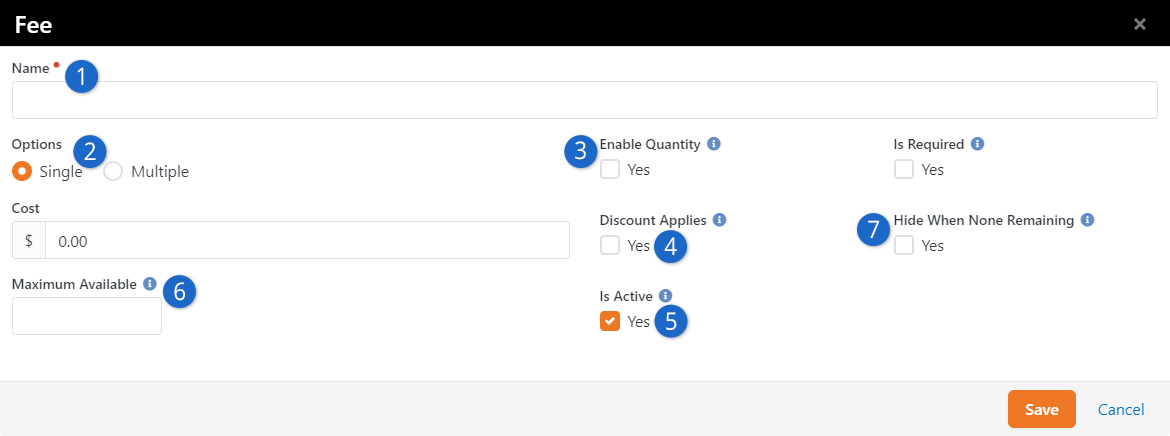
- 1 Name
- This will be used for the label that goes above the fee selection.
- 2 Options
- Here is where you'll make the determination of whether the fee has multiple
options. When selected, it will display a key/value input that allows you to enter
optional text as well as the cost.
- 3 Enable Quantity
- Pretty obvious what this does (enables the quantity picker).
- 4 Discount Applies
- Sometimes you'll want the discount calculation to apply to fees, sometimes not.
- 5 Is Active
- Check this box to make the fee active. Inactive fees will not be displayed for
new registrations but will be displayed when viewing charges for existing registrations.
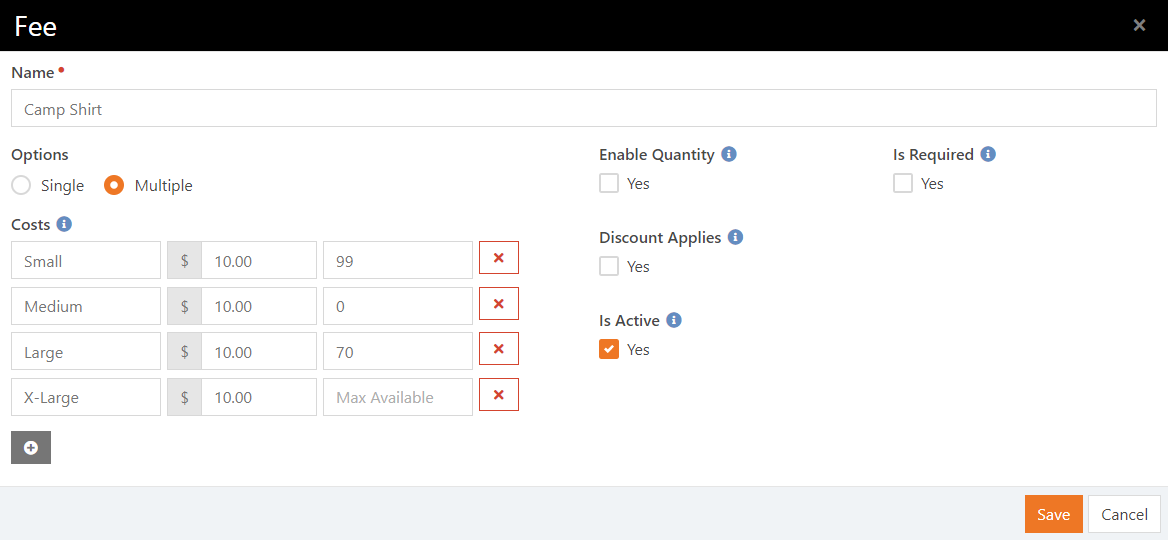
- 6 Maximum Available
- If a max available quantity is not specified, it is an unlimited item. Adding a
number to this field will show the remaining available items when registering.
Keep in mind this number applies to registration instances, not individual registrations.
For example, if the fee is being used for summer camp t-shirts, and if you have a single
registration instance, then you would enter the total number of t-shirts you have in stock.
- 7 Hide When None Remaining
- You can enable this setting to hide fee items from view if you've selected
Enable Quantity and
there are zero remaining items. If this is unchecked, then items with zero remaining will
still show but can't be selected by the person registering.
Optional vs. Required Fees
Fees can be either optional or required. To designate a fee as required select the
Is Required checkbox on the
Fee Editor screen. Required fees are designated by a red dot on the event registration screens. If a registration is submitted with a missing required fee value, Rock will display a message asking the registrar to select a value before proceeding.
Here's a closer look at how Rock handles each of the fee types above when they are designated as required:
- Single Option - Rock automatically checks the box and disables it to prevent changes.
- Single Option with Quantity - Rock sets the minimum quantity to "1" and prevents it from being changed to less.
- Multiple Options - Rock creates the same dropdown list as an optional fee but displays a message if no value is selected.
- Multiple Options with Quantity - Because at least one option must have a value selected, Rock displays a warning if all options have a value of "0".
Required Fees Options
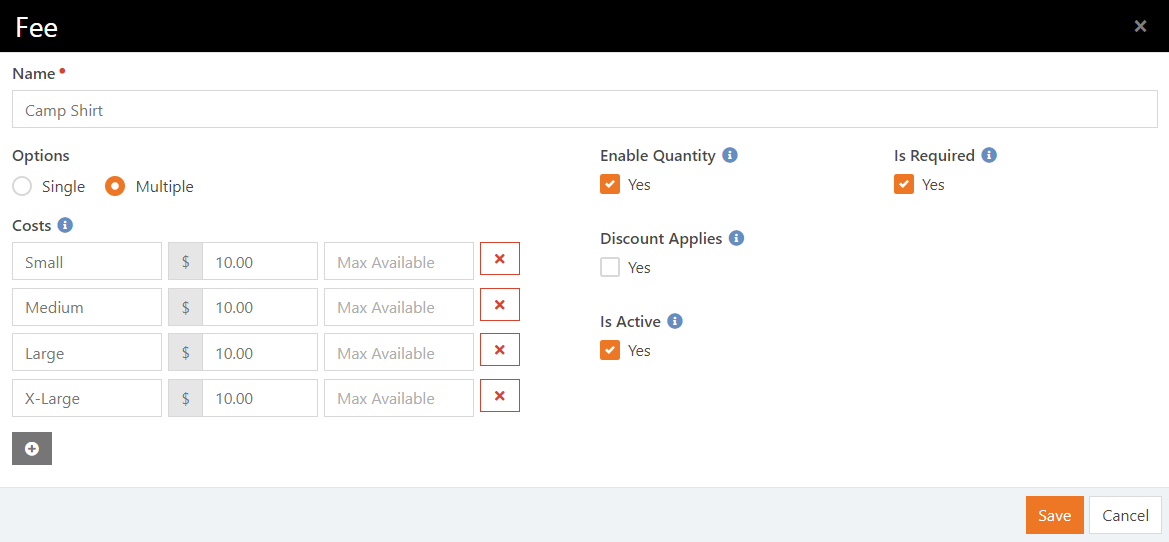
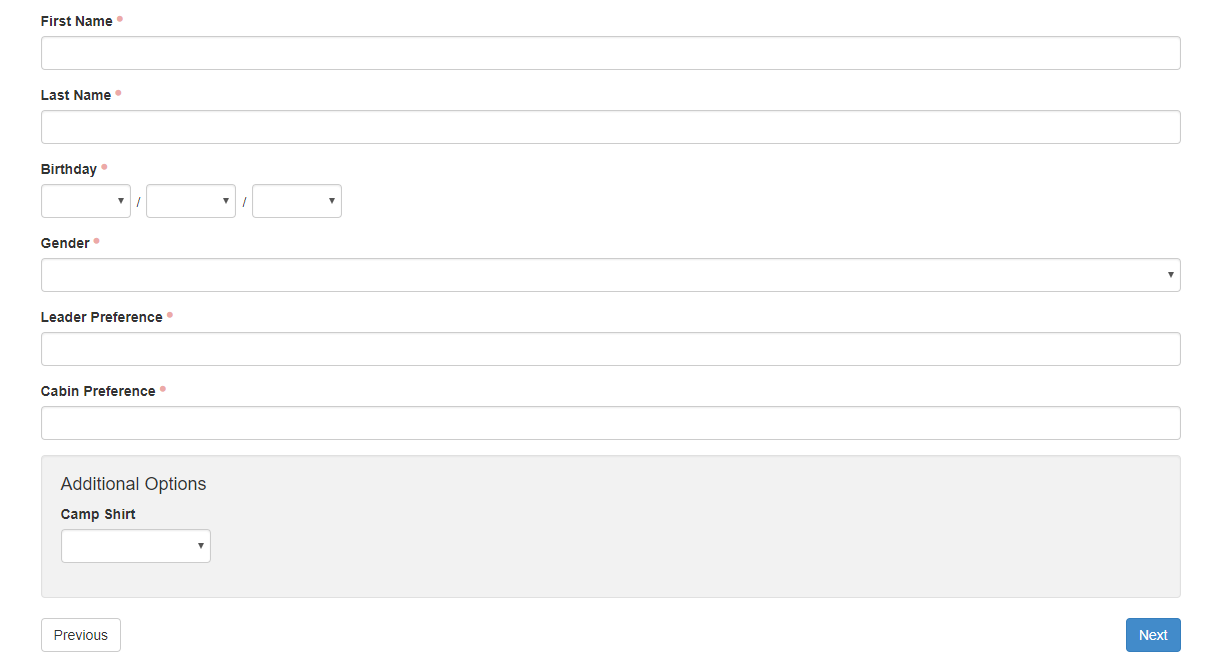
Keeping the
Is Required checkbox on the
Fee Editor screen unchecked creates Additional Options in the registration.
Optional Fees Options
 Registering with Optional Fees
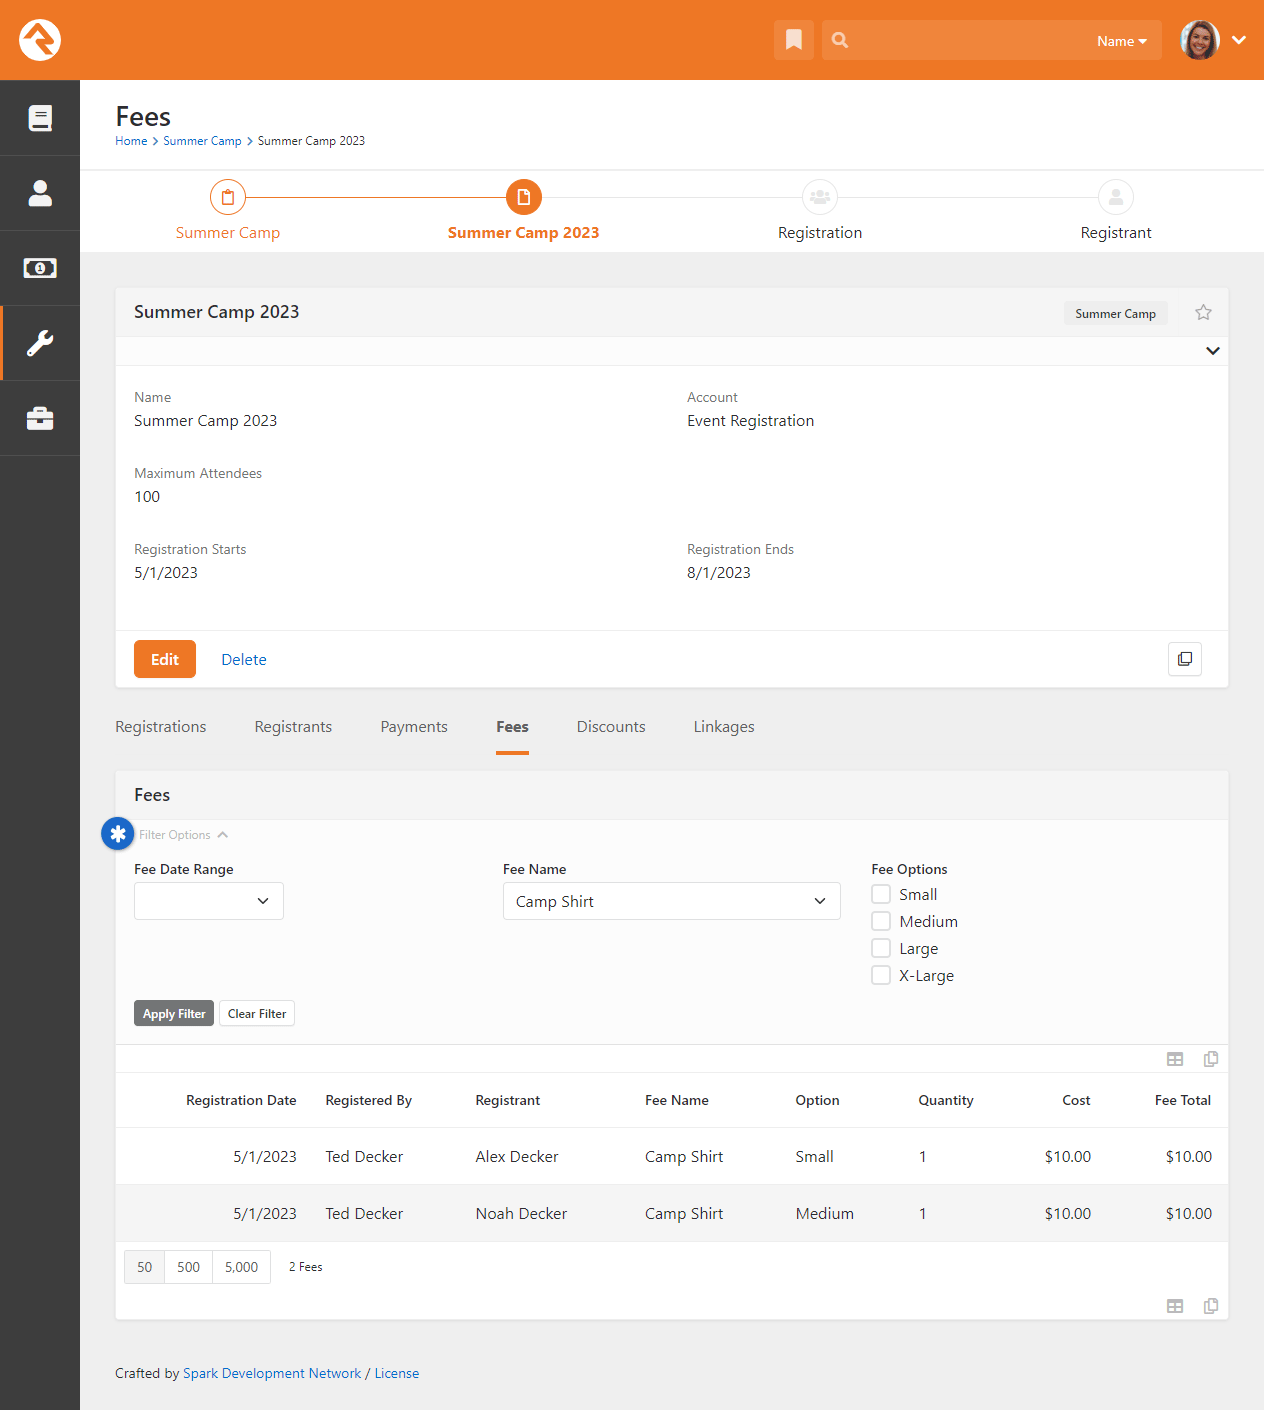
Fee Reports
All of the fees for each registration are listed under the Fees tab on the
Registration Instance screen. You can use the filter options to filter the information by date range, fee name, and/or one or more of the options that apply to that fee. (Note: because the options vary with each fee, the available filter options are only displayed once a particular fee name is selected.)
Viewing Fees
To further help you track and work with fees, you also have the option of exporting fees to an Excel spreadsheet. To do this, click the
button on the
Fees tab on the
Registration Instance screen.
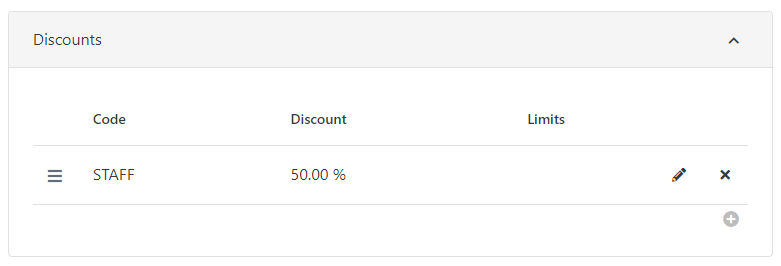
Discounts
People often ask, "Do you have quantity or early bird discounts?" Well, Rock has something better. Rock's discount feature gives you a ton of flexibility to create discounts customized for your organization's needs. Want to provide a discount code? You can do that. Want to offer a discount for families registering more than three children? You can do that, too. How about a unique combination of both of these only for a limited time and you want the discount to be automatically applied? Yep, Rock's got you covered. Let's take a closer look at these options and how they work.
Discounts are listed in the Discounts section of the Registration Template. Here you can add, edit and delete discounts.
Discount List
Click the button to create a new discount.
Discount Editor
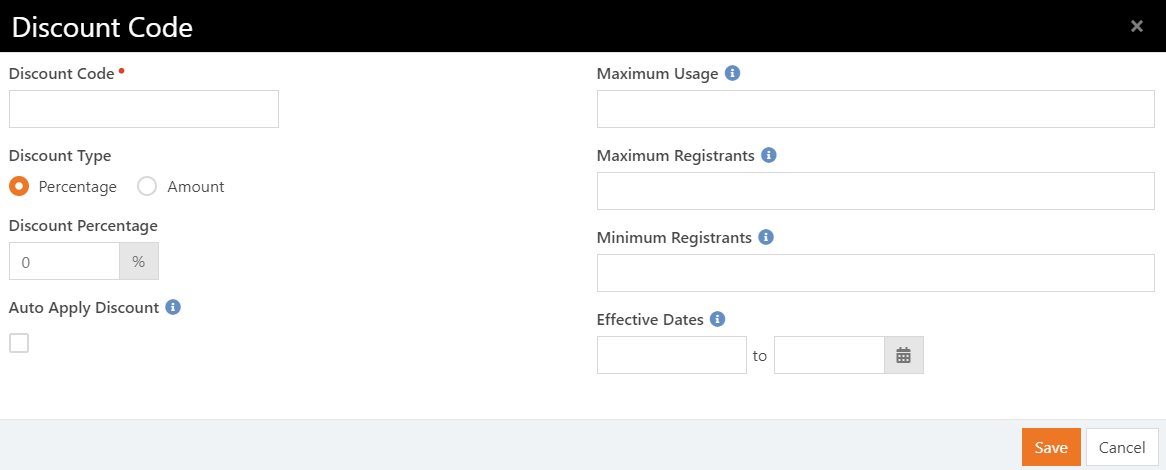
All of the discount options are available in the
Discount Code screen.
From here you can create whatever combination of criteria you want for each discount.
One Discount Per Registration Instance
Keep in mind that only one discount can be applied to each registration instance.
If multiple discounts are set up to automatically apply, and if the registration
qualifies for all of them, then the first discount listed in the template will be
applied. When a discount is automatically applied, it can be manually replaced
with a single other code.
OK, let's take a closer look at each of the discount options.
Discount Codes
Discount codes allow you to give individuals a code to reduce the amount of their registration.
This discount can be in the form of a percentage of costs/fees or a fixed amount. To create a discount code, enter a percentage or amount in the Discount Type and Discount Percentage fields of the Discount Code screen. Individuals can then apply the discount code at the time of registration, or after registering if they haven’t yet paid in full (see Post-Registration Discount Codes).
Quantity Discounts
Quantity discounts allow you to create a discount for multiple registrations in the same transaction, such as a group registration. To create this type of discount, enter the minimum and maximum number of registrants in the Discount Code screen. When Rock processes the registration, if the number of registrants entered falls within the parameters entered, the discount is applied.
Maximum Registrants
The number of Maximum Registrants reflects how many people within the registration can have the discount applied.
If you have three registrants being signed up, and if Maximum Registrants is set to '1', then the discount will
only apply to one of the three registrants. If you want to have a group or family pay only the price of a single
person, set the Maximum Registrants to be one less than Minimum Registrants, and make sure the discount covers all
the costs and fees of only a single person.
Early Bird Discounts
Early bird discounts apply a discount for registrations that fall within a certain date range. That date range is entered in the
Effective Dates fields of the Discount Code screen. When Rock processes the registration, if the date of registration falls within the entered timeframe, the discount is applied.
Customized Discounts
You can create your own, unique discount by combining any of these discount types. Just know that when the registration is processed, all of the criteria you enter has to be met for the discount to be applied. So, that super complicated option we mentioned above? Maybe not the best practice.
Automatic Discounts
The Discount Code screen includes an option to automatically apply the discount. If this option is selected, Rock will automatically check the registrations against the discount codes available and apply the first discount that matches the criteria. The order the codes are listed in the Registration Template is the order in which Rock applies them. A registrant can override any automatic discount with a discount code entered manually during the registration process.
Maximum Usage
You can limit the number of times a discount code can be used by entering a value in the Maximum Usage field. For example, you might use this to grant a discount to the first 100 people who register. Leave this field blank if you want the discount code to be available for use indefinitely.
Viewing and Reporting Used Discounts
Once discounts for a particular registration event are used, they're recorded under the Discounts tab in the Registration Instance screen. You can filter these records by:
- Discount Date Range - Displays all of the discount codes used during the dates specified.
- Discount Code - Displays the discounts matching the code selected from the dropdown menu.
- Code Search - Displays all discount codes that match the search criteria, whether it be a word, partial word or number. For example, if you search for "ly", Rock will display any codes with names that contain "ly". If you create discount codes with specific prefixes, such as numbers or abbreviations, the search function can help you quickly locate all of the codes matching a particular prefix. Note: If you select a discount code from the dropdown menu, the discount code search option will be disabled.
The amounts displayed in the Total Results section of the screen are based on the discount codes displayed. If you filter the discounts, the totals will be recalculated and updated based on the filter parameters.
Payment Plans
Payment Plans let
you spread out your payments over time, making it easier to afford activities like camps
or other events. With options to customize how often payments are made, Payment Plans
offer flexibility and peace of mind, ensuring everyone can participate in your events.
Obsidian Block and Version
The Payment Plan feature is available only when using the Obsidian version of the
Registration Entry block. This feature is available as of Rock v16.7.
Starting a Payment Plan
Registering for an event with a Payment Plan is simple. The registration process stays
the same as it is without Payment Plans. There's only a slight change during the final
step, where you’ll have the option to create a Payment Plan.
Create a New Plan
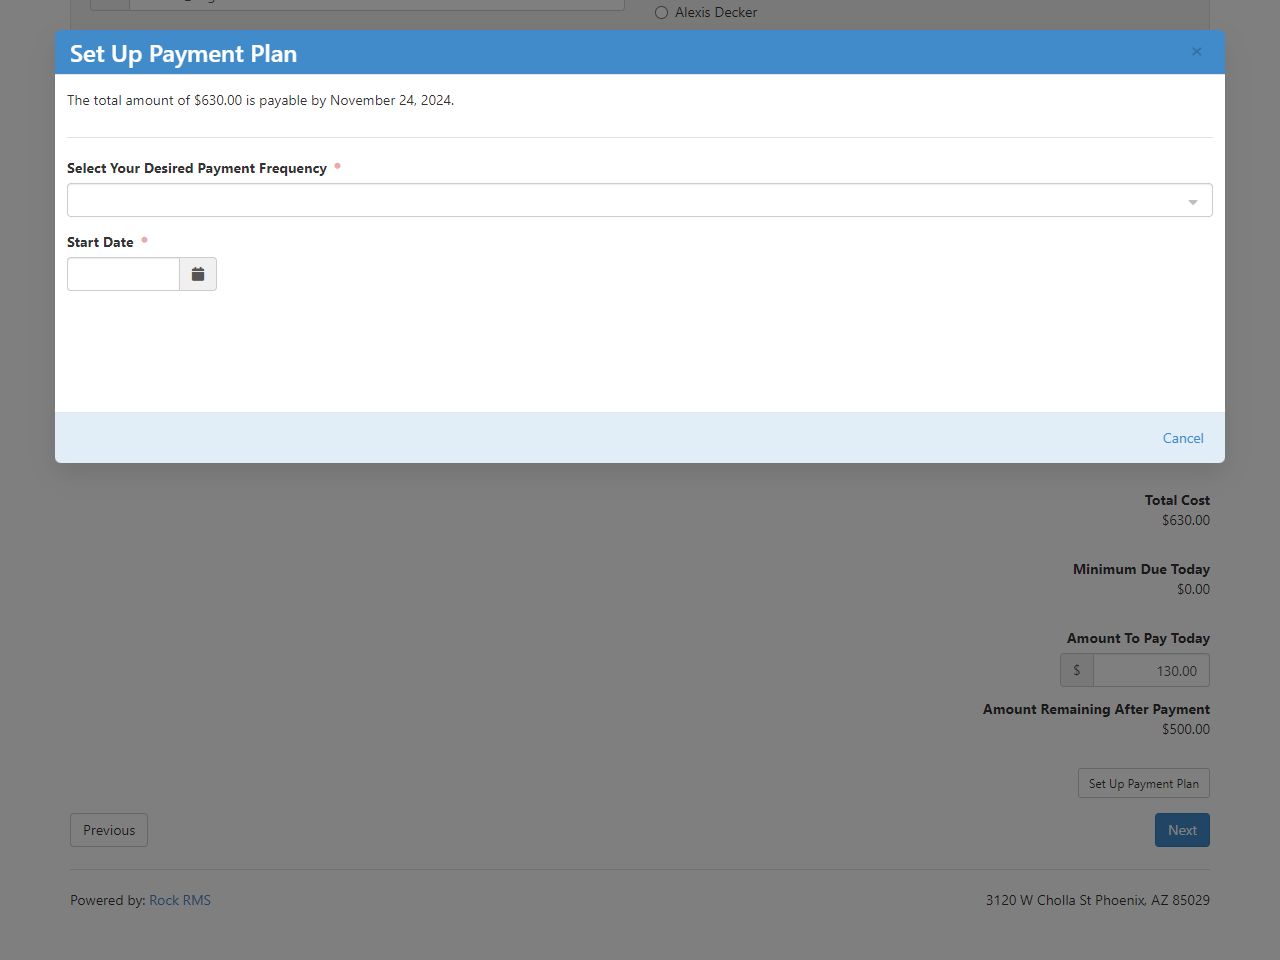
When you reach the payment step, you can either pay in full or set up a Payment Plan
by clicking the
Set Up Payment Plan
button. From there, you’ll be asked to choose:
- Payment Frequency: How often you want to make payments
(weekly, monthly, etc.)
- Start Date: When you’d like your payments to begin.
Set Up Payment Plan
Once you’ve made your selections, you’ll move to the next screen where you can
customize your Payment Plan further.
Set Up Payment Plan
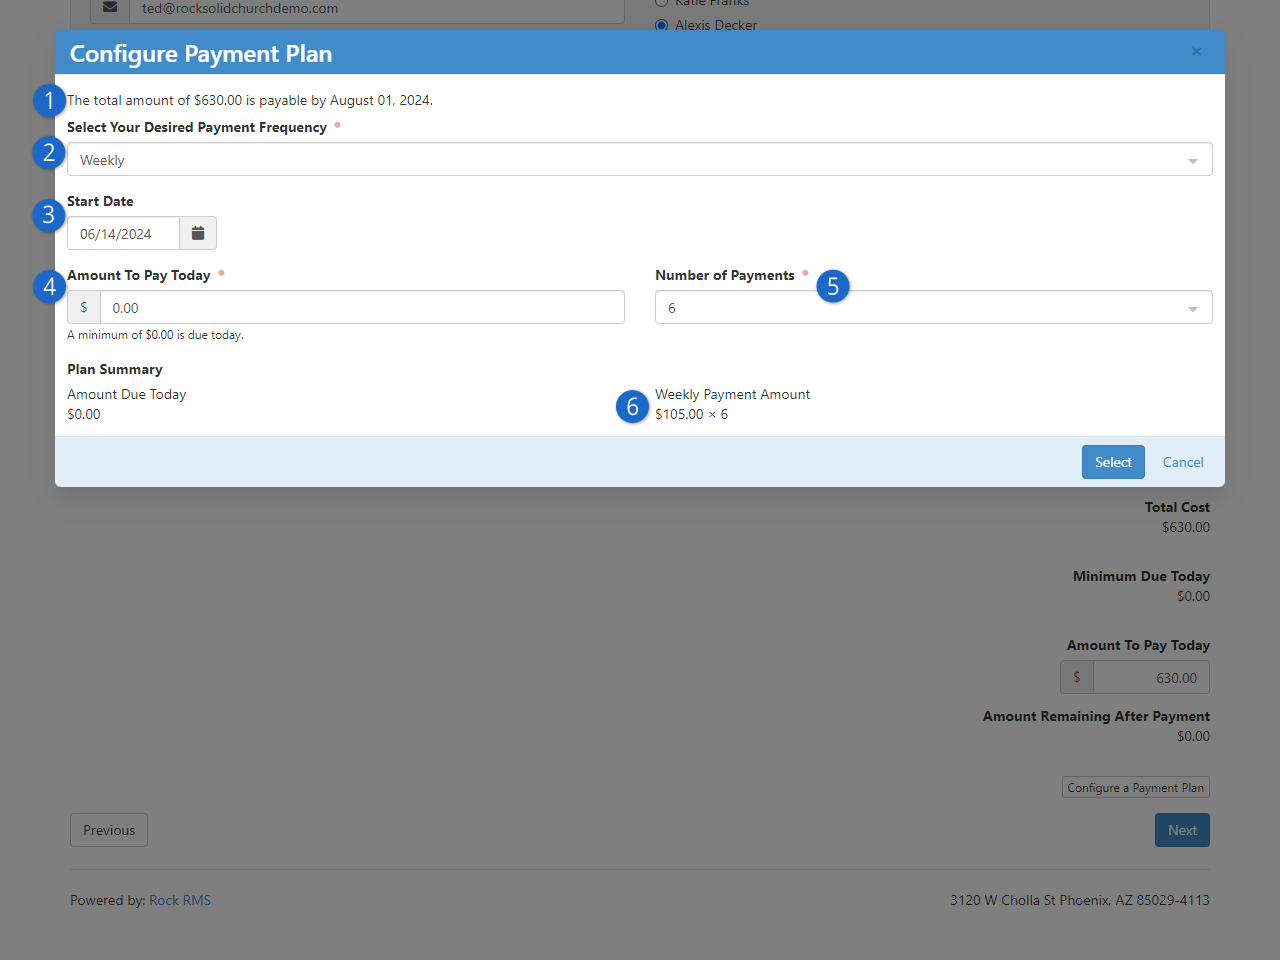
- 1 Total and Due Date
- The total amount you owe and when it needs to be fully paid.
- 2 Payment Frequency
- Choose how often you’d like to make payments (the available options may vary
depending on your payment gateway).
- 3 Start Date
- This affects how many payments you’ll make before the due date. A later start
date usually means fewer payments.
- 4 Amount To Pay Today
- You can choose to pay part of the cost upfront, and the rest will be spread
out over the remaining payments.
- 5 Number of Payments
- This is based on the frequency and the time left until the deadline. For
example, if you’re making weekly payments and the deadline is two months away,
you can make up to eight payments.
- 6 Payment Schedule
- A summary of your payment plan, showing how much each payment will be,
how many payments there will be, and how often they’ll happen.
Please note that Payment Plans can only be created during the registration process.
Your staff or volunteers won’t be able to set one up on behalf of someone else.
While administrators can modify payment plans, they can't create them.
Once your plan is set, you can manage it by going to the Recent Registrations
section from your
My Account page.
You’ll have the option to cancel your Payment Plan if needed.
Change or Cancel a Plan
If you want to make changes to your Payment Plan, you’ll need to cancel the
current plan and set up a new one. Again, you can do this on your
My Account
page under Recent Registrations.
If a new fee is added after you’ve set up your Payment Plan (like an
additional t-shirt), the plan won’t automatically adjust to cover the
new amount. The additional fee will need to be paid separately.
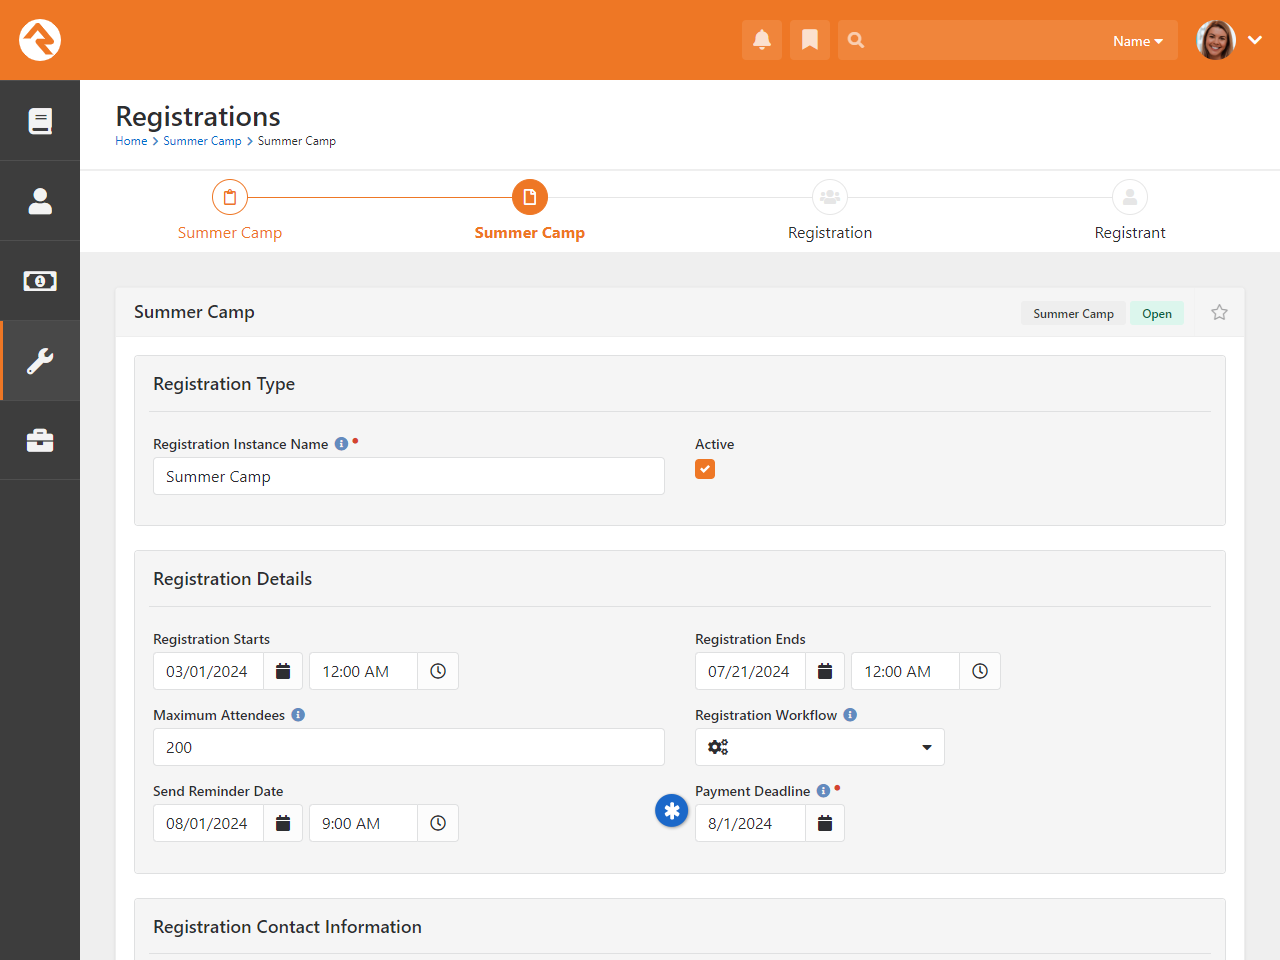
Configuring Payment Plans
Now that you’ve seen how a Payment Plan works, let’s talk about how to configure
it. Payment Plans are enabled in the registration template settings (under
Tools > Event Registration).
Enable Payment Plans
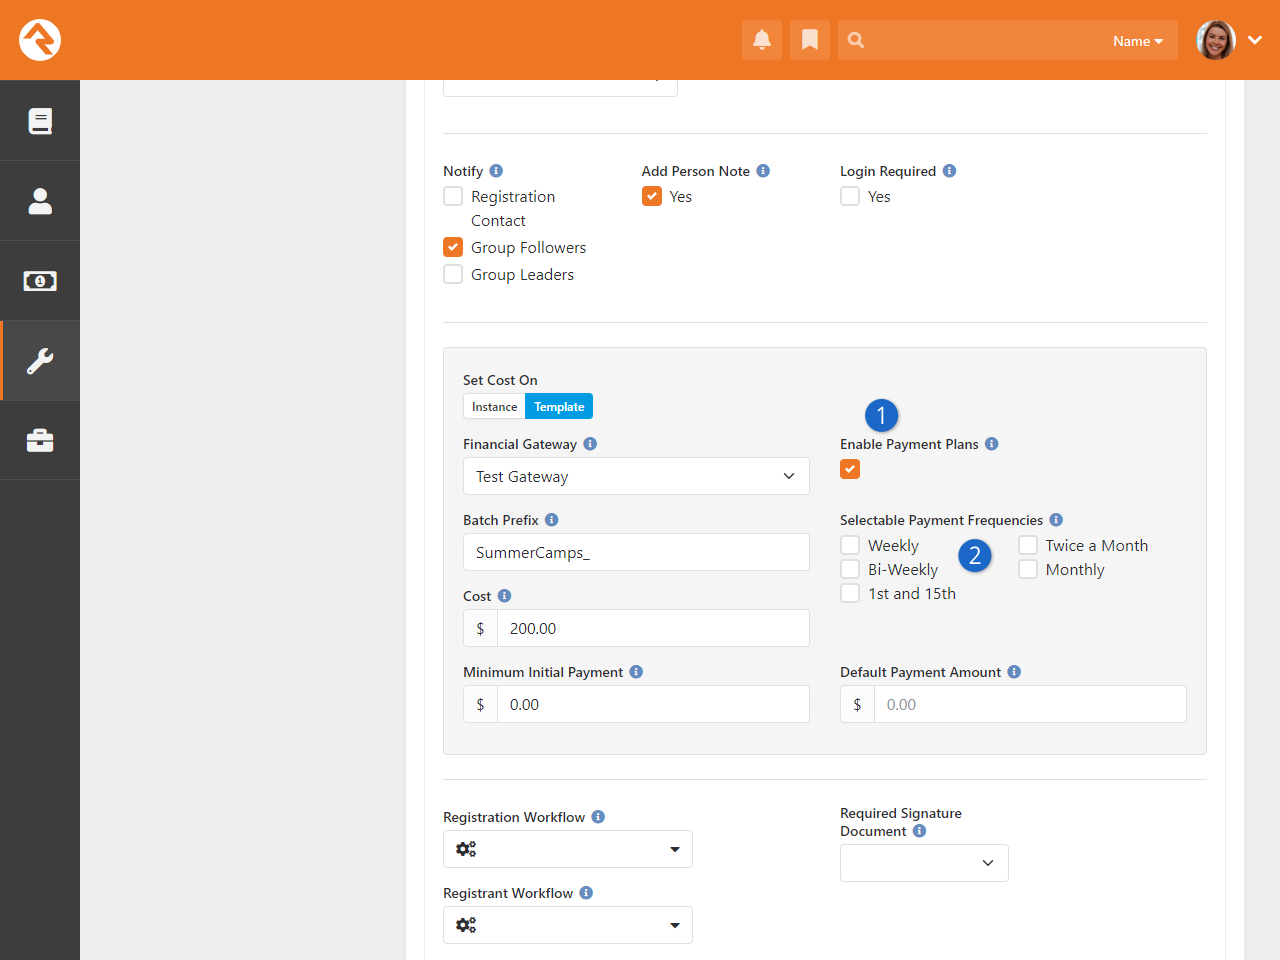
- 1 Enable Payment Plans
- To enable Payment Plans, simply check the box labeled
Enable Payment Plans
in the template settings. This will unlock more options. Check with your gateway
provider to ensure their service is compatible with Payment Plans.
- 2 Selectable Payment Frequencies
- Choose which payment frequencies (weekly, monthly, etc.) are available for people
to use when creating their plans. If you select none, all options will be available. If
you select all, new options added later won't be automatically available.
Next, set a
Payment Deadline
for the registration. This is the date by which all payments must be completed. The number
of payments available will depend on the frequency selected and the time remaining before
this deadline.
Set Payment Deadline
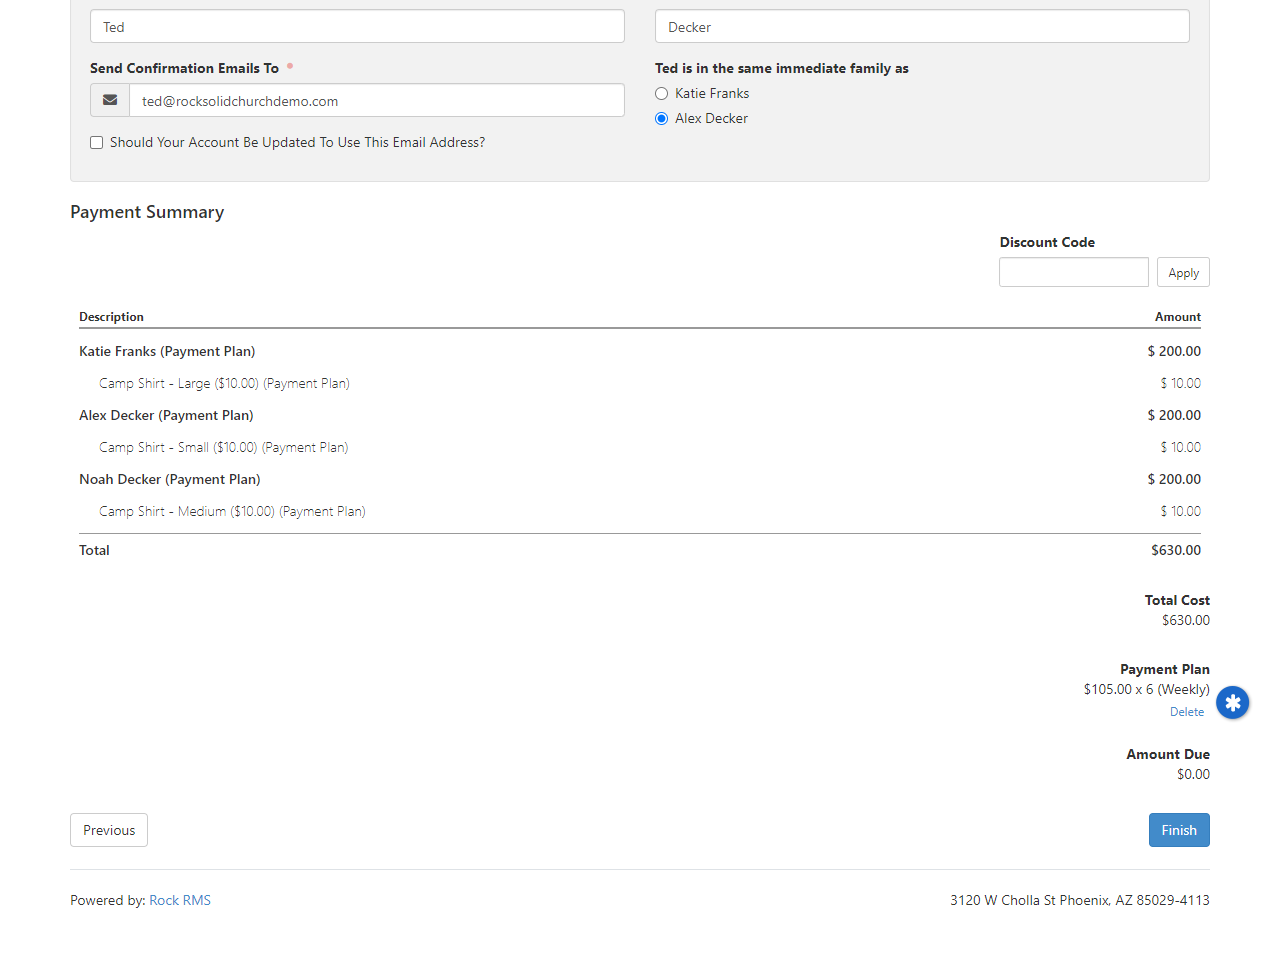
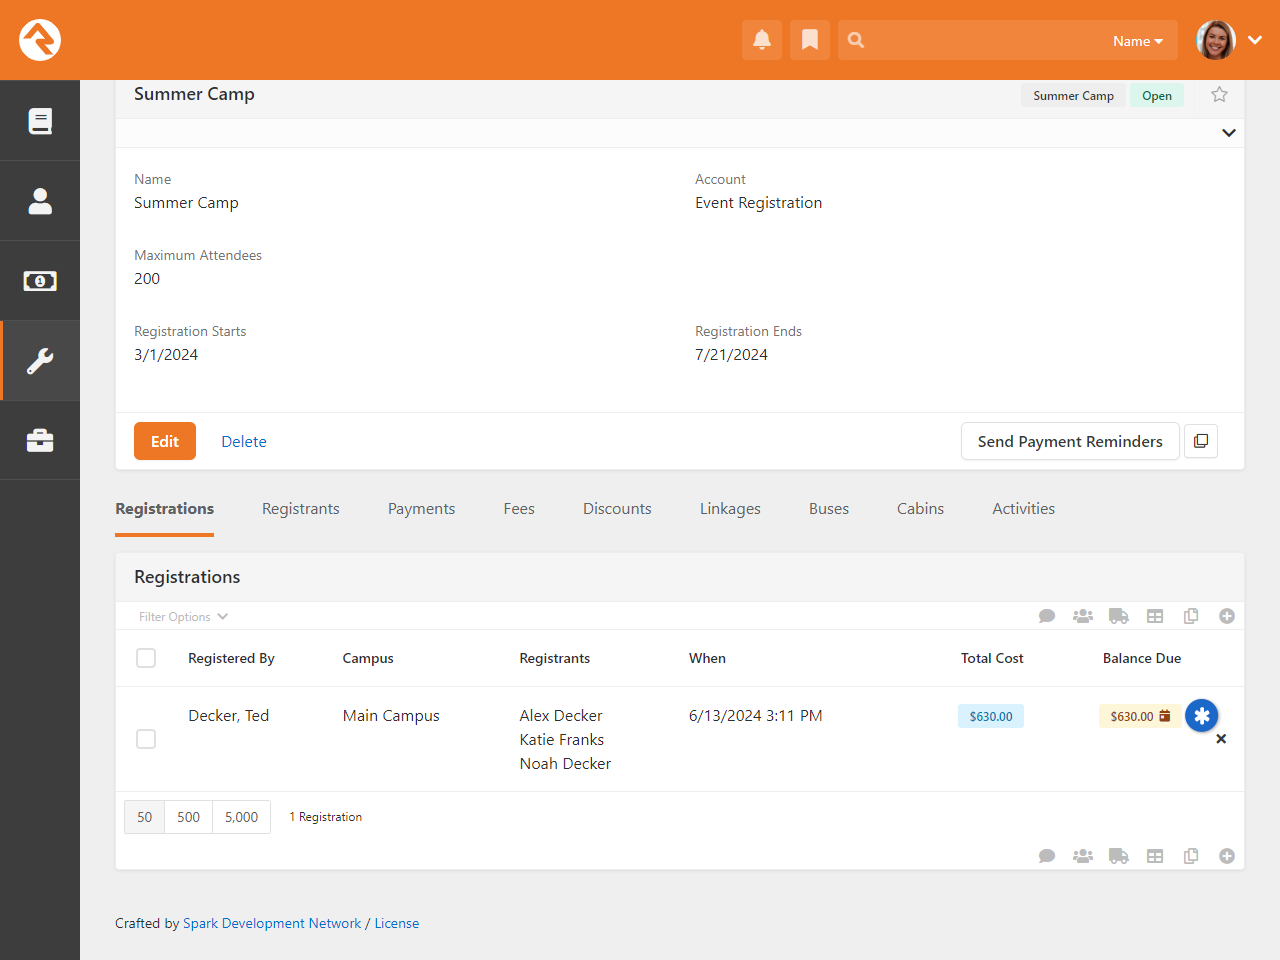
Payment Plan Administration
Payment Plan management happens in the same screens used for managing event registrations,
with added features. If a Payment Plan is in place, you’ll see a calendar icon next to the
Balance Due
on the Registrations tab.
Payment Plan In Event Registration
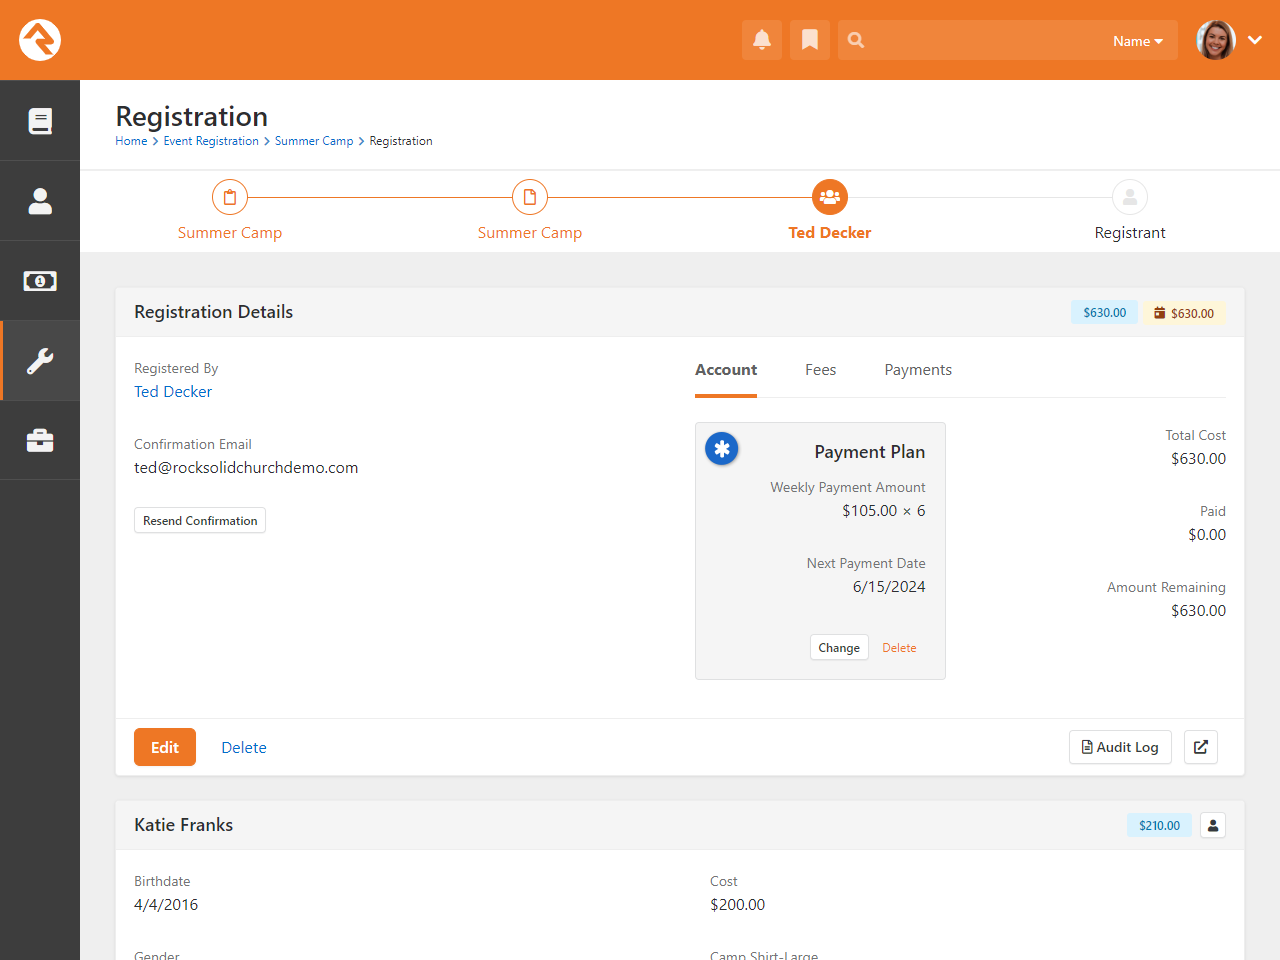
Administrators can make changes to existing Payment Plans by accessing the registration
details.
Deleting a plan will cancel the plan and any remaining payments will not be made.
If the person wants to continue to use a Payment Plan after it’s been deleted,
they must create a new plan. Note that the
Change
and
Delete options
pictured below are only available if the block's security is updated to allow
Edit Payment Plan
access.
Payment Plan In Event Registration
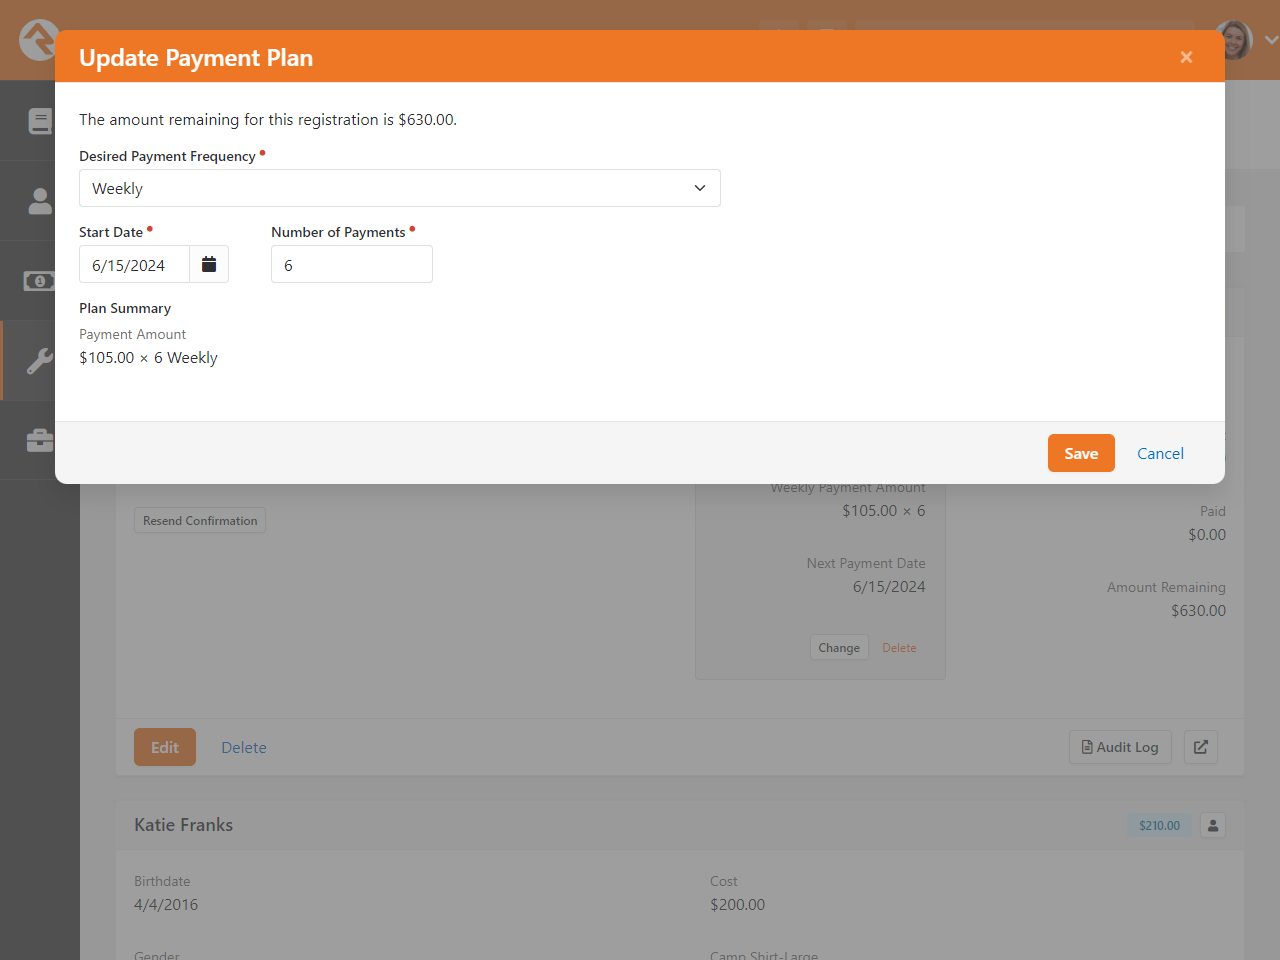
The
Number of Payments
field, pictured below, differs for administrators. While registrars can only
select a certain number of payments based on frequency, start date and payment
deadline, administrators can choose any number. This allows extending the Payment
Plan beyond the deadline, which can help if someone is worried about making the
current payments.
Administrative Change to Plan
Please note that changes cannot be made on the date a payment is due. Also, if
additional fees are added, the Payment Plan won’t automatically update to reflect
the new total, so the person will need to pay the fee separately. However,
administrators can adjust the Payment Plan manually to reflect the updated balance.
Managing Event Registrations
Now that you're comfortable creating event registrations, let's see how to manage
them through the registration lifecycle.
Promoting Your Registration
The easiest way to give your guests access to an event registration is through a calendar
event. The Bringing It All Together
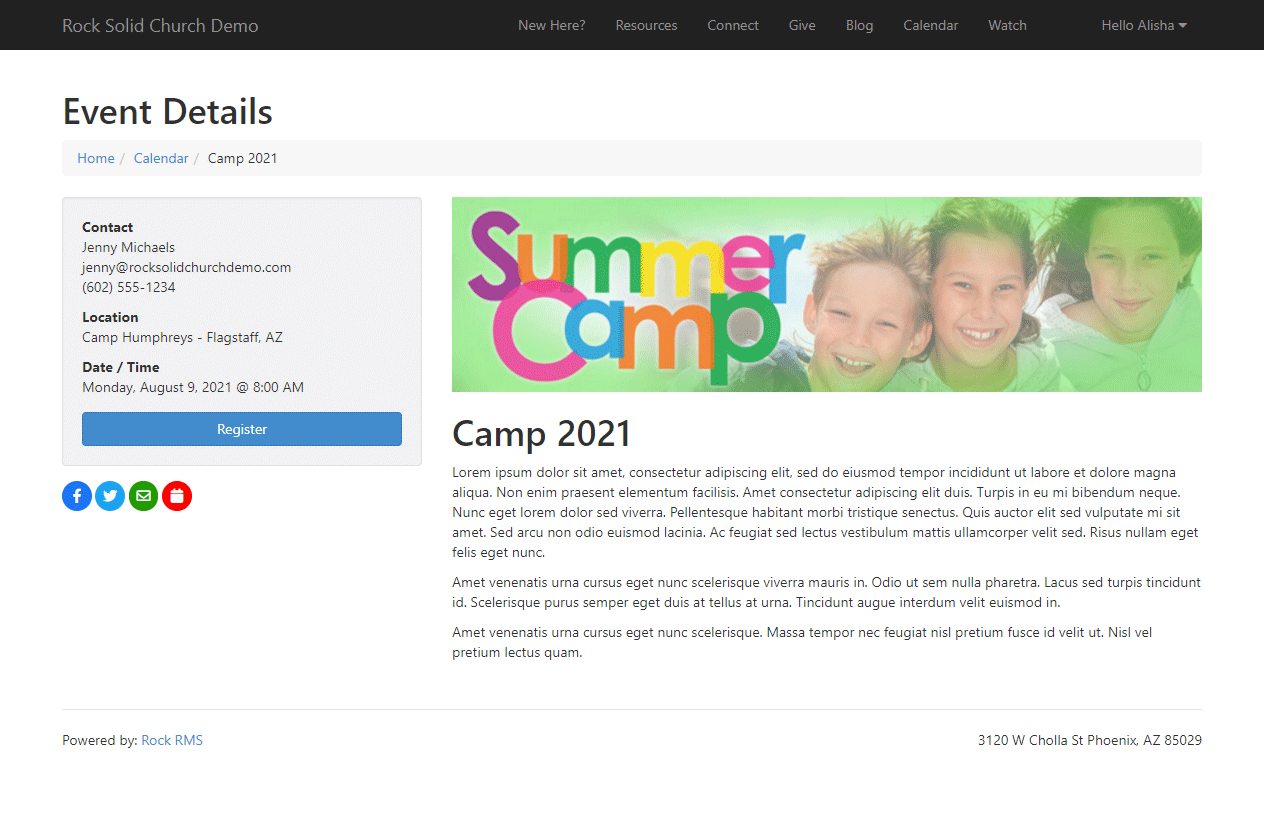
chapter below covers the process of linking calendar events to registrations. Once linked,
the event detail will display the Register
button as shown below.
Event Detail Page With Registration Link
You can also link directly to an event registration using a URL. The formats for doing so are:
- http://www.yourexternalsite.com/page/999?RegistrationInstanceId=999 (where the page id
and registration instance id match the appropriate values)
- http://www.yourexternalsite.com/Registration/<slugname> (you can find more on slugs
in the Bringing It All Together
chapter below)
Managing Registrations
You can manage the registrations by going to the Event Instance Detail Page:
Tools > Event Registration > Registration Detail > Registration Instance.
At the top of this page, you'll see the details of the registration with an
Edit button to modify its
settings. You'll also notice a number of tabs toward the bottom of the page, each relating to
a different component of the registration process (registrations, payments, etc.). The content
on each of the tabs can be filtered using the Filter Options link.
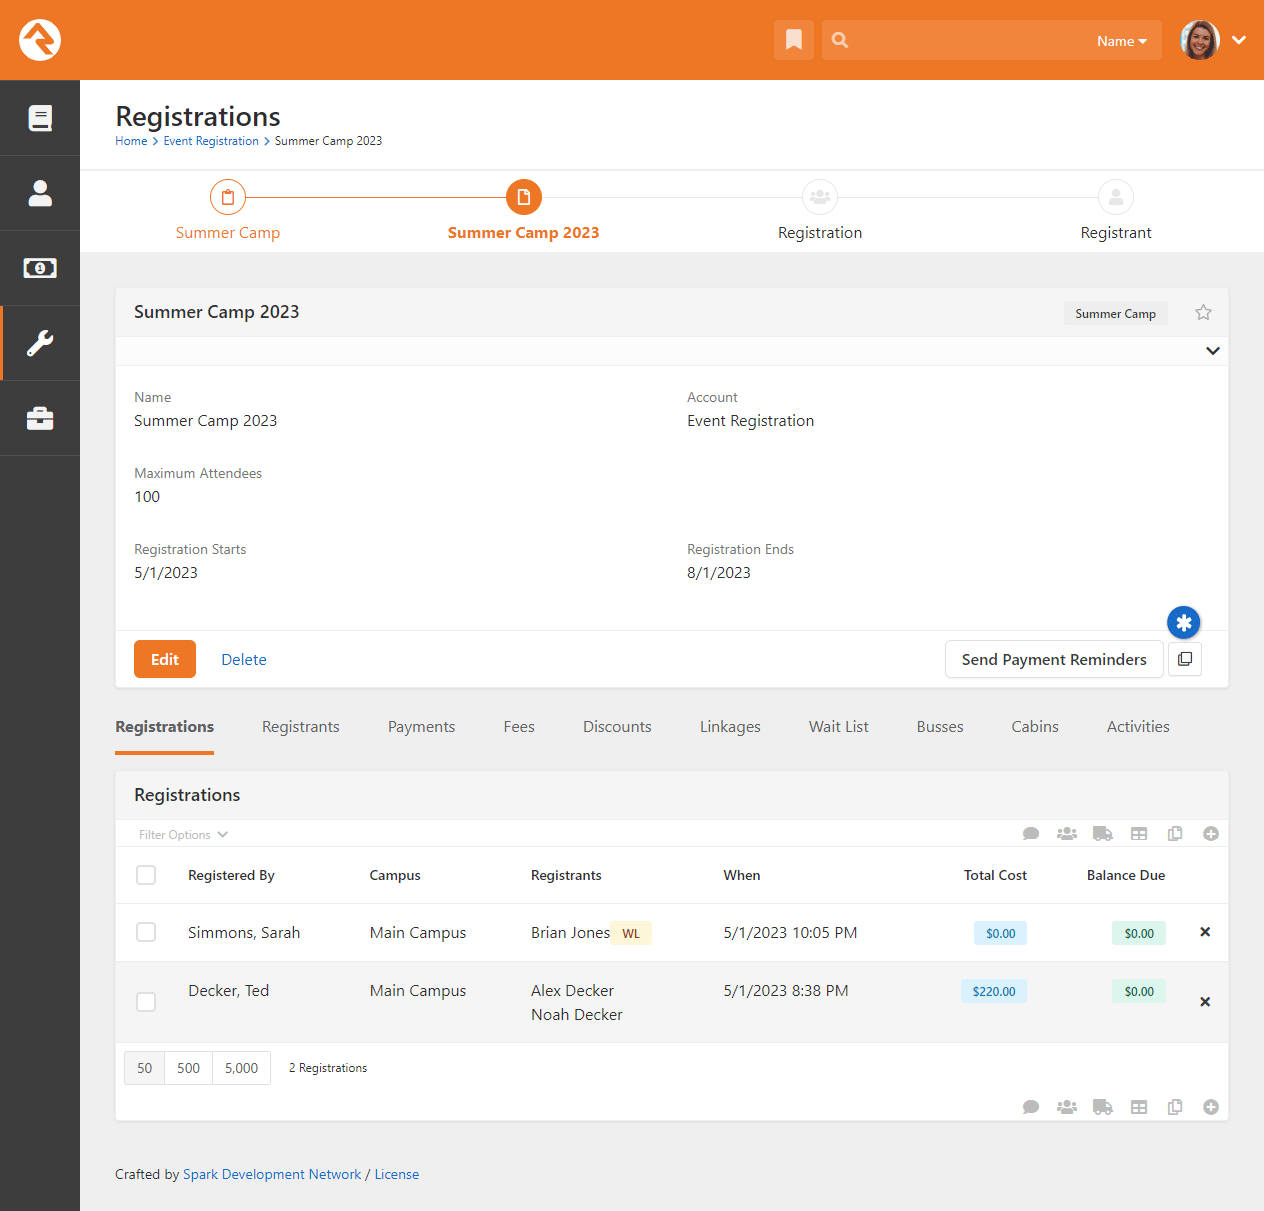
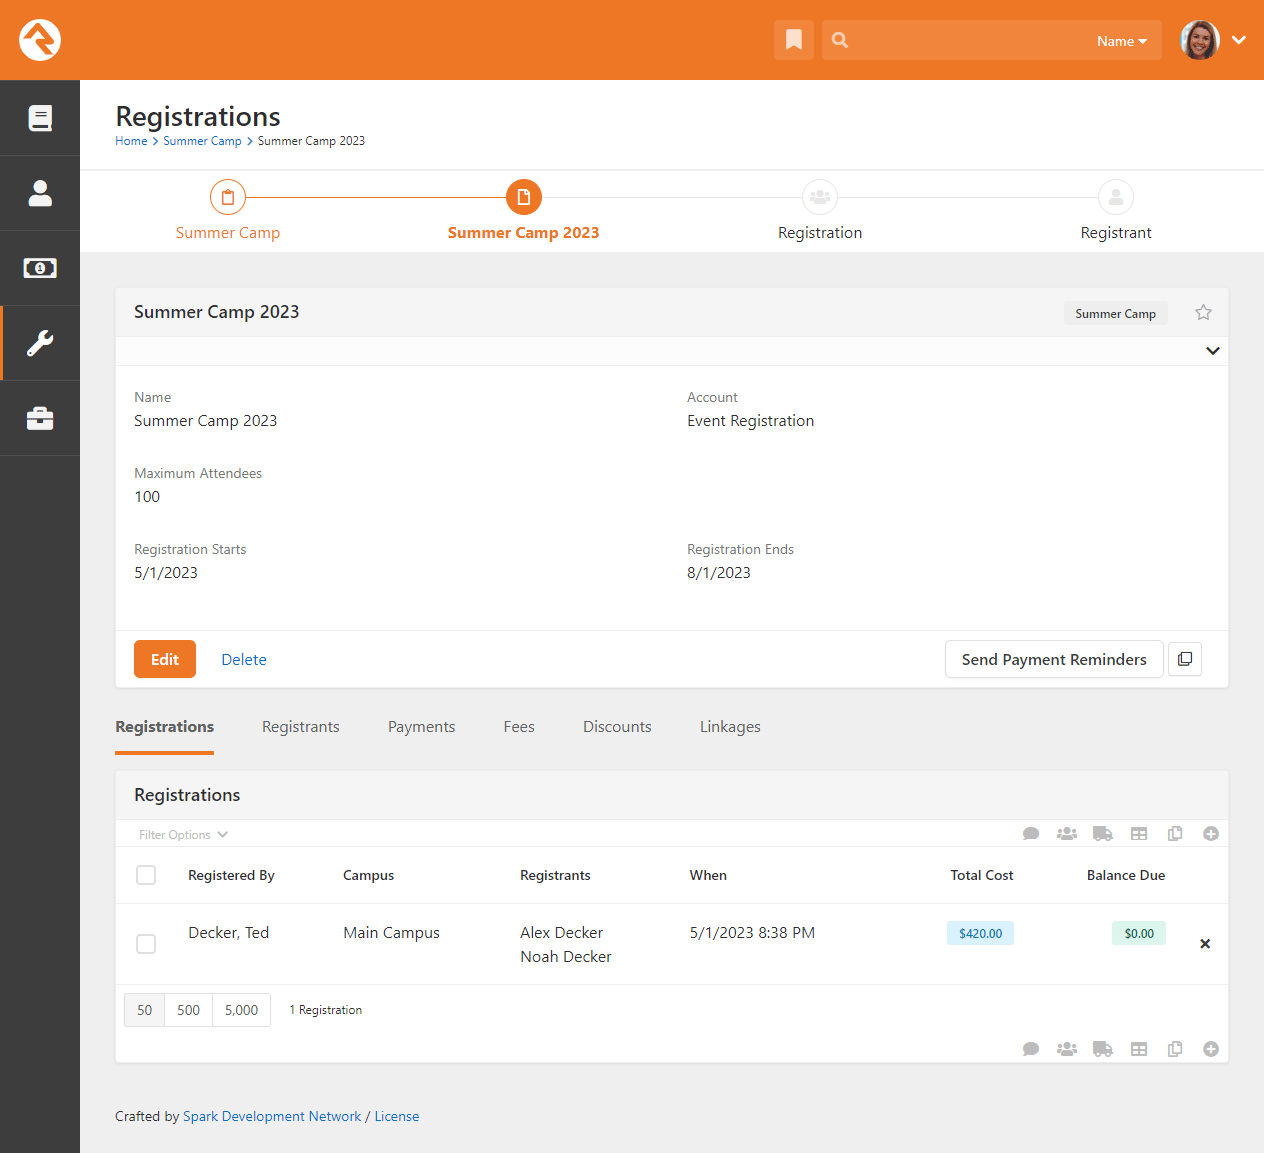
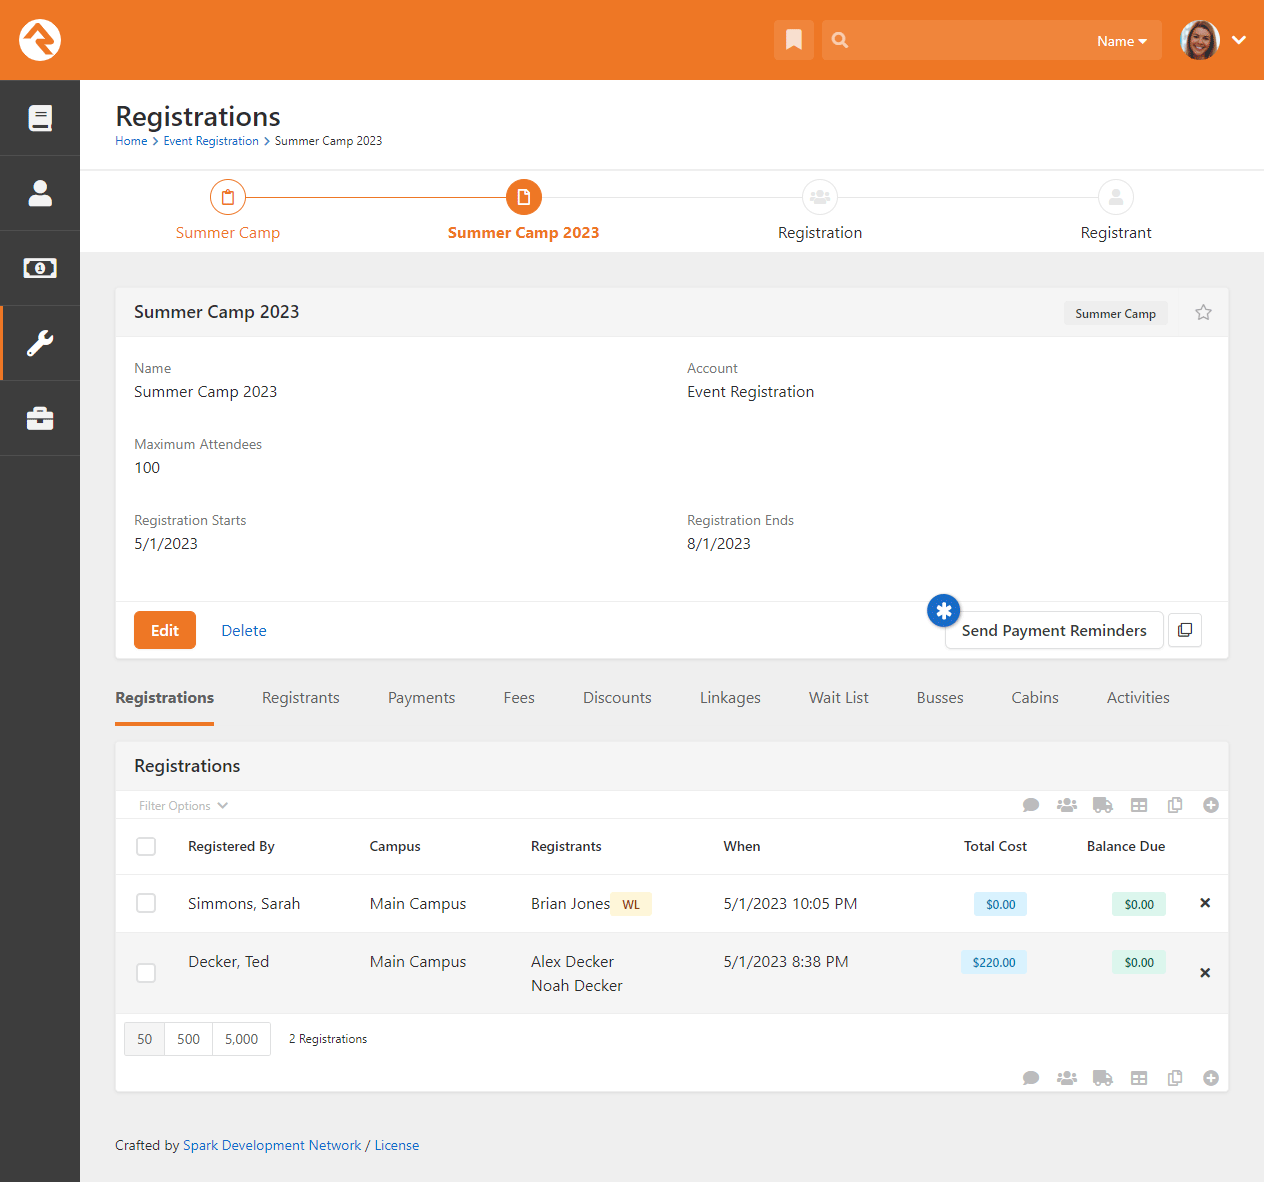
Registrations Tab
The Registrations Tab
shows all of the registrations that have been entered into the system. Remember these are
registrations that could have multiple registrants. If any of the registrations are tied
to a campus (e.g., because there is a Campus linkage configured, see below) then
a campus column will also appear.
Registration Instance Detail Page
From this tab you can view and edit an existing registration or manually add a registration
yourself (great if you also allow paper registrations).
Registration Edit Screen

- 1 Registration Details
- This shows the details of the registration including information on the Registrar.
You can easily resend the confirmation email from here.
- 2 Registrant Details
- Next you will see a panel for each registrant on the registration. You can also
edit their registration details from this screen.
- 3 Financial Information
- These tabs allow you to view and edit account, fee and payment information. We'll discuss this further below.
- 4 Audit Log
- This button allows you to view information about how the registration was entered and any
financial changes that were made.
- 5 Move Registration
- Sometimes a registration needs to be moved. Perhaps the person registered for the wrong instance of the event, or maybe they
just changed their mind. Don't worry, moving a registration is easy! However, you can only move the registration to an instance that uses the
same registration template (moving them across different templates would be rather difficult as there would be different fields,
costs, fees and discounts.) This button allows you to complete the move of the registration.
- 6 Add New Registrant
- Notice that at the bottom of the screen you can add more registrants to the
registration if needed.
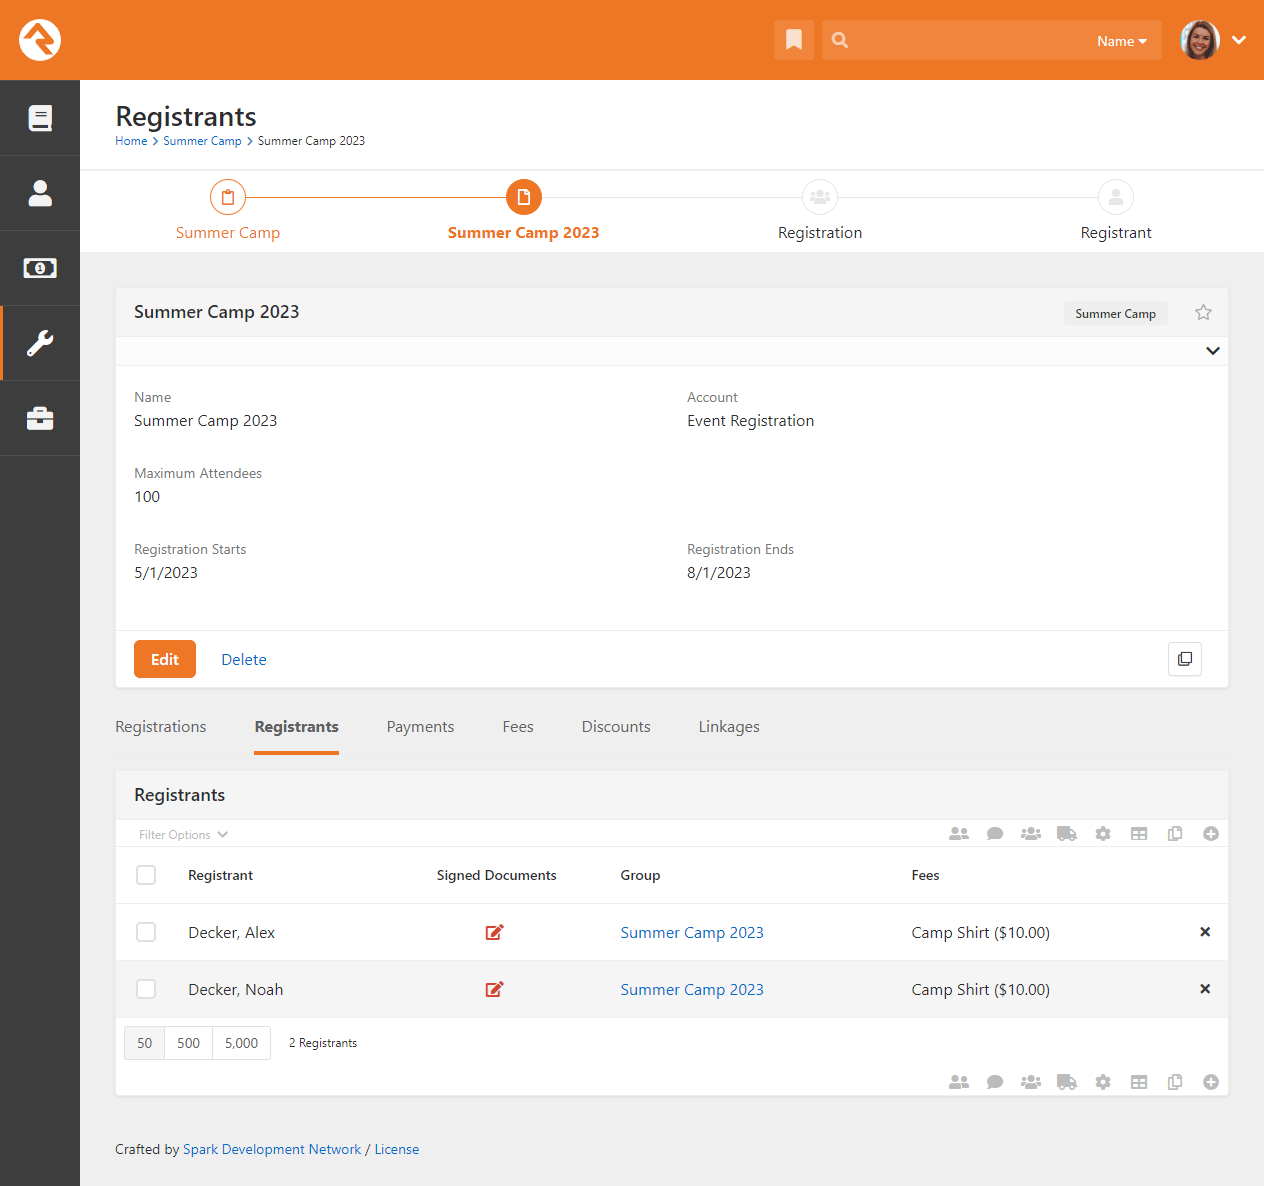
Registrants Tab
The next tab shows a listing of all registrants for the event, including summary information about groups,
fees and placements. This list is also filterable. Clicking a row will show you the registrant's details as
well as the rest of the related registration information. If that screen seems familiar, it's because it's
the same screen as the one above except that we scroll down to the selected registrant's information.
Registration Instance Registrants
You may notice a
icon at the top and bottom of the list of registrants, in addition to the other grid
actions. Clicking this will start a new communication, sent to the registrar of any selected
registrants. This allows you to filter the list of registrants and then easily contact the
associated registrars.
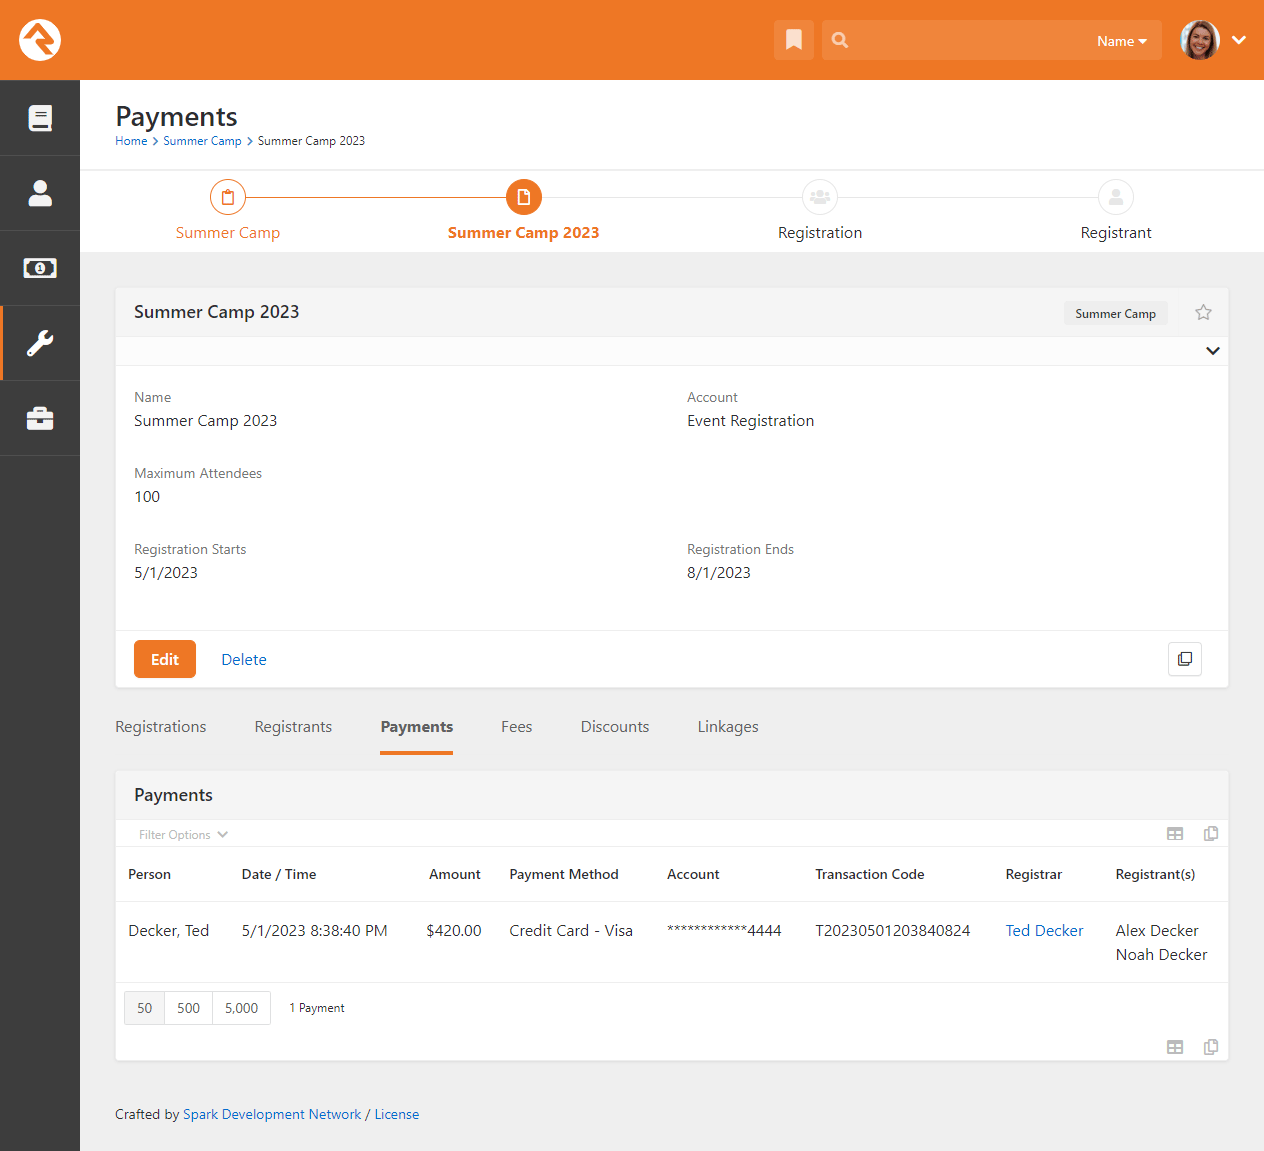
Payments Tab
The payments tab allows you to view all the payments that have been made for registrations for this instance. Clicking on one of
the rows in the list opens a financial transaction for that payment. From this transaction detail screen, you can process
a refund for the payment.
Registration Payments
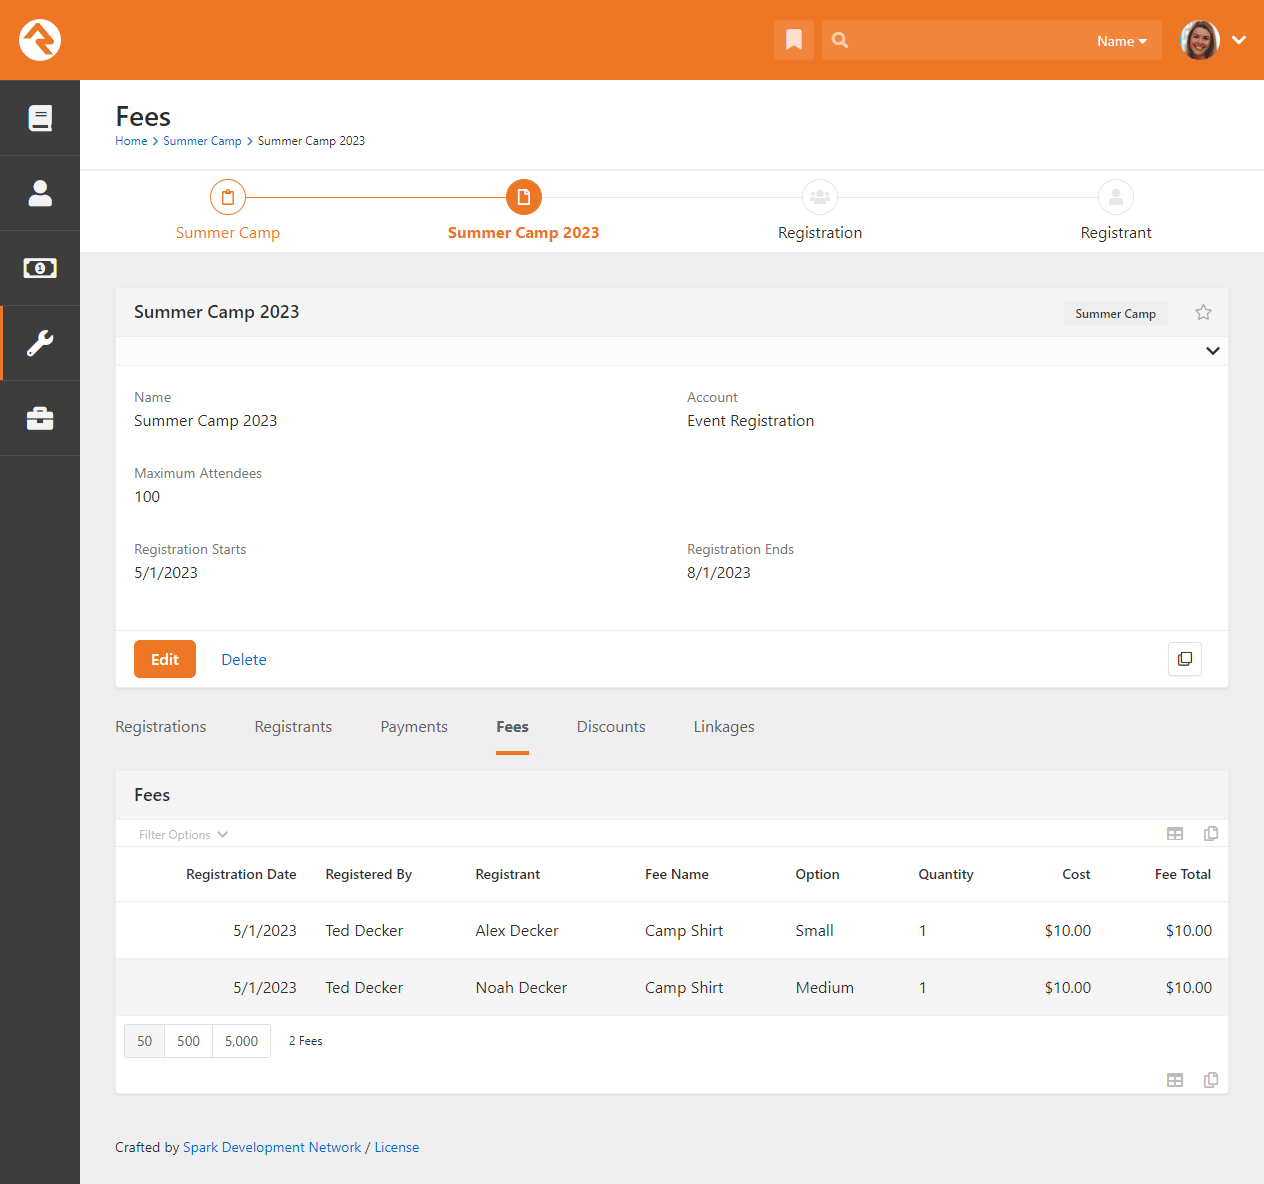
Fees Tab
This tab displays all of the registration fees associated with the event. The information can be filtered and exported to a spreadsheet. Be sure to read the Registration Fees chapter to learn how fees work with event registration.
Registration Instance Fees
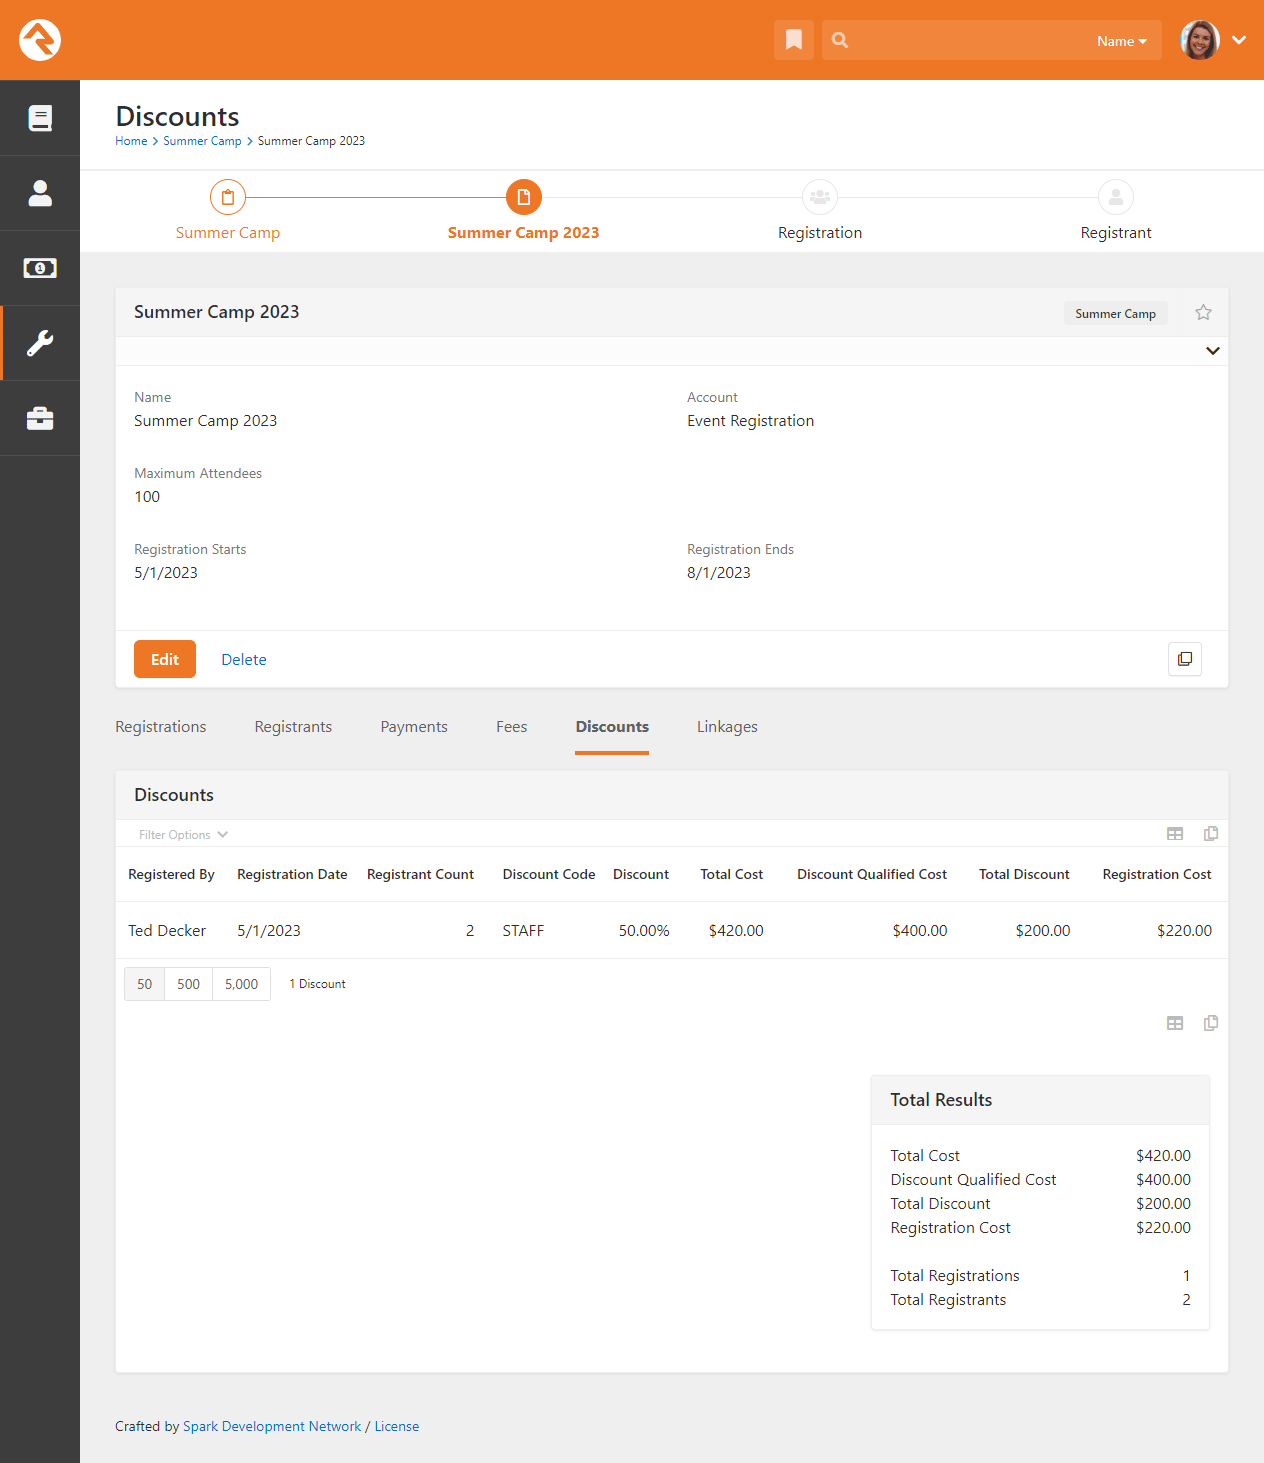
Discounts Tab
This tab displays all of the discounts that have been used, as well as a lot of useful information about the discounts. You can view which codes were used, who used them, how many times each discount was used, and the total costs of the discounts. As with the other tabs, the information provided in this tab is filterable and can be exported to a spreadsheet.
Registration Instance Discounts
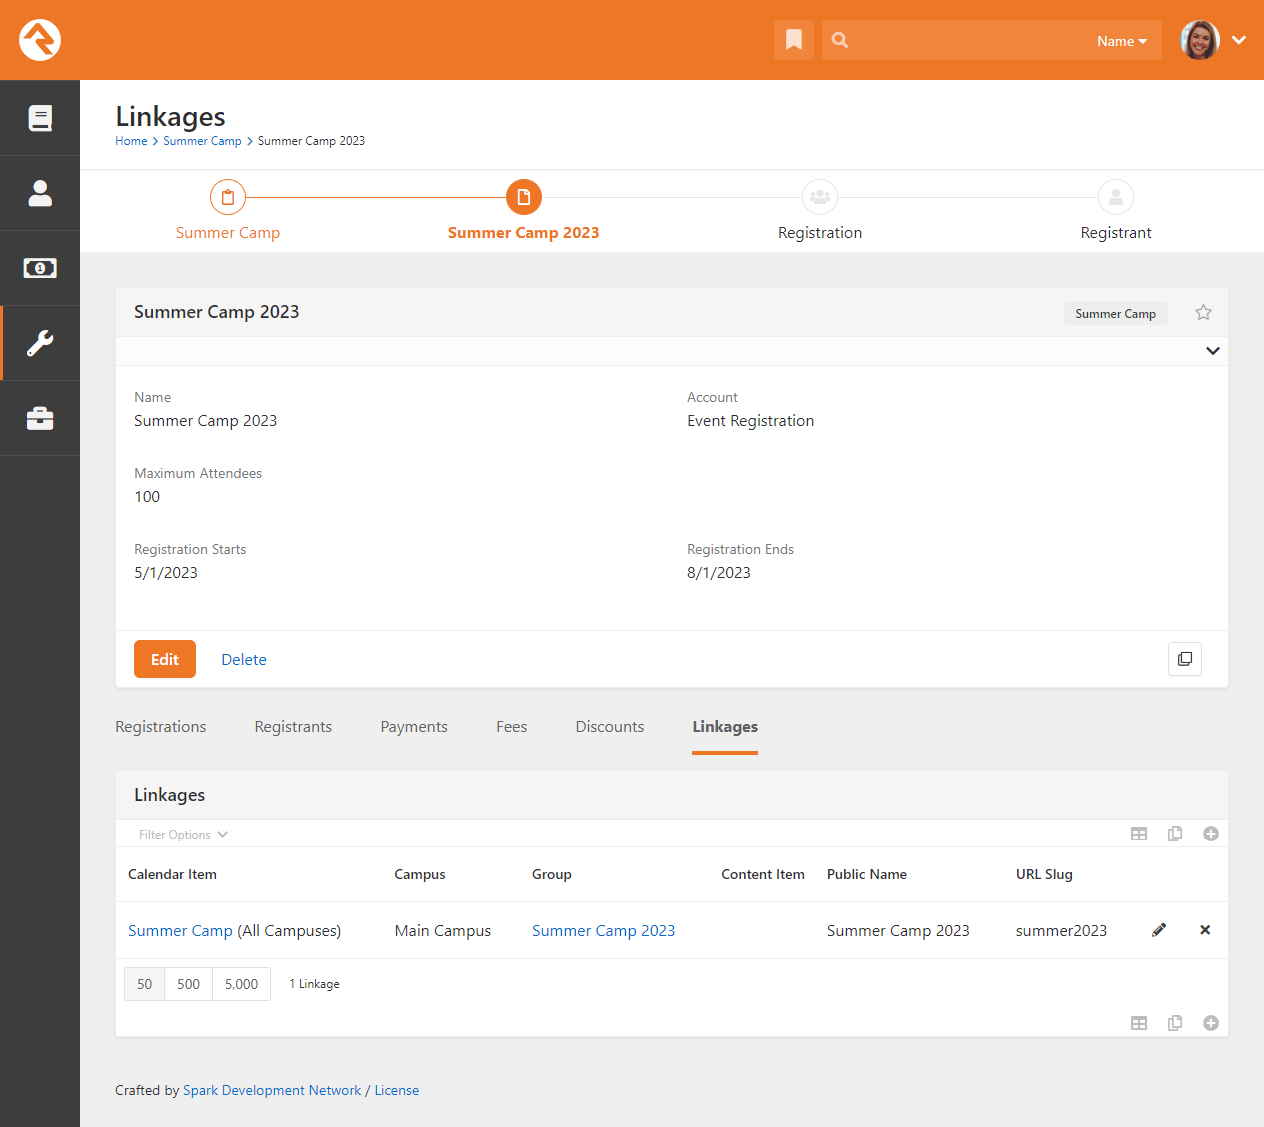
Linkages Tab
This tab will make more sense once you read the
Bringing It All Together section. Basically, it shows
all the related calendar events and groups that are linked to this registration. You can
also include a Campus linkage, which will associate registrations with that campus.
The Calendar Item campus ("All Campuses" in this example) comes from the
calendar item event occurrence's campus.
Registration Instance Linkages
If you don't have a Campus linkage set up, you can pass a CampusId parameter in
the URL during registration and the registration will instead be associated with that
campus. If you do have a Campus linkage set up, the registration will be associated with
the linkage campus regardless of URL parameters used during the registration.
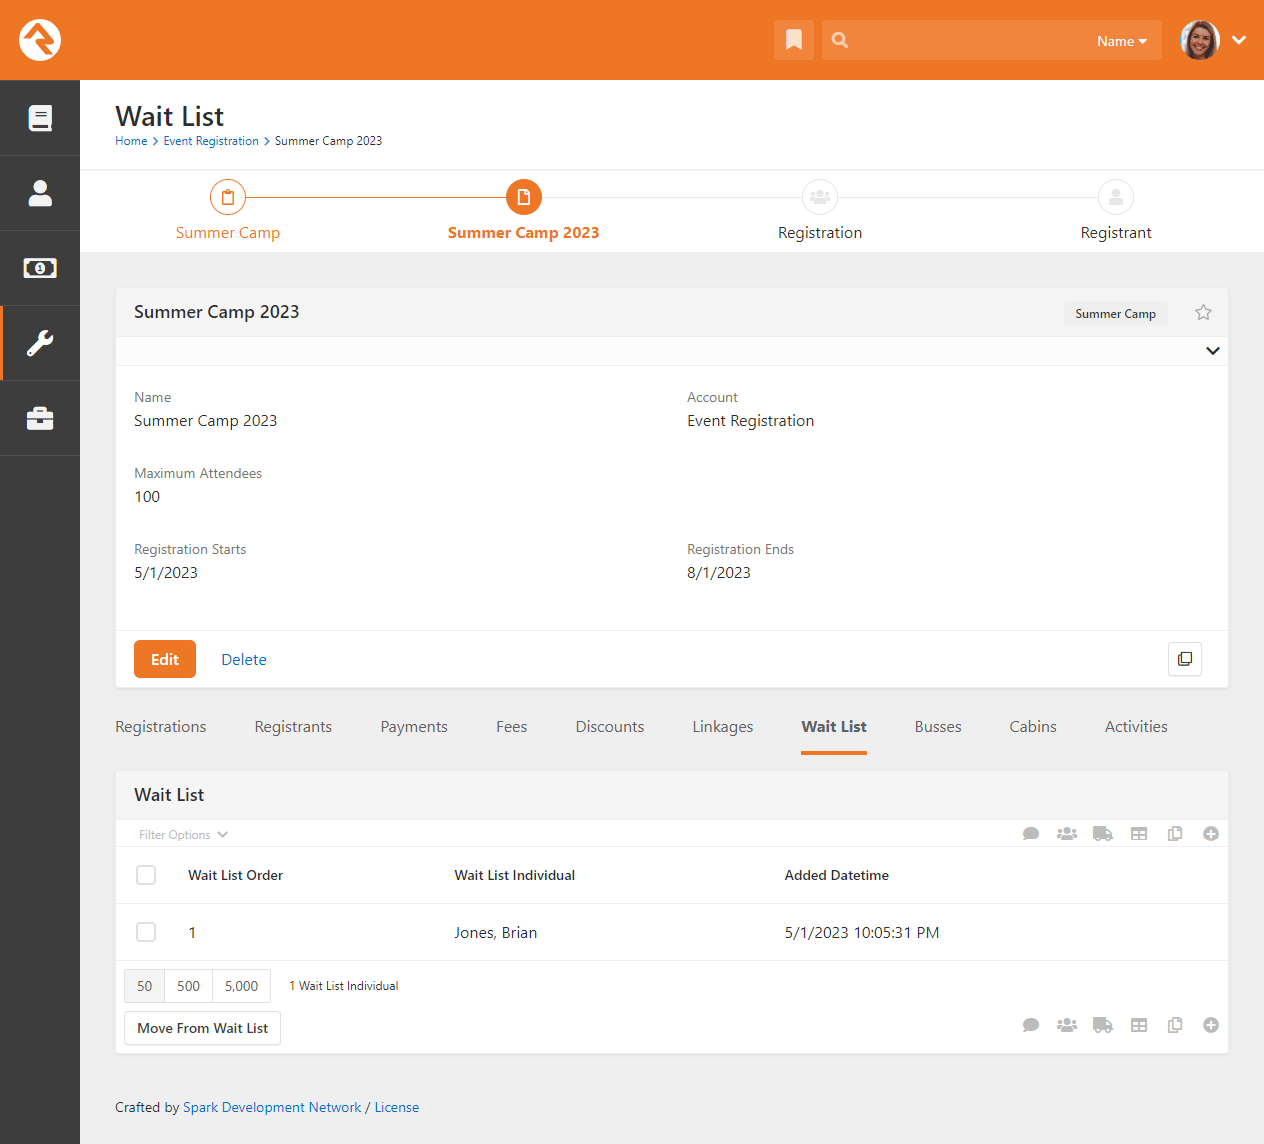
Wait List Tab
This tab displays registrants on the wait list and allows you to move them off of the wait list. To learn more about wait lists, see the Wait Lists chapter below.
Registration Instance Waitlist
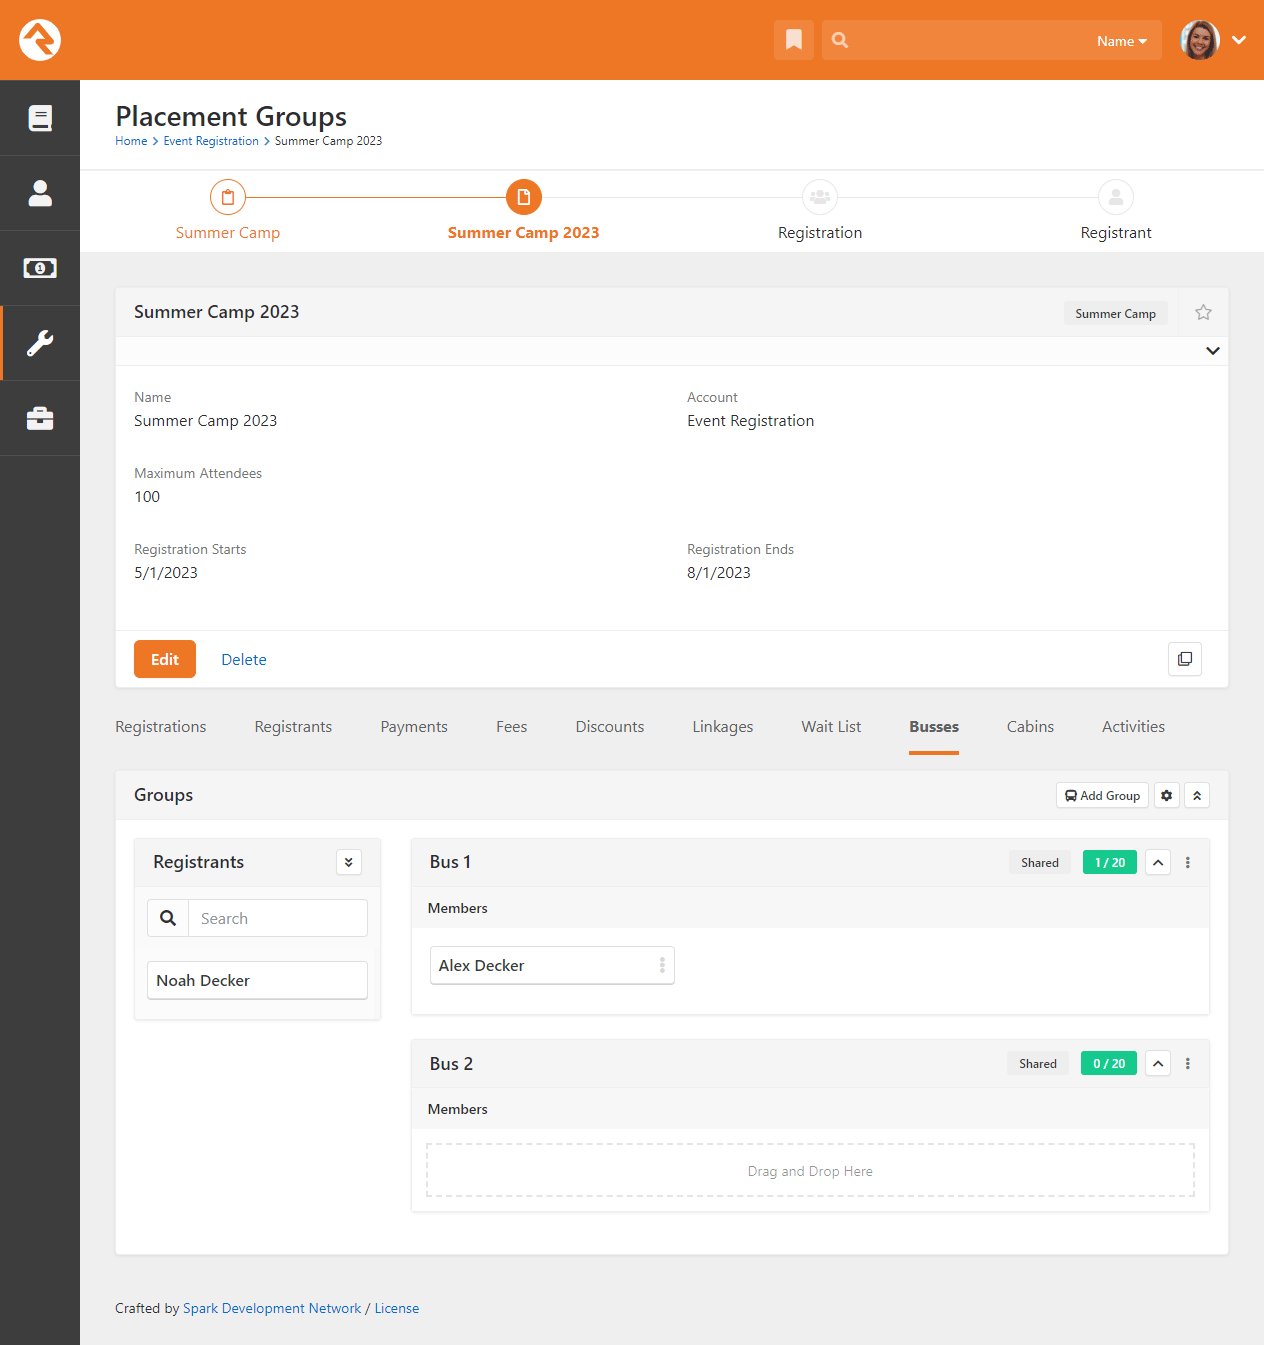
Group Placement Tabs
If you've set up Placement Configuration in your
registration template, you'll also see one or more tabs related to those placements. This is where you can sort registrants
into groups. See the Registration Group Placements chapter to learn more.
Registration Group Placement
Wait Lists
We know your events are going to be popular. So popular, in fact, that you probably won't be able to fit everyone. Don't worry,
Rock's wait list features will ensure that you can manage the crowds. Let's take a look at how these features work.
Registration Entry
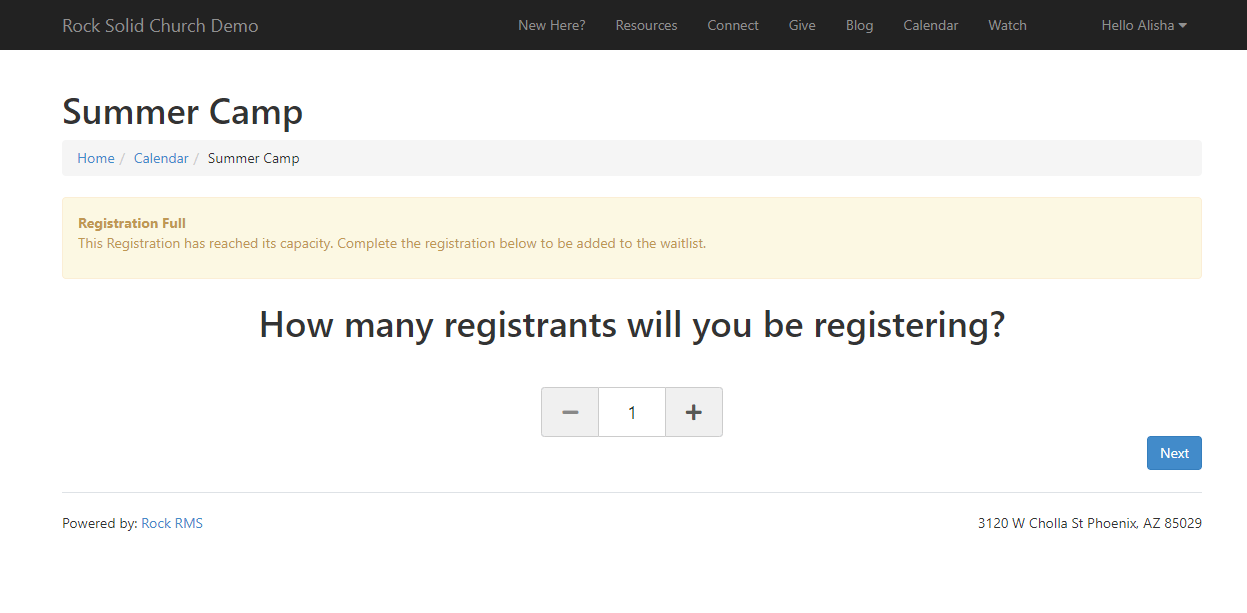
You can enable the wait list features on registration templates. Then, you'll configure the maximum number of registrants
on registration instances. When the event is full, individuals will see the message
below when they attempt to register.
Wait List Warning
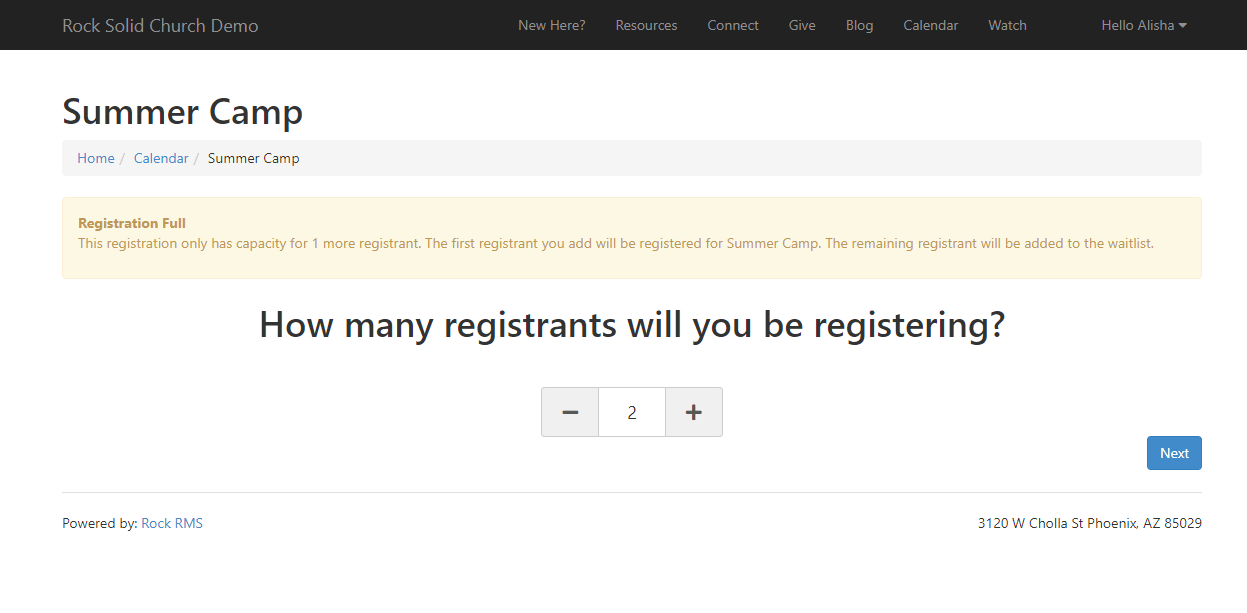
At this point, the individual can decide not to register or to add themselves to the waitlist. Let's look at a
slightly more complex scenario. What if there is only one spot left and the person is hoping to register two individuals? When
they arrive at the page, they'll see a normal registration page. But, when they select more people than there are slots available,
they'll get the message below.
Wait List Warning (Partial)
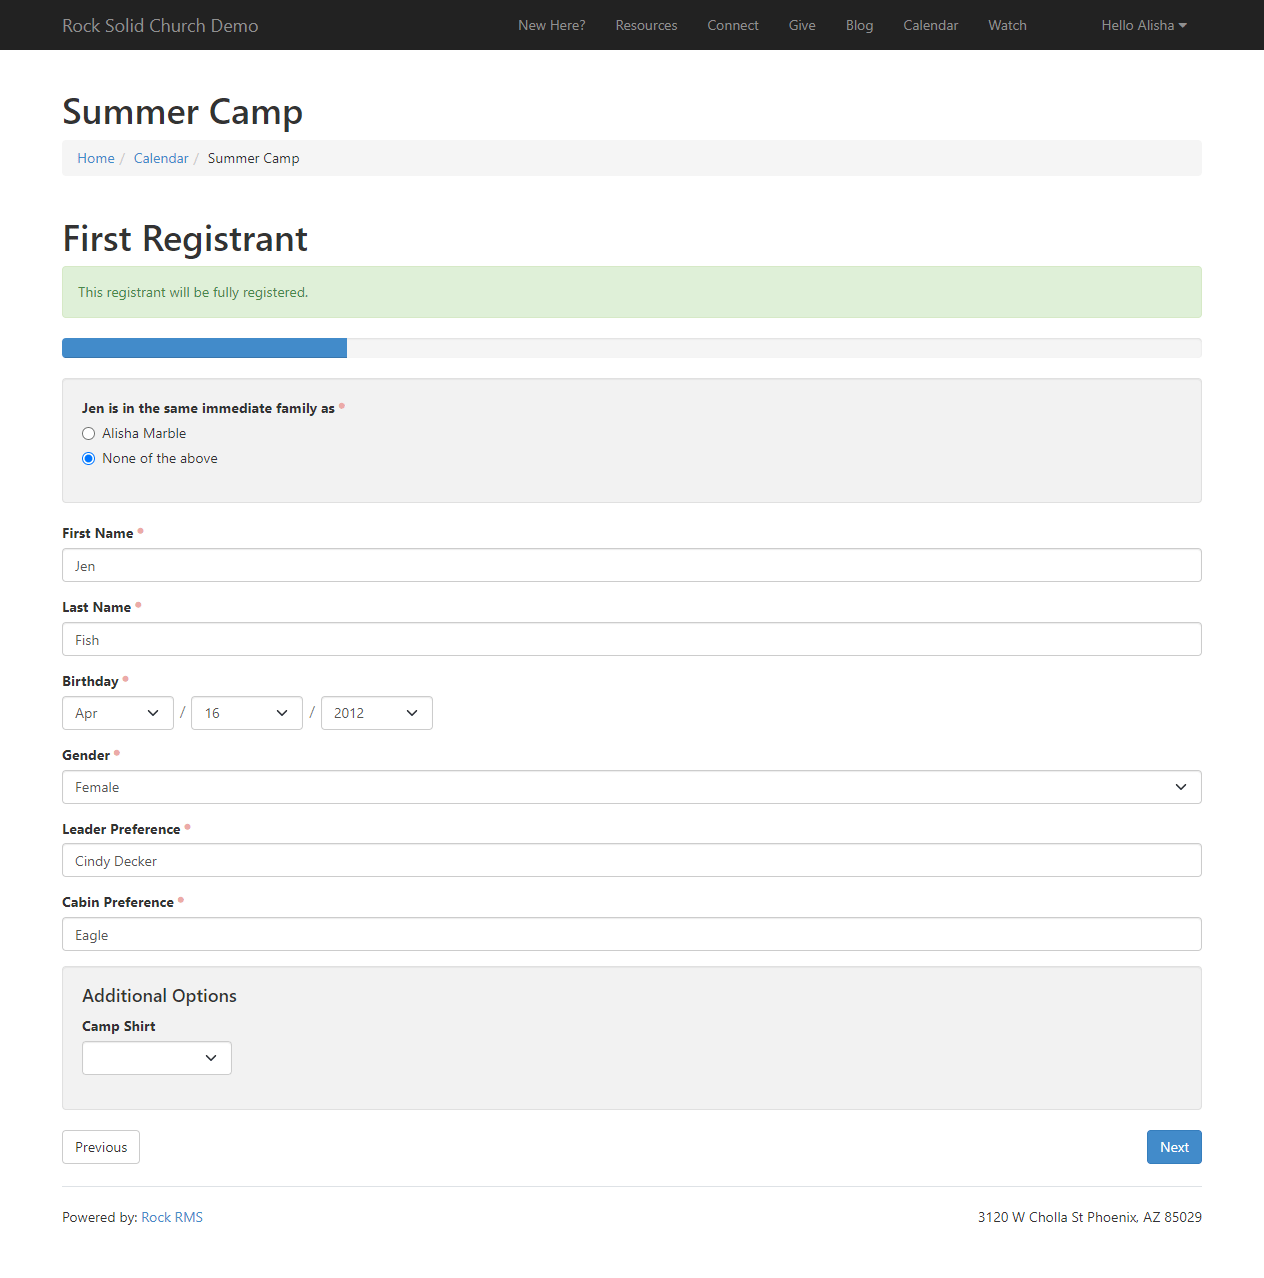
In this case, let's assume that they would like to continue with registering both kids for camp. You'll notice
that the registrant entry screen below looks fairly normal but has an additional notice at the top reminding
them that this individual will be fully registered for the event.
Registrant Screen
As they move to register the second child, they will notice that the reminder is now warning them that this
individual will be on the wait list. Careful observers may have noticed that the number of entry fields
has changed. (We're not asking for Leader Preference, etc.) You have the option to configure registration form fields
for the wait list or to hide them.
Group Member Entry Fields
Since individuals on a wait list are not added to configured groups, entry fields that are stored as group member attributes cannot be shown.
Wait List Screen
As they move to the payment screen, note that those on the wait list are not charged for the registration. They are simply holding a spot.
Wait List Payment
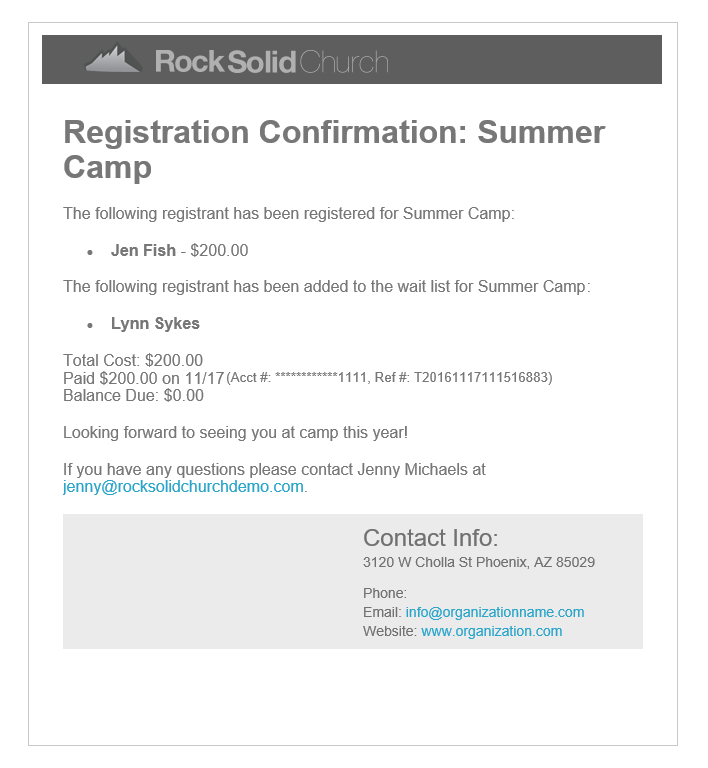
It's very important that we're clear about who is on a wait list and who is a full registrant. To this end, both the confirmation
screen and the email reflect the individual's registration status.
Wait List Confirmation Screen
 Wait List Confirmation Email
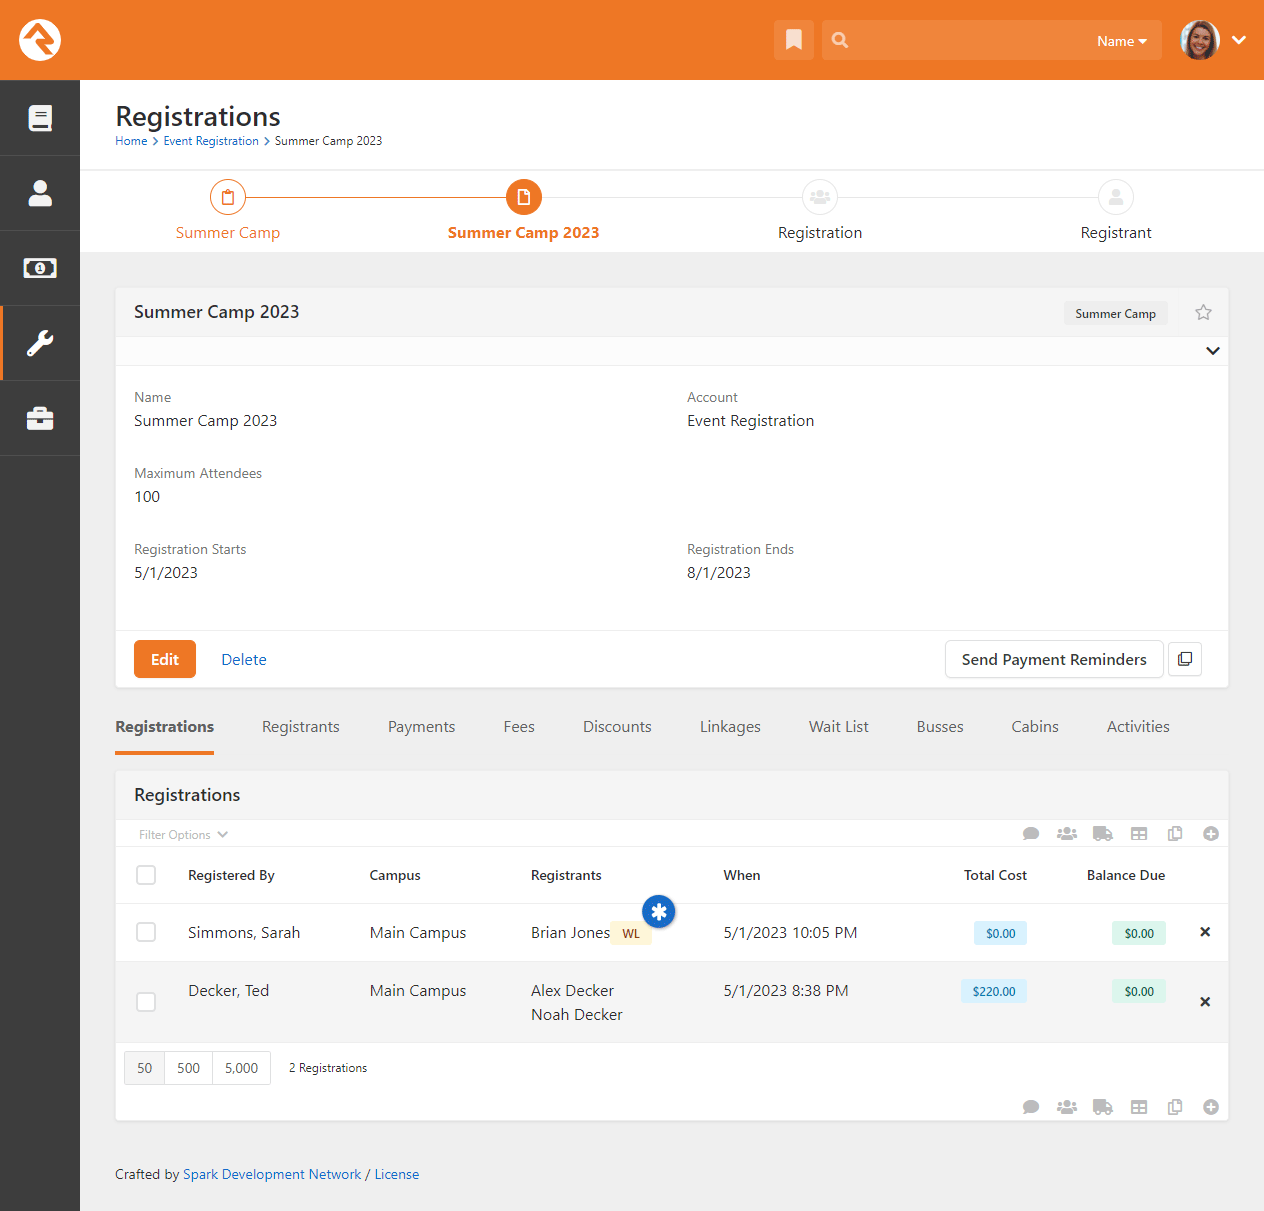
Wait List Administration
Now that we're familiar with the process of registering for a wait list, let's look at how you can administer wait lists.
From the registration instance screen, you'll notice that registrations with individuals on a wait list are clearly noted
on the list. There is also a Wait List tab to help you
view and manage the wait list.
Registration List
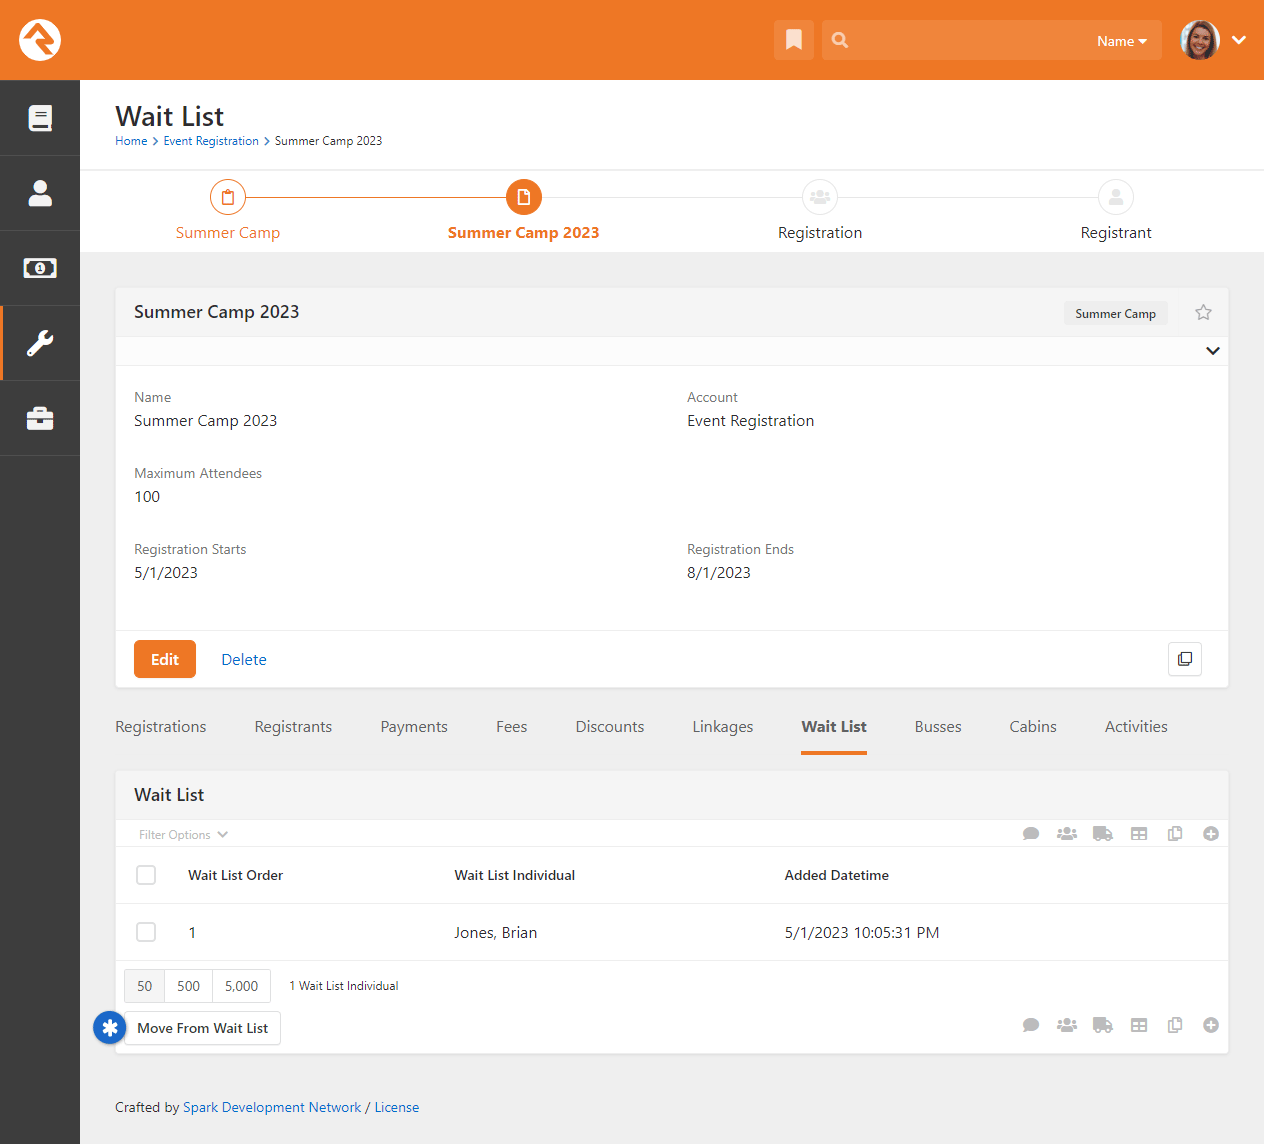
The Wait List tab allows you to view those on the wait list with their placement order. If you would
like to move an individual from the wait list to a full registrant, simply select the checkbox in front of their
name and select the Move From Wait List button at
the bottom of the grid.
Wait List Tab
After you select to move them, you'll see the screen below confirming that they have been moved. At this point the new full registrant
will be added to any groups that were configured.
Wait List Move Confirmation
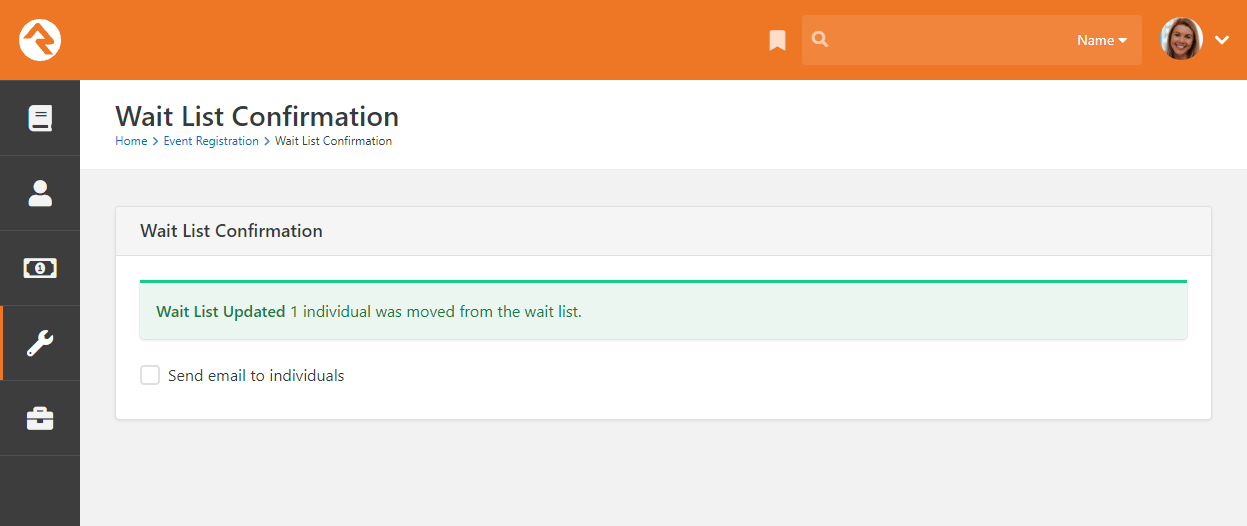
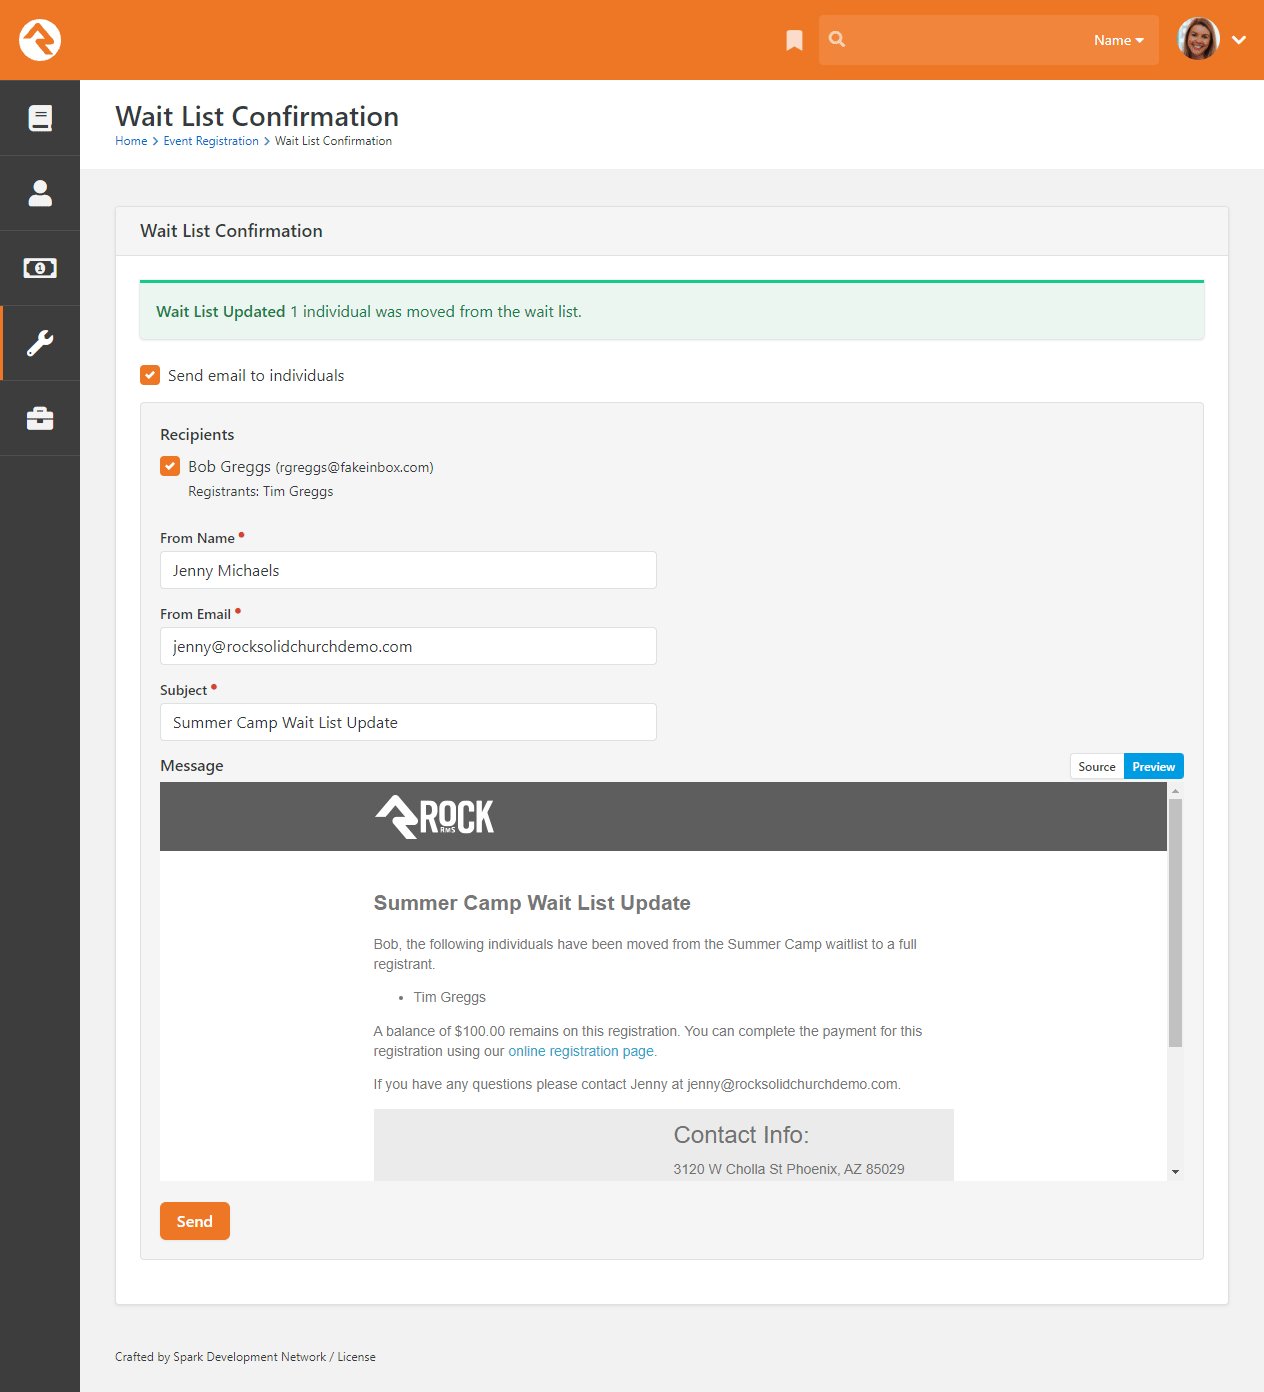
If you'd like to send them an email to confirm the move and request additional fields simply select the
Send email to individuals checkbox.
The email that is sent should remind them if any payment is due and also ask them to complete the registration if any additional
fields are needed. This email might be crafted already in the Registration Template, but if not, you can click the
Source toggle to create it here. Don't forget you can use
Lava to personalize the content.
Wait List Move Email
While this feature makes moving people from the wait list a simple process, you can also convert a full registrant to a wait list
member or a wait list member to a full registrant from the registration details screen.
Registration Payment Reminders
Allowing partial payments is great, but getting the remaining balance has always been difficult. That was until Rock came around. Now there are several
tools for getting the remaining balance quickly and easily. Let's look at all your options!
Manual Reminders
One way to remind individuals of remaining balances is to manually send them a reminder. You can do this from the
Registration Instance page.
Send Payment Reminders
Once you click the Send Payment Reminders link, you'll see the page below.
This page allows you to customize the reminder text and who should receive the email.
Payment Reminder Communication
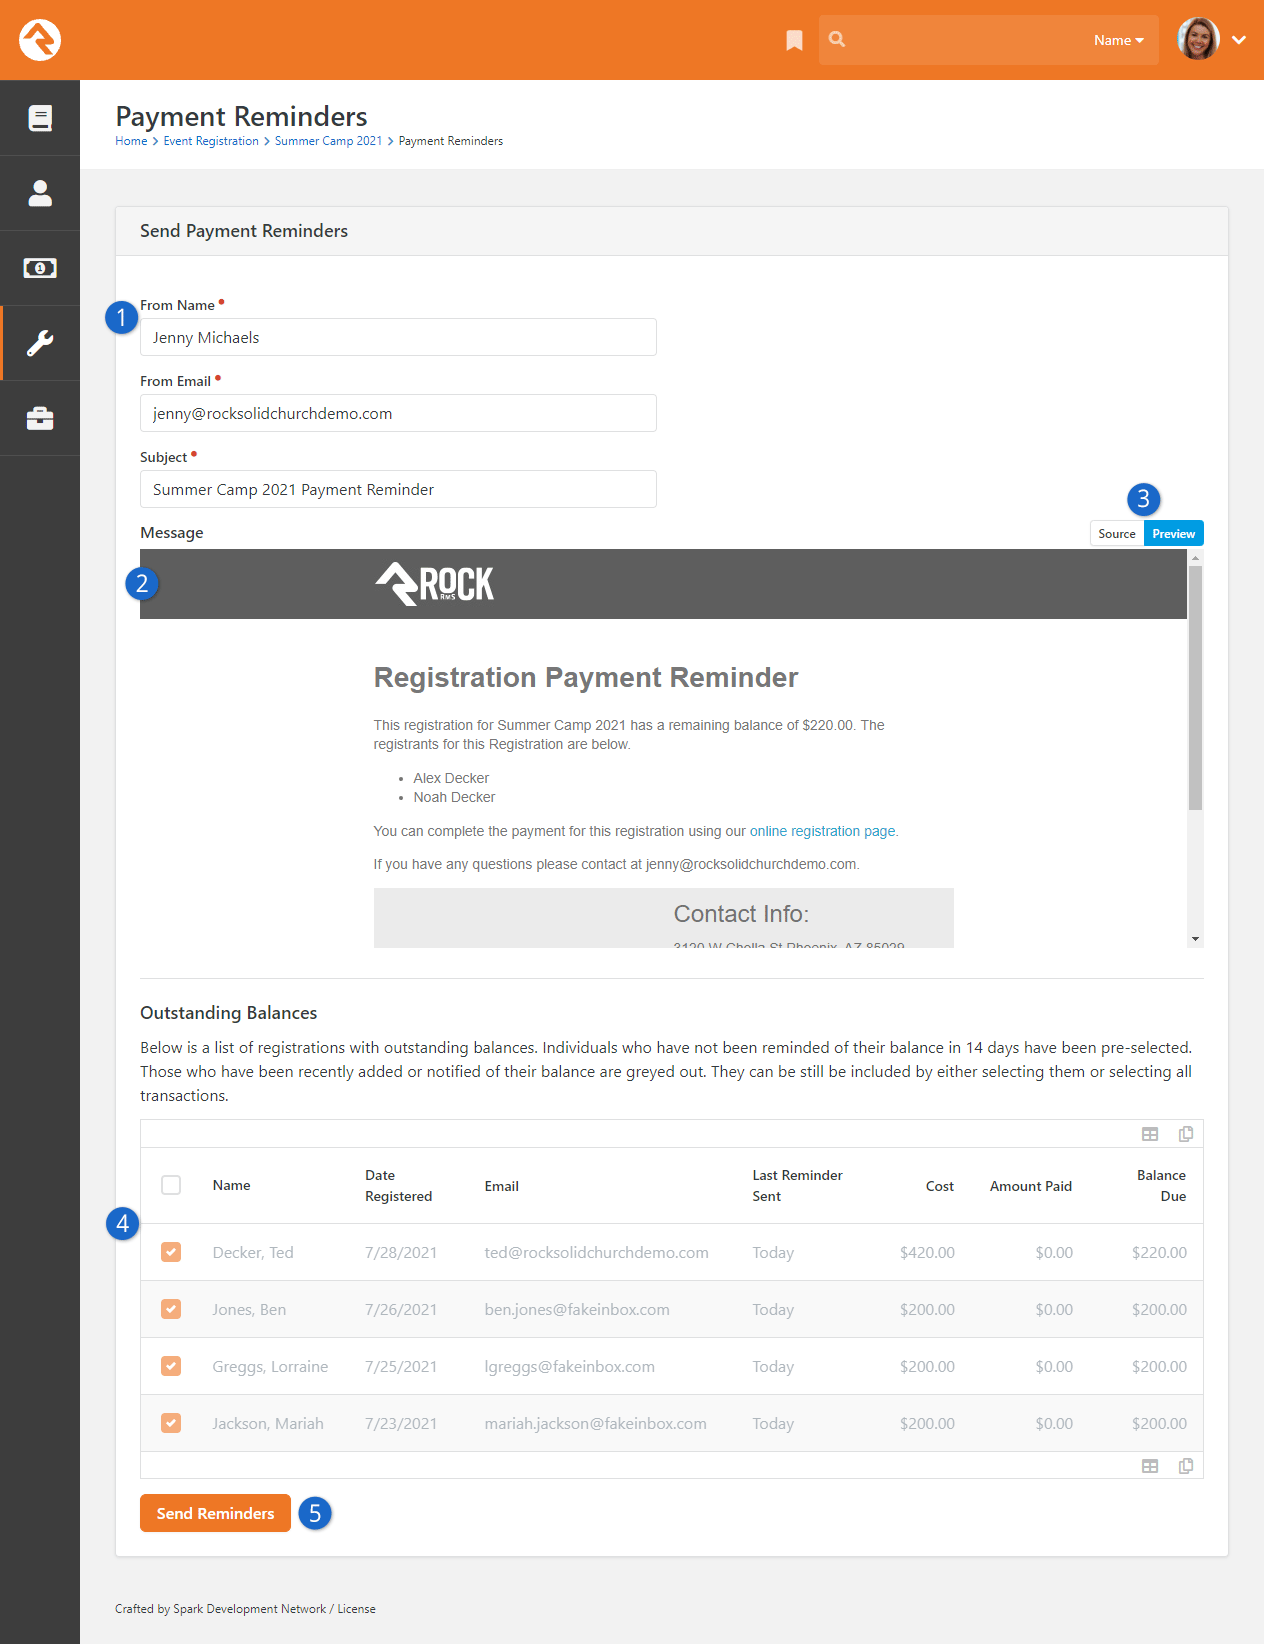
- 1From Name
- The From Name, From Email and Subject should be filled in for you based on the values supplied from the registration template. You
can edit these values to suit your needs.
- 2Message
- Next you see a preview of the email the individuals will receive. The preview uses the information for the first person on the grid below
to give you a precise view of what the person will receive in their inbox.
- 3Template Toggle
- You can choose to edit the email template if you wish by clicking the Source
toggle. This will display the Lava template that creates this email.
- 4People
- Below the preview you'll see a list of those with a remaining balance. When creating the list, Rock looks at the
Payment Reminder Time Span setting for the registration template.
If the registration has already received a reminder or was created within this timespan, the registration is greyed out and is not
selected (the checkbox is not checked). You can, however, override this and select specific registrations or all registrations.
- 5Button
- Click the Send Reminders button and you're off to the races!
Automatic Reminders
Manual reminders are nice, but automatic ones…well they're even better! If you provide a
Payment Reminder Time Span on the registration template, Rock will send an
automatic reminder to the registrations based on that timeframe. So, for example, if you provide the value of 30 for the
Payment Reminder Time Span, they will receive a reminder every 30 days until
their balance is paid. Reminders will not be sent if the Payment Reminder Time Span
is set to "0" or left blank.
This sending is done through the Event Payment Reminders job
under System Settings > Jobs Administration. This job does have one
configuration parameter you should be aware of. The job Cut-off Date
is the number of days past the registration close date to send reminders. After this cut-off, reminders will need to be sent manually to
prevent eternal reminders.
Registration Group Placements
Sometimes registration isn't over once all the information is collected. In fact, sometimes
that's just the beginning. That's certainly the case with events like sports teams and camps.
After everyone’s registered, you still need to form teams and camp groups. This can be a daunting
and laborious task, but that's where Rock's group placement features come to the rescue. They
allow you to easily sort registrants into one or more groups with minimal effort.
For these tools to kick in, you need to first enable them on your registration template.
Let’s take a look at how that’s done.
Placement Configuration
Registration templates have a panel called
Placement Configuration
where you can define areas into which registrants should be sorted. Ultimately this will mean
placing registrants into groups, but those groups can be created and added later in the process.
For now, let’s look at the
Placement Configuration
options available in the registration template.
Registration Template Placement Configuration
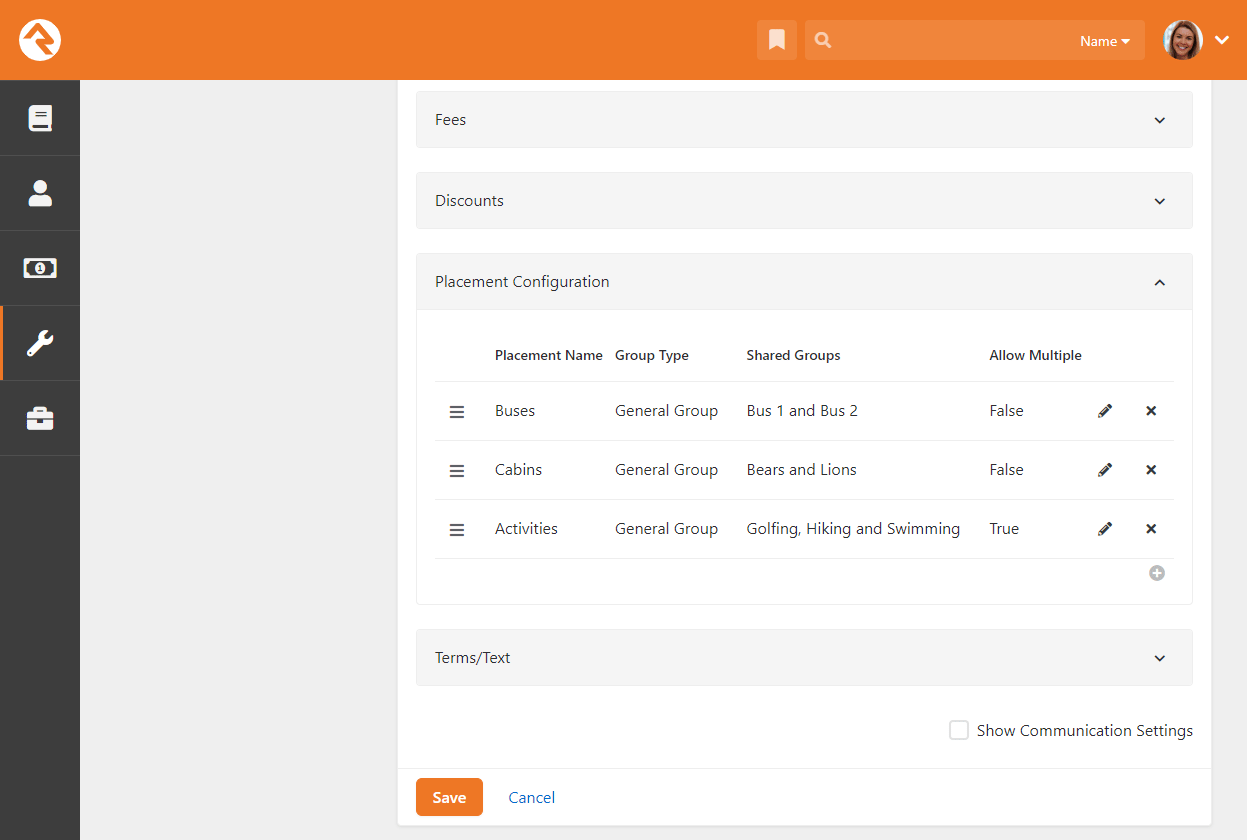
From the Placement Configuration
panel pictured above, you can see the list of the template’s placements and a summary of their setup.
After your template is configured, each of the items in this list will appear as a tab within the
registration instance. Click the button to add new placements to the list.
Edit Placement Configuration
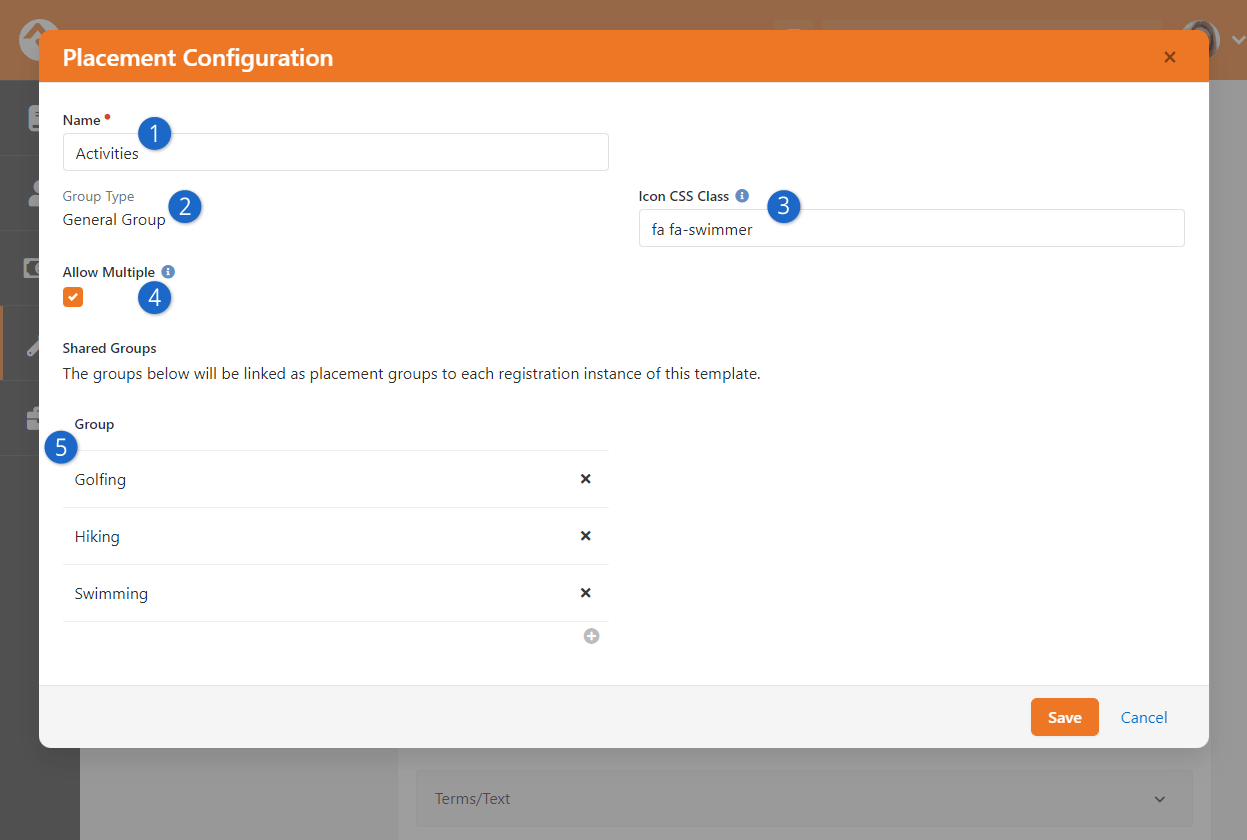
- 1 Name
- Provide a name for the placement. This name will appear as a tab within the registration instance.
- 2 Group Type
- When adding a new placement, you are required to select a
Group Type.
This controls what type of groups registrants can be placed into.
- 3 Icon CSS Class
- You can optionally set an icon for the placement.
- 4 Allow Multiple
- If you select this box, then a single registrant can be placed into more than one group in this placement type.
In the example pictured above this option is selected because registrants can participate in more than one activity.
You probably wouldn’t want to enable this for something like bus assignments, because each person should only be
assigned to a single bus.
- 5 Shared Groups
- Use the button to add groups to the
Shared Groups
list. This will be the list of groups into which you can place registrants, which
we’ll explore in detail below. These groups are shared across registration instances
that use this template. Only want a group for a single instance? Read on, we’ll cover
that soon.
Once the placement feature is configured, you’ll see an extra tab for each placement group you’ve defined.
From these tabs you can quickly place the registrants into groups. Let's see how this works.
Registration Instance Group Placement
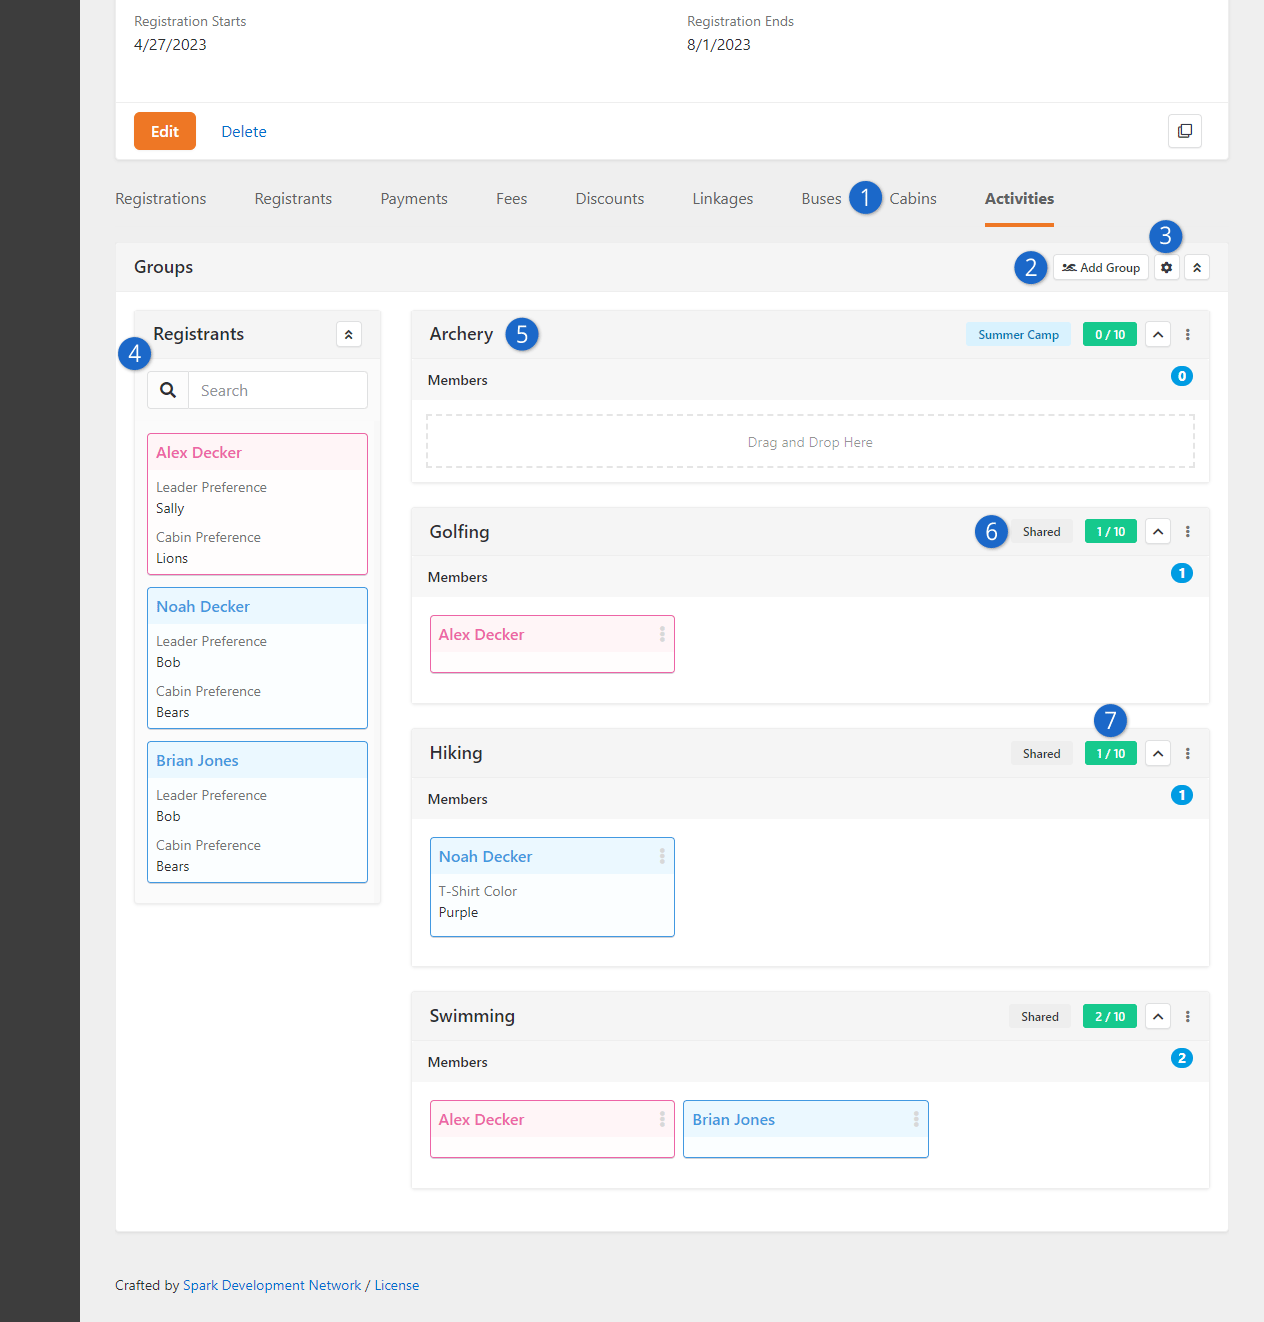
- 1 Placements
- In the example pictured above, there are three Shared placement areas. This matches the
Placement Configuration
list defined on the template.
- 2 Add Group
- Click this button to add a group to this registration instance. You can either create a new
group directly from this page or you can add an existing group. The Archery group was
added to the registration instance this way.
- 3 Placement Configuration
- Click the icon to access additional placement configuration options.
There are a lot of options here, so we’ll discuss them in detail below.
- 4 Registrants
- A searchable list of registrants lets you easily drag and drop individuals into the group placements
on the right. If applicable, you can update the configuration (from the icon)
to display registrant attribute values such as “Cabin Preference”.
- 5 Placement Groups
- Each group into which a person can be placed is listed here. Group requirements and limits are enforced
when adding individuals into these groups, so you can leverage the group’s configuration to help ensure
people are placed appropriately.
- 6 Labels
- Placement groups that have been added to the registration template will appear with a “Shared” label.
This is a handy reminder that the group is shared across registration instances. You can also use the
Add Group button to add groups to this
instance only, which assigns a label based on the instance name.
- 7 Capacity Count
- If a group has a capacity, then this label will appear and will be updated automatically as registrants
are placed. In the example pictured above, “Swimming” has a limit of 10 registrants with two spaces
already taken by Brian Jones and Alex Decker.
Next, let’s look at some of the placement configuration options available within the instance. These settings are
used in addition to the registration template’s placement setup. Click the icon to
access them.
Edit Instance Placement Configuration
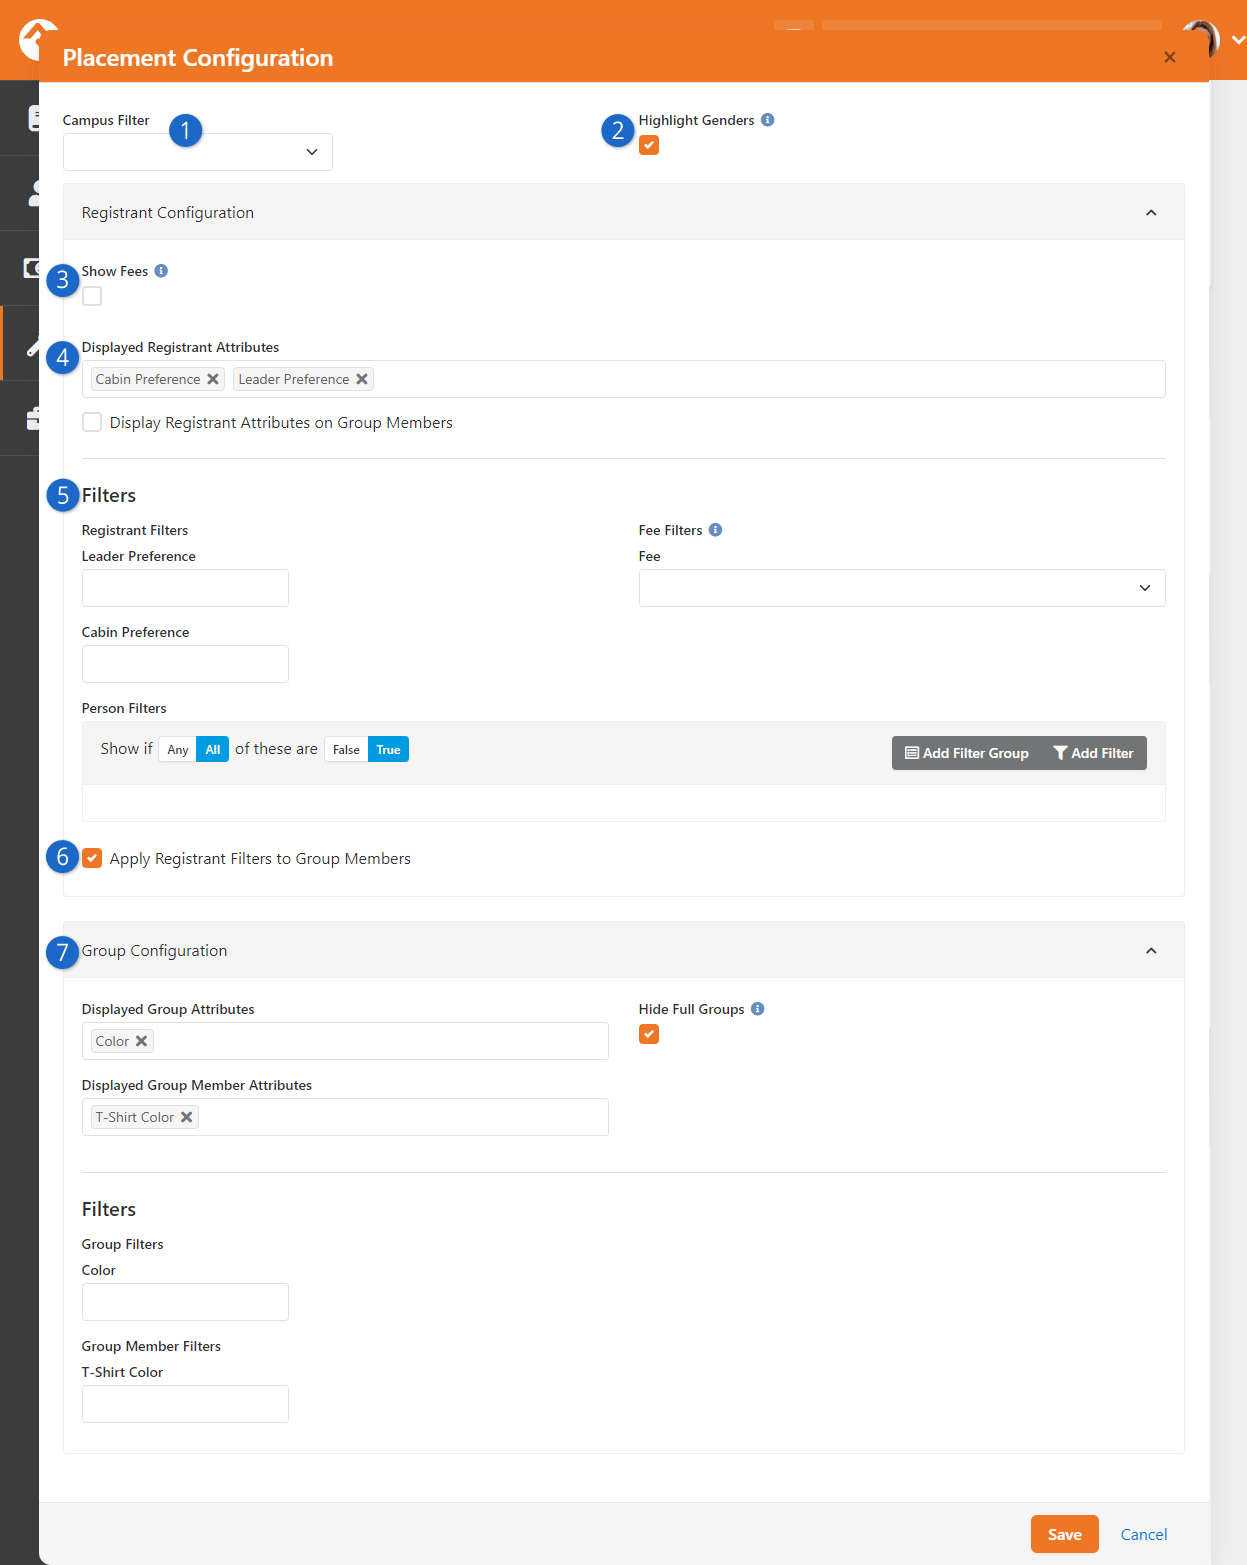
- 1 Campus Filter
- Selecting a campus here will only show placement groups for that campus. Placement groups without a
campus assigned will always be shown.
- 2 Highlight Genders
- If enabled, registrant names will be highlighted pink or blue according to the person’s gender.
- 3 Show Fees
- Enabling this option is useful for cases where a person should only be placed into a group if they have
paid certain fees.
- 4 Displayed Registrant Attributes
- Choose which attributes should be displayed for each registrant on the placement screen. This makes it
easy to place camp registrants into their desired locations. You can choose whether or not to show
these attributes on placed registrants on the right side of the screen by setting the
Display Registrant Attributes on Group Members
option.
- 5 Filters
- You can restrict the list of registrants by adding filters here. In the example pictured above, a filter
can be added according to a registrant's fees. You can also add a person filter to, for example,
filter by age or grade.
- 6 Apply Registrant Filters to Group Members
- Here you can choose whether filters used for the registrants listed on the left should also
apply to placed registrants on the right.
- 7 Group Configuration
- You can choose to display Group and/or Group Member attributes if any are configured. You can also choose
to Hide Full Groups if you don’t want
to display groups that have reached capacity. The filters listed in this area come from group and
group member attributes.
Registration Template Placement Page
This page is a lot like the group placement tabs described above, with one key difference. This page references a
template, combining the registrants from different instances. This is ideal for placing large volumes of registrants
quickly and easily.
Registration Template Placement Page
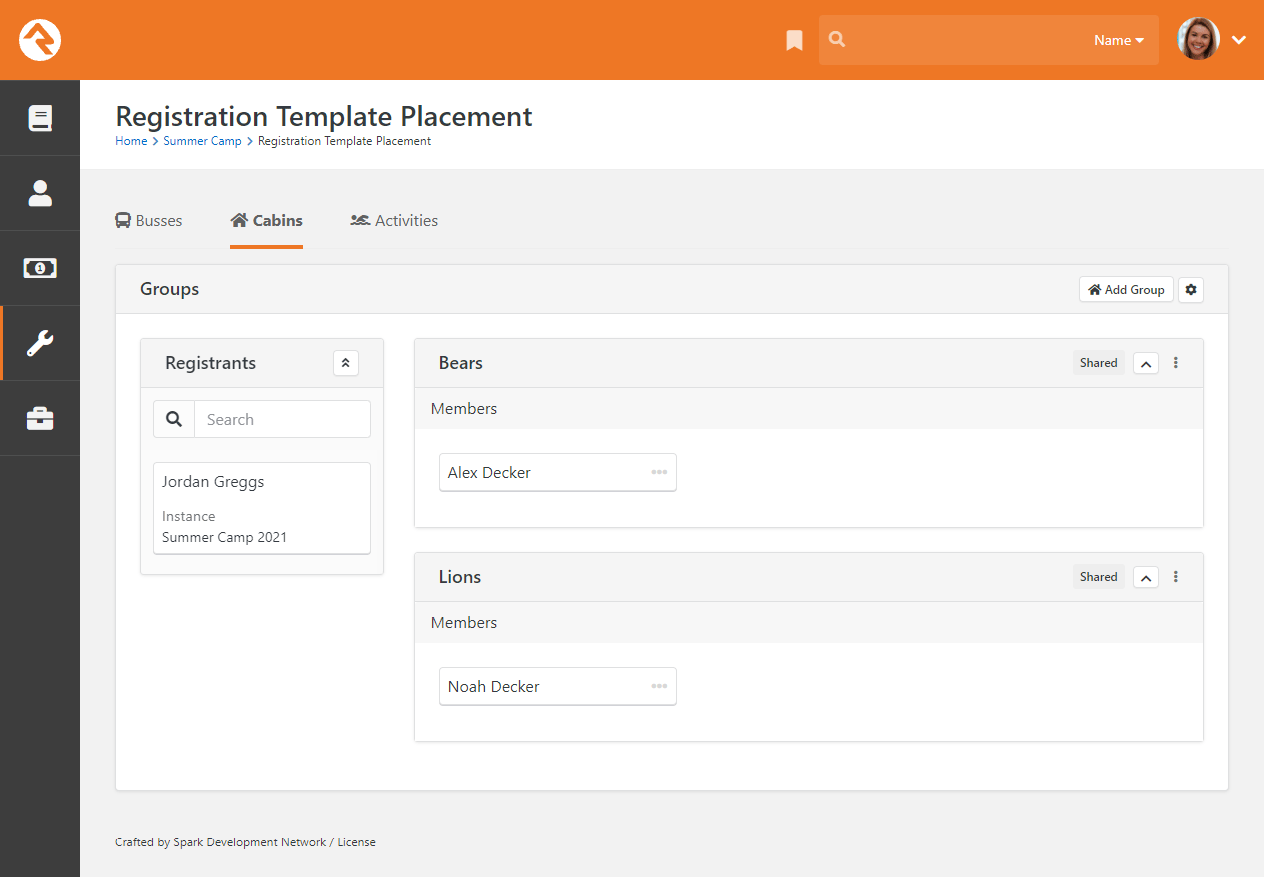
This page can be accessed from the registration template detail page by clicking the
icon
as pictured below.
Access Registration Template Placement Page
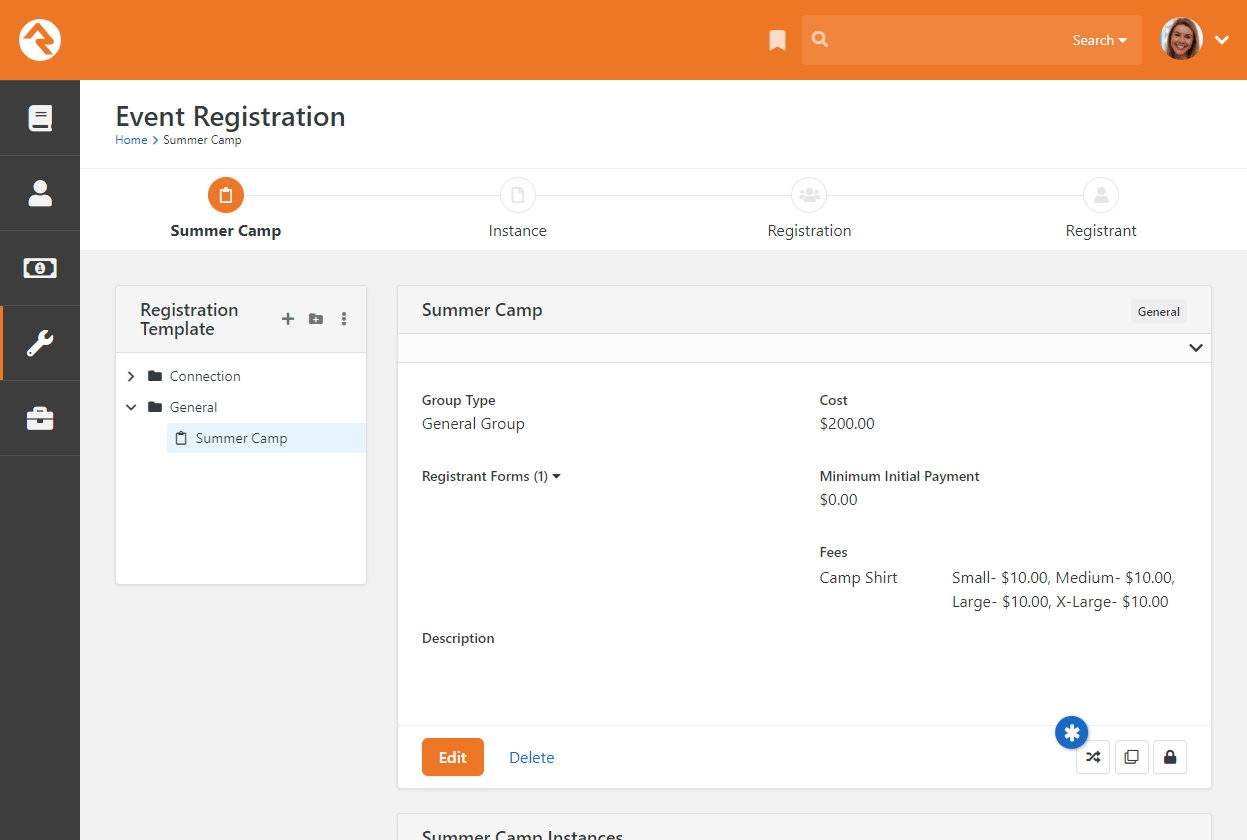
Registration Finances
Paid registrations come with the additional complexity of having to work with money. Rock
provides several tools to make this as simple as possible while also ensuring that there
are good protections in place for proper accountability.
Adding Payments
While most of the time payments for events will be handled by the registrar during the registration
process, you can manually enter payments on their behalf from the registration details page:
Tools > Event Registration > Registration Template > Registration Instance > Registration
(ok... that seems complex, but it's really not as bad as it looks on paper...)
From the Registration Details page, you can manage payments
using the Payments tab pictured below.
Registration Payments
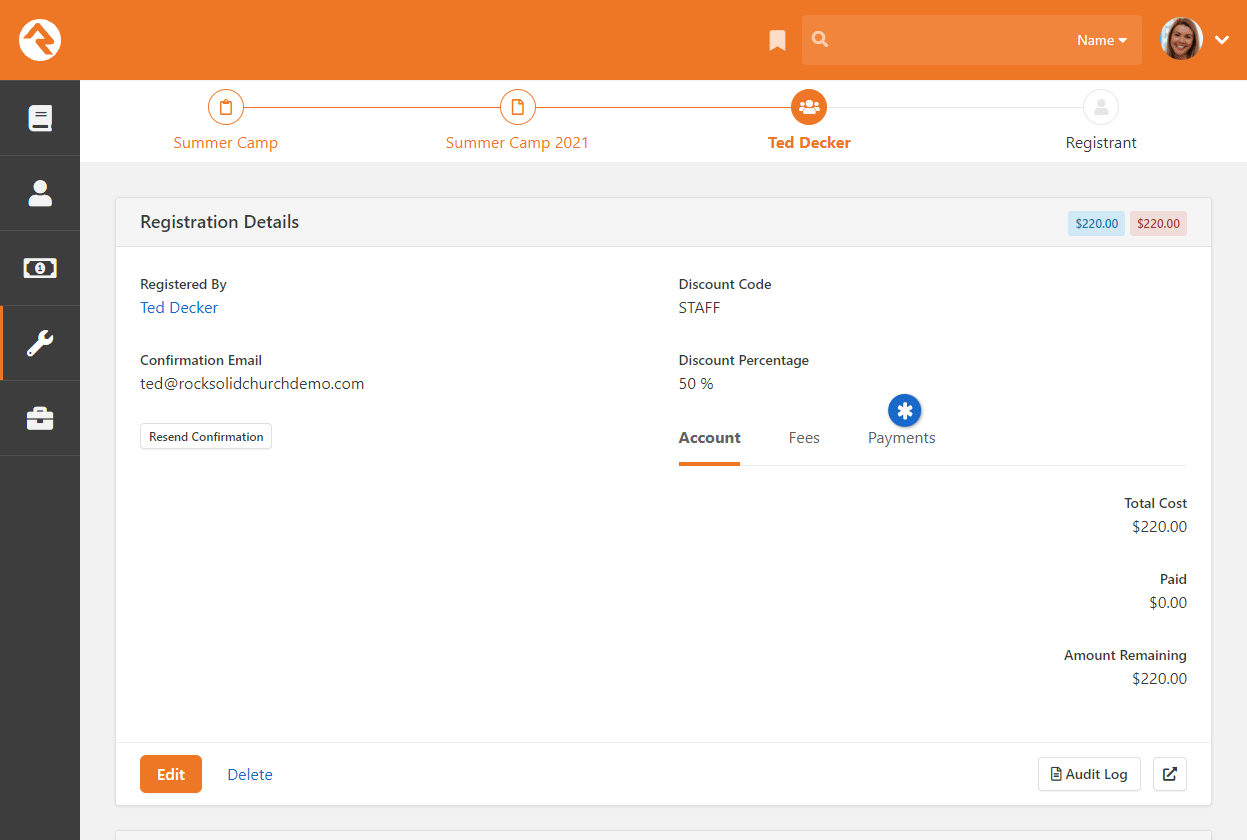
Once you click the link you will see the Payments Edit Panel.
The screenshot below shows you all the options on this screen.
Payments Edit Panel
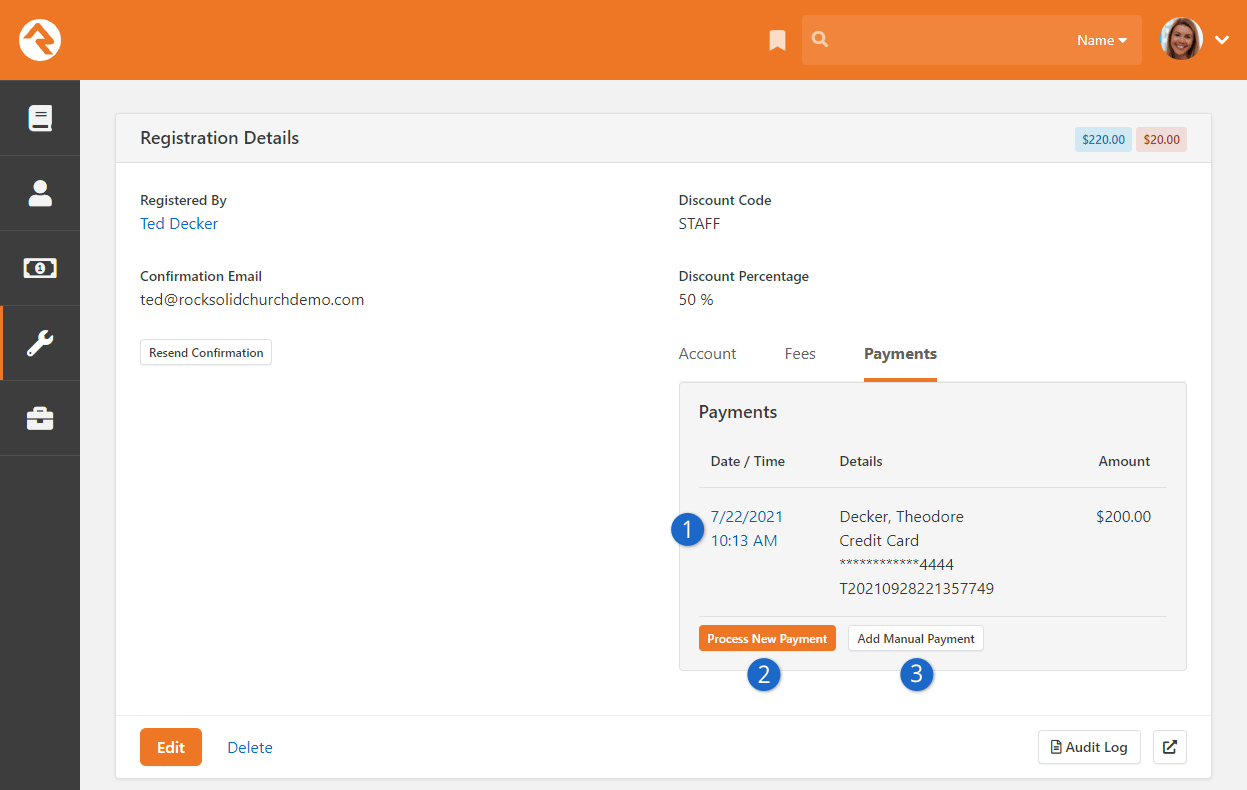
- 1 Payment Detail
- Clicking on the date of the payment will take you to the financial transaction detail page for the payment. From
here you can get more information about the payment and process a full or partial refund.
- 2 Process New Payment
- Selecting this option allows you to run a new credit card payment through Rock. In order
for this to work, the registration type's financial gateway must support the "hosted" mechanism.
See the Configuring a Gateway section of the Rock Your Finances guide for more.
- 3 Add Manual Payment
- This option allows you to enter the details of a manual (off-line) payment, like cash or check.
Refunds
Processing full or partial refunds through Rock is simple. Simply click the
Date / Time link
shown in call-out #1 above to proceed to the financial transaction detail page for the payment.
From here you will see the screen below. Note the refund button at the bottom of the page.
Financial Transaction Detail
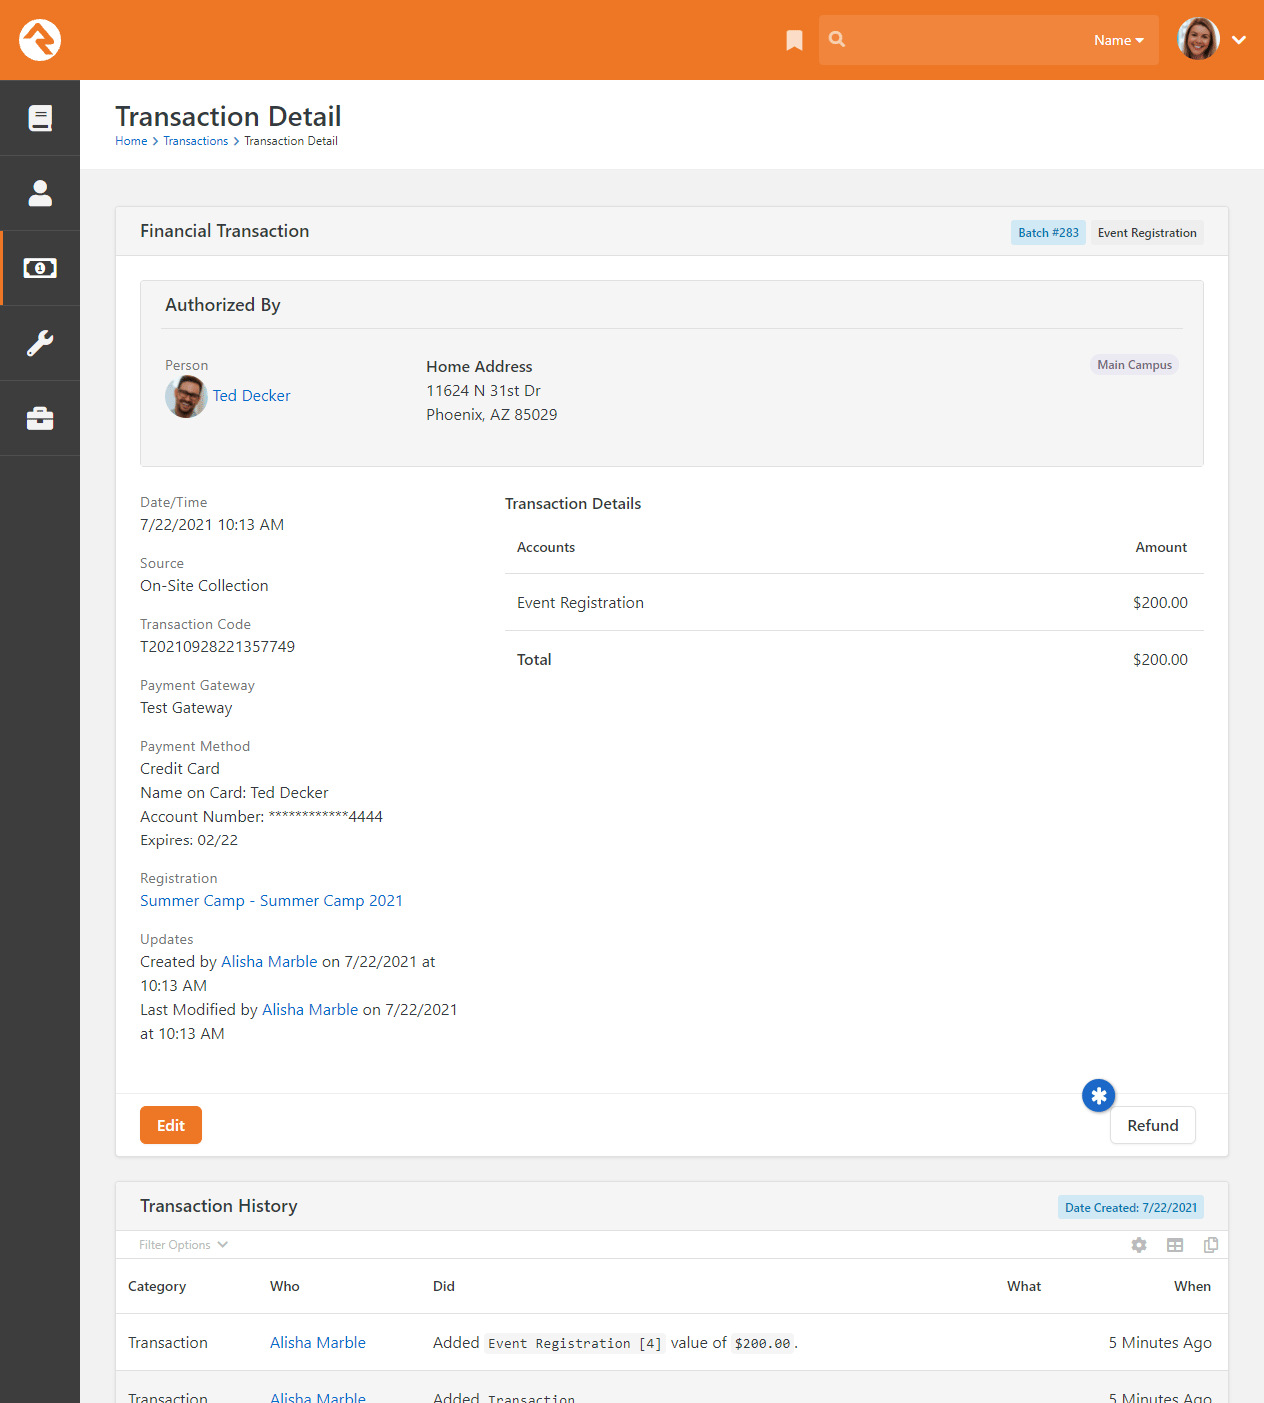
Clicking the Refund button will
show the refund modal below.
Payments Edit Panel
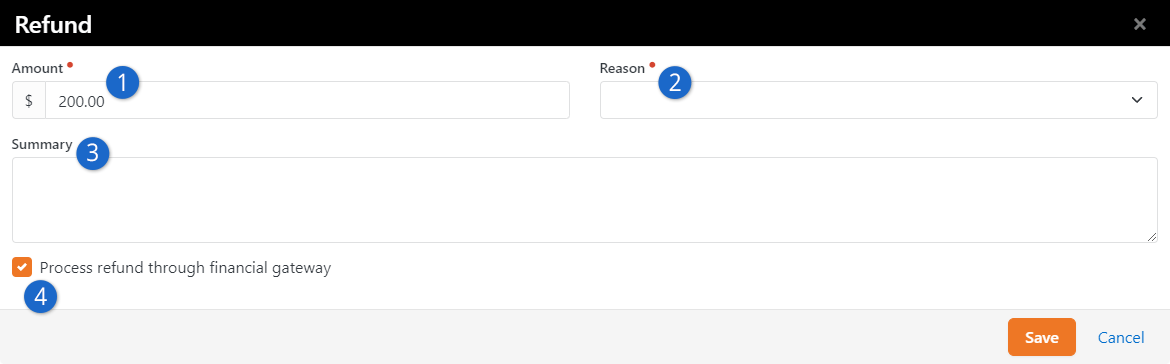
- 1 Amount
- This tells Rock how much the refund should be for. By default, the
full amount of the financial transaction is entered into the box.
- 2 Refund Reason
- This dropdown allows you to pick from a standard set of refund reasons. You
can modify this list under Admin Tools >
General Settings > Defined Types > Refund Reasons.
- 3 Summary
- This field allows you to enter specific notes about the refund.
- 4 Process Refund Through Gateway
- This checkbox determines if the refund should be automatically run through the payment gateway (checked)
or just entered into Rock (unchecked).
Partial Payments
Partial payments are a popular feature for events with higher costs, like camps. The age ol' problem with
them comes when it's time to complete the payments. Many times, people want to pay off the balance, but they're
not sure how. Other times... well... they just need a reminder. Let's look at several strategies on how to
make partial payments work for you.
Allowing Partial Payments
To allow partial payments, a
Minimum Initial Payment amount
must be provided in either the registration template or the registration instance (wherever the
cost is being set).
Reminder Emails
The default email template for event reminders will provide a summary of the amount due with a link to
complete the payment. Remember that the reminder emails can be sent out more than once by changing the
send date to the future after the initial reminder goes out.
Recent Registration Block
Rock also ships with a Recent Registration
block on the My Account page of the external
website. This block, located under the Assessments list along the right of the page, shows registration
information and notes if a payment is due. Clicking the link will take them to a page where they can complete
the payment or apply a discount code. Note: this block only displays registrations that have an attached
Calendar Event Item.
You'll want to review this block's settings. It can display registrations based on various criteria:
recent registrations, future events, balances due, or any combination thereof. It's not limited to
recent registrations only. There's also a Lava Template, which means you can customize how
the block appears and what information it shows.
Recent Registration Block
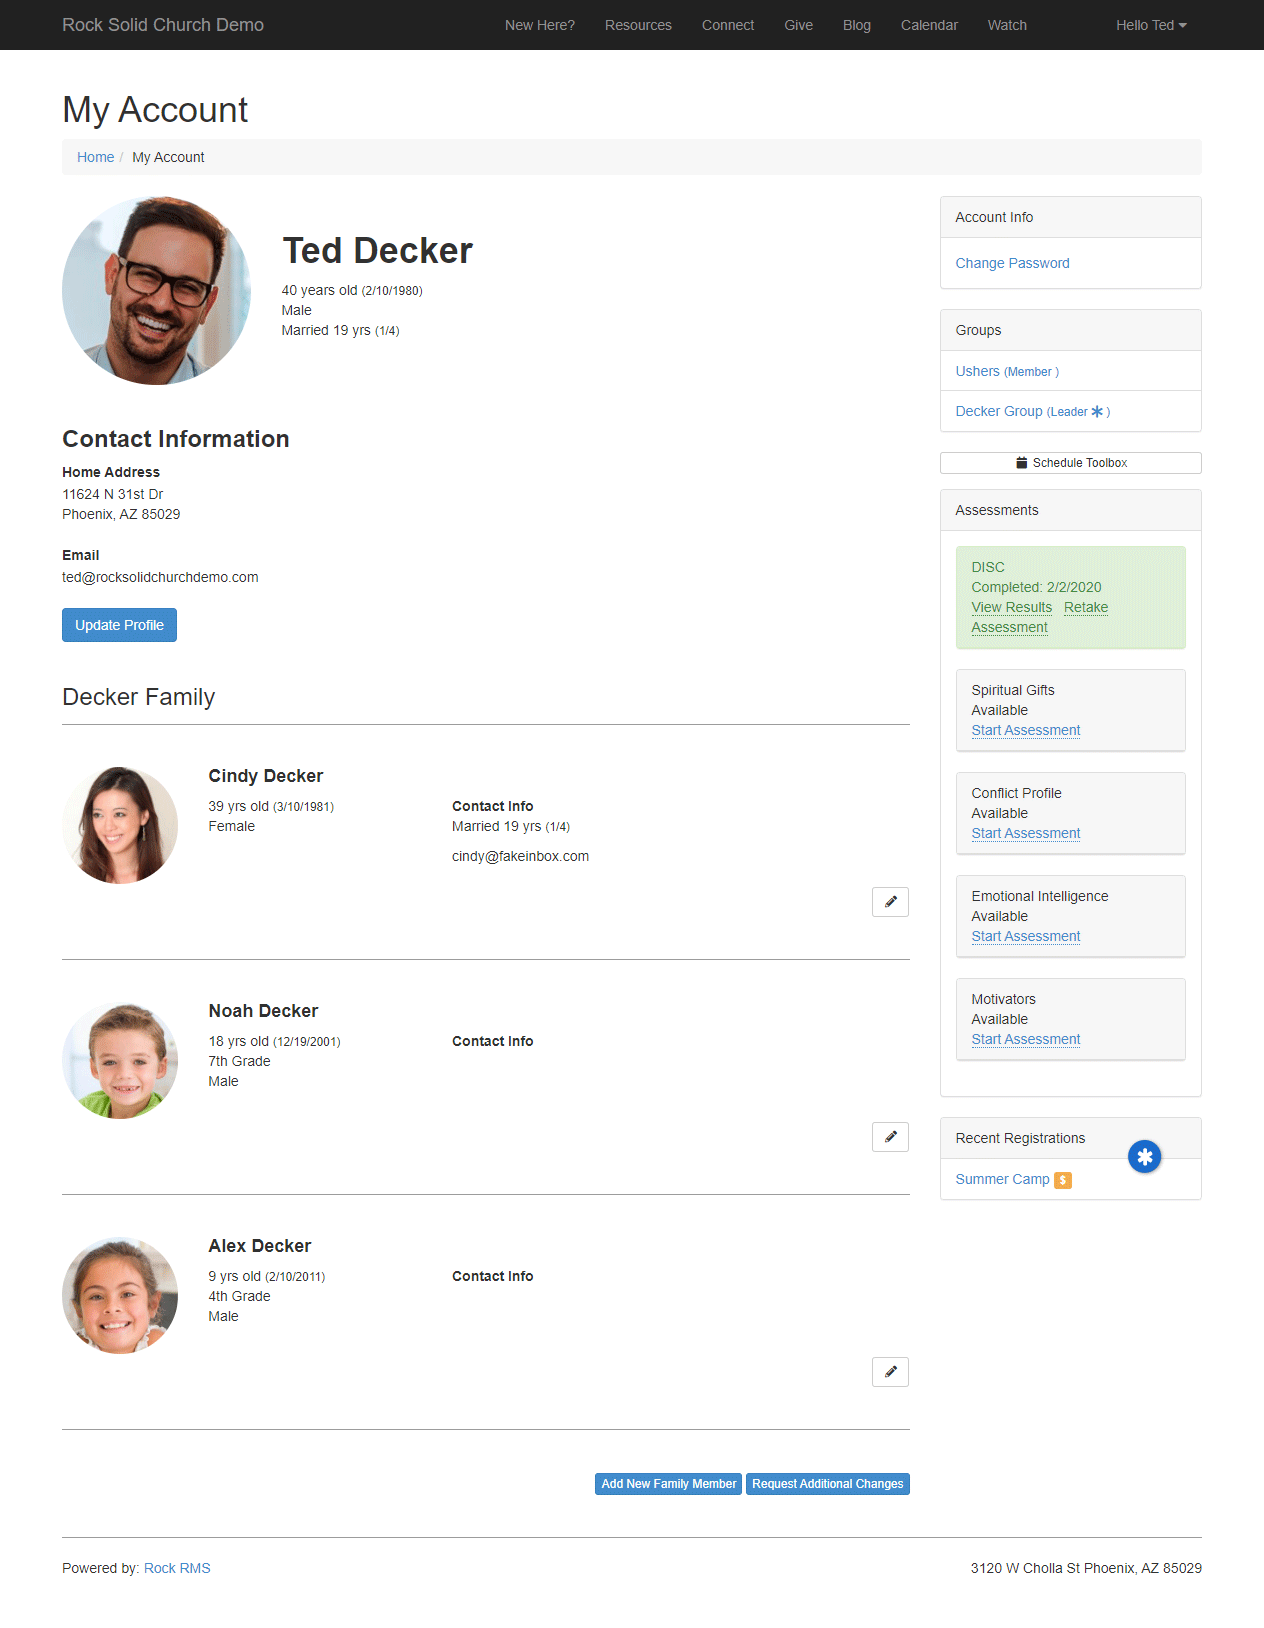
Post-Registration Discount Codes
Not only does the Recent Registration block allow individuals to make payments against an outstanding balance,
they can also apply a discount code (see Discounts). This is great if they find out about the discount after
registering, or if they simply forgot to apply the code when they first registered.
To apply the discount code
the individual needs to access the
Review Registration
page from the Recent Registration
block, the same way they would to make a payment as described above.
Review Registration Page
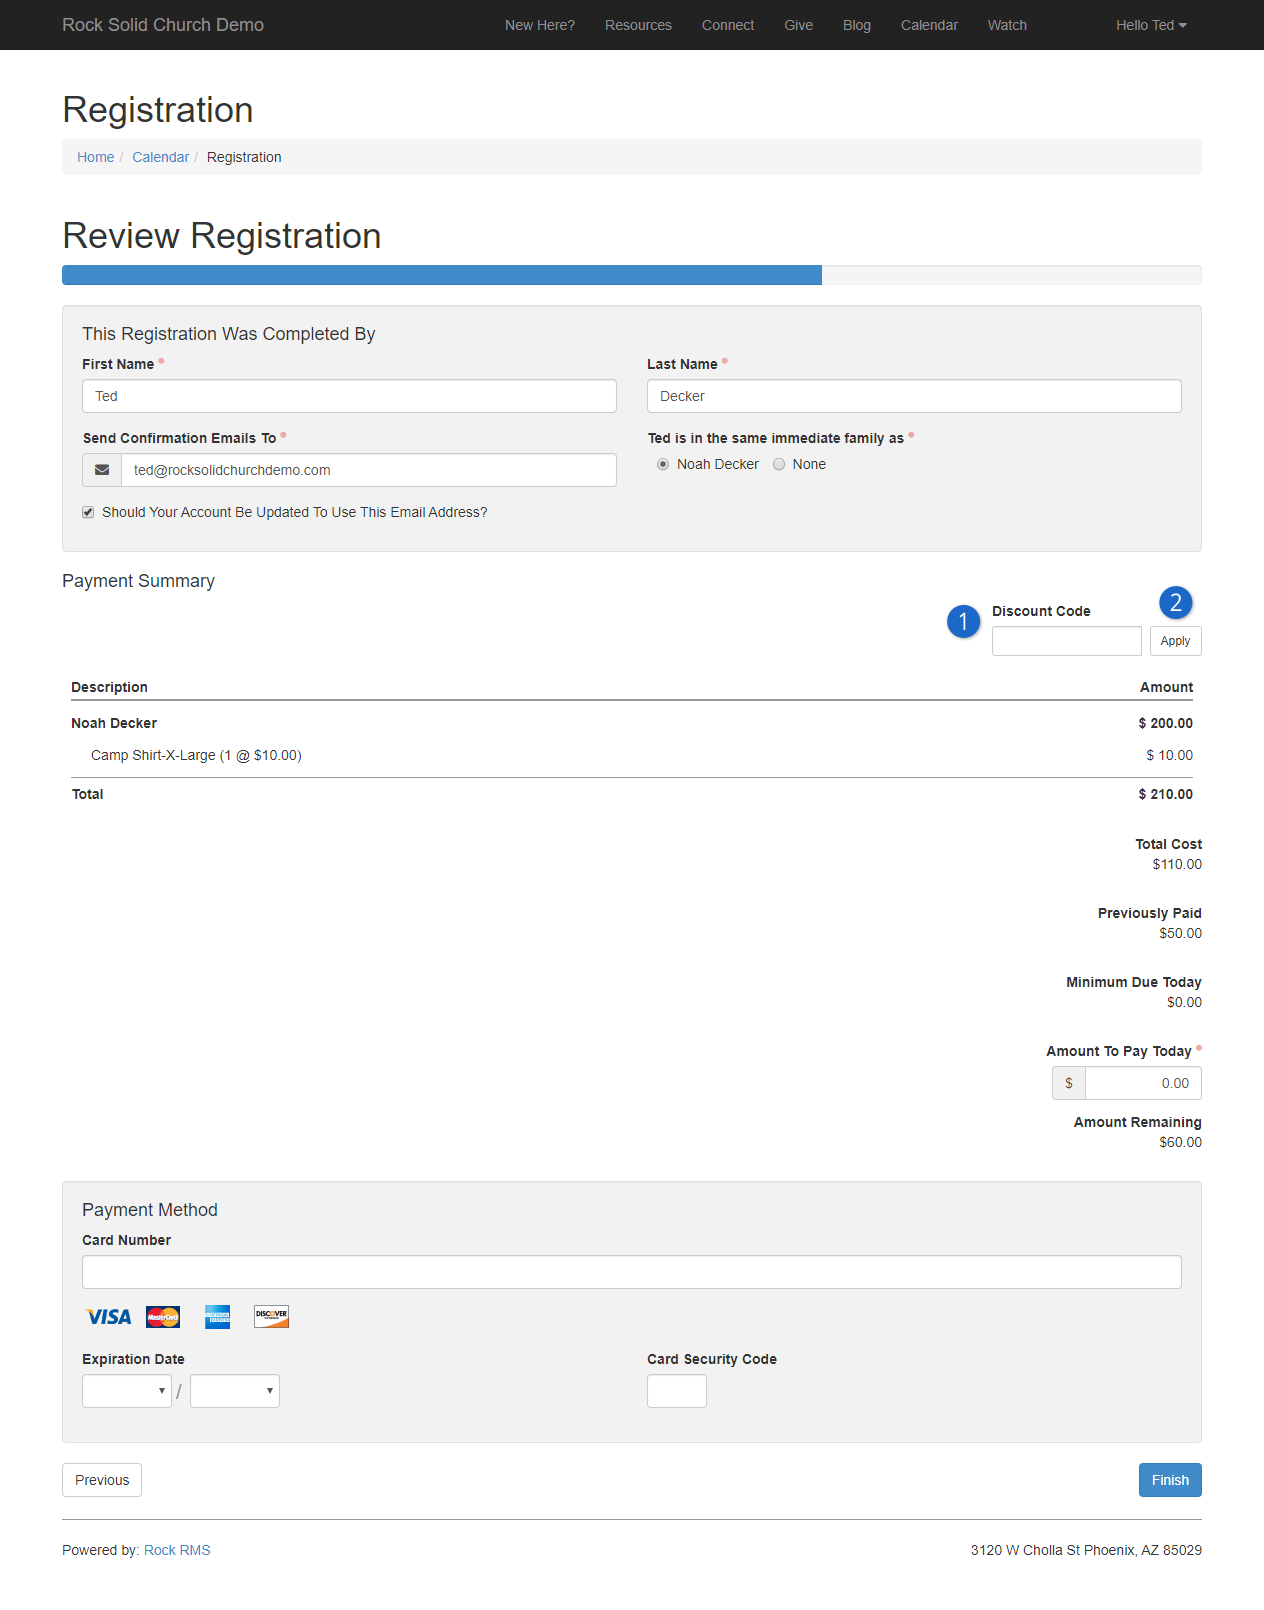
- 1 Discount Code
- Individuals enter a discount code here to apply the discount toward their remaining balance.
-
- 2 Apply
- If a valid discount code has been entered, pressing the Apply button will immediately apply the discount
to the individual’s balance (pressing Finish is not required).
Individuals who have already paid in full will not be able to enter a discount code after registering. Similarly,
individuals who have already used a discount code can’t apply an additional discount code.
If the discount ends up deducting more than the individual owed, the result will be a negative balance on their
account. In that case you’ll need to manually issue a refund (see Refunds) to get the balance back to zero.
Event Registration Matching
If you need to match event payments to transactions in a batch,
Event Registration Matching is
exactly what you’re looking for. You’ll find it under
Finance > Event Registration Matching.
This lets you select a batch and a registration instance, then match transactions from that
batch to individual registrations. This can be particularly helpful if you’re using
Check Scanning
to process a set of registration payments, but it works with any transaction from any open
batch.
Event Registration Matching
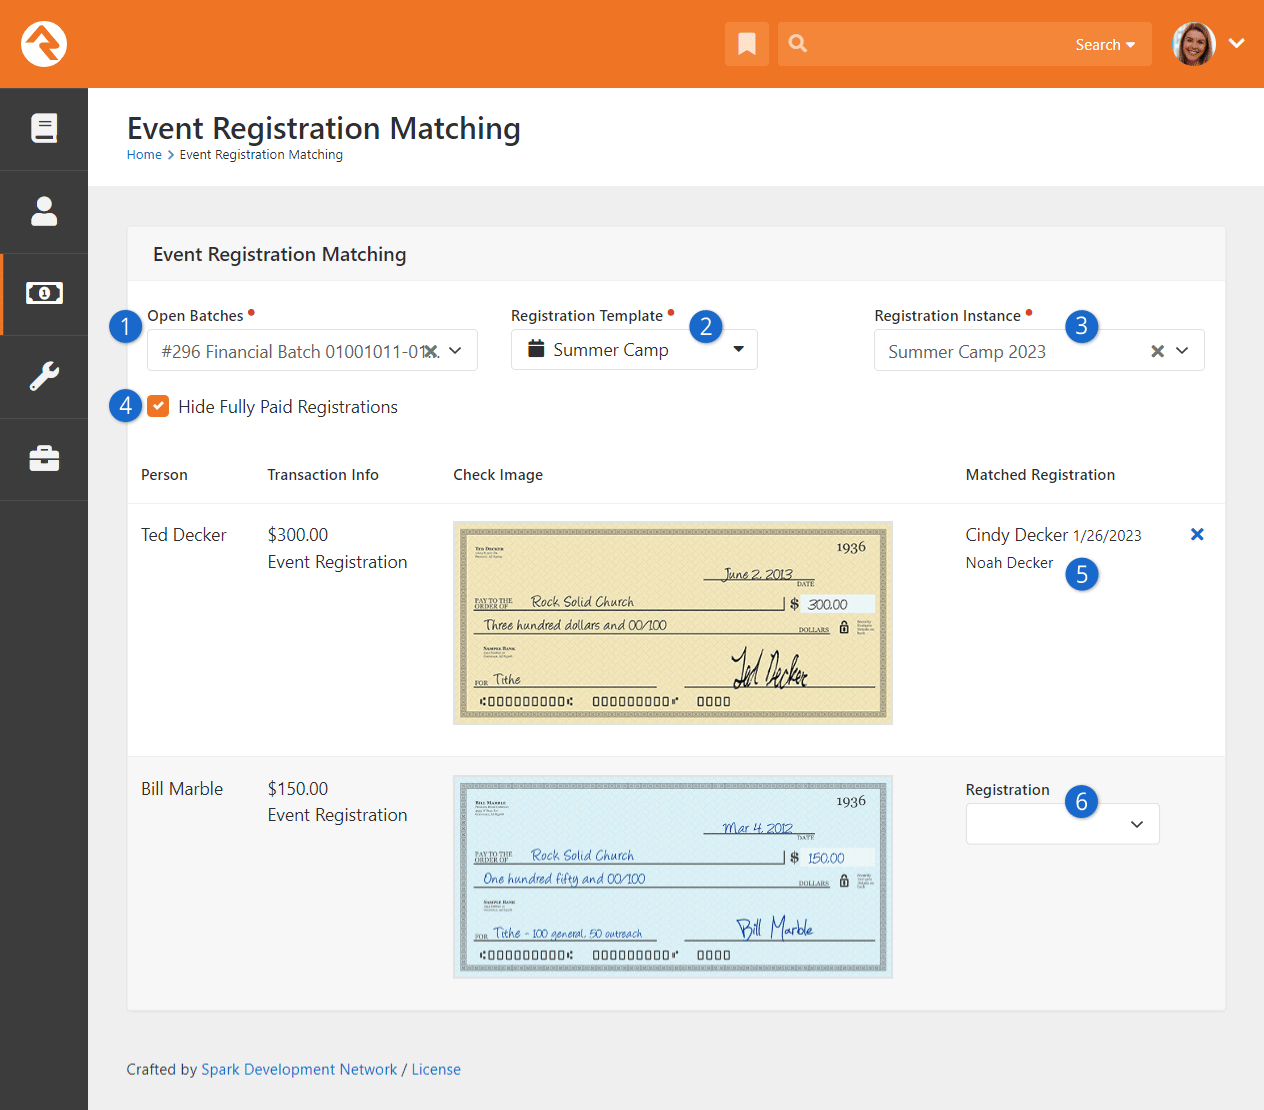
- 1 Open Batches
- You can select any open batch from this list. Keep in mind that the batch must be
Open and not
Pending.
- 2 Registration Template
- Select a registration template from the list. This is needed to select a registration
instance of that template in the next field.
- 3 Registration Instance
- Event Registration Matching works with a single registration instance at a time. The
registration instance is used to identify the registrations that you’ll be matching payments
to.
- 4 Hide Fully Paid Registrations
- It’s unlikely that you’ll be processing payments for registrations that have already
been paid in full. Selecting this option lets you hide those registrations from the list. If
you uncheck this box, all registrations for the selected instance will be made available for
matching, even if they are paid in full.
- 5 Matched Registration
- In this example screenshot we have already matched the first check to Noah Decker’s
registration. After selecting his registration, the drop-down menu is replaced by the name
of the registrant and the date of the registration, for informational purposes. You can
click the 'X' to un-match this payment from the selected registration.
- 6 Select Registration
- This row in the example screenshot has not yet been matched to a registration. The
drop-down lets you search for a registration to match with the payment. The registrations
you’ll see here are controlled by the
Registration Instance
and
Hide Fully Paid Registrations
settings described above.
You’ll notice there is no
Save button on this page.
As soon as a transaction is matched to a registration, the registration itself is updated behind
the scenes in real time. For instance, we could view Noah Decker’s registration right now and
see that it has been paid in full. If we were to un-match that transaction from Noah’s
registration, that too would be updated in real time and anyone viewing the registration would
see a balance owed.
Calendars
There are three components that make up Rock's calendar capabilities: Calendars, Events and Event Occurrences.
Calendar Components
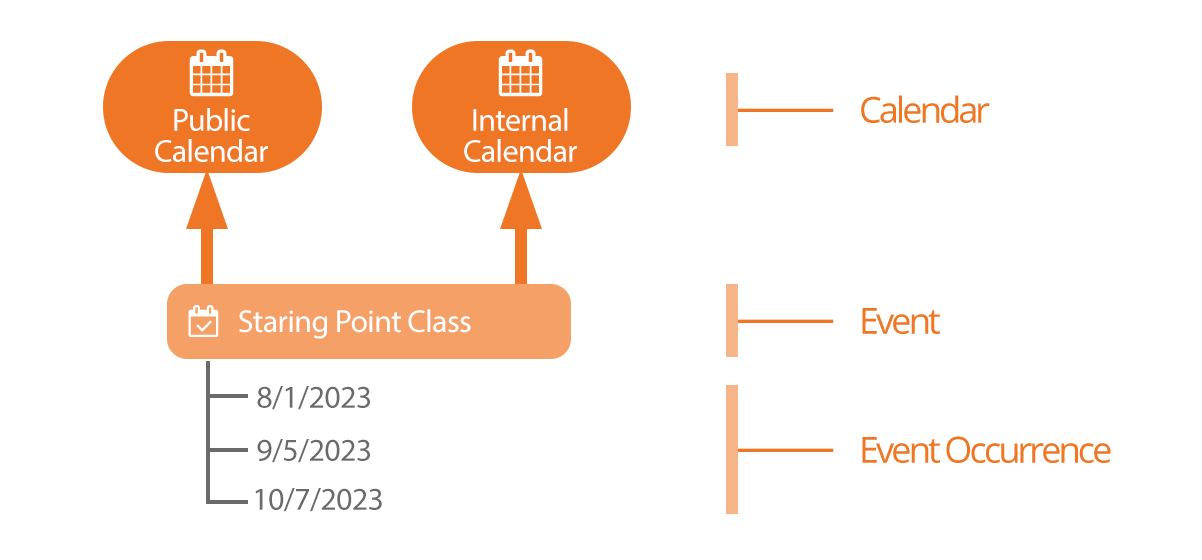
One might wonder why we need separate events and event occurrences. Couldn't we just put the
schedule on the event and be done with it? That would certainly work, but there are cases where
the same type of event, say Baptism, happens repeatedly. Having separate event and event items
allows us to do things like list all the upcoming baptism dates.
Event Calendars
Every organization has the need for multiple calendars. Even a small organization will have
a public and private (internal) calendar. Most will have several more. You can administrate
calendars under Tools > Calendars.
Out of the box Rock ships with two pre-configured calendars:
- Internal: Used for internal events like staff meetings, retreats, etc.
- Public: For events targeted towards your members and attendees.
Events Can Be Placed on More Than One Calendar
Sometimes you'll have an event that should be displayed on more than one calendar. Rock
supports this. An event can be on any number of calendars you'd like.
Calendar List
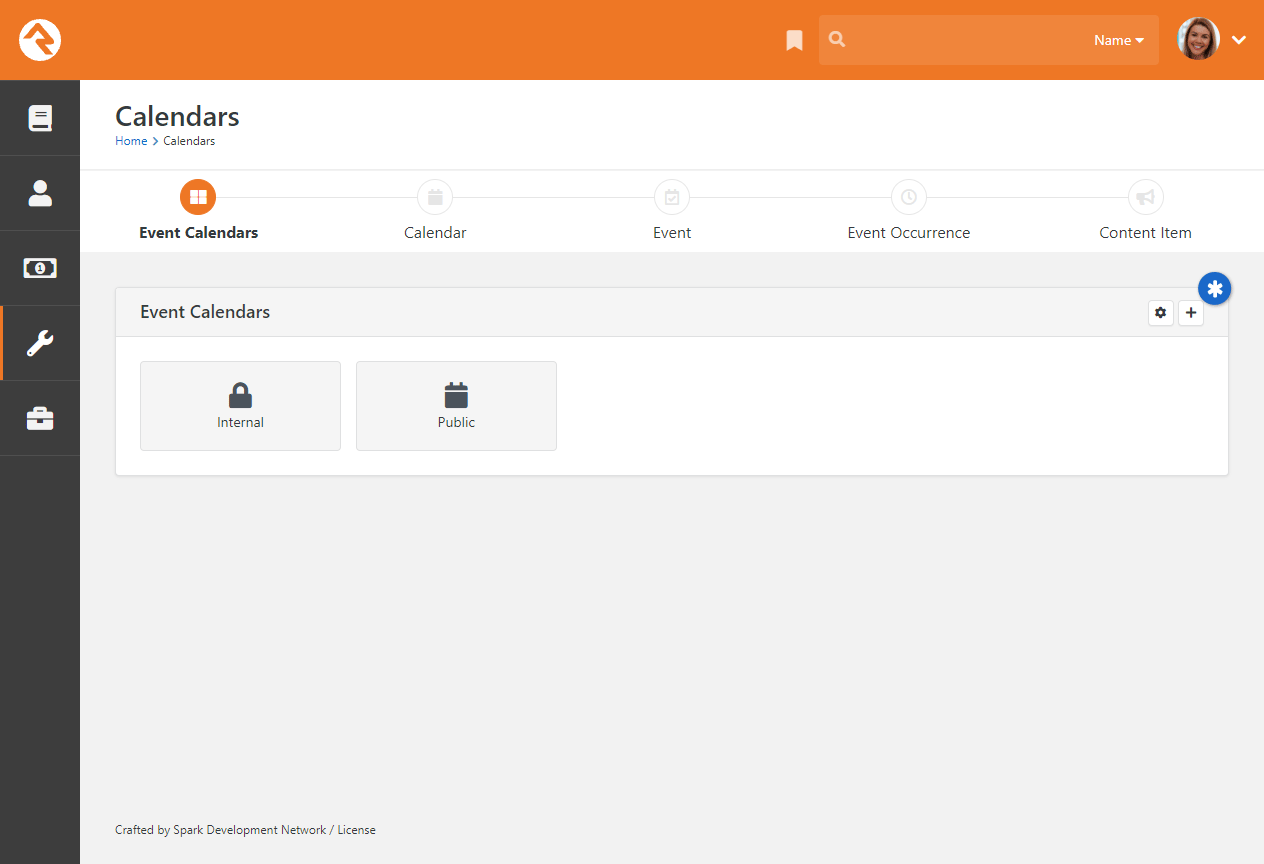
You can add additional calendars by selecting the add button in the upper right of the panel,
as pictured above.
When adding or editing a calendar you will see the screen below:
Calendar Details
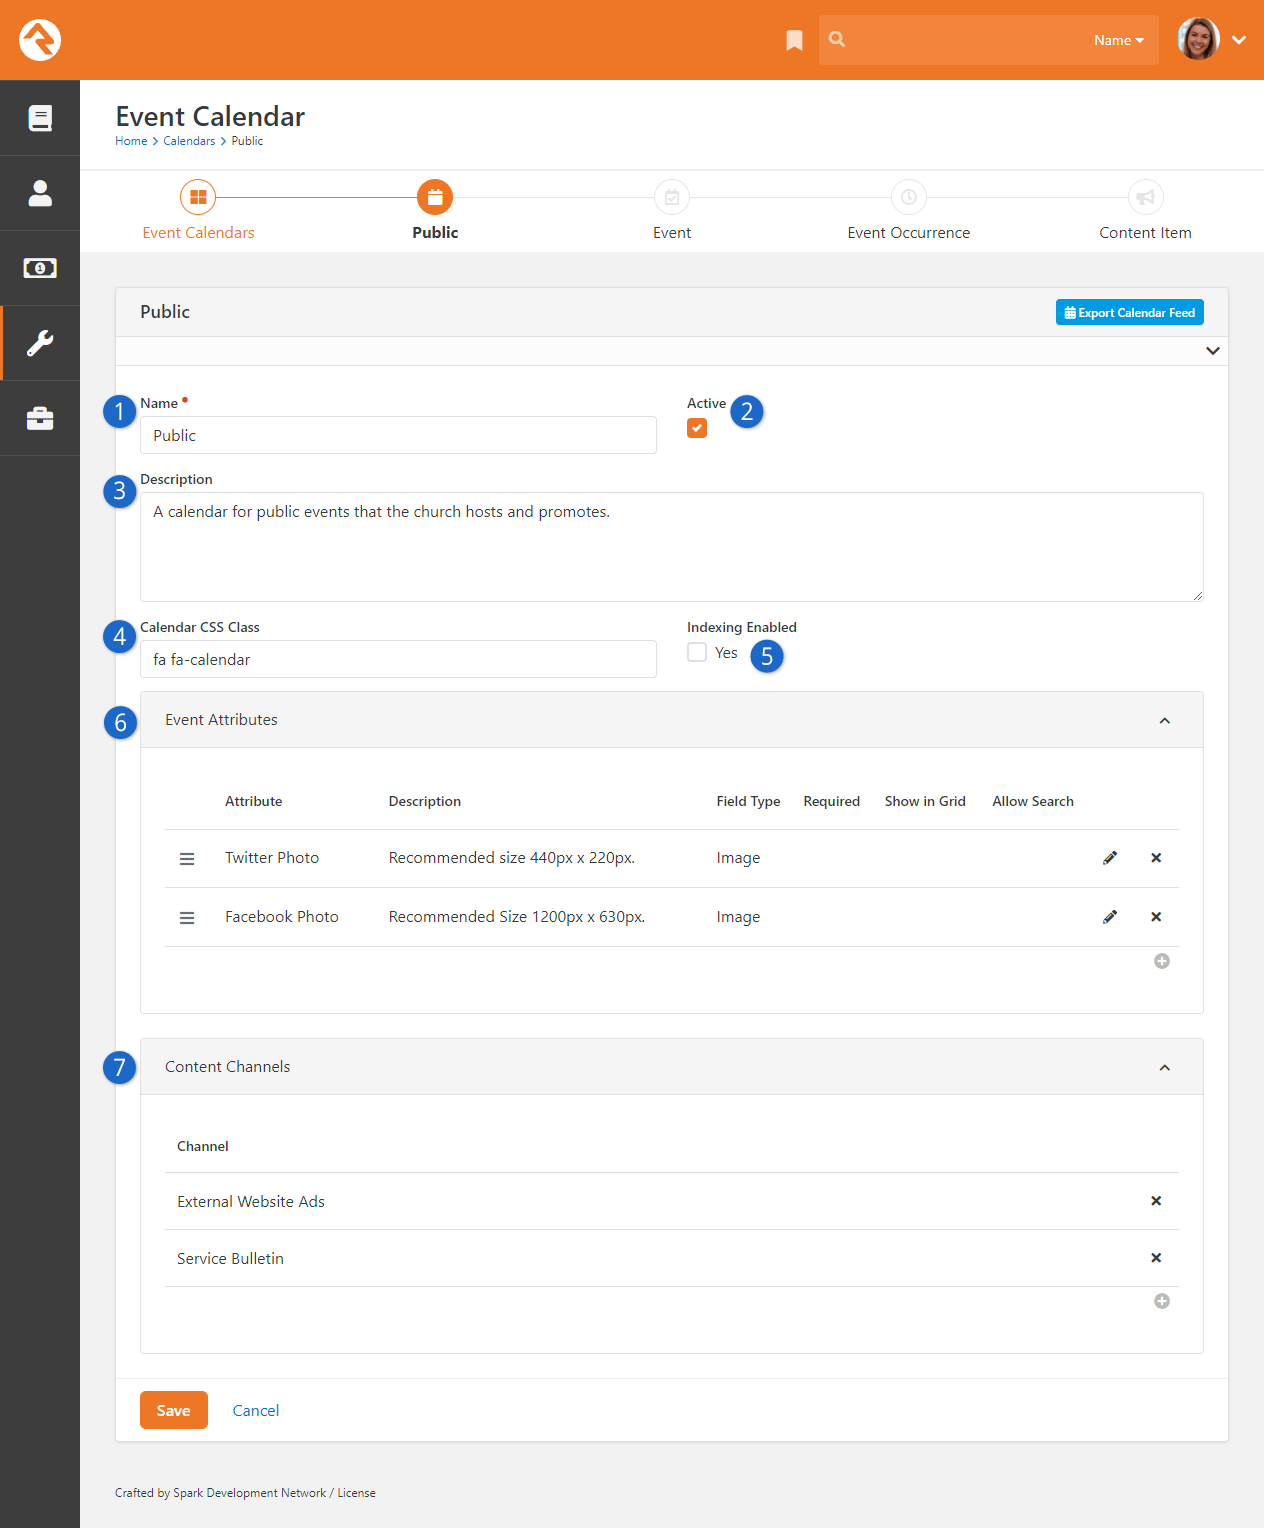
- 1 Name
- The name of the calendar.
- 2 Active
- Whether the calendar is currently active.
- 3 Description
- A quick reminder of what the calendar is for and how it should be used.
- 4 Icon CSS Class
- The Font Awesome icon class the calendar should use.
- 5 Indexing Enabled
- Event Items can be indexed for use by
Universal Search.
This is set here at the calendar level.
- 6 Event Attributes
- Each calendar can define custom attributes available to the events that are on them.
This is where you define these attributes.
- 7 Content Channels
- We'll cover content channels later in the Bringing It All Together
chapter. For now, just know that you can link content channels to events to allow you to
easily promote them.
Calendar Security
You can set up security for each calendar you define. This allows you to delegate the
management of these calendars and their events. You set security from the
Calendar Details Page
by pressing the button.
Events
Once you've created your calendar, you're ready to place events on them.
Tools > Calendars > Calendar
Shows a list of the current events for a calendar on the Calendar Details Page.
As you get more and more events, you'll
want to start using the filters on this grid to help you manage the events that are displayed.
The event add/edit screen below shows you how to manage the events on the calendar.
Calendar Details
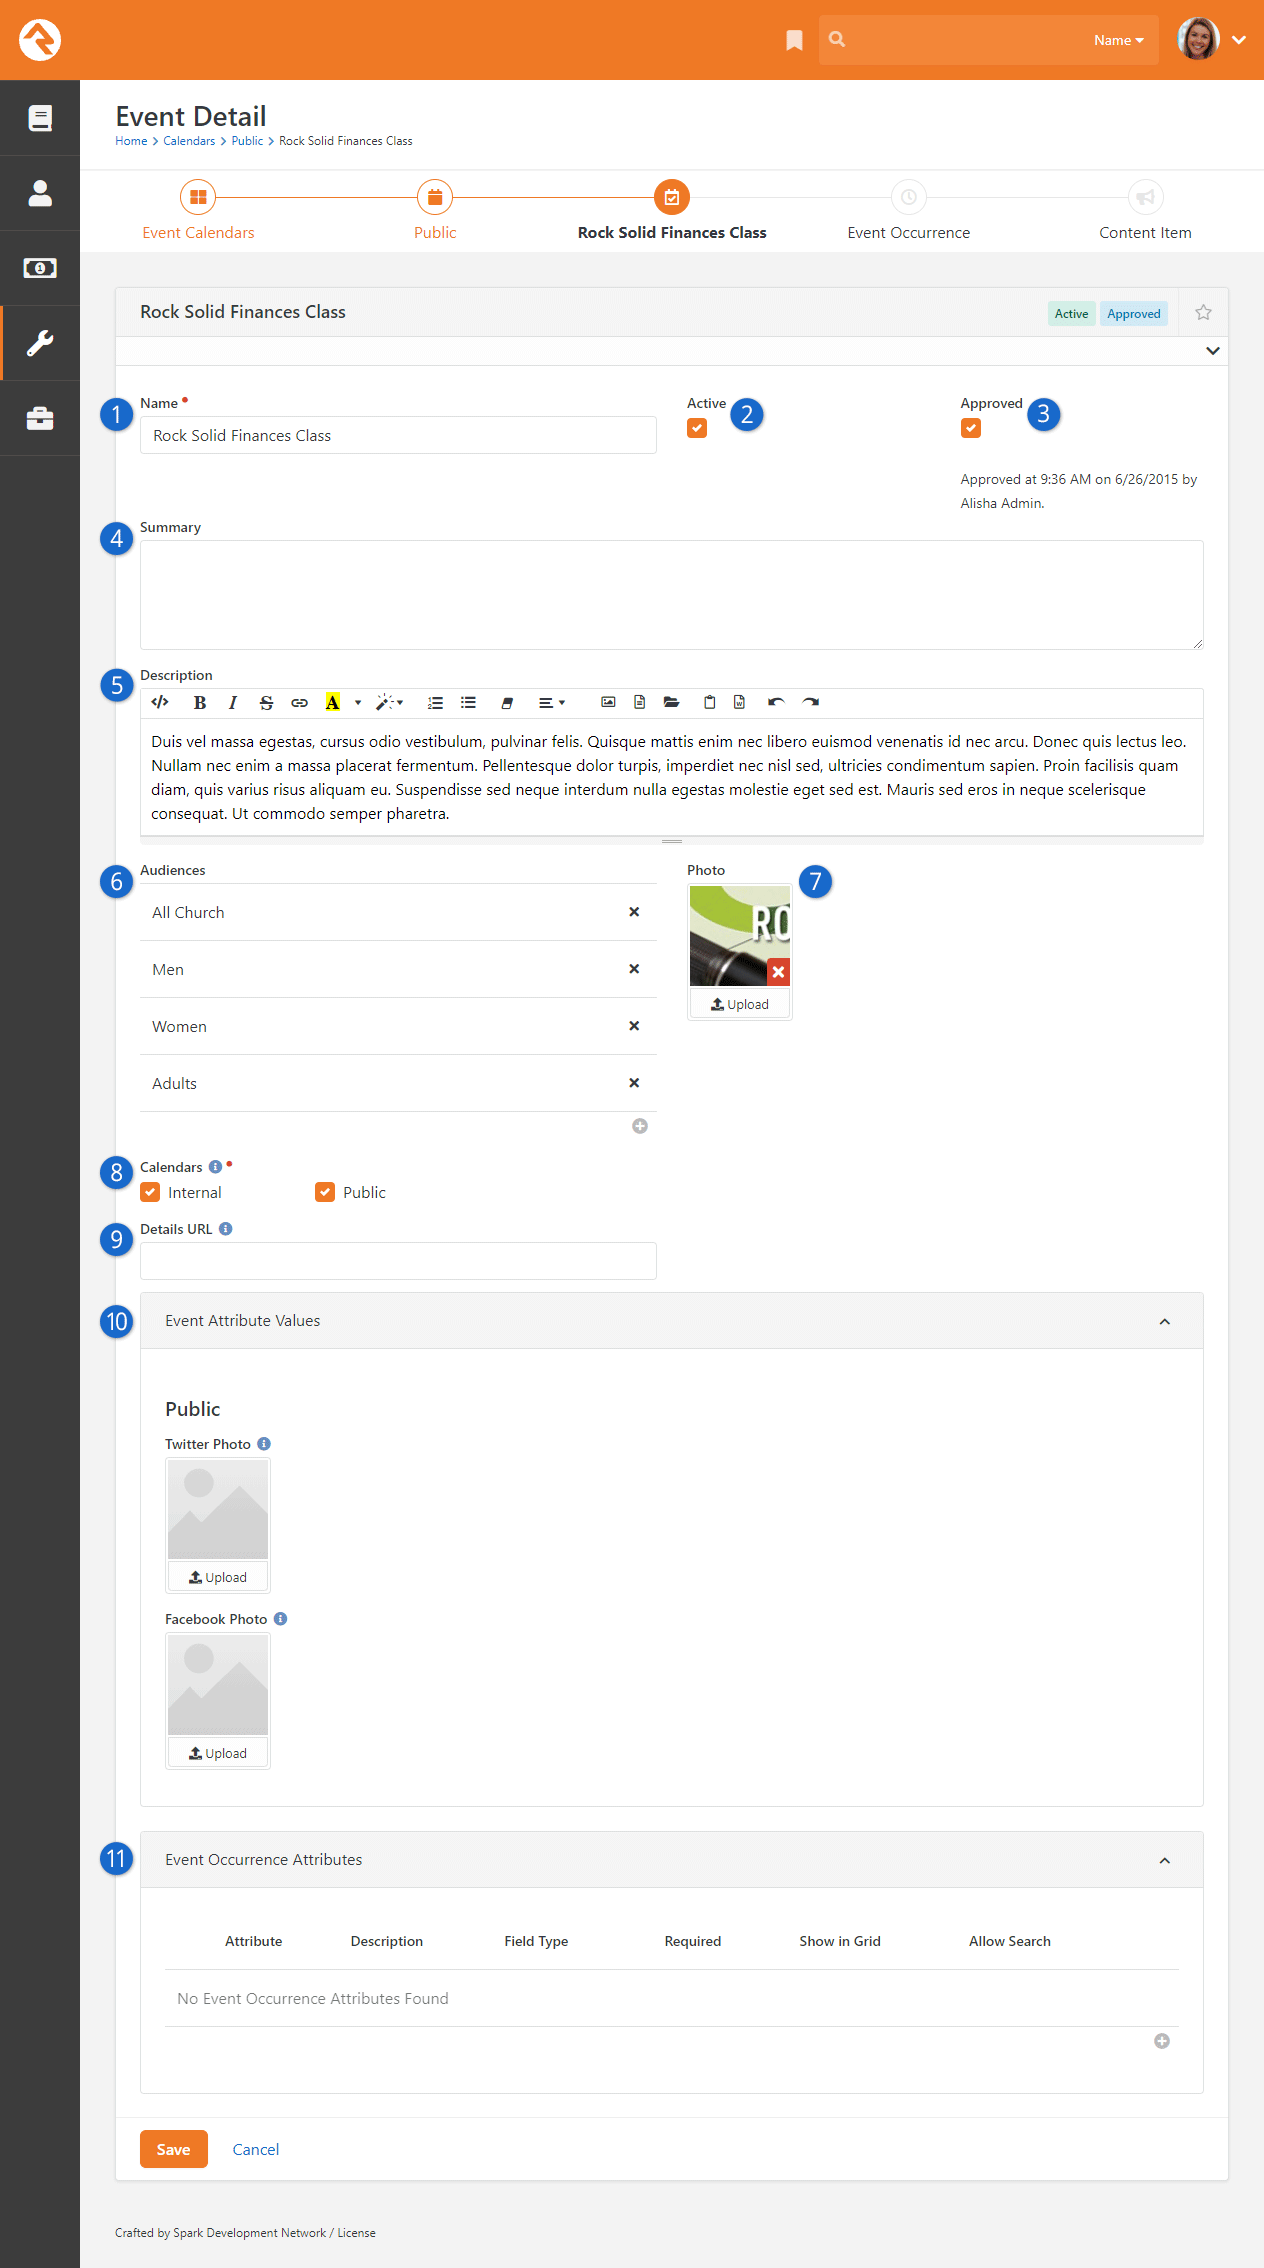
- 1 Name
- The name of the event.
- 2 Active
- Whether the event is currently active.
- 2 Approved
- If you have 'Approval' permission to the calendar, you'll be able to approve the event here.
- 4 Summary
- A quick description of the event that will display on the calendar when
listing multiple events.
- 5 Description
- A more complete description of the event that will be displayed on the event detail page.
- 6 Audiences
- This helps to categorize the events by those who would be most interested. These are
the same audience choices that are used for the other web content channels.
- 7 Photo
- A picture is worth a thousand words, right? So don’t skimp - include one on your event.
- 8 Additional Calendars
- As we mentioned above, you can place your event on as many calendars as you'd like.
- 9 Details URL
- If you provide a web address here it will be used instead of the Rock event details page when your
guests click 'More Information' from the calendar.
- 10 Attribute Values
- Remember how we could define custom attributes for the events on custom calendars?
This is where you'll add the values for these attributes. The attributes are grouped by
calendar.
- 11 Event Occurrence Attributes
- Define an attribute on an Event Item where the value is set on each of its Event Item Occurrences.
Follow An Event
After saving an event you can choose to follow it by selecting the
icon in the upper right corner of the details block. This will add it to the list of followed events on
your dashboard.
Event Occurrences
We have our calendar and now, events. All that's left is to add the event occurrences that
determine when these events occur. Some events may only occur once, while others apply often.
Either way, you'll add the occurrences from the Event Details Page.
Event Instance Edit
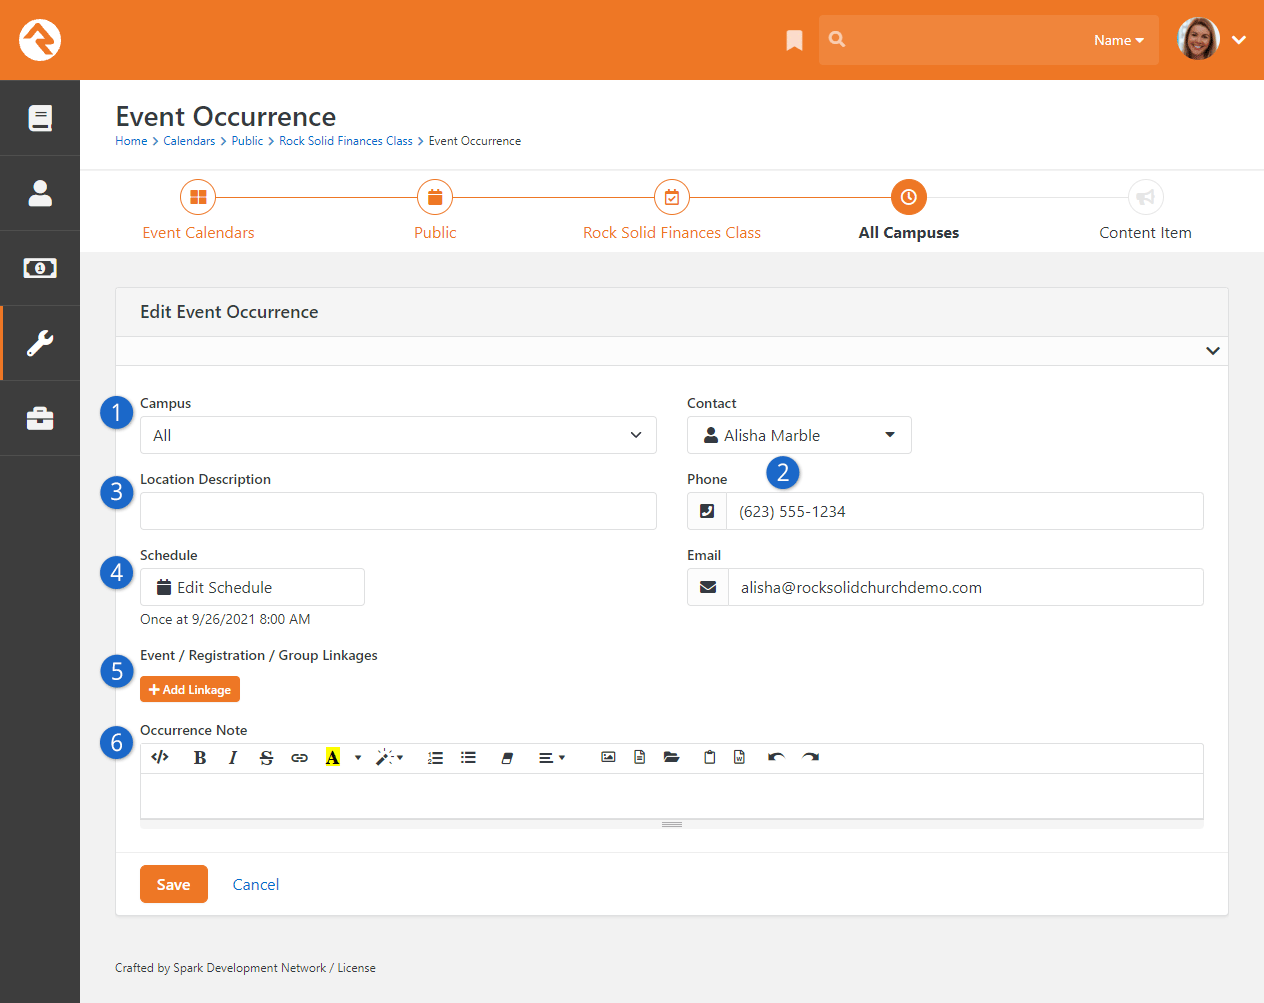
- 1 Campus
- First, we must select which campus this event will occur on (single campus organizations
can select either all or the main campus).
- 2 Contact Information
- Next, we select who the contact will be and provide their email and phone number.
- 3 Location Description
- Now we can describe the location where the event will be held. Instead of using a
location picker, we decided to allow you to enter a more descriptive text of where the
event is being held.
- 4 Schedule
- Ok, now for the important part. When will the event occur? Hopefully by now you've
had a chance to use the Rock Schedule Builder
tool in other features. It's a powerful tool for defining complex re-occurring schedules.
It also does simple one-time schedules too.
- 5 Linkages
- Most often, you'll want to create a registration for your calendar event. Instead of
having to leave the screen to create the registration instance, you can do it right here.
You can also link to an existing registration instance, or simply link the event to a slug
without linking to any registration instance. We'll talk more about how to do all
this in the Bringing It All Together chapter.
- 6 Occurrence Note
- This note will be shown on the calendar detail screen on the public website. It's
used to provide custom notes about the specific occurrence.
You might be thinking, "Hey! Reoccurring
schedules? I thought we were supposed to create a new occurrence each time the
event occurred?" Yes... and no... Some occurrences of an event may last two
to three weeks (say a single occurrence of a three-week stewardship class). In this case,
make a single occurrence with a reoccurring schedule.
Once you save your calendar occurrence, you'll be taken to the occurrence detail screen.
From here you'll see that you can click the button to
add a new content channel item, or you can click the button
to link to an existing content channel item. Adding and connecting with content channel items allows you to enter and track promos for your event.
Event Instance Detail
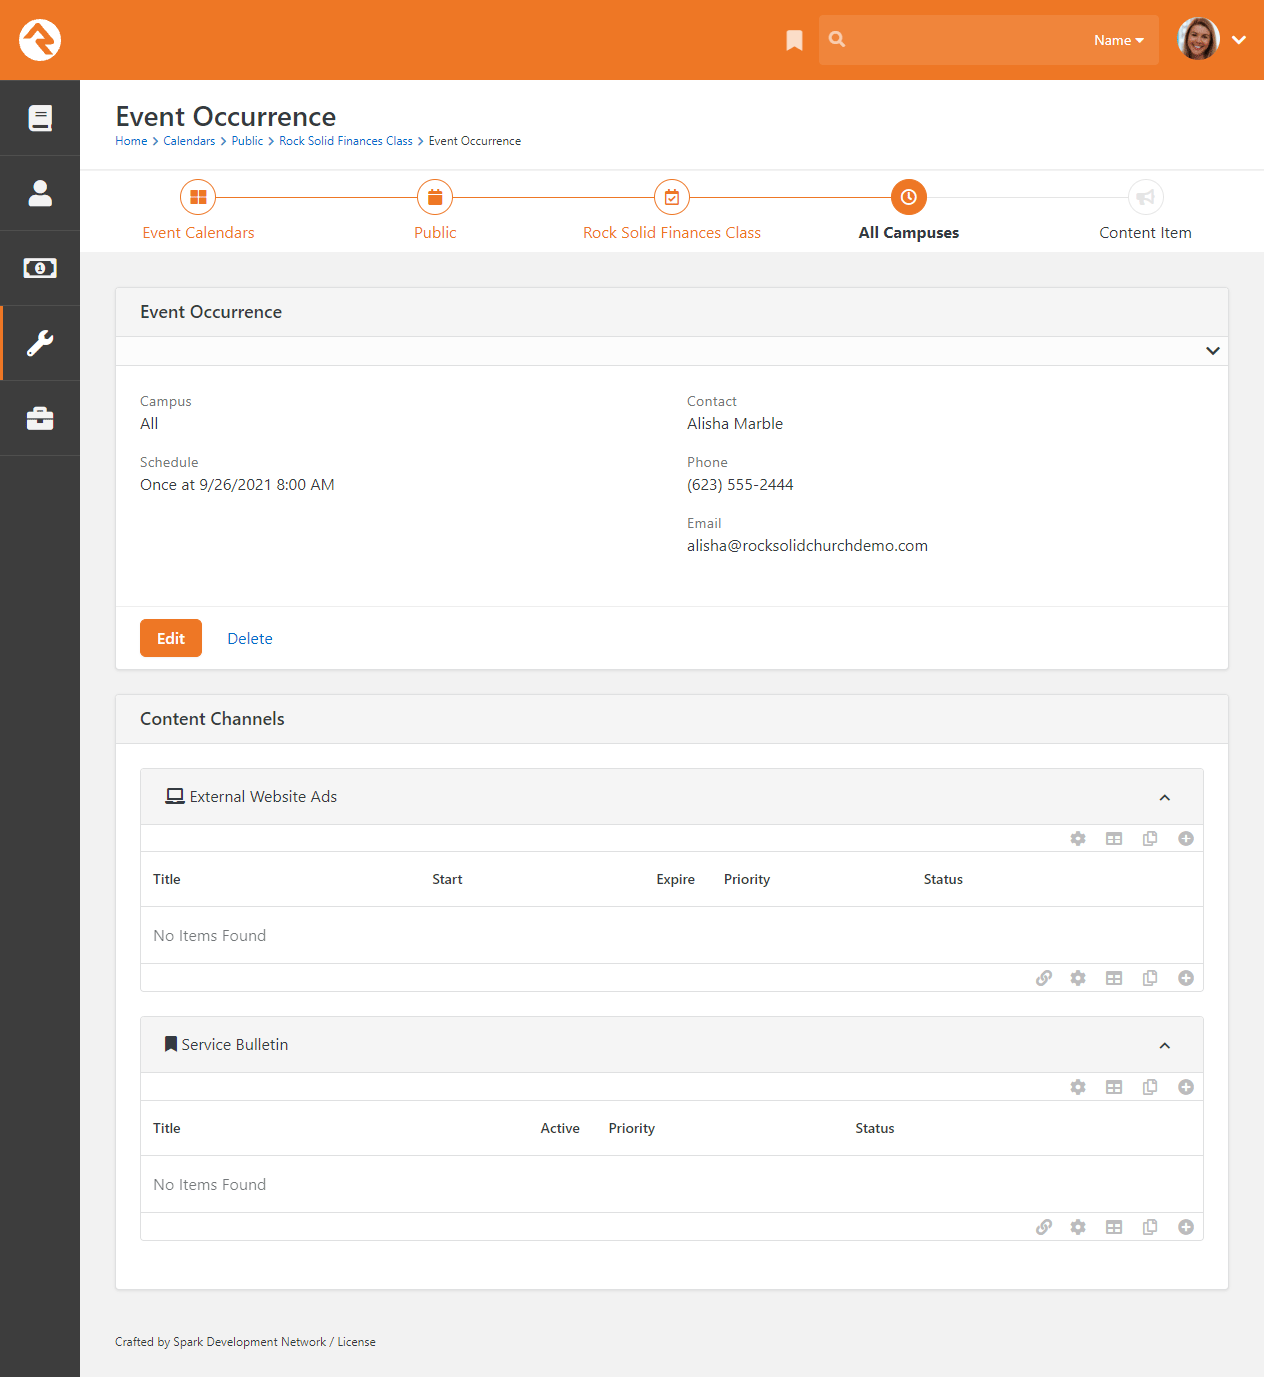
Event Occurrence Attributes
You can create specific attributes to assign to event occurrences. For example, you could create a "Lunch Provided?" attribute to use with recurring staff meetings. Then for each meeting assign that attribute a value of "Yes" or "No". As with all attributes, the possibilities are endless and completely customizable for your organization's needs. Keep in mind when creating these attributes, they will be available for every calendar event.
To create an event occurrence attribute value, click the button on the main Event Calendars screen to access the Calendar Attributes screen.
Calendar Attributes

In the Event Occurrence Attributes section, click the
button to create the new attribute. Once saved, the attribute is available in the Attribute Values section of the event's Edit Event Occurrence screen.
Event Item Occurrence Attributes
Hang on, what if I know an attribute will ONLY be used for one event occurrence? Well, in this case, you can set your attributes within the Event Details, such as your staff meetings.
Scroll to the bottom of the Event Details page for the Event Occurrence Attributes panel and expand it.
Click the button to add a new attribute.
Event Item Attributes
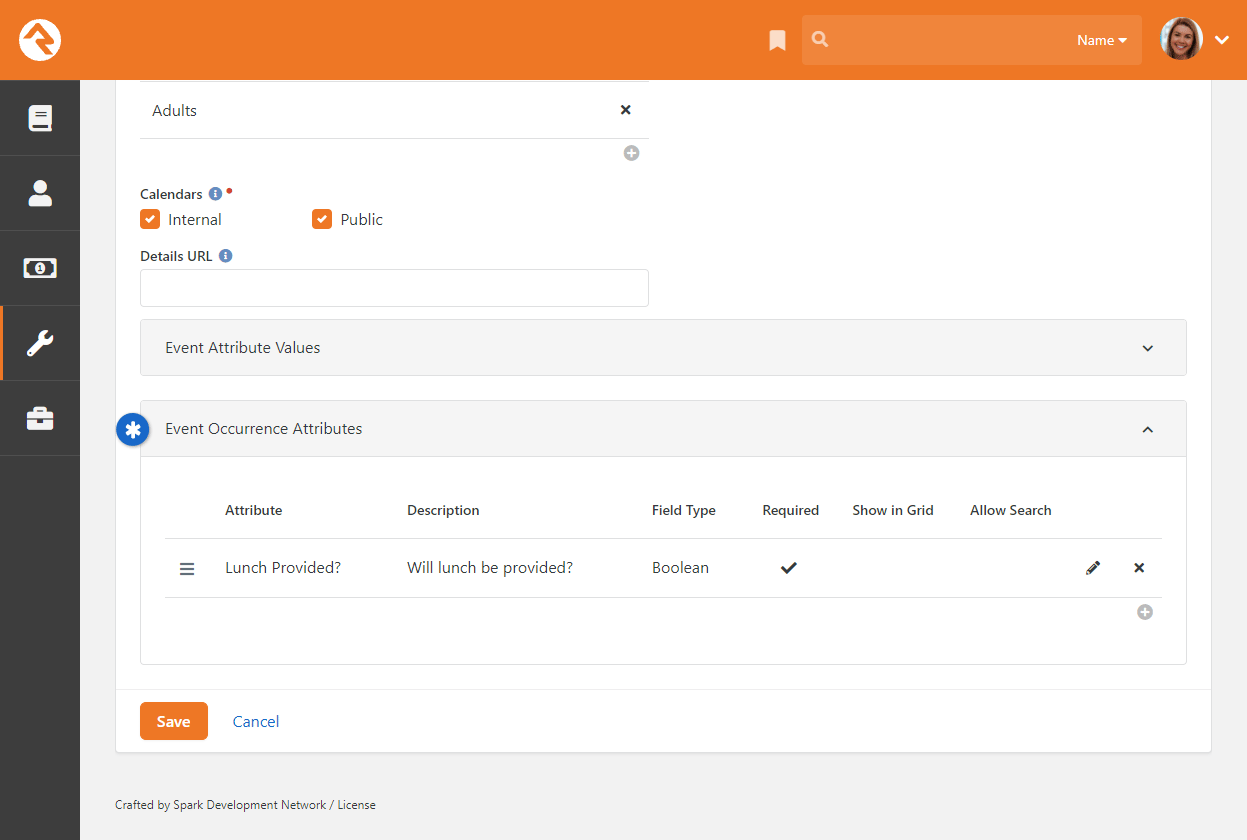
Now in the Attribute Values section of the event's
Edit Event Occurrence screen, you will see all
the specific event attributes along with the global attributes created in the Calendar Attributes screen.
Calendar Blocks
Below is what the calendar looks like on the external website. These blocks have a ton of settings (much of the page is rendered in Lava so
the possibilities are endless).
Calendar Block
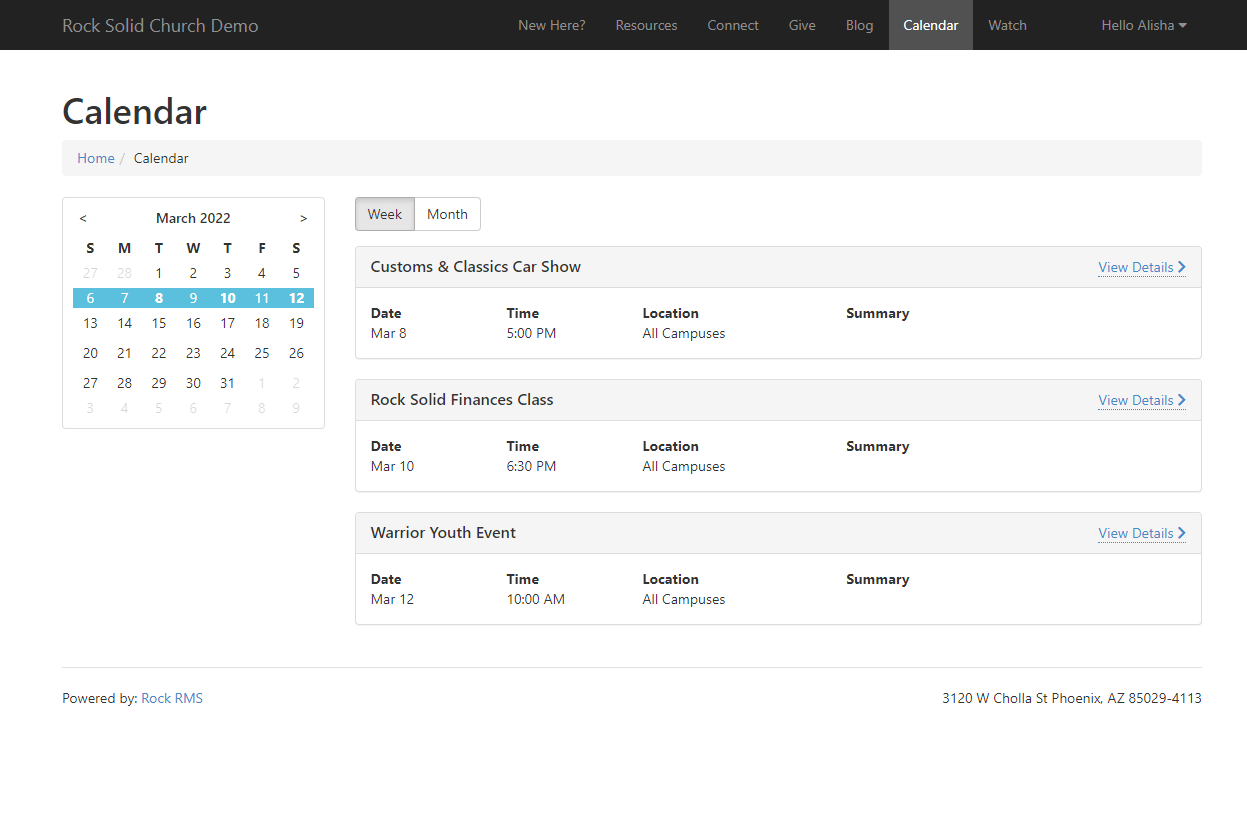 Event Detail Block
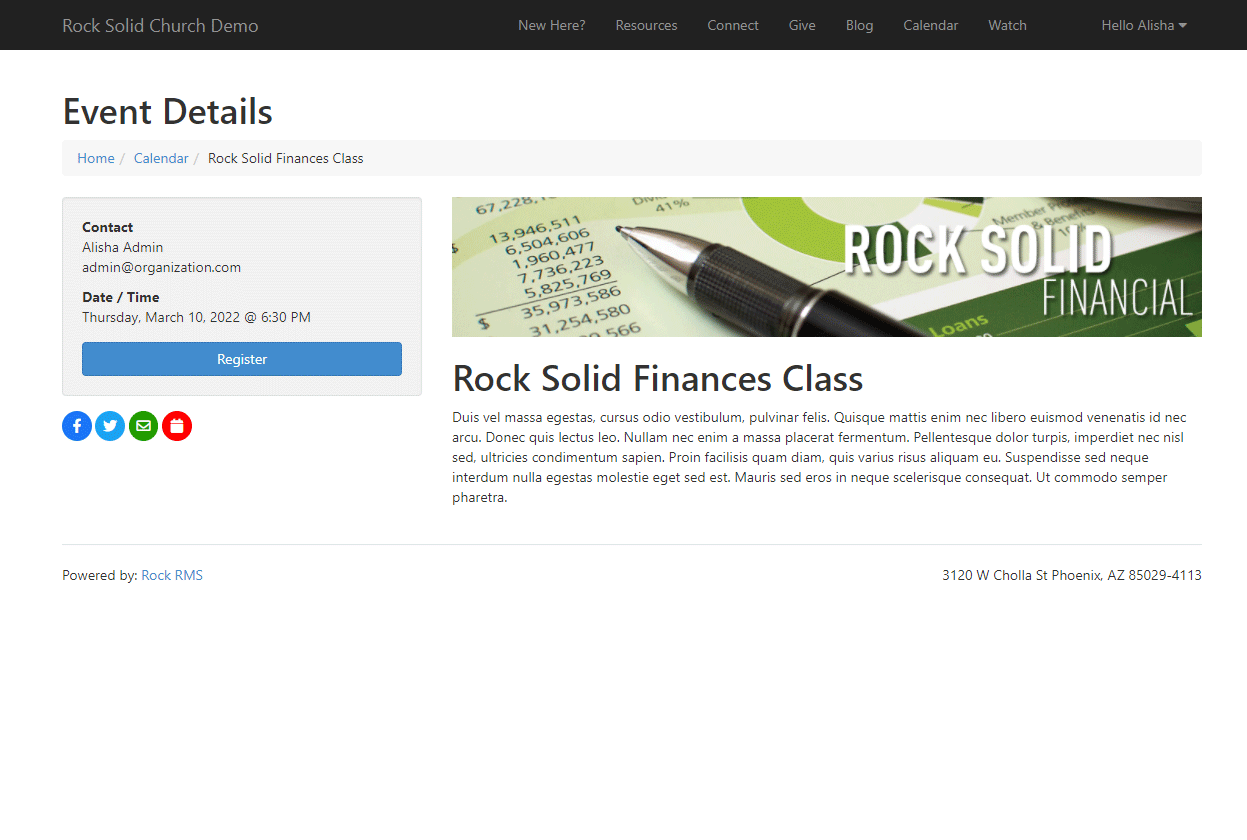
iCalendar Feed
Once you have your event calendars up and running, you can use Rock's iCalendar feed feature to create dynamic calendars in Outlook, iOS, OSX iCal, Google Calendar and Android. This means you and the members of your organization can have access to event calendars right in your pocket. The iCalendar feed is accessed by URL, which you add to your email client or calendar program. The process will vary depending on the program you're using, but most programs have an option for adding a calendar from an internet address. Once you add the event calendar URL to your program, it will sync and stay updated with that calendar in Rock.
Calendar Settings and Formatting
There are a couple of things about the iCalendar feed you should know before going forward. First of all, any security added to calendars is enforced, so you need to have access to any non-public calendars you want to use with the iCalendar feed. Second, Rock takes care of providing and formatting the calendar content. You can, however, customize the calendar's description by adding the following Lava to the Lava template:
                {{ EventItem.Description }}

                {{ EventItemOccurrence.Note }}
(Remember, Lava templates can be found at Admin Tools > General Settings > Defined Types > Lava Templates.)
OK, let's take a look at the iCalendar URL itself.
Calendar URL
The calendar URL has a specific format:
http://rocksolidchurchdemo.org/GetEventCalendarFeed.ashx?calendarid=1
This sample URL provides the feed for a calendar located at rocksolidchurchdemo.org with an ID of "1".
There are three parts to the URL: the organization's domain name (i.e., rocksolidchurchdemo.org), the GetEventCalendarFeed function, and the calendar parameters (i.e., calendarid=1). The domain name and the parameters will change according to the organization and the desired calendar options, but the GetEventCalendarFeed.ashx portion must remain unchanged in order for the feed to work.
Let's take a closer look at the parameters available for customizing the calendar feed. You can use parameters to tell the feed to pull only events from a specific campus, specified dates, or even from a certain Lava template. The following parameters are available with the iCalendar feed:
| Parameter |
Description |
Example |
| templateid |
The Lava template ID for the iCalendar description. If this is not specified, the default is used. The default is a concatenation of the EventItem Description and the EventItemOccurrence Note. |
templateid=1234 |
| campusids |
A comma separated list of campus IDs. Default is all campuses. |
campusids=2,4,12,9 |
| audienceids |
A comma separated list of audience IDs. Default is all audiences. |
audienceids=5,6 |
| startdate |
The earliest date to get calendar info. Format: yyyyMMdd. Default is the current day. |
startdate=20180501 |
| enddate |
The latest date to get calendar info. Format: yyyyMMdd. Default is two months from the startdate. |
enddate=20180701 |
So, using our same URL sample above, if you want to grab the feed for events on the public calendar from April 1, 2018 through July 7, 2018, the URL feed would be:
http://RockSolidChurchDemo.org/GetEventCalendarFeed.ashx?calendarid=1&startDate=20180401&enddate=20180707
To filter the above URL for two audience types, the URL would be:
http://RockSolidChurchDemo.org/GetEventCalendarFeed.ashx?calendarid=1&startDate=20180401&enddate=20180707&audienceIds=147,1698
Now, you could build the iCalendar feed URL yourself; but to make things super easy, you can also quickly
grab the URL for the event calendar you want to use by going to the
Event Calendar screen and clicking the
Export Calendar Feed button. This will
copy the URL to your clipboard.
Export Calendar Feed
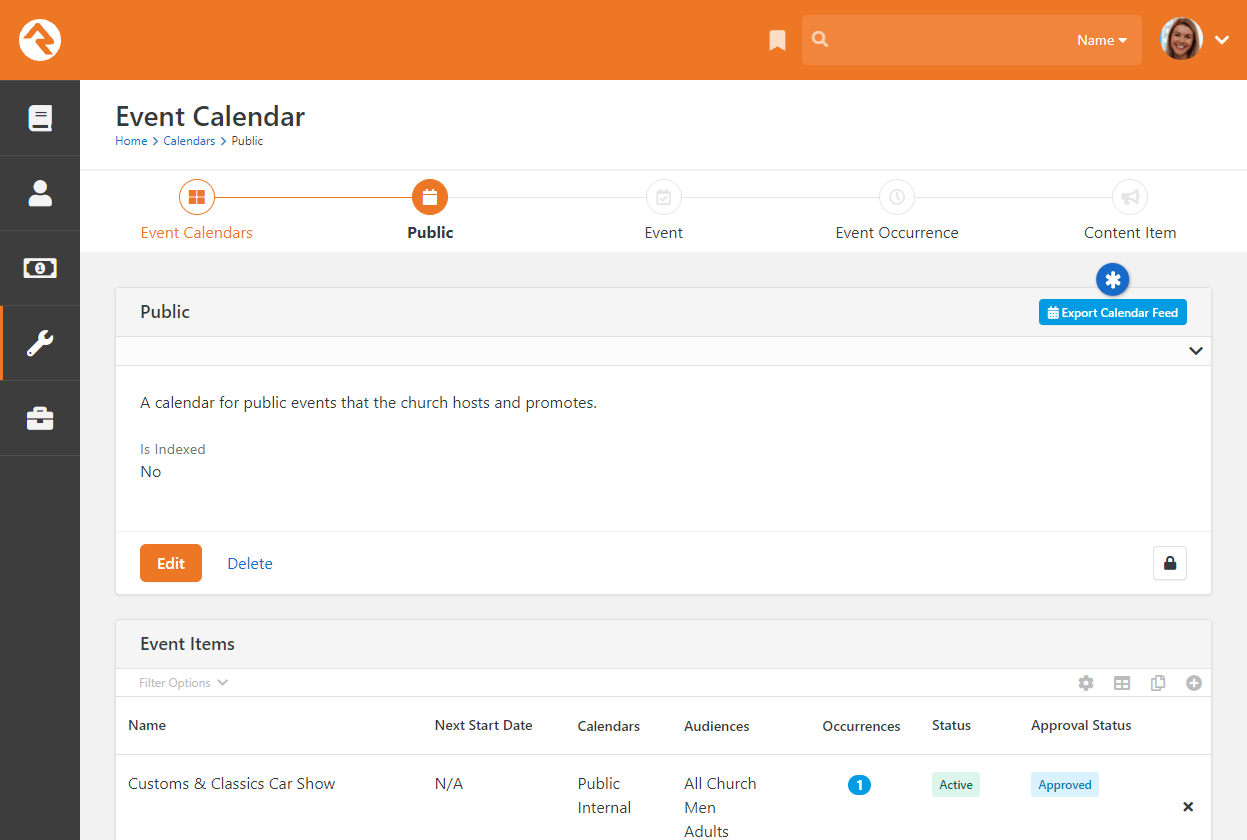
Bringing It All Together
Hopefully you're starting to see the symbiotic relationship between event registrations and
calendar events. The fact that they share the same manual should tell you that they go together
like peas and carrots (or steak and potatoes). We've also seen that groups can be linked to
registrations, and that content channels also have a role with calendar events.
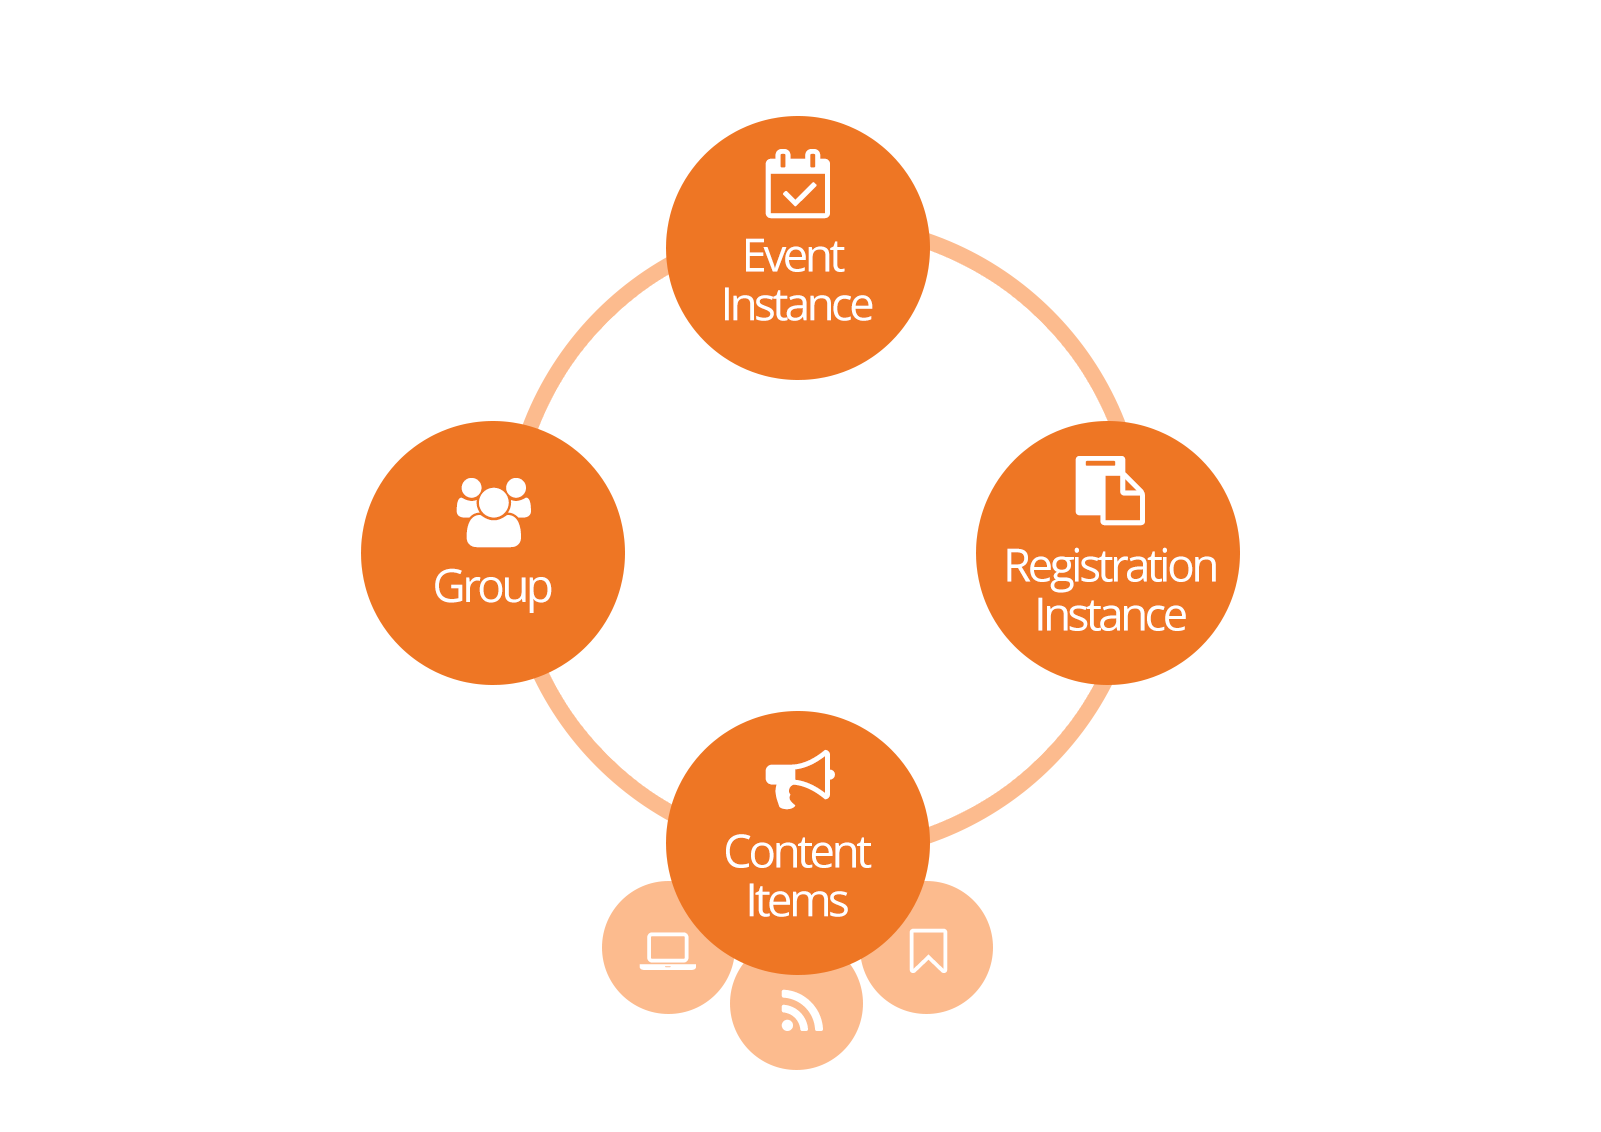
You might be wondering how you're going to manage all these items for a specific event. We did
too, so we worked hard to make it as simple as possible. Here’s how.
While you can link registrations, events, groups and content channel items many different ways,
here's the easiest:
- Create your event group that the registration will place registrants into.
- Create your calendar event and occurrence.
- While editing your occurrence select the
Add Linkage
button. There are a few linkage options for you, which we’ll summarize here and then
describe in more detail below.
- No Registration Required: Select this option if you’re not linking
the event to a registration. This lets you link a URL Slug to the event without
needing a registration instance.
- Create Registration Instance: This lets you set up a new registration
instance directly from the calendar occurrence instead of creating it separately and having
to link them later.
- Use Existing Registration Instance: If you already have a registration
instance created then you can use this option to link it to this event occurrence.
- After saving the occurrence, you can optionally enter any content channel items you need for
your event. See below for more details.
Once you create these linkages, you can view and manage them from either the calendar occurrence, group
or event instance detail screens.
URL Slug Required
The URL Slug must be used in order to have event registrants be automatically placed into the correct
group.
Adding Calendar Linkages
As noted in the section above, you have different linkage options available to you when creating a new
calendar event and occurrence. In this section we’ll look at each option in detail.
No Registration Required
Select this option when you don't need a registration but still want to have a URL slug
associated with an event.
No Registration Required
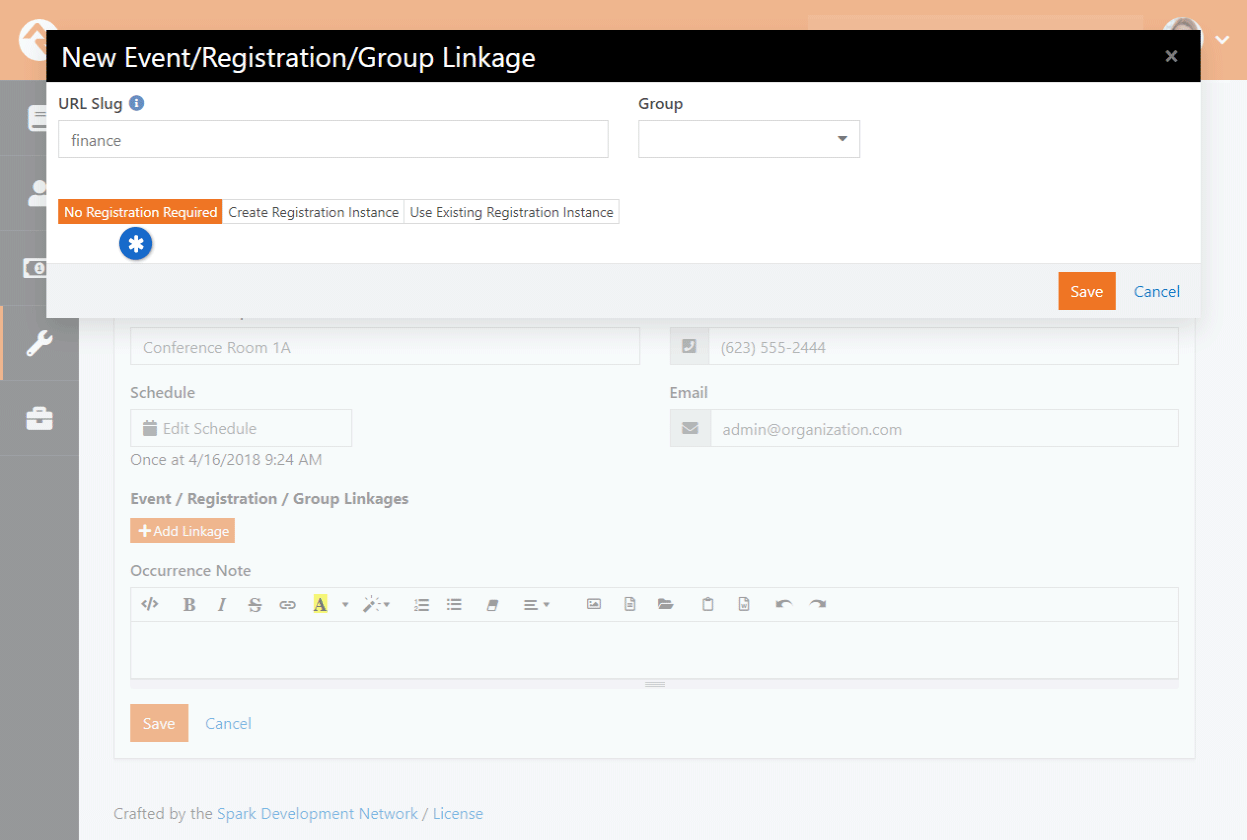
In the example pictured above we’re not linking the calendar occurrence to any registration
instance. However, we can still create a handy URL slug.
URL Slugs: Say what?!
A "slug" is a common web term that refers to a part of a web address that identifies a
page, or component of a page, using human-readable keywords. If you're not Noah Webster,
that means instead of saying Registration?RegistrationInstanceId=153 you
can say Registration/SummerCamp2021. In most cases the slug can be whatever
you want but try to use only letters and numbers (e.g., SummerCamp2021) if possible
because some special characters may cause issues with browsers. Keeping that in mind,
dashes are commonly used (e.g., Summer-Camp-2021) without causing problems.
Keep in mind when using the
No Registration Required
option that you might need to add some
page routes on
your external site.
To get the URL slug to work, you’ll need a page route similar to events/{slug} or campinfo/{slug}
on the page that has the
Calendar Event Item Occurrence Lava
block. The route must include {slug} because this tells the system where to
look for the linked event occurrence.
Create Registration Instance
You would use
Create Event Registration Instance
if you want to link the event occurrence to a registration instance that hasn’t been created
yet. This means you can create a registration instance directly from the calendar instead of
creating it separately and having to link them later.
Create Registration Instance
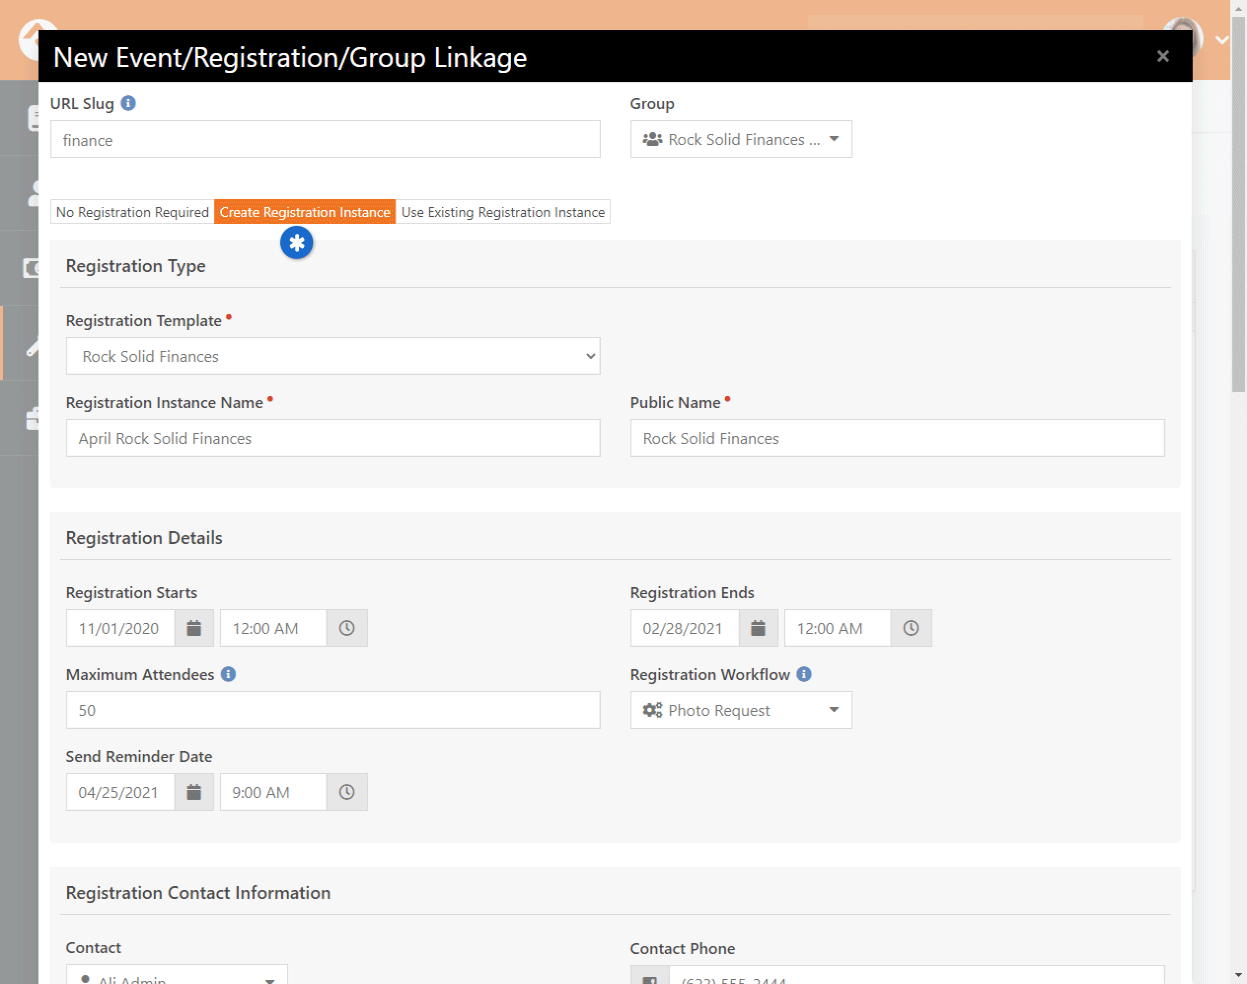
If the screen pictured above looks familiar, that’s because it’s the same information you’d
use to create a registration instance from outside of the calendar. Just like any time you
add a registration instance, you need to have a
registration template set up first. If a template
doesn’t exist for the instance you’re trying to create, you’ll have to go back and add one.
Use Existing Registration Instance
You’ll use this option if you already have a registration instance that just needs to be
linked to this calendar occurrence.
Use Existing Registration Instance
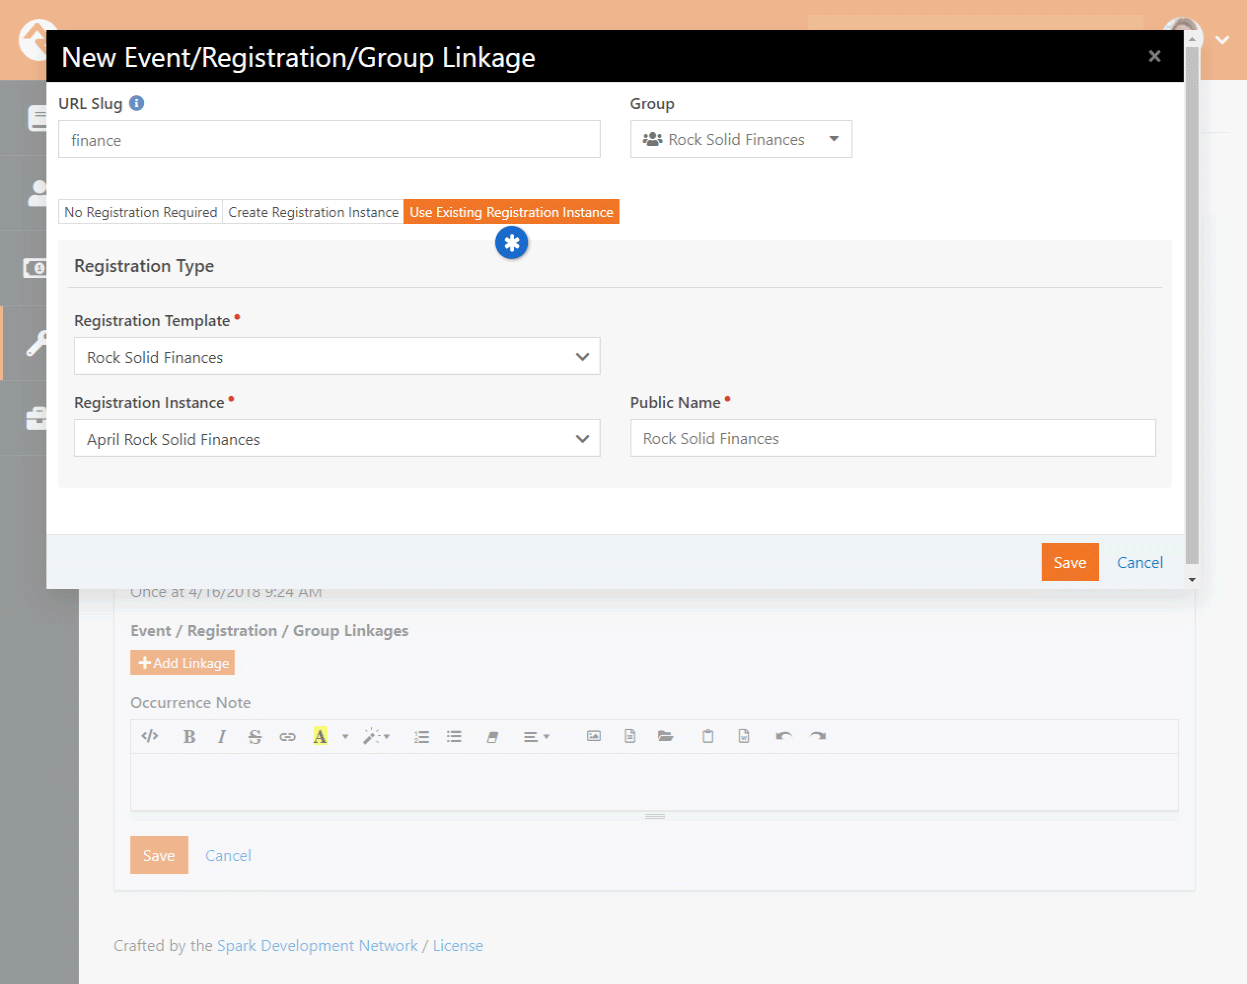
As you can see in the example pictured above, all you’ll need to do is pick the template
and instance, and then give it a Public Name. Like the other options, you can also create
a slug and link to a group from here.
Linking Content Channel Items
After saving the event occurrence, you can optionally create or link to any content channel
items you need for your event. This is a great way to get the word out about the event.
When viewing the occurrence, there is an area at the bottom of the page for
Content Channels.
Add Content Channel Item
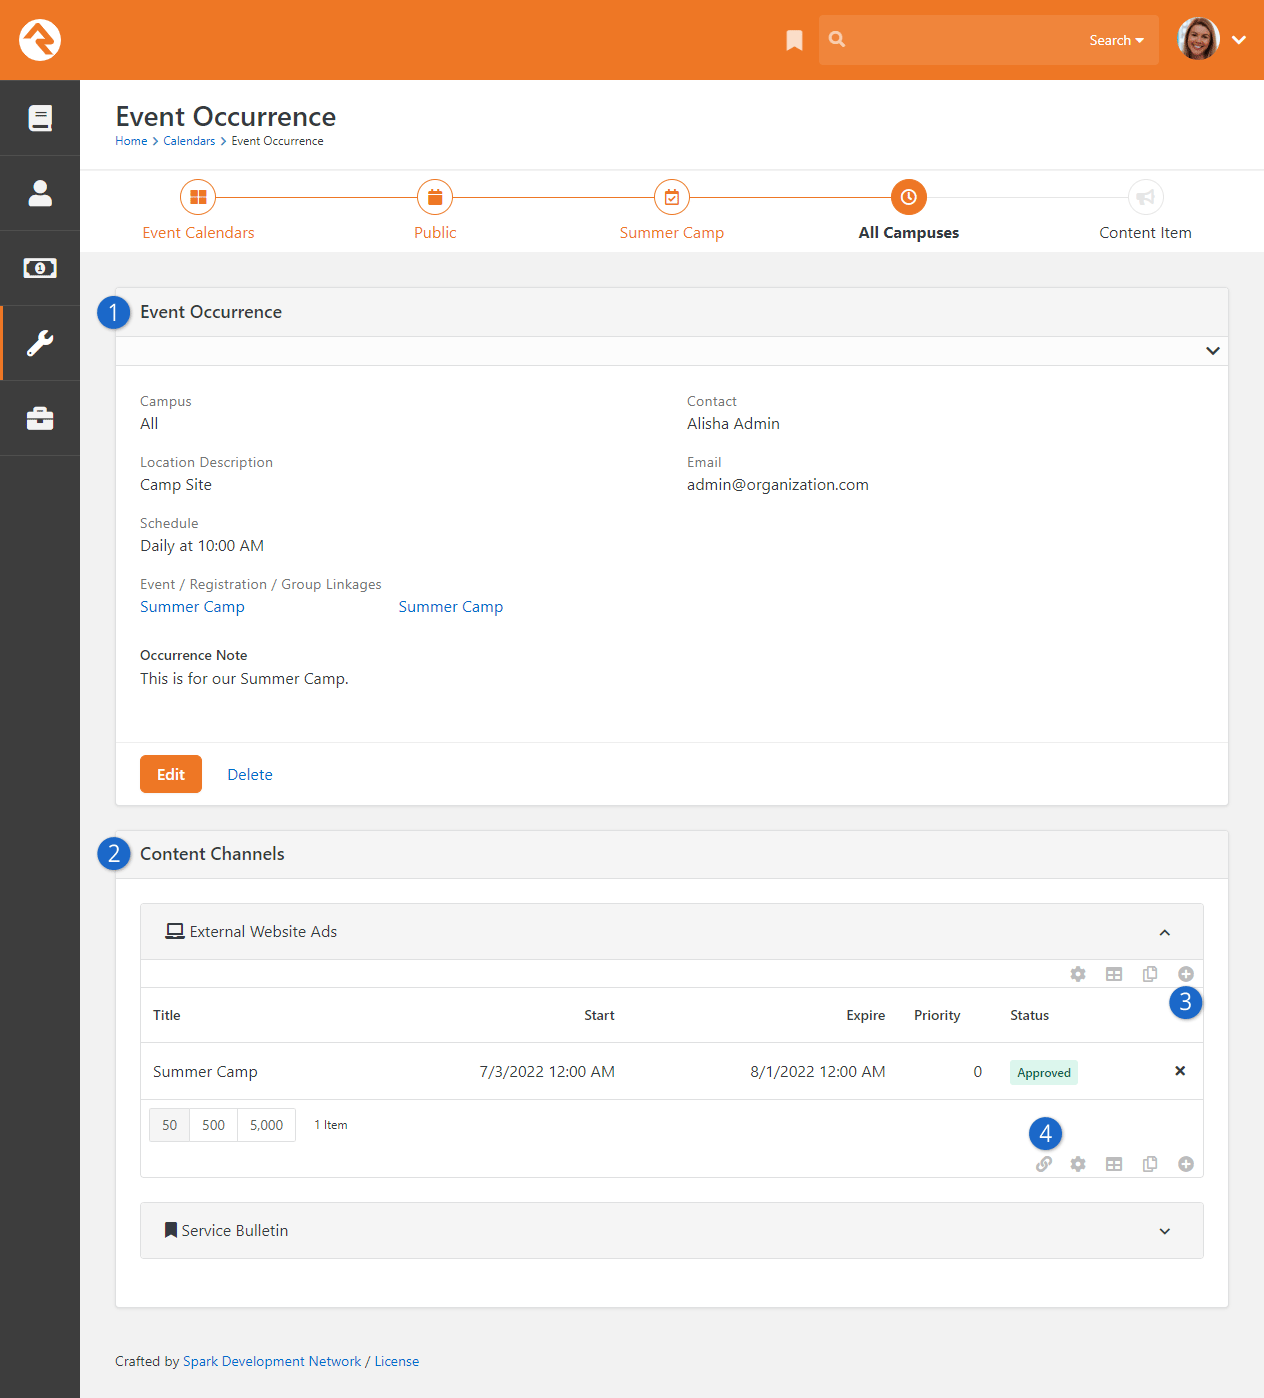
- 1 Event Occurrence
- Content channel items are added to the event occurrence. For details on how to get
to this point, see the Calendars chapter above.
- 2 Content Channels
- You can only add content channel items to the content channels listed here. The list
of available content channels is configured at the Calendar (e.g., Public, Internal)
level.
- 3 Add New Item
- Clicking the button lets you add a new content
channel item to the corresponding content channel.
- 4 Link Existing Item
- You can click the button to link the event occurrence to
a content channel item that has already been created.
For more details on creating and working with content channels, check out our
Designing and Building Websites Using Rock
manual.
Securing Calendars and Events
There are two security roles that help secure the management of calendars and events. Let's look at each.
Securing Calendars
While those in the RSR - Staff Workers and
RSR - Staff Like Workers roles can view and
add new events, only those in the RSR - Calendar Administration
can approve events and create new calendars.
Securing Event Registrations
Like calendars, those in the RSR - Staff Workers and
RSR - Staff Like Workers roles can create
new instances of registrations, but only those in the
RSR - Event Registration Administration
can create new registration templates.
From a financial perspective anyone in the staff/staff-like roles can add payments to a registration but out of the box
you will need to be in the RSR - Finance Administration
role to process refunds.
Event Blocks
How you decide to display events to your guests will be very unique. Rock provides several blocks to help
you craft the experience you desire.
See our Designing and Building Websites Using Rock
guide for more information on blocks in general.
Calendar Block
The Calendar Lava block is the basic calendar
list block for your external calendar. The screen shot below shows the block
in its default form, however this block comes with a ton of settings to change the way it is displayed. Below is
a list of some of the settings that this block provides.
- Event Calendar: The calendar (public, internal, etc.) to pull events from.
- Default View Option: Which view option (day, week or month) to initially show.
- Details Page: The page to navigate to, to show the event's details.
- Campus Filter Display Mode: Options to show a campus filter (Hidden, Plain, Panel Open, Panel Closed).
- Audience Filter Display Mode: Options to show an audience filter (Hidden, Plain, Panel Open, Panel Closed).
- Filter Audiences: Allows you to filter which audiences you'd like to show as filter options.
- Show Date Range Filter: Determines whether a date range filter should be displayed.
- Show Small Calendar: Determines whether the small calendar in the upper left should be shown.
- Show Day View: Determines whether the day view should be shown as an option.
- Show Week View: Determines whether the week view should be shown as an option.
- Show Month View: Determines whether the month view should be shown as an option.
- Enable Campus Context: Determines whether the campus context should be used to filter the events (assumes that
a campus context is in use on your site).
- Lava Template: The Lava template that will be used to format the list of filtered events.
- Start of Week Day: Determines what day is the start of a week.
- Set Page Title: Determines if the block should set the page title with the calendar name.
External Calendar
Event Item Occurrence Detail
Once you pick an event from the calendar, the
Calendar Event Item Occurrence Lava
block displays the
details for the event occurrence. This page is formatted entirely using Lava, so customize at will.
Below are the options you have in the block's settings.
- Registration Page: The page to navigate to for registration.
- Set Page Title: Determines if the block should set the page title with the event item name.
- Lava Template: The Lava template that will be used to format the list of filtered events.
Event Occurrence Detail
Calendar Item Occurrence List Lava
This is more of a specialty block. It lists upcoming occurrences for a specific event item. This is helpful for events
like specific classes (e.g., Starting Point, Stewardship Class) or events that routinely happen (e.g., Baptisms).
- Event Item: The event item to show occurrences for.
- Campuses: Which campuses to show occurrences for.
- Use Campus Context: Determines whether the campus context should be used to filter the events (assumes that
a campus context is in use on your site).
- Date Range: You can filter the occurrence list by a sliding date range (e.g., upcoming two weeks).
- Max Occurrences: The maximum number of occurrences to show.
- Registration Page: The page to navigate to for registration.
- Lava Template: The Lava template that will be used to format the list of filtered events.
Calendar Item Occurrence List Lava
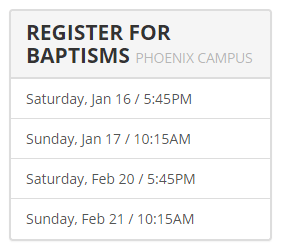
Calendar Item Occurrence List By Audience Lava
This is another specialty block. It lists upcoming occurrences for a specific audience (All Church, Youth, Children, etc.). This is helpful for
pages devoted to these audiences. Below are some of the options available in the block's settings.
- Audience: The audience to filter on.
- Calendar: Which calendar to use.
- Use Campus Context: Determines whether the campus context should be used to filter the events (assumes that
a campus context is in use on your site).
- Date Range: You can filter the occurrence list by a sliding date range (e.g., upcoming two weeks).
- Max Occurrences: The maximum number of occurrences to show.
- Registration Page: The page to navigate to for registration.
- Lava Template: The Lava template that will be used to format the list of filtered events.
Calendar Item Occurrence List By Audience Lava
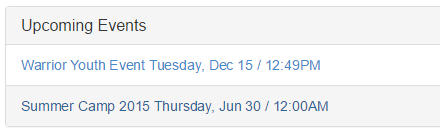
Event Calendar Item Personalized Registration
This is a quirky, but insanely cool little block. Its main use is to facilitate internal registrations for special classes from
an individual's Person Profile page. Let's dig into a sample to understand
this better.
Say your organization has a special orientation class called Starting Point. Previous attendance in this class is really important
to you so you've created a special badge to show if someone has attended this class. But... you also want to easily be able to register
people for upcoming classes when they call or email you. You can then set the markup of your badge to link to a page with this block if
they have not attended Starting Point. This block takes the person and looks up upcoming class dates based on their campus. Once you
select a date you can select other members of the family and create a registration to add them to the class.
It should be noted that this block creates an online registration and then redirects to the registration block to complete the process. This
allows for the collection of extra fields configured for the registration and also allows for things like confirmation and reminder emails.
- Include Family Members: Determines if a list of family members should be displayed to include in the registration.
- Days In Range: The number of days in the future to filter event occurrences for.
- Max Display Events: The maximum number of occurrences to show.
- Registration Page: The page to redirect to, to complete the registration.
- Start Registration At Beginning: You can optionally choose to redirect to the beginning of the registration process (a good
option if you expect additional custom fields to be needed) or the end (a good option if additional fields are not needed as you can
quickly complete the registration).
The block requires the following inputs through the URL:
- PersonGuid: The Guid of the person to be registered.
- EventItemId: The Id of the event item to process the registration for.
Event Calendar Item Personalized Registration